
Chapter 3. Formatting Text with Tags
In this chapter, you will:
Creating webpages is not word processing. It’s important to keep that in mind as you learn HTML because I’m going to ask you to be patient for a few chapters as you learn HTML the right way—that is, the standards-compliant way.
When most people think of formatting text, the first thing that pops into their minds is choosing a font—a typeface, size, and color. That’s easy to do in a word-processing document, but in HTML it’s more complicated. Early versions of HTML used a <font> tag to specify a particular typeface, size, or color. If it were a decade ago, I would be happy to teach you that tag in this chapter, but the <font> tag has been removed from HTML5. Even though most browsers still recognize the <font> tag, you shouldn’t use it; it’s obsolete. Therefore, rather than teach you bad habits with old tags, I’m going to teach you how to apply typefaces, sizes, and colors to text with styles—but not in this chapter. Although using styles is a superior way of applying fonts to text, it is a little more advanced than you’re ready for just yet. You’ll learn all about using fonts in HTML code in Part II.
This chapter introduces several important tags that format text according to its purpose. In Chapter 2, you learned about the <p> tag for regular paragraphs, but there are many other tags that are used for headings, programming code, quotations, and more. Most of the tags discussed in this chapter are semantic tags; they describe the function of the text, rather than provide directions for formatting. For example, the <h1> heading tag specifies that the text within it should be formatted as a major heading, but it provides no specifics as to what that formatting should be.
The formatting specifics for semantic tags can come from a variety of sources:
Styles As you will learn in Part II of this book, you can specify the font families and sizes to use throughout your entire website. For example, you can select a font family that will be suggested to the browser whenever a certain tag is applied.
The web browser in use Each web browser has defaults for the standard HTML tags. For example, in Internet Explorer (and most other browsers), <h1> is left-aligned, 18-point Times New Roman. Most browsers use the same defaults for the very basic tags, but non-standard browsers, such as those on phones, often display text very differently.
Individual user customization A user can customize his web browser to suit his preferences. Later in this chapter, you’ll get to play with these settings in Internet Explorer so you’ll know what your potential audience might be doing.
Keep in mind as you practice using tags that their formatting is not fixed. The results you see when previewing the exercise pages in Internet Explorer represent the default settings for your version of Internet Explorer (or whatever browser you are using to preview them); the style is not intrinsic to those tags themselves. That will become important in Part II of the book, when you learn how to define more specific formatting for tags.
Important
Before you can use the practice files provided for this chapter, you need to download and install them from the book’s companion content location. See “Downloading the Companion Content” at the beginning of this book for more information.
Creating Headings
Headings in webpages function the same way as they do in printed documents--they separate text into sections. The HTML standard defines six levels of headings, <h1> through <h6>, each one progressively smaller in font size.
As previously noted, there are no specific sizes or fonts assigned to the heading tags; their appearance can vary depending on the browser and its settings. But the heading levels connote relative sizes; the higher the heading number, the smaller the size in which it will render on the screen. In Internet Explorer 9, for example, using the default settings, these six heading levels look as shown in Figure 3-1.
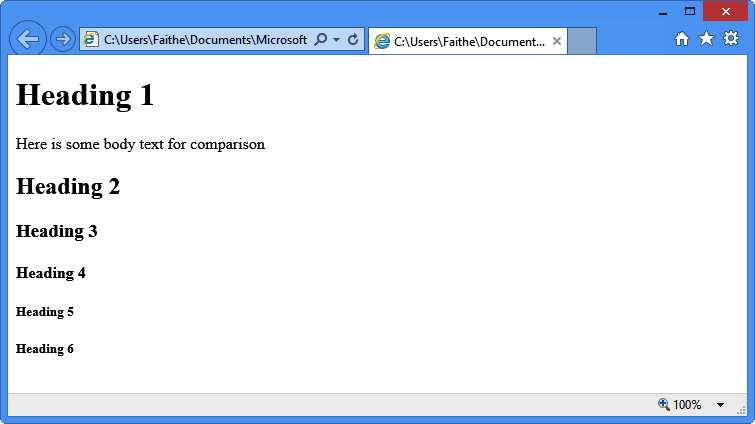
Perhaps you noticed that headings 5 and 6 are actually smaller than body text. Keep in mind, though, that these are just the default settings; you can redefine these headings to display any size you want.
Many screen-reader programs use the heading codes <h1> through <h6> to help visually impaired users navigate a document, and some page structures rely on headings for outlining, too. (HTML5 has a new way of outlining documents, but that’s beyond the scope of this book.) In some cases, though, you might have a stack of headings that collectively should take up only one spot in an outline, like this example:
<h1>Margie's Travel</h1>
<h2>Travel for the young at heart!</h2>
HTML5 introduces a new tag to deal with this situation: <hgroup>. When you enclose a stack of headings within <hgroup>, only the first heading in the stack displays in an outline; other headings will be ignored by screen readers and other outlining tools.
<hgroup><h1>Margie's Travel</h1> <h2>Travel for the young at heart!</h2></hgroup>
Browsers that do not support this tag simply ignore it, so there is no harm in using it when appropriate.
In the following exercise, you will create some headings for the opening page of Margie’s Travel’s website.
Create Headings
Create Headings
In both Notepad and Internet Explorer, open the index.htm file located in the DocumentsMicrosoft PressHTML 5 Start Here�3FormatCreatingHeadings folder.
Immediately below the <body> tag, edit the first line to use the <h1> tag instead of the <p> tag, like this:
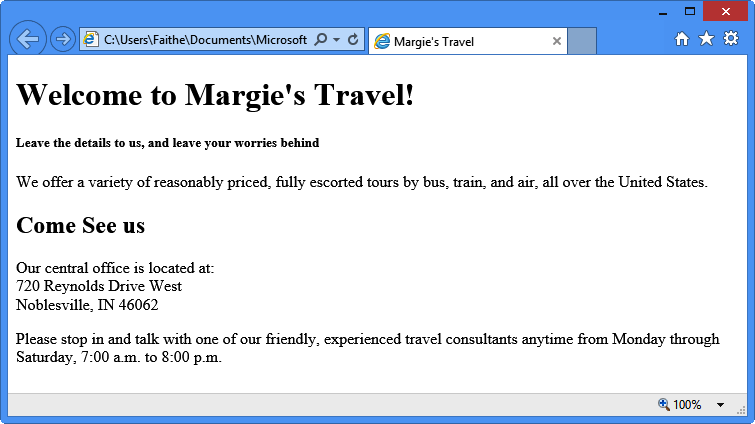
<h1>Welcome to Margie's Travel!</h1>Click at the end of the line you just edited, press Enter to start a new paragraph, and then type the following:
<h5>Leave the details to us, and leave your worries behind</h5>Note
Some coding purists will tell you that you should use an <h2> heading instead of <h5> for the subtitle above and then apply a style to make the text look like you want, but because it is a few chapters yet until you will learn about styles, I’m taking a shortcut. For now, the default appearance of the <h5> heading is much closer to the desired look we want for this exercise.
Use a two-sided <hgroup> tag to enclose the two paragraphs you just worked with, like this:
<hgroup><h1>Welcome to Margie's Travel!</h1> <h5>Leave the details to us, and leave your worries behind</h5></hgroup>Immediately above the line containing the text Our central office is located at:, type the following:
<h2>Come See Us</h2>Save the file and then refresh Internet Explorer to check your work.
The new heading displays in the body of the page.
Leave the file open in both Notepad and Internet Explorer for the next exercise.
Applying Bold and Italic Formatting
Applying bold and italic styles are two ways of making text stand out and attract attention. You generally use these styles in paragraphs rather than in headings, but it’s perfectly acceptable to use them anywhere.
For simple boldface and italics, use the <b> tag or the <i> tag, respectively. Each is a two-sided tag that encloses the text to be formatted. For example:
<p>I had a<i>great</i>time at the party.</p> <p>The reception will be held at<b>The Arbor Arch</b>in Plainfield.</p>
If you want to apply both bold and italic formatting, you can nest one tag inside the other. Don’t mix up their order, though. When nesting tags, the rule is: first in, last out. So this is correct:
<p>The next book we will read is <b><i>The Catcher in the Rye</i></b></p>
In contrast, the following example is wrong, because the order of the ending </b> and </i> tags are reversed:
<p>The next book we will read is <b><i>The Catcher in the Rye</b></i></p>
Even though the tags in the preceding example are improperly nested, most browsers will still display them correctly, provided you are using HTML as the document type. In an XHTML document, however, this type of tag reversal is not accepted.
Note
HTML also allows the <strong> tag as a substitute for <b> and the <em> tag (emphasis) as a substitute for <i>. You will probably never use those, but you should know what they are in case you come across them. You can also define bold attributes and italic attributes for styles, as you will learn in Part II.
In the following exercise, you will make text bold and italic.
Apply Bold and Italic
Apply Bold and Italic
If they are not already open, open the index.htm file (that you worked with in the previous exercise) in both Internet Explorer and Notepad.
Alternately, you can use the index.htm file located in the DocumentsMicrosoft PressHTML 5 Start Here�3FormatApplyingBold folder.
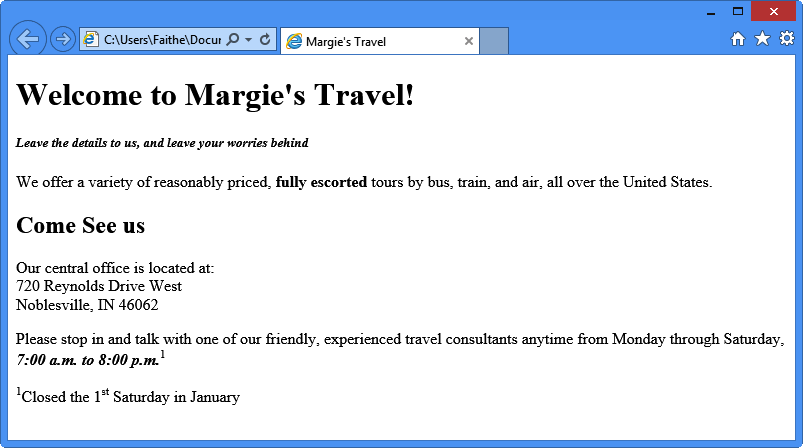
In Notepad, locate the <h5> heading near the top of the document and then enclose its text in an <i> tag:
<h5>
<i>Leave the details to us, and leave your worries behind</i></h5>In the first body paragraph, enclose fully escorted in a <b> tag:
<p>We offer a variety of reasonably priced,
<b>fully escorted</b>tours by bus, train, and air, all over the United States.</p>Enclose the office hours in <b> and <i> tags:
<p>Please stop in and talk with one of our friendly, experienced travel consultants anytime from Monday through Saturday,
<b><i>7:00 a.m. to 8:00 p.m.</i></b></p>Save the file and then refresh Internet Explorer to view the results.
Leave the file open in both Notepad and Internet Explorer for the next exercise.

Applying Superscript and Subscript Formatting
Superscript formatting makes text smaller and raises it off the baseline. You’d typically use superscript to format exponents in math equations (for example, the 2 shown in X2+1) and for footnote numbers and symbols (like this**). You can also use superscript to format ordinal numbers (such as 1st, 2nd, and 3rd) to make your page look more polished.
Subscript makes text smaller and moves it below the baseline. The most common use for subscripts is in chemical formulas (for example, H2 SO4).
Note
How much the text shifts up or down, or how much smaller the font size becomes, depends on the browser. In some browsers, using superscript or subscript changes the line spacing so that a paragraph that contains them can seem unevenly spaced.
In the following exercise, you will apply superscript formatting to create a footnote and an ordinal.
Apply Superscript Formatting
Apply Superscript Formatting
If they are not already open, open the index.htm file that you worked with in the previous exercise in both Internet Explorer and Notepad.
Alternately, you can use the index.htm file located in the DocumentsMicrosoft PressHTML 5 Start Here�3FormatApplyingSuperscript folder.
At the end of the last line of text, between the </b> and the </p> tags, type <sup>1</sup>, as shown in the following:
<p>Please stop in and talk with one of our friendly, experienced travel consultants anytime from Monday through Saturday, <b><i>7:00 a.m. to 8:00 p.m.</i></b>
<sup>1</sup></p>Immediately before the </body> tag, type the following:
<p><sup>1</sup>Closed the 1<sup>st</sup> Saturday in January</p>This creates the footnote itself, which includes an ordinal number.
Save the file and then refresh the page in Internet Explorer to view the results.
Close Notepad and Internet Explorer. The next exercise uses a different file.
Using Monospace and Preformatted Text
Most of the text in this book is set in a proportional font. This means that individual characters take up varying amounts of space horizontally, depending on the size of the individual character. For example, the letter M takes up more space than the letter I, so a string of Ms occupies more space than a string of Is.
As a demonstration, let’s take a look at 10 of each character to see the difference:
MMMMMMMMMM

IIIIIIIIII
Most webpages that we’re accustomed to viewing use proportional fonts; they are attractive, professional-looking, and easier to read.
In contrast, a monospace font is one whose characters occupy exactly the same amount of horizontal space, regardless of the actual size and shape of the individual character. Back in the days of the typewriter, all type was monospaced because of the way the typewriter worked: as you typed, the carriage moved exactly the same amount of space to the right, no matter which letter was keyed. Here are those same 10 Ms and Is in a monospace font:
MMMMMMMMMM IIIIIIIIII
Some common uses for monospaced text include:
It is uncommon to use monospaced text on a website, but for special situations it’s nice to have that capability. To apply monospace style, you can use any of the tags outlined in Table 3-1. Most browsers do not make a formatting distinction between these tags by default, but you can define them differently in your styles if you like.
Note
The <tt> tag was widely used for monospace text in a document in earlier HTML versions, but is not supported in HTML5.
These tags work nicely if you just want to make certain that characters appear in a monospaced font, but they don’t change the fact that HTML omits extra spacing and line breaks that the text might include. When formatting something that requires the verbatim inclusion of white space (such as spaces or line breaks), you must use the <pre> tag, which stands for “preformatted.” The <pre> tag not only displays the text in monospace, but also preserves all the spaces and line breaks that the web browser would usually ignore, so the text will look very similar to the original.
Note
There are many different monospace fonts. Most browsers use Courier (or a variant) unless you specify otherwise. Later in this chapter, you will learn how to specify a plain text font in Internet Explorer by changing the setting in the browser that controls the font used for monospace.
The <pre> tag can also come in handy when text that you copied and pasted from another source contains a lot of line breaks and paragraph breaks. You could manually enter a <br> for every line break and a <p> for every paragraph break, but that is pretty labor-intensive for a large file with a lot of breaks. Using the <pre> tag is a shortcut. One common use for the <pre> tag is in poetry archives, for example, where line breaks and spacing add meaning to the poems.
In the following exercise, you will add monospaced text to an existing page and you will create a new page containing a poem and an ASCII graphic.
Use Monospaced and Preformatted Text
Use Monospaced and Preformatted Text
In both Notepad and Internet Explorer, open the instructions.htm file located in the DocumentsMicrosoft PressHTML 5 Start Here�3FormatUsingMonospace folder.
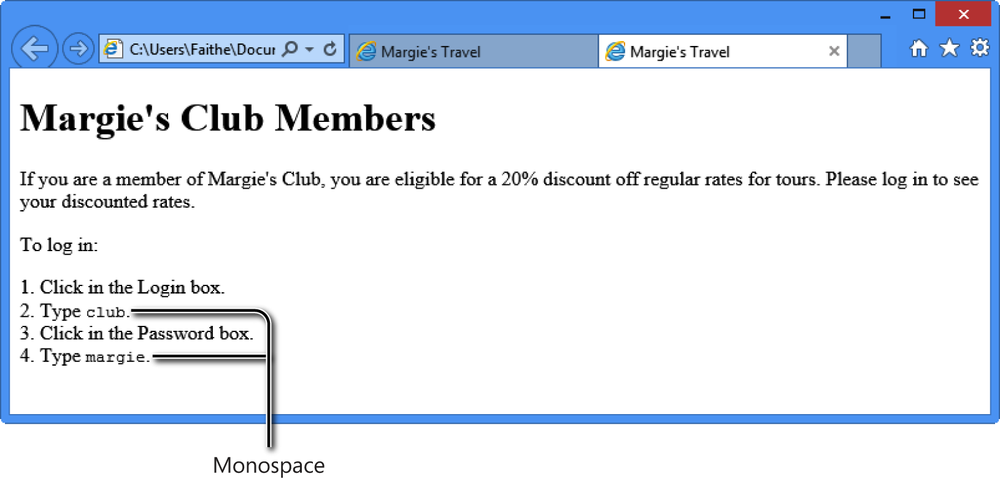
Enclose club in step 2 and enclose margie in step 4 in <kbd> tags:
<p>1. Click in the Login box.<br> 2. Type
<kbd>club</kbd>.<br> 3. Click in the Password box.<br> 4. Type<kbd>margie</kbd>.</p>Save the file and then refresh Internet Explorer (F5) to check your work.
The text is now monospace, but it doesn’t stand out very well. Let’s make it more noticeable by formatting it as bold.
Enclose the two monospace words in <b> tags (on the inside of the <kbd> tags):
<p>1. Click in the Login box.<br> 2. Type <kbd>
<b>club</b></kbd>.<br> 3. Click in the Password box.<br> 4. Type <kbd><b>Margie</b></kbd>.</p>Note
You can place the <b> tags either inside or outside the <kbd> tags as long as you apply the first-in, last-out rule consistently. For example, you could write <b><kbd>customer</kbd></b> or you could write <kbd><b>customer</b></kbd>, but you should not mix up the tag order like this: <b><kbd>customer</b></kbd>. Improperly nested codes usually render properly in HTML, but not in XHTML
Save your work and then refresh Internet Explorer to see the changes. Now the monospace text displays in boldface.
Close the instructions file and close Internet Explorer.
Open the poem file in Notepad and Internet Explorer.
In Notepad, in the <head> section, create the following title:
<title>Song of the Open Road by Walt Whitman</title>Open another copy of Notepad, and in it, open the poemtext file.
Select all the text in the poemtext file (Ctrl+A is one way to do so) and press Ctrl+C to copy it to the Clipboard.
Close the poemtext file.
In the poem file, click below the <body> tag and press Ctrl+V to paste the copied text between the <body> and </body> tags.
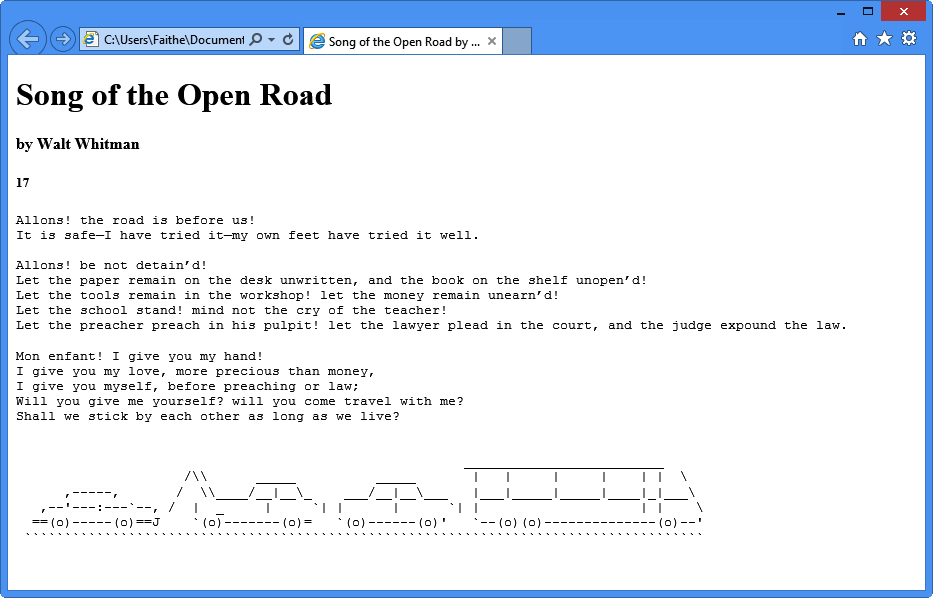
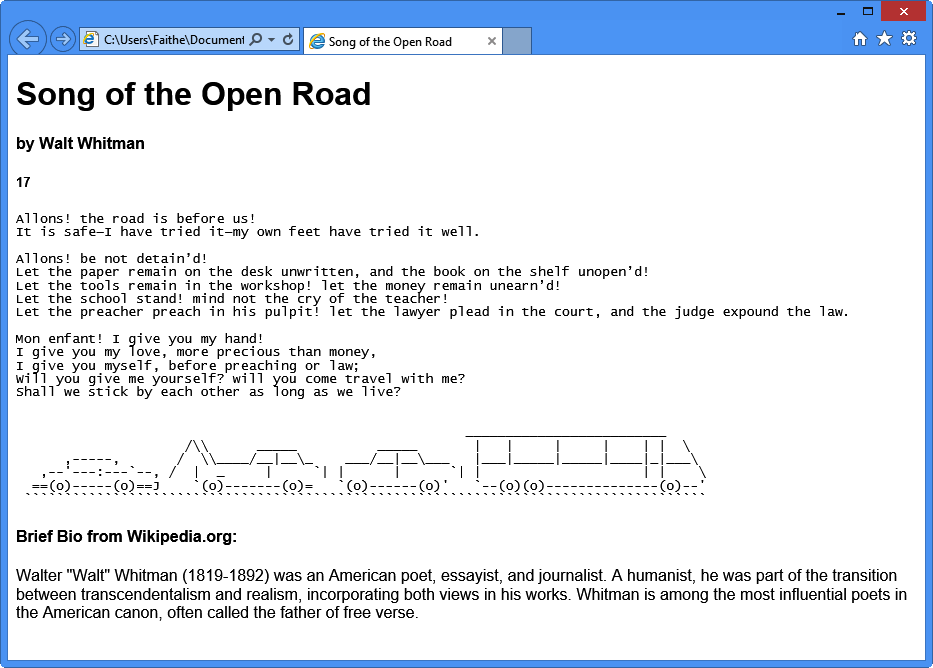
Apply the <h1> tag to the poem title within the <body> section:
<h1>Song of the Open Road</h1>Apply the <h4> tag and the <i> tag to the attribution:
<h4><i>by Walt Whitman</i></h4>Apply the <h5> tag to the stanza number:
<h5>17</h5>Apply the <pre> tag to the rest of the poem and to the graphic below it:
          <pre>Allons! the road is before us!
          It is safe-I have tried it-my own feet have tried it well.


          Allons! be not detain'd!
          Let the paper remain on the desk unwritten, and the book on the shelf
          unopen'd!
          Let the tools remain in the workshop! let the money remain unearn'd!
          Let the school stand! mind not the cry of the teacher!
          Let the preacher preach in his pulpit! let the lawyer plead in the court, and
          the judge expound the law.


          Mon enfant! I give you my hand!
          I give you my love, more precious than money,
          I give you myself, before preaching or law;
          Will you give me yourself? will you come travel with me?
          Shall we stick by each other as long as we live?


                                                       _________________________
                    /\      _____          _____       |   |     |     |    | |
     ,-----,       /  \____/__|__\_    ___/__|__\___   |___|_____|_____|____|_|___
  ,--'---:---`--, /  |  _     |     `| |      |      `| |                    | |
 ==(o)-----(o)==J    `(o)-------(o)=   `(o)------(o)'   `--(o)(o)--------------(o)--'
``````````````````````````````````````````````````````````````````````````````````</pre>
Save the Poem file and then refresh Internet Explorer to check your work.
Leave the poem.htm file open in Notepad and Internet Explorer; it will be used again in the next exercise.

Formatting a Block Quotation
When quoting blocks from other sources, it is customary, both on webpages and in print, to indent those blocks from the main body of the text. The <blockquote> tag does exactly that. And don’t feel constrained about using it; you can use <blockquote> for any text that you want to indent. You don’t have to use it only for quotations.
The <blockquote> tag has a cite=“URL” attribute, but most browsers don’t do anything with it. If you happen to know the URL for the source you are citing, it is good practice to include it in the tag for browsers that do support the attribute and also as an aid to anyone who might be viewing or editing your raw HTML code later.
Note
There is also a <q> tag, which is used for formatting inline quotations. Its only functionality is to place quotation marks around the text that it encloses. Most people don’t use this tag because it is much easier to simply type the quotation marks.
In the following exercise, you will add a block quotation to a webpage.
Use a Block Quotation Tag
Use a Block Quotation Tag
In Notepad, open the bio.txt file located in the DocumentsMicrosoft PressHTML 5 Start Here�3FormatFormattingBlock folder.
Select all the text (Ctrl+A) and copy it to the Clipboard. Then close bio.txt.
Open the file poem.htm in both Notepad and Internet Explorer if they are not already open from the preceding exercise. You can use the copy of poem.htm you used previously in the chapter or you can open the copy located in the DocumentsMicrosoft PressHTML 5 Start Here�3FormatBlockQuote folder.
In the poem file, click between the </pre> and </body> tags to move the insertion point there, and then press Ctrl+V to paste the copied text.
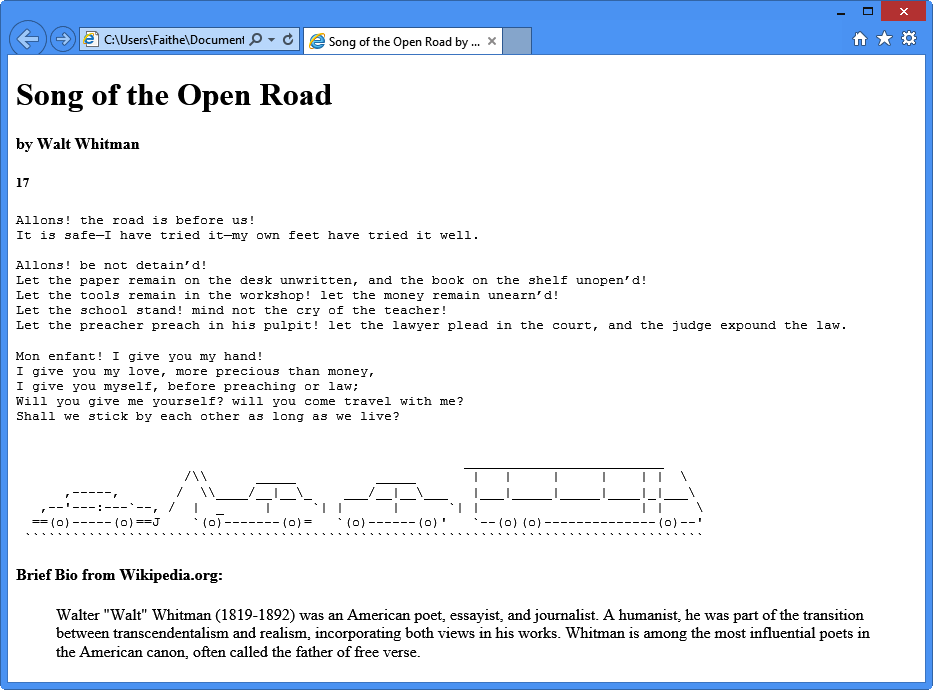
Enclose the text Brief Bio from Wikipedia.org: in an <h4> tag:
<h4>Brief Bio from Wikipedia.org:</h4>Enclose the biographical note in a <p> tag:
<p>Walter "Walt" Whitman (1819-1892) was an American poet, essayist,
and journalist. A humanist, he was part of the transition between
transcendentalism and realism, incorporating both views in his works.  Whitman
is among the most influential poets in the American canon, often called the
father of free verse.</p>
Immediately before the opening <p> tag in the previous example, type this opening <blockquote> tag:
<blockquote cite="http://en.wikipedia.org/wiki/Walt_whitman">At the end of the paragraph, after the </p> tag, type the closing </blockquote> tag:
</blockquote>Save the poem file and then display it in Internet Explorer to check your work.
Close Notepad. Leave poem.htm open in Internet Explorer to use in the next exercise.
Configuring View Settings in Internet Explorer
At the beginning of the chapter, I mentioned that users can customize how certain tags are displayed on their own computers by setting the viewing preferences in their browsers. To understand what people might be doing with your pages, take a few moments to examine the settings in Internet Explorer 9. The customization capabilities in other browsers, including previous versions of Internet Explorer, are similar.
In the following exercise, you will view HTML pages in Internet Explorer 10 and then specify a variety of settings.
Configure Internet Explorer View Settings
Configure Internet Explorer View Settings
If poem.htm is not already open in Internet Explorer, open it. A copy of poem.htm is available in DocumentsMicrosoft PressHTML 5 Start Here�3FormatConfiguringSettings.
If the menu bar doesn’t display in Internet Explorer, press Alt to make it visible.
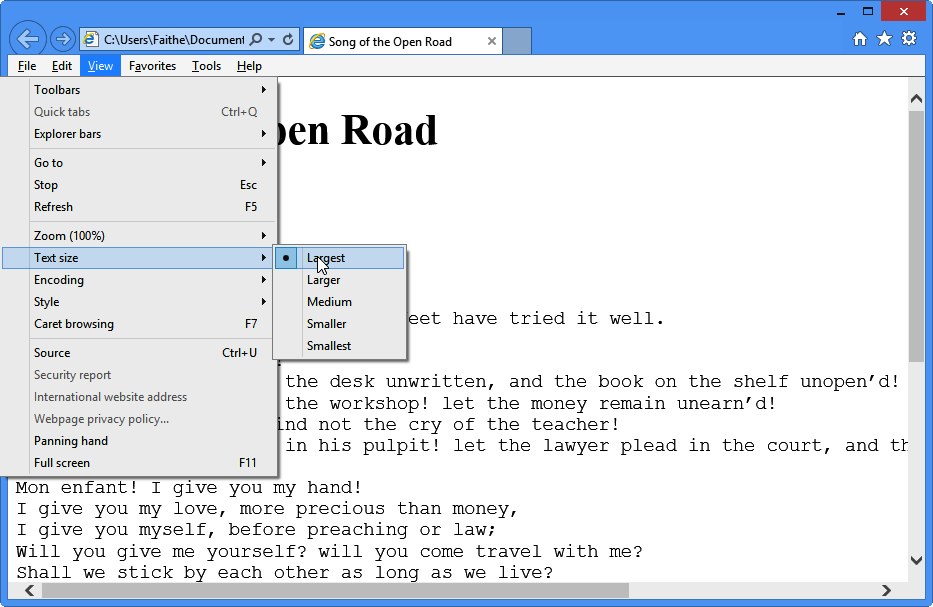
Choose View | Text Size | Largest.
All the text on the page increases in size.
Choose View | Text Size | Smallest.
All the text on the page decreases in size.
Choose View | Text Size | Medium.
The text returns to its default size.
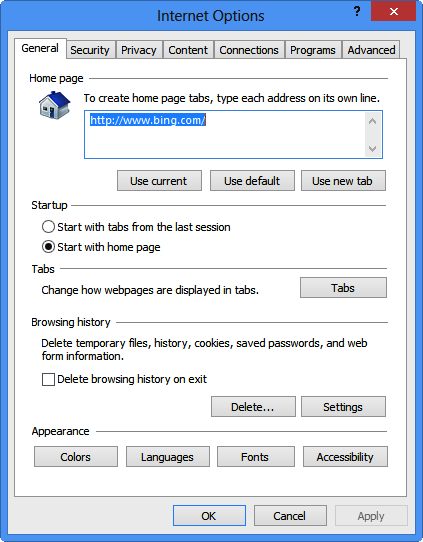
Choose Tools | Internet Options.
The Internet Options dialog box displays.
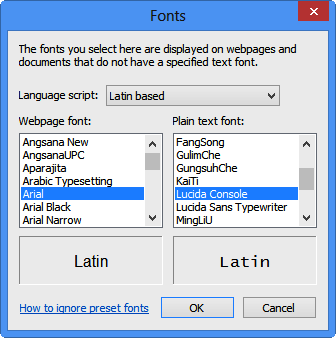
On the General tab, click the Fonts button.
The Fonts dialog box displays.
In the Webpage font list, click Arial.
In the Plain text font list, click Lucida Console (if you have it; otherwise select another font). Plain text means monospace in this context.
Your choices are immediately reflected in the sample text below the font lists.
Click OK to apply your changes and to close the Fonts dialog box.
Click OK to apply your changes and to close the Internet Options dialog box.
The page now displays in Arial font for regular text and in Lucida Console for monospace text. Your font choices are now overriding Internet Explorer’s defaults.
Repeat steps 6-11 to change the webpage font back to Times New Roman and the plain text font back to Courier New.
Close Internet Explorer.
Key Points
Most tags are semantic. They specify that text has a certain function, such as a heading or quotation, rather than specifying a certain way it should appear.
The exact formatting (the appearance) applied to tagged text is controlled by the default settings of the browser, by individual user customization, or by styles.
Define headings by using the tags <h1> through <h6> (largest to smallest).
When one heading immediately follows another as a subheading, you might want to group them with <hgroup> so that screen readers and outlines show them as a single unit. This is optional.
To make text bold, use the <b> tag; to italicize it, use the <i> tag.
The tag for superscript is <sup>; the tag for subscript is <sub>.
Monospaced text uses a font whose characters all occupy the same amount of horizontal space, no matter the specific character; its opposite is proportional text.
By default, most web text appears in a proportional font. To specify a monospaced font, use the <kbd>, <code>, or <samp> tag. HTML5 no longer supports the obsolete <tt> code for monospaced text.
By default, a web browser strips out any extra spaces and ignores paragraph breaks (except for those created when using the <p> tag). To force the browser to render spaces and line breaks in text, enclose that text in a <pre> tag.
To set off a block quotation, use the <blockquote> tag. The tag can take a cite=“URL” attribute, but most browsers do not make use of it.
In Internet Explorer, you can choose a default text size from the View menu. This affects only your copy of Internet Explorer, not the page itself.
In Internet Explorer, you can choose a default text font by opening the Internet Options dialog box, clicking Fonts, and specifying the fonts to use for various purposes.