
Chapter 4. Using Lists and Backgrounds
In this chapter, you will:
Suppose you’re studying for an important test or gathering information for a big project at work. There’s a lot of data and very little time in which to digest it. Which would you rather browse through: a long report on the topic, or a list of the important points?
If you’re like most people, you would probably prefer a list. Lists make text easier to skim. English teachers might wring their hands over this (and I can say this because I was an English teacher), but we’ve become a society of skimmers and browsers. People don’t like to read paragraph after paragraph of plain text. They like their information divided up into easily digestible chunks.
In this chapter, you’ll learn to create several types of lists with HTML, including bulleted lists, numbered lists, and definition lists. You’ll learn how to create nested lists within lists, how to use styles to specify the bullet character or numbering style, and how to create horizontal lines (which in HTML-speak are called rules) that further help divide a page.
You’ll also learn about entity codes that make it possible to insert special characters or symbols that are not on your keyboard as well as symbols such as greater than (>) and less than (<) that would ordinarily be interpreted as HTML tag markers.
Finally, this chapter takes a quick look at webpage backgrounds, both solid color and graphics. Most professional web designers do not use background colors or background graphics, but some hobbyists find them fun. In addition, when you learn about using divisions in Chapter 11, you’ll see how understanding backgrounds can come in handy for creating a navigation bar that contrasts with the main page.
Important
Before you can use the practice files provided for this chapter, you need to download and install them from the book’s companion content location. See Code Samples at the beginning of this book for more information.
Creating Bulleted and Numbered Lists
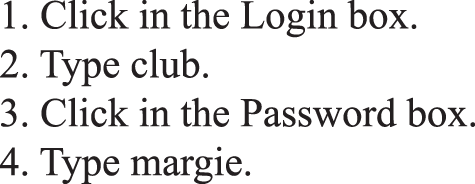
In Chapter 3, you worked with a file that contained a numbered list, but it was set up as a regular <p> paragraph with <br> breaks for each line, such as the following:
<p>1. Click in the Login box.<br>
2. Type <b>club</b>>.<br>
3. Click in the Password box.<br>
4. Type <b>margie</b>.</p>
Tagging the list this way worked in this instance because the lines were short and simple, but HTML has tags designed specifically for creating lists, and it’s better to use those tags when possible. They accept attributes that you can use to control formatting and they create hanging bullets and numbers (that is, bullets and numbers that “hang” off the left margin of the paragraph).
The tag for a numbered list is <ol>, which stands for ordered list. For a bulleted list, the tag is <ul>, which stands for unordered list. Each numbered or bulleted item within the list is tagged <li>, to denote that it’s a list item. You start the list with the opening <ol> or <ul> tag, enclose each list item with <li> and </li> tags, and then finish the list with the closing </ol> or </ul> tag. Here’s the numbered list from the previous example, this time using the proper tags:
<ol>
   <li>Click in the Login box.</li>
   <li>Type <b>club</b>.</li>
   <li>Click in the Password box.</li>
   <li>Type <b>margie</b>.</li>
</ol>
Note
The indentation is added to make the text easier for you to read, but the browser ignores extra spaces. In fact, if the <ol> tag had been placed on the same line as the first <li> item, it would not have made any difference.
You’ve probably noticed that what’s missing here is the numbers themselves. That’s because when creating an ordered list in HTML, you don’t assign the numbers to the items yourself. You let HTML handle that for you as well as the paragraph alignment. The result is a standard, recognizable numbered list (see Figure 4-1).
A bulleted list works the same way, except you use <ul> tags. Here’s an example:
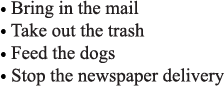
<ul>
   <li>Bring in the mail</li>
   <li>Take out the trash</li>
   <li>Feed the dogs</li>
   <li>Stop the newspaper delivery</li>
</ul>
This produces a basic bulleted list on a webpage (see Figure 4-2).
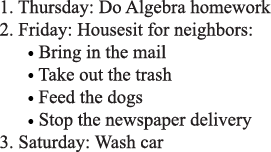
Nesting Lists
You can nest lists within one another. In the following example, we have a bulleted list embedded within a numbered list. Notice how this nested list was constructed. The bulleted sublist (the <ul> tag) is placed within one of the <li> tags within the numbered <ol> list.
<ol>
   <li>Thursday: Do Algebra homework</li>
   <li>Friday: Housesit for neighbors:
      <ul><li>Bring in the mail</li>
      <li>Take out the trash</li>
      <li>Feed the dogs</li>
      <li>Stop the newspaper delivery</li></ul></li>
   <li>Saturday: Wash car</li>
</ol>
On a webpage, it would look like what’s shown in Figure 4-3.
Changing the Bullet or Number Character
Bulleted lists and numbered lists can be styled by using a list-style-type: type attribute. This is a type of style-based attribute that you will be seeing a lot more of later in this book, but for now we’re using it as a standalone technique for changing the bullet character or numbering style. You can use the values shown in Table 4-1 for the list-style-type attribute. (Table 4-1 isn’t a comprehensive list, but it covers all the values you are likely to use.)
To apply the attribute, place it in the opening <ul> or <ol> tag. For example, to create a bulleted list that uses the square bullet character, start the list this way:
<ul style="list-style-type: square">
To create a numbered list that uses uppercase Roman numerals, start the list this way:
<ol style="list-style-type: upper-roman">
Note
Another way of specifying the bullet or number type is use a cascading style sheet (CSS); you’ll learn more about CSS later in the book, starting in Chapter 6.
Specifying the Start of a Numbered List
To start a numbered list at a number other than 1, use the start=“n” attribute with the <ol> tag, where n is the starting number. For example:
<ol start="3">
You might want a different starting number if a list is continuing from an earlier list, but separated from the current list by some regular paragraphs, for example.
The starting number is always specified as an Arabic numeral in the <ol> tag, even if you have chosen a Roman numeral or letter style for the list.
You can use the value=“n” attribute for an individual list item <li> if you want to change the numbering for one item only. For example, to force a particular list item to be numbered with a 5 (or in a list with Roman numerals, a V), insert the value=“n” attribute, as shown here:
<li value="5">
In the following exercise, you will create and nest ordered and unordered lists.
Create Ordered (Numbered) and Unordered (Bulleted) Lists
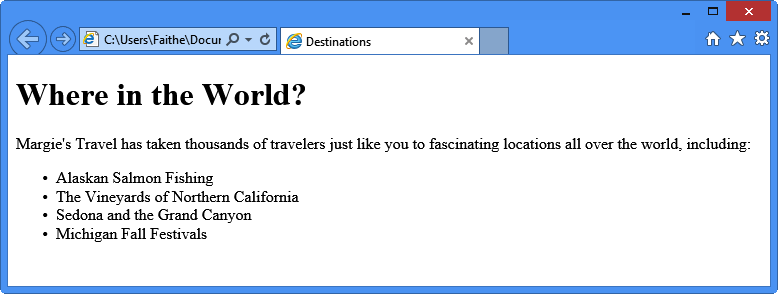
In Notepad and Internet Explorer, open the destinations.htm file in the DocumentsMicrosoft PressHTML 5 Start Here�4ListsNestingLists folder.
Create the following numbered list above the </body> tag:
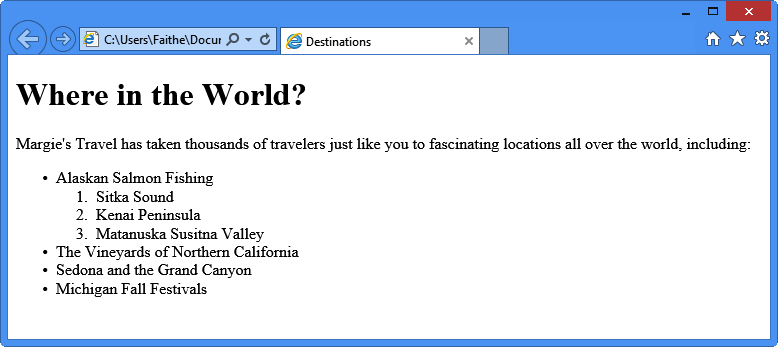
<ul><li>Alaskan Salmon Fishing</li><li>The Vineyards of Northern California</li><li>Sedona and the Grand Canyon</li><li>Michigan Fall Festivals</li></ul>Save the file and then refresh Internet Explorer to view your work.
Immediately beneath the Alaskan Salmon Fishing line, create a nested ordered list as shown below, then save and check your work.
<ul> <li>Alaskan Salmon Fishing</li>
<ol><li>Sitka Sound</li><li>Kenai Peninsula</li><li>Matanuska Susitna Valley</li></ol>Immediately beneath the Sedona and the Grand Canyon line, create a nested ordered list as shown below, then save and check your work.
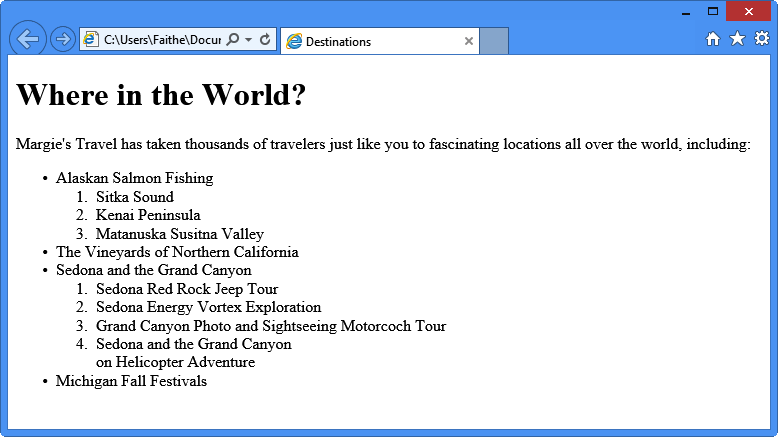
<li>Sedona and the Grand Canyon</li>
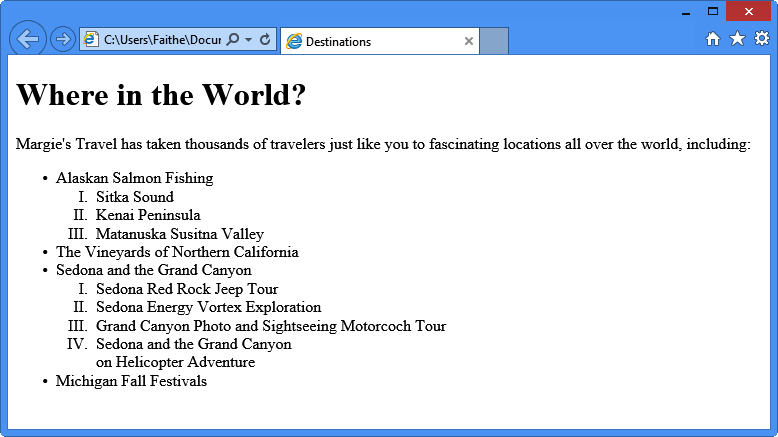
<ol><li>Sedona Red Rock Jeep Tour</li><li>Sedona Energy Vortex Exploration</li><li>Grand Canyon Photo and Sightseeing Motorcoach Tour</li><li>Grand Canyon Helicopter Adventure</li></ol>Change the opening tag of both ordered lists so that they use uppercase Roman numerals:
<ol
style="list-style-type: upper-roman">Save and then check your work. Close Notepad and Internet Explorer.
Creating Definition Lists
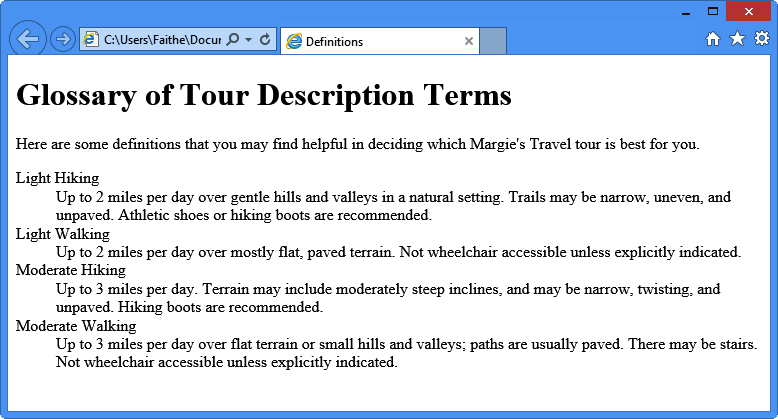
A definition list (see Figure 4-4) is just what it sounds like: a list that presents terms with their definitions, such as you would see in a glossary. The word being defined serves as a heading, and the definition paragraph is indented under it.

The complete list (headings and definition paragraphs) is contained within the <dl> and </dl> tags, which stands for definition list. Each word to be defined is contained in a <dt> (definition term) tag, and the definition paragraphs are contained in <dd> (definition description) tags. Here’s the code for the example shown in Figure 4-4:
<dl>
<dt>Moderate Hiking</dt>
<dd>Up to 3 miles per day. Terrain may include moderately steep inclines, and may be
narrow, twisting, and unpaved. Hiking boots are recommended.</dd>
<dt>Moderate Walking</dt>
<dd>Up to 3 miles per day over flat terrain or small hills and valleys; paths are
usually paved. There may be stairs. Not wheelchair accessible unless explicitly
indicated.</dd>
</dl>
This example shows a one-to-one relationship between words and definitions (one definition for each word), but that’s not a requirement. You can have multiple consecutive entries of either type. You might do this to accommodate situations in which a single word has two meanings or two words have the same definition.
Note
HTML permits you to omit the closing </dt> and </dd> tags, but you should get into the habit of using them anyway. XHTML requires them.
In the following exercise, you will create a glossary of terms on a webpage.
Create a List of Definitions
Create a List of Definitions
In Notepad and Internet Explorer, open the definitions.htm file located in the DocumentsMicrosoft PressHTML 5 Start Here�4ListsCreatingDefinitions folder.
Above the </body> tag, type the following:
<dl><dt>Light Hiking</dt><dd>Up to 2 miles per day over gentle hills and valleys in a natural setting.Trails may be narrow, uneven, and unpaved. Athletic shoes or hiking boots arerecommended.</dd><dt>Light Walking</dt><dd>Up to 2 miles per day over mostly flat, paved terrain. Not wheelchairaccessible unless explicitly indicated.</dd><dt>Moderate Hiking</dt><dd>Up to 3 miles per day. Terrain may include moderatelysteep inclines, andmay be narrow, twisting, and unpaved. Hiking boots are recommended.</dd><dt>Moderate Walking</dt><dd>Up to 3 miles per day over flat terrain or small hills and valleys; pathsare usually paved. There may be stairs. Not wheelchair accessible unlessexplicitly indicated.</dd></dl>Save the file and then refresh Internet Explorer to view your work. Close Notepad and Internet Explorer.
Inserting Special Characters
Special characters are characters that are not included on a standard English keyboard. Examples include letters with accent marks over them (such as in the word résumé) or an ownership symbol (such as © or ™). In HTML, these special characters are referred to as entities. You create them by using codes beginning with an ampersand (&), followed by an entity name or an entity number, and then ending with a semicolon. The entity names and entity numbers both represent the same thing; you can use either one. For example, or   each renders as a non-breaking space.
In addition to the non-keyboard symbols, certain other symbols must be created as entities in HTML because they have a specific meaning in HTML. The most common are the ampersand (&), the greater than sign (>), and the less than sign (<). You can’t just type those symbols in HTML code because a browser will interpret them as tags or entities rather than characters to display.
Table 4-2 lists the most common entities. For a more complete list, refer to the entities.htm file included with the data files for this book.
Symbol | Entity Name | Entity Number |
& | & | |
< | < | |
> | > | |
  | ||
¢ | ¢ | |
£ | £ | |
¥ | ¥ | |
© | © | |
® | ® | |
° | ° | |
± | ± | |
† | † | |
™ | ™ |
Note
The nonbreaking space entity is very popular for creating spaces, and in fact, many WYSIWYG web site creation programs like Microsoft Expression Web and Adobe Dreamweaver insert them for you when you press the spacebar. Don’t use nonbreaking spaces instead of good layout techniques, though. For example, if something needs to be indented a certain amount, use the correct HTML tags and styles for indenting it, don’t just “space over” with a half-dozen codes.
In the following exercise, you will add copyright and trademark symbols to a webpage using entities.
Insert Special Characters
Insert Special Characters
In Notepad and Internet Explorer, open the index.htm file located in the DocumentsMicrosoft PressHTML 5 Start Here�4ListsInsertingSpecial folder.
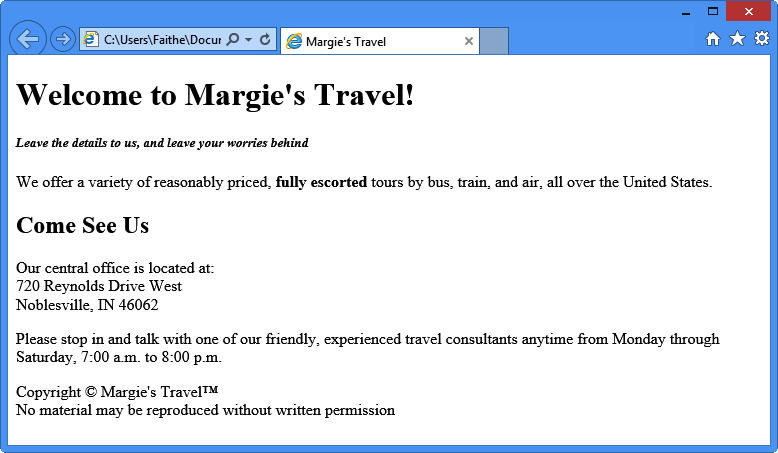
Add copyright and trademark symbols to the copyright notice at the bottom of the file:
<p>Copyright
©Margie's Travel™<br> No material may be reproduced without written permission</p>Save the file and then refresh Internet Explorer to check your work. Leave Notepad and Internet Explorer open for the next exercise.
Inserting Horizontal Lines
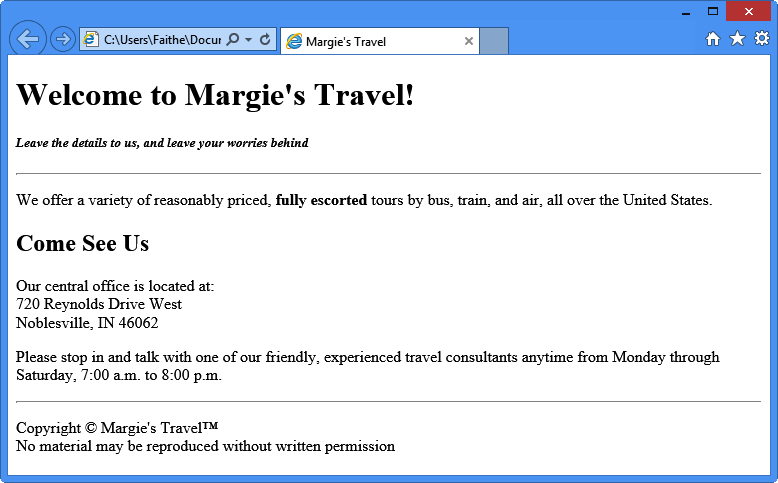
Horizontal lines—which HTML calls horizontal rules—can be useful as dividers between sections of text in a webpage. For example, in the preceding exercise, you created a copyright notice that blends in perhaps a little too well with the rest of the text on the page; it would stand out more if it were separated from the rest of the document by a horizontal line. You might also want to add another horizontal line between the first headings and the rest of the document (see Figure 4-5).
To add a horizontal line, simply add the following one-sided tag where you want the line to appear:
<hr>
Note
In XHTML, you must add a space and closing slash, like this: <hr />. HTML5 also recognizes that syntax as an optional alternative. The slash is required for XHTML compatibility, while the space preceding the slash enables older browsers to read the tag correctly.
By default, the line runs the entire width of the browser window, is two pixels in height, and is black with a chiseled effect. You can change these characteristics by applying attributes within the tag.
Most of the original attributes for the <hr> tag were deprecated in HTML 4.01; attributes such as align, color, size, and width are not supported at all in HTML5. You now set the rendering characteristics for a horizontal line using styles, as you will learn in Chapter 6.
It’s best to specify a uniform appearance for all lines by using a cascading style sheet, as you’ll learn to do in Chapter 6, but you can also add styling directly to the <hr> tag by simply including the style=“attributes” attribute, which is what we’ll do here in this chapter. After you learn the other methods, you may choose to use these methods instead in your own work.
The style attributes you can set for a horizontal line are border, color, background-color, width, and height. When you combine two attributes in a single style= statement, you separate them with semicolons. For example, to create a red line that is 3 pixels thick and spans 50% of the window’s width, you would write:
<hr style="color: red; background-color: red; height: 3px; border:none; width: 50%">
Why two different color specifications? Some browsers use color to assign a color to the line, others use background-color; therefore, you should include both tags and assign the same color for both. The browser will read whichever one it needs and ignore the other one.
For a solid line with no border, you should include border:none, as shown in the previous example. Otherwise the horizontal rule will have a thin black border around it.
Note
In Chapter 8, you’ll learn more possibilities for using the border attribute, including creating solid borders, dotted borders, and dashed borders.
HTML recognizes these 16 basic color names. You can also specify a color by its hexadecimal number, like #f00 for red.
Aqua
Black
Blue
Fuchsia
Gray
Green
Lime
Maroon
Navy
Olive
Purple
Red
Silver
Teal
White
Yellow
Note
To see full-color samples of these colors, refer to DocumentsMicrosoft PressHTML 5 Start HereReferencecolors.htm. See the section Understanding How Colors are Specified on Webpages later in this chapter to find out how you can use other colors than the ones listed above.
In the following exercise, you will add two horizontal rules to a webpage.
Add Decorative Horizontal Lines
Add Decorative Horizontal Lines
Start with the index.htm file still open in Notepad and Internet Explorer from the previous exercise. Or open index.htm in Notepad and Internet Explorer in the DocumentsMicrosoft PressHTML 5 Start Here�4ListsCreatingRule folder.
Immediately above the copyright notice, add this tag:
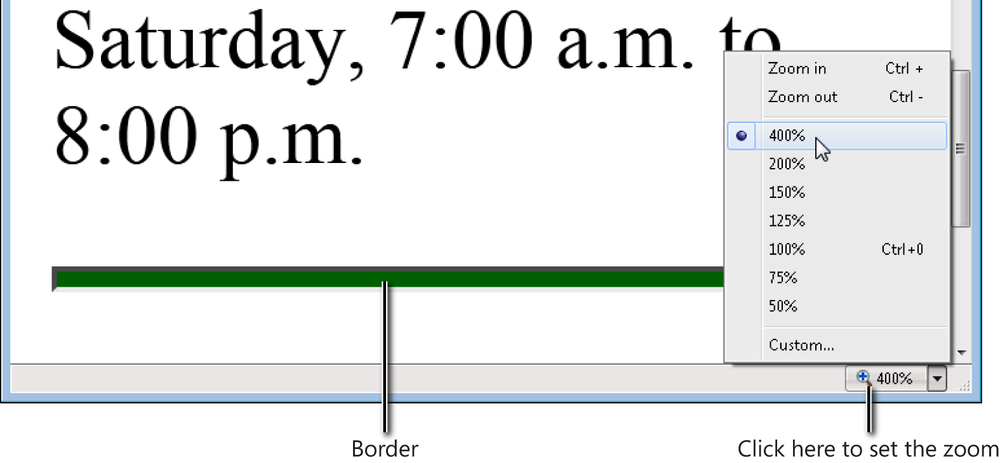
<hr style="color: green; background-color: green; height: 3px">Save the file and then refresh Internet Explorer to check your work.
Use the Change Zoom Level control in the bottom-right corner of the Internet Explorer window to zoom in to 400% and look at the horizontal rule. Notice that it has a border around it.
The color and style of the border depend on the browser; in Internet Explorer 10, it’s a dark gray border on the top and left and a light gray border on the bottom and right.
In Notepad, add border:none to the style:
<hr style="color: green; background-color: green; height: 3px;
border:none">Save the file in Notepad and then refresh Internet Explorer to check your work. Notice that the horizontal rule is now solid, with no border.
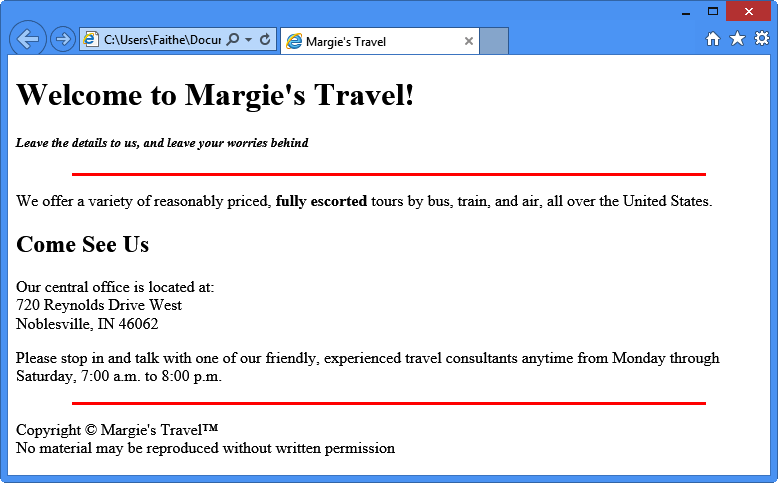
In Notepad, change the color of the horizontal rule to red and then set its width to 85%:
<hr style="color:
red; background-color:red; height: 3px; border:none;width:85%">Select the entire <hr> tag and then press Ctrl+C to copy it to the Clipboard.
Paste the copied tag immediately below the </hgroup> tag. Save the file.
In Internet Explorer, reset the zoom to 100% and then refresh Internet Explorer to check your work. Leave Notepad and Internet Explorer open for the next exercise.
Choosing Background Colors and Foreground Colors
Many web design experts caution against using dark or patterned backgrounds on webpages because these backgrounds can make it difficult to read the text. Some designers go so far as to say that you should not use any background color at all; they prefer that black text on a white background be the norm. A quick look at a few major commercial websites will confirm the near-universality of this opinion. Look at high-traffic sites like www.msn.com, news.google.com, and www.microsoft.com; you’ll find that the body text is almost exclusively black (or another dark color) on a white (or other pale) background.
Rules are made to be broken, however, and you might find situations in which a colored or patterned background is perfect for a certain page (or set of pages). For example, you might assign a background color to a webpage that you want to differentiate from other pages of a website.
Understanding How Colors are Specified on Webpages
The 16 basic colors presented in the preceding section are the best colors to use on webpages because they are universally accepted. Every browser interprets these colors the same way. However, you will probably find many situations in which none of those 16 colors is appropriate. For example, you might find that they are all too dark or too vivid to make an attractive page background. Therefore, you will sometimes need to rely on other ways of specifying colors.
One way to specify a color is by its RGB (red-green-blue) value. Using this method, you can describe a color using a series of three numbers, from 0 to 255. Each number represents the component of red, green, or blue that makes up the color. For example, pure red is 255,0,0; that is, maximum red (255), no green (0), and no blue (0). You can create a large range of colors using these three values. For example, 255,153,0 represents a particular shade of orange—full red, a little more than half green, and no blue.
Another way to express color values in HTML is by using a hexadecimal value. The hexadecimal values represent the RGB values converted to the base-16 numbering system. For example, the value 255 converts to FF, so the RGB value 255,255,0 can also be expressed as the hexadecimal value #FFFF00.
The problem with defining colors by using RGB or hexadecimal values is that not every display supports that many colors. Any unsupported colors appear as dithered (that is, formed with a cross-hatch pattern of two colors blended together). Therefore, most web designers try to stick with what are called web-safe colors. A web-safe color is one that exactly matches one of the colors in a standard 8-bit color display. Web-safe colors use only the following numeric values for red, green, and blue: 0, 51, 102, 153, 204, and 255. To see full-color samples of all the web-safe colors, refer to My DocumentsMicrosoft PressHTML 5 Start HereReferencewebsafe.htm.
Yet another way to express color values is by using extended names. These are similar to the basic color names, but there are a lot more of them. Officially they are supported only by Internet Explorer, but most browsers recognize them. To see full-color samples of all the extended colors, refer to My DocumentsMicrosoft PressHTML 5 Start HereReferenceextended.htm.
Applying a Background Color
To specify a background color for an entire page, insert the style=“background-color: color” attribute into the opening <body> tag. For example, to make the background of an entire page yellow, use the following:
<body style="background-color: yellow">
You can use the color name, the RGB value, or the hexadecimal value. Therefore, the following are equivalent to the code just shown:
<body style="background-color: #FFFF00">
<body style="background-color: rgb(255,255,0)">
Applying a Foreground Color
The foreground color is the default text color for the page. You can set the foreground color by using the style=“color: color” attribute. It can be combined with the attribute for the background color in a single style= statement. For example, to set yellow text on a navy blue background, use the following:
<body style="background-color: navy; color: yellow">
Note
Just like with the horizontal rule earlier in this chapter, we are using styles here to format the body of the page. You will learn more about styles in Chapter 6.
In this exercise, you will change the foreground and background colors of a webpage.
Apply Background and Foreground Colors
Start with the index.htm file still open in Notepad and Internet Explorer from the previous exercise. Or open index.htm in Notepad and Internet Explorer in the DocumentsMicrosoft PressHTML 5 Start Here�4ListsApplyingBackground folder.
Add the following style attribute to the <body> tag:
<body
style="color:navy; background-color:#FFFFCC">Save the file and then refresh Internet Explorer to check your work.
The webpage text should now be navy blue, and the page background should be pale yellow.
Leave the file open in Notepad and Explorer for the next exercise.

Specifying a Background Image File
A background image displays behind the text on a page. By default, the image is tiled to fill the page and scrolls with the page.
Unfortunately, there are plenty of examples of ineffective or distracting backgrounds on the web. Here are some tips for making yours better than those.
First of all, choose images that are designed to be tiled, so each copy blends smoothly into the next. When the image’s edges blend well, it will look like a single large image. In Figure 4-6, the edges do not blend well.
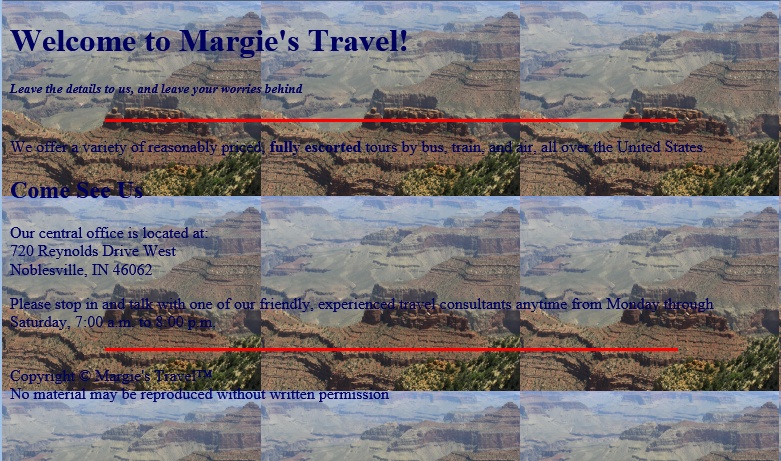
On the other hand, the edges of the tiled copies shown in Figure 4-7 blend together well in both directions.

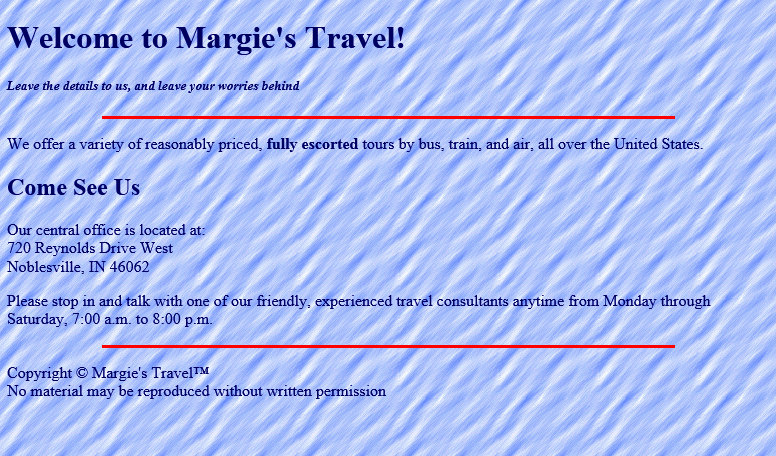
Use subtle patterns that don’t distract from the text. The preceding examples fail that test; they impede readability in a big way. Figure 4-8 shows a better one.
If you specify a background image, you should also specify a background color. The color will not be visible unless the image fails to display for some reason or unless the image has transparent areas in it. The background color is especially important if you use a dark background image and a light foreground color; if the image does not display, the text still must display on a dark background to be readable.
To use a background image file, use a style=“background-image: url(image)” attribute in the opening <body> tag, as you did for foreground and background colors in the preceding section. For example, to use the background image file called granite.gif that is located in the same folder as the HTML file, you would write:
<body style="background-image: url(granite.gif)">
Notice that you must enclose the image file name in parentheses following the url. You do not need to specify a path to the image as long as it is stored in the same folder as the HTML file.
The <body> tag can hold many style specifications in a single style= attribute. Separate them with semicolons, as you did previously with the foreground and background colors. For example, to combine the background image, background color, and foreground color in a single attribute, do the following:
<body style="background-image: url(granite.gif); color: navy; background-color:
#FFFFCC">
By default, the background image is repeated both horizontally and vertically to fill the window. You can force it not to repeat by adding the background-repeat= attribute to the <body> tag and specifying repeat-x (repeat horizontally only), repeat-y (repeat vertically only), or no-repeat. For example, to prevent any repeating, use the following:
<body style="background-image: url(granite.gif); color: navy; background-color:
#FFFFCC; background-repeat: no-repeat">
By default, the background image scrolls with the text when the user scrolls down the page. To force the image to stay fixed, add the background-attachment=fixed attribute to the <body> tag, as follows:
<body style="background-image: url(granite.gif); color: navy; background-color:
#FFFFCC"; background-attachment=fixed">
In the following exercise, you will display an image as a webpage background.
Use a Graphic as a Background
Start with the index.htm file still open in Notepad and Internet Explorer from the previous exercise. Or open index.htm in Notepad and Internet Explorer in the DocumentsMicrosoft PressHTML 5 Start Here�4ListsSpecifyingImages folder.
Replace the existing opening <body> tag with this one:
<body style="background-image: url(ripplez.gif); background-color: #FFFFCC">Save the file and then refresh the Internet Explorer display to check your work. Close the Notepad and Internet Explorer windows.
Key Points
To create a numbered (ordered) list, use the <ol> tags. For a bulleted (unordered) list, use the <ul> tags.
Within the <ol> or <ul> tags, use <li> tags for each list item. These tags are all two-sided. HTML does not require the closing </li>, but XHTML does.
Ordered and unordered lists can be nested. Enclose the second-level <ul> or <ol> list within a <li></li> tag inside the main list.
To use a different bullet character or numbering style, use the style=“list-style-type: type” attribute in the <ul> or <ol> opening tag.
To create a definition list, use the <dl></dl> tags. Within the <dl> tags, enclose each term in a <dt></dt> tag, and enclose each definition in a <dd></dd> tag.
You can display special characters on a webpage by using HTML character entity references.
To insert a horizontal line (rule), use the <hr> tag. This is a one-sided tag. Put any style specifications for the line within it, such as border, color, height, and width.
You can specify colors by using basic or extended names, RGB values, or hexadecimal values.
To assign a background color to a page, insert a style=“background-color: color” attribute into the <body> opening tag. For a foreground color, use style=“color: color”. These attributes can be combined into a single statement with a semicolon separator, like this: style=“background-color: red; color: white”.
To assign a background image to a page, insert a style=“background-image: image” attribute into the <body> opening tag.