
Chapter 13. Formatting Tables
In this chapter, you will:
Chapter 12, explained how to create tables structurally; now it’s time to learn how to make them more attractive. By default, a table is just a plain container—no border, no shading, and no text formatting. It’s up to you to add all those things if you want them.
Not every table needs elaborate formatting. If you are using a table as a container for a page layout, as demonstrated at the end of Chapter 12, you probably want the table to be as unobtrusive as possible. But even unobtrusive tables can benefit from some of the small improvements you’ll learn about in this chapter, such as adjusting the amount of space between the border of a cell and its content. (That’s called padding, as you might remember from Chapter 8.)
In this chapter, you’ll learn how to apply borders to table cells and how to fill their backgrounds with color or images. You’ll learn how to fine-tune cell spacing and padding, and how to make the contents of a cell align a certain way vertically and horizontally.
Important
Before you can use the practice files provided for this chapter, you need to install them from the book’s companion content page to their default locations. See Code Samples in the beginning of this book for more information.
Applying Table Borders
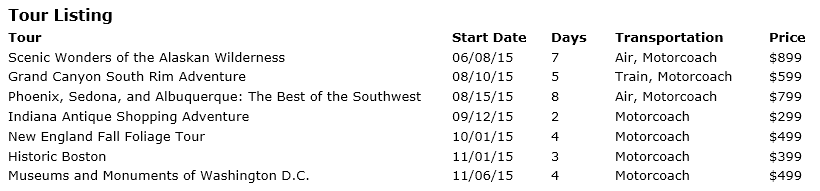
Tables created using the default settings are pretty plain—in fact they’re invisible—so it can be difficult to distinguish where one cell ends and the next cell begins. To help with this problem, you can place borders around cells, either globally or selectively. You might also choose to fill (shade) certain cells to help them stand out. For example, the spacing in the table shown in Figure 13-1 makes it difficult for a reader to follow a line across the page.
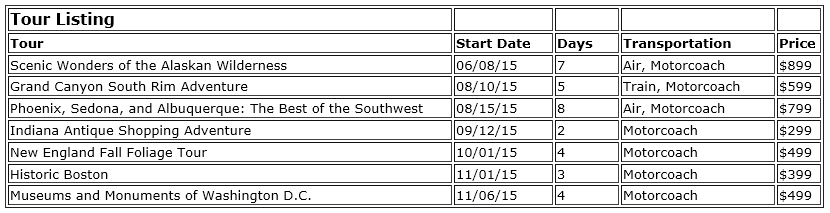
You could make it easier to read by applying borders like those shown in Figure 13-2.
Tip
If you don’t like the double lines between each cell, set the cell spacing to 0. You’ll learn how to do that in the Changing Cell Padding, Spacing, and Alignment section on page 237.
You can apply borders to a table either by adding attributes to the <table> tag or with styles, either applied to the individual table or placed in an internal or external cascading style sheet. This chapter shows both methods, but the style method is the more modern one, and it is also more reliable because it produces consistent results across all browsers.
Applying Borders by Using Attributes
By default, a table has no border. To add a one-pixel border around both the table as a whole and around each individual cell, you can add this attribute to the <table> tag:
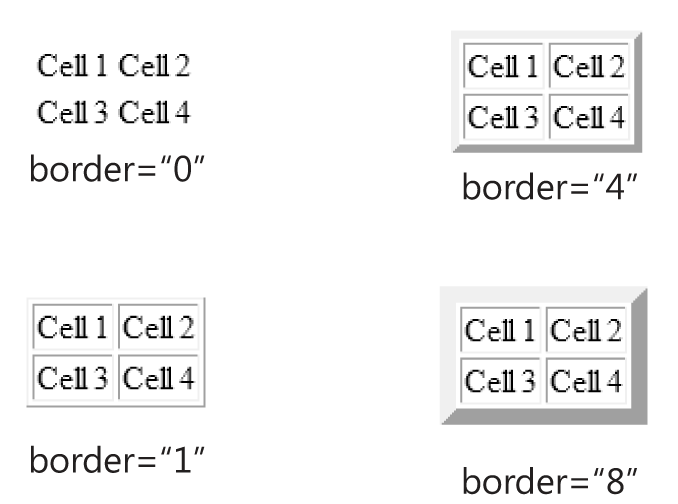
<table border="1">As shown in Figure 13-3, increasing the number increases the width of the outer border around the whole table, but not the inner borders. You might recall from Chapter 12 that the border=“1” attribute is a quick way to see the borders of a table for the purposes of learning or debugging.
If you want to play around with the above examples on your own, use the following code (changing the border= property to the desired value):
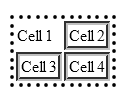
   <table border="8">
  <tr>
    <td>Cell 1</td>
    <td>Cell 2</td>
  </tr>
  <tr>
    <td>Cell 3</td>
    <td>Cell 4</td>
  </tr>
</table>
The border attribute applies a border to all sides of all cells. If you do not want the border on some of the sides, you can use the frame and/or rules attributes.
The frame attribute specifies which sides of the outer frame of the table will display the border. The valid values are:
above: Top border only
below: Bottom border only
border: All four sides
box: All four sides
hsides: Top and bottom only (hsides stands for horizontal sides)
vsides: Left and right only (vsides stands for vertical sides)
lhs: Left side only (lhs stands for left-hand side)
rhs: Right side only (rhs stands for right-hand side)
void: No outer border
The rules attribute does the same thing for the inner lines of the table (the cell borders). The valid values are:
all: All inner lines
cols: Only vertical inner lines
groups: Lines around defined groups, if any (such as column groups, which you’ll learn about later in this chapter)
rows: Only horizontal inner lines
none: No inner lines
For example, if you want only vertical borders in your table, around both the table as a whole and around each of the cells, apply these attributes to the <table> tag:
<table border="1" frame="vsides" rules="cols">Applying Borders by Using Styles
You can also apply borders by using cascading style sheets (CSS), which is the most flexible and consistent method. You should choose the CSS method in most cases, especially on sites that you expect to be active for many years to come, because the older methods of formatting tables may be deprecated in the future.
In Chapter 8, you learned about style-based borders for paragraphs. You use them the same way for the <table> and <td> tags. To review:
The border-width attribute controls the thickness of the border. Specify a value in pixels.
The border-color attribute controls the color of the border. Specify a color by name, hexadecimal number, or RGB value.
The border-style attribute controls the line style. Choose among solid, dotted, dashed, double, groove, ridge, inset, outset, or none.
To set all three attributes at once, use the border attribute and then place the settings after it in this order: width, color, style.
To format the border sides individually, replace the border attribute with the border-top, border-bottom, border-left, or border-right attribute.
You can apply these attributes either to the entire table (by using the <table> tag or a style rule) or to individual cells (by using the <td> tags). You can apply them to individual instances within the opening tags themselves, you can create rules in the <style> area that govern all instances within a document, or you can create rules in the external style sheet that govern all documents that use it.
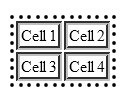
For example, the following code applies a black dotted border around the outside of a table and a silver grooved border around one specific cell (see Figure 13-4):
<tablestyle="border-style: dotted; border-color: black"> <tr> <tdstyle="border-style: groove; border-color: silver"> Cell 1</td> <td>Cell 2</td> </tr> <tr> <td>Cell 3</td> <td>Cell 4</td> </tr> </table>

To format all tables or all cells the same way, define the attributes in an embedded style sheet:
<style>
table {border-style: dotted; border-color: black}
td {border-style: groove; border-color: silver}
</style>
This code produces a result that looks as shown in Figure 13-5.
As always, you can override the style rule with a style attribute placed specifically within an individual tag. For example, to make the first cell borderless, modify its <td> tag:
<table>
   <tr>
      <td style="border-style: none">Cell 1</td>
      <td>Cell 2</td>
   </tr>
   <tr>
      <td>Cell 3</td>
      <td>Cell 4</td>
   </tr>
</table>
This code produces a result that looks as shown in Figure 13-6.
In the following exercise, you will add default table border settings to an external style sheet and then you will override those settings for an individual instance within a document.
Apply and Remove Table Borders
In Notepad, open the default.css file located in the DocumentsMicrosoft PressHTML5 Start Here13FmtTablesApplyingBorders folder.
Add the following style rules to the default.css style sheet:
table {border-style: outset; border-color: gray; border-width: 2px}td {border-style: solid; border-color: gray; border-width: 1px}Save and close default.css, and then open tours.htm in Internet Explorer.
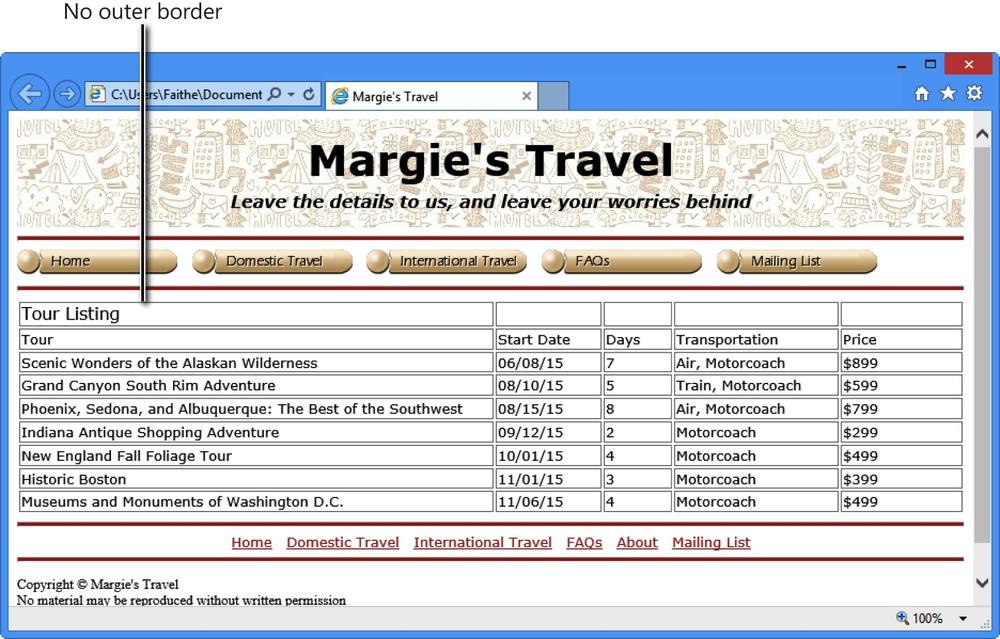
In Notepad, open tours.htm and then remove the outer border from all sides of the table.
<table
style="border-style: none">Save the file and then refresh Internet Explorer.
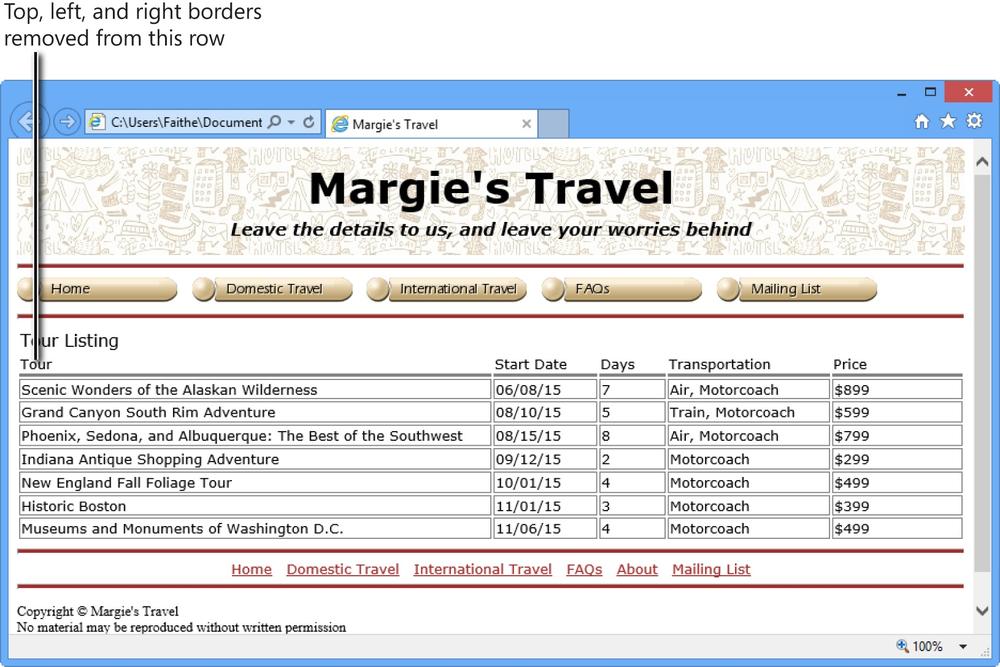
Each cell has a border around it, but there is no overall border surrounding the table.
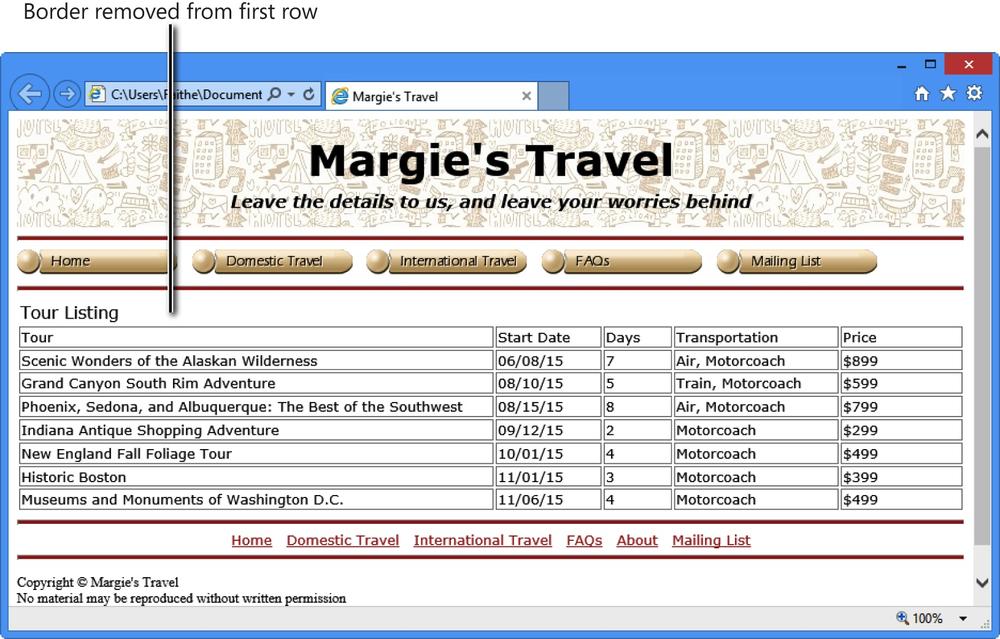
Remove the border from each cell in the top row. You have to do this for each cell individually, because you can’t apply this particular style to the <tr> tag.
<table style="border-style: none"> <tr><b> <td style="font-size: 1.2em;border-style: none">Tour Lis ting</td> <tdstyle="border-style: none"></td> <tdstyle="border-style: none"></td> <tdstyle="border-style: none"></td> <tdstyle="border-style: none"></td> </b></tr>Save the file and then refresh Internet Explorer.
The top cell now appears to be floating above the rest of the table, borderless.
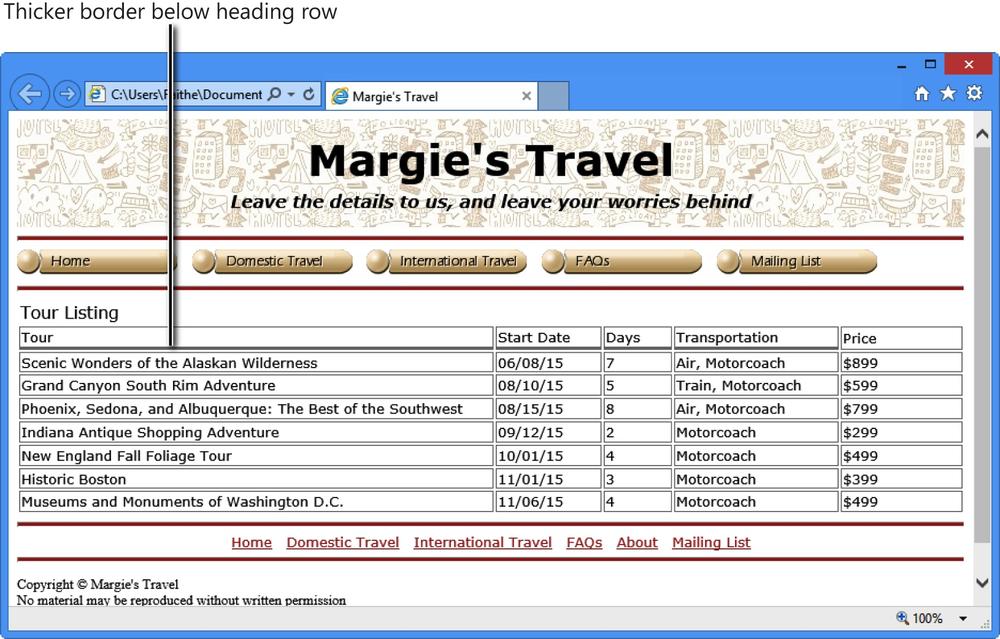
In the row containing the column headings, make the bottom border three pixels thick:
<tr><b> <td style="width: 440px;border-bottom-width: 3px">Tou r</td> <td style="width: 95px;border-bottom-width: 3px">Star t Date</td> <td style="width: 60px;border-bottom-width: 3px">Days </td> <td style="width: 150px;border-bottom-width: 3px">Tra nsportation</td> <tdstyle="border-bottom-width: 3px">Price</td> </b></tr>Save the file and then refresh Internet Explorer.
Remove the borders from all sides of the cells in the row containing the column headings. (Hint: type the attributes once, and then copy and paste.)
<tr><b> <td style="width: 440px; border-bottom-width: 3px;
border-top-style: none;border-left-style: none; border-right-style: none">Tour</td > <td style="width: 95px; border-bottom-width: 3px;border-top-style: none;border-left-style: none; border-right-style: none">Start Date </td> <td style="width: 60px; border-bottom-width: 3px;border-top-style: none;border-left-style: none; border-right-style: none">Days</td > <td style="width: 150px; border-bottom-width: 3px;border-top-style: none;border-left-style: none; border-right-style: none">Transportatio n</td> <td style="border-bottom-width: 3px;border-top-style: none;border-left-style: none; border-right-style: none">Price</td> </b></tr>Save the file and then refresh Internet Explorer.
Close Notepad and Internet Explorer.

Applying Background and Foreground Fills
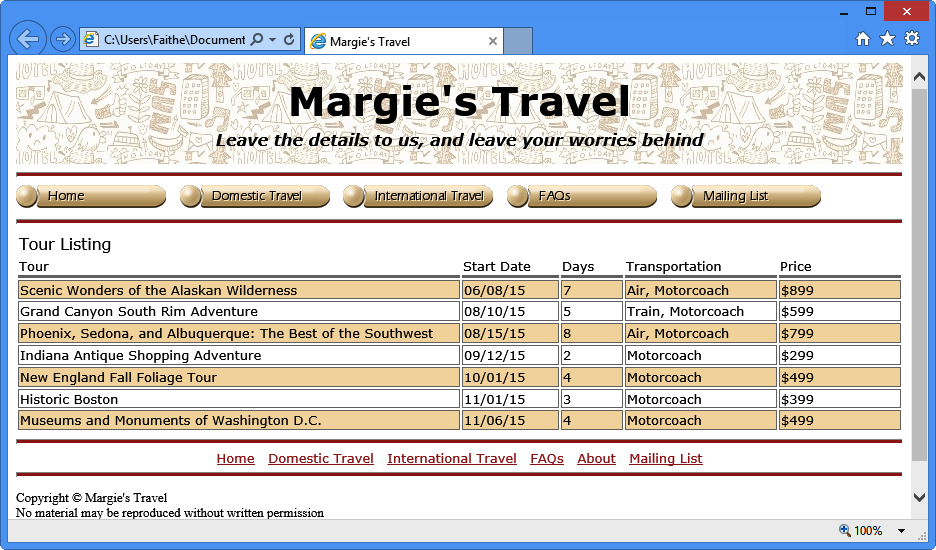
Each table, row, and cell is its own distinct area, and each can have its own background. For example, you might want to apply a different color background to a heading row to make it stand out, or change the color of every other line in a listing to help visitors track a line across the table, as shown in Figure 13-7.

To apply a background color to a table, use the same background-color style rule that you use for documents. For example, to make a certain row orange:
<tr style="background-color: orange">
The table background can also be a picture, just like a document background. Apply the background-image attribute to any portion of a table. For example, to apply it to the entire table:
<table style="background-image: url(images/leaf.gif)>
If the image is smaller than the allotted space, it will be tiled, just as when you apply an image to a page background.
Note
If you apply both a background color and a background image to the same cell(s), the more specific application takes precedence. For example, if you apply a background color to the table as a whole, and then apply a different color to an individual cell, the different color will appear in that cell.
The foreground of an element is its text, as you learned in Chapter 4. You can set the color of any table element like this:
<table style="color: blue">
In the following exercise, you will apply background and foreground colors to a table and use an image as a background.
Format a Table’s Foreground and Background
Format a Table’s Foreground and Background
In both Notepad and Internet Explorer, open the tours.htm file located in the DocumentsMicrosoft PressHTML5 Start Here13FmtTablesApplyingBackground folder.
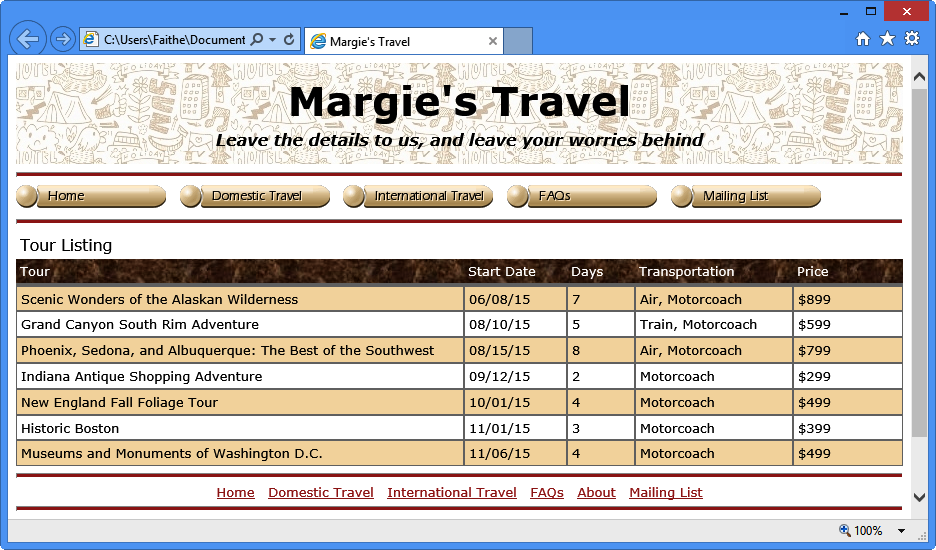
Add a style to the third row of the table (Scenic Wonders of the Alaskan Wilderness) that sets the background color to wheat:
<tr style="background-color: wheat">
       <td>Scenic Wonders of the Alaskan Wilderness</td>
       <td>06/08/15</td>
       <td>7</td>
       <td>Air, Motorcoach
       <td>$899</td>
</tr>
Copy the edited <tr> tag from the third table row and then insert it into every other row (the fifth, seventh, and ninth rows):
<tr
style="background-color: wheat"> <td>Phoenix, Sedona, and Albuquerque: The Best of the Southwest</td> <td>08/15/15</td> <td>8</td> <td>Air, Motorcoach <td>$799</td> </tr> <trstyle="background-color:wheat"> <td>New England Fall Foliage Tour</td> <td>10/01/15</td> <td>4</td> <td>Motorcoach <td>$499</td> </tr> <trstyle="background-color:wheat"> <td>Museums and Monuments of Washington D.C.</td> <td>11/06/15</td> <td>4</td> <td>Motorcoach <td>$499</td> </tr>Save the file and then refresh Internet Explorer.
In Notepad, in the row containing the column headings, add a style rule that sets the background to the marble.jpg file (located in the images folder) and sets the foreground (text) color to white:
<tr
style="background-image: url(images/marble.jpg); color:white"> <td style="width: 440px; border-bottom-width: 3px; border-top-style: none; border-left-style: none; border-right-style: none"><b>Tour</b></td> <td style="width: 95px; border-bottom-width: 3px; border-top-style: none; border-left-style: none; border-right-style: none"><b>Start Date</b></td > <td style="width: 60px; border-bottom-width: 3px; border-top-style: none; border-left-style: none; border-right-style: none"><b>Days</b></td> <td style="width: 150px; border-bottom-width: 3px; border-top-style: none; border-left-style: none; border-right-style: none"><b>Transportation</b> </td> <td style="border-bottom-width: 3px; border-top-style: none; border-left- style: none; border-right-style: none"><b>Price</b></td> </tr>Save the file and then refresh Internet Explorer.
Close Notepad and Internet Explorer.

Changing Cell Padding, Spacing, and Alignment
Cell padding, cell spacing, and cell alignment are three different ways you can control how cell content displays on a page. You learned about these features in previous chapters, but let’s briefly review them.
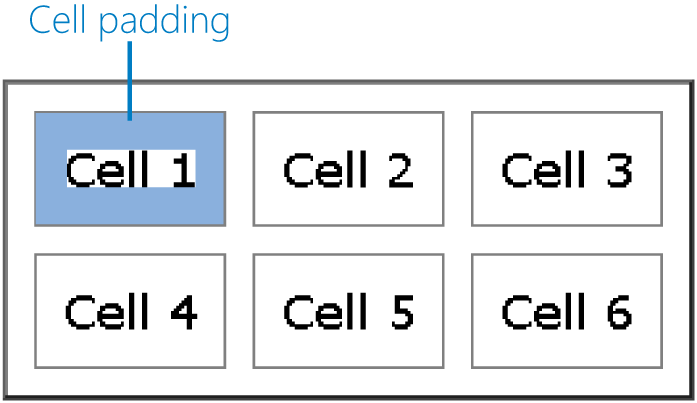
Padding refers to the amount of space between an element’s content and its outer edge. For a table cell, padding refers to space between the cell border and the text or graphic within it (see Figure 13-8).
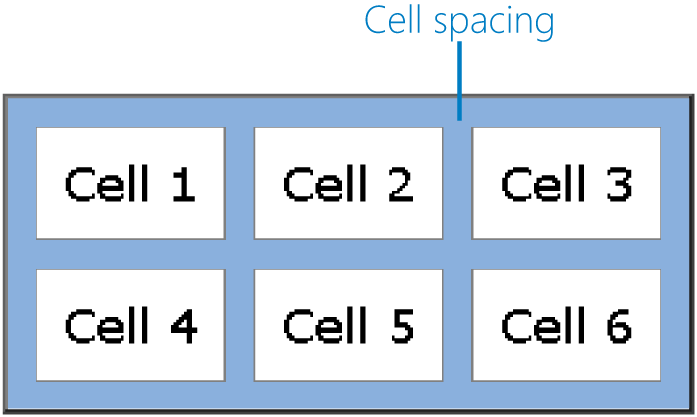
Spacing refers to the amount of space between the outside of an element and the adjacent element. For a table cell, spacing refers to the space between the border of one cell and the border of the adjacent cell (see Figure 13-9).
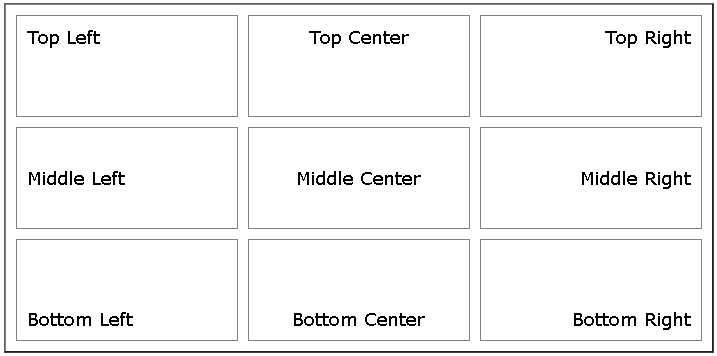
Alignment (see Figure 13-10) refers to the placement of the content within its allotted area, either vertically or horizontally. For normal paragraphs (not in a table), alignment refers only to horizontal placement between the margins. For a table cell, however, there are separate settings for vertical and horizontal alignment.
Setting Cell Padding
To set the padding for the entire table, use the cellpadding attribute in the <table> tag. (The cellpadding attribute does not work with individual row and cell tags.)
<table cellpadding="4px">
To set the padding for an individual cell, use the padding attribute in a style, as you did in Chapter 8 for a paragraph:
<td style="padding: 4px">
To set padding in a style sheet:
td {padding: 4px}Setting Cell Spacing
The default table border looks like a double line, but this effect is just a combination of the border around the table as a whole and the border around each cell. The double effect is created by the spacing between the cells.
To make the borders a single solid line between one cell and another, set the cell spacing to zero (see Figure 13-11):
<table cellpadding="10px" cellspacing="0px">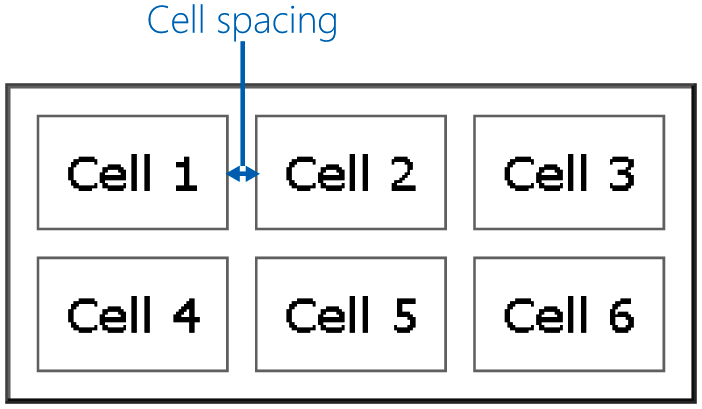
Setting Horizontal and Vertical Alignment
A cell’s content has two alignments: vertical (top, middle, or bottom) and horizontal (left, center, right, or justify). You can set these with attributes or with styles. To set alignment with attributes, use the align attribute to specify the horizontal alignment and use the valign attribute to specify the vertical alignment:
<td align="center" valign="middle">
You can also set alignment with a style by using text-align to specify the horizontal alignment and vertical-align to specify the vertical alignment:
<td style="text-align: center; vertical-align: middle">
These can be applied to the entire table, to individual rows, or to individual cells. (Yes, alignment works with rows, unlike spacing and padding.)
In the following exercise, you will adjust the padding, spacing, and alignment of a table.
Change a Table’s Padding, Spacing, and Alignment
In both Notepad and Internet Explorer, open the tours.htm file located in the DocumentsMicrosoft PressHTML5 Start Here13FmtTablesChangingPadding folder.
Set the padding for the entire table to 4px:
<table style="border-style: none;
cellpadding="4px">Set the cell spacing for the entire table to 0px:
<table style="border-style: none" cellpadding="4px"
cellspacing="0px">Save the file and then refresh Internet Explorer.
Note
Notice that wherever two bordered cells touch, the border appears double thick. You can change that by removing the border from one side of each of those cells. For example, you can remove the right and bottom border on a cell like this:
<td style="border-right-style: none; border-bottom-style: none">
Alternatively, you can simply increase the table’s outer border thickness so that it matches the thickness of the inner borders.
Close Notepad and Internet Explorer.
Key Points
To apply a simple default border to a table, include the border=“1” attribute in the table’s opening tag. A value greater than 1 increases the table border but not the cell borders.
The frame attribute specifies which sides of the table frame display the border; the rules attribute specifies which sides of the cell borders display the border.
For maximum flexibility, specify borders by using style sheets. Border style attributes in tables are the same as border style attributes around paragraphs: border-width, border-color, and border-style.
To format one side of a border individually, specify the side in your attribute: border-top-width, border-bottom-style, and so on.
You can apply a background color by using the style=“background-color: color” attribute for the whole table or for an individual row or cell. To set the text color (foreground color), use the color attribute.
Padding is the amount of space between the border of the cell and its contents. Set it by using the cellpadding attribute in the <table> tag. For an individual cell, set the padding by using a style, like this: <td style=“padding: 4px”>.
Spacing is the amount of space between the outside of an element and an adjacent element. Set it by using the cellspacing attribute in the <table> tag.
Alignment is the placement of the content within the cell. For vertical alignment, use the valign attribute; for horizontal alignment, use align. To align using a style, use text-align for horizontal or vertical-align for vertical.