
Chapter 15. Incorporating Sound and Video
In this chapter, you will:
Use the <video> tag
Use the <audio> tag
Playing video and audio on the web is a bit more difficult than other web-related tasks. This stems from the multitude of formats that are available from competing vendors and open source groups. These formats have varying degrees of support in the popular modern web browsers; often they have no support at all in older browsers. Together, these factors make it difficult to deliver audio and video that’s consistently playable for all of your visitors.
The addition of the <video> and <audio> tags in HTML5 makes the process of delivering and playing video and audio more straightforward. Playing multimedia will get easier over time as newer browsers support the tags and people upgrade their older browsers. However, for the foreseeable future, it will still be necessary to encode your multimedia files into multiple formats.
Important
Before you can use the practice files provided for this chapter, you need to install them from the book’s companion content page to their default locations. See Code Samples in the beginning of this book for more information.
Understanding Audio and Video in HTML5
Traditionally, developers and designers have most commonly set up pages to play video and audio on the web using Adobe Flash. Sites such as YouTube (http://www.youtube.com) embed video inside of a Flash file. This requires that the end user has the Flash player installed.
The HTML5 specification introduces an alternative to that: a standard tag, <video>, which enables the playing of video content. However, the <video> tag still requires a video file and also requires end users to have an appropriate player installed on their computers.
Prior to HTML 5, the traditional delivery method for audio clips was to use the <object> or <embed> tag to embed a clip on a page. HTML5 provides the <audio> tag to do this instead.
As of this writing, not all browsers support the <audio> and <video> tags. Adding to the complexity is the need to support multiple formats for video, depending on what your visitor’s browser can play.
This chapter shows you how to take advantage of the <audio> and <video> tags and helps to sort out the difficulties surrounding video compatibility.
Before going further you should understand that at the time of this writing support for these two new tags is limited to the following browsers:
Browsers that don’t support these tags ignore them, but if you want to deliver your audio or video to a full range of browsers—new and old—you’ll need to be able to do it without the use of these tags. This chapter shows both the old and new methods.
HTML Multimedia Basics
Before getting into the details of creating multimedia-rich webpages, you should have a basic understanding of how HTML5—and previous versions of HTML—present audio and video clips.
The most common method of placing multimedia content on a webpage is to embed an audio or video clip in the page so that it plays within the page itself when the visitor clicks a button. For this to work, visitors to your site must be using a web browser that supports the type of sound or video file you’re providing or they must download and install a plug-in (a helper program) to add support for that file to their browser. If everyone in your audience uses Internet Explorer version 5.5 or higher, you can use the <object> tag for this; otherwise you should use the <embed> tag. Or, if your audience uses an HTML5-compliant browser, you can use the new <audio> and <video> tags.
As an alternative, you can link to an audio or video clip so that it plays in an external application (such as Microsoft Windows Media Player) when the visitor clicks its hyperlink. For this to work, the visitor must have an external application that supports the type of sound or video file you’re providing, or they must download and install a separate program. This technique works the same in all browsers, though, which is a plus. Use the <a> tag for the link, just like with any other hyperlink. For example:
<a href="mysong.mp3">Playing my song!</a>
This chapter focuses mainly on the embedding type of multimedia presentation.
Multimedia Formats and Containers
When people talk about video files, they’re usually talking about files with an .avi, .mp4, .ogg, .flv, or .mkv extension. These extensions are simply indicators of the container format for the video file itself; they don’t indicate the format in which the video was encoded. When the video includes an audio track, the container file includes both the video and audio components.
Common container formats include Ogg (.ogv), Flash Video (.flv or .f4v), the aforementioned Audio Video Interleave (.avi), MPEG-4 Part 14 (.mp4), Matroska (.mkv), and many others. There is also a new format called WebM, which is an open-source video container format that will likely grow in popularity due in part to its support by Google. WebM is meant to be used exclusively with the VP8 video codec and the Vorbis audio codec (more on codecs in the next section).
Codecs: Decoding the Video and Audio
When a producer (the person or organization making the audio or video available) encodes multimedia, they choose the format in which to encode the file. The person who views that video or listens to the audio must have the appropriate decoding software installed on their computer to play the file. This decoding software is called a codec.
The word codec is shorthand for compressor/decompressor (or coder/decoder, depending on whom you ask). The codec refers to the style in which the video or audio file was encoded or formatted. To decode a video or audio file means that the computer uses an algorithm to decipher the encoded video or audio into a human-consumable form.
Now throw in the web browser. The browser, such as Internet Explorer, either needs to have built-in support for a format or needs to have a plug-in available to recognize that it can play the audio or video file. Luckily, all of the common formats and codecs today are either supported natively or are readily available in some form of plug-in installer for the popular web browsers. As newer browsers that support HTML5 appear, the use of specific third-party plug-ins—at least for video and audio—will (hopefully) become a thing of the past.
Just as there are numerous container formats, there are also several common video encoding formats. Some of the most popular ones include H.264, VP8, DivX, Theora, and several others. If you plan to do much video work on the web, you’ll likely need to account for several different formats and containers to reach the widest possible audience.
As with video, playing audio through a computer or hand-held mobile devices (such as smartphones) requires a codec to read the file and play it back. Two popular formats are MPEG-4 Audio Layer 3, which you might recognize as MP3, and AAC, which is frequently used by Apple. Vorbis is another audio format, frequently used in an Ogg container.
Which Format to Choose?
If all of this sounds complex, it is. Not only is it tough to choose among the multiple formats, but whatever your choice, there’s no guarantee that your visitors will be able to play that format anyway.
So how do you choose which format to use? The answer is that you don’t choose one format; you make the clip available in multiple formats. The tag in your webpage page’s code lists all the alternate versions you are providing and in the order you want the browser to attempt to use them. When the browser renders your page, it selects the first one in that list that it is able to use and ignores the others.
Table 15-1 shows the three most common container file formats, not including Flash. The text in the Container column refers not only to the container type but to the file extension used for the containers.
Container | Browser support | Video Codec | Audio Codec |
Ogg | Firefox, Opera | Theora | Vorbis |
mp4 | Internet Explorer, Safari | H.264 | AAC |
WebM | Firefox 3.5+, Opera | VP80 | Vorbis |
An easy way of converting your video to these three formats is to use a utility such as the open source VLC Media Player (www.videolan.org/vlc/index.html). You can also use your own favorite video format conversion utility, if you have one. Later in this chapter I’ll show you how to use VLC Media Player to convert a clip.
Encoding Video
Now that you have a high-level view of video and audio playback on the web, you might be wondering how you encode your favorite vacation videos into three formats (four if you count Flash). The clips provided for the exercises in this chapter are ready-to-go, but you will need to prepare your own video clips on your own.
Just as playback is complex, so too is encoding. People frequently employ a combination of software to encode and convert videos between formats. Fortunately, there is good free and open-source software for doing so.
In the following exercise, you will use VLC Media Player to encode a video clip in two different container formats, in preparation for making them available on a webpage. If you don’t want to go to the trouble of doing this, it’s okay to skip it; I will provide you with the already-converted files in a later exercise.
In this exercise, you will encode a video clip in .ogv and .webm formats.
Encode a Video Clip with VLC Media Player
Download and install VLC Media Player from www.videolan.org/vlc/index.html. The video clip to use for this exercise is located in the DocumentsMicrosoft PressHTML5 Start Here15MultimediaEncodingVideo folder.
In VLC Media Player, on the Media menu, click Open File. Navigate to the location containing the data file for this exercise (Agility.mod), select it, and then click Open.
The clip starts playing immediately in VLC Media Player. If you don’t want to watch the entire video right now, click the Pause button in the playback controls.
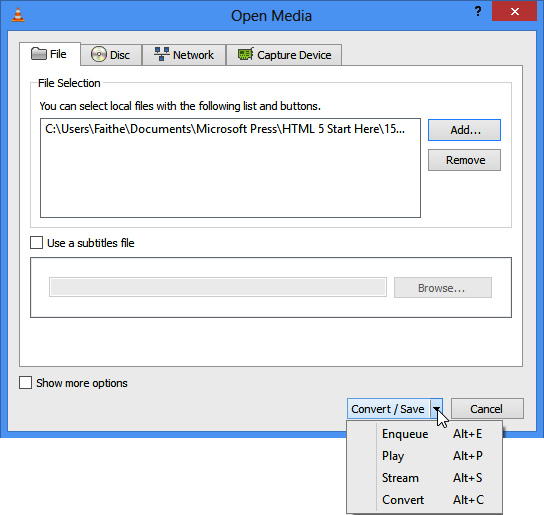
On the Media menu, click Convert/Save. The Open Media dialog box displays.
Click the Add button. The Select One or Multiple Files dialog box displays.
Click Agility.mod and then click Open. That file now displays in the File Selection section of the Open Media dialog box.
Click the down arrow to the right of the Convert/Save button and then click Convert.
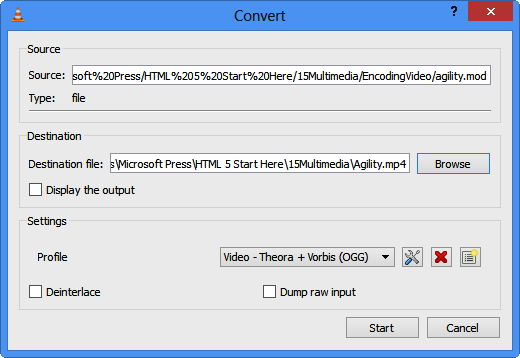
Click the Browse button. The Save File dialog box displays.
Navigate to the folder where you want to save the file (for example, the folder for this exercise’s files). Click in the File name box, type Agility.mp4, and then click Save.
In the Settings section, click the Profile drop-down list and then click Video – Theora + Vorbis (OGG).
Click Start and then wait for the clip to be converted. The progress bar below the preview window shows the progress.
Repeat the process for the following format:
Create Agility.webm using the Video – VP80 + Vorbis (Webm) profile
Embedding Video Clips
Now that you have your video clips in order, you are ready to place them on a webpage. This section shows how to use the <video> tag to place video on a page as well as how to fall back to Flash video if necessary.
Introducing the <video> Tag
At a basic level, the <video> tag looks like this:
<video src="myvideo.mp4"></video>
There are several attributes and different ways to use the <video> tag that make it more configurable for your needs and the needs of your audience. Several attributes are helpful, including:
Not surprisingly, you use the width and height attributes to set the width and the height of the video display area on the page:
<video src="myvideo.mp4" width="320" height="240"></video>
The controls attribute determines whether a default set of playback controls should be visible within the browser. This can be helpful and I recommend using it. In fact, if you don’t use the controls attribute, the visitor has no way to replay the video without reloading the entire page. How annoying! Here’s an example of the controls attribute:
<video src="myvideo.mp4" controls></video>
The preload attribute tells the browser to begin downloading the video immediately when the element is encountered. If the video is the central theme of the page, and it’s likely that all (or most) visitors will want to watch the video, then it’s a good idea to use the preload option. However, if the video element is a small part of the page and visitors aren’t likely to watch it, then preloading the video is just a waste of bandwidth. Here’s the preload attribute in action:
<video src="myvideo.mp4" preload></video>
The loop attribute tells the browser to restart the video immediately when it’s finished playing:
<video src="myvideo.mp4" loop></video>
Finally, the autoplay attribute makes the video automatically play when the page is loaded. For most purposes this is generally a bad idea from a usability and accessibility standpoint. Most users will want control over the video; they’ll play it when their attention is focused and they’re ready to consume the video element. And even with the autoplay attribute enabled, your visitors might have that option disabled in their browsers. For that reason, along with the usability problem, I recommend not using the autoplay attribute with one notable exception: if you don’t include the controls attribute, then you need to include autoplay; otherwise, the video won’t play and visitors will have no way to start it. Here’s an example of the autoplay attribute:
<video src="myvideo.mp4" autoplay></video>
Putting it together, a real-world video element looks like this:
<video src="myvideo.mp4" width="320" height="240" controls></video>
The <video> tag enables more than one source (via the source element) which you can capitalize on by including links to multiple versions of a video. You can also add a type attribute to tell the browser a bit more about the video file to which you’re linking. For example, a <video> tag that includes an .ogg container, an .mp4 container, and a .webm container would look like this:
<video width="320" height="240" controls>
    <source src="myvideo.mp4" type="video/mp4">
    <source src="myvideo.ogg" type="video/ogg">
    <source src="myvideo.webm" type="video/webm">
</video>
With those options you now have Internet Explorer and Safari covered (thanks to the mp4 container); Firefox and Chrome covered (thanks to the Ogg container); and other browsers covered, too (thanks to the WebM container).
The <embed> Tag: Your Fallback Plan
But what happens when someone visits your site with an older browser that doesn’t support HTML5, so it can’t use your <video> tag? Older browsers will simply ignore the <video> tag, so its mere presence won’t cause errors. However, you still need to find a way for those visitors to view the video.
You’ll find that most Internet Explorer users also have Flash installed. With that in mind, you can also include a Flash version of the video on your page. You can include an extra element with the help of the <embed> tag. Flash can play H.264 encoded video with AAC audio; therefore, you don’t need to convert your video to yet another format. You can simply refer it to the existing .mp4 container version of your video. Here’s an example:
<video width="320" height="240" controls>
    <source src="myvideo.mp4" type="video/mp4">
    <source src="myvideo.ogg" type="video/ogg">
    <source src="myvideo.webm" type="video/webm">
<embed src="myvideo.mp4" type="application/x-shockwave-flash" width="320"
height="240" allowscriptaccess="always" allowfullscreen="true">
</video>
Note that you place the <embed> tag within the <video> tag. You do that because if any of the sources that appear before it are able to execute, the browser will ignore the <embed> tag. Only if the <video> tag itself is unrecognized will the <embed> tag take effect.
Place a Video Clip on a Webpage
Now that you’ve got a handle on the theory, it’s time to put it into practice with an exercise.
In the following exercise, you will add a video to an HTML page as an embedded clip with the <video> tag and provide an alternative copy as a downloadable link with the <a> tag. You will also practice embedding the clip with the <embed> tag.
Add a Video Clip to a Webpage
In Notepad and in Internet Explorer, open the blog.htm file located in the DocumentsMicrosoft PressHTML5 Start Here15MultimediaAddingVideo folder.
Modify the <video> tag to specify a width, a height, autoplay, and controls:
<video
width="320" height="240" autoplay controls>On the line below the <video> tag, add the following sources:
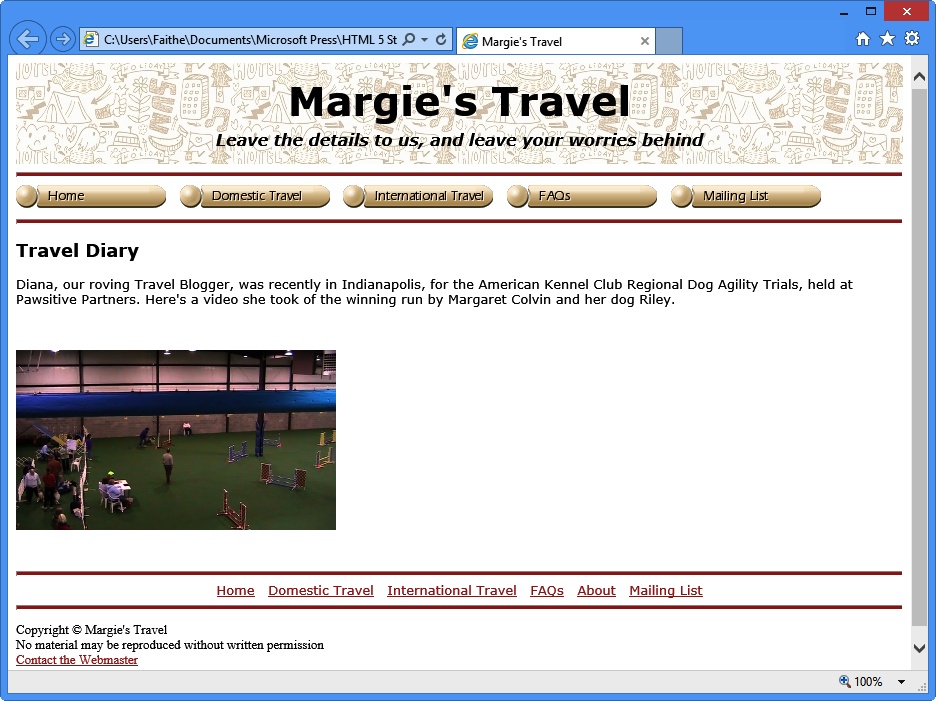
<video width="320" height="240" autoplay controls>
<source src="videosagility.webm"><source src="videosagility.ogv"><source src="videosagility.mp4"></video>Refresh Internet Explorer to view the clip on the page. If you see a warning message that Internet Explorer restricted the content, click Allow Blocked Content to continue. The clip begins playing. Because it is Internet Explorer, it is actually playing the MP4 version of the clip, but you don’t know that; the clip selection is invisible to the user.
Open the page in a different browser.
To do that, you can right-click the blog.htm file, click Open With, and then select the desired browser. Or you can copy the address from the Address bar in Internet Explorer and then paste it into the Address bar in the other browser.
The page loads in the other browser. You might notice some minor differences in the way the page is formatted and the video clip displays. For example, the controls might look different.
Next, we’ll add a Flash version for users who don’t have access to an HTML5-compliant browser.
Return to Notepad. Immediately before the closing </video> tag, add an <embed> tag to play the clip via Flash, along with a note explaining what is required to play the Flash version.
Note
The AVI version provided in the sample files for this chapter has a watermark on it because it was created with a trial version of Aimersoft Video Converter. Despite the watermark, the file still plays just fine for the purposes of this demonstration.
<video width="320" height="240" autoplay controls>
<source src="videos/agility.webm">
<source src="videos/agility.ogv">
<source src="videos/agility.mp4">

<embed src="videos/agility.mp4" type="application/x-shockwave-flash"
width="320" height="240" allowscriptaccess="always" allowfullscreen="true">
<p>Click here to download a high-resolution version of the clip in AVI
format.</p>
</video>
Make the words Click here into a hyperlink that points to the agility.avi file:
<p><
a href="videos/agility.avi">Click here</a> to download a high-resolution version of the clip in AVI format.</p>Save your work in Notepad and then try out the file in several different browsers.
Close Notepad and Internet Explorer.
Note
The Flash version won’t run unless the browser doesn’t support the <video> tag. If you don’t have such a browser and you want to see what the Flash version is like, rename blog.htm to some other name and then delete the <video> and <source> tags from the file, leaving only the <embed> tag. Then view the page in various browsers to see how they implement Flash. A drawback to the Flash version is that it lacks user controls.
Incorporating Audio on a Webpage
The good news is that by working your way through the video information in this chapter, you’ve already learned nearly all the background that you need to play audio on a webpage. The bad news is that the same format and encoding problems that plague video on the web also apply to audio, except that the audio problems are a bit worse. This section examines the <audio> tag and its alternatives.
Playing Audio with the <audio> Tag
You might be thinking that playing audio on a webpage would be easier than video, but for the most part, it’s not. You still need to provide for different browsers and encode your audio into different formats. In addition, for the most part, your visitors will still need special plug-ins to play audio. With that said, the <audio> tag is new to HTML5 and, assuming that the browser manufacturers can come to some type of agreement, playing audio on the web should become easier a few years in the future.
Like the <video> tag, the <audio> tag supports multiple sources. With no common format, you’ll need to encode the audio multiple times to try to get the audio out to the widest possible audience. Also like the <video> tag, the <audio> tag supports attributes such as controls, autoplay, loop, and preload. Therefore, the syntax for the <audio> tag is essentially the same as the syntax for the <video> tag.
Tip
There are numerous applications that convert audio between formats. As with the video conversions, I used VLC to do most of the audio conversion to create the sample files for this chapter. VLC is available at http://www.videolan.org/vlc/.
If you provide MP3 support and Ogg Vorbis support for audio files on a page, you’ll hit most of the browsers that people viewing your page are likely to be using. You’ll find support for at least one of these two formats in Firefox, Chrome, Safari, Opera, and Internet Explorer. Again, as with video, you should also embed your audio stream into a Flash object so older versions of Internet Explorer can use it, and you might also choose to provide a downloadable copy as a last resort, like we did with the .avi file in the previous exercise.
Here’s an example that shows the <audio> tag with two files, which are called with the help of the <source> element that you saw earlier in the video section of this chapter:
<audio controls>
    <source src="myaudio.mp3"></source>
    <source src="myaudio.ogg"></source>
</audio>
Playing Audio in Older Browsers
As with video, playing audio in older browsers requires the <embed> tag. When used with audio, you’ll typically use two attributes, src and autostart; src configures the source of the audio and autostart controls whether the audio clip should play automatically upon page load. Adding the <embed> tag to the previous example results in this HTML:
<audio controls>
<source src="myaudio.mp3">
<source src="myaudio.ogg">
<embed src="myaudio.mp3">
</audio>
By default, content included with <embed> will be automatically played. If you don’t want this, then add the autostart=“false” attribute tag, like so:
<embed src="myaudio.mp3" autostart="false">
Note
Even when using <embed> to include audio, the visitor must still have software capable of playing the type of file being provided.
One other attribute commonly used with <embed> is the loop attribute. The loop attribute, when set to true or infinite, restarts the audio clip when it completes. It can also be set to false to indicate that the audio clip should play only once. However, the default is to play the audio clip only once; therefore, omitting the loop attribute is the same as setting it to false.
Now you get to practice placing an audio clip. In the following exercise, you’ll add an audio file to an HTML5 page.
Add an Audio Clip to a Webpage
In Notepad and in Internet Explorer, open the index.htm file located in the DocumentsMicrosoft PressHTML5 Start Here15MultimediaAddingAudio folder.
Immediately above the <div id=“bottomnav”> tag, add the tags for the audio clip:
<audio autoplay><source src="audio/margie.mp3"><source src="audio/margie.ogg"></audio>Before the closing </audio> tag, add an <embed> tag that will play the clip in a non–HTML5-compliant browser:
<audio autoplay> <source src="audio/margie.mp3"> <source src="audio/margie.ogg">
<embed src="audio/margie.mp3"></audio>Open Internet Explorer 9 or later and then view the page.
The audio should start playing automatically. You might need to click Allow Blocked Content if Internet Explorer prevents the audio from playing automatically.
Close Notepad and Internet Explorer.
Key Points
Incorporating sound and video is accomplished by providing video and audio files in multiple formats to ensure that your visitors can view the multimedia no matter what browser they’re using.
It’s important to understand the different containers and codecs available for video and audio and how those are supported across your visitor’s browsers.
HTML5 introduces the <video> and <audio> tags, which enable multimedia to be included in webpages.
Older browsers don’t support the <audio> and <video> tags, so it’s important to provide video in legacy formats such as Flash to enable visitors who use these browser to view the content as well.
Use <embed> to include audio and video content in a format that non-HTML5-compliant browsers can interpret.