

Love at First Sight by Shon E. Richards
Many editing packages come with a range of presets that allow you to transform your images so that they resemble something from outer space rather than planet earth. This chapter will look at what presets are available to you, as well as show you how to write your own.
Filters & Presets
The idea that you can press a button and apply a transformative filter to your images isn’t something that has sprung fully formed from the minds of app developers or was even originally aimed specifically at smartphone photography. Open up Photoshop and you will find a dizzying array of filters that can pixelate your image in seven different styles, add 14 different fashions of blur, watercolorize it, spherize it, or texturize it—and that’s just to start. Photoshop’s alternatives also have their own catalogs of filters, and just like standalone filter apps for your phone, you can purchase filter apps for your desktop, too.
Plastic Wrap


You could decide to cover your entire image with plastic using the Plastic Wrap filter (Filter > Filter Gallery > Artistic > Plastic Wrap), but by using the Magnetic Lasso to isolate the bird, I was able to apply the filter effect to the bird alone.
Furthermore, you can also make your life easier by using Presets and Actions, which are preprogrammed settings or series of actions that you can apply to your tools or images.
What you can achieve at the touch of a button is quite spectacular, especially if you have the vision to combine these preinstalled effects with your own edits.
Presets: Presets have thus far been mentioned briefly in connection with other software tools; they are basically ready-programmed settings for various tools. We previously saw how Photoshop has a vast selection of brush presets, and we touched on the idea that you can write your own if there are particular settings you find yourself using regularly, or import those written by other people. However, presets don’t just apply to brushes or Fill Layers.
Filters: Filters make for a quick and easy way of transforming your images, but just as with the methods that we explored earlier in the book, they don’t have to be used in isolation from your other editing tools and techniques. Using any filter as a part of your surreal-imaging armory will enormously expand the possibilities. Part of the fun of creating surreal images is exploring the options for yourself, but here are a few of my favorite filters to get you started!

PRESET MANAGER: If you head to the Presets Manager (Edit > Presets > Presets Manager), you can select a preset from the drop-down menu for any of the following tools: Brushes, Swatches, Gradients, Styles, Patterns, Contours, Custom Shapes, and Tools.

PRESETS: To each of these, you can add thousands of other built-in selections or load an imported selection. Presets are just another thing that Photoshop allows you a vast degree of control of in your image editing.
Frosted Glass

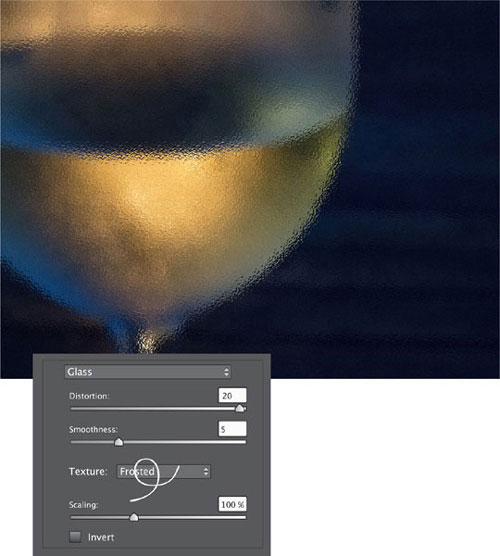
My condensation-covered wine glass takes on a different look when a Frosted Glass filter is applied over it. You can find the glass effects under Filter > Filter Gallery > Distort > Glass.
There’s another drop-down box in the Glass menu that allows you to select from Blocks, Canvas, Frosted, or Tiny lens, and the Distortion, Smoothness, and Scaling sliders allow you control over the final impact of the effect.
Twirl

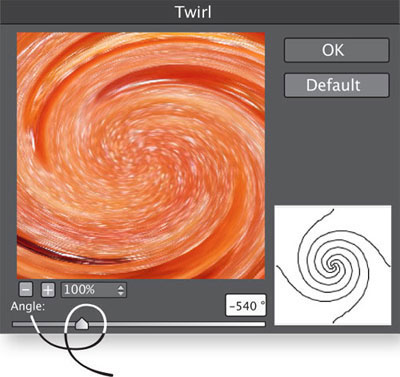

By using the Magnetic Lasso to select the tomatoes and then applying the Twirl filter (Filter > Distort > Twirl), I’ve been able to transform my standard fried breakfast into something slightly more unusual. The angle slider at the bottom of the dialog box enables you to decide how tightly you wish the twirl to turn, and in which direction.
Solarize


The Solarize filter gives your images a peculiar lighting effect. You can find it under Filter > Stylize > Solarize. Unlike many of Photoshop’s other filters, there is no control over its strength or impact. You hit the button and wait to see exactly how it will render your image!
Texture: There is a selection of different textures that you can apply to your images straight from the Filter Gallery: Filter > Filter Gallery > Texture, and then choose from Craquelure, Grain, Mosaic Tiles, Patchwork, Stained Glass, and Texturizer. Within the Texturizer option you can select from Brick, Burlap Sacking, Canvas, and Sandstone textures.

Each of the texture choices has a finer degree of control that you can exert; for example, the Craquelure option allows you to control the size of the space between the cracks, how deep the cracks run, and how bright they are.
However, if these options don’t provide you with the texture that you want, some filter options allow you to import your own texture from a PSD file. When you’ve selected your filter, choose Load Texture from the dialog box and then load your texture of choice.
In my example, I’ve made it appear as if a bottle of water is backed on canvas.


I’ve kept the Scaling, which controls the size of the canvas weave, as small as possible and the Relief, which determines how thick the fibres of the canvas would be, relatively subtle. The more that you increase the Relief, the more obscured the original image becomes. If I wanted to I could ramp up both of those values and make it look unrealistic.

It is of course perfectly possible to apply a texture to just a selection of an image. Here, I’ve isolated the water bottle and overlaid it with the Craquelure effect.

Furthermore, because I have applied the filter in a separate layer, I am able to control how the Filter layer blends with the original layer. This is what it looks like at 50% Opacity.
Blur: There is a catalog of different blur options sitting in Photoshop’s Filter menu. You can help to bring a sense of movement to an image with the Motion Blur filter, soften and lighten highlights, darken and sharpen shadows with a Gaussian Blur, give the illusion of making a depression in something soft, create ripples in a pond with Radial Blur, or miniaturize an image with the Tilt-Shift blur filter.

Miniaturizing images with the Tilt-Shift blur filter usually works best when a scene has been shot from above: street scenes, valleys, and sports stadiums are favorites. Here, I’ve manipulated a photo of some chalk pavement art along with the boxes of chalk.

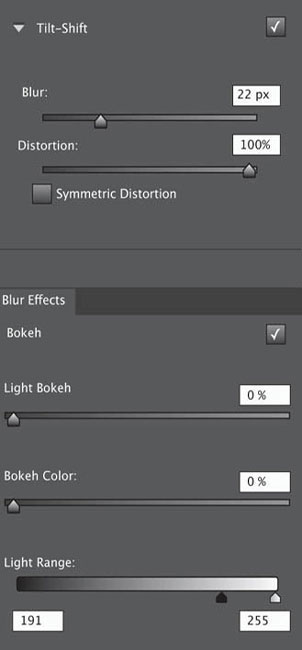
The mechanism for adding a tilt-shift effect is similar to that of a graduated filter. There is the focus band, two bands on either side of that which are slightly out of focus, and the external stripes of blur. The bands of focus don’t have to run parallel to the horizontal frames of the image; you can pivot them at will, as well as alter their position in the image. In this instance, they’re running diagonally from the upper left corner to the lower right corner. The width of the bands can also be adjusted to determine how much is in focus and how much is blurred.

Use the Blur slider to control how blurry the blurred areas are, and the Distortion slider to choose the shape of the blur. If you push the distortion value to +100, it will give you linear blur; -100 creates a radially blurred effect.
To give the image its finishing touches, I over-brightened it, upped the contrast, and over-saturated the colors. It all adds to the feel of unreality in the image.
Actions
In addition to filters, Photoshop also has Actions. At their simplest, Actions are shortcuts for editing processes that you undertake regularly. Photoshop comes with some Actions already installed, but you can also write your own and download those written by other people, either for free or for a small fee, to apply to your photos. If you find that you always perform a particular series of edits to every photo, for example increasing the contrast by 20% and the saturation by 5%, you might want to write an Action that will apply those particular changes to your photos with one click.
Actions are stored in the Actions panel (Window > Actions), and can also be accessed by pressing the arrow button beside the Histogram/Navigator panel. To apply an Action, select the one you want from the list and click the “Play” button at the bottom of the panel. That’s it—your image should be sepia-toned, or have a vignette, or feature a wooden picture-frame effect.
The benefit of the Action tool is that it allows you to record a more complicated series of edits, too. Rather than having to individually render a cross-processed effect on every photo, once you’ve found a cross-processed look that works for you, you can write and record it as an Action, and apply it whenever you want with one click.


To record your own Action, open the Actions panel (Window > Actions) and press the Create New Action button. It’s at the bottom of the panel that resembles a turning page.
Name your Action, and then press the Record button.

Proceed to edit your image to create the effect you want. When you’re finished, hit the Stop button on the Actions panel.
Now you’ll have your very own action, ready to apply whenever you want it.
My cross-processing effect is slightly more subtle than Photoshop’s, with gentler Curves and an altered overall contrast. I created it by adding a new layer and adjusting the image’s Tonal Curves, moving the individual red, green, and blue channels as well as the RGB channel until I achieved the effect that I wanted.
In this case I reshaped the blue curve into an inverted “S” shape, pulling down the highlights and increasing the shadows. Both the red and green channels were reshaped into “S” curves, the red one steeper than the green. Finally, I tweaked the overall Contrast Curve by pushing up the highlights and pulling down the shadows. This wasn’t an effect that just worked with the first few adjustments that I made. It was a case of trial and error, sometimes making bold alterations and at other times small adjustments, until I was satisfied with the look.
TONAL CURVES
For more on Tonal Curves see page 51.
You might not like either cross-processing effect, but it always helps to have options that give you the chance to experiment and create your own.

The Original Image

My Cross-processing

Photoshop’s Cross-processing