

Cashmere by Amy Weber
There are thousands of camera apps available for smartphones in Apple’s App Store and on Google Play. Every day, new apps are being developed and released for sale, older ones are updated, and unpopular or obsolete ones are withdrawn from the market. But the principle remains the same: they can enable you to do some tremendous things with your casually snapped photos. Likewise, just about any compact camera that has hit the shops in the past 12 months has a vast of array of filters built into it that can be used to give a photo a surreal edge.
This chapter will look at what tools are on offer, what you can do with them to make your photos look amazing, and provides tips on how to create some deliberately surreal photography using the kit you build yourself.
Choosing & using apps
WHAT TO BUY?
There has been a veritable explosion of photography apps on the market since the social media revolution. Instagram went from zero to 1,000,000 subscribers within three months, and within 18 months of its release, its founders sold it to Facebook for $1 billion. Apps and photography are big business.
With literally thousands of programs available for download, ranging from the truly terrible to the must-have, how do you know which ones to spend your money on and which ones to avoid in your attempt to find the perfect program? Well, to start with you should try to keep it simple.

ScratchCam FX

PhotoGoo

TouchRetouch

FocalLab

Filterstorm
PicBoost
App-mania
There’s an app for absolutely every photo-effect you could ever want, so the only thing you’re limited by is your imagination!
TRY IT FREE
Quite a few of the paid apps offer a scaled-down free version, too. If you’re not sure if a particular app is the one for you, see if there’s a free version to test out first.

Snapspeed

Juxtapose

CutoutCam

Camera360

FX Photo Studio

PicSay Pro

WaterMyPhoto

PhotoWaterReflection

Pixlr-o-matic

Photoshop Express
ESSENTIAL EDITING
It’s tempting to launch into creating fabulous surreal images using your cellphone and a selection of specialized apps, but before you embark on the process of compositing, adding filters, and experimenting with different effects, you need to be able to perform the essential functions—cropping, straightening, rotating, sharpening, and adjusting the brightness, contrast, and white balance of your images. Plenty more adjustments might be made along the way, but your surreal image is only going to be as good as the original image or images comprising it, so it pays to get the simple stuff right.
My favorite apps for mobile editing are Snapseed and Photoshop Express (both are iOS and Android-capable). Both allow you to take photos in-app or import from your camera’s library, both have intuitive, easy-to-use interfaces, and both also have a selection of effects filters. There is very little difference between the two, but if I had to choose, I’d likely opt for Snapseed. However, it should be noted that this is based on personal preference rather than objective judgment. The good news is that both apps are free. You can download them both, try them out, and then decide on your favorite.
Juxtaposer is one of my favorite apps for creating surreal images. Put simply, it lets you stick pieces from one photo on top of another to create a montage. You start by importing a base image and then layering a second photograph over it. Next, you use your fingers to resize, rotate, and erase any unwanted elements from the upper layer to reveal the base image and create a composite.
Using your fingers on a touchscreen to erase parts of an image with any degree of precision can be quite tricky and more than a little frustrating, but luckily, Juxtaposer allows you to zoom in and adjust the size and feather on the erase brush, which helps significantly. Practice will be needed to get it right, though.
When you’ve completed your first two layers, you can export your creation to your Camera Roll, email it to yourself or someone else, or upload it to Flickr, Twitter, or Facebook. If you get interrupted and don’t manage to finish it in one sitting, you can save it and resume editing later. Or if you think that it needs more, you can import a third layer and carry on.
As Juxtaposer is an iOS-only app, Android users might be wondering what their options are here. I would suggest trying CutoutCam Pro. Rather than layering one image on top of another and erasing the upper layer’s superfluous data, you cut a hole in the base image and insert a second image into it. You achieve the same effect, but via a slightly different means. PicSay Pro is also a highly regarded app that gives you an extensive selection of effects, including the ability to cut out parts of one photo and insert them into another.

Snapspeed
Snapseed provides you with a great deal of control over your images, and is very easy to use.

Photoshop Express
Adobe offers a free editing app, Photoshop Express. It’s also easy to use and has impressive functionality.

Juxtaposer
The lower layer is a mojito, and the upper layer, which is having the extraneous data erased, is the same rambutan as appears in the Snapseed screenshot. The idea here was to turn the inside of a slice of lime, sitting on the side of the glass, into a swirling rambutan.
Being able to distort an image, or a section of an image, is probably one of your most valuable options when creating a surreal composition. Swirls, blurs, and reflections are all useful things to have in your surreal compositing kit.
I’ve struggled to find an app that will allow you to selectively apply a swirl effect to an image. It’s a case of cropping precisely what you want to make swirly, and then integrating it into the final image. Photoshop Express has a swirl effect, called “twirl,” hiding away among the distort features under the Effects tab. However, the distort features, which include Blur and Pixelate, aren’t part of the free package and you will need to purchase an upgrade. But Photoshop Express does have the advantage of allowing you to perform your basic edits and also apply various effects within the same application, and you can also choose if your image should spiral clockwise or counter-clockwise.
If you’d rather try a free swirl option, Picture Effect Magic and Camera Fun Free are available for iOS and Android respectively. Picture Effect Magic comes with both advantages and disadvantages: it creates the tightest spiral, but only in one direction, and I’ve had issues with its stability.
Paid-for swirling apps include iPhotoSwirl for iOS and Camera Fun Pro for Android. PicSay Pro, mentioned earlier in the merging and compositing section, also has a distortion feature.
If iPhotoSwirl allowed you to crop in-app, rather than before you imported your image, it would augment the Blur, Hue, Contrast, and Brightness tools—not to mention the filters and borders—that are already available. As it is, you have to cut down your image in another app first.
There’s no stand-out swirl application for me; it’s a case of finding the one that suits your needs the most, depending on your aesthetics and frequency of use.
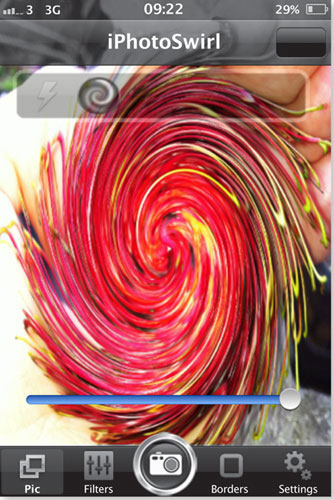
iPhotoSwirl
There’s that rambutan again, now with a deep swirl thanks to iPhotoSwirl.

Camera360
Each of these effect menus has another layer of options beneath it, giving you a vast range of toys to play with on your photos!
To introduce symmetry into your images, Camera360, which operates on both Android and iOS platforms, is the application to try. Camera360 offers a vast number of editing options, but if you head into the “Funny” effects menu, you can select from a horizontal mirror that can be angled either up or down, or a vertical mirror that can reflect either side of your image. There’s also an Opacity slider that controls the strength of the reflection or the reflected image.
It is definitely worth exploring Camera360 for all of the editing functionality it offers, which includes blur effects, a range of hand-drawn filters, and an 1839 look. Don’t just use it for mirroring effects!
There are two apps, one for Android and the other for iOS, that have been receiving rave reviews and are worth installing: Photo Water Reflection and Water My Photo. Both of them add a watery reflection to your photos, which could be the perfect finishing effect for a surreal image.

FX Photo Studio
There are quite literally hundreds of filters for your images in FX Photo Studio, and most of them can be independently adjusted. Not only that, but you can layer filter over filter. The possibilities are almost endless.
Most of these filters can be fine-tuned to some degree, too. You can dictate the “amount,” or strength, of a filter, and the effect, contrast, blur, and brightness can all be controlled, too. I find that the range of options can be almost bewildering, but you can earmark your favorite effects and also create your own presets that combine two or more filters.
FILTERS
While applying a filter might be a quick way to add a sweeping sense of the surreal to an image, filters take on a different complexity when you use them in conjunction with other apps. Washing a color filter over my surreal creation is usually the final step in the process. I sometimes opt for something that is vivid and confronting, other times I use a more whimsical and dreamlike effect. If I can’t choose, I can apply one of each and save two different images.
Many people I know swear by FX Photo Studio filters. The range is astonishing, with over 100 different effects for your images, from toy camera to vintage, through the use of the use of the glow and grunge filters. These filters can be layered until you run out of space, making for a huge number of possibilities.
Pixlr-o-matic is a less overwhelming filter gallery, but still has plenty of options and is available for free on both Android and iOS phones. It comes with 25 preinstalled film effects and 30 lighting styles. There are various frames, too, and if these options prove insufficient, you can purchase even more filters. It’s my filter app of choice because it provides me with enough variety, but is also manageable.

Pixlr-o-matic
The filter choices run on a filmstrip at the bottom of the screen; Pixlr-o-matic is easy to use and has enough choice without being too much.
Getting some app-spiration
So, what can you achieve with a few apps and a little time? Here are some examples of effects I came up with using various apps.


ALIEN ORCHID
A lighting effect applied in Snapseed and a film effect from Pixlr-o-matic gives this orchid an almost alien appearance.


CACT-I
A cactus in my aunt’s garden, my eye, a little merging with Juxtaposer, and a filter from Pixlr-o-matic gives you a creepy looking plant. Juxtaposer was used to combine both the cactus and the eye; then Pixlr-o-matic was used on the merged image.


KETTLE
Some merging, a little graduated blurring, and some brightening with Juxtaposer and Snapseed ends with a genie emerging from a boiling kettle. Juxtaposer was used to merge the two base images; Snapseed was used on the final image to produce the final effect.
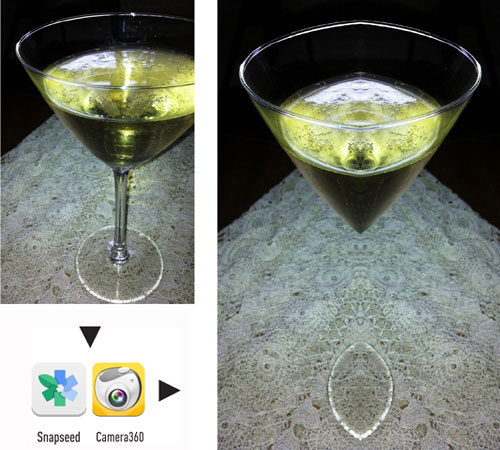
COCKTAIL
Shooting this glass just off-center then using Snapseed for a few quick tweaks combined with the left mirror in Camera360 creates a magical floating cocktail.

TOY VEHICLES
Even indoors these toy cars aren’t safe from the rain with a bit of help from Water My Photo.
Quick & dirty with compact-camera filters
Nearly any compact camera that comes to the market now—and quite a few interchangeable lens models, too—wouldn’t be complete without an array of special effects filters that can miniaturize, posterize, or do pretty much anything to your images in-camera. The exact range of special effects will vary from camera to camera, but among them you will usually find a fisheye, miniature, vintage, and toy-camera filter.
It’s also worth remembering that the method of application of these filters varies across cameras. Some cameras will expect you to select your filter while you are shooting your images—adding it later isn’t an option. Other cameras will enable you to apply the effect of your choice once you have your shot; you might even be able to layer several filters to achieve the result that you want.
Depending on your photo’s subject, how you photograph it, and the filter or filters that you apply, you might find yourself exploring the deeper recesses of your imagination.

Six Feet Under?
Using the Reflection Magic Filter effect on the Olympus SH-25MR has put a different spin on this photograph of a graveyard. Shoot Stats: Olympus SH-25MR on Reflection Magic Filter setting.

The Gherkin Through a Fisheye
This photograph of 30 St. Mary Axe (formerly the Swiss Re Building) in London was taken using an Olympus SH-25MR with the Fisheye Magic Filter effect. A beautifully oval building fondly known as “the Gherkin” has become almost spherical.
Shoot Stats: Olympus SH-25MR on Reflection Magic Filter setting.
Applying a filter in-camera and in isolation might not be sufficient to transform your photo into the surreal creation of your dreams, but it could be a start.
Cross-processing
While digital might be the format of choice for most photographers now, from professionals to people snapping pictures on their cameraphones, film hasn’t been entirely shunned and forgotten. That’s good, because a little bit of creative photography combined with a touch of technical know-how and a smattering of chemistry gives you the opportunity to produce super surreal images. Go out with an analog camera, shoot what you like, and then have the film cross-processed. Tah-daa!
The idea behind cross-processing is pretty simple. Developing film requires chemicals. Depending on the type of film that you use, different combination of chemicals is required to process it. If you were to use color negative film—the type that leaves you with a negative—it would be processed with C-41 chemicals. Color slide, or reversal, film on the other hand (the type of film that produces slides you’d watch on a wall with a projector) needs E-6.
Unsurprisingly, if you were to cross-process your films you would switch the chemicals used to develop them. Color negative film would be given the E-6 treatment while color slide film would be developed using C-41.
The results? Images shot on color negative film, but processed with slide film chemicals will take on a muted, low-contrast appearance. Develop slide film with color negative chemicals and the results will be much more contrasty, with saturated colors and interesting casts. In short, you can achieve some fabulously surreal-looking photographs, for example skies can turn pink and pavements can show up green, by shooting everyday subjects and experimenting with their development.
If you’d like to push your analog surrealism a little bit further when cross-processing, you can also under- or overexpose and then compensate for it, too. You could deliberately underexpose all of your images on one roll of film and then ask for it to be “pushed”—or over-developed—by a stop or two when it is cross-processed. This will give you higher contrast images as well as unusual color casts and saturation from the cross-processing.
Should you do the reverse, overexpose in-camera and have the film “pulled” by one or two stops in development, you’ll have images that are lower contrast.
Film shot on any type of analog camera can be cross-processed for a slightly surreal effect, but it’s the so-called toy cameras that can really add an extra special splash of other-worldliness to their images. The photographs taken with toy cameras tend to have light leaks and color bleeds, so if you add some cross-processing color oddity, you’ll easily achieve a fantastical result.
Any decent photo lab will know exactly what you mean if you ask to have your films cross-processed and the development pushed or pulled by a couple of stops. All you need to do is get your hands on an analog camera, a selection of different films, and get snapping!

My Niece
It isn’t especially surreal, but this image does give an idea of the effects you can achieve by using a toy camera and treating your images to a cross-processing makeover. Shoot stats: Holga camera with Fujifilm Fujicolor Pro 400H film.

Dolly
The acid colors and the effect of some light leakage from the camera give this photograph of an abandoned doll a slightly unreal look.
Multiple exposures
Multiple exposures have been around since the dawn of photography. The theory is simple: the same frame of film is exposed to light twice or more to create a merged image of the same scene with different features or two completely different scenes. Naturally the practice isn’t quite that simple, but it isn’t that difficult, either.
The general rule for a double exposure is to underexpose both images by 1 stop. If you are trying a quadruple exposure, it’s an exposure compensation of -2 stops, and -3 stops for eight exposures. This all assumes the light levels between each shot are fairly similar. Don’t forget that you don’t have to alter the aperture in order to achieve the correct exposure; adjusting your shutter speed will also do the job.
If your multiply exposed image is of the same scene with, for example, the same person appearing in it in several different positions, then you will need a tripod to achieve this. It might help to remotely release the shutter, too, as the remote release helps to prevent miniscule movements of the camera that can ruin the multiple-exposure effect.
Multiple exposures do not have to be of the same scene. You can use the technique to superimpose people into positions in incongruous places, to create interesting lighting effects in your shots, and to experiment with different colored gels over your flash or filters over your lens. Also try rotating your camera to achieve monstrous or ghostly portraits, leaning buildings, or uncanny landscapes. Think of multiple exposures as the editing-suite-free version of image compositing!
Some analog cameras have a specific multiple-exposure function that allow you to expose the same frame of film several times. However, you can rewind film in cameras that have manual winding mechanisms, enabling you to expose a frame a second (or third or fourth …) time. As every model of camera operates differently, there’s no definitive guide to rewinding your film by one frame; you’ll have to either read the manual or experiment!

My Holga
My Holga was ridiculously cheap, and is a lot of fun to use. Creating multiple exposures with it is so easy that you can sometimes do it by mistake if you forget to wind on the film! However, it takes 120 film which isn’t widely processed, so to get my images exposed I have to use a mail-order service.

Multiple Mom
My mother often comments that she needs to be able to split herself in two; I think I’ve accomplished that here. Shoot stats: Holga camera, double exposure on Ilford Delta 400 film.
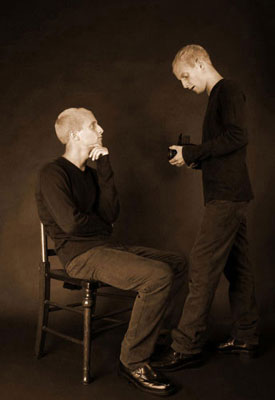
Multiple-exposure Portrait
Portraits incorporating multiple versions of the subject can be anything from great fun to downright eerie. Shoot stats: Canon EOS 60D with a Sigma EX 17–35mm ƒ/2.8–4.0 lens at 17mm; ƒ/11 with a shutter speed of 1/180 second and ISO 100.
Image © Haje Jan Kamps.
DOING IT DIGITALLY
The appeal of multiple exposures has prompted several camera manufacturers to include a multiple-exposure function in their cameras. They even come with “auto gain” to help you get your exposure correct. However, if your digital camera isn’t multiple-exposure-capable, all is not lost—two of Surreal Photography’s contributors explore this topic in Chapter 7: A Surreal Gallery. On Pages 116–121 and pages 178–181 Jess Rigley and Miss Aniela respectively discuss how they digitally manipulate their images to create a multiple-exposure effect.