

Floating On By by Daniela Bowker
The creation of a surreal image does not necessarily have to begin and end in an editing suite. Physical photographic techniques can be just as effective in producing an otherworldly, dreamlike image as hours spent in Photoshop. In this chapter we’ll explore how you can use different lenses, filters, and exposure times—individually and in combination—to achieve a range of fascinating effects.
Lenses
There are two particular lenses that you might wish to utilize for surreal image-taking due to the great distortions they give: the fisheye and the tilt-shift.
FISHEYE
Fisheye lenses are non-rectilinear, ultra wide-angle lenses. They were originally developed for meteorological usage to study cloud formations, as their extreme angle of view—in some cases up to 180 degrees—was able to take in the whole sky. In order to capture such a wide angle of view, they distort their images significantly. It’s this distortion that makes them a valuable addition to the surreal photographer’s toolkit.
Anything towards the center of a fisheye photo will appear magnified, while the entire image will curve as it reaches the edges of the frame. In some cases, the image itself will end up being circular. By taking a portrait with a fisheye lens, you can give your subject a comically large eye, or make her or his nose monstrous, whereas a landscape shot with a fisheye might have a curved horizon or bent trees.
There are two predominant types of fisheye lenses: circular and full-frame. A circular lens will, unsurprisingly, create an image that’s circular in the frame with entirely dark corners. A full-frame fisheye lens covers the entire frame, so it doesn’t produce blackened corners.
By combining the line-bending and foreshortening effects of a fisheye lens, you have the opportunity to create beautiful surreal images, or something that is comically distorted and not entirely realistic.

Lloyds of London
This photograph shows two well known buildings in London, Lloyds of London on the left and the Willis insurance building to the right. While I’ve kept the colors looking natural here, experimenting with them could make this photograph even more surreal. Shoot stats: Canon EOS Rebel XSi with Canon EF 8–15mm ƒ/4.0 L fisheye USM lens at 8mm; ƒ/5.6 with a shutter speed of 1/640 second and ISO 200.

A London Fisheye Snow Globe
This cityscape was taken from the Monument to the Great Fire of London. Shooting through the security mesh with a fisheye lens gives the impression that the city has been encapsulated in a snow globe. I’ve enhanced that illusion by boosting the color saturation and adding a white vignette.
Shoot stats: Canon EOS Rebel XSi with Canon EF 8–15mm ƒ/4.0 L fisheye USM lens at 8mm; ƒ/4.0 with a shutter speed of 1/2000 second and ISO 200.
Lenses are the second most important factor behind good photography, after photographers themselves. What you can achieve with a different lens, or the impact of a good one on a photograph, is remarkable.

TILT-SHIFT
It isn’t just the fisheye lens that can be used to capture surreal photographs by slightly distorting our view. Tilt-shift lenses are a fabulous means of allowing you to simulate miniaturized scenes. You can photograph a stadium and make the players on the field look like dolls, while a busy intersection photographed with a tilt-shift lens can make cars and people appear tiny. The parasols in beach scenes can resemble the paper umbrellas you get in cocktails, and an Alpine village photographed from above with a tilt-shift lens might not look like anything other than a model.
Buying a tilt-shift lens is an expensive undertaking, but there are cheaper alternatives. You might want to start by renting or borrowing a lens to see how you feel about it. If you decide that you love tilt-shifting, but that between $1,000 and $1,500 for a lens is a bit too much to spend, take a look at Lensbaby’s range for some more affordable options.
If you want to get a bit more technical, tilt-shift lenses work by adjusting the plane of focus in relation to the image sensor. With a “normal” lens, the plane of focus (where all the light rays converge, and the image is sharp) in an image runs parallel to the sensor.
The “tilt” part of a tilt-shift lens rotates the angle of the focal plane relative to the sensor; not only is the plane of focus then at an angle, but it also becomes a wedge shape. It means that you can get objects in both the foreground and background of a scene in sharp focus at relatively wider apertures—which is its common use in landscape photography. In surreal photography, however, it can be tilted in the opposite direction, resulting in everything on either side of the wedge that’s in focus being blurred. The result mimicks the extremely shallow depth of field that is usually found only in macro photography; and so when viewing such a scene, the human visual system interprets the results as a miniaturized scene.
Long exposures
LONG EXPOSURES
Long exposures are often associated with evocative images of cities at night and streets illuminated by the lights of passing cars, but in fact they aren’t as restrictive as you might think.
There are two vital factors to effective long-exposure images: patience, and a good tripod. If you don’t already own a tripod, I’d advise you to invest in one, whether or not you intend to work with extended shutter speeds. They are invaluable for all kinds of studio work as well as portraiture, time lapses, any kind of photography when you don’t want to be near the camera (wildlife photography for example), and if you don’t want the camera to move, whether for one shot or between multiple shots.
When it comes to long exposures, tripods are vital for ensuring that you have a crisp and blur-free image by maintaining the camera’s stability for the duration that the shutter is open. The length of time that you can keep a camera steady while hand-holding it is a lot shorter than you think.
Go on—indulge me for a moment. Get out your camera and take a series of images, starting with a shutter speed of one hundredth of a second. Gradually lengthen the exposure time. At which point do your images start to go slightly fuzzy around the edges?
As for patience, it isn’t just about those few seconds while your camera’s shutter is open and you’re standing there feeling slightly redundant. Setting up a long exposure shot can take time, from finding your location to erecting your tripod. Then you will need to experiment with the settings on your camera to ensure that you get the perfect exposure.
Patience also means being prepared to wait while the perfect shot comes along. London Town Meets Tron, shown opposite, was the product of a very cold evening spent on an overpass in East London. There were plenty of other good shots from that night’s shooting, but I was specifically listening for any emergency vehicle sirens to capture the effect of their flashing lights.
Long exposures are not limited to low-light situations, either—they are also a valuable means of capturing motion in an image. A motion-blurred photograph might not in itself constitute a surreal image, but the effect can certainly contribute to an overall surreal composition. Remember—many of the techniques explored in this book can be used in conjunction with each other to help you realize your creative vision; you don’t need to limit yourself to just using one thing or another.
BEWARE OF OVEREXPOSURE
You might need to use a much smaller aperture than you would have anticipated (even for night shooting) when working with long exposures. A slow shutter speed can let in far more light than you might think, leading to an overexposed image if the aperture is too large.

This image was shot on an overpass in East London late one evening. The exposure lasted 30 seconds, which ensured that I captured the blue lights of the emergency vehicle from the bottom of the frame to the top. I was only able to prevent the image from being overexposed and revealing too much of the environment (rather than just the lights in motion) by using an aperture of ƒ/32.
Shoot stats: Canon EOS Rebel XSi with Sigma 70–200mm ƒ/2.8 lens at 97mm; ƒ/32 with a shutter speed of 30 seconds and ISO 100.
A long exposure will allow you to capture everything that is there in front of your eyes, and will also allow you to see what was previously invisible—the light stretched out by time.
Infrared
The light that we’re able to see, referred to somewhat uninspiringly as “visible light,” is a small part of an entire radioactive spectrum of wavelengths that’s measured in nanometers. Visible light ranges from violet, at roughly 400 nanometers, to deep red, which measures around 750 nanometers. There are, however, other types of radiation that we can sense, if not see, such as infrared (IR) and ultraviolet (UV), and both of these present interesting options when it comes to surreal photography.
The spectrum of IR wavelengths ranges from 750 nanometers—where visible, deep red falls off—and stretches to 20,000 nanometers. The human eye might not be able to detect these wavelengths, but they’re still there, and if you have the right equipment, you can capture them with your camera. I use nothing more sophisticated than my Canon EOS Rebel XSi, a 50mm prime lens with a Hoya R72 filter, and a tripod. This kit isn’t able to capture much in excess of 1,300 nanometers, but still records nice images.
Cameras are designed so that they are insensitive to IR light, with what’s known as a “hot mirror” inserted in front of the sensor to protect it and reflect IR light back toward the source. However, these hot mirrors aren’t 100% effective, and by filtering out visible light using an IR filter, you can record IR images. The filter that most IR photographers seem to favor is the Hoya R72; these are widely available, but do ensure that you purchase the correct one for your lens.
The difficulty that you’ll likely encounter when trying to focus comes as a result of the IR filter; as it blocks out the majority of visible light passing through the lens, it tends to leave you with a dark viewfinder, so you don’t have anything to work with when you’re focusing your lens. You have two options you could pursue to overcome this: set up your shot without the filter and then apply it, or trust your autofocus, though a crucial point to note is that autofocus doesn’t work with an IR filter on the lens, so if you use this method you need to use an IR-adapted camera. IR light focuses at a different point to visible light, so you’ll need to adjust the focus slightly. Older lenses often have a separate focus mark for IR, but most new lenses do not. The easiest workaround to correct the problem is to use a smaller aperture or bigger depth of field to compensate.
Setting up your shot and then placing the filter over your lens is a little awkward, but seeing as you’ll be using a tripod anyway (more on that in a moment), it won’t be wasted time. Working in this way is more likely to help you achieve the image that you want than relying on a combination of the camera’s autofocus and stopping down sufficiently to let the autofocus find its “sweet spot.” Only by experimenting and trying both methods will you find what works best for you.
To get the exposure correct, you will need to use a slow shutter speed, probably between ten and 30 seconds, to allow enough IR light to reach the sensor to expose it sufficiently. This is where your tripod comes in, as you’ll never manage to hold your camera steady for that length of time. Long exposures also have a tendency to noisiness, so use as low an ISO as you can manage.
IR ADAPTED
If you decide that you’re totally in love with IR photography, you might want to invest in an IR-adapted camera, which has had the hot mirror removed. Until then, though, an IR filter for your lens should do the job. Oh, and a tripod, you’ll definitely need one of those.


False Color
A strong red or magenta cast is normal for an IR image straight from the camera, but that can be corrected with a little manipulation, in this case with Lightroom.
Don’t be surprised if your IR photos emerge from your camera with strong red or magenta casts; this is known as false color. It’s normal and is simple to fix in an editing suite by altering the red and blue color balances in the image. You might need to amend the contrast to complete the image, too.
Some lenses are prone to producing “hot spots,” or patches of much brighter exposure that are usually, and most inconveniently, in the center of the image. There’s very little that you can do about this except to try a different lens. Prime lenses are less prone to hot spots, but there are no guarantees.
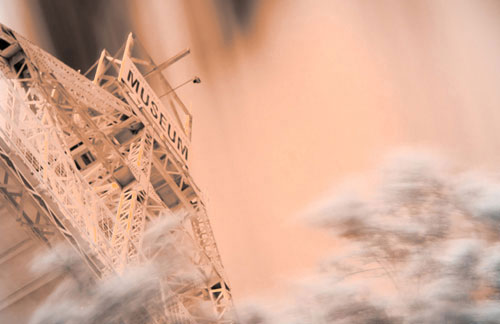
Floating On By
Drifting clouds, white trees, and an orange sky: IR in Australia.
Shoot stats: Canon EOS Rebel XSi with Canon EF 50mm ƒ/1.8 II lens at 50mm; ƒ5.6 with a shutter speed of 30 seconds and ISO 100.
ULTRAVIOLET
UV photography tends to be less common than IR photography; it’s tricky, much like IR, but it doesn’t always yield the breathtaking images of IR. However, alone or in combination with other techniques, it could be just what you need to create your perfect surreal image.
UV light has a wavelength that’s shorter than visible light at around 400 nanometers, but isn’t as short as X-rays at 10 nanometers (hence ultraviolet). Plenty of UV light is available from the sun, so don’t think that you need to go out and buy yourself a black light if you’d like to try UV photography; you just need a filter that will block out visible light and allow your camera’s sensor to detect the UV light. However, UV photography is far more successful on a bright, sunny day because there will be more UV light bouncing around.
There are quite a few filters on the market to facilitate UV photography, but also a lot that block UV light, too. When you purchase a filter, make sure that you have the right type: a UV pass or transmission filter. The UV transmission filter will be black or at least dark, whereas UV blocking filters are usually colorless.
Similarly to IR photography, you will need to use a long exposure in order to produce an image. Consequently, you will need to use a low ISO to help reduce digital noise and a tripod to ensure that your images are sharp.
Flowers are the archetypal UV subject, as they have wonderful markings that are only visible in the UV spectrum, but people make good UV subjects, too, especially when smeared in sunscreen. Sunscreen in general makes for fun pictures, as it is designed to block UV light and therefore appears matte black in photos.
If you find that UV photography is something that you want to explore more, it might be worth investing in some UV-emitted lights, or think about trying UV-fluorescence photography. This uses UV-emitting lights that have been protected by a glass filter, called an exciter filter, and is shot in a dark room with a black background. In addition, your camera will require a barrier filter to block out any extraneous UV, save for that which is fluorescing.

R72 IR Transmission Filter
Want to try your hand at IR photography? You’ll be needing an IR filter.