Not many Mac models come with a DVD burner anymore. But if yours has one (maybe an external USB drive), a CD or DVD is great for backing up stuff, transferring stuff to another computer (even a Windows PC), mailing to somebody, or offloading (archiving) older files to free up hard drive space. You can buy blank CDs and DVDs incredibly cheaply in bulk—$20 for 100 CDs, for example—via the Web.
You can burn a disc in either of two ways: with the blank disc inserted or without.
The burn folder is a special folder that you fill up by dragging file and folder icons to it. Then, when you’re ready to burn, you just insert the blank disc and go.
The burn-folder concept has a lot going for it:
No wasted hard drive space. When you use a burn folder, you’re not using up any additional disk space as you load up a disc with files and folders. Instead, the Mac just sets aside aliases of the files and folders you want to burn. Aliases take up negligible hard drive space. When you finally burn the disc, the designated material is copied directly onto the CD or DVD.
Easy reuse. You can keep a burn folder on your desktop, prestocked with the folders you like to back up. Each time you burn a disc, you get the latest version of those folders’ contents, and you’re saved the effort of having to gather them each time.
Prepare ahead of time. You can get a CD or DVD ready to burn without having a blank disc on hand.
Here’s how you use burn folders:
Create a burn folder.
To make a burn folder appear on your desktop, choose File→New Burn Folder. To create one in any other window, right-click a blank spot inside that window and, from the shortcut menu, choose New Burn Folder.
Either way, a new folder appears, bearing the universal Mac “burn” symbol (
 ).
).Rename it.
Its name is highlighted, so you can just start typing to rename it. Press Return when you’re finished.
Load up the folder by dragging files and folders onto it.
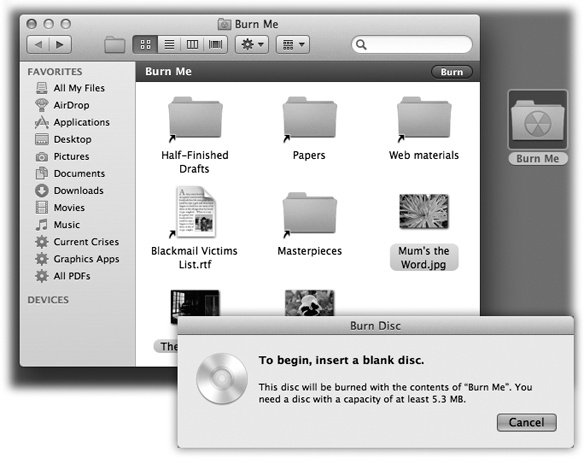
If you double-click the burn folder to open its window (Figure 9-12), you’ll notice that you’re not actually copying huge files. You’re simply making a list of aliases.
Tip
At the bottom of the burn folder’s window, the “minimum disc size” display keeps track of how much stuff you’ve loaded up so far, so you can gauge if it will fit on one disc.
Figure 9-12. Top: A burn folder looks like any ordinary folder—except that it has that radioactive logo on it. You can drag files and folders right into its window; OS X displays only aliases for now, but when you burn the disc, the actual files and folders will be there. If you open the burn folder, you find an unusual strip across the top. Its most important feature is the Burn button at the right. Bottom: Ready to proceed, Captain.
Decorate the window, if you like.
You can choose list view or icon view; you can drag the icons into an arrangement you like; you can change the background color of the window; and so on. One nice feature of the Mac (which is not available on The Other OS) is that the look of a window is preserved when you burn it to CD.
Click the Burn button in the upper-right corner of the window, or choose File→Burn Disc.
The message shown at bottom in Figure 9-12 appears.
Insert a blank disc.
If you have a slot-loading Mac, then slip the disc into the slot. If your Mac has a sliding CD/DVD tray instead, open it first by pressing the button on the tray or by pressing your
 key for about a second.
Tip
Once you’ve inserted a CD or DVD into your tray, you can close it either by pushing gently on the tray or by pressing the
key again.One last confirmation box appears, where you can name the disc and choose a burning speed for it.
The Mac’s laser proceeds to record the CD or DVD, which can take some time. Feel free to switch into another program and continue using your Mac. When it’s all over, you have a freshly minted CD or DVD, whose files and folders you can open on any Mac or Windows PC.
If you have a blank disc ready to go, burning is even simpler.
Start by inserting the disc. After a moment, the Mac displays a dialog box asking, in effect, what you want to do with this blank disc (unless you’ve fiddled with your preference settings). See Figure 9-13 for instructions.
If you choose Open Finder, then the disc’s icon appears on the desktop after a moment; its icon also appears in the Sidebar, complete with the burn symbol (![]() ).
).
At this point, you can begin dragging files and folders onto the disc’s icon, or (if you double-click the icon) into its window. You can add, remove, reorganize, and rename the files on it just as you would in any standard Finder window. All you’re really doing is dragging aliases around; the real files are left untouched on your hard drive. You can also rename the CD or DVD itself just as you would a file or folder.
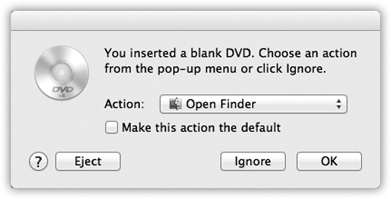
Figure 9-13. Choose Open Finder if you plan to copy regular Mac files onto the CD or DVD, or Open iTunes if you plan to burn a music CD using iTunes. (Click “Make this action the default” if you figure you’ll always answer this question the same way.) Click OK. To burn the disk, drag its icon onto the Burn icon in the Dock, or choose File→Burn Disc.
When the disc’s icon contains the files and folders you want to immortalize, do one of these things:
Choose File→Burn [the disc’s name].
Click the Burn button in the upper-right corner of the disc’s window.
Drag the disc’s icon toward the Trash icon in the Dock. As soon as you begin to drag, the Trash icon turns into the yellow
logo. Drop the disc’s icon onto it.Right-click the disc’s icon; from the shortcut menu, choose Burn [the disc’s name].
In any case, a dialog box now appears. Click Burn. When the recording process is over, you’ll have yourself a DVD or CD that works in any Mac or PC.
Here are a few final notes on burning CDs and DVDs at the desktop:
Not sure what kinds of discs your Mac can burn? Choose
 →About This Mac, and click More Info. In the resulting dialog box, click the Storage tab. There it is, plain as day: a list of the formats your machine can read and write (that is, burn). For example, you might see: “CD-Write: -R, -RW. DVD-Write: -R, -RW, +R, +RW.”
If you do a lot of disc burning, a full-fledged CD-burning program like Toast (www.roxio.com) adds myriad additional formatting options that let you make startup CDs, video CDs, and so on.
When you insert a CD-RW or DVD-RW disc that you’ve previously recorded, the box shown in Figure 9-13 doesn’t appear. Instead, the disc’s icon simply appears on the desktop as though it’s an ordinary CD. Before you can copy new files onto it, you must erase it using Disk Utility, as described in the previous section.
The discs that your Mac burns work equally well on Macs and Windows (or Linux) PCs. If you plan to insert a CD or DVD into a PC, however, remember that Windows doesn’t permit certain symbols in a Windows filename ( / : * ? “ < > |). You’ll run into trouble if any of your file names contain these symbols. In fact, you won’t be able to open any folders on your disc that contain illegally named files.