- Switching to the Mac: The Missing Manual, Mavericks Edition
- The Missing Credits
- Introduction
- One. Welcome to Macintosh
- 1. How the Mac Is Different
- 2. Folders, Dock & Windows
- Renaming Icons
- Selecting Icons
- Moving and Copying Icons
- Aliases: Icons in Two Places at Once
- Finder Tags
- The Trash
- Get Info
- Shortcut Menus, Action Menus
- The Spotlight Menu
- The Spotlight Window
- Customizing Spotlight
- Smart Folders
- 4. Documents, Programs & Mission Control
- The Mac App Store
- Other Ways to Get Mac Software
- Opening OS X Programs
- Launchpad
- Windows That Auto-Reopen
- The “Heads-Up” Program Switcher
- Full Screen Mode
- Mission Control: Death to Window Clutter
- Dashboard
- Exposé
- Hiding Programs the Old-Fashioned Way
- How Documents Know Their Parents
- Keyboard Control
- The Save and Open Dialog Boxes
- Auto Save and Versions
- Documents in the Cloud
- 5. Entering, Moving & Backing Up Data
- Two. Making the Move
- 6. Transferring Your Files to the Mac
- 7. Special Software, Special Problems
- ACDSee
- Acrobat Reader
- ACT
- Ad Subtract (Pop-Up Stopper)
- Adobe [your favorite program here]
- AOL
- AIM (AOL Instant Messenger)
- Children’s Software
- Chrome
- Easy CD Creator
- Encarta
- Eudora
- Excel
- Firefox
- Games
- Google Desktop Search
- Google Earth
- Google Chrome
- ICQ
- Internet Explorer
- iTunes
- McAfee VirusScan
- Microsoft Access
- Microsoft Money
- Microsoft Office
- Microsoft Publisher
- Microsoft Visio
- Minesweeper
- MSN Messenger
- NaturallySpeaking
- Netscape
- Newsgroup Readers
- Norton AntiVirus
- Norton Utilities
- Notepad
- Outlook/Outlook Express/Windows Mail
- PaintShop Pro
- Picasa
- PowerPoint
- QuickBooks
- Quicken
- RealPlayer
- RssReader
- Skype
- Snagit (Screenshots)
- Solitaire
- Street Atlas USA
- TaxCut, TurboTax
- Winamp, MusicMatch
- Windows Media Player
- WinZip
- Word
- WordPerfect
- Yahoo Messenger
- 8. Windows on Macintosh
- 9. Hardware on the Mac
- Mac Meets Printer
- Making the Printout
- Managing Printouts
- Printer Sharing
- Faxing
- PDF Files
- Fonts—and Font Book
- Digital Cameras
- Disks
- Startup Disks
- Erasing a Disk
- Burning CDs and DVDs
- iTunes: The Digital Jukebox
- DVD Movies
- AirPlay
- Keyboards
- Mouse
- Monitors
- Scanners
- Three. Mavericks Online
- 10. Internet Setup & iCloud
- 11. Mail & Contacts
- Checking Your Mail
- Tailoring the Look of Mail
- Writing Messages
- Reading Email
- VIPs
- The Anti-Spam Toolkit
- Contacts (Address Book)
- 12. Safari
- 13. Messages
- Four. Putting Down Roots
- 14. Accounts, Security & Gatekeeper
- 15. Networking, File Sharing & Screen Sharing
- 16. System Preferences
- The System Preferences Window
- Accessibility
- App Store
- Bluetooth
- CDs & DVDs
- Date & Time
- Desktop & Screen Saver
- Dictation & Speech
- Displays
- Dock
- Energy Saver
- General
- iCloud
- Internet Accounts
- Keyboard
- Language & Region
- Mission Control
- Mouse
- Network
- Notifications
- Parental Controls
- Printers & Scanners
- Security & Privacy
- Sharing
- Sound
- Spotlight
- Startup Disk
- Time Machine
- Trackpad
- Users & Groups
- 17. Notifications
- 18. The Freebie Programs
- Your Free OS X Programs
- App Store
- Automator
- Calculator
- Calendar
- Chess
- Contacts
- Dashboard
- Dictionary
- DVD Player
- FaceTime
- Font Book
- Game Center
- GarageBand
- iBooks
- Image Capture
- iMovie, iPhoto
- iTunes
- Launchpad
- Maps
- Messages
- Mission Control
- Notes
- Photo Booth
- Preview
- QuickTime Player
- Reminders
- Safari
- Stickies
- System Preferences
- TextEdit
- Time Machine
- Utilities: Your OS X Toolbox
- Activity Monitor
- AirPort Utility
- AppleScript Editor
- Audio MIDI Setup
- Bluetooth File Exchange
- Boot Camp Assistant
- ColorSync Utility
- Console
- DigitalColor Meter
- Disk Utility
- Grab
- Grapher
- Java Preferences
- Keychain Access
- Migration Assistant
- Network Utility
- RAID Utility
- System Information
- Terminal
- VoiceOver Utility
- Five. Appendixes
- A. Installation
- B. Troubleshooting
- C. The “Where’d It Go?” Dictionary
- About [this program]
- About [this program]
- Accessibility Options control panel
- Active Desktop
- Add Hardware control panel
- Add or Remove Programs
- All Programs
- Alt key
- Automatic Update
- Backspace key
- Battery level
- BIOS
- Briefcase
- Calculator
- Camera and Scanner Wizard
- CDs and DVDs
- Character Map
- Clean Install
- Clipboard
- Command line
- Control Panel
- Copy, Cut, Paste
- Ctrl key
- Date and Time
- Delete Key (Forward Delete)
- Desktop
- Directories
- Disk Defragmenter
- Disks
- Display control panel
- DLL files
- DOS prompt
- Drivers
- End Task dialog box
- Exiting programs
- Explorer
- Favorites
- Faxing
- File Sharing
- Floppy disks
- Folder Options
- Fonts
- Help and Support
- Hibernation
- Internet Explorer
- Internet Options
- IRQs
- Java
- Keyboard control panel
- Logging in
- Mail control panel
- Maximize button
- Menus
- Minimize button
- Mouse control panel
- (My) Computer
- (My) Documents, (My) Pictures, (My) Music
- (My) Network Places
- Network Neighborhood
- Notepad
- Phone and Modem Options control panel
- Power Options
- Printer Sharing
- Printers and Faxes
- PrntScrn key
- Program Files folder
- Properties dialog box
- Recycle Bin
- Regional and Language Options control panel
- Registry
- Run command
- Safe Mode
- ScanDisk
- Scheduled Tasks
- Scrap files
- Screen saver
- Search
- Shortcut menus
- Shortcuts
- Sounds and Audio Devices
- Speech control panel
- Standby mode
- Start menu
- StartUp folder
- System control panel
- System Tray
- Taskbar
- Taskbar and Start Menu control panel
- “Three-fingered salute”
- ToolTips
- Tweak UI
- User Accounts control panel
- Windows (or WINNT) folder
- Windows logo key
- Windows Media Player
- Windows Messenger
- WordPad
- .zip files
- About [this program]
- D. The Master OS X Keystroke List
- Index
- About the Author
- Colophon
- Copyright
In the real world, VIPs are people who get backstage passes to concerts, or special treatment at business functions (it stands for “very important person”). In Mavericks, it means “somebody whose mail is important enough that I want it brought to my attention immediately when it arrives.”
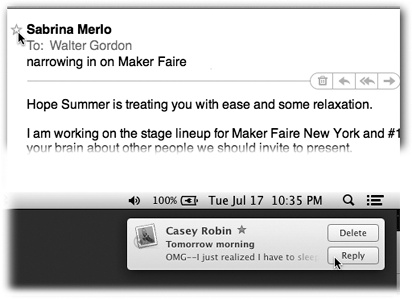
Figure 11-13. Top: To designate a VIP, open a message she’s sent you. Point to her name. A hollow star appears; click there. The star darkens. (Or choose Add to VIPs from the pop-up menu that appears when you point to her name.) Note: If that person one day insults you, fires you, or dumps you, you can remove her VIP status by clicking that same star again. Bottom: OS X can alert you when VIP messages arrive. And in Mavericks, you can reply right on the spot.
So who should your VIPs be? That’s up to you. Your spouse, your boss, and your doctor come to mind.
To designate someone as a VIP, follow the steps shown in Figure 11-13. From now on, lots of interesting things happen:
A new mailbox, called VIPs, appears in your mailboxes list. Click it to see all the mail from all your VIPs (even messages you’ve deleted). Or click the flippy triangle to see your VIPs’ names, each representing messages from that person.
A new menu button appears on your Favorites toolbar called VIPs. Click to see all VIP messages, or click the
 to see a pop-up menu of all the VIPs’ names. Here again, the point is that you can jump to the messages from just that person.
If you use iCloud, the same person is now a VIP on all your other Macs (running Mountain Lion or later), plus iPhones and iPads (running iOS 6 or later).
Best of all, you can set up your Mac so that when a new message from a VIP comes in, an alert bubble appears in the top-right corner of your screen (Figure 11-13, bottom). That feature, of course, is part of the Notification Center, and it’s described in Chapter 17. See the box on When You Want to Be Nudged about Incoming Mail for instructions on setting this up.
GEM IN THE ROUGH: When You Want to Be Nudged about Incoming Mail
The Notification Center (Chapter 17) consolidates all the different programs and features that might want your attention—Mail, Reminders, Twitter, Facebook, software updates, and so on—into a single tidy list.
But if a little Notification Center alert bubble appeared on your screen every time any new Mail message came in, you’d go quietly mad. Fortunately, a new Mail setting lets you tell Mail, “Don’t disturb me unless it’s really important. Like if it’s from my accountant.”
Here’s how to set up this useful filter. Choose Mail→Preferences→General. See the “New message notifications” pop-up menu?
Here you can choose Inbox only (all incoming messages trigger alert bubbles); VIPs (perhaps the most useful option—only messages from these essential people produce alerts); Contacts (messages from anyone in your address book trigger alerts—just not messages from strangers); or All Mailboxes (every single incoming message flags you).
You can also choose the name of a smart mailbox, if you’ve created one. That’s a pretty potent feature. It means that you can set up incoming messages to alert you only if they match whatever criteria your smart mailbox uses. For example, you might not want to be disturbed except when a message comes from one of your best friends and it has an attachment and it mentions “money I owe you.”
You may have noticed, by the way, that there’s no option here for “Don’t show me Mail message bubbles at all.” That’s because you do that in System Preferences.
Open System Preferences→Notifications, click Mail, and turn off Show in Notification Center. Now you’ll be left in peace when new mail arrives, no matter who it’s from.
-
No Comment