All right, now you know how to dismiss, stifle, or respond to notification bubbles. But what if you miss one? Or you decide to act on it later?
Thought you’d never ask.
On the iPhone or iPad, all of those “Hey you!” messages collect on a single screen called the Notification Center. So it occurred to somebody at Apple: Why should that handiness be confined to the phone?
In OS X, the Notification Center looks almost exactly the same as it does on mobile devices (Figure 17-3).
To make it appear on a laptop, swipe two fingers onto the trackpad from the right. (Start the swipe off to the right of the trackpad. It’s the first time you’ve ever crossed the edge of the trackpad with a Mac gesture. Weird.)
You can also open the Notification Center by clicking the ![]() in the upper-right corner of your screen. That’s a handy trick if your Mac doesn’t have a trackpad—if it’s an iMac, for example. (You can also set up a keystroke or a “hot corner” to open the Notification Center, if you like. See Mission Control keystrokes.)
in the upper-right corner of your screen. That’s a handy trick if your Mac doesn’t have a trackpad—if it’s an iMac, for example. (You can also set up a keystroke or a “hot corner” to open the Notification Center, if you like. See Mission Control keystrokes.)
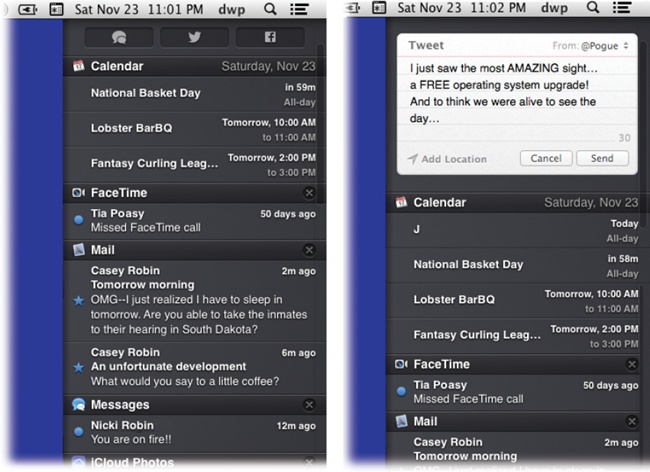
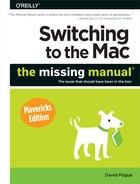
Figure 17-3. Left: Here’s the Notification Center, where all those incoming messages pile up, for your inspection pleasure. Right: The three buttons at the top let you trigger new messages via Messages, Twitter (shown here), and Facebook—without interrupting what you’re doing.
Either way, the Notification Center slides onto the screen like a classy black window shade, printed in white with every recent item of interest; whatever was on your screen gets shoved temporarily off to the left side.
Tip
To close the Notification Center, swipe the opposite way (left to right) with two fingers. Or just click any other part of the screen. Or click the ![]() again. Or press the Esc key. Or just blink really hard.
again. Or press the Esc key. Or just blink really hard.
Here you’ll find all your apps’ notifications, as well as all your Mac’s messages, reminders, upcoming appointments, and so on.
Once the center is open, you can have three kinds of fun:
Scroll the list to see more of it.
Click an item in the Notification Center to open the relevant app for more details. For example, click an appointment listed there to open its information panel in Calendar. Click the name of a software update to open the Mac App Store program to read about it and download it. Click a message’s name to open Mail, where you can read the entire message.
Click the little
 to dismiss one app’s entire list of notifications once you’ve seen them. (The app is free to fill up your Notification Center again once it has something to say.)
If you’ve told OS X the details of your iCloud, Twitter, or Facebook accounts, then a strange little surprise awaits you at the top of the Notification Center: buttons that let you send a Messages message, post a tweet, or post a Facebook item—right from there, without having to open an app or go to a Web page.
Note
You can hide these buttons, if you like. Open System Preferences→Notifications, and turn off “Show share buttons in Notification Center.”
When you click one of these buttons, you get the little pop-up card illustrated in Figure 17-3 at right.
And what do these buttons have to do with notifications? Absolutely nothing. They’re here in the Notification Center because Apple wanted them to be available anytime, anywhere, no matter what program you were using—and the Notification Center is a perfect always-available dashboard.
You can (and should) specify which apps are allowed to junk up your Notification Center. Open System Preferences→Notifications to see the list of apps that might want to get your attention in the master Notifications list (Figure 17-4).
Tip
A faster way to get to the proper System Preferences pane is built right into the Notification Center itself. Click the tiny ![]() icon at the very bottom of the panel.
icon at the very bottom of the panel.
This is also the place where you can specify the order of the various apps’ notifications in the center. Use the Sort Notification Center pop-up menu at the bottom of the window. If you choose By Time, then the apps with the newest alerts appear at the top. But if you tap Manually, then you can simply drag the app names up or down in the list to specify their top-to-bottom order on the Notification Center list.
Out of the box, the following OS X programs are listed in the Notification Center:
Share Buttons lets you hide the Message, Twitter, and Facebook buttons at the top of the Notification Center (shown in Figure 17-3).
Game Center flags you when somebody has invited you to a game or wants to become your friend.
Mail lets you know when you’ve received a new message. (Mercifully, Mail’s Preferences→General tab lets you limit these alerts, so you won’t be buried in a barrage of meaningless heads-up bubbles. You can tell Mail to alert you only when somebody in your Contacts list has written to you, only when a message lands in a smart mailbox folder, only when you get email from someone you’ve designated as a VIP—or whenever any message lands in any mailbox.
Messages lets you know when somebody has sent you an instant message.
Safari. Certain Web sites, if they’re open in Safari, can send you notifications (known as HTML Web notifications).
iCloud Photos lets you know when somebody has subscribed to a stream of pictures you’ve shared (or has commented on one, or added one).
Twitter pops up whenever somebody has mentioned you on Twitter or tried to reach you with a direct message.
Facebook governs the appearance of updates from your Facebook friends.
Maps refers to the new Maps app and its attempts to get your attention.
Other companies’ apps may appear in this list, too: BusyCal, Evernote, Skype, and so on.
Now it’s time to change the settings for one app at a time. Click an app’s name to see its individual Notifications settings (Figure 17-4—the Calendar app, in this example).

Figure 17-4. Here in System Preferences, you can specify which apps are permitted to intrude on the precious billboard that is your Notification Center—and how they’re permitted to intrude. Some individual apps, including Mail and Calendar, offer additional controls in their Preferences boxes. For example, in Calendar, you can turn off notifications from shared calendars and from meeting invitations.
As hinted above, different apps can get your attention in different ways:
None. If certain apps seem to bug you with news you really don’t care about, you can make them shut up forever. They won’t bother you with pop-up messages, although they can still insert items into the Notification Center panel.
Banners. This option (Figure 17-4) makes incoming notifications slide quietly and briefly onto the top right of your screen. Each message holds still long enough for you to read it, but it goes away automatically after a few seconds. Banners are a good option for things like Facebook and Twitter updates and incoming email messages.
Alerts. These notifications don’t go away until you click a button to dismiss them. Good for important messages, like alarms and flight updates.
At the bottom of the Notifications window, you get more settings for each app:
Show notifications on lock screen. Do you want summaries of all your missed notifications to appear on your Lock screen (“5 email notifications”) when you wake up the Mac after having been away? It’s a great new Mavericks feature, as long as you don’t mind passing busybodies knowing how popular you are.
Show in Notification Center: __ Recent Items. This pop-up menu specifies how many rows of information you want to reserve for this app in the Notification Center: one from your Scrabble app, for example, but all 20 of your recent Reminders.
Tip
If you turn off this checkbox, the app disappears from the Notification Center completely. You can still get its alert messages, but you won’t see them listed in the Notification Center panel. Another way to achieve the same effect: Drag the app’s name down to the bottom of the list, below the Not in Notification Center heading.
Badge app icon. If you turn this option on, then each app’s actual icon (in your Launchpad and on your Dock) sprouts a red, circled number. This number lets you know how many times it’s tried to flag you about something.
Play sound when receiving notifications. Some apps play a sound when a new notification arrives. For example, Calendar dings to remind you of an upcoming event. It’s a little extra insurance that you won’t miss a nudge; here’s where you can turn these sounds off.
Tip
If this Notification Center thing gets you fired up, then you should probably know about Growl, too. It’s a free program that creates an effect very similar to Notification Center—but with far more customization. You can make the alerts appear in a different corner of your screen, for example, or change how they look. Growl is available on this book’s “Missing CD” page at www.missingmanuals.com.