It may be goofy, it may be pointless, but the Photo Booth program is a bigger time drain than Solitaire, the Web, and Dancing with the Stars put together.
It’s a match made in heaven for any Mac with a video camera above the screen, but you can also use it with a camcorder, iSight, or Webcam. (Photo Booth doesn’t even open if your Mac doesn’t have some kind of camera.)
Open this program and then peer into the camera. Photo Booth acts like a digital mirror, showing whatever the camera sees—that is, you.
But then click the Effects button. You enter a world of special visual effects—and we’re talking very special. Some make you look like a pinhead, or bulbous, or like a Siamese twin; others simulate Andy Warhol paintings, fisheye lenses, and charcoal sketches (Figure 18-22). In fact, there are five whole pages of effects, nine previews on a page. (The last two pages hold backdrop effects, described below.)
To page through them, click the left or right arrow buttons, or press ![]() or
or ![]() , or swipe with two fingers on your trackpad (one finger on the Magic Mouse).
, or swipe with two fingers on your trackpad (one finger on the Magic Mouse).
The first page contains eight effects, some of which use sophisticated face-recognition smarts to track your face as it moves around the frame. That’s how Dizzy and Lovestruck are able to keep the animated birds or hearts circling your head, and how Chipmunk, Nose Twirl, and Bug Out are able to distort your cheeks, nose, and eyeballs even as you move around.
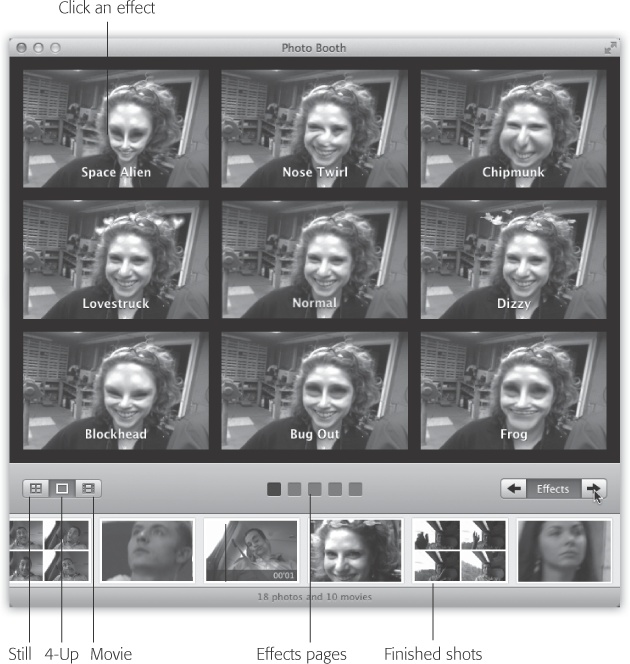
Figure 18-22. The Photo Booth effects must have been dreamed up one night in the midst of a serious beer party at Apple. They’re disturbingly creative. If you decide that you really look best without any help from Apple’s warped imagery, click the Normal icon in the center. A few of them are new in Mavericks.
Some of the effects have sliders that govern their intensity; you’ll see them appear when you click the preview.
When you find an effect that looks appealing (or unappealing, depending on your goals here), click the camera button, or press ⌘-T. You see and hear a 3-second countdown, and then snap!—your screen flashes white to add illumination, and the resulting photo appears on your screen. Its thumbnail joins the collection at the bottom.
If you click the 4-Up button identified in Figure 18-22, then when you click the Camera icon (or press ⌘-T), the 3-2-1 countdown begins, and then Photo Booth snaps four consecutive photos in 2 seconds. You can exploit the timing just the way you would in a real photo booth—make four different expressions, horse around, whatever.
The result is a single graphic with four panes, kind of like what you get at a shopping-mall photo booth. (In Photo Booth, they appear rakishly assembled at an angle; but when you export the image, they appear straight, like panes of a window.) Its icon plops into the row of thumbnails at the bottom of the window, just like the single still photos.
GEM IN THE ROUGH: Still and Video Backdrops
Photo Booth and Messages are cousins, and they’re closer than ever. One particular feature, in fact, is identical in each: custom backdrops. You can replace the actual, mundane background of your office or den with something far more exciting: a rushing waterfall, for example, or a rider’s-eye view of a roller coaster. In fact, you can use any photo or video you want as the background.
It’s just like the bluescreen or greenscreen technology that Hollywood uses to put actors someplace they’re not—but without the bluescreen or greenscreen.
To replace your background in Photo Booth, click Effects. The fourth page of effects offers eight canned backgrounds, prepared by Apple for your enjoyment: various spectacular stills (cloudscape, color dots, the moon) and videos (Eiffel Tower plaza, aquarium, roller coaster, tropical beach, Yosemite waterfall).
The final page offers eight empty preview squares. You’re supposed to drag a still or a video from your desktop (or iPhoto) into these empty squares, making them not so empty.

In any case, prepare the backdrop by clicking one of the preview squares. Photo Booth says, “Please step out of the frame.” Do it. Photo Booth is going to memorize what its field of view looks like without you in it, so that when you reappear, it can tell you apart from your boring office background.
Now, when you record the movie or take the photo, you’ll be amazed to discover that Photo Booth has just transplanted you to the far more exotic locale you selected. (Alas, blotches may result if the background includes movement or highly contrasting elements.)
Photo Booth can also record videos, complete with those wacky distortion effects. Click the third icon below the screen, the Movie icon (Figure 18-22), and then click the camera button (or press ⌘-T). You get the 3-2-1 countdown—but this time, Photo Booth records a video, with sound, until you click the Stop button. (The little digital counter at left reminds you that you’re still filming.) When it’s over, the movie’s icon appears in the row of thumbnails, ready to play or export.
Tip
If you click a movie’s thumbnail after recording it, a Trim button appears at the right end of the scroll bar. When you click it, yellow trim handles appear at both ends of the scroll bar (the same ones you’d see when trimming a video on the iPhone or iPad, or in iPhoto). Drag them inward to trim off any dead air at the beginning or end of your video clip. Hit the space bar to check your work. If the trim is OK, click the ![]() button to confirm the trim.
button to confirm the trim.
To look at a photo or movie you’ve captured, click its thumbnail in the scrolling row at the bottom of the screen. (To return to camera mode, click the ![]() .)
.)
Fortunately, these masterpieces of goofiness and distortion aren’t locked in Photo Booth forever. You can share them with your adoring public in any of these ways:
Click the photo or movie, and then choose File→Export. You’re asked to name and save the exported image or video.
Drag a thumbnail out of the window to your desktop.
Right-click (or two-finger click) a thumbnail. From the shortcut menu, choose Reveal in Finder. You’re taken to the actual image or movie file on your hard drive, ready for copying, moving, deleting, renaming, or whatever.
Click Email to send the photo or movie as an outgoing attachment in Mail.
Click the Add to iPhoto button to import the shot or movie into iPhoto.
Click User Picture to make this photo represent you on the Login screen.
Click Buddy Picture to make this photo represent you in Messages (Chapter 13).
Tip
You can choose one frame of a Photo Booth movie to represent you. As the movie plays, click the Pause button, and then drag the scroll-bar handle to freeze the action on the frame you want. Then click User Picture or Buddy Picture.
Similarly, you can click your favorite one pane of a 4-up image to serve as your account photo—it expands to fill the Photo Booth screen—before clicking User Picture or Account Picture.
And speaking of interesting headshots: If you export a 4-up image and choose it as your Buddy Picture, you’ll get an animated buddy icon. That is, your tiny icon cycles among the four images, creating a crude sort of animation. It’s sort of annoying, actually, but all the kids are doing it.
As you set off on your Photo Booth adventures, a note of caution: Keep it away from children. They won’t move from Photo Booth for the next 12 years.