The beauty of OS X’s design is that the operating system itself is frozen in its perfect, pristine state, impervious to conflicting system extensions, clueless Mac users, and other sources of disaster.
That’s the theory, anyway. But what happens if something goes wrong with the complex software that operates the hard drive itself?
Fortunately, OS X comes with its own disk-repair program. In the familiar Mac universe of icons and menus, it takes the form of a program in Applications→Utilities called Disk Utility. In the barren world of Terminal and the command-line interface, there’s a utility that works just as well but bears a different name: fsck (for file system check).
In any case, running Disk Utility or its alter ego fsck is a powerful and useful troubleshooting tool that can cure all kinds of strange ills, including these problems, among others:
Your Mac freezes during startup, either before or after the login screen.
The startup process interrupts itself with the appearance of the text-only command line.
You get the “applications showing up as folders” problem.
The easiest way to check your disk is to use the Disk Utility program. Use this method if your Mac can, indeed, start up. (See Method 2 if you can’t even get that far.)
Disk Utility can’t fix the disk it’s on (except for permissions repairs, described at the beginning of this appendix). That’s why you have to restart the Mac into Recovery Mode and run Disk Utility from there. The process goes like this:
Start up the Mac from the Recovery HD, or a recovery flash drive.
They’re both described earlier in this appendix. You wind up, after some time, at the Utilities screen.
Click “Disk Utility: Repair or erase a disk using Disk Utility.”
After a moment, the Disk Utility screen appears.
Click the disk or disk partition you want to fix, click the First Aid tab, and then click Repair Disk.
The Mac whirls into action, checking a list of very technical disk-formatting parameters.
If you see the message, “The volume ‘Macintosh HD’ appears to be OK,” that’s meant to be good news. Believe it or not, that cautious statement is as definitive an affirmation as Disk Utility is capable of making about the health of your disk.
Disk Utility may also tell you that the disk is damaged but that it can’t help you. In that case, you need a more heavy-duty disk-repair program like DiskWarrior (www.alsoft.com).
Techier folk can also boot into the Mac’s raw Unix underlayer to perform some diagnostic (and healing) commands.
Specifically, you can run the Unix program fsck, for which Disk Utility is little more than a pretty faceplate.
Note
Even so, Apple recommends that you use Disk Utility if at all possible. Use fsck only if all else fails.
Like any Unix program, fsck runs at the command line. You launch it from the all-text, black Unix screen by typing fsck and pressing Return. (You can also use fsck -f.)
You can’t, however, just run fsck in Terminal. You have to run it when the usual arsenal of graphic-interface programs—like the Finder and its invisible suite of accessory programs—isn’t running.
The Terminal program is the best-known form of OS X’s command line, but it’s not the only one. In fact, there are several other ways to get there.
In general, you don’t hear them mentioned except in the context of troubleshooting, because the Terminal program offers many more convenient features for doing the same thing. And because it’s contained in a OS X–style window, Terminal is not as disorienting as the three methods you’re about to read.
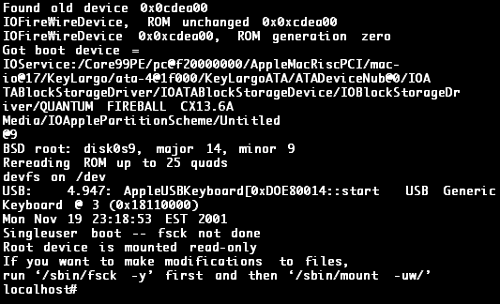
All these techniques take you into console mode, shown in Figure B-4. In console mode, Unix takes over your screen completely, showing white type against black, no windows or icons in sight. Abandon the mouse, all ye who enter here; in console mode, you can’t do anything but type commands.
To get there in times of startup troubleshooting, press ⌘-S while the Mac is starting up. (If you’re stuck at the frozen remnants of a previous startup attempt, you may first have to force restart your Mac; hold down the ![]() button for 5 seconds.)
button for 5 seconds.)
Instead of arriving at the usual desktop, you see technical-looking text scrolling up a black screen as the Mac runs its various startup routines. When it finally stops at the localhost# prompt, you’re ready to type commands. You’re now in what’s called single-user mode, meaning that the Unix multiple-accounts software has yet to load. You won’t be asked to log in.
At the root# prompt, type fsck -y (note the space before the hyphen) and press Return. (The y means “yes,” as in “yes, I want you to fix any problems automatically.”)
Now the file-system check program takes over, running through five sets of tests. When it’s complete, you’ll see one of two messages:
The volume Macintosh HD appears to be OK. All is well. Type exit and press Return to proceed to the usual login screen and desktop.
File system was modified. A good sign, but just a beginning. You need to run the program again. One fsck pass often repairs only one layer of problems, leaving another to be patched in the next pass. Type fsck -y a second time, a third time, and so on, until you finally arrive at a “disk appears to be OK” message.
Type exit at the prompt and press Return to get back to the familiar world of icons and windows.