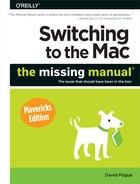
iTunes, in your Applications folder, is the ultimate software jukebox (Figure 9-14). It can play music CDs; tune in to Internet radio stations; load up your iPod, iPhone, or iPad; and play digital sound files (including the Internet’s favorite format, MP3 files) and other popular audio formats. It can also turn selected tracks from your music CDs into MP3 files, so that you can store favorite songs on your hard drive to play back anytime—without having to dig up the originals.
iTunes also lets you record your own custom audio CDs that contain only the good songs. Finally, of course, iTunes is the shop window for the online iTunes Store, which sells music, TV shows, movies, and iPhone/iPad apps.
Tip
The following pages present a mini-manual on iTunes. For the full scoop, plus coverage of the iPod and the iTunes Store, consult iPod: The Missing Manual.
The first thing to understand is that iTunes is three apps in one. It’s designed to be the viewer for all the music, videos, apps, and ebooks in three places: (1) on your computer, (2) on your phone or tablet, and (3) in Apple’s online store.
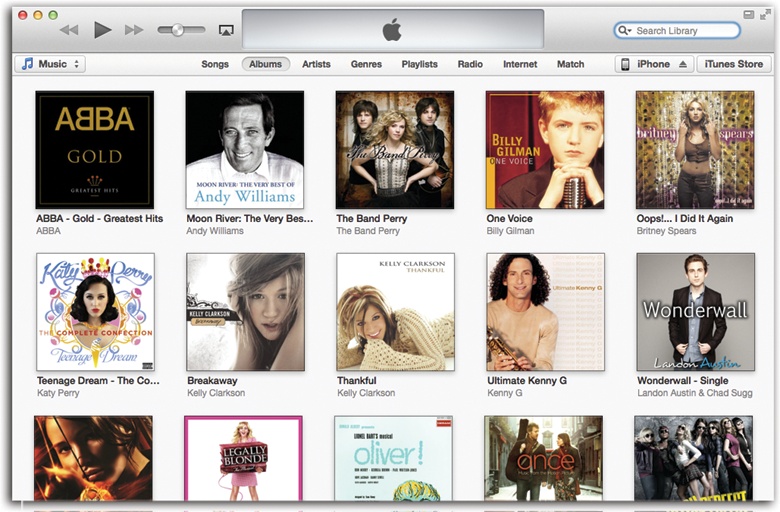
Figure 9-14. The Music button is a pop-up menu. From it, you can jump to the lists of Movies, Music, TV Shows, and other categories on your Mac. You can also view the lists of stuff you’ve bought. The playback and volume controls are at the top-left corner. At upper-right: a search box that lets you pluck one track out of a haystack.
The button at top right lets you choose either Library (what’s on your computer) or iTunes Store. When your iPhone (or other i-gadget) is connected, it has a button of its own right next door.
The following pages take you through the three worlds—computer, store, iPhone—one by one.
The library is all the music, videos, apps, and ebooks that you’ve downloaded to your Mac or PC. To see it, click Library at the upper-right corner of iTunes. (If that button says iTunes Store instead, then you’re already seeing your library.)
At this point, you’re supposed to drill down to the material you want to manage or play:
Use the pop-up button at the top-left side of iTunes to specify what kind of file you want to look at: Music, Movies, TV Shows, Podcasts, Books, or Apps.
Use the buttons across the top to further isolate or sort what you’re after. For example, if you chose Music in step 1, then your options are Songs, Albums, Artists, Genres, Playlists, Radio, Internet, and Match. If you choose Movies, then the options are Unwatched, Movies, Genres, Home Videos, and List. You get the idea.
When you click one of these headings, the contents appear in the center part of the iTunes window. You may see wildly different things here, depending on what you clicked. For example, if you click Songs, you see a huge alphabetical list; if you click Albums, you see a square grid of album covers.
Once you have iTunes, the next step is to start filling it with music and video so you can get all that goodness onto your iPhone. iTunes gives you at least three options right off the bat:
Let iTunes find your files. If you’ve had a computer for longer than a few days, you probably already have some songs in the popular MP3 format on your hard drive, perhaps from a file-sharing service or a free music Web site. If so, then the first time you open iTunes, it offers to search your PC or Mac for music and add it to its library. Click Yes; iTunes goes hunting around your hard drive.
Tip
You may have songs in the Windows Media Audio (WMA) format. Unfortunately, iTunes can’t play WMA files. But when iTunes finds nonprotected WMA files, it offers to convert them automatically to a format that it does understand. That’s a convenient assurance that your old music files will play on your new toy. (iTunes can not, however, convert copy-protected WMA files like those sold by some music services.)
Visit the iTunes Store. Another way to feed your Mac is to shop at the iTunes Store, as described in the next section.
Import music from a CD. iTunes can also convert tracks from audio CDs into digital music files. Just start up iTunes and then stick a CD into your computer’s CD drive. The program asks if you want to convert the songs to audio files for iTunes. (If it doesn’t ask, then click Import CD at the bottom of the window.)
If you’re connected to the Internet, the program automatically downloads song titles and artist information from the CD and begins to add the songs to the iTunes library.
If you want time to think about which songs you want from each CD, then you can tell iTunes to download only the song titles and then give you a few minutes to ponder your selections. To do that, choose iTunes→Preferences→General. Use the “When you insert a CD” pop-up menu to choose Show CD.
From now on, if you don’t want the entire album, you can exclude the dud songs by turning off their checkmarks. Then click Import CD.
Tip
If you always want all the songs on that stack of CDs next to your computer, then change the iTunes CD import preferences to Import CD and Eject to save yourself some clicking. When you insert a CD, iTunes imports it and spits it out, ready for the next one.
In that same Preferences box, you can also click Import Settings to choose the format (file type) and bit rate (amount of audio data compressed into that format) for your imported tracks. The factory setting is the AAC format at 128 kilobits per second.
Most people think these settings make for fine-sounding music files, but you can change your settings to, for example, MP3, which is another format that lets you cram big music into a small space. Upping the bit rate from 128 to 256 Kbps makes for richer-sounding music files—which also happen to take up more room because the files are bigger. The choice is yours.
Once the importing is finished, each imported song bears a green checkmark, and you have some brand-new files in your iTunes library.
A playlist is a list of songs you’ve decided should go together. It can be any group of songs arranged in any order, all according to your whims. For example, if you’re having a party, you can make a playlist from the current Top 40 and dance music in your library. Some people may question your taste if you, say, alternate tracks from La Bohème with Queen’s A Night at the Opera, but hey—it’s your playlist.
To create a playlist in iTunes, press ⌘-N, or choose File→New→Playlist.
A freshly minted playlist starts out with the impersonal name “Playlist.” Just type a better name: “Cardio Workout,” “Shoe-Shopping Tunes,” “Hits of the Highland Lute,” or whatever you want to call it. But don’t click Done yet.
Now you can add your songs or videos. The quickest way is to drag their names directly onto the playlist’s icon. Use any of the buttons across the top—Songs, Albums, Artists, whatever—to find the songs; then drag their names into the empty Playlist column at the right side.
Tip
Instead of making an empty playlist and then dragging songs into it, you can work the other way. You can scroll through a big list of songs, selecting tracks as you go by ⌘-clicking—and then, when you’re finished, choose File→New→Playlist From Selection. All the songs you selected immediately appear on a brand-new playlist.
When you drag a song title onto a playlist, you’re not making a copy of the song. In essence, you’re creating an alias of the original, which means you can have the same song on several different playlists.
iTunes even starts you out with some playlists of its own devising, like “Top 25 Most Played” and “Purchased” (a convenient place to find all your iTunes Store goodies listed in one place). To see all your playlists, make sure you’re viewing your library and your music; click Playlists at the top.
Smart playlists constantly rebuild themselves according to criteria you specify. You might tell one smart playlist to assemble 45 minutes’ worth of songs you’ve rated higher than four stars but rarely listen to, and another to list your most-often-played songs from the ’80s.
Tip
To rate a song, make the window wide enough that you can see the Rating column. (If you don’t see this column, then right-click any column heading and choose Rating from the list of options.) Then just click the Rating column for a selected song. The appropriate number of stars appears—one, two, three, four, or five—depending on the position of your click. You can change a song’s rating as many times as you like—a good thing, considering the short shelf life of a pop hit these days.
To make a smart playlist, choose File→New Smart Playlist (Option-⌘-N). The dialog box shown in Figure 9-15 appears. The controls here are designed to set up a search of your music database. Figure 9-15, for example, illustrates how you’d find up to 74 minutes of Beatles tunes released between 1965 and 1968—that you’ve rated three stars or higher and that you’ve listened to no more than twice.
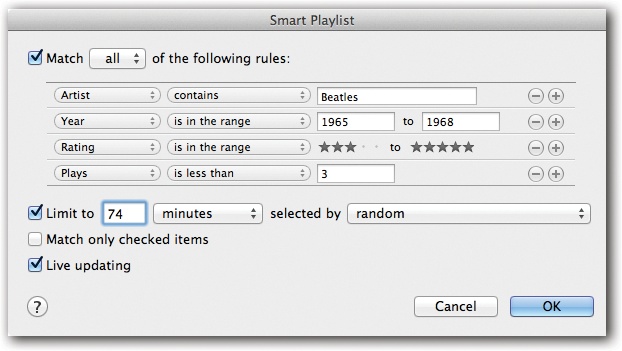
Figure 9-15. A smart playlist is a powerful search command for your iTunes database. You can set up certain criteria, like the hunt for particular Beatles tunes illustrated here. The “Live updating” checkbox makes iTunes keep this playlist updated as your collection changes, as you change your ratings, as your play count changes, and so on.
A playlist is easy to change. Here’s what you can do with just a little light mousework. Start by making sure you’re viewing your library and your music, and click Playlists at the top:
Change the order of songs in the playlist. Drag song titles up or down within the playlist window to reorder them.
Add new songs to the playlist. Click Add To (upper right), and then tiptoe through your iTunes library and drag more songs into a playlist.
Delete songs from the playlist. If your playlist needs pruning, or that banjo tune just doesn’t fit in with the brass-band tracks, you can ditch it quickly: Click the song in the playlist window and then hit Delete or Backspace to get rid of it. When iTunes asks you to confirm your decision, click Remove.
Deleting a song from a playlist doesn’t delete it from your music library—it just removes the title from your playlist.
Delete the whole playlist. To delete an entire playlist, click its name in the list of playlists (far left) and then press Delete. Again, this zaps only the playlist itself, not all the songs you had in it. (Those are still in your computer’s iTunes folder.)
The iTunes software’s second purpose is to be the face of Apple’s online iTunes Store. (From your library, click iTunes Store at upper right).
Once you land on the store’s main page and set up your iTunes account, you can buy and download songs, audiobooks, ebooks, apps, and videos. This material goes straight into your iTunes library.
Tip
iTunes doesn’t have a monopoly on music sales. Amazon, Google, Rhapsody, and other services sell songs in MP3 format, meaning no copy protection. eMusic.com has great MP3 prices, but the music comes from lesser-known bands. And Amazon’s MP3 Downloader software can whip your purchases right into iTunes.
To navigate the iTunes Store, click the buttons across the top strip: Music, Movies, TV Shows, App Store, Books, Podcasts, and iTunes U.
There are all kinds of ways to slice, dice, and search this catalog. For example, in the Music store, you can use the Music button at the top of the screen as a pop-up menu; choose a category or genre, like Free on iTunes (free songs!), Recent Releases, Blues, Metal, and so on. You can use the search box (top right) to find a song by name, album name, band, composer, and so on.
Or just scroll down. The various buttons on the front page of the Music Store represent music Apple thinks you might like: new releases, big hits, Genius recommendations (songs Apple thinks you’ll like based on an analysis of what’s already in your library), and so on. Down the right side of the window, you see lists of the top-selling songs and albums. A handy way to see what the rest of your fellow music lovers are buying, if you don’t mind being a sheep.
The same tools are available for finding TV shows, movies, podcasts, audiobooks, and so on.
The iTunes store also offers an increasingly vast selection of downloadable TV episodes ($2 apiece, no ads) and movies (some you can buy for $10 to $20, others you buy or rent for $3 to $6).
Once you rent a movie, you have 30 days to start watching—and once you start, you have 24 hours to finish before it turns into a pumpkin (actually, it deletes itself from your computer and any phones or tablets you’ve synced it to).
All iTunes movies and TV shows are copy-protected.
When you create an account in iTunes, you automatically authorize that computer to play copy-protected songs from the iTunes Store. Authorization is Apple’s way of making sure you don’t go playing those music tracks on more than five computers, which would greatly displease the movie studios.
You can copy those songs and videos onto a maximum of four other computers. To authorize each one to play music from your account, choose Store→Authorize Computer. (Don’t worry; you have to do this just once per machine.)
When you’ve maxed out your limit and can’t authorize any more computers, you may need to deauthorize one. On the computer you wish to demote, choose Store→Deauthorize Computer.
In Mavericks, Apple has given you an amazing gift: your own radio station. Your own empire of radio stations, in fact.
The new iTunes Radio service (Figure 9-16) lets you listen to exactly the kind of music you want to hear. It doesn’t just distinguish among genres like jazz or rock; your choices are far more specific, like “upbeat male vocals with driving brass section” versus “slow lovesick ballads with lots of strings.”
You don’t get to choose the exact songs or singers you want to hear. Instead, you specify a “seed” song, singer, or musical genre, and iTunes Radio does the rest. For example, if you choose Billy Joel as your “seed,” then you’ll hear a lot of Billy Joel, but also a lot of other music that sounds more or less like his.
Here’s something you can’t do when you listen to real radio: Skip past a song you don’t like. When you tap the ![]() button, iTunes Radio instantly skips to the next song it would have played. In fact, you can even tell it Play More Like This or Never Play This Song to shape your radio station’s future.
button, iTunes Radio instantly skips to the next song it would have played. In fact, you can even tell it Play More Like This or Never Play This Song to shape your radio station’s future.
Note
You’re allowed to skip up to six songs per hour per station. When you’ve reached your skip limit, the Skip button is dimmed for an hour.
In exchange for all this magic, you have to listen to the occasional ad between songs—unless you subscribe to iTunes Match (Keyboards), in which case you never hear any ads.
The idea of a “seed song”–based radio service isn’t new, of course. It’s the same idea as Pandora, a Web site and app that has offered precisely the same features for years. But iTunes Radio is built in, it syncs with the Apple TV, iPhone, and iPad, and it’s so nice to use.
When you open iTunes and look at your library, choose Music from the top-left pop-up menu; then click Radio on the top bar.
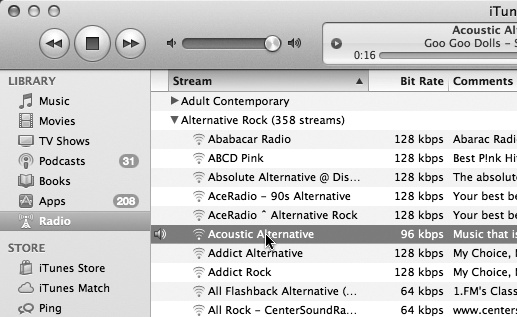
Figure 9-16. This composite illustration shows the most useful parts of iTunes Radio. Top: You can’t fast-forward or rewind within a Radio song. The progress bar is just a graph that shows you where you are in the song. The numbers on either side show you how far you are into the song and how much is left to play. What you can do, though, is click the > button to open this secret menu. Play More Like This and Never Play This Song let you fine-tune your “radio station,” tailoring it precisely to your tastes. Bottom: Here’s how you create a new station. Click a genre tile or type in a “seed” performer.
Across the top, you get a horizontally scrolling set of “album covers” (Figure 9-16). They represent ready-made “radio stations” that Apple has supplied for you. Click the one called “iTunes Top 100: Pop,” for example, and your Mac instantly begins playing the biggest current pop hits.
Below these, you see bigger “album covers” for radio stations you’ve created yourself, as described below. Don’t forget to scroll down to see them all.
As a station plays, the control panel at the top center shows the song’s name, band, and album name. And, of course, the price; Apple would be thrilled if you came across a song you liked so much that you wanted to buy it. That’s why the price button ($1.29, for example) is so prominent. When you tap it, the price changes to say Buy Song; tap again to download the song directly. Now you can listen to it again, on demand, without being subject to the randomness of iTunes Radio.
You can set up a new “radio station” of your own in either of two ways: by choosing one of Apple’s canned, ready-to-use stations or by typing in a song or performer you like.
Prefab stations. Tap the
 button. Boom: There’s a huge, scrolling list of music genres—Blues, Christian, Classical, Indie Rock, and so on (Figure 9-16, bottom). Tap one to see a list of prefab radio stations, ready to hear.
If you tap Jazz, for example, the options include Bop, Early Jazz, Jazz Rock, Latin Jazz, and The Big Band Era. Tap the
 to listen a little bit. If you like what you hear, tap Add, just to its right. You’ve just added a new “radio station” to the iTunes Radio main screen.
Type in a “seed.” Tap
, and then tap the tiny search box at the top. Type in the name of a singer, band, song, or kind of music (“show tunes” or “a cappella,” for example).In the results, tap the entry that looks most promising (“A Cappella Radio,” for example). You’ve just created a new station, and it begins playing instantly. Its details page opens, too, so you can fine-tune it.
Tip
If a song comes on that you especially like, the New Station from Artist and New Station from Song buttons (Figure 9-16) instantly create a new station that will play more music that sounds like this performer or this song. In effect, you get to branch your original station into one that’s more finely tuned to a particular taste.
On the main Radio screen, in the My Stations row, tap the icon of the station you want to mangle or obliterate.
GEM IN THE ROUGH: Internet Radio and Podcasts
iTunes Radio may be all the rage. But the Internet radio feature that’s been in iTunes for years is still around, too. It lets you tune in to hundreds of Internet-based radio stations, which may turn out to be the most convenient music source of all. They’re free, they play 24 hours a day, and their music collections make yours look like a drop in a bucket.
You can also download and listen to podcasts, which are like Web-distributed personal radio shows—some commercial (like NPR) and some homemade (sometimes very homemade).
For radio, choose Music from the top-left corner pop-up menu. Click Internet at the top of the screen. (If you don’t see Radio there, then choose iTunes→Preferences→General and turn on Internet Radio.)
In the main list, if you’re connected to the Internet, you’ll see categories like Blues, Classic Rock, Classical, and so on, as shown here. Click the flippy triangle to see a list of Internet radio stations in that category.
When you see one that looks interesting, double-click it. (The higher the number in the Bit Rate column, the better the sound quality.) Wait a moment for your Mac to connect to the appropriate Internet site, and then let the music begin!
Without add-on shareware (like Audio Hijack Pro), there’s no easy way to capture Internet broadcasts or to save them onto your hard drive. You can, however, drag a radio station’s name into a playlist to make it easier to access later on. If you discover other Internet radio stations that sound interesting, choose File→Open Stream, type in the station’s Web address (URL), and press Return.
To grab a podcast, click iTunes Store at top right. At the top of the screen, click Podcasts. Now you can browse a vast list of available podcasts. When you click one that looks promising, you can either listen to it on the spot, or—and here’s the real fun—click Subscribe.
Once you do that, choose Podcasts from the top-left pop-up menu in your Library view to find the latest episodes of the podcasts you’ve subscribed to. Sync those babies to your iPod or iPhone, and you’ve got interesting material—or, at least fresh material—to listen to every day of the week.
Now you can rename your station (click its existing name) or share it. Using the Play More Like This and Never Play This sections, you can add performers, songs, or genres that you want more of or don’t want to be part of this station anymore.
Finally, Delete a station by right-clicking (or two-finger clicking) its icon.
The third and final function of iTunes is to load up, and back up, your iPhone, iPad, or iPod Touch. (The following discussion uses “iPhone” as an example, but it works the same way with other i-gadgets.) You can connect your iPhone to your computer either wirelessly, over WiFi, or with the white USB cable that came with it.
Once the device is connected, click the iPhone button at the top-right corner of the iTunes screen. (That button doesn’t appear when you’re in the store. In that case, click Library first.) Now you can look over the device’s contents or sync it (read on).
Pretty simple: Plug one end of the white cable (supplied with your iPhone) to your computer’s USB jack. Connect the other end to the device. If it’s turned on and awake, then it’s officially connected.
The familiar white USB cable is all well and good—but since you’re using a wireless device, why not sync it to your computer wirelessly, for Pete’s sake?
The iPhone can be charging in its dock, happily and automatically syncing with your laptop somewhere else in the house. It transfers all the same stuff to and from your computer—apps, music, books, contacts, calendars, movies, photos, ringtones—but through the air instead of via your USB cable.
Your computer has to be turned on and running iTunes. The iPhone and the computer have to be on the same WiFi network.
To set up wireless sync, connect the device using the white USB cable, one last time. Ironic, but true.
Now open iTunes and click the iPhone button at top right. On the Summary tab, scroll down; turn on “Sync with this iPhone over Wi-Fi.” Click Apply. You can now detach the device.
From now on, whenever the iPhone is on the WiFi network, it’s automatically connected to your computer, wirelessly. You don’t even have to think about it. (Well, OK—you have to think about leaving the computer turned on with iTunes open, which is something of a buzzkill.)
Just connecting it doesn’t necessarily mean syncing it, though; that’s a more data-intensive, battery-drainy process. Syncing happens in either of two ways:
Automatically. If the phone is plugged into power (like a speaker dock, an alarm-clock dock, or a wall outlet), and it’s on the same WiFi network, then it syncs with the computer all by itself.
Manually. You can also trigger a sync manually—and this time, the phone doesn’t have to be plugged into power. To do that, open Settings→General→iTunes→Wi-Fi Sync and tap Sync Now. (You can also trigger a WiFi sync from within iTunes—just click the Sync button. It says “Sync” only if, in fact, anything has changed since your last sync.)
Once your iPhone is connected to the computer and you’ve clicked its name in the upper-right corner of iTunes, the top of the iTunes window reveals a horizontal row of word buttons: Summary, Info, Apps, Tones, Music, Movies, TV Shows, Podcasts, Books, Photos, and On This iPhone. For the most part, these represent the categories of stuff you can sync to your device. They let you specify exactly what you want copied to it—which songs, which TV shows, which apps, and so on.
Once you’ve made your selections, click the Summary tab and then click Apply. (The Apply button says Sync instead if you haven’t actually changed any settings.)
To play a song or video in iTunes, double-click it. Or click iTunes’ Play button (![]() ) or press the space bar. The Mac immediately begins to play the songs whose names have checkmarks in the main list, or from the CD currently in your Mac.
) or press the space bar. The Mac immediately begins to play the songs whose names have checkmarks in the main list, or from the CD currently in your Mac.
Tip
The central display at the top of the window shows not only the name of the song and album, but also where you are in the song, as represented by the horizontal strip. Drag the handle, or click elsewhere in the strip, to jump around in the song.
As music plays, you can control and manipulate the sound and the visuals of your Mac in all kinds of interesting ways. Some people don’t move from their Macs for months at a time.
Visuals are onscreen light shows that pulse, beat, and dance in sync to the music. (For real party fun, invite some people who grew up in the ‘60s to your house to watch.)
To summon this psychedelic display, choose View→Show Visuals, or just press ⌘-T. The show begins immediately—although it’s much more fun if you choose View→Enter Full Screen (Control-⌘-F) so the show takes over your whole monitor. True, you won’t get a lot of work done, but when it comes to stress relief, visuals are a lot cheaper than a hot tub.
You can control iTunes’ music playback using its menus, of course, but the keyboard can be far more efficient. Here are a few of the control keystrokes worth noting:
Function | Keystroke |
|---|---|
space bar | |
Next song/previous song | |
Louder, quieter | |
Rewind, fast-forward | |
Eject the CD | ⌘-E |
Turn Visuals on | ⌘-T |
Turn Visuals off | ⌘-T or mouse click |
Full-screen mode | Control-⌘-F |
Exit full-screen visuals | ⌘-T, ⌘-F, Esc, or mouse click |
Here’s a clever touch: In iTunes→Preferences→Playback, you see a checkbox called Sound Check. Its function is to keep the playback volume of all songs within the same basic level so you don’t have to adjust the volume to compensate for different recorded levels. (This setting, too, gets transferred to your iPod, iPad, or iPhone.)
Come to think of it, you could while away quite a few happy afternoons just poking through the Preferences dialog box. It grows richer with every successive version of iTunes.
If you choose Window→Equalizer, you get a handsome control console that lets you adjust the strength of each musical frequency independently (Figure 9-17).
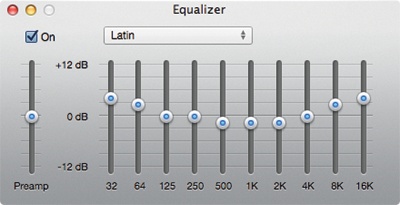
Figure 9-17. Drag the sliders (bass on the left, treble on the right) to accommodate the strengths and weaknesses of your speakers or headphones (and listening tastes). Or save yourself the trouble—use the pop-up menu above the sliders to choose a canned set of slider positions for Classical, Dance, Jazz, Latin, and so on. These settings even transfer to your i-gadgets.