
If you’re setting up a Standard/Managed account, the Parental Controls checkbox affords you the opportunity to shield your Mac—or its very young, very fearful, or very mischievous operator—from confusion and harm. This is a helpful feature to remember when you’re setting up accounts for students, young children, or easily intimidated adults. (This checkbox is available for Admin accounts, too, but turning it on produces a “Silly rabbit—this is for kids!” sort of message.)
You can specify how many hours a day each person is allowed to use the Mac, and declare certain hours (like sleeping hours) off-limits. You can specify exactly who your kids are allowed to communicate with via email (if they use Mail) and instant messaging (if they use Messages), what Web sites they can visit (if they use Safari), what programs they’re allowed to use, and even what words they can look up in the OS X Dictionary.
Here are all the ways you can keep your little Managed account holders shielded from the Internet—and themselves. For sanity’s sake, the following discussion refers to the Managed account holder as “your child.” But some of these controls—notably those in the System category—are equally useful for people of any age who feel overwhelmed by the Mac, are inclined to mess it up by not knowing what they’re doing, or are tempted to mess it up deliberately.
Note
If you apply any of these options to a Standard account, then the account type listed on the Users & Groups panel changes from “Standard” to “Managed.”
To begin, click Open Parental Controls at the bottom of the Users & Groups pane. Click Enable Parental Controls, if necessary. Now you should see the screen shown in Figure 14-5.
GEM IN THE ROUGH: Logs
On the Web tab of the Parental Controls panel, you’ll find a button called Logs. That, my friends, is Big Brother Central. It gives you a complete rundown of what your kids have been up to. Its four categories—Websites Visited, Websites Blocked, Applications, and Messages—are extremely detailed. For example, in Applications, you can see exactly which programs your kids tried to use when, and how much time they spent in each one.
It’s spying, sure, but it’s for the good of the child. (Right?) Use the pop-up menus at the top to change the time period being reported (Today, This Week, or whatever) and how they’re grouped in the list—by date or by application/Web site.
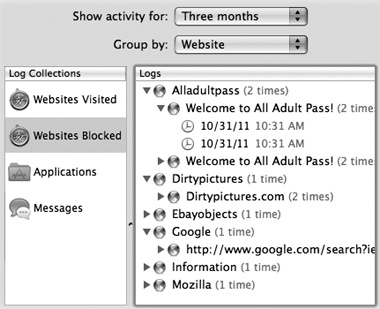
If you see something that you really think should be off limits—a site in the Websites Visited list, an application, a Messages session with someone—click its name and then click Restrict. You’ve just nipped that one in the bud.
Conversely, if the Mac blocked a Web site that you think is really OK, click its name in the list, and then click Allow. (And if you’re wondering what a certain Web page is, click it and then click Open.)
On this tab (Figure 14-5), you can limit which programs your Managed-account flock is allowed to use. (Limiting what people can do to your Mac when you’re not looking is a handy feature under any shared-computer circumstance. But if there’s one word tattooed on its forehead, it would be “Classrooms!”)
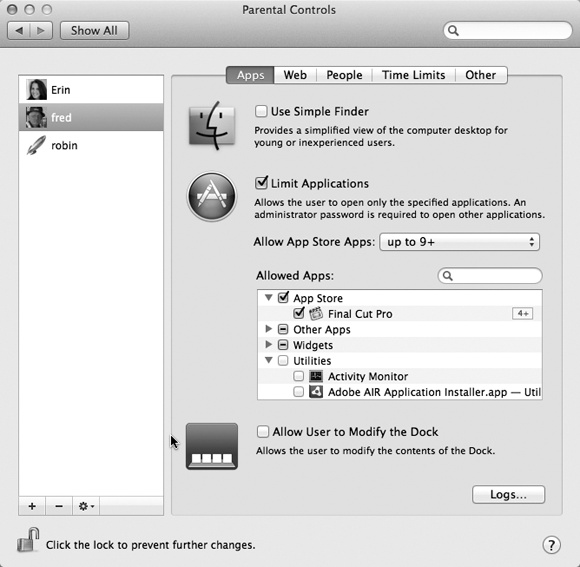
Figure 14-5. In the Parental Controls window, you can control the capabilities of any account holder on your Mac. If you turn on Limit Applications, then the lower half of the Apps tab window lets you choose applications (those from the Mac App Store and others), and even Dashboard widgets, by turning on the boxes next to their names. (Expand the flippy triangles if necessary.) Those are the only programs the account holder will be allowed to use. The search box helps you find certain programs without knowing their categories.
At the bottom of the dialog box shown in Figure 14-5, you see a list of all the programs you’ve bought from the Mac App Store, all other programs, all Dashboard widgets, and all the apps in your Utilities folder. Only checked items will show up in the account holder’s Applications folder. (If you don’t see a program listed, then use the search box, or drag its icon from the Finder into the window.)
Note
This panel gives special attention to programs you’ve bought from the App Store (see Chapter 4). The Allow App Store Apps pop-up menu even lets you specify an appropriate age group for the permitted apps. If you choose “up to 9+,” for example, your well-parented offspring will be allowed to use all App Store programs that have been rated for use by anyone who’s 9 or older.
If you’re really concerned about somebody’s ability to survive the Mac—or the Mac’s ability to survive somebody—turn on Use Simple Finder. Then turn on the checkboxes of the programs that person is allowed to use.
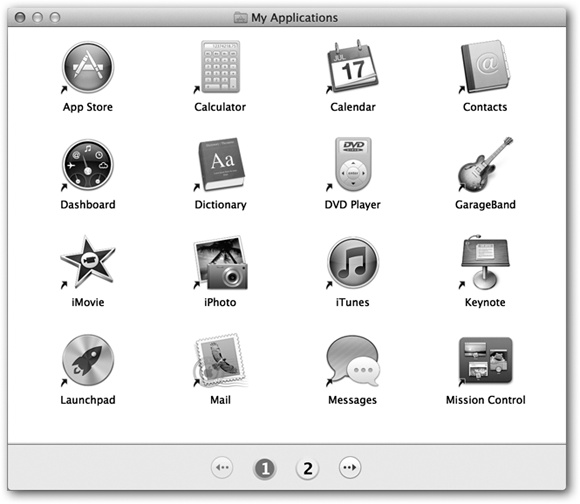
Suppose you’ve been given a Simple Finder account. When you log in, you discover the barren world shown in Figure 14-6. There are only three menus (![]() , Finder, and File), a single onscreen window, no hard drive icon, and a bare-bones Dock. The only folders you can see are in the Dock. They include these:
, Finder, and File), a single onscreen window, no hard drive icon, and a bare-bones Dock. The only folders you can see are in the Dock. They include these:
My Applications. This folder holds aliases of the applications that the administrator approved. They appear on a strange, fixed icon view called “pages.” List and column views don’t exist. As a Simple person, you can’t move, rename, delete, sort, or change the display of these icons—you can merely click them. If you have too many to fit on one screen, you get numbered page buttons beneath them, which you can click to move from one set to another.
Documents. Behind the scenes, this is your Home→Documents folder. Of course, as a Simple Finder kind of soul, you don’t have a visible Home folder. All your stuff goes in here.
Figure 14-6. The Simple Finder doesn’t feel like home—unless you’ve got one of those Spartan, space-age, Dr. Evil–style pads. But it can be just the ticket for less-skilled Mac users, with few options and a basic one-click interface. Every program in the My Applications folder is actually an alias to the real program, which is safely ensconced in the off-limits Applications folder.
Shared. This is the same Shared folder described on Sharing Across Accounts. It’s provided so that you and other account holders can exchange material. However, you can’t open any of the folders here, only the documents.
Trash. The Trash is here, but you won’t use it much. Selecting or dragging any icon is against the rules, so you’re left with no obvious means of putting anything into your Trash.
The only program with its own icon on the Dock is the Finder.
To keep things extra-simple, OS X permits only one window at a time to be open. It’s easy to open icons, too, because one click opens them, not two.
The File menu is stunted, offering only a Close Window command. The Finder menu gives you only two options: About Finder and Run Full Finder. (The latter command prompts you for an administrator’s user name and password, and then turns back into the regular Finder—a handy escape hatch. To return to Simple Finder, just choose Finder→Return to Simple Finder.)
The ![]() menu is really bare-bones: You can Log Out, Force Quit, or go to Sleep. That’s it. And there’s no trace of Spotlight.
menu is really bare-bones: You can Log Out, Force Quit, or go to Sleep. That’s it. And there’s no trace of Spotlight.
Otherwise, you can essentially forget everything else you’ve read in this book. You can’t create folders, move icons, or do much of anything beyond clicking the icons that your benevolent administrator has provided. It’s as though OS X moved away and left you the empty house.
Although the Simple Finder is simple, any program (at least, any that the administrator has permitted) can run from Simple Finder. A program running inside the Simple Finder still has all its features and complexities—only the Finder has been whittled down to its essence.
In other words, Simple Finder is great for streamlining the Finder, but novices won’t get far combating their techno-fear until the world presents us with Simple iMovie, Simple Mail, and Simple Microsoft Word. Still, it’s better than nothing.
This feature is designed to limit which Web sites your kid is allowed to visit.
Frankly, trying to block the racy stuff from the Web is something of a hopeless task; if your kid doesn’t manage to get around this blockade by simply using a different browser, then he’ll just see the dirty pictures at another kid’s house. But at least you can enjoy the illusion of taking a stand, using approaches with three degrees of severity:
Allow unrestricted access to Web sites. No filtering. Anything goes.
Try to limit access to adult Web sites automatically. Those words—“try to”—are Apple’s way of admitting that no filter is foolproof.
In any case, OS X analyzes what’s on a Web page that you try to call up and filters out Web sites with naughty material. These sites won’t appear in Safari while this account holder is logged in. By clicking Customize and then editing the “Always allow” and “Never allow” lists, you can override its decisions on a site-at-a-time basis.
Allow access to only these Web sites. This is the most restrictive approach of all: It’s a whitelist, a list of the only Web sites your youngster is allowed to visit. It’s filled with kid-friendly sites like Disney and Discovery Kids, but of course you can edit the list by clicking the
 and
and  buttons below the list.
Here you can control your kid’s access to three realms of people: those on email, on Messages, and on Game Center. Turn on the checkboxes as you feel it’s necessary.
Then build a list of email and chat addresses, corresponding to the people you feel comfortable letting your kid exchange emails and chats with. Click the ![]() button below the list, type the address, and then press Return. Lather, rinse, repeat.
button below the list, type the address, and then press Return. Lather, rinse, repeat.
Tip
No, you can’t drag cards in from Contacts; that would be much too simple. But after clicking the ![]() button to create a new row in the list (in Edit mode), you can drag just the email address out of a Contacts card you’ve opened up. Or expand the resulting dialog box (click the
button to create a new row in the list (in Edit mode), you can drag just the email address out of a Contacts card you’ve opened up. Or expand the resulting dialog box (click the ![]() button) and double-click someone in your address book.
button) and double-click someone in your address book.
For reasons explained in a moment, turn on “Send permission requests to” and plug in your own email address.
POWER USERS’ CLINIC: Parental Remote Controls
It occurred to somebody at Apple that the Parental Controls feature might be especially useful in a classroom. That person further realized that it’d be very cool if you could adjust the settings for Macs A, B, C, and D while seated at Mac E. That is, the teacher might prefer not to have to scurry from kid’s desk to kid’s desk to make changes.
And that’s why you can operate Parental Controls from another Mac on the same network.
Phase 1: While seated at the first kid’s Mac, open System Preferences, open Parental Controls, click the ![]() , and then enter your password.
, and then enter your password.
Now click the name of the account you want to manage remotely. Then, from the ![]() menu below the list of accounts, choose Allow Remote Setup. Close System Preferences.
menu below the list of accounts, choose Allow Remote Setup. Close System Preferences.
Repeat for each account on each Mac that you’ll want to manage from afar.
Phase 2: Go back to your teacher’s desk. On your own Mac, choose Go→Connect to Server. In the resulting dialog box, click Browse.
Now you get a list of the other Macs on the network. Click one and enter an administrator’s name and password for that Mac.
Now open System Preferences, click Parental Controls, click the ![]() , and then enter your password again. This time, you’ll see a section in the Users & Groups list called Other Computers. Click the account name (on the kid’s Mac) whose settings you want to change. Enter the administrator name and password of the remote computer one more time, and off you go!
, and then enter your password again. This time, you’ll see a section in the Users & Groups list called Other Computers. Click the account name (on the kid’s Mac) whose settings you want to change. Enter the administrator name and password of the remote computer one more time, and off you go!
Now then: When your youngster uses Apple’s Mail program to send a message to someone who’s not on the approved list, or tries to chat with someone not on the list, she gets the message shown at top in Figure 14-7. If she clicks Ask Permission, then your copy of Mail shortly receives a permission-request message; meanwhile, the outgoing message gets placed in limbo in her Drafts folder.
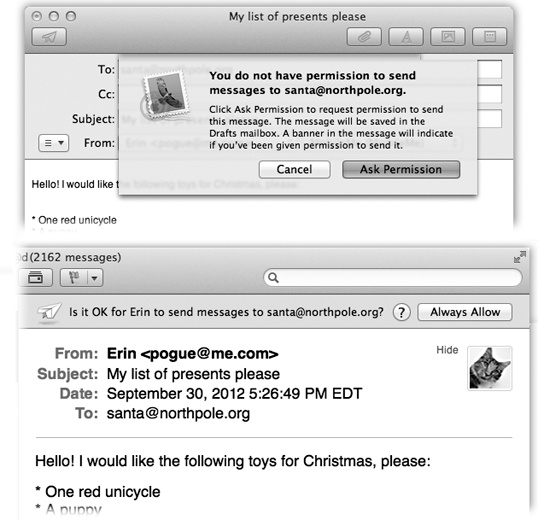
Figure 14-7. Top: If your kid tries to contact someone who’s not on the Approved list, she can either give up or click Ask Permission. Bottom: In the latter case, if you use Mail as your email program, you’ll know about your kid’s attempt. If you’re convinced that the would-be correspondent is not, in fact, a stalker, you can grant permission by clicking Always Allow. Your young ward gets the good news the next time she visits her Drafts folder, where the message has been awaiting word from you, the Good Parent.
If you add that person’s address to the list of approved correspondents (Figure 14-7, bottom), then the next time your young apprentice clicks the quarantined outgoing message in her Drafts folder, the banner across the top lets her know that all is well—and the message is OK to go out.
Note
This feature doesn’t attempt to stop email or chat using other programs, like Microsoft Outlook or Skype. If you’re worried about your efforts being bypassed, block access to those programs using the Permitted Applications list described above.
When your underling fires up Messages or Mail, she’ll discover that her Buddy List is empty except for the people you’ve identified.
Handling the teenage hissy fit is your problem.
Clever folks, those Apple programmers. They must have kids of their own.
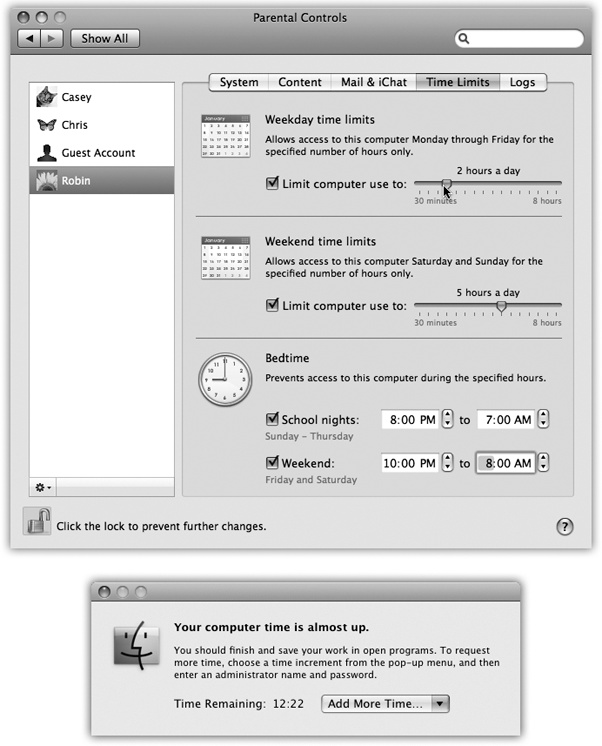
They realize that some parents care about how many hours their kids spend in front of the Mac, and that some also care about which hours (Figure 14-8):
How much time. In the “Weekday time limits” and “Weekend time limits” sections, turn on “Limit computer use to,” and then adjust the slider.
Figure 14-8. Top: If this account holder tries to log in outside the time limits you specify here, she’ll encounter only a box that says, “Computer time limits expired.” She’ll be offered a pop-up menu that grants her additional time, from 15 minutes to “Rest of the day”—but it requires your parental consent (actually, your parental password) to activate. Bottom: Similarly, as her time on the Mac winds down, she’ll get this message. Once again, you, the all-knowing administrator, can grant her more time using this dialog box.
Which hours. In the “Bedtime” section, turn on the checkbox for either “School nights” or “Weekend,” and then set the hours of the day (or, rather, night) when the Mac is unavailable to your young account holder.
In other words, this feature may have the smallest pages-to-significance ratio in this entire book. Doesn’t take long to explain it, but it could bring the parents of Mac addicts a lot of peace.
Tip
When Time Limits have been applied, your little rug rats can now check to see how much time they have left to goof off on the Mac before your digital iron fist slams down. When they click the menu-bar clock (where it now says the current time), a menu appears, complete with a readout that says, for example, “Parental Controls: Time Remaining 1:29.” Good parenting comes in many forms.
This tab offers a few miscellaneous options, including the following:
Hide profanity in Dictionary. OS X comes with a complete electronic copy of the New Oxford American Dictionary. And “complete,” in this case, means “it even has swear words.”
Turning on “Hide profanity in Dictionary” is like having an Insta-Censor™. It hides most of the naughty words from the dictionary whenever your young account holder is logged in.
Limit printer administration. When this checkbox is on, your underlings aren’t allowed to change your Mac’s printer settings. You wouldn’t want them deleting or installing any printers, would you?
Limit CD and DVD burning. When you first create Standard accounts, their holders are free to burn CDs or DVDs. But in a school lab, for example, you might want to turn off the ability to burn discs (to block software piracy). That’s why this box is here.
Disable changing the password. Pretty self-explanatory. This option prevents your unruly minions from changing their passwords. That’s your job, after all.