iBooks is Apple’s ebook reading program. For years, it’s turned the iPhone or iPad into a sort of pocket-sized Kindle. It lets you carry around dozens or hundreds of books in your pocket, which, in the pre-ebook days, would have drawn some funny looks in public.
And now, in Mavericks, it comes to the Mac.
The beauty of all this is iCloud syncing. If you’re reading a book on your iPhone in line for the Department of Motor Vehicles, you’ll find that your iPad opens up to exactly the same page when you’re on the train home. And when you open your MacBook at home, it’ll be on the same page as where you left the iPad. Your books, documents, notes, highlighting, and other details are synced among your Apple gadgets, too. (You can turn that syncing feature off in iBooks→Preferences→General if it spooks you.)
Most people think of iBooks as a reader for books that Apple sells on its iTunes bookstore—bestsellers and current fiction, for example—and it does that very well. But you can also load it up with your own PDF documents, as well as thousands of free, older, out-of-copyright books.
Tip
iBooks is very cool and all. But in the interest of fairness, it’s worth noting that Amazon’s free Kindle app, and Barnes & Noble’s free B&N eReader app, are much the same thing—but offer much bigger book libraries at lower prices than Apple’s.
To shop the iBooks bookstore, open the iBooks app. Click iBooks Store in the upper-left corner; the iBooks app becomes the literary equivalent of the App Store, complete with the icons across the bottom. The links here offer everything you’d need in your bibliographic quest: “NY Times” (bestseller lists), “Top Authors,” “Best of the Month,” “Books Made into Movies,” “Free Books,” and so on. You can also search by name or click Purchased to see what you’ve bought.
Tip
Once you’ve bought a book from Apple, you can download it again on other Macs, iPhones, iPod Touches, and iPads. Buy once, read many times. That’s the purpose of the Not In My Library tab, which appears when you click Purchased.
But unless you have some kind of privacy concern, you may as well tell iBooks to download your books automatically as you buy them on your other Apple gadgets. Open iBooks→Preferences→Store and turn on “Download new purchases automatically.” That way you’ll never forget what you bought on your iPad as you sit down at your Mac.
Once you find a book that looks good, you can click Get Sample to download a free chapter, read ratings and reviews, or click the price itself to buy the book and download it straight to the phone.
If you see a book cover bearing the ![]() icon, that’s a book you own—it’s available in your online locker—but you haven’t downloaded it to this Mac yet. Click to download.
icon, that’s a book you own—it’s available in your online locker—but you haven’t downloaded it to this Mac yet. Click to download.
Apple’s bookstore isn’t the only way to get books. You can also load up your ebook reader from your computer, feeding it with ePub files.
Actually, ePub is the normal iBooks format. It’s a very popular standard for ebook readers, Apple’s and otherwise. The only difference between ePub documents you create and the ones Apple sells is that Apple’s are copy protected.
To add your own ePub documents to your iBooks library, just drag their icons off the desktop and into the iBooks window. Or choose File→Add to Library.
And where are you supposed to get all these files? Free (and not free) ebooks in ePub format are everywhere. There are 33,000 free downloadable books at gutenberg.org, for example, and over a million at books.google.com—oldies, but classic oldies, with lots of Mark Twain, Agatha Christie, Herman Melville, H.G. Wells, and so on. (Lots of these are available in the Free pages of Apple’s own iBooks store, too.)
iBooks can display and catalog PDF documents, too. PDFs are everywhere—people send them as attachments, and you can turn any document into a PDF file. (For example, on the Mac, in any program, choose File→Print; in the resulting dialog box, click PDF→Save as PDF.) You bring them into iBooks by dragging them into its window, or with File→Add to Library.
When you double-click one, though, it doesn’t open in iBooks; it opens into Preview. Which is, after all, a program expressly designed for reading PDF documents.
You’ve been warned.
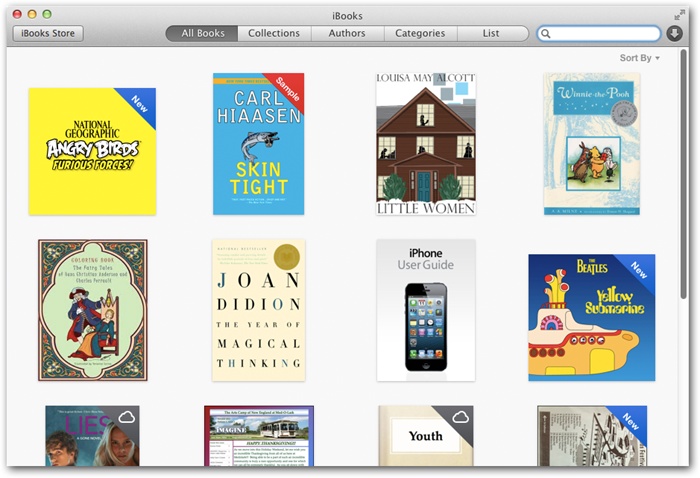
When you open iBooks, you see your own personal library represented as little book covers (Figure 18-14). Mostly what you’ll do here is click a book to open it. But there are all kinds of other activities waiting for you:
You can reorganize your bookshelf. Use the Sort By pop-up menu to choose Most Recent or Title—or Sort Manually, which means that you can drag books around into any order you like.
You can view your library as a compact list. Click List at the top to switch the book-cover view to a much more boring (but more compact) list view. The column headings let you sort the list by author, title, category, and so on. And there’s a search box, too, which lets you search your books’ titles—helpful if you have an enormous library.
To delete a book, click it and then press the Delete key; confirm in the warning box. Of course, deleting a book from the Mac doesn’t delete your safety copy on your other gadgets or online.
Organize your books into folders. In iBooks, the “folders” are called collections, but it’s the same idea. You might have one for school, one for work, and a third for somebody who shares your Mac, for example.
Figure 18-14. Your iBooks library is more than just book covers. Stamps at the top-right corner indicate which are new, which are free samples, and which are actually online, waiting to be downloaded. In the “Sort By” pop-up menu, you can choose Show Title & Author to add that information beneath the book covers.
To see your collections, click Collections; the Collections list opens at the left side. Make a new collection by clicking the
 button (or choose Use File→New Collection; type to name it.
Now, to file your books away, select them (you can press ⌘ as you click to select multiple books); then choose File→Add to Collection and choose the name of the collection you want them in.
But come on—you’re a reader, not a librarian. Here’s how you read an ebook.
Open the book by double-clicking the book cover. Now the book opens, ready for you to read. Looks great, doesn’t it (Figure 18-15)? If you’re returning to a book you’ve been reading, iBooks remembers your place.
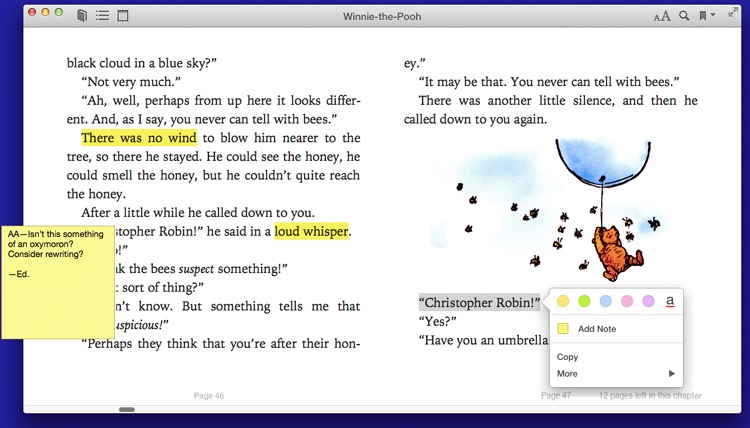
Figure 18-15. Here’s a composite shot showing all kinds of iBooks features: a Note open (left), the highlighting palette (right), and the navigation bar (top). Ordinarily, the reading experience is much quieter.
In general, reading is simple: Just read. Turn pages like this:
You should also take a moment to adjust your reading environment. For example:
Enter Full Screen mode for the biggest, least distracting view of your book (see Full Screen Mode).
Specify either a one-page or a two-page spread (use the Single Page or Two Pages commands in the View menu). In Full Screen mode, Single Page isn’t available.
Adjust the type size using the
 button. That’s a huge feature for people with tired or over-40 eyes. And it’s something paper books definitely can’t do.
The same pop-out panel offers a Fonts button, where you can choose from five different typefaces for your book.
Adjust the background color. The
button also offers a Themes button, which lets you specify whether the page itself is white, black (with white text, for nighttime reading), or Sepia (off-white).
While you’re reading, iBooks makes all the onscreen controls fade away so you can read in peace. But if you move your mouse to the top of the window, a row of additional controls appears (Figure 18-15):
 opens the Table of Contents panel. The chapter or page names are “live”—you can click one to jump there.
 opens the search box. It lets you search for text within the book you’re reading, which can be extremely useful.
 adds a bookmark to the current page. This isn’t like a physical bookmark, where there’s only one in the whole book; you can use it to flag as many pages, for as many reasons, as you like.
Once you’ve accumulated a bookmark or two, use the
 next to the menu to see a list of them—and to jump back to one.
Here are some more stunts that you’d have trouble pulling off in a printed book. If you double-click a word, you get a graceful, elegant page from iBooks’ built-in dictionary. You know—in the unlikely event that you encounter a word you don’t know.
And if you drag across some text to highlight it, you get some surprise options (Figure 18-15):
Highlight. Click one of the colored dots to add tinted, transparent highlighting, or underlining, to the word you clicked. (To remove highlighting, click inside a highlighted area and click Remove Highlighting.)
Note. When you click Add Note, iBooks creates highlighting on the selected passage and opens an empty, colored sticky note so you can type in your own annotations. When you click outside the note, it collapses down to a tiny Post-it square in the margin. Click to reopen it.
To delete a note, click the highlighted text. Click Remove Note or Remove Highlight & Note.
Copy copies the highlighted text, ready for pasting in some other program.
In the More menu, a few additional options lurk:
Search Book opens the same search box that you’d get by clicking the
icon—except that this time, the highlighted word is already filled in, saving you a bit of typing.Search Web, Search Wikipedia hand off the highlighted text to Safari, which searches Google or Wikipedia.
Facebook, Messages, Twitter, Email opens the Share sheet (The OS X Spelling and Grammar Checker) so you can send the highlighted material to somebody else by message or email, or post a favorite quote on Twitter or Facebook.
Speak reads the highlighted passage aloud.
Tip
The Mac’s speaking feature isn’t limited to a blob of text that you’ve highlighted. You can use the Edit→Speech→Start Speaking command to have the entire book read to you—in a voice that’s only a little robotic. Yes, this is exactly the feature that debuted in the Amazon Kindle and was then removed when publishers screamed bloody murder—but somehow, so far, Apple has gotten away with it.
Once you’ve added bookmarks, notes, and highlighting to your book, they’re magically and wirelessly synced to any other copies of that book—on other gadgets, like the iPad or iPod Touch, other iPhones, or other Mavericks Macs. Very handy indeed.
Furthermore, if you click the ![]() button, you’ll see the Notes pane. It presents a tidy list of all your bookmarked pages, notes, and highlighted passages. You can click one of the listings to jump to the relevant page.
button, you’ll see the Notes pane. It presents a tidy list of all your bookmarked pages, notes, and highlighted passages. You can click one of the listings to jump to the relevant page.
If you’ve embraced the simple joy of reading electronic books, then you deserve to know where to make settings changes: in iBooks→Preferences. Here are the options waiting there.
Let lines break naturally. Ordinarily, iBooks presents text with ragged-right margins. Select “Justify text” if you like the text to stretch from edge to edge of the screen.
Auto-hyphenate words. Sometimes, typesetting looks better if hyphens allow partial words to appear at the right edge of each line. Especially if you’ve also turned on “Justify text.”
Sync. Turn this on if you’d like your bookmarks, highlighting, and book collections to be synced with your other Apple gadgets.
See the tip on Tip.
If you’re a parent, you might wish to shield your impressionable offspring from dirty reading material—or to shield your credit card from wild teenage book-spending sprees (we should all have that problem!).
Click the ![]() and enter your administrator’s password; now you can turn on “Disable the iBooks Store” to prevent purchases, or “Restrict books with explicit content” to block the downloading of raunchy material.
and enter your administrator’s password; now you can turn on “Disable the iBooks Store” to prevent purchases, or “Restrict books with explicit content” to block the downloading of raunchy material.