OS X, as you’ve probably heard, no longer comes on a DVD. When your Mac won’t even start up, there’s no DVD to insert as a backup startup disk, as there always was before. That’s a scary place to be; if your hard drive is sick, then everything on it may be inaccessible to you. What you need is an emergency drive that can repair the hard drive and get you back in operation.
Apple is way ahead of you on this one. It offers three simulated repair disks: three ways to supply disk-repair and system software–repair tools in times of crisis.
Here’s the sneaky surprise: When you install Mavericks, it automatically creates an invisible hidden “hard drive” (a partition of your main drive that has its own icon) called Recovery HD. It’s a 650-megabyte “drive” that’s generally invisible to you. It’s even invisible to Disk Utility, so even if you erase your hard drive, the Recovery HD is still there to help you.
But if you can’t seem to start up your Mac properly, or if your hard drive is acting a little flaky, you’ll be glad you had this “separate” startup disk. On it, Apple has provided some emergency tools for fixing drive or software glitches, restoring files, browsing the Web, and even reinstalling OS X.
Note
The OS X installer creates the Recovery HD partition only if your startup drive is an internal drive. In certain other situations, it won’t create the partition—for example, if you’re installing OS X onto a RAID volume or one with a non-standard Boot Camp partition setup.
You can power up your Mac from the Recovery HD in either of two ways:
Hold down ⌘-R as the Mac is starting up. You can let go when you see the Apple logo appear.
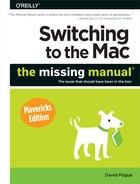
Hold down the Option key as the Mac is starting up. When you see the Startup Manager (Figure B-2, top), let go. Click the up-arrow button below the Recovery HD icon.
Either way, you wind up at the Utilities screen shown in Figure B-2, bottom.
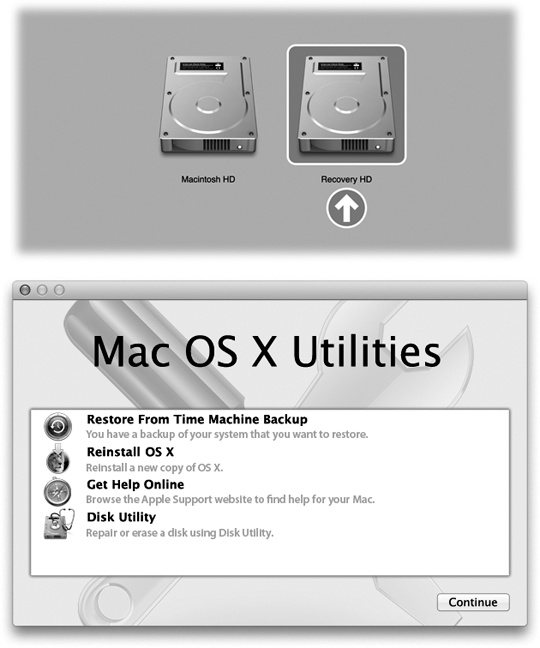
Here, Apple has supplied you with four important tools:
Restore From Time Machine Backup. If your Mac is really hosed, this is the option you want. It restores your entire software world—programs, data, settings, OS X itself—from the Time Machine backup you carefully set up as you read Chapter 5.
Figure B-2. Top: This simple display of disk icons is known as the Startup Manager. It’s an easy way to specify which disk you want to start up from. Bottom: Here’s the point of the Recovery HD partition: a screen full of emergency utilities that can fix your Mac’s regularly scheduled hard drive. If there’s a pop-up menu at the bottom, it’s for choosing a WiFi hotspot so that you can access the rest of your network. That might be useful when, for example, you want to access your Time Machine backups.
This option completely erases your existing hard drive, so—you know. Be sure.
Once you choose this option, click Continue. You’re now asked to choose the Time Machine drive, then the time-stamped backup you want to restore from, and, finally, the drive or partition you want to wipe out. You get one more warning that you’re about to wipe out the destination drive. When you click Continue, the restoration begins. When it’s all over—usually a couple of hours later—the Mac restarts as though nothing ever happened.
Reinstall OS X. You can use this option to install a copy of OS X onto any hard drive—for example, you could reinstall it on your main internal drive.
Get Help Online. This option opens your Safari Web browser, which presents you with some helpful information about using the Recovery Mode that you’ve fired up. You’re actually online at this point, so you can also visit any other Web site you might find helpful.
Quit Safari when you’re finished browsing; you return to the main OS X Utilities window.
Disk Utility. Use this option to open Disk Utility, the Mac’s hard drive diagnostics-and-repair program. You can use it to check, fix, erase, or partition any of your hard drives.
For example, you can repair the main startup disk, which is often the most useful option.
Those four options are the big-ticket items, but don’t miss the menu bar. The commands here let you open the Firmware Password Utility, Network Utility (Network Utility), and Terminal (Saving a report).
OK, the Recovery HD concept is clever. And most of the time, it’s all you need.
But what if your hard drive is completely hosed? What then, smart guy? You can’t very well boot up from the Recovery HD if it’s sitting on the same dead hard drive.
Or what if you’ve just installed a brand-new, bigger, or faster hard drive? It doesn’t have OS X on it. It doesn’t have Recovery HD on it. How are you supposed to install Mavericks?
In those situations, recent Mac models—those released in 2011 and later—offer an even cleverer option: Internet Recovery. This mode offers the same exact options that the Utilities screen of Recovery HD would have—but you’re connecting to that software online, over a high-speed Internet connection. You’re literally starting up from Apple’s hard drives, thousands of miles away.
So even if your hard drive is dead as a doornail, you can still repair it, reinstall OS X, and so on.
To fire up Internet Recovery, make sure your computer is in a WiFi hotspot or connected to an Ethernet network. Then hold down ⌘-R as the computer is starting up. You can let go when you see the screen that asks you to choose a WiFi network. Do that, and then enter the password for the network, if necessary.
Now your Mac downloads a disk image containing just enough software to get you to the Utilities screen described in the previous section.
But what if the hard drive is so sick that you can’t start up from the Recovery HD—and your Mac isn’t new enough to offer the Internet Recovery feature? (Or what if it does offer that feature, but you’d rather repair your Mac a quicker way?)
One solution is to build yourself a bootable OS X flash drive, DVD, or hard drive, as described on Recovery Mode: Three Emergency Disks. Not only is it capable of starting up or reinstalling OS X, but it also has a complete set of recovery tools on board.
But creating a bootable drive takes a lot of steps, and it requires sacrificing an 8-gigabyte (or bigger) flash drive. If you have any flash drive, even a 2-gigabyte one that somebody handed you at a trade show, you can load it up with just the recovery tools, to use in times of trouble. Creating this kind of emergency flash drive is somewhat easier than creating the kind of full-blown reinstallation flash drive described in Appendix A.
Note
To create an emergency “disk,” your Mac must have OS X on it already, including the invisible Recovery HD partition. That’s because it relies on the data and software on that partition.
Also, you have to format the flash drive correctly, as described on The Homemade Installer Disk. It’s OK if the flash drive is partitioned; just leave at least 2 gigs for the recovery partition.
To get started, download Apple’s free OS X Recovery Disk Assistant. (It’s available from this book’s “Missing CD” page at www.missingmanuals.com. It may seem to be intended for Mountain Lion, but it still works fine in Mavericks.)
Insert your flash drive into the Mac. Open the OS X Recovery Disk Assistant; click Agree to get through the legalese screen.
Click the name of the flash drive, and then click Continue. You’re warned that this process will erase the flash drive (or its partition), and you’re asked to authenticate yourself with an administrator name and password.
When you click OK, your Mac begins creating the recovery disk. After a minute or so, a message congratulates you, and the newly created drive’s icon appears in the Recovery Disk Assistant program, bearing the name Recovery HD.
To use this emergency disk, hold down the Option key as the Mac starts up. You wind up at the Startup Manager screen shown in Figure B-2, top. From the pop-up menu, choose your WiFi hotspot.
Now click the up-arrow button below the Recovery HD icon. (You may even see two Recovery HD icons—one of them is the USB flash drive, and the other is the invisible partition on your hard drive.) Your Mac is starting up from the flash drive! After a moment, you wind up at the Utilities screen described earlier in this appendix.