- Switching to the Mac: The Missing Manual, Mavericks Edition
- The Missing Credits
- Introduction
- One. Welcome to Macintosh
- 1. How the Mac Is Different
- 2. Folders, Dock & Windows
- Renaming Icons
- Selecting Icons
- Moving and Copying Icons
- Aliases: Icons in Two Places at Once
- Finder Tags
- The Trash
- Get Info
- Shortcut Menus, Action Menus
- The Spotlight Menu
- The Spotlight Window
- Customizing Spotlight
- Smart Folders
- 4. Documents, Programs & Mission Control
- The Mac App Store
- Other Ways to Get Mac Software
- Opening OS X Programs
- Launchpad
- Windows That Auto-Reopen
- The “Heads-Up” Program Switcher
- Full Screen Mode
- Mission Control: Death to Window Clutter
- Dashboard
- Exposé
- Hiding Programs the Old-Fashioned Way
- How Documents Know Their Parents
- Keyboard Control
- The Save and Open Dialog Boxes
- Auto Save and Versions
- Documents in the Cloud
- 5. Entering, Moving & Backing Up Data
- Two. Making the Move
- 6. Transferring Your Files to the Mac
- 7. Special Software, Special Problems
- ACDSee
- Acrobat Reader
- ACT
- Ad Subtract (Pop-Up Stopper)
- Adobe [your favorite program here]
- AOL
- AIM (AOL Instant Messenger)
- Children’s Software
- Chrome
- Easy CD Creator
- Encarta
- Eudora
- Excel
- Firefox
- Games
- Google Desktop Search
- Google Earth
- Google Chrome
- ICQ
- Internet Explorer
- iTunes
- McAfee VirusScan
- Microsoft Access
- Microsoft Money
- Microsoft Office
- Microsoft Publisher
- Microsoft Visio
- Minesweeper
- MSN Messenger
- NaturallySpeaking
- Netscape
- Newsgroup Readers
- Norton AntiVirus
- Norton Utilities
- Notepad
- Outlook/Outlook Express/Windows Mail
- PaintShop Pro
- Picasa
- PowerPoint
- QuickBooks
- Quicken
- RealPlayer
- RssReader
- Skype
- Snagit (Screenshots)
- Solitaire
- Street Atlas USA
- TaxCut, TurboTax
- Winamp, MusicMatch
- Windows Media Player
- WinZip
- Word
- WordPerfect
- Yahoo Messenger
- 8. Windows on Macintosh
- 9. Hardware on the Mac
- Mac Meets Printer
- Making the Printout
- Managing Printouts
- Printer Sharing
- Faxing
- PDF Files
- Fonts—and Font Book
- Digital Cameras
- Disks
- Startup Disks
- Erasing a Disk
- Burning CDs and DVDs
- iTunes: The Digital Jukebox
- DVD Movies
- AirPlay
- Keyboards
- Mouse
- Monitors
- Scanners
- Three. Mavericks Online
- 10. Internet Setup & iCloud
- 11. Mail & Contacts
- Checking Your Mail
- Tailoring the Look of Mail
- Writing Messages
- Reading Email
- VIPs
- The Anti-Spam Toolkit
- Contacts (Address Book)
- 12. Safari
- 13. Messages
- Four. Putting Down Roots
- 14. Accounts, Security & Gatekeeper
- 15. Networking, File Sharing & Screen Sharing
- 16. System Preferences
- The System Preferences Window
- Accessibility
- App Store
- Bluetooth
- CDs & DVDs
- Date & Time
- Desktop & Screen Saver
- Dictation & Speech
- Displays
- Dock
- Energy Saver
- General
- iCloud
- Internet Accounts
- Keyboard
- Language & Region
- Mission Control
- Mouse
- Network
- Notifications
- Parental Controls
- Printers & Scanners
- Security & Privacy
- Sharing
- Sound
- Spotlight
- Startup Disk
- Time Machine
- Trackpad
- Users & Groups
- 17. Notifications
- 18. The Freebie Programs
- Your Free OS X Programs
- App Store
- Automator
- Calculator
- Calendar
- Chess
- Contacts
- Dashboard
- Dictionary
- DVD Player
- FaceTime
- Font Book
- Game Center
- GarageBand
- iBooks
- Image Capture
- iMovie, iPhoto
- iTunes
- Launchpad
- Maps
- Messages
- Mission Control
- Notes
- Photo Booth
- Preview
- QuickTime Player
- Reminders
- Safari
- Stickies
- System Preferences
- TextEdit
- Time Machine
- Utilities: Your OS X Toolbox
- Activity Monitor
- AirPort Utility
- AppleScript Editor
- Audio MIDI Setup
- Bluetooth File Exchange
- Boot Camp Assistant
- ColorSync Utility
- Console
- DigitalColor Meter
- Disk Utility
- Grab
- Grapher
- Java Preferences
- Keychain Access
- Migration Assistant
- Network Utility
- RAID Utility
- System Information
- Terminal
- VoiceOver Utility
- Five. Appendixes
- A. Installation
- B. Troubleshooting
- C. The “Where’d It Go?” Dictionary
- About [this program]
- About [this program]
- Accessibility Options control panel
- Active Desktop
- Add Hardware control panel
- Add or Remove Programs
- All Programs
- Alt key
- Automatic Update
- Backspace key
- Battery level
- BIOS
- Briefcase
- Calculator
- Camera and Scanner Wizard
- CDs and DVDs
- Character Map
- Clean Install
- Clipboard
- Command line
- Control Panel
- Copy, Cut, Paste
- Ctrl key
- Date and Time
- Delete Key (Forward Delete)
- Desktop
- Directories
- Disk Defragmenter
- Disks
- Display control panel
- DLL files
- DOS prompt
- Drivers
- End Task dialog box
- Exiting programs
- Explorer
- Favorites
- Faxing
- File Sharing
- Floppy disks
- Folder Options
- Fonts
- Help and Support
- Hibernation
- Internet Explorer
- Internet Options
- IRQs
- Java
- Keyboard control panel
- Logging in
- Mail control panel
- Maximize button
- Menus
- Minimize button
- Mouse control panel
- (My) Computer
- (My) Documents, (My) Pictures, (My) Music
- (My) Network Places
- Network Neighborhood
- Notepad
- Phone and Modem Options control panel
- Power Options
- Printer Sharing
- Printers and Faxes
- PrntScrn key
- Program Files folder
- Properties dialog box
- Recycle Bin
- Regional and Language Options control panel
- Registry
- Run command
- Safe Mode
- ScanDisk
- Scheduled Tasks
- Scrap files
- Screen saver
- Search
- Shortcut menus
- Shortcuts
- Sounds and Audio Devices
- Speech control panel
- Standby mode
- Start menu
- StartUp folder
- System control panel
- System Tray
- Taskbar
- Taskbar and Start Menu control panel
- “Three-fingered salute”
- ToolTips
- Tweak UI
- User Accounts control panel
- Windows (or WINNT) folder
- Windows logo key
- Windows Media Player
- Windows Messenger
- WordPad
- .zip files
- About [this program]
- D. The Master OS X Keystroke List
- Index
- About the Author
- Colophon
- Copyright
At the top of every Finder window is a small set of function icons, all in a gradient-gray row (Figure 2-26). These icons start out on the toolbar:
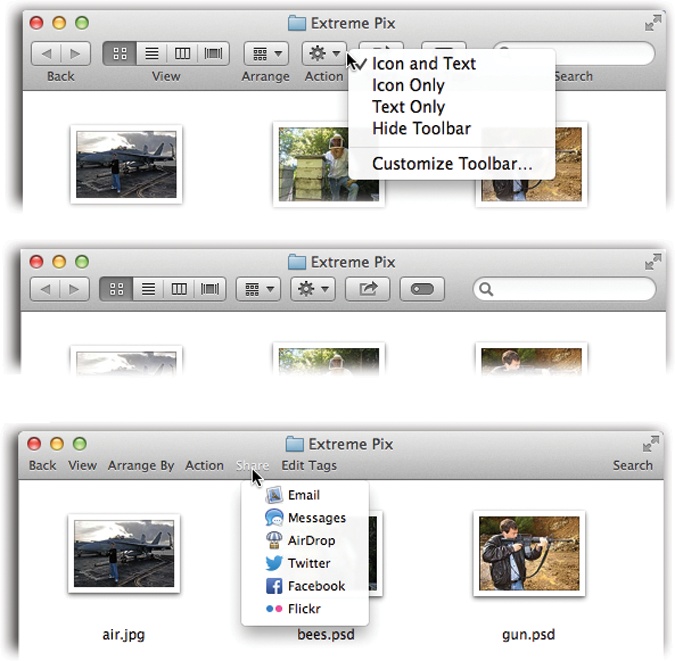
Figure 2-26. If you right-click (or two-finger click) a blank spot on the toolbar, you get a pop-up menu that offers you a choice of looks for the buttons here: Icon and Text, Icon Only, or Text Only. In Text Only mode (bottom), the four View buttons are replaced by a little pop-up menu called View. Furthermore, the search box turns into a one-word button called Search. Clicking it brings up the Searching window.
Back (
 ), Forward (
 ). The Finder works something like a Web browser. Only a single window remains open as you navigate the various folders on your hard drive.
The Back button (
) returns you to whichever folder you were just looking at. (Instead of clicking , you can also press ⌘-[, or choose Go→Back—particularly handy if the toolbar is hidden, as described below.)The Forward button (
) springs to life only after you’ve used the Back button. Clicking it (or pressing ⌘-]) returns you to the window you just backed out of.View controls. The four tiny buttons next to the
button switch the current window into icon, list, column, or Cover Flow view, respectively. And remember, if the toolbar is hidden, you can get by with the equivalent commands in the View menu at the top of the screen—or by pressing ⌘-1 for icon view, ⌘-2 for list view, ⌘-3 for column view, or ⌘-4 for Cover Flow view.Arrange. This pop-up menu lets you group the files in a window by date, name, or other criteria; see Arrange By and Sort By.
Action (
 ). You can read about this context-sensitive pop-up menu on Shortcut Menus, Action Menus.
Share (
 ). You can read about this context-sensitive pop-up menu on New Folder with Selection.
Tags (
 ). Here’s the Tags menu described on Creating Tags.
Search box. This little round-ended text box is yet another entry point for the Spotlight feature described in Chapter 3. It’s a handy way to search your Mac for some file, folder, disk, or program.
With the toolbar, the Dock, the Sidebar, and the large icons of OS X, it almost seems like there’s an Apple conspiracy to sell big screens.
Fortunately, the toolbar doesn’t have to contribute to that impression. You can hide it by choosing View→Hide Toolbar or by pressing Option-⌘-T. (The same keystroke, or choosing View→Show Toolbar, brings it back.)
Of course, you can also just make it smaller by hiding the labels (or the icons), as shown in Figure 2-26.
You can drag toolbar icons around, rearranging them horizontally, by pressing ⌘ as you drag. Taking an icon off the toolbar is equally easy. While pressing the ⌘ key, just drag the icon clear away from the toolbar. You can also get rid of a toolbar icon by right-clicking (two-finger clicking) it and choosing Remove Item from the shortcut menu.
You can also drag a different set of icons onto the toolbar. That’s the purpose of the View→Customize Toolbar command.
-
No Comment