
Here it is, one of the big-ticket new features in Mavericks: Finder tags. They offer a way to color-code, or apply a keyword to, your icons (Figure 3-6). Finder tags are a lot like the Finder labels that have been on the Mac for decades, with a few differences:
You can apply more than one tag to an icon, in effect letting it be in more than one place, or sortable in more than one way. A photo of Aunt Edna in her early days on the farm could be tagged Relatives, Photos, and Ancient History.
You can have more than seven of them; in fact, you can have dozens (although you can choose from only seven colors).
You can create, assign, and use tags in many more ways, in many more places, than you could labels. For example, you can assign a label or two to a new document as you’re naming and saving it.
Tags sync. That is, if you have more than one Mac, and they’re signed into the same iCloud account, the same tags are available on all your machines.
After you’ve applied tags to icons, you can perform some unique file-management tasks—in some cases on all of them simultaneously, even if they’re scattered across multiple hard drives. For example:
Round up files with Find. Using the Spotlight search command described in Chapter 3, you can round up all the icons with a particular tag, no matter which folders they’re in.
Sort a list view by tag. No other Mac sorting method lets you create an arbitrary order for the icons in a window. When you sort by tag, the Mac creates alphabetical clusters within each tag grouping.
This technique might be useful when, for example, your job is to process several different folders of documents; for each folder, you’re supposed to convert graphics files, throw out old files, or whatever. As soon as you finish working your way through one folder, flag it with a tag called Done. The folder jumps to the top (or bottom) of the window, safely marked for your reference pleasure, leaving the next unprocessed folder at your fingertips, ready to go.
Tip
In a list view, the quickest way to sort by tag is to first make the tag column visible. Do so by choosing View→Show View Options and then turning on the Tags checkbox.
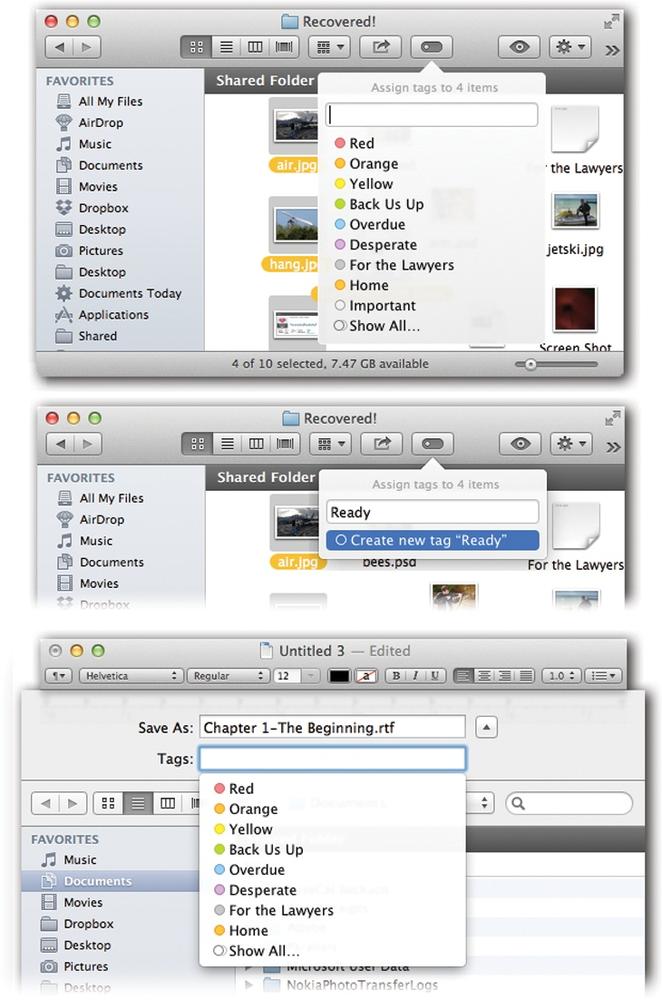
Figure 3-6. Use the File menu,
 menu, or shortcut menu to apply label tags to highlighted icons. You can even apply a label within an icon’s Get Info dialog box. Middle: The same menu is your opportunity to create (and simultaneously apply) a new tag. Just type it. Bottom: You can also apply a tag—or even create a new one—at the moment you’re saving a new document. Just type the new tag names into the Tags box that appears just below the Save As box.
Track progress. Use different-colored tags to track the status of files in a certain project. For example, the first drafts have no tags at all. Once they’ve been edited and approved, make them blue. Once they’ve been sent to the home office, make them purple.
(Heck, you could have all kinds of fun with this: Money-losing projects get red tints; profitable ones get green; things that make you sad are blue. Or not.)
Apple starts you out with a few handy tags, ready to apply to any files you like. They come with ingenious names like Red, Yellow, Blue, and Gray.
If you upgraded your Mac from an earlier version of OS X, you’ll find your old Finder labels magically reincarnated as tags, too.
But to create a new tag, use one of the techniques shown in Figure 3-6. You’re simultaneously creating a new tag and applying it to the file(s) in question. The new tag will be available later in the regular Tags menus.
To change a tag’s name, reassign it to a different color, or delete the tag entirely, open the Tags tab of the Preferences dialog box, as shown in Figure 3-7.
Tip
Actually, an identical set of controls appears when you right-click (or two-finger click) one of the tags that appears in the Sidebar of any Finder window.
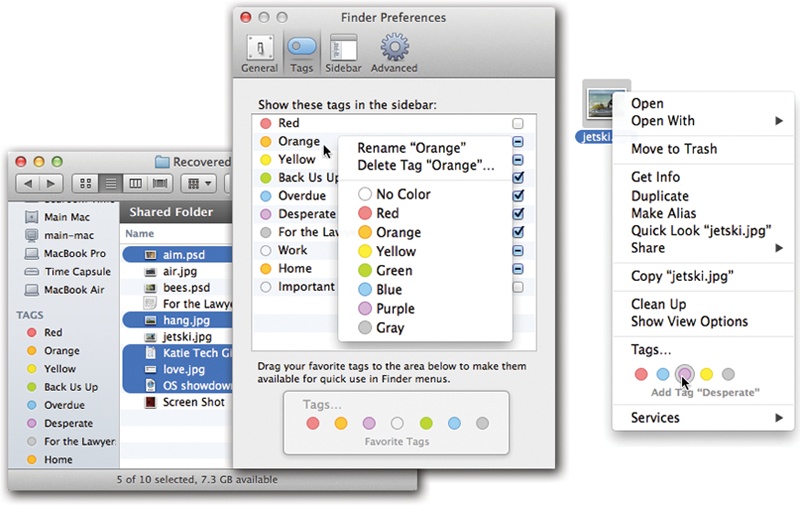
Figure 3-7. Middle: In Finder→Preferences→Tags, you can right-click a tag for the shortcut menu shown here. It lets you rename a tag, delete it, or choose a different color. Left: You can install some favored tags in the Sidebar. Right: An even smaller set of favorites appears in Finder menus and shortcut menus.
Apple is prepared for Tagageddon; it’s created a system that could lead some people to create hundreds of tags. That number, of course, is a bit unwieldy. Fortunately, Apple has also equipped you with not one but two sets of “favorites.”
Sidebar favorites. In Mavericks, the Sidebar at the left side of each Finder window has a section reserved exclusively for displaying the tags you use the most (Figure 3-7, left). To choose which tags you want installed here, open the Preferences dialog box shown in Figure 3-7 and turn on the corresponding checkboxes. (Turn off a checkbox to remove its tag from the Sidebar, of course.)
Menu favorites. As shown in Figure 3-7 at right, there’s room for only a few favorite tags—their colored dots, anyway—right in the File→Tags menu, or the shortcut menu that appears when you right-click or two-finger click an icon.
So how do you choose which tags get these exalted positions? In the dialog box shown in Figure 3-7 (middle), drag each favored tag’s name into the Favorite Tags box at bottom. (You can remove one by dragging its dot out of that box.)
To apply a tag to a file, highlight the file(s), and then do one of the following:
Choose from a menu. Right-click (or two-finger click) an icon in the Finder or click the
button at the top of the Finder window (Figure 3-6, middle). Or choose File→Tags.In each case, you get to see colored dots representing the “menu favorite” tags in your arsenal, as described above. Or you can click Show All to see the complete scrolling list of dozens. (You can apply multiple tags to a single icon.)
Use the Sidebar. You can drag Finder icons onto the names of tags in the Sidebar.
Apply while saving. You can tag a file as you’re saving it (Figure 3-6, bottom).
Apply in the Get Info box. See Locked Files.
Apply within the app. Certain Apple programs, like TextEdit, Pages, Numbers, and Keynote, bear a tiny triangle next to the document’s name on the title bar. You can click it to open a Tags box, which lets you edit a document’s tags while you’re still working on it.
Hit a keystroke. The Spotlight Menu describes how you can assign keystrokes to common Mac menu commands. As it turns out, the File→Tags command is available for assignment, too. Give it, say, Control-T, and from now on you can call up the Tags dialog box without even taking your fingers off the keyboard.
For the application name, use Finder; for the menu title, type Tags… (press Option-semicolon to produce that three-dot ellipsis, not three periods).
Once you’ve applied a tag, you can see it in the Finder. It’s represented as a colored dot preceding the file’s name; see Figure 3-8.
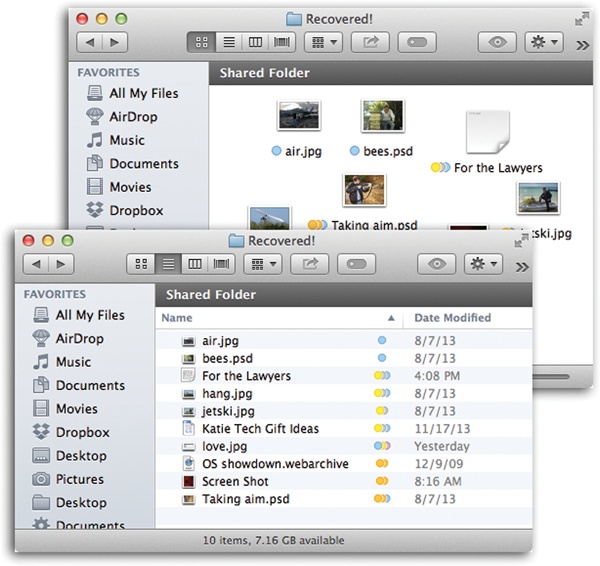
Figure 3-8. In Mavericks, a tag no longer changes the background color of an icon’s name, as labels once did. That’s because you can now apply more than one tag to a single icon. Instead, tags show up as colored dots—and if you’ve applied more than one, they show up as stacked, side-by-side colored dots.
OK. So you sat up all weekend, painstakingly tagging each of your thousands of files. Now comes the payoff: using tags.
Find them all with a click. Click one of the tag names in the sidebar (Figure 3-7, left). You’ve instantly performed a Mac-wide search for all files with that tag. They appear in a single search-results window, regardless of where they’re actually sitting on your computer.
Find them all using the Find box. Type a few letters of the tag’s name in the Find box at the top-right corner of any Finder window. Use the “Tags” search token (Power Searches with Tokens).
Find them all with Spotlight. Into the Spotlight box, type tag:orange (or whatever the tag name is). The results list shows you all the icons you’ve tagged that way.
The beauty of these last two methods is that you can combine search criteria. In the Spotlight box, you could search for tag:orange and kind:movie, for example.