Considering how many ways there are to move files back and forth between Macs, it seems almost comical that anybody complained when Apple discontinued built-in floppy disk drives. Here’s a catalog of the different ways you can move your files from one computer to another, including some that might not have occurred to you.
You can shoot a file to another Lion-or-later Mac with a single drag-and-drop operation, thanks to AirDrop (AirDrop) or another file-sharing method. You can open files from the other drives, copy stuff back and forth—anything you would do with your own disk. Step-by-step instructions are in Chapter 15.
Best for files of any size, when the computers are in the same building.
Tip
And for $0, you can create an ad hoc network, meaning a tiny wireless network between just two computers (or a handful). Great when you’re in the car somewhere, or in the airport waiting lounge, or a hotel lobby, and someone says, “Hey, can I have a copy of that?” Details are on The Get Info method.
Dropbox is a free service, almost universally adored, that lets you create synchronized folders on multiple computers. Add a file to, say, your New Projects folder on your home Mac, and it appears instantly in the matching folder on your Windows folder at work.
You can use Dropbox to share folders with other people, too. Just drag a new file into a shared folder, and marvel as your associates get an auto-generated email message letting them know that you’ve posted a new document. They open the shared folder on their own desktops, and there are your files, waiting. (Details are at www.dropbox.com/help/19.)
The great thing about services like Dropbox is that you don’t have to worry about the small file-size limits imposed by email. (There’s a 2-gigabyte storage limit on Dropbox’s free accounts, but you can upgrade to larger storage capacities for a fee; you also get more storage granted when you refer a friend to Dropbox.)
You can always burn your files onto a blank CD or DVD and then carry or mail it to the recipient. Awfully slow and clumsy, but it does result in a safety copy of whatever you’re transferring.
FireWire Disk Mode/Thunderbolt Disk Mode is a brilliant but little-known Macintosh-only feature that lets you turn one Mac into an external hard drive for another. This is by far the fastest method yet for transferring a lot of data—even faster than copying files over a network. It’s extremely useful in any of these situations:
You’re traveling with a laptop. You want to copy your life onto it from your main Mac, including your entire 5 GB email folder and project files, before taking it on a trip, and then unload it when you return.
You have a new Mac. You want to copy everything off the old one, without having to wait all night.
One Mac won’t start up. You want to repair it, using another Mac as a “front end.”
Unfortunately, not all Macs have a FireWire or Thunderbolt jack. If you’re among the lucky, though, you can use the following trick. (In the following steps, suppose your main Mac is an iMac and you want to use a MacBook as an external hard drive for it.)
Connect the FireWire (Thunderbolt) jacks of both computers with a cable.
If you have an older Mac with a FireWire 400 jack, you need a 6-pin FireWire cable—not the one that connects a camcorder to a Mac. The one you need has the same large connector on both ends.
Modern Macs have Apple’s FireWire 800 jacks, which require a 9-pin FireWire cable (and give you much greater speed). If only one Mac has a FireWire 800 jack, then use that computer’s traditional FireWire 400 connector instead. Otherwise, you need either a special FireWire 800–to–FireWire 400 cable, or the 400-to-800 adapter that came with your Mac.
On the MacBook, choose
 →System Preferences. Click Startup Disk.
The Startup Disk panel opens.
Click Target Disk Mode. In the confirmation box, click Restart.
The MacBook turns off and then on again. A giant gray FireWire icon (
 ) or Thunderbolt icon (
 ) bounces around the laptop screen.
Now take a look at the iMac’s screen: Sure enough, there’s the MacBook’s hard drive icon on the desktop. You’re ready to copy files onto or off of it, at extremely high speeds, and go on with your life.
When you’re finished working with the MacBook, eject it from the iMac’s screen as you would any disk. Then turn off the laptop by pressing the power button.
The next time you turn on the MacBook, it’ll start up from its own copy of OS X, even if the cable is still attached. (You can disconnect the cable whenever you please.)
Note
The steps above describe the Mavericks method of setting up Target Disk Mode. But the old way still works, too. Leave the iMac turned on, but shut down the MacBook. (Make sure it’s plugged in. You wouldn’t want the battery to die in the middle of this process.) Now turn the MacBook on again, but hold down the T key immediately after the chime. After a moment, you see the big Y-shaped FireWire icon (![]() ) on the laptop screen, and the laptop’s hard drive shows up on the iMac’s desktop. Continue from step 4 above.
) on the laptop screen, and the laptop’s hard drive shows up on the iMac’s desktop. Continue from step 4 above.
This method is arguably quicker, because you don’t have to open up System Preferences. And this method works when the Mac is too sick even to start up.
A flash drive, also called a thumb drive, is one of those keychain-like doodads that plug into your USB jack. Inside is a big chunk of memory that acts like a miniature hard drive. When the flash drive is plugged into your Mac, its icon shows up on the desktop as a disk. Use it as a tiny, 8-gigabyte hard drive (or whatever size you’ve bought).
The beauty of a flash drive is that it works instantly and automatically with any Mac or any Windows machine, without software installation or configuration. It’s small and light enough to carry around on your keychain…and it’s so darned cool. If you regularly transfer documents between Macs or between Macs and PCs, a flash drive will change your life.
An iPod is an extremely fine music player with enormous capacity. That’s because it contains an actual hard drive (or a bunch of memory) that stores the songs.
But because the modern iPod has a USB connector, most models make dandy portable hard drives for everyday files, too—not just music.
To set the iPod up for data transfer, proceed like this:
Connect the iPod to your Mac with its white USB cable. Open iTunes. Click the iPod icon in the left-side Source list.
The iPod Summary screen appears.
Turn on “Enable disk use.”
A dialog box warns you that even when you’re just syncing up your music collection (and not using the iPod as a hard drive for files), you have to manually eject the iPod after each use.
Click OK, and then OK again.
After a moment, you see the iPod’s icon appear on your desktop.
Now you’ve got yourself a multigigabyte external hard drive. Just drag your files onto or off the iPod icon, exactly as though it’s a disk (which it is). The iPod automatically keeps your data files separate from your music files; your other files won’t be touched when you update your music collection from iTunes.
Whenever you’re finished using the iPod as a hard drive, eject it in any of the usual ways. For example, in the Finder, drag its icon to the Trash, or right-click it and choose Eject from the shortcut menu.
Bluetooth is a cable-elimination technology. It’s designed to let Bluetooth-equipped gadgets communicate within about 30 feet, using radio signals.
Bluetooth comes built into most computers and cellphones, plus the occasional printer, pocket organizer, even camera or camcorder.
Bluetooth is built into all recent Macs. It’s ready, therefore, to connect with Apple’s wireless keyboard and mouse; to get on the Internet using a Bluetooth cellphone as a cordless modem; to listen to music through wireless headphones or speakers; and to transfer files through the air to similarly equipped gear.
Bluetooth is pretty slow. (You get transfer speeds of 30 to 150 K per second, depending on the distance.) But when you consider the time you’d have taken for wiring, passwords, and configuration using any other connection method, you may find that Bluetooth wins, at least in casual, spur-of-the-moment, airport-seat situations.
And Bluetooth works no matter what the gadget—Mac, Windows, cellphone—so it’s great as a universal file-exchange translator, too.
Note
For more details on configuring your Mac for Bluetooth connections, see Activating the screen saver.
To shoot a file or two across the airwaves to a fellow Bluetooth-equipped Mac fan, first pair your Mac with the other Bluetooth machine, as described on More Gestures. In System Preferences→Bluetooth, make sure your Mac is Discoverable. Discoverable means, “Other Bluetooth gadgets can see me.” (Check the receiving gadget, too, to make sure it’s in Discoverable mode.) Then you’re ready to send:
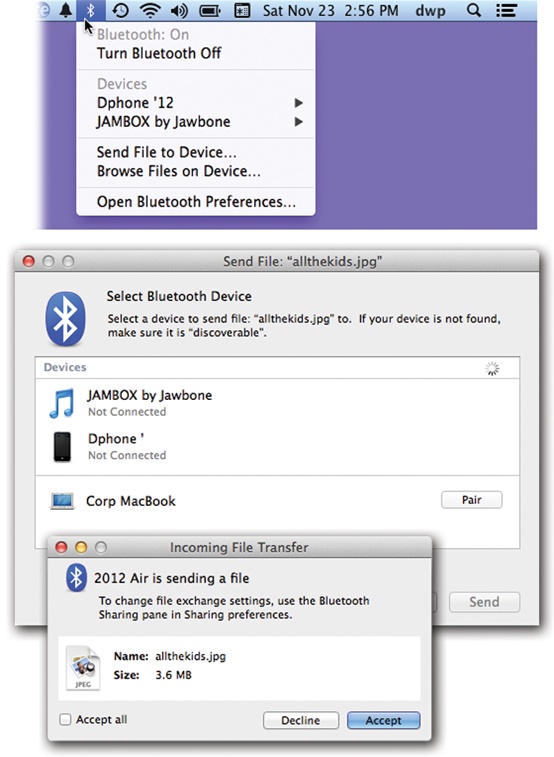
From the Bluetooth
 menulet (Figure 5-10, top), choose Send File.
If you don’t have the Bluetooth menulet on your menu bar, then open System Preferences. Click Bluetooth, and turn on “Show Bluetooth status in the menu bar.”
Figure 5-10. Top: Once your Mac is paired with the other gadget, it’s super-easy to shoot a file to it wirelessly. In this example, you’ll start by choosing Send File to Device. (But you could save the second step by choosing the gadget’s name from this menulet and then Send File from the submenu.) Not shown: The box where you’re asked to choose the file for sending. Middle: OK. The Mac is saying: “Send this file to what gadget?” Click the one you want. (If this is the first time, you might see the Pair button next to the discoverable gadget’s name. Click it to complete the introduction.) Bottom: This is the view from the receiving machine (a Mac, in this case). “Someone’s sending you a file. Do you want it?”
After a moment, the Select File to Send dialog box appears. (You’ve actually succeeded in opening a program called Bluetooth File Exchange, which sits in your Applications→Utilities folder.)
Navigate to, and select, the files you want to send.
If you’re trying to send a bunch of them, you may find it easier to drag their icons onto the Bluetooth File Exchange icon in your Applications→Utilities folder.
Either way, a new Send File dialog box appears, showing the list of Bluetooth machines within range (Figure 5-10, middle).
In the list of found machines, click the name of the one you want to send your files to, and then click Send.
What happens now depends on how the receiving machine has been set up. In most cases, a dialog box tells the receiver that files are arriving (Figure 5-10, bottom); if he clicks Accept, then the download proceeds. He’s then offered the chance to either (a) open each transferred file or (b) reveal its highlighted icon in the Finder.
Tip
In System Preferences→Sharing→Bluetooth Sharing, you can control what happens when someone sends you files via Bluetooth. Usually, you’ll want your Mac to ask whether or not to accept these files. (That’s what the option “Ask What to Do” means.) You can also specify where you want received files to wind up—for example, in your Downloads folder.
You can also perform this entire procedure in reverse. That is, you can go fishing through your buddy’s files without her explicitly having to send anything.
To make a Mac invadable, the person to be invaded must open System Preferences→Sharing and turn on Bluetooth Sharing. Here’s also where she can specify what folder is available to you for examination (the Mac proposes her Home→Public folder), and what kind of security she wants to set up.
Then all you have to do is choose Browse Device from your own menulet (you can see it in Figure 5-10)—and let the rummaging begin!