
Chapter 8. Working with trees and lists
In this chapter and the next, we’ll explore some of the most useful widgets provided by JFace. However, the framework that goes along with those widgets is also one of the most complicated that we’ll cover in this book, so pay attention.
Certain widgets’ main purpose is to display sets of data. Although the data can be anything from rows in a database to a list of your most frequently played mp3s, certain common ways of structuring that data for display occur frequently. Even when the final display is very different, many common tasks must be done to make sure the data is ready to be shown to the user. The data must be obtained from a source; it’s often sorted into a certain order or has elements filtered out; and you need a way to associate a text string or image with each domain object. JFace provides the Viewer framework to deal with these common issues; we’ll need to discuss the common elements of that framework before we get into the details of particular widgets.
After we provide a foundation for understanding viewers and their related classes, this chapter will show you how to display data in a list or tree. We’ll follow that up with a discussion of tables in chapter 9.
8.1. Viewers and the Viewer framework
JFace provides the Viewer framework to enable easy manipulation of certain widgets. This framework includes many classes and interfaces with complex relationships, as shown in figure 8.1. As we discuss each section of this framework in turn, you may find it helpful to refer to this diagram frequently.
Figure 8.1. An overview of the Viewer framework
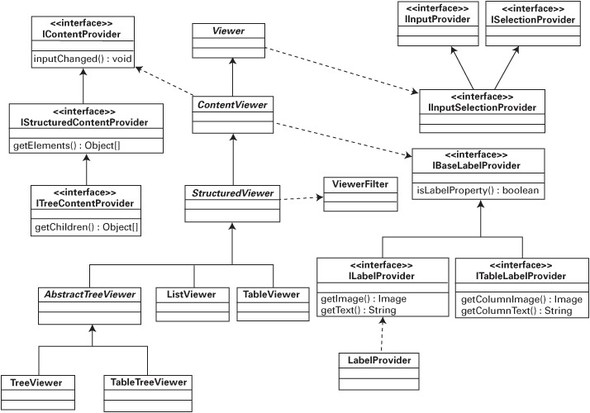
As we discuss these classes, it’s important to keep the big picture in mind. The Viewer framework is an implementation of the design pattern known as Model-View-Controller (MVC). The core of the idea is to separate domain objects (the Model) from the user interface (the View) and the logic that controls them (the Controller).
At the heart of the framework is the abstract class Viewer and its descendants. The path of the inheritance hierarchy we’re concerned with here involves ContentViewer and StructuredViewer.
An appropriate Viewer provides a layer of abstraction between a widget and the data it displays and forms the View portion of the MVC triad, creating a display for a domain object. To the client programmer, a Viewer provides an interface that is much more natural to manipulate than is provided by the widget itself. The widget, on the other hand, is given a way to obtain data without having to worry about its source. By manipulating a collection of objects through the interface provided by the Viewer, the widget can rearrange the data into a form most convenient for its own internal use without affecting the original data structure.
ContentViewer adds functionality to deal with data in the form of domain objects by making use of a variety of interfaces, which by JFace convention have an I at the beginning of their names. These interfaces, which we’ll discuss in more detail later in the chapter, represent extension points, which you can use to plug your application’s custom logic into the framework.
StructuredViewer imposes a structure on the data provided to ContentViewer. The specifics of the structure can vary widely, but methods to perform common tasks such as filtering or sorting are implemented at this level of the hierarchy.
Each widget—Tree, List, Table, and so on—has a matching Viewer subclass, such as ListViewer or TableViewer. The widget is intended to be matched with at most one instance of its Viewer, and once the Viewer has been associated with the widget, all manipulation should be done through the viewer instead of to the widget directly. Trying to mix calls between the widget and its viewer will have unpredictable results. All concrete Viewer subclasses provide a constructor that takes an instance of the appropriate widget and associates it with the new viewer. Alternatively, a constructor taking only a Composite is provided, which instantiates a widget as a child of the given Composite and binds it to the viewer.
Once associated with the widget, viewers typically provide several methods. The most important of these are easy ways to add elements to and retrieve or remove elements from the collection of data displayed by the widget. Additionally, methods to set label providers are implemented at this level. Label providers, discussed in detail in the next section, generate suitable UI text from domain objects. The IBaseLabelProvider interface serves as the common interface that all label providers must implement. More specific interfaces then derive from IBaseLabel-Provider and are used by individual widget types. The abstract ContentViewer class defines these methods to take the IBaseLabelProvider interface; but by implementing the methods here, you can insert checks to ensure that only implementations of IBaseLabelProvider that are appropriate to the given widget are added, while the common logic is performed by the superclass.
Most of the methods defined in these base classes won’t be called directly by your code. Instead, you’ll provide the viewer with a class that implements one of the interfaces, and the viewer will call methods on your class at the appropriate time. Table 8.1 summarizes the methods you’ll need to be familiar with to make proper use of viewers.
Table 8.1. Important viewer methods
|
Method |
Defined in ... |
|---|---|
| getControl() | Viewer |
| getSelection() | Viewer |
| refresh() | Viewer |
| setInput() | Viewer |
| setContentProvider() | ContentViewer |
| setLabelProvider() | ContentViewer |
| addFilter() | StructuredViewer |
| reveal() | StructuredViewer |
| setSorter() | StructuredViewer |
8.1.1. Providers
The first subclass of Viewer, ContentViewer, adds functionality for dealing with the data displayed by a widget, thereby providing the M (Model) in MVC. It’s the role of a provider to perform application-specific work to make a piece of data available to the widget—for example, to return the text that should be displayed to represent a given domain object in a list. There are two types of providers: Label-Providers and ContentProviders. The class hierarchies we discuss here are both shown in figure 8.1; you’ll probably find it helpful to refer back to the diagram as we explore the various interfaces and classes.
Label providers
Label providers implement either ILabelProvider or ITableLabelProvider, both of which extend IBaseLabelProvider. ILabelProvider and ITableLabelProvider are similar in spirit, the only difference being that ITableLabelProvider deals with table columns, whereas ILabelProvider assumes one-dimensional data.
The logic for label providers revolves around three methods. The first is isLabelProperty(), defined in IBaseLabelProvider. Given an object and the name of a property, the method returns a boolean indicating whether a change to the given property requires a corresponding update to a visible label. It isn’t mandatory, but properties typically conform to JavaBean naming standards: that is, if the bean has a property name, then a getName() and possibly a setName() method is defined for the object. isLabelProperty() is called when an object has been updated by an Editor (see the next section) to optimize drawing operations. If isLabelProperty() returns false, ContentViewer knows that it isn’t necessary to redraw the widget.
Subinterfaces of IBaseLabelProvider also provide getText() and getImage() methods in various forms. Each is given an object, and it’s the responsibility of the provider to return the text and/or image that should be displayed for that object. Returning null results in no text or image being displayed. The only difference between standard label providers and table label providers is that the methods in ITableLabelProvider take an additional parameter indicating the index of the column being populated; the concept is otherwise exactly the same.
JFace provides a default implementation of ILabelProvider called LabelProvider, which returns null for all images, along with the result of calling toString() on the given object for the text. This can be useful for debugging or getting a prototype running quickly, but you’ll usually need to subclass LabelProvider or provide a new implementation of the interface that performs logic appropriate to your application. The data returned by toString() typically isn’t appealing for users to look at.
Content providers
In addition to label providers, ContentViewer concerns itself with content providers. Whereas a label provider provides the text or image to display for an element, a content provider provides the actual elements to be displayed. IStructuredContentProvider defines the getElements() method, which is given an Object as input and returns an array of Objects to display in the widget. When setInput() is called on the Viewer, the object given as a parameter is passed to the content viewer. The content provider is then responsible for using that input parameter to return a collection of domain objects to be displayed by the widget.
A simple example is a content provider that displays information from an XML file. It could take an input stream as a parameter, parse the XML from the stream, and then return objects representing various elements of the XML data to be displayed by the viewer. It isn’t necessary to use a content provider, however; if you add() the elements that you wish to display, it will work fine.
Two other methods on IStructuredContentProvider can often be left empty. The first is dispose(), which the viewer calls when it’s being disposed of; you can use this method to clean up any allocated resources that the content provider may be hanging on to. The last method is inputChanged(Viewer viewer, Object old-Input, Object newInput), which the viewer uses to notify the content provider that the root input object has changed. Although many applications can safely ignore this method, the Javadocs suggest its intended use. Suppose your application contains domain objects that broadcast events, such as a network resource that sends notifications when it becomes unavailable. When the viewer’s input is changed from one of these objects to another, inputChanged() can be used to unregister the content provider from listening to the old input object and register for events from the new one.
8.1.2. Listeners
The various viewer classes provide support for a variety of event listeners. The base Viewer class offers notification of help request and selection changed events. Moving down the hierarchy, StructuredViewer adds support for double-click events, and AbstractTreeViewer adds default selections and tree events. Events and listeners were already discussed in detail in chapter 4; the same principles that we talked about earlier apply here as well. Listeners are used to implement the logic behind the application; they make up the Controller portion of MVC.
8.1.3. Filters and sorters
As we mentioned earlier, it’s common to want to sort items before they are displayed. This sorting can be done by an infinite variety of parameters, from alphabetically sorting contact information in an address book to listing emails by data received. To perform sorting or similar manipulations of data, the elements need some sort of structure. Knowledge of this structure comes from the Structured-Viewer class. The key functionality offered by a StructuredViewer is the ability to run objects through a filter and sort them before they’re displayed.
Filters are an elegant idea; they help decouple the creation of a group of items from the act of deciding which ones should be displayed. A natural first inclination would be to create only the items that should be displayed. However, this approach lacks flexibility. For each set of objects to display, you must rewrite the retrieval logic. Additionally, for efficiency reasons, it may make more sense to load the entire set of objects once and cache them. Making constant round trips to a database is a sure way to slow your application to a crawl.
In order to use a filter, you’ll load the entire collection once, either by using a ContentProvider or by add()ing the objects. When it’s time to display the data, you call StructuredViewer’s addFilter() method, giving it an implementation of ViewerFilter that only accepts the items to be displayed.
For example, assume we have a list of words. The user can choose to display only words that start with a certain string. The code is simple. It first defines a filter:
public class SubstringFilter extends ViewerFilter
{
  private String filterString;

  public SubstringFilter( String s )
  {
    filterString = s;
  }

  public boolean select( Viewer viewer,
                        Object parentElement, Object element )
  {
    return element.toString().startsWith( filterString );
  }
}
Now we can use it on the viewer:
StructuredViewer viewer = ...
//set content provider, etc for the viewer
SubstringFilter filter = new SubstringFilter( "" );
viewer.addFilter( filter );
By default, this displays every element, because any string starts with the empty string. When the user enters a string to filter by, these lines of code update the display:
viewer.removeFilter( filter );
filter = new SubstringFilter( userEnteredString );
viewer.addFilter( filter );
Calling addFilter() automatically triggers refiltering of the elements, and now only strings that start with the string entered by the user are displayed. Notice that there was no need to worry about the original collection of objects. The viewer still maintains the entire collection; it chooses to display only the ones for which the filter returns true when select() is called. It’s even possible to have multiple filters on a viewer; in this case, only items that pass all the filters are displayed.
There is one caveat to be aware of when you’re using a design that revolves around filters: Although it’s conceptually simpler to load an entire collection and let the filters handle selection, this approach won’t scale well if your collection potentially contains millions of items. In this case, you’ll probably have to fall back on the “load only what you need” method. As always, carefully consider the demands of your specific application.
Similar in spirit to filters, StructuredViewer also allows custom sorting of its elements using setSorter() and a ViewerSorter. After all elements have been filtered, the sorter is given a chance to reorder the elements before they are displayed. To continue our earlier example, you could use a sorter to alphabetize the words in the list. The default implementation of ViewerSorter sorts the labels for each element in a case-insensitive manner. The easiest way to implement your own ViewerSorter is to override the compare() method, which acts identically to the compare() method in java.util.Comparator. compare() is given two objects and returns a negative integer, zero, or a positive integer, to denote less than, equals, or greater than, respectively.
You can use the isSorterProperty() method to avoid resorting if a given change wouldn’t change the sort order. If you need more complex comparisons, you can use the category() method to break elements into different categories, each of which will be sorted independently. For example, if you have a list of Order objects, category() could return 1 for inbound orders and 2 for outbound orders, whereas compare() sorts based upon the order number. The list will then group all the inbound orders together, sorted by order number, followed by all the outbound orders, also sorted by order number. This technique is most effective if there is also a visual cue that corresponds to the different categories. The following example shows the code used to implement such an approach:
public class OrderSorter extends ViewerSorter
{
  public int category(Object element)
  {
    //assumes all objects are either InboundOrder
    //or OutboundOrder
    return (element instanceof InboundOrder) ? 1 : 2;
  }

  public int compare(Viewer viewer, Object e1, Object e2)
  {
    int cat1 = category(e1);
    int cat2 = category(e2);
    if( cat1 != cat2 ) return cat1 – cat2;
    //Order is the superclass of both InboundOrder
    //and OutboundOrder
    int firstOrderNumber = ((Order)e1).getOrderNumber();
    int secondOrderNumber = ((Order)e2).getOrderNumber();
    return firstOrderNumber – secondOrderNumber;
  }
}
Notice that this example manually calls category(). This is necessary because we’ve overridden the compare() method, so if we don’t call category() ourselves, it won’t be called at all.
Unlike filters, it’s only possible to have one sorter at a time on a given StructuredViewer. Multiple sorters wouldn’t make sense, because each would clobber the work done by the others.
The default implementation of compare() generates labels for each item and sorts based on those generated labels. For this reason, the Viewer is passed to the compare() method. By casting the Viewer to a ContentViewer, the label provider can be retrieved using getLabelProvider() and used to get the text that will be displayed for the given element. In the previous example, overriding compare() thus becomes unnecessary if the label provider is implemented such that it returns the order number in String form. In that case, you could get away with implementing category() to differentiate between inbound and outbound orders and trust the default compare() to correctly group the orders. However, doing so would introduce coupling between the label provider and the sorter, since if the label provider changes, the orders may not be sorted correctly. How serious an issue this might be will vary from application to application.
Now that we have all the background out of the way, let’s see some examples of using these widgets.
8.2. Trees
A tree control displays data in a hierarchal format, allowing a user to easily see the relationship between different elements. You’re probably familiar with using Windows Explorer or a similar tool on your platform of choice to navigate your machine’s file system. The folders on your machine are displayed, with each subfolder displayed beneath its parent. Sections of this hierarchy can be expanded or hidden, allowing you to focus on the section of the file system that interests you. A tree control lets you provide similar functionality for any group of objects that has a parent/child relationship, the way folders and subfolders do. Figure 8.2 shows a simple tree.
Figure 8.2. A tree showing parent/child relationships

We’ll first discuss the SWT Tree widget, followed by the TreeViewer from JFace, which you can use to simplify use of the Tree.
8.2.1. SWT trees
Tree doesn’t have a particularly useful interface. It extends Scrollable and provides the basic operations outlined in table 8.2.
Table 8.2. Operations available on a tree
|
Method |
Description |
|---|---|
| addSelectionListener() | Enables notification of selection events. |
| addTreeListener() | The TreeListener interface provides callbacks for notification when a level of the tree is expanded or collapsed. |
| select()/deselect() | Modifies the current selection. |
| getSelection() | Retrieves the current selection. |
| show() | Forces the control to scroll until the given item is visible. |
The items in the tree are a bit more interesting.
TreeItem
TreeItem is the class used to add items to a Tree. In addition to displaying content, TreeItems maintain a relationship with both parent and child items. A given item’s parent can be retrieved with getParentItem(), which returns null for an item at the root of the Tree; getItems() returns the children in the form of an array of TreeItem.
Two style options are relevant for a Tree. The first is a choice between SWT.SINGLE or SWT.MULTI, which affects how many items may be selected at a time. Tree defaults to SWT.SINGLE, which means that each time an item is selected, the previous selection disappears. Using SWT.MULTI lets the user select multiple options in whatever way is supported by the operating system (usually by Ctrl- or Shift-clicking multiple entries).
The last style that may be applied is SWT.CHECK, which causes checkboxes to be drawn to the left of each item in the tree. If checkboxes have been enabled, the status of any given TreeItem can be queried using the getChecked() method, which returns a boolean indicating whether the item has been checked. Note that on some platforms, an item can be selected without being checked.
A parent is set by passing it to the constructor of TreeItem and can’t be modified from either end of the relationship. Because of the way these relationships are maintained, removing a single item from a Tree is awkward: You must call removeAll() to empty the Tree and rebuild its contents, minus the items you wish to remove.
TreeItems provide methods to modify the text or image displayed in the form of setText() and setImage(). A TreeItem can be forced to expand or contract itself using setExpanded(boolean).
You’re welcome to build and display a tree by directly creating and manipulating TreeItems, but doing so forces you to deal with widgets on a lower level than is necessary. By using a TreeViewer to handle your tree, you can focus on the logic of your application rather than on the details of user interface elements.
8.2.2. JFace TreeViewers
A TreeViewer offers the filtering and sorting capabilities common to all Viewers, as well as the ability to use a label provider. Additionally, a TreeViewer can use an ITreeContentProvider to populate itself. The ITreeContentProvider interface extends IStructuredContentProvider to add methods for querying the parent or children of a given node.
As we mentioned in our earlier discussion of general Viewer features, a content provider provides an interface to business object relationships. For example, suppose you need to display the elements of an XML document in a tree to allow the user to easily navigate between them. Using a Tree and TreeItems directly, this would require you to loop through all elements in the document, building the items by hand. Using the DOM parsing facilities in JDK 1.4, the resulting pseudocode looks something like this:
Document document = ... //parse XML
Tree tree = ...
NodeList rootChildren = document.getChildNodes();
for(int i = 0; i < rootChildren.getLength(); i++)
{
  Element rootElement = (Element)rootChildren.item(i);
  TreeItem item = new TreeItem(tree, NODE_STYLE);
  item.setText(rootElement.getTagName());
  buildChildren(rootElement, item);
}

...

/*
Recursively builds TreeItems out of the child
nodes of the given Element
*/
private void buildChildren(Element element,
                           TreeItem parentItem)
{
  NodeList children = element.getChildNodes();
  for(int i = 0; i < children.length(); i++)
  {
    Element child = (Element)children.item(i);
    TreeItem childItem = new TreeItem(parentItem, NODE_STYLE);
    buildChildren(child, childItem);
  }
}
In contrast, the code to use a content provider consists of trivial implementations of methods defined in ITreeContentProvider:
Document document = ... //parse XML document
TreeViewer viewer = ...
viewer.setContentProvider(new XMLContentProvider());
viewer.setInput(document);
viewer.setLabelProvider(XMLLabelProvider());

...

class XMLContentProvider
      implements ITreeContentProvider
{
  public Object[] getChildren(Object parentElement) {
    return toObjectArray(((Node)parentElement).getChildren());
  }

  public Object[] getElements(Object inputElement) {
    return toObjectArray(((Node)inputElement).getChildren())
  }
  private Object[] toObjectArray(NodeList list){
    Object[] array = new Object[list.getLength()];
    for(int i = 0; i < list.getLength(); i++) {
      array[i] = list.item(i);
    }
    return array;
  }

  public Object getParent(Object element) {
    return ((Node)element).getParentNode();
  }

  public boolean hasChildren(Object element) {
    return ((Node)element).getChildNodes().getLength() > 0;
  }

  ... //additional methods with empty implementations
}
At first glance, the content provider code takes more space, and in terms of lines of code it’s longer. However, we would argue that the content provider is both conceptually simpler and easier to maintain. getChildren() and getElements() call getChildren() on the current Node and convert the result to an array. Using Tree, you’re forced to handle the top-level elements differently than the rest of the items, creating two separate sections of code that must be updated if the requirements change. More importantly, by using a TreeViewer, content provider, and label provider, you’re operating directly on your domain objects (in this case, Nodes of an XML document). If the document changes, the display can be updated by calling refresh() on the viewer. At runtime, if more detail should be displayed at each node, an alternate implementation of ILabelProvider can be assigned to the viewer. If you’re creating a Tree and TreeItems by hand, these cases require you either to manually traverse the tree to find and update the relevant nodes or to rebuild the entire Tree from scratch. On the whole, use of a content provider results in a design that is both simpler and more flexible.
It’s worth discussing the hasChildren() method briefly. It’s provided as an optimization hint for the tree. It would be possible to call getChildren() and check the size of the returned array, but in some cases it may be expensive to get the children of a given element. If a content provider can determine whether there are children for a node without having to compute all the children, then returning false here enables the tree to skip calling getChildren() when there aren’t any children to display. If there is no easy way to calculate this, it’s safe to always return true from hasChildren() and let getChildren() return an empty array when there are no children to display.
8.3. Using the List widget
A List widget presents a sequence of items. An mp3 player could use a List to present playlists to the user, whereas Eclipse uses a List to display possible matching classes when you choose Open Type. The user can select one or more values from the list, as shown in figure 8.3.
Figure 8.3. A simple list

Again, we’ll cover building lists with the basic SWT classes and then dive into the more powerful capabilities offered by ListViewers.
8.3.1. SWT lists
Because the widget is so simple, it’s easy to use a List without an attached Viewer and still obtain useful results. For example, building a list of Strings requires nothing more than the following:
List list = new List(parent, SWT.SINGLE);
for( int i = 0; i < 20; i++ )
{
  list.add( "item " + i);
}
Like Tree, List supports SWT.SINGLE or SWT.MULTI to control how many items may be selected simultaneously. No other styles (other than the ones supported by superclasses) are supported by Tree.
Note
If you’re developing an SWT application that will run on Motif, you should be aware that it isn’t possible to absolutely prevent the vertical scrollbar from being shown on a list. Accordingly, in Motif, SWT.V_SCROLL is added to whatever other styles you specify for a List in order to ensure that the style bits match what is displayed.
The List inherits scrolling capability from its superclass, Scrollable. Unless you specifically change it, the style is assumed to be SWT.V_SCROLL. This means that if the list of items exceeds the space available, a vertical scrollbar appears to allow the user to navigate the list. No horizontal scrollbar is available unless you add SWT.H_SCROLL to the style.
The drawback in our example is that List only accepts instances of String. Consequently, there is no way to display an image in the list, and updating a domain object requires searching the List for its old value, removing it, and replacing with the new one. This approach works fine for simple situations like the one shown previously, but eventually you’ll most likely want to do something more interesting with your List. For that, you’ll need to use a ListViewer.
8.3.2. JFace ListViewers
Using a ListViewer is the preferred way to interact with a List. At its most basic level, using the viewer allows more options for controlling the behavior of the widget, such as adding an image to each element or changing the order of the items on the fly without having to rebuild the entire list. It also allows decoupling of your model data from the way it’s presented.
A ListViewer is instantiated with a parent Composite and an SWT style. The viewer supports the same styles as the basic List: SWT.SINGLE and SWT.MULTI, which designate how many items may be selected at the same time.
Although ListViewer provides an add() method that you can use to insert objects directly into the list, using a ContentProvider, as we did with the Tree-Viewer, is a good idea. ListViewer uses the IStructuredContentProvider interface. This interface is simple, generally requiring only that the method Object[] getElements(Object inputElement) be implemented. After setInput() is called in the viewer, getElements() is called and passed the same object that was set the input to the viewer.
With all the various helper classes operating on the viewer—content providers, label providers, filters, sorters—it’s important to understand the way they interact. Everything starts with the content provider, which returns the entire set of items that may be displayed. This set is then passed to any filters attached to the viewer, which have the opportunity to remove items. Any items that pass all filters are then sorted and finally given to the label provider to determine what to display.
Retrieving items with IStructuredSelection
Up to this point, we haven’t discussed how to retrieve the selected items from a ListViewer or TreeViewer. Any time you wish to query which items are selected, JFace provides an interface, IStructuredSelection, to manage the results.
getSelection(), which returns an instance of IStructuredSelection, is provided by the StructuredViewer class. Being an IStructuredSelection implies that there is some structure to the data returned—namely, an order. The interface provides a method to retrieve an iterator for the selected items, the same as the objects in the Collections framework. This iterator returns items in the same order in which they appear in the List. Typically, you’ll loop through the items, as shown here:
...
IStructuredSelection selection =
   (IstructuredSelection)viewer.getSelection();
for( Iterator i = selection.iterator();
      i.hasNext(); )
{
      Object item = i.next();
      //process item
}
...
If necessary, however, the interface also provides toArray() and toList() methods to retrieve the entire collection of selected items at once.
8.4. Updating WidgetWindow
Let’s add two new composites to the WidgetWindow, one to demonstrate trees and the second for lists. First add Ch8TreeComposite, which appears in listing 8.1.
Listing 8.1. Ch8TreeComposite.java
package com.swtjface.Ch8;

import java.util.ArrayList;
import java.util.List;

import org.eclipse.jface.viewers.ITreeContentProvider;
import org.eclipse.jface.viewers.TreeViewer;
import org.eclipse.jface.viewers.Viewer;
import org.eclipse.swt.SWT;
import org.eclipse.swt.layout.FillLayout;
import org.eclipse.swt.widgets.Composite;

public class Ch8TreeComposite extends Composite
{
  public Ch8TreeComposite(Composite parent)
  {
    super(parent, SWT.NULL);
    populateControl();
  }

  protected void populateControl()
  {
    FillLayout compositeLayout = new FillLayout();
    setLayout(compositeLayout);

    int[] selectionStyle = {SWT.SINGLE, SWT.MULTI};  1 Styles
    int[] checkStyle = {SWT.NONE, SWT.CHECK};

    for(int selection = 0;
            selection < selectionStyle.length;
            selection++)
     {
       for(int check = 0; check < checkStyle.length; check++)
       {
         int style = selectionStyle[selection] | checkStyle[check];
         createTreeViewer(style);
       }
     }
  }

  private void createTreeViewer(int style)
  {
    TreeViewer viewer = new TreeViewer(this, style);

    viewer.setContentProvider(new ITreeContentProvider() { 2 ContentProvider
      public Object[] getChildren(Object parentElement) {
        return ((TreeNode)parentElement).getChildren().toArray();
      }

      public Object getParent(Object element) {
        return ((TreeNode)element).getParent();
      }

      public boolean hasChildren(Object element) {
        return ((TreeNode)element).getChildren().size() > 0;
      }

      public Object[] getElements(Object inputElement) {
        return ((TreeNode)inputElement).getChildren().toArray();
      }

      public void dispose() {}

      public void inputChanged(Viewer viewer,
                                Object oldInput,
                                Object newInput) {}
     });

     viewer.setInput(getRootNode()); 3  setInput()
  }

  private TreeNode getRootNode()   4   getRootNode()
  {
    TreeNode root = new TreeNode("root");
    root.addChild(new TreeNode("child 1")
          .addChild(new TreeNode("subchild 1")));
    root.addChild(new TreeNode("child 2")
          .addChild( new TreeNode("subchild 2")
            .addChild(new TreeNode("grandchild 1"))) );

    return root;
  }

}

class TreeNode  5 TreeNode
{
  private String name;
  private List children = new ArrayList();
  private TreeNode parent;

  public TreeNode(String n)
  {
    name = n;
  }

  protected Object getParent()
  {
    return parent;
  }

  public TreeNode addChild(TreeNode child)
  {
     children.add(child);
     child.parent = this;
     return this;
  }

  public List getChildren()
  {
    return children;
  }

  public String toString()
  {
    return name;
  }
}
-
 These two orthogonal style sets cover all possible styles available for a Tree. The code loops through and combines them to make several sample tree instances, demonstrating all the different styles.
-
 Here the code defines a ContentProvider, which is used to provide data to the TreeViewer. Notice that it can assume the parameters to each method are an instance of the appropriate domain object (TreeNode, in this case) and cast them accordingly.
-
 Calling setInput() on the viewer starts the process of populating the tree with the given data.
-
 This method builds the initial collection of domain objects.
-
 This simple class serves as the domain object for the example.
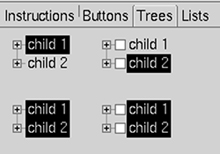
This pane creates simple trees three levels deep. We use the class TreeNode to act as the domain objects. TreeNode’s only function is to maintain a list of children.
The key method to pay attention to is createTreeViewer(), which creates a new TreeViewer instance and assigns it an ITreeContentProvider. This content provider receives TreeNodes and knows how to return the children for each node. Because the domain objects naturally know about their own relationships, implementing the content provider consists of trivially asking each node for its parent or children and calling toArray() when appropriate. There is no need to convert objects to Strings in getChildren() or getElements(). You can return the full domain object and let the label provider (in this case, the default BaseLabelProvider, which calls toString()) worry about how to display them.
After assigning the content provider, you must remember to call setInput() and pass it the TreeNode to use as the base of the tree. This step associates actual domain objects with the viewer; otherwise the viewer can’t know which objects to display. This root object is passed to getElements() to retrieve the first level of children. Each element in the array returned by getElements() is in turn passed to getChildren() to build the next level of the hierarchy. This process continues until has Children() returns false or no more children are returned by getChildren(). Figure 8.4 shows the results when you run this example.
Figure 8.4. Tree pane
To run this example, you must add the following three lines to WidgetWindow:
TabItem chap8Tree = new TabItem(tf, SWT.NONE);
chap8Tree.setText("Chapter 8 Tree");
chap8Tree.setControl(new Ch8TreeComposite(tf));
Next, listing 8.2 presents the Ch8ListComposite, which uses some of the more advanced viewer features.
Listing 8.2. Ch8ListComposite.java
package com.swtjface.Ch8;

import java.util.ArrayList;
import java.util.List;

import org.eclipse.jface.viewers.IStructuredContentProvider;
import org.eclipse.jface.viewers.LabelProvider;
import org.eclipse.jface.viewers.ListViewer;
import org.eclipse.jface.viewers.Viewer;
import org.eclipse.jface.viewers.ViewerFilter;
import org.eclipse.jface.viewers.ViewerSorter;
import org.eclipse.swt.SWT;
import org.eclipse.swt.layout.FillLayout;
import org.eclipse.swt.widgets.Composite;

public class Ch8ListComposite extends Composite
{
  public Ch8ListComposite(Composite parent)
  {
    super(parent, SWT.NULL);
    populateControl();
  }

  protected void populateControl()
  {
    FillLayout compositeLayout = new FillLayout();
    setLayout(compositeLayout);

    int[] styles = {SWT.SINGLE, SWT.MULTI};   1 Styles

    for(int style = 0; style < styles.length; style++)
    {
      createListViewer(styles[style]);
    }
  }

  private void createListViewer(int style)
  {
    ListViewer viewer = new ListViewer(this, style);

    viewer.setLabelProvider(new LabelProvider() {
        public String getText(Object element) {
            return ((ListItem)element).name;
        }
    });

    viewer.addFilter(new ViewerFilter() {  2  Filter
        public boolean select(Viewer viewer,
                              Object parent,
                              Object element) {
            return ((ListItem)element).value % 2 == 0;
        }
    });

    viewer.setSorter( new ViewerSorter() {   3 Sorter
      public int compare(Viewer viewer,
                          Object obj1,
                          Object obj2) {
        return ((ListItem)obj2).value - ((ListItem)obj1).value;
      }
    });

    viewer.setContentProvider(new IStructuredContentProvider() {
      public Object[] getElements(Object inputElement)
      {
        return ((List)inputElement).toArray();
      }

      public void dispose() {}

      public void inputChanged(Viewer viewer,
                                Object oldInput,
                                Object newInput)
      {
      }
    });

    List input = new ArrayList();
    for( int i = 0; i < 20; i++ )
    {
      input.add(new ListItem("item " + i, i));
    }

    viewer.setInput(input);
  }
}

class ListItem  4 ListItem
{
  public String name;
  public int value;

  public ListItem(String n, int v)
  {
    name = n;
    value = v;
  }
}
-
These two styles are the only ones available for lists. The code creates one of each.
-
This simple ViewerFilter selects only items whose value field is even. If two divides cleanly into the value, you return true, which allows the item
to be displayed.
-
This ViewerSorter sorts domain objects by their value field, from high to low.
-
ListItem acts as the domain object for this example.
This code creates a class ListItem to act as domain objects. ListItem stores a name and an integer value, which are used for ordering and filtering.
Because a List handles only simple data with no relationships between elements, implementing the IStructuredContentProvider requires only a single line in getElements(). To make up for the boring implementation of the content provider, we’ve added a label provider, a filter, and a sorter. We’ll consider these in the order in which they’re executed.
After the viewer has retrieved the list of items from the content provider, the filter is given first shot at the items. For the sake of this example, we decided to only display items whose value field is even. This can be accomplished by implementing the select() method of the filter and returning true or false depending on whether the value is even. Only items that you return true for will eventually be displayed. If you added more than one filter to the viewer, they would each be called in turn.
Next the sorter is used to determine the order of items in the list. The compare() method sorts ListItems by their value, from high to low. Again, this requires a single line of code.
Finally, once the items have been filtered and sorted, the text to display is determined by calling a label provider. Because the results of calling toString() on objects wouldn’t be pretty, you create a label provider that returns the name field of each ListItem. The final result is shown in figure 8.5; add these lines to WidgetWindow, compile, and run:
TabItem chap8List = new TabItem(tf, SWT.NONE);
chap8List.setText("Chapter 8 List");
chap8List.setControl(new Ch8ListComposite(tf));
Figure 8.5. The list pane
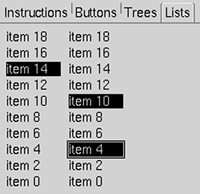
The elegance of the viewer design becomes apparent when you consider that all these operations are cleanly decoupled from each other. The content provider doesn’t care what will be done with the objects it provides. Filters don’t need to know about each other or how the items will be sorted. The label provider displays objects without having to care how the sorter ordered them. And any one of these can be swapped for a completely different implementation without affecting the rest of the code.
8.5. Summary
Understanding the relationships between the various widgets and their viewers is key to using these controls effectively. Simple use of the controls is possible without the viewers, but being able to use filters, sorters, label providers, and content providers will enable you to separate the concerns of your application much more cleanly. Above all, decide whether you’re going to use the viewers, and stick to that decision. Mixing direct creation of TreeItems (or any other item class) with use of a content provider will cause unpredictable results and make understanding your code very difficult.