
Lighting and Communication
The most important element in the design of television images is light. Apart from its fundamental role of illuminating the subject, light determines tonal differences, outline, shape, colour, texture and depth. It can create compositional relationships, provide balance, harmony and contrast. It provides mood, atmosphere and visual continuity. Light is the key pictorial force in television production.
One of the simplest definitions of the aim of any TV production was stated succinctly as ‘whatever is happening on screen, the viewer wants to see it and usually wants to hear it’. Good television lighting does a great deal more than simply enabling the viewer to see programme content, but usually the first basic technical requirements are to supply sufficient light to enable cameras to be correctly exposed, at the appropriate colour temperature, and to help modify or create a suitable contrast range for the subject in order to meet the requirements of TV broadcasting (see page 108).
These technical requirements can be satisfied fairly easily if sufficient luminaires and power are available but washing the subject with light may produce flat, dead pictures that fail to engage the audience’s attention. The controlled use of light to satisfy and enhance production requirements is also the aim and objective of studio and location lighting.
The Nature of Light
In order to control light it is necessary to understand how light behaves and have some means of measuring its physical characteristics.
What the human eye can detect (the visible spectrum from red to violet), is only part of a range of electromagnetic radio waves that enable radio and television to be transmitted, radar and microwaves to operate, and also includes ultraviolet radiation, X-rays and gamma rays. They can be categorized by their individual wavelength – the distance from wave peak to wave peak – which in visible light is measured in nanometres.
The eye begins to register wavelengths at about approximately 700 nm (red) through to a peak response to wavelengths of 555 nm (green) up to shorter wavelengths of approximately 400 nm (blue). This non-uniform average response to visible light when plotted is known as the photopic curve and any useful meter to measure light should mimic this curve.
1 LIGHT SOURCE has a luminous intensity (I) measured in candelas
2 ILLUMINATION (E): luminous flux incident onto a surface, measured in lumens/m2 = lux
3 LUMINOUS FLUX (F): radiant energy (F) weighted by the photopic curve, measured in lumens
4 LUMINANCE (L): measure of the reflected light from a surface, measured in apostils
Luminous flux emitted into the solid cone from a source of 1 candela = 1 lumen

![]() Inverse Square Law: Doubling the distance from light to subject quarters the level of illumination (lux) falling on the subject.
Inverse Square Law: Doubling the distance from light to subject quarters the level of illumination (lux) falling on the subject.
![]() Cosine Law: If the angle of a light beam to a surface it is illuminating is less than 90°, the illuminance of that surface is reduced by a factor determined from the cosine law.
Cosine Law: If the angle of a light beam to a surface it is illuminating is less than 90°, the illuminance of that surface is reduced by a factor determined from the cosine law.
![]() Incident Light Meter: These meters are designed to measure the light falling on the subject. To calculate the ratio between key and fill, place the meter close to the face of subject and point in turn at the key light and the fill. The ratio of the two readings will provide the contrast ratio of light on the face.
Incident Light Meter: These meters are designed to measure the light falling on the subject. To calculate the ratio between key and fill, place the meter close to the face of subject and point in turn at the key light and the fill. The ratio of the two readings will provide the contrast ratio of light on the face.
There have been many theories about perception and many visual experiments. Most conclude that perception is instantaneous and not subject to extended judgement. It is an active exploration rather than a passive recording of the visual elements in the field of view and is selective and personal. The mind makes sense of visual elements by grouping elements into patterns. Any stimulus pattern tends to be seen in such a way that the resulting structure is as simple as the given conditions permit.
Although perception seeks visual unity, a detailed visual communication requires contrast to articulate its meaning. Morse code can be understood if the distinction between a dot and a dash is accentuated. Communication is achieved by contrast. The communication carrier – sound or light – provides a message by modulation. There is a need for polarities, whether loud or soft, dark or light, dot or dash. Meaning is made clear by comparison. A television image requires the same accentuation of contrast in order to achieve coherent meaning. Light, by supplying contrast of tones, can remove visual ambiguity in a muddle of competing subjects but the wrong tonal contrast can produce a confused and misleading ‘message’.
The Choice Between Harmony and Contrast
Visual arts have traditionally employed two competing systems – harmony, which tends to balance out conflict of mass, and contrast, which stresses differences and therefore makes meaning clear. Harmony is the weakening or toning down of irregularity. It is epitomized by the perfect distribution of ratio and balance accomplished in classical art. There are no visual ambiguities or uncertainties of what is displayed either in the objectives of the visual designer or in the perception of the viewer. But perceptual attention demands stimulation whereas harmony tends towards the elimination of visual conflict. There is a visual design need to introduce tension through contrast to achieve clarity of communication. In its most extreme form, middle tones are eliminated to provide a simplification of the image to the bare essentials. If the purpose of a television image is to convey ideas, information or feeling, then contrast is required to articulate the image and to focus on the meaning of the message.
Hard and Soft
Within this broad generalization, two qualities of light are used in television production – hard and soft. Usually hard light produces the greatest contrast, modelling and texture. It creates depth, shape and relationships. All light, hard or soft can reveal modelling, texture, contrast – it is a matter of shadow structure which determines the ‘sharpness’ of the effects. Diffused light is often applied to reduce the contrast introduced by a hard light source and to create an integrated harmony of tones.
The individual response to colour may be a product of fashion and culture – a learnt relationship – or may be an intrinsic part of the act of perception. People’s colour preferences have been tested and in general western people choose in order of preference blue, red, green, purple, orange, yellow. This choice is modified when the colour is associated with an object that has a specific use. Below is a very generalized checklist of points to bear in mind when using colour:
![]() Many colours have a hot or a cold feel to them. Red is considered hot and blue is felt as cold. It will take other strong design elements within a shot to force a foreground blue object to exist in space in front of a red object. The eye naturally sees red as closer than blue unless the brightness, shape, chroma value and background of the blue are so arranged that in context it becomes more dominant than the desaturated, low brightness of the red.
Many colours have a hot or a cold feel to them. Red is considered hot and blue is felt as cold. It will take other strong design elements within a shot to force a foreground blue object to exist in space in front of a red object. The eye naturally sees red as closer than blue unless the brightness, shape, chroma value and background of the blue are so arranged that in context it becomes more dominant than the desaturated, low brightness of the red.
![]() Colour effects are relative and no one set of guidelines will hold true for all colour relationships. For example, the intensity of a hot colour can be emphasized by surrounding it by cool colours. The intensity of the contrast will affect balance and to what part of the frame the eye is attracted.
Colour effects are relative and no one set of guidelines will hold true for all colour relationships. For example, the intensity of a hot colour can be emphasized by surrounding it by cool colours. The intensity of the contrast will affect balance and to what part of the frame the eye is attracted.
![]() The perception of the apparent hue of any coloured object is likely to vary depending on the colour of its background and the colour temperature of the light illuminating it. Staging someone in a yellow jacket against green foliage will produce a different contrast relationship to staging the same person against a blue sky.
The perception of the apparent hue of any coloured object is likely to vary depending on the colour of its background and the colour temperature of the light illuminating it. Staging someone in a yellow jacket against green foliage will produce a different contrast relationship to staging the same person against a blue sky.
![]() Complementary contrast balance can be achieved by opposing a colour with its complementary. The complementary of red is green, the complementary of blue is orange, the complementary of yellow is violet. These complementary pairings consist of a hot and a cold colour. Complementaries placed alongside each other will appear to have more vividness and vitality than colours that are adjacent in the colour wheel. Visual equilibrium however is not simply achieved by equal areas of complementary pairs. Blue needs a greater area to balance its complementary orange. Red needs approximately the same area of green whereas yellow needs a relatively small area of violet to achieve visual equilibrium.
Complementary contrast balance can be achieved by opposing a colour with its complementary. The complementary of red is green, the complementary of blue is orange, the complementary of yellow is violet. These complementary pairings consist of a hot and a cold colour. Complementaries placed alongside each other will appear to have more vividness and vitality than colours that are adjacent in the colour wheel. Visual equilibrium however is not simply achieved by equal areas of complementary pairs. Blue needs a greater area to balance its complementary orange. Red needs approximately the same area of green whereas yellow needs a relatively small area of violet to achieve visual equilibrium.
![]() Colour can communicate experience or feeling by association. Red is often described as passionate, stimulating and exciting. Blue is seen as sad and depressing. Yellow is serene and gay whilst green is thought of as restful and stable. Strong prolonged stimulation of one colour has the effect of decreasing the sensitivity to that colour but sensitivity to its complementary is enhanced.
Colour can communicate experience or feeling by association. Red is often described as passionate, stimulating and exciting. Blue is seen as sad and depressing. Yellow is serene and gay whilst green is thought of as restful and stable. Strong prolonged stimulation of one colour has the effect of decreasing the sensitivity to that colour but sensitivity to its complementary is enhanced.
![]() The balancing of area and the shape of a coloured object has a strong impact on the unity of an image. A small area of intense colour can unbalance a composition and continually attract the eye. If its location coincides with the main subject of the shot then the right emphasis is achieved. If it exists near the edge of frame or away from the dominant subject then it acts as a second subject of interest and is a distraction.
The balancing of area and the shape of a coloured object has a strong impact on the unity of an image. A small area of intense colour can unbalance a composition and continually attract the eye. If its location coincides with the main subject of the shot then the right emphasis is achieved. If it exists near the edge of frame or away from the dominant subject then it acts as a second subject of interest and is a distraction.
![]() Paintings often achieve a strong visual impact by restricting the range of colours used. A limited palette of colours on a set can create unity and impact. A number of sequences in a variety show can each be given their own individual identity by using colours which compliment or contrast with the artiste’s costume colour.
Paintings often achieve a strong visual impact by restricting the range of colours used. A limited palette of colours on a set can create unity and impact. A number of sequences in a variety show can each be given their own individual identity by using colours which compliment or contrast with the artiste’s costume colour.
![]() Colour temperature: A piece of iron when heated glows first red and then, as its temperature increases, changes colour through yellow to ‘white hot’. The colour of a light source can therefore be conveniently defined by its colour temperature. Strictly speaking this only applies to incandescent sources (i.e. sources glowing because they are hot). The most common incandescent source is the tungsten filament lamp. Colour temperature is measured in Kelvin equivalent to °C +273. The colour temperature of domestic tungsten light is 2760 K, while that of a tungsten halogen source is 3200 K.
Colour temperature: A piece of iron when heated glows first red and then, as its temperature increases, changes colour through yellow to ‘white hot’. The colour of a light source can therefore be conveniently defined by its colour temperature. Strictly speaking this only applies to incandescent sources (i.e. sources glowing because they are hot). The most common incandescent source is the tungsten filament lamp. Colour temperature is measured in Kelvin equivalent to °C +273. The colour temperature of domestic tungsten light is 2760 K, while that of a tungsten halogen source is 3200 K.
A ‘talking head’ is probably the most common shot on television. Whether news, drama, sport or entertainment, people like watching people. The reflectivity of the human face varies enormously by reason of different skin pigments and make-up. In general, Caucasian face tones will tend to look right when a ‘television white’ of 60% reflectivity is exposed to give peak white. Average Caucasian skin tones reflect about 36% of the light. As a generalization, face tones are approximately one stop down on peak white. But as well as achieving correct exposure, lighting a face also involves making decisions about how a specific face is to be portrayed. Most professional presenters know their ‘good’ side and their ‘bad’ side. This may be to do with blemishes or their nose line but usually it is because faces are often asymmetrical about the centre-line. Depending on its position, the keylight modelling will either make the shadowed side of the face appear to be narrower (to be avoided if it is already the narrow side of the face) or broader.
The lighting treatment must take into account blemishes (‘key’ into the blemish), emphasizing or adjusting the overall shape of the face, the shape or the jaw line, the line of the eyes, the line of the mouth, etc. If a subject with a bent nose is keyed the same way as the bend of the nose, this will exaggerate the nose bend. If keyed in the opposite direction it will tend to straighten out the bend. The American cinematographer Gordon Willis used top lighting on Marlon Brando in The Godfather to help reduce Brando’s jowls but this also had the effect of putting his eyes in shadow and making him more mysterious and threatening. Presenters with deep set eyes can lose contact with their audience unless a way is found to get light on to their eyes. A catch light reflected in the eyes often lifts the personality of the face and allows the viewer ‘eye contact’ with the most important part of the face.
Multi-camera shooting requires lighting which provides for different angles and many faces on the same set. Location lighting may only have to accommodate one face and one camera position, but the shot may include a natural lighting source such as a window or the direct light from the sun. Ideally, the aim is to light artistes separately to their backgrounds as this enables control of the lighting of both areas to be achieved.
Hard and Soft Light
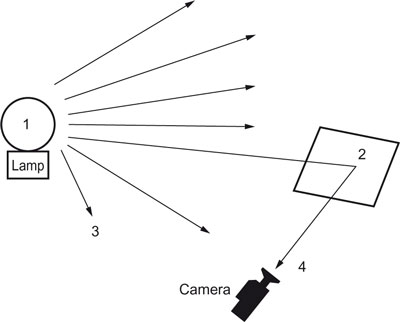
A light source can be identified as being ‘hard’ or ‘soft’ depending on the type of shadow it produces. A hard source (e.g. direct sunlight) produces a hard edge shadow, reveals texture and is usually a point source or of a small area. A ‘hard’ lamp can be focused and have its beam shaped by barndoors and is more controllable than a ‘soft’ source. Soft light produces overlapping shadows with soft edges. It tends to obliterate texture and because it needs a large originating area to be soft, it is difficult to control.
Key Light
A single strong directional light gives the best modelling and structure to a shot. The key light provides the necessary exposure and brings out the three dimensional aspects of the subject. As we have discussed, when keying faces, the decisions to be made are: where should the nose shadow fall (or should there be a nose shadow?), are deep-set eyes lit, does the angle and position of the key suit the structure of the subject’s face, are there reflections in spectacles, and are any facial imperfections exaggerated or concealed? Does it throw unwanted shadows on the background of the shot?

Fill
Wherever the key is placed, the strong shadows it creates need to be modified to reduce the contrast range and normally to lighten the mood of the shot. This is achieved by a fill light usually on the opposite side of the lens to the key, which is a soft source of light produced by a reflector or a diffused flooded lamp or an overcast sky but not direct sunlight. The key-to-fill ratio on the face is the contrast range and can be balanced by using a meter or estimated by eye to match the required mood of the shot. An average is between 2:1 and 3:1.
Backlight
It is usually necessary to find some visual way of separating the subject from its background so that attention can be focused on the subject. Check for suitable unobtrusive background detail when positioning camera and subject and use a hard light source directed from behind the subject to highlight the head. This will give sparkle to the hair and rim light the shoulders. Try to avoid too high an intensity – the backlight should hardly be perceptible.
Background Light
To avoid people being shot in limbo, some light needs to be directed to the space behind them. The aim should be to light sufficient background to provide some indication of location whilst avoiding overpowering the foreground. A lit background gives space and mood to the shot, but on location, ensure that it conforms to the main source of light.
How light is shaped, balanced and distributed within a shot plays a vital part in television production but there are a number practical considerations when deciding the overall level of light that is to be used. These include:
![]() satisfying exposure requirements which depend on camera sensitivity
satisfying exposure requirements which depend on camera sensitivity
![]() creating an appropriate depth of field
creating an appropriate depth of field
![]() providing a good environment for artists performance
providing a good environment for artists performance
![]() heat generation, ventilation, number of luminaires available, total capacity and cost of the power supply.
heat generation, ventilation, number of luminaires available, total capacity and cost of the power supply.
Camera Sensitivity
Camera sensitivity is usually quoted by camera manufacturers with reference to four interlinking elements – a subject with peak white reflectivity, scene illumination, f-number, and signal-to-noise ratio for a stated signal. It is usually stated as being the resulting f-number when exposed to a peak white subject with 89.9% reflectance lit by 2000 lux and also quoting the signal/noise ratio. For most current cameras this is f8 with some achieving f11 and better. The sensitivity of the camera could be increased by simply greater and greater amplification of weak signals but this degrades the picture by adding ‘noise’ generated by the camera circuits. In a great deal of ‘actuality’ location work (e.g. news gathering, sports coverage, etc.), the gain of the head amplifiers can be increased if insufficient light is available to adequately expose the picture.
Depth of Field
Lighting level will determine f-number for correct exposure, which in turn will decide depth of field (see Zoom lens, page 50). The range of subjects in focus within the frame will have a significant effect on the visual appearance of the production. The chosen depth of field can therefore be a production design element as well as having a crucial impact on the ability to find and hold focus in ad lib camerawork. Other factors which affect exposure include shutter speed, lens range extenders, zoom ramping, filters, prompt devices and the lighting environment to accommodate performance and mood.
Mood and Atmosphere
With highly sensitive cameras, it is possible to achieve correct exposure with very low light levels – levels which may appear to be darker than the corridor approach to the studio. This may be appropriate for some types of drama but it can have a depressing effect on other types of TV productions.
Economics
Luminaires require a power supply and, in an enclosed space like a studio, ventilation to extract heat that tungsten lamps can generate. The number and cost of luminaires available to a production, the total capacity of the power supply and the deployment of the rig, is another practical controlling factor in lighting design.
![]() Reflector: A reflector board or sheet requires no power and takes up very little space. It is invaluable for fill-in lighting by bouncing light from daylight or lamp into shadow.
Reflector: A reflector board or sheet requires no power and takes up very little space. It is invaluable for fill-in lighting by bouncing light from daylight or lamp into shadow.
![]() Battery Lamps: These are fixed to the top of the camera and powered from the camcorder battery or, preferably, a separate battery belt. When working in daylight they require a dichroic filter to correct the colour temperature of the lamp to daylight. Dichroic filters are made of glass and are therefore more fragile than gel filters, but their advantage is that they transmit approximately 15% more light than gels.
Battery Lamps: These are fixed to the top of the camera and powered from the camcorder battery or, preferably, a separate battery belt. When working in daylight they require a dichroic filter to correct the colour temperature of the lamp to daylight. Dichroic filters are made of glass and are therefore more fragile than gel filters, but their advantage is that they transmit approximately 15% more light than gels.
![]() Flight Kit (Portable Lighting Kit): This is a two or three lamp kit that derived its name from its compact size – small enough to fit into a metallized container for quick stowage and easy transportation.
Flight Kit (Portable Lighting Kit): This is a two or three lamp kit that derived its name from its compact size – small enough to fit into a metallized container for quick stowage and easy transportation.
![]() Redhead: This is a 800 W lamp drawing 3.3 A, weighing 3 kg including barn-door and safety glass, with an output of approximately 6000 candelas (cd) flooded and 24,000 cd spotted when over 4 m.
Redhead: This is a 800 W lamp drawing 3.3 A, weighing 3 kg including barn-door and safety glass, with an output of approximately 6000 candelas (cd) flooded and 24,000 cd spotted when over 4 m.
![]() Blonde: This is a 2000 W lamp drawing 8.3 A and weighting 6 kg with barndoor and safety glass. It produces approximately 25,000 cd flooded and 150,000 cd spotted when over 6 m. Because of their weight and flexibility and their low power consumption they can be rigged and derigged quickly and plugged into most domestic power supplies.
Blonde: This is a 2000 W lamp drawing 8.3 A and weighting 6 kg with barndoor and safety glass. It produces approximately 25,000 cd flooded and 150,000 cd spotted when over 6 m. Because of their weight and flexibility and their low power consumption they can be rigged and derigged quickly and plugged into most domestic power supplies.
![]() Discharge Lamps: Discharge light sources such as HMI lamps produce light by ionizing a gas contained in the bulb. They have greater efficiency than tungsten, are lighter and cooler in operation and produce light which approximates to daylight. They require an EHT supply to ionize the gas and a current limiting device. This may be a simple inductive choke or in the form of a flicker free electronic ballast. A 1.2 kW HMI, which is one of the most useful on a small unit with conventional ballast, will draw 12 A when switched on but settle to 6.4 A when warmed up. It can therefore be used on a domestic 13 A ring main circuit providing no other lamps are connected when it is switched on.
Discharge Lamps: Discharge light sources such as HMI lamps produce light by ionizing a gas contained in the bulb. They have greater efficiency than tungsten, are lighter and cooler in operation and produce light which approximates to daylight. They require an EHT supply to ionize the gas and a current limiting device. This may be a simple inductive choke or in the form of a flicker free electronic ballast. A 1.2 kW HMI, which is one of the most useful on a small unit with conventional ballast, will draw 12 A when switched on but settle to 6.4 A when warmed up. It can therefore be used on a domestic 13 A ring main circuit providing no other lamps are connected when it is switched on.
![]() Ballast: The use of high-frequency dimmable ballasts operating above 40 kHz provide a flicker free output and allow dimming with a simple 0–10 V control (or 100 Ω potentiometer) to achieve reduction in lighting levels with little change in colour (unlike dimmed tungsten sources).
Ballast: The use of high-frequency dimmable ballasts operating above 40 kHz provide a flicker free output and allow dimming with a simple 0–10 V control (or 100 Ω potentiometer) to achieve reduction in lighting levels with little change in colour (unlike dimmed tungsten sources).
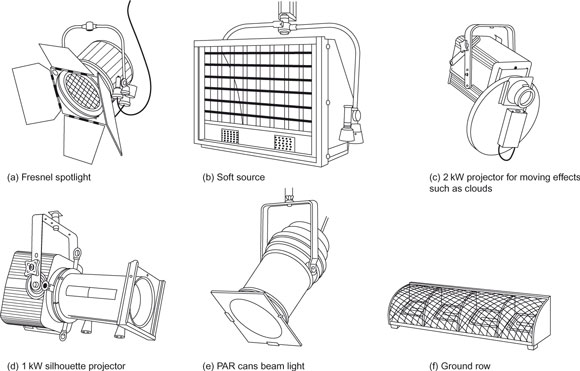
There are many different types of luminaire that have been developed to satisfy different aspects of lighting (see figure page).
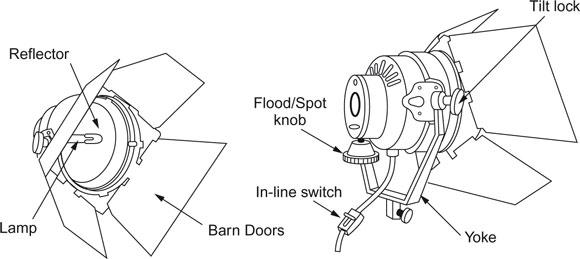
![]() Fresnel Spotlights (a): This is a general purpose luminaire used in a wide range of applications that require a good modelling light (e.g. keylight, backlight, set light or hard fill-light). It is available in a number of operating wattage ranging from 100 W up to 24 kW and is fitted with a Fresnel lens and a reflector/lamp assembly that can be moved to alter the beam angle from wide angle (full flood) to narrow angle (full spot). The light output from the luminaire can be directed by a pan/tilt and a spot/flood mechanism, and if required, this can be adjusted by a pole when the lamp is rigged at a height. Fresnel spotlights are usually fitted with barndoors to control the beam shape.
Fresnel Spotlights (a): This is a general purpose luminaire used in a wide range of applications that require a good modelling light (e.g. keylight, backlight, set light or hard fill-light). It is available in a number of operating wattage ranging from 100 W up to 24 kW and is fitted with a Fresnel lens and a reflector/lamp assembly that can be moved to alter the beam angle from wide angle (full flood) to narrow angle (full spot). The light output from the luminaire can be directed by a pan/tilt and a spot/flood mechanism, and if required, this can be adjusted by a pole when the lamp is rigged at a height. Fresnel spotlights are usually fitted with barndoors to control the beam shape.
![]() Soft Source (b): Soft sources are large area sources which produce light on the subject from many directions resulting in multiple overlapping shadows. They need to be of a large area (such as light bouncing off a large white surface), to be truly soft and are useful for controlling the density of shadows, creating gradations of tone, improving the appearance of a face (e.g. hiding blemishes), creating a shadowless backlight, and for lighting shiny or glossy surfaces (e.g. car commercials). Soft luminaires are often grouped together to create a large effective area.
Soft Source (b): Soft sources are large area sources which produce light on the subject from many directions resulting in multiple overlapping shadows. They need to be of a large area (such as light bouncing off a large white surface), to be truly soft and are useful for controlling the density of shadows, creating gradations of tone, improving the appearance of a face (e.g. hiding blemishes), creating a shadowless backlight, and for lighting shiny or glossy surfaces (e.g. car commercials). Soft luminaires are often grouped together to create a large effective area.
![]() Transparency Projectors (c): Transparency projectors are luminaires with condenser optics and a projection lens to project still or moving effects, e.g. clouds, flames, etc.
Transparency Projectors (c): Transparency projectors are luminaires with condenser optics and a projection lens to project still or moving effects, e.g. clouds, flames, etc.
![]() Silhouette Projector (d): A luminaire which has a lens system to produce a sharply focused disc of light or to project a customized metal cut-out called a gobo (e.g. logo, abstract pattern, etc.). The projector includes metal shutters within it to shape the beam and may have a single lens or twin lens optics, and they are also available with a rotatable gobo holder.
Silhouette Projector (d): A luminaire which has a lens system to produce a sharply focused disc of light or to project a customized metal cut-out called a gobo (e.g. logo, abstract pattern, etc.). The projector includes metal shutters within it to shape the beam and may have a single lens or twin lens optics, and they are also available with a rotatable gobo holder.
![]() PAR Cans Beam Light (e): Parabolic aluminized reflector lights produce a very intense and narrow beam of light which, when used with smoke, results in the production of dramatic shafts of light. The lamp and reflector are part of a sealed unit with a front element that may be plain, diffused or in the form of a lens. A gel slot is fitted to the front of the can and the design of the lamp filament allows the lamp to be rapidly switched on and off. They are available in various beam spreads from wide flood to very narrow spot.
PAR Cans Beam Light (e): Parabolic aluminized reflector lights produce a very intense and narrow beam of light which, when used with smoke, results in the production of dramatic shafts of light. The lamp and reflector are part of a sealed unit with a front element that may be plain, diffused or in the form of a lens. A gel slot is fitted to the front of the can and the design of the lamp filament allows the lamp to be rapidly switched on and off. They are available in various beam spreads from wide flood to very narrow spot.
![]() Ground Row (f): Ground row units are used to light cycloramas and are positioned on the floor or hung from hoists. The angle of the row and its distance from the cyc are critical in achieving an even lit cyc from top to bottom. They are available as single units fitted with frosted 625 W or 500 W linear tungsten halogen lamp that are slotted together, or as groups of four, six, etc. Each open faced luminaire can be fitted with an individual coloured gel and are separately wired to allow for the grouping and mixing of colours.
Ground Row (f): Ground row units are used to light cycloramas and are positioned on the floor or hung from hoists. The angle of the row and its distance from the cyc are critical in achieving an even lit cyc from top to bottom. They are available as single units fitted with frosted 625 W or 500 W linear tungsten halogen lamp that are slotted together, or as groups of four, six, etc. Each open faced luminaire can be fitted with an individual coloured gel and are separately wired to allow for the grouping and mixing of colours.
There are many other types of luminaires including:
![]() Fluorescent Luminaires (Cold Lights): Fluorescent luminaires usually use several lamps to produce a practical light source, hence they are soft sources. Control of the light beam shape is either by a fine structured ‘egg-crate’ or ‘honeycomb’ fitment. Improved phosphors have made the fluorescent lamp acceptable for television and film and are available to provide tungsten matching and daylight matching colour temperatures.
Fluorescent Luminaires (Cold Lights): Fluorescent luminaires usually use several lamps to produce a practical light source, hence they are soft sources. Control of the light beam shape is either by a fine structured ‘egg-crate’ or ‘honeycomb’ fitment. Improved phosphors have made the fluorescent lamp acceptable for television and film and are available to provide tungsten matching and daylight matching colour temperatures.
![]() Dual Source Luminaires: These are basically a hard source and a soft source bolted together with pole-operation of pan, tilt, spot/flood, hard/soft and power switching.
Dual Source Luminaires: These are basically a hard source and a soft source bolted together with pole-operation of pan, tilt, spot/flood, hard/soft and power switching.
![]() Follow Spot: The follow-spot is used to light artistes at long throws in complete isolation, and to follow any artiste movement. It is a narrow angle version of a twin-lens hard-edged projector, designed to use a tungsten halogen or discharge light source, depending on the lamp throw required.
Follow Spot: The follow-spot is used to light artistes at long throws in complete isolation, and to follow any artiste movement. It is a narrow angle version of a twin-lens hard-edged projector, designed to use a tungsten halogen or discharge light source, depending on the lamp throw required.
![]() Moving Lights (Intelligent Lights): A moving light achieves its effects by moving the complete luminaire or by moving a mirror to move the beam. A variety of effects are available, e.g. pan and tilt, colour change of light beam (infinite or limited colour wheel), beam angle change, beam focus change, gobo wheel, rotating gobo effects, diffusion, colour correction, mechanical dimmer. Some are designed to remotely ‘follow’ the performer by way of a small transmitter carried by the artiste which sends signals to receivers around the edge of the performing area. The information received is used to process the controlling signals sent to the moving lights.
Moving Lights (Intelligent Lights): A moving light achieves its effects by moving the complete luminaire or by moving a mirror to move the beam. A variety of effects are available, e.g. pan and tilt, colour change of light beam (infinite or limited colour wheel), beam angle change, beam focus change, gobo wheel, rotating gobo effects, diffusion, colour correction, mechanical dimmer. Some are designed to remotely ‘follow’ the performer by way of a small transmitter carried by the artiste which sends signals to receivers around the edge of the performing area. The information received is used to process the controlling signals sent to the moving lights.
To rehearse, record or transmit multi-camera studio productions it is necessary to have continuous control of the luminaires. The lighting console allows the lighting director to set and adjust dimmer levels, scrollers, moving lights and practicals. The luminaires can be grouped and their levels adjusted for lighting changes and then computer memorized. For purposes of rigging and/or adjustments during rehearsal, the console should have the ability to be remotely controlled from the studio floor. Usually the console will be equipped with a mimic board which allows a quick visual check of which lamps are currently in use. The third essential element in the control of light is a high quality switchable monitor or monitors displaying the programme production and close liaison with the vision controller. There is also a requirement for load meters to be installed alongside the lighting console so that the load current for each phase can be monitored.
Dimmers
The lighting console provides the necessary control signals to remotely operate dimmers. Modern consoles usually achieve this by generating a digital number for sequential transmission over one pair of wires using a digital multiplexing system (DMX 512). Whenever possible there should be a dimmer for each lighting circuit (outlet) matched to its associated lighting channel number (dimmer number).
In the past, the thyristor or silicon controller rectifier (SCR) was the preferred electronic method for controlling the current to a luminaire, and hence its light output. These were superseded by transistor dimmers which were quieter in operation and avoided large current surges on ‘switch-on’ and could be rack mounted or located, if required, on lighting hoists.
Modern digital dimmers use the DMX data signal directly for processing the control of the dimmer, using a ‘number’ not an analogue voltage and allow a cheaper, more reliable, accurate dimmer, with a faster response to level changes, protection against overloads and short circuits and with a choice from a number of dimmer laws. The dimmer law is the relationship between the fader setting and light output.
Digital Multiplex 512 (DMX 512)
DMX 512 provides a digital multiplex system capable of handling the control information for 512 channels, as a single data channel. The fader setting between 0 and +10 V (analogue signal) is sampled in channel sequence at a regular interval and converted into an 8-bit binary number, this provides 255 discrete fader levels plus OFF. This data is sent as a sequence down a single cable to all devices using DMX 512.
![]() Neutral Density Filters: A recurring problem with location interiors is to control and balance the intensity of daylight from windows with the much lower light levels from lamps. Neutral density (ND) filters will reduce the level of daylight without changing its colour temperature. They are made of flexible gelatin or thin acrylic sheets and are available in a range of grades. They can also be combined with colour correction filters. The filters are fixed to windows in a method that will avoid being seen on camera. Although ND gel can buckle and produce flares it is easily transportable in rolls. The acrylic sheet needs to be cut, is difficult to move and is expensive.
Neutral Density Filters: A recurring problem with location interiors is to control and balance the intensity of daylight from windows with the much lower light levels from lamps. Neutral density (ND) filters will reduce the level of daylight without changing its colour temperature. They are made of flexible gelatin or thin acrylic sheets and are available in a range of grades. They can also be combined with colour correction filters. The filters are fixed to windows in a method that will avoid being seen on camera. Although ND gel can buckle and produce flares it is easily transportable in rolls. The acrylic sheet needs to be cut, is difficult to move and is expensive.
![]() Plastic ‘Scrim’: a perforated material silver on one side and black on the other, can also be used on windows (black side in) to act as a neutral density filter (0.6 ND). It is more robust than ND gels and not so prone to flare. Check that its perforated pattern cannot be seen on camera.
Plastic ‘Scrim’: a perforated material silver on one side and black on the other, can also be used on windows (black side in) to act as a neutral density filter (0.6 ND). It is more robust than ND gels and not so prone to flare. Check that its perforated pattern cannot be seen on camera.
![]() Polarizing Filters on the camera lens reduce reflections and glare, darken blue skies and increase colour saturation. They are useful in eliminating reflections in glass such as shop windows, cars and shooting into water. The filter must be rotated until the maximum reduction of unwanted reflection is achieved.
Polarizing Filters on the camera lens reduce reflections and glare, darken blue skies and increase colour saturation. They are useful in eliminating reflections in glass such as shop windows, cars and shooting into water. The filter must be rotated until the maximum reduction of unwanted reflection is achieved.
![]() Spun Or Diffusion, a fibreglass-type material, is used in front of lamps to diffuse or soften the light. It also reduces the lamp intensity. It can be used to cover partially a portion of the lamp’s throw to soften edges and to produce a reduction in brightness in part of the shot. It is available in a range of grades and can be doubled up in use to increase diffusion.
Spun Or Diffusion, a fibreglass-type material, is used in front of lamps to diffuse or soften the light. It also reduces the lamp intensity. It can be used to cover partially a portion of the lamp’s throw to soften edges and to produce a reduction in brightness in part of the shot. It is available in a range of grades and can be doubled up in use to increase diffusion.
![]() Colour Filters: Polyester filters have a clear plastic base coated with a coloured pigment. Polycarbonate filters have the base material mixed with the pigment. They are referred to as high temperature (HT) filters and are not affected by heat as much as the polyester filters.
Colour Filters: Polyester filters have a clear plastic base coated with a coloured pigment. Polycarbonate filters have the base material mixed with the pigment. They are referred to as high temperature (HT) filters and are not affected by heat as much as the polyester filters.
![]() Colour Correction Filters are used to correct the light sources to a common colour temperature, e.g. tungsten sources to daylight (5500 K), daylight to tungsten (3200 K) or to correct both sources to an intermediate value (see location lighting figures, page 135).
Colour Correction Filters are used to correct the light sources to a common colour temperature, e.g. tungsten sources to daylight (5500 K), daylight to tungsten (3200 K) or to correct both sources to an intermediate value (see location lighting figures, page 135).
![]() Barndoors are metal flaps fitted to the front of the lamp lens and can be adjusted in a number of ways to keep light off areas in shot and to shape, soften and produce gradations on surfaces.
Barndoors are metal flaps fitted to the front of the lamp lens and can be adjusted in a number of ways to keep light off areas in shot and to shape, soften and produce gradations on surfaces.
Programme Planning
Daily multi-camera TV production from a studio complex requires the same precision in planning as any ‘conveyor belt’ industrial process. There is neither the time nor staff to simply arrive in a studio without pre-planning where sets, furniture and artistes will be positioned. This information is crucial to the lighting director’s need to produce a lighting plot for the pre-rigging of luminaires before rehearsal begins. Production content, style and artistes’ movement is required so that a lighting strategy can be evolved. The lighting director needs to visualize the production and plan the lighting treatment accordingly.
Lighting Plot
The lighting plot is usually a 1:50 scale drawing of the studio detailing the type, position and aiming direction of all luminaires, colour filters, any flags, cutters, half wires, etc., floor luminaires, practical lamps, e.g. wall lights, table stands, any special lighting requirements. There is no internationally agreed set of symbols for use on a television lighting plot and many television companies use their own ‘in-house’ signs and codes (figure opposite). It is important that any changes to the lighting rig during set and light, or rehearsal, are indicated on the lighting plot to keep it up to date.
Using a copy of the lighting plot, the electricians rig all the appropriate lighting equipment, filters, etc. The lighting director, using a remote rigger panel, together with the electricians, will then set each luminaire to the correct height and adjust it to light the required area.
Rehearsal and Levels
A rough lighting balance may be obtained during the setting process, but usually it is when shots are available during the rehearsal that a satisfactory balance can be achieved. The lighting team of lighting director, console operator and vision control operator work together to produce a satisfactory lighting balance and exposure. Often the vision control operator will avoid exposure adjustment to cameras until the lighting balance has been set. Because of the interaction between lighting levels, lighting balance, camera exposure and black level on picture quality, the process of balancing the lighting levels requires the use of Grade 1 monitors which have been correctly aligned and are available as a common reference.
Recording/Transmission
All the lighting conditions set during rehearsal, lighting cues and lighting changes have to be executed as rehearsed during the recording/transmission period as well as responding to the unplanned and the unexpected.
It is useful to adopt a definite procedure when setting luminaires, say start upstage and work down-stage or the reverse. For each Fresnel spotlight:

Stencil symbols for a lighting plot
![]() Check that the height is correct.
Check that the height is correct.
![]() Rotate barndoors to the configuration you think you require. This avoids the disturbance of a ‘set’ luminaire if you leave this to last. Many barndoors develop a reluctance to rotate smoothly, requiring some additional force which often displaces the luminaire setting!
Rotate barndoors to the configuration you think you require. This avoids the disturbance of a ‘set’ luminaire if you leave this to last. Many barndoors develop a reluctance to rotate smoothly, requiring some additional force which often displaces the luminaire setting!
![]() Open barndoors so that you can see the hot spot.
Open barndoors so that you can see the hot spot.
![]() Adjust pan/tilt as necessary to‘set’ luminaire. Useful to check that illuminance is satisfactory for keylights
Adjust pan/tilt as necessary to‘set’ luminaire. Useful to check that illuminance is satisfactory for keylights
![]() Adjust barndoors as necessary.
Adjust barndoors as necessary.
![]() Avoid trying to set a luminaire with others on.
Avoid trying to set a luminaire with others on.
![]() When all the luminaires are set, have a look at each lighting condition.
When all the luminaires are set, have a look at each lighting condition.
![]() Check illuminance and make up basic memories.
Check illuminance and make up basic memories.
![]() Finally set the line-up lamp.
Finally set the line-up lamp.
One of the principal aims of a television production is to create a stream of pictures that convinces the viewer that they are watching continuous action in ‘real’ time. Direction, camerawork, sound, lighting, vision mixing all practise an ‘invisible’ technique designed to hide the mechanics of bringing the image to the screen in order to emphasize the content of the programme. The vision controller plays a crucial part in this strategy by ensuring image continuity in exposure, colour and picture quality. In order to achieve this, he/she must continuously monitor the output of all cameras making any appropriate adjustments to iris, black level and colour as needed. This can only be achieved if each shot is assessed on a Grade 1 monitor coupled to a waveform monitor/vectorscope.
Matching pictures is usually achieved by using a joystick control for each camera which, when depressed, switches that camera’s output to the assessment monitor. Rotating the top of the joystick allows the black level to be set, and moving the joystick forwards or backwards opens/closes the iris. The ratio of joystick movement to iris movement can be altered by a FINE and a COARSE setting. For studio work, the iris control is normally operated in the FINE mode, which allows one f-stop either side of the central position; the central position having been set to the nominal lens aperture. The COARSE iris control is normally used on outside broadcasts where large changes in lighting levels can be expected!
In a studio production, exposure will be dependent on lighting levels and variation in levels. It is common practice for the lighting director to attempt to balance out lighting levels during rehearsal before the vision control operator begins exposure correction. To maintain the ‘invisible’ technique there should be no evidence of vision control adjustment in the recorded/transmitted picture. Usually each shot will be previewed before it is used but sometimes (e.g. spontaneous actuality events under sunlight), adjustment on shot is unavoidable. Picture matching is focused on exposure, matching face tones and background, and black level. A small adjustment of black level has a greater effect on the TV image than a similar alteration to iris. To summarize, the operational role of the vision control operator may include:
![]() Align the cameras prior to rehearsal and transmission/recording
Align the cameras prior to rehearsal and transmission/recording
![]() Align vision/lighting control room monitors
Align vision/lighting control room monitors
![]() check incoming/outgoing vision sources to the vision mixer
check incoming/outgoing vision sources to the vision mixer
![]() adjust black level, iris setting of each shot and colour match if required
adjust black level, iris setting of each shot and colour match if required
![]() set the appropriate contouring detail for each shot and adjust gamma and knee as appropriate
set the appropriate contouring detail for each shot and adjust gamma and knee as appropriate
![]() switch appropriate mixed viewfinder feeds to camera viewfinders as required and identify any vision faults and arrange for the necessary adjustment.
switch appropriate mixed viewfinder feeds to camera viewfinders as required and identify any vision faults and arrange for the necessary adjustment.
There are a number of video signal measurements that can be objectively checked with a vectorscope and waveform monitor, but essentially picture matching has to be done visually using a monitor. Picture monitor alignment is of critical importance if correct picture assessment is to be achieved.
Many monitors are designed with an automatic alignment system using a sensor placed against the face of the monitor. Another method of assessing monitor line-up is by feeding the monitor display with a special test signal from an external picture line-up generating equipment known as PLUGE.

PLUGE test signal
The PLUGE test signal allows accurate setting of brightness and contrast. Brightness is adjusted so that the lighter bar is just visible, but the darker bar is not visible. Using a spotmeter, the contrast is adjusted to give 25 foot lamberts off the peak white signal. The other ‘steps’ may be used to check the gamma of the monitor. Ideally, brightness and contrast should be remotely controlled from the Vision Controller’s desk.
A method of checking chroma is by feeding colour bars to the monitor and switching the monitor to blue only. Under this condition, the three right-hand colour bars should look the same brightness. Precise assessment can be improved by turning down the brightness control (to be reset later) and/or viewing the screen through a suitable ND filter. All adjustments of monitors should be done under normal control room operating lighting levels.
Minimum Exposure
One of the prime reasons for using lamps on location interiors is to boost existing lighting levels to the minimum level required for exposure. With camera sensitivity increasing with each new camera/recorder that is developed and with the ability to switch in additional gain it would seem that usable pictures could be recorded anywhere and at any time. This may be acceptable for emergency hard news coverage but there are many situations which require an additional light source not only to produce a noise-free picture but also to bring modelling and therefore legibility to the image.
Modelling The Picture
Controlling the direction and intensity of light on a face and background brings space and form to a picture. It allows for better compositions and it focuses attention on the main subject in the frame. It can also, if it is skilfully handled, help to express the character or enhance the appearance of the person who is being recorded. These are important considerations when a three-dimensional world is depicted on a two-dimensional screen.
Modifying Contrast Range
Using artificial light or reflectors with daylight can help improve the rendering of detail in highlights and shadows. The most common example is a face lit by the sun. With a clear sky and a bright sun, the contrast between the sunlit part of the face and the shadows will produce a contrast of about 8:1. Using a reflector board to bounce the sunlight on to the unlit side of the face can lift the shadow so that detail can be seen and a more acceptable portrait produced.
Source of Light
When adding to existing light, try to make certain that the new illumination and shadows created are consistent and logical with any original light sources that appear in the frame. A window in an interior shot will be seen by the audience as the main source of light. Additional lighting should be positioned out of frame to reinforce the direction of the perceived main source of light. The keyed side of the face should be on the same side as any lit practical in frame (e.g. table lamp beside the subject). If there is no apparent source of light within the frame, then lamps can be placed to suit the subject depending on the practicalities of placing the lighting stands and the requirements of the shot. Think ahead before lighting the first shot to be recorded because lighting continuity in subsequent shots will require the same direction and apparent source of light to be consistent. The questions to ask are: will it be possible to light reverses from the same direction, is there room to place and direct lamps, will that direction be suitable for the subject, and how long will it take to relight?
Whether shooting interior or exterior, a fundamental problem with location work is dealing with a mixture of light of different colour temperatures. If the light remains uncorrected, faces and subjects may have colour casts which look unnatural and distracting.
The two most common light sources on location are daylight, which has a range of colour temperatures but averages around 5600 K, and tungsten light which is often produced by lamps carried to the location which are approximately 3200 K.
Colour Correction Filters
There are two basic types of correction filter used when attempting to combine mixed lighting of tungsten and daylight.
![]() An orange filter which converts daylight to tungsten and is most often seen attached to windows for interior shots.
An orange filter which converts daylight to tungsten and is most often seen attached to windows for interior shots.
![]() A blue filter which converts tungsten to daylight and is often used on tungsten lamps.
A blue filter which converts tungsten to daylight and is often used on tungsten lamps.
Any correction filter will reduce the amount of light it transmits and therefore a balance must be struck between colour correction and sufficient light for adequate exposure. A filter for full colour conversion from daylight to tungsten will have a transmission of only 55% which means nearly half of the available light is lost. A filter for full colour correction from tungsten to daylight has an even smaller transmission factor of 34% – it cuts out nearly two thirds of the possible light from a lamp. This is a more serious loss because whereas daylight is usually more than adequate for a reasonable exposure, reducing the light output of a lamp (say a redhead) by blue filtering to match daylight may leave an interior lit by blue filtered lamps short of adequate light.
All Light Sources at Same Colour Temperature
The choice when shooting an environment which has a mixture of daylight and tungsten is to decide whether to correct all sources to daylight or all sources to tungsten. If the choice is tungsten, any window which is in shot or producing light which is reaching the shot requires filtering. It needs a full orange filter squeegeed onto the glass or fastened by double sided tape onto the frame.
Orange filters can be obtained which have additional light reduction by combining with neutral density filters. This is helpful when attempting to balance out a very bright window with the interior lit by lamps.
Many multi-camera studio productions will involve lighting two or three people in an interview situation. A single camera location interview allows lamps to be reset between each set-up but a continuous live multi-camera interview requires all faces in shot to be lit simultaneously. There are a number of standard interview shots to be lit (see Interviews page, 178) ranging from close-ups of each participant to over-the-shoulder two-shots and a wide or establishing shot. The normal eye-line of the participants will be towards each other and each face needs to be keyed with respect to the camera that will be shooting their closest shot. Usually this puts the keylight ‘upstage’ of the participant to create modelling shadow on the downstage side of their face. When setting keylights and backlights on an interview semi-circle, careful barndooring is necessary to prevent unwanted light falling on the wrong subject.
Multi-Purpose Luminaire
A Fresnel spotlight can be used on wide beam so two artistes can be covered easily with one luminaire. Although it is advisable to have separate backlights for each participant for individual control to avoid, for example, a conflict of lighting levels when a bald headed interviewee is placed alongside a dark haired participant, it is sometimes possible (provided there is sufficient artiste separation) for a key light to double as a backlight. Usually, the backlight needs only be half the power of the keylight, and therefore because the luminaire will be closer as a back-light and consequently be of too high intensity, a bottom half-wire (doubled or overlapped as necessary) should be fitted to obtain the correct backlight illumination. This half-wire should be clear of the inner three rings of the Fresnel lens to ensure that the lamp which is acting also as keylight, is accurately ‘centred’ on the artiste to be keyed with no loss of illuminance.
Mood and Programme Style
Lighting sets the mood of a shot and therefore consideration should be given to the lighting style and if it matches the aims of the programme. News, magazine and current affairs programmes often attempt to present an objective viewpoint. A set which is fussily lit, with odd washes of colour or looks like Elsinore Castle on a foggy day is unlikely to give credibility to the truthfulness of the presentation or visually engage the viewer. Match your lighting style to the content of the programme. Leave obtrusive lighting styles to pop concerts and entertainment shows. Attempt to make your lighting technique invisible and keep it simple.
Electrical and Location Safety Checklist
![]() Location electrical supplies: It is important to check the power supply fuse rating and the condition of the wiring before using a domestic supply. Blown fuses can waste time but burnt out wiring could start a fire. Also check cable runs, especially around doors and tops of stairs. Check where you place lamps. They get hot and so will anything touching them.
Location electrical supplies: It is important to check the power supply fuse rating and the condition of the wiring before using a domestic supply. Blown fuses can waste time but burnt out wiring could start a fire. Also check cable runs, especially around doors and tops of stairs. Check where you place lamps. They get hot and so will anything touching them.
![]() More haste: Location recording is often a scramble to rig, record, wrap and move on to the next set-up. There is always the urgency to get the job done but, pressurized as this may be, it is never expedient to cut corners on safety. A couple of minutes saved by not making safe a cable crossing the top of a flight of stairs may result in injury and many hours of lost time. You have a responsibility to ensure that the condition and the method of rigging lamps and cables at a location is safe to yourself and to members of the public.
More haste: Location recording is often a scramble to rig, record, wrap and move on to the next set-up. There is always the urgency to get the job done but, pressurized as this may be, it is never expedient to cut corners on safety. A couple of minutes saved by not making safe a cable crossing the top of a flight of stairs may result in injury and many hours of lost time. You have a responsibility to ensure that the condition and the method of rigging lamps and cables at a location is safe to yourself and to members of the public.
![]() Electrical Condition: Check the earthing and safety of lamps. Make certain the safety glass or wire is fitted and not damaged in any way. Check the condition of cables for frayed or worn insulation and that they are earthed correctly.
Electrical Condition: Check the earthing and safety of lamps. Make certain the safety glass or wire is fitted and not damaged in any way. Check the condition of cables for frayed or worn insulation and that they are earthed correctly.
![]() HMIs: Discharge light sources such as HMI lamps produce light by ionizing a gas contained in the bulb. Because of a high bulb pressure they are liable to explode and they also produce a harmful level of ultra-violet radiation. Therefore all discharge sources must be fitted with a glass filter as a safety glass. Usually an inter-lock will prevent the supply of EHT if the safety glass is broken or missing. Check that any HMI you are using has a safety glass fitted.
HMIs: Discharge light sources such as HMI lamps produce light by ionizing a gas contained in the bulb. Because of a high bulb pressure they are liable to explode and they also produce a harmful level of ultra-violet radiation. Therefore all discharge sources must be fitted with a glass filter as a safety glass. Usually an inter-lock will prevent the supply of EHT if the safety glass is broken or missing. Check that any HMI you are using has a safety glass fitted.
![]() Placement of Lamps: Adequate time should be allowed for the selection of suitable sites for the safe placement of lamps and for their setting up.
Placement of Lamps: Adequate time should be allowed for the selection of suitable sites for the safe placement of lamps and for their setting up.
![]() Lamps should be placed so that they do not obstruct entrances, exits or passageways. They should be placed in such a way that there is no risk of them being knocked over.
Lamps should be placed so that they do not obstruct entrances, exits or passageways. They should be placed in such a way that there is no risk of them being knocked over.
![]() Stands should be sited on firm, level ground and set at a height to ensure maximum stability. Use portable sand bags to weigh stands down.
Stands should be sited on firm, level ground and set at a height to ensure maximum stability. Use portable sand bags to weigh stands down.
![]() Particular care should be taken when placing lamps so that any heat generated can do no damage nor cause a risk of fire.
Particular care should be taken when placing lamps so that any heat generated can do no damage nor cause a risk of fire.
![]() Cables should not run across thoroughfares unless they do not cause a tripping hazard or they are at a suitable height. Any cables which are flown (unsupported) must be securely tied off at a suitable height.
Cables should not run across thoroughfares unless they do not cause a tripping hazard or they are at a suitable height. Any cables which are flown (unsupported) must be securely tied off at a suitable height.
![]() If a lamp is knocked over it should be switched off, allowed to cool and not used again until it has been examined.
If a lamp is knocked over it should be switched off, allowed to cool and not used again until it has been examined.