Okay, we're ready to start adding new sections for dynamic content to our template now. In order to add new content areas, we will have to start modifying the TemplaVoila data structure and template objects. For now, this is not much different from using the TemplaVoila Wizard that we used in Chapter 1. We are going to add new areas to the HTML file for mapping and use the backend interface to add elements to TemplaVoila, so that we can update fields with page properties or TypoScript in the future. For our first new element, we are going to add a banner to our example template.
Before we modify the TemplaVoila data structure, we're going to add a div enclosure for the banner to our original HTML file. Like before, all that's important is that we create a set of tags with a unique identifier. We are going to map our new div tags in TemplaVoila, which will tell TemplaVoila to replace any content inside of them with some generated content that we will define in the data structure. If we add a div tag between our menu and the main content, the body of our HTML template will look like the example below.
<!DOCTYPE HTML>
<html>
<head>
<meta charset="utf-8" />
</head>
<body>
<ul id="menu-area"><li class="menu-item"><a href="">Menu Item #1</a></li></ul>
<ul id="submenu-area"><li class="submenu-item"><a href="">Submenu Item #1</a></li></ul>
<div id="banner_image"></div>
<div id="content">This is our content</div>
</body>
</html>
After we have saved the update to our HTML template, we need to add the element to the TemplaVoila data structure. TemplaVoila uses data structures to define the content elements for each template in a custom XML format that is stored in the database. In TemplaVoila, template objects are then used to store the mapping information between the original HTML file and the content elements in the data structure. So, our next step is to update the data structure with our new content element and then we can update the mapping in our template object.
We can define the type of element and some parameters in a wizard for the data structure, and TemplaVoila will regenerate the data structure XML in the database according to what we set up. First, we need to go into the editing area for our data structure for the first time:
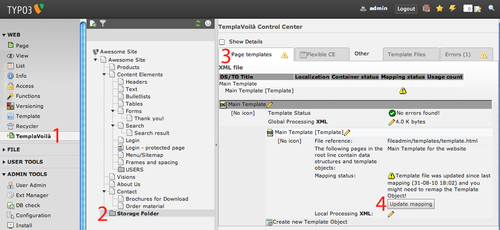
- Choose TemplaVoila in the far-left menu to edit our TemplaVoila templates.
- Choose Storage Folder from the page tree; this is where our TemplaVoila template objects and data structures are stored.
- Make sure you are on the Page templates tab to see our current templates.
- Under the Main Template, click on Update mapping to access the data structure and mapping areas.
- On the Template Mapping page, click on the Modify DS / TO (Data Structure/Template Object) button in the Information tab.
- When we click on the button to modify the data structure, TYPO3 will give us a pop-up warning about overwriting our XML. If we had manually edited the XML of our data structure at any point, then we would want to be careful here because editing the data structure with the backend graphic interface tools will overwrite the XML from scratch. As we have not edited the data structure by hand, we can go ahead and click on OK on the warning pop-up.
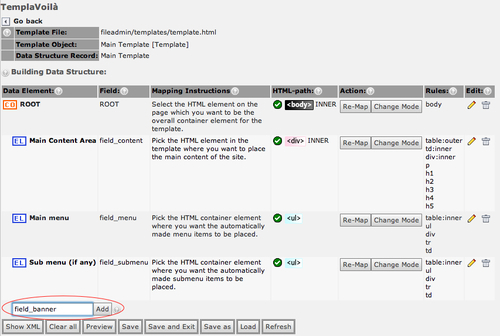
- On the bottom of the data structure page, we can create a new element for the template. Go ahead and fill in the name of our new field, field_banner, and click on the Add button.
When the frame refreshes, we can fill in the fields to define our new data element. TemplaVoila used to require editing the data structure XML directly to define most of the fields for a data element, but the newest versions of TemplaVoila allow us to edit almost every field that we need completely within the graphical interface. For now, we can go ahead and fill out the fields similar to the default element fields.
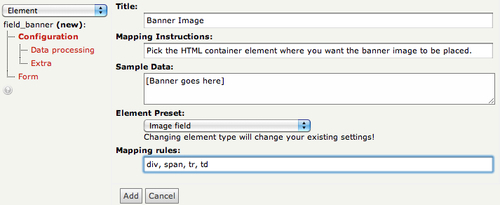
- Title: The title of our new data element will be displayed in the TYPO3 backend. To keep things simple, we will name our element Banner Image.
- Mapping Instructions: The mapping instruction will be seen in the backend on the mapping pages, and we are going to follow the same style as the default mapping instructions with our instructions: Pick the HTML container element where you want the banner image to be placed.
- Sample Data: Sample data is used when generating previews in the backend mapping area. Let's go ahead and follow the format of the default elements by leaving our Sample Data with the words [Banner goes here], which will of course be filled in later by TYPO3.
- Element Preset: The Element Preset determines the type of element that we will be creating in the template. We can modify this information later, but by choosing an appropriate element preset at the beginning we allow TemplaVoila to automatically generate the most fitting XML and TypoScript data. This will make more sense in a moment when we start writing the TypoScript. As we are going to fill this data element with an image we will go ahead and set our element preset to Image field.
- Mapping rules: Template creators use mapping rules to restrict how other editors can map this data element in the future. We are going to tie this directly to an image, so we don't want users to accidentally map this to a header tag in the future. Let's go ahead and allow only a few container elements by setting our mapping rules as div, span, tr, td.
If we fill everything out correctly, this is what our screen should look like before we save it:
Once we are satisfied that we have filled out the initial configuration correctly, we can click on the Add button. Adding the field with the button saves it temporarily, but it is still not saved permanently to the template. Clicking on the Add button updates the configuration of our element based on the Element Preset, and TemplaVoila will generate some basic TypoScript to define our image element. Click on field_banner | Configuration | Data processing to see the preset TypoScript code:
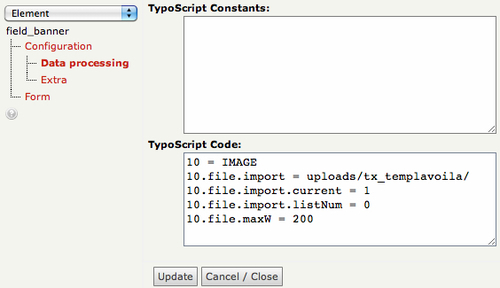
As we are using this as a banner, we want to change the maximum width of our file from the default that TemplaVoila generated, 200. Change the last line to 10.file.maxW = 800 and click on Update.
Now we can save our new data structure to the database. In order to permanently save our changes and overwrite the old data structure, we need to click on the Save button and clear the cache.
Now that we have created a new element and saved the changes to our template, we can check the XML that the graphical interface created for us. Click on Show XML and we will see that it has added our banner image field to the XML with all of the configuration options we chose. Obviously, we only filled in a couple of fields, but it filled in the rest based on the defaults for our installation. If we want finer control over our data elements that the wizard can't give us, we can always edit the XML directly.
As you can see, most of the data structure XML is simple and easy to read. Once we edit the XML by hand, we can no longer use the wizards to modify the data structure or it will write over our changes.
The new field in our XML should look like the following code snippet. Go ahead and look through the code real quick to see the basic XML tags and TypoScript that our wizard created:
<field_banner type="array">
<tx_templavoila type="array">
<title>Banner Image</title>
<description>Pick the HTML container element where you want the banner image to be placed.</description>
<sample_data type="array">
<numIndex index="0">[Banner goes here]</numIndex>
</sample_data>
<eType>image</eType>
<tags>div,span,tr,td</tags>
<TypoScript>
10 = IMAGE
10.file.import = uploads/tx_templavoila/
10.file.import.current = 1
10.file.import.listNum = 0
10.file.maxW = 800
</TypoScript>
<proc type=»array»>
<stdWrap></stdWrap>
</proc>
</tx_templavoila>
<TCEforms type=»array»>
<label>Banner Image</label>
<config type=»array»>
<type>group</type>
<internal_type>file</internal_type>
<allowed>gif,png,jpg,jpeg</allowed>
<max_size>1000</max_size>
<uploadfolder>uploads/tx_templavoila</uploadfolder>
<show_thumbs>1</show_thumbs>
<size>1</size>
<maxitems>1</maxitems>
<minitems>0</minitems>
</config>
</TCEforms>
</field_banner>
Look at how the XML is storing the information that we just filled in like the sample data mapping rules. You can also see how the wizard used the element preset of Image field to generate some basic TypoScript and initial parameters to define our new image object.
We have successfully added our own data element and configured it, and we even looked at the XML for fun. Next, we need to map our new element to its appropriate location in our original HTML file. Let's go ahead and click on the Map button in the backend and map our new data element to the div tag in our updated HTML template with the identifier banner_image.
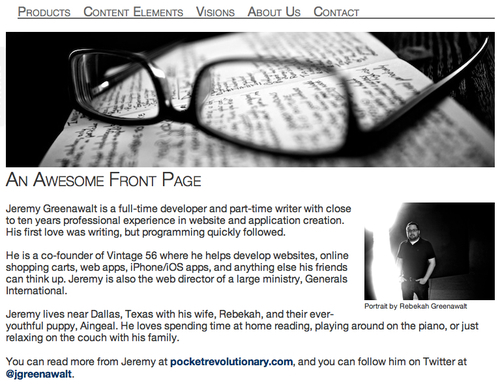
Now that we have mapped the banner area, we can add a banner to our front page. This is where the editor experience is affected because we chose the Image preset when we created our new data element because different types of data elements are edited in different parts of the page or TypoScript template. If we had chosen Page Content Elements, then we would have another column visible in the Web | Page view. We chose the Image preset, so we are going to update and use this field by adding an image through our page properties. Go ahead and click on the page you would like to modify and right-click the page and choose Edit page properties. If we go to the Extended tab, we can see that Banner Image has been added as a new optional content area in the backend:
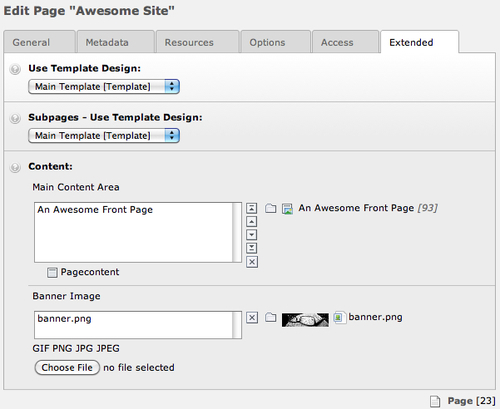
I chose a random image that was roughly the right size just to test our banner and show the example output. We haven't modified the flexible width layout in CSS or redesigned the page to work with one fixed size of banners, but we could do that later if we needed to. What we have done, though, is create our first new template element from scratch, and it wasn't even a standard element for generic content; we created a very specific banner element that could be used on a live site with just a little bit of CSS tweaking, but it doesn't look too bad right now: