Master Mail Concepts
As I said in the Introduction, this book isn’t about basics, as such. However, as I’ve corresponded with many Mail users over the years, I’ve discovered that there are certain concepts that Apple hasn’t made self-explanatory, and that therefore tend to trip people up. In order to understand and act on much of the rest of this book, you need to grasp a few concepts that are, perhaps, unnecessarily confusing. In this chapter I walk you through the ones I consider most important.
Most of the items in this chapter pertain only to the Mac version of Mail, but if you’re an iOS user, be sure to read Special Mailboxes, much of which is also applicable to iOS.
Account Setup
Setting up new accounts in Mail has gotten easier in recent versions, especially if you’re using one of the major email providers Mail already knows about (iCloud, Exchange, Google/Gmail, Yahoo, and AOL)—almost the entire procedure is automated. However, there are still a few gotchas, especially if you’re using a different provider.
Pick a Preference Pane
For starters, there are two places where you can add, edit, or remove accounts: in Mail > Preferences > Accounts (or, just for adding accounts, the shortcut Mail > Add Account) and in System Preferences > Internet Accounts (which you can also reach from within Mail by choosing Mail > Accounts).
Why two places, and when should you use which?
The reason for the System Preferences > Internet Accounts pane is twofold. First, many account types (including iCloud, Exchange, and Gmail) include more features than just email, and affect more apps than just Mail, so Internet Accounts provides a central location where you can enable or disable individual data types like Mail, Calendars, Contacts, and Notes for each account. Second, some account types (like Twitter and Facebook) are used by macOS but not by specific, built-in apps, and so it makes sense to provide one central location to set up all these accounts.
The reason for the Mail > Preferences > Accounts pane is, of course, to make it more convenient to add an email account when you’re already working in Mail—and because you may need to configure any of numerous email account settings that are specific to Mail, and that therefore would be inappropriate for Apple to put in System Preferences.
You can add a new account to Mail in either place, and after you do so, both locations will reflect that account. Beyond that, the System Preferences > Internet Accounts pane gives you less control over the minute details of email account settings than Mail’s Accounts pane does, although there are a couple of things you can do only in Internet Accounts.
Here are the specifics:
Mail > Preferences > Accounts: Visit this pane to edit outgoing (SMTP) servers, add secondary From addresses, change the behavior of Special Mailboxes, and adjust details such as whether to download attachments or use an IMAP path prefix.
System Preferences > Internet Accounts: Use this to enable or disable account features such as Calendars and Contacts, to delete any accounts synced via iCloud, or to set up internet accounts that don’t involve Mail.
Force POP or IMAP
When you create a new account (in Mail > Preferences > Accounts, or in System Preferences > Internet Accounts), you start by clicking the plus ![]() button and selecting an account type. (As a shortcut, you can simply choose Mail > Add Account.) If the type you want isn’t on that list (such as a standard IMAP or POP account), in Mail, you select Other Mail Account and then click Continue; or in Internet Accounts, you click Add Other Account, and then select Mail Account. Then you fill in your name, email address, and password.
button and selecting an account type. (As a shortcut, you can simply choose Mail > Add Account.) If the type you want isn’t on that list (such as a standard IMAP or POP account), in Mail, you select Other Mail Account and then click Continue; or in Internet Accounts, you click Add Other Account, and then select Mail Account. Then you fill in your name, email address, and password.
At this point, if you click Sign In, Mail looks up the server and tries to figure out what it can set up for you automatically. (If Mail can’t figure it out, it presents more fields for you to fill in.) But sometimes it guesses wrong—for example, it might set up an account as IMAP when what you really wanted was POP, because the server supports both protocols and Mail uses the one it thinks is best. But there’s no way to change the server type after the fact, and no obvious way to override which type of account (POP or IMAP) is used.
Here’s the non-obvious way: When you set up the account, enter your name, email address, and password—but deliberately enter the wrong password! Click Sign In, and you can then click POP or IMAP, as you prefer; manually fill in the server name, username, and (correct) password; and then click Next to continue with account setup.
Use iCloud Aliases
If you have an iCloud account, you can add up to three aliases—extra email addresses that deliver messages to the same Inbox. For example, my Apple ID (and thus, my primary iCloud address) is [email protected]. But if I wanted a second address that would be more obvious and memorable, I could (well, did) set up the alias [email protected]. Any email sent to [email protected] is actually delivered to [email protected]. (If you came to iCloud from a MobileMe or Mac.com account, you may also have iCloud addresses in the me.com or mac.com domains.)
Strangely, you can’t add, remove, or edit aliases from within Mail—this task has to be done on the iCloud website, but at least Mail offers you a shortcut to get there. In Mail > Preferences > Accounts > iCloud > Account Information, choose Edit Email Addresses from the Email Address pop-up menu to open your iCloud Mail preferences in a web browser. Enter your iCloud credentials if prompted to do so, make any desired changes to your aliases, and then click Done.
With your alias(es) set up on the iCloud site, they appear automatically in Mail. To determine which email address Mail uses by default for your iCloud account, go back to the Email Address pop-up menu just mentioned and choose which one you want. You can always override this for an individual message by choosing a different address from the From pop-up menu in the header portion of the new message window.
Configure Alternative From Addresses
Many email providers let you have several aliases (email addresses in the same domain, all of which deliver email to the same account). In addition, some providers (including Gmail) let you send mail from addresses that are associated with other accounts, after verifying that you’re authorized to do so. (Some email providers reject outgoing messages whose From address doesn’t match your account credentials unless you’ve specially authorized it.) You can configure Mail with these aliases or extra addresses so they’re available to choose when you compose a new message (see Addressing).
iCloud aliases appear automatically (see Use iCloud Aliases). For other accounts, go to Mail > Preferences > Accounts > Account Name > Account Information and choose Edit Email Addresses from the Email Address pop-up menu. For each alias you want to add, click the plus ![]() button and type the email address (and, optionally, a different full name) into the appropriate fields. Click OK. Each of these addresses then appears in the From pop-up menu in the new message window.
button and type the email address (and, optionally, a different full name) into the appropriate fields. Click OK. Each of these addresses then appears in the From pop-up menu in the new message window.
Decoding the Mail Sidebar
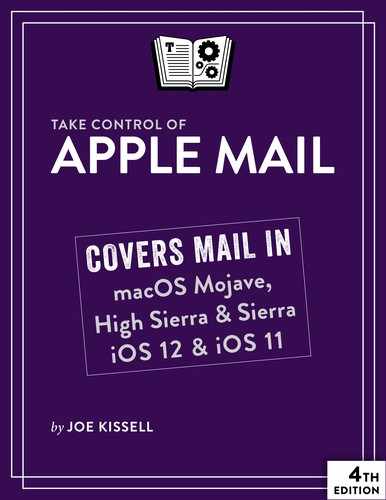
Mail’s sidebar displays all your mailboxes, including local mailboxes (stored only on your Mac) and server mailboxes (stored on an IMAP or Exchange server but also cached to your Mac—see the sidebar Cached Messages, ahead). I can’t imagine not wanting to see those mailboxes all the time, but for some reason, the entire sidebar is hidden by default in macOS Mail. So, if you don’t see it there on the left side of Mail’s main window, choose View > Show Mailbox List to display it.
What you see in that sidebar can vary tremendously based on your accounts and settings. Here are the main facts you should know:
Reordering: You can drag any section heading (such as Mailboxes, iCloud, On My Mac, Smart Mailboxes, or any account name) to move it higher or lower in the list. In addition, you can drag individual mailboxes within a section up or down to reorder them or to move one mailbox into another, in which case the higher-level mailbox acts like a folder.
Hidden headings: A heading appears only if there’s something to go under it (see Hidden Interface Elements). In general, that means user-created mailboxes. So, if you have an iCloud account with only the standard Special Mailboxes (and default settings), you won’t see an iCloud heading in the sidebar. However, if you create a new mailbox on the iCloud server (choose Mailbox > New Mailbox and then choose iCloud from the Location pop-up menu), the iCloud heading appears with your new mailbox underneath it.
Collapsing and expanding: If you move your pointer over a heading, the word Show or Hide appears to its right. Click this to expand (Show) or collapse (Hide) the list of mailboxes beneath. But the heading itself isn’t hidden as long as there’s something underneath it (per the previous point). Next to the Show or Hide label, when you hover over the heading, is a plus
 icon; click it to add a new mailbox (equivalent to Mailbox > New Mailbox) or, if you click the plus icon next to Smart Mailboxes, a new smart mailbox (equivalent to Mailbox > New Smart Mailbox).
Nesting mailboxes: You can nest mailboxes inside one another just as you can do with folders in the Finder. Drag a mailbox onto another one to make it a sub-mailbox; drag it up a level (a horizontal line shows where it will land when you release the button) to promote it.
Local vs. server: Mail doesn’t always make it obvious whether a mailbox is stored locally or on a server. If a mailbox is listed under the heading for a server-based account, it’s located on the server. If a mailbox is listed under the On My Mac heading (which, again, won’t appear unless there’s something under it), it’s stored locally. (To create a new local mailbox, choose Mailbox > New Mailbox and then choose On My Mac from the Location pop-up menu.)
However, the Special Mailboxes such as Inbox and Sent follow slightly different rules. Except for Inbox, if a special mailbox has an account-specific mailbox underneath, that mailbox is stored on a server—although, as I explain ahead, the name of the mailbox on the server may not match what you see in Mail. If you have only POP accounts, all the special mailboxes are stored locally.
Special Mailboxes
A number of mailboxes that appear in most accounts—Inbox, Drafts, Sent, Junk, Trash, and (sometimes) Archive—are shown under the Mailboxes heading in Mail’s sidebar. They have distinctive icons and behave differently from other mailboxes; I refer to these as “special” mailboxes (Figure 1).
One reason these mailboxes are special is that Mail automatically stores messages in them when you take certain actions (such as sending or deleting mail).
Another thing that makes these mailboxes special is that, for server-based accounts, they are all unified in macOS, which is to say that if you have multiple accounts set up, each special mailbox acts as a folder of sorts for each individual account’s mailboxes of that type—click the disclosure triangle next to Sent, for example, and you’ll see each account’s Sent mailbox listed underneath. (The Inbox is always unified, even for POP accounts.)
If you select the topmost (unified) icon for any special mailbox, Mail displays, to the right, all the messages for that type of mailbox in all your accounts; select an individual account in any special mailbox category to see just the messages for that account.
Here are the special mailboxes and what they do:
Inbox: Every account has an Inbox, if nothing else; it’s the mailbox where new messages are delivered.
Drafts: Messages you’ve started composing, but have not yet sent, are stored here. (Mail saves drafts automatically after 30 seconds, or you can choose File > Save to save a draft immediately.)
Sent: When you send a message, Mail keeps a copy here for your future reference.
Trash: When you delete a message, Mail can either remove it immediately or move it to a Trash mailbox (which is safer, and the default choice for most accounts).
Junk: This mailbox is designated for spam. If you’ve enabled junk mail filtering in macOS and set it to Move It to the Junk Mailbox (in Mail > Preferences > Junk Mail), Mail moves messages marked as junk to this mailbox.
iOS displays a Junk mailbox for any account that has one, but since iOS Mail doesn’t have a built-in spam filter, if junk mail arrives on your iOS device, you must move it to the Junk mailbox manually. A shortcut: Swipe to the left on an offending message, tap More, and then tap Move to Junk.
Archive: In macOS, the Message > Archive command (or an optional toolbar icon) moves messages to an Archive mailbox, creating that mailbox in the current account if necessary. (However, this may or may not function the way you expect; see Archiving for further details.) The Archive mailbox is listed with your other “special” mailboxes as long as at least one of your currently enabled accounts includes a top-level Archive mailbox.
In both macOS and iOS, Mail has swipe gestures for archiving messages (for macOS, see Gestures; for iOS, see Use Swipe Gestures); and in iOS, you can also choose to move discarded messages to the Archive mailbox rather than Trash by default (see Change Account Settings). In addition, you can add the Archive mailbox for any individual account to your top-level Mailboxes view (see iOS Mail vs. macOS Mail).
If you use only POP, Mail stores all these special mailboxes locally on your Mac. For server-based accounts, Mail can store any of these special mailboxes either locally or on the server, depending on how you’ve configured the controls in Mail > Preferences > Accounts > Your Account > Mailbox Behaviors—if you have a server location chosen for any of the mailboxes (the default), that special mailbox is stored on the server for that account. (You are, of course, free to store any of these special mailboxes locally instead, but in general, I recommend leaving them all on the server—especially Drafts and Sent—so that you can see the same messages on all your devices.)
You might infer from the fact that a given account appears under, say, the unified Sent mailbox in Mail’s sidebar that there must be a mailbox named Sent on the corresponding server. There could be, but the mailbox might instead be named Sent Messages or Sent Mail or Sent Items or whatever—the “real” name (which sometimes shows up when you use an email client other than Mail, or a webmail interface) doesn’t necessarily match Mail’s special mailbox name. Similarly, “Junk” could in fact be Spam or Junk Mail, “Trash” could be Deleted Messages or Deleted Items, and so on.
When you add a new account, Mail usually figures out automatically which mailbox the server means to use for Sent, Trash, and so on, and everything just works, even if the names don’t match precisely. But in some situations—especially with IMAP accounts that don’t come from one of Mail’s preset providers—Mail consistently guesses wrong. For example, if you set up an IMAP account that already has a mailbox named Sent, Mail ignores that mailbox. When you send a message, Mail creates a new mailbox named—wait for it—Sent Messages and moves your sent message there. Something similar may happen with Trash (which Mail calls Deleted Messages). It defies logic, I know, but there it is.
The consequence of this weird behavior is that if you use a webmail interface or another email client, it puts messages in whichever special mailbox it thinks is the correct one, but Mail uses a different one. You may find messages you’ve sent within Mail in Mail’s Sent special mailbox (which is really Sent Messages behind the scenes), but messages you sent in a web browser can appear in a mailbox called Sent (its real name), which is listed with your other user-created mailboxes under that account’s heading in your sidebar.
So, it’s up to you to tell Mail—ideally, immediately after you set up any new account and before you send, delete, or file anything—which mailbox should serve which function. To do this, go to Mail > Preferences > Accounts > Your Account > Mailbox Behaviors (as described above) and choose the desired mailboxes from the pop-up menus.
What if Mail has already created duplicate special mailboxes for you and you’re having trouble untangling them? Skip ahead to Untangle Special Mailboxes for macOS, and if you’re using iOS, also see Special Mailbox Problems.
Controlling Mail Formatting
When you create a new message (File > New Message), or forward or reply to an incoming message, you can of course simply type away and click Send. Mail lets you compose your messages either in plain text (my recommendation) or in rich text (the default), in which you can control fonts, sizes, styles, colors, and so on. In either case, you can drag in or paste graphics and other files if you want to attach them to your message.
I say more about formatting options later in Choose Formatting Wisely and dealing with attachments in Use Attachments Judiciously, but for now, I want to talk about a higher-level concept: who controls the formatting.
I’ve heard two related and contradictory complaints about Mail:
“Why can’t I, as the recipient of a message, control the font, size, and other formatting? Why must I put up with the sender’s goofy preferences?”
“Why can’t I, as the sender of a message, control exactly what the recipient sees? Sometimes text, formatting, and attachments don’t look the same on the recipient’s end.”
Many versions ago, Mail afforded recipients much more control over how messages appeared, allowing them to override the sender’s formatting in various ways. Now, however, your options are severely limited, and lots of Mail users find that irritating. Equally, senders are frustrated that they can’t know for sure that recipients will see what they think they’re sending—especially if the recipient is using a different email app on a different platform.
As the recipient of a message, as long as you’re using Mail, you have only limited control over what you see. You can set the default font and size for incoming messages in Mail > Preferences > Fonts & Colors > Message font > Select, but this setting applies only to plain text messages—rich text messages will appear using whatever fonts and colors the sender chose, although if the sender didn’t specify a size, your custom size will apply. (You can also force plain text messages to use a monospaced font by selecting “Use fixed-width font for plain text messages” in Mail > Preferences > Fonts & Colors.)
As the sender of a message, meanwhile, you can apply whatever formatting you like, but you cannot guarantee that the recipient will see that formatting, unless that person is also using Apple Mail. Some email clients display only plain text, while others allow the user to switch between plain text and rich text and choose a default viewing format, regardless of what the sender selected. Because you can’t be sure what client the recipient will use or what their settings may be, you should not depend on formatting to convey your point (as in, “I’ve put my remarks in red text”).
I’m unhappy with this situation, because it satisfies neither recipients nor senders. Unfortunately, there’s not much to be done about it, other than to confine yourself to plain text (or minimally formatted rich text) and ask your correspondents to do the same. Again, refer to Choose Formatting Wisely for further information.
Hidden Interface Elements
Almost everything in Mail can be accomplished in at least two or three ways—for example, by clicking a toolbar button, choosing a menu command, or pressing a keyboard shortcut. That’s been the standard way to design Mac apps since day one. All these interface elements are easily discoverable—you can simply look at a toolbar or menu and there they are, and if you have trouble finding them, there’s always the Help menu.
But several years ago, Apple began releasing apps (including Mail) with a new design element: hidden controls that appear only when your pointer hovers over (or near) them. Presumably this was done to give the interface a cleaner, less cluttered look. Unfortunately, this design kills discoverability—you can’t know that it’s possible to click on a control if you can’t even see that control. And, even once you’ve discovered those magic spots where controls sometimes appear, aiming for them when your pointer is in the far corner of the screen is imprecise at best. The result is that the process of “target acquisition” is clumsier and takes longer.
This isn’t a huge problem for tasks that can be accomplished in some other way, such as choosing a menu command. But in cases where there’s no other way to do someting, hiding the controls to do it is Just Wrong. Although this isn’t the only sense in which Mail contains hidden interface elements, it’s the most egregious.
I can’t convince Apple to stop hiding controls, but I can at least point out what’s hidden and where:
Hide/Show: In Decoding the Mail Sidebar, I mentioned that the controls to hide and show the mailboxes for each account are hidden—hover over the account name in the sidebar to display Hide or Show (along with a plus
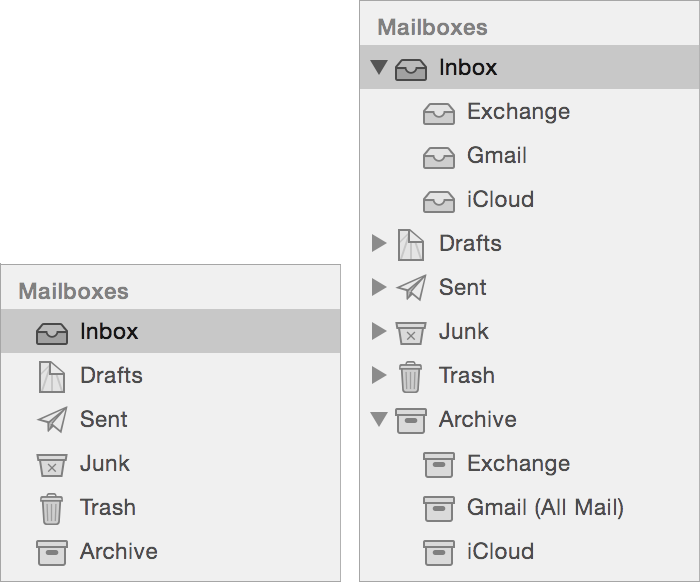
button for adding a new mailbox).Incoming message controls: If you hover your pointer over (or near) the header portion of a message, a block of controls appears (Figure 2).
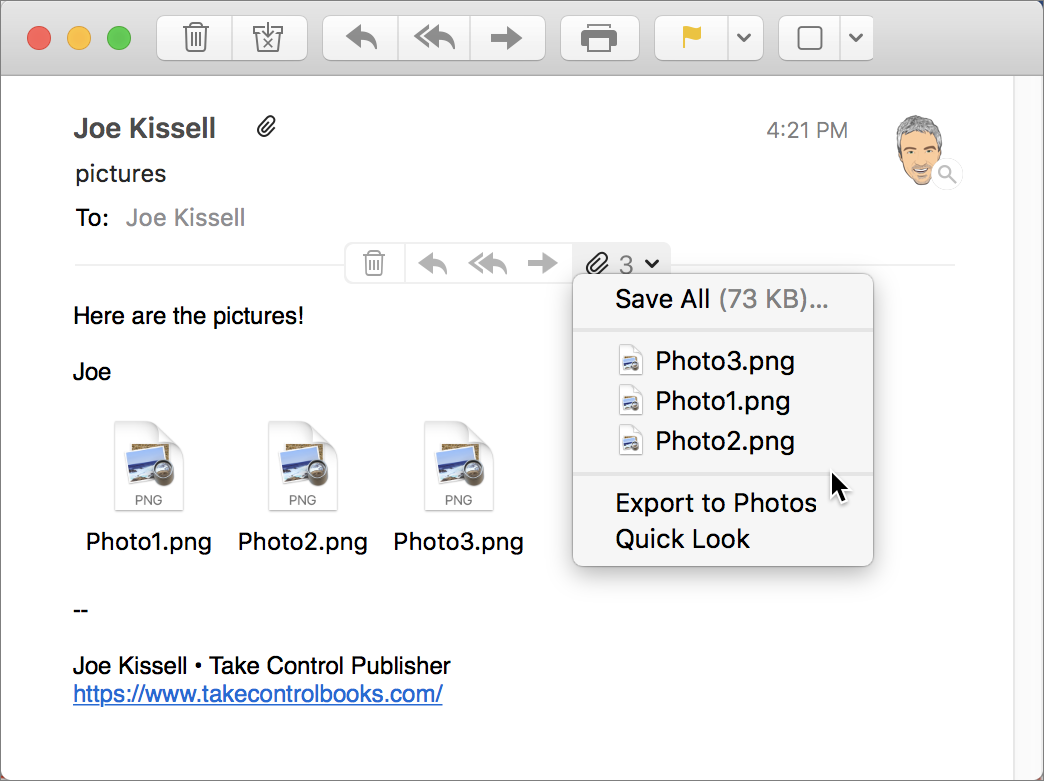
Figure 2: This group of controls appears only when your pointer approaches it, and the rightmost control contains (for messages with image attachments) an Export to Photos command that isn’t found on any other menu. The four leftmost controls (Delete, Reply, Reply All, and Forward) are for actions you can accomplish in several other ways. But the pop-up menu on the right, which appears only if the message has one or more image attachments, contains an Export to Photos command that doesn’t appear anywhere else in Mail. Well, that’s not exactly true. It does appear on the contextual menu that pops up if you right-click (or Control-click) an image attachment—but that menu is hidden too!
VIP stars: The star icon shown next to the sender’s name is what you click to designate that sender as a VIP (see VIPs). But that star doesn’t appear until the pointer moves over the spot directly to the left of the sender’s name in the message header.
Priority pop-up menu: When you’re composing a new message, the window can optionally show a tiny pop-up menu from which you can choose to mark your message as Low, Normal, or High priority. See Message Header for details.
From menu: If you have more than one email address or account enabled, the message composition window shows the name and email address the message will be sent from. To use a different From address, you can hover over the address shown and choose an address from the pop-up menu—but you can’t tell there’s a pop-up menu there until you hover over it.
Bcc and Reply-To fields: You may need to specify one or more Bcc (Blind carbon copy) addresses for outgoing messages, so that none of the recipients (regardless of which field contained their address) will see the Bcc addresses. You may also want to specify a different Reply-To address, if you want replies to a message to go to a different address than the one you sent it from.
Mail offers Bcc and Reply-To fields, but they’re hidden by default. To turn them on when composing a new message, choose View > Bcc Address Field or View > Reply-To Address Field. These fields will remain visible in all new messages you compose, unless you return to that menu and choose the commands again to hide them.
Toolbar buttons: I probably don’t need to mention this here because customizable toolbars appear in lots of apps, but if you’re looking for an Archive button, say, or any of numerous other controls that don’t appear there by default, check out Toolbars.
Dark Mode control: If you have enabled Dark Mode on your Mac (in System Preferences > General), you’ll also see a new checkbox in Mail > Preferences > Viewing: “Use dark backgrounds for messsages.” It’s checked by default, but if you prefer your messages to have white backgrounds and black text by default, even in Dark Mode, you can uncheck it.
Gestures
If you have a Mac laptop, a Magic Trackpad, or a Magic Mouse, you can use touch-based gestures in Mail. These apply only to message lists, not to message contents, and they’re not nearly as flexible as those in iOS, but still, they’re a start:
Swipe right with two fingers (trackpad) or one finger (Magic Mouse): A short swipe (less than halfway across the message list) reveals a Read (or Unread) button; click it to mark the message as Read (or Unread). A long swipe (halfway or more across the message list) toggles the message’s read status immediately.
Swipe left with two fingers (trackpad) or one finger (Magic Mouse): A short swipe (less than halfway across the message list) reveals a Trash or Archive (depending on the account type and settings) button; click it to move the message to that mailbox. A long swipe (halfway or more across the message list) sends the message to the Trash or Archive mailbox immediately. To determine whether the action is Trash or Archive, go to Mail > Preferences > Viewing, and choose either Trash or Archive from the “Move discarded messages into” pop-up menu.
Full-Screen Mode
When your Mac is in full-screen mode, the foreground app fills the entire screen and the menu bar, Dock, Desktop, and other elements are hidden. (To enter full-screen mode, click the green ![]() button in the upper-left corner of the window or choose View > Enter Full Screen.) While in full-screen mode, when you create a new message or double-click a message (which normally opens it in its own window), Mail switches into Split View, showing your message list and previews on the left, and the individual message on the right. (If Mail is already in Split View, any new windows you open appear in the Viewer half of the screen, in front of the message viewer.) In either full-screen mode or Split View, you can switch between multiple in-progress draft messages in tabs at the top of the pane or window.
button in the upper-left corner of the window or choose View > Enter Full Screen.) While in full-screen mode, when you create a new message or double-click a message (which normally opens it in its own window), Mail switches into Split View, showing your message list and previews on the left, and the individual message on the right. (If Mail is already in Split View, any new windows you open appear in the Viewer half of the screen, in front of the message viewer.) In either full-screen mode or Split View, you can switch between multiple in-progress draft messages in tabs at the top of the pane or window.
With a separate message pane open in Split View, you can also click the minimize ![]() button or press ⌘-M, either of which causes the in-progress message’s title bar to slide to the bottom of the screen. You can then do whatever else you want in Mail, and click that minimized title bar whenever you want to continue working on your message. In fact, you can have multiple minimized draft messages; each one gets its own tab at the bottom of the screen. Even when a message window is minimized like this, you can drag an attachment to it.
button or press ⌘-M, either of which causes the in-progress message’s title bar to slide to the bottom of the screen. You can then do whatever else you want in Mail, and click that minimized title bar whenever you want to continue working on your message. In fact, you can have multiple minimized draft messages; each one gets its own tab at the bottom of the screen. Even when a message window is minimized like this, you can drag an attachment to it.
You can use the same process to minimize any open message or thread. That is, if you double-click a message or thread in any mailbox list to open it in its own pane while in full-screen mode, you can then click the minimize ![]() button or press ⌘-M to minimize it.
button or press ⌘-M to minimize it.
Note: In a change from earlier versions of Mail, you can now have both drafts and incoming messages minimized at the same time.
Addressing
When you address an outgoing message, Mail usually does the right and expected thing, such as autocompleting names or addresses based on what you’ve typed so far. Alternatively, you can click the plus ![]() icon at the right side of the To, Cc, or Bcc header to display a popover with the contents of your Contacts. Either way, Mail uses data from the Contacts app to help it fill in addresses, so be sure you’ve entered your most important addresses there.
icon at the right side of the To, Cc, or Bcc header to display a popover with the contents of your Contacts. Either way, Mail uses data from the Contacts app to help it fill in addresses, so be sure you’ve entered your most important addresses there.
However, in a few cases Mail’s addressing behavior may not be what you expect, so allow me to clarify the following:
Previous recipients: Addresses you’ve previously sent email to are added to Mail’s Previous Recipients list, and those addresses are also used for autocomplete. Over time, this list can accumulate cruft (including outdated and erroneous addresses), so you might want to clean it out occasionally to make addressing more accurate. To do this, choose Window > Previous Recipients, and then select and delete any addresses you don’t need. (Try sorting the addresses by Last Used to easily find ones you haven’t used in a long time.)
You can also remove a single address from Previous Recipients by selecting a name in the header portion of any message (so that it becomes a blue box), clicking the tiny arrow on its right side, and choosing Remove from Previous Recipients List from the menu.
Multiple addresses: If you type or paste an email address into an address field (as opposed to using autocomplete for an address Mail already knows) and want to type another, press Return or type a comma. Mail then encapsulates the address you’ve just typed in a tidy blue box, and is ready for the next one.
Groups and smart groups: The Contacts app lets you create groups of addresses—for example, a Family group with the contact records of your family members. You can type a portion of a group’s name and Mail autocompletes it just as it would for an individual name. This even works for smart groups you created in Contacts.
Bcc and Reply-To: As I said in Hidden Interface Elements, you can enable either of these normally hidden fields if you need them when addressing a message.
Smart addresses: If Mail knows an addressee’s full name (for example, if it’s listed in Contacts), then by default, it shows only the name—not the email address—in address fields. This is called a smart address, but I think it’s dumb because I have lots of contacts with multiple email addresses, and it’s often important for me to know which address I’m sending mail to. But smart addresses force me to click the little arrow next to each person’s name to discover which address it’s using.
To turn off smart addresses so Mail displays each person’s full name and email address, go to the Mail > Preferences > Viewing and deselect Use Smart Addresses.
From address: If you have more than one account set up in Mail, you can choose which one is used by default for outgoing messages, and you can override that choice for any given message. To change the default, go to Mail > Preferences > Composing and choose an address from the “Send new messages from” pop-up menu.
The default option here is “Automatically select best account,”but I’ve found this setting to be weird and unpredictable—even more so than the “Account of selected mailbox” option in El Capitan and earlier. Previously, with “Account of selected mailbox” chosen, Mail used the account corresponding to the selected message or Inbox. Now, if you’ve selected a message in a specific account’s Inbox, Mail sends the message from that account. But if you’re anywhere else, Mail chooses what it considers the “best” account, according to a logic I’ve been unable to discern but which has been wrong for me nearly every single time. And, even if you have a specific account’s Inbox selected when you create a new message, Mail might decide to override that account depending on the To addresses in your message. In short: feel free to try this if you like, but expect the unexpected. My advice is: for maximum sanity, avoid “Automatically select best account”!
To change the From address manually for a given message, choose the account you want from the From pop-up menu just above the message area.
Filing
To move a message to a different mailbox (even if that’s in a different account), you can drag the message to the new location in the sidebar, or select it and choose Message > Move to > Mailbox Name (or, in Mojave, the Move control on the toolbar). (If you prefer, you can copy messages instead—hold down Option while dragging, or use the Message > Copy to submenu.)
As you use Mail, it notices your filing patterns—for example, if you file most messages from a particular sender into a certain mailbox. Mail then makes an educated guess as to where you might want a selected message to go. If Mail can identify a likely destination, it shows up in a few places:
The Message > Move to Suggested Mailbox Name command, just below the Archive command.
The Touch Bar on a MacBook Pro.
In Mojave, the Move
 control on the toolbar—if it shows the destination mailbox you want to use, just click it; otherwise, click the arrow on the right side and choose your destination from the pop-up menu.
iOS also supports suggested destinations; see About Suggested Destinations in iOS.
Archiving
Mail has an Archive command (Message > Archive) and an optional Archive toolbar button for archiving incoming messages. However, it works differently depending on whether the message you’re archiving is in a Gmail account:
Non-Gmail accounts: Mail moves the selected messages to a mailbox at the top level of that account called Archive—and if that mailbox isn’t already present, Mail creates it. (For POP accounts, the mailbox is local; otherwise, it’s on the server.)
Gmail accounts: Mail removes the Inbox label from the message, which means it disappears from your Inbox and appears in the Archive (All Mail) mailbox under Archive in your sidebar. On the Gmail website, the message appears only in All Mail unless it also has another label.
Because the Archive mailbox is a unified “special” mailbox (refer back to Special Mailboxes), you can view the archived messages from all your accounts in one place if you like, but only non-Gmail accounts actually use a server-based mailbox called Archive.
By the way, I want to mention a source of frequent misunderstanding: pressing the Delete key in Mail does not archive messages (in either Mail’s sense or Gmail’s sense). In Mail, Delete means “delete,” because after all, even people who archive almost everything sometimes need to delete messages.
Notifications
With the system-wide Notifications feature in macOS, previews of incoming messages can—at your option—appear as alerts (which stay on screen until you dismiss them) or banners (which disappear automatically after 5 seconds, but can be consulted later by clicking the Notification Center ![]() icon in the upper-right corner of your screen), with or without accompanying sounds and Dock icon badges.
icon in the upper-right corner of your screen), with or without accompanying sounds and Dock icon badges.
Notifications are enabled by default, but you may want to adjust their behavior, both in Mail and in System Preferences.
To determine which incoming messages will trigger Mail to send notifications, go to Mail > Preferences > General and choose one of the following from the New Message Notifications pop-up menu:
Inbox Only: Only new, unread messages that appear in your Inbox (and not, for example, messages that are automatically filtered into other mailboxes—see Use Rules) trigger notifications.
VIPs: Only incoming messages from people you’ve marked as VIPs (see VIPs) trigger notifications.
Contacts: Messages from any address in your Contacts list trigger notifications.
All Mailboxes: Any and all new messages trigger notifications.
Smart Mailbox: Any smart mailboxes you’ve set up (see Work Smarter with Smart Mailboxes) appear here. New messages appearing in the selected smart mailbox trigger notifications.
To determine what the system does when Mail sends a notification:
Go to System Preferences > Notifications (Figure 3).
Figure 3: Set system-wide notifications from Mail in the Notifications pane of System Preferences. In the list on the left, select Mail.
Click None, Banners, or Alerts to set what type of notification (if any) should appear when Mail receives a new message that meets the criterion you set in the previous set of steps.
Select “Show notifications on lock screen” if you want to display notifications for Mail when your Mac’s screen is locked and requires a password (configure the screen lock in System Preferences > Security & Privacy > General).
Select “Show message preview” if you want Mail notifications to include a portion of the message text; choose either “when unlocked” or “always” from the pop-up menu to determine when the preview is shown.
To prevent notifications from appearing in Notification Center, uncheck “Show in Notification Center.”
If you want to prevent Notification Center from listing the number of outstanding notifications on Mail’s Dock icon, uncheck Badge app icon.” (If this is unchecked, Mail’s Dock icon won’t display the number of unread messages, even if you’ve set it to do so in the General pane of Mail’s preferences window.)
If you want to prevent Notification Center from playing a sound when a notification occurs from Mail, uncheck “Play sound for notifications.” (Unlike the previous setting, even if this unchecked, Mail still plays sounds when new messages arrive if you’ve set it to do so in Mail > Preferences > General.)
Changes take place immediately.
Data Detectors
Mail has a feature called Data Detectors, which intelligently identifies strings of text that match patterns like street addresses, dates (even vaguely stated dates, like “next Tuesday” or “breakfast tomorrow”), phone numbers, and flight numbers—and then lets you do appropriate things with them. With Data Detectors, you can quickly add an entry to Contacts (or update an existing entry), schedule an event in Calendar, look up a location in the Maps app, track a flight, and so on. Data Detectors work only on messages you’ve already received or sent, not on new messages you’re composing (even if they’re stored in Drafts).
Just as in iOS (see Use Calendar and Contact Shortcuts), macOS Mail sometimes shows a banner at the top of an incoming message (Figure 4) with an icon and message (such as “Siri found new contact info in this email,” “Siri found updated contact info in this email,” or “Siri found 1 event in this email”) and a link that says “add to Contacts…” or “add to Calendar….” Click the link to display a popover in which you can confirm the information and add it to Contacts or Calendar, respectively.
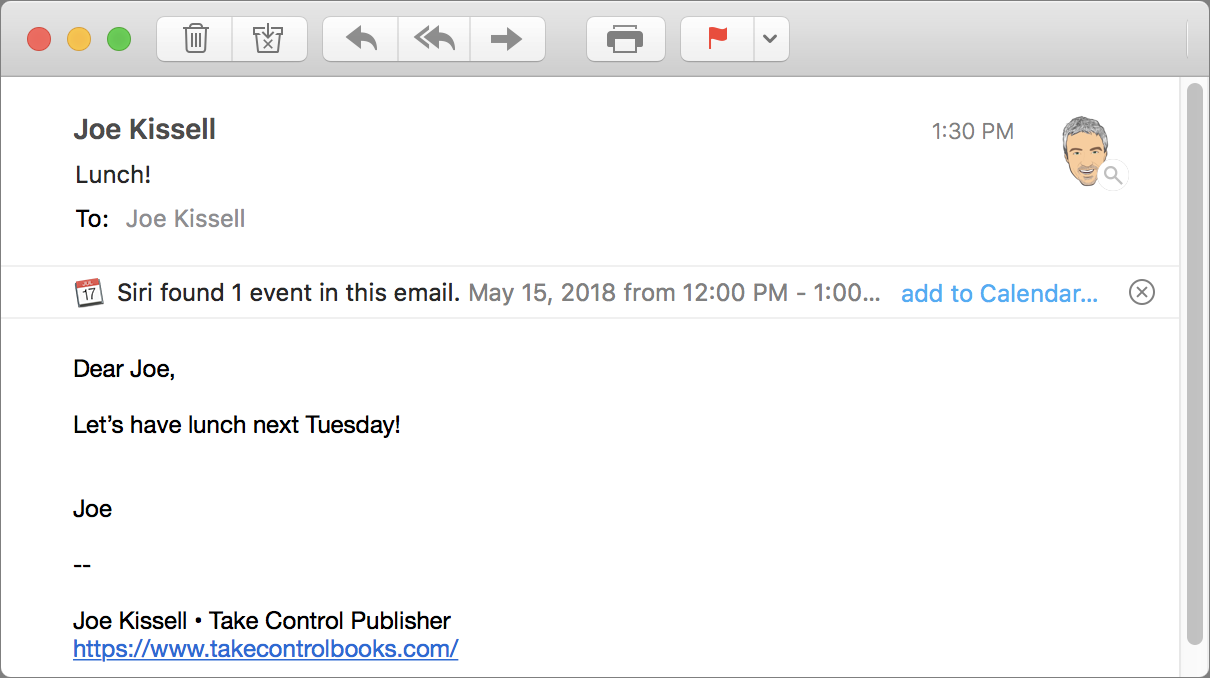
Unfortunately, whether these banners appear can be pretty hit-or-miss. For example, when the sender includes a phone number in the message signature, I usually see a link to add a contact, but not always.
Even if you don’t see a banner, however, Data Detectors may have detected something useful! If you see a chunk of text that looks like one of the kinds of data I just mentioned (an address, phone number, date, flight number, and so on), move your pointer over it. If Data Detectors considers it to be an appropriate kind of data, a dotted box appears around it, with a downward-pointing arrow ![]() on the right. Click the triangle
on the right. Click the triangle ![]() to display either a contextual menu with one or more options, or a popover with additional controls, depending on the type of data.
to display either a contextual menu with one or more options, or a popover with additional controls, depending on the type of data.
In iOS Mail, all text that Data Detectors identifies as possibly useful is blue and underlined, just like a URL. Tap one of these link-like strings to pop up relevant controls.
Attachments
You’ve always been able to attach a file to a message by dragging the file into the message or clicking the Attachments ![]() button. But attachments have often been the source of considerable frustration, especially when they’re large or when the recipient is using a mobile device (for more on this topic, refer to Use Attachments Judiciously). macOS Mail has three features that aim to make attachments easier to work with: Mail Drop, which replaces attachments with links; Markup, which lets you annotate graphical attachments within Mail; and Continuity Camera, which lets you snap a photo or scan a document with your iOS device and insert the resulting graphic directly into an email message.
button. But attachments have often been the source of considerable frustration, especially when they’re large or when the recipient is using a mobile device (for more on this topic, refer to Use Attachments Judiciously). macOS Mail has three features that aim to make attachments easier to work with: Mail Drop, which replaces attachments with links; Markup, which lets you annotate graphical attachments within Mail; and Continuity Camera, which lets you snap a photo or scan a document with your iOS device and insert the resulting graphic directly into an email message.
Mail Drop
Many email servers prevent you from sending (or the recipient from receiving) messages over a certain size. Even if that’s not an issue, someone receiving your message on a mobile device may not want to download a huge file. One way to avoid the aggravations of emailing large attachments is to send links instead. In other words: copy a file to cloud storage, follow the cloud storage service’s procedure to get a URL for the file, and then email that URL. But this approach involves several manual steps, which can be tedious if you do this often.
A better way is an iCloud feature called Mail Drop. With Mail Drop, you compose a message and drag files in to attach them, just as you normally would. But when you click the Send button, if the attachment(s) total over 20 MB or so in size, Mail uploads them to iCloud and inserts into the message a download link to the files; that link is valid for 30 days. This works for attachments totaling up to 5 GB per message. (For more details, see Apple’s Mail Drop limits page.)
Mail Drop requires you to be signed in to an iCloud account in System Preferences > iCloud. In addition, Mail Drop must be enabled—for each account—in Mail. Mail Drop is enabled by default for iCloud email accounts; for other IMAP and Exchange accounts (unfortunately, it doesn’t work with POP accounts), Mail prompts you to use Mail Drop when you send a large attachment if you haven’t already turned it on (Figure 5).

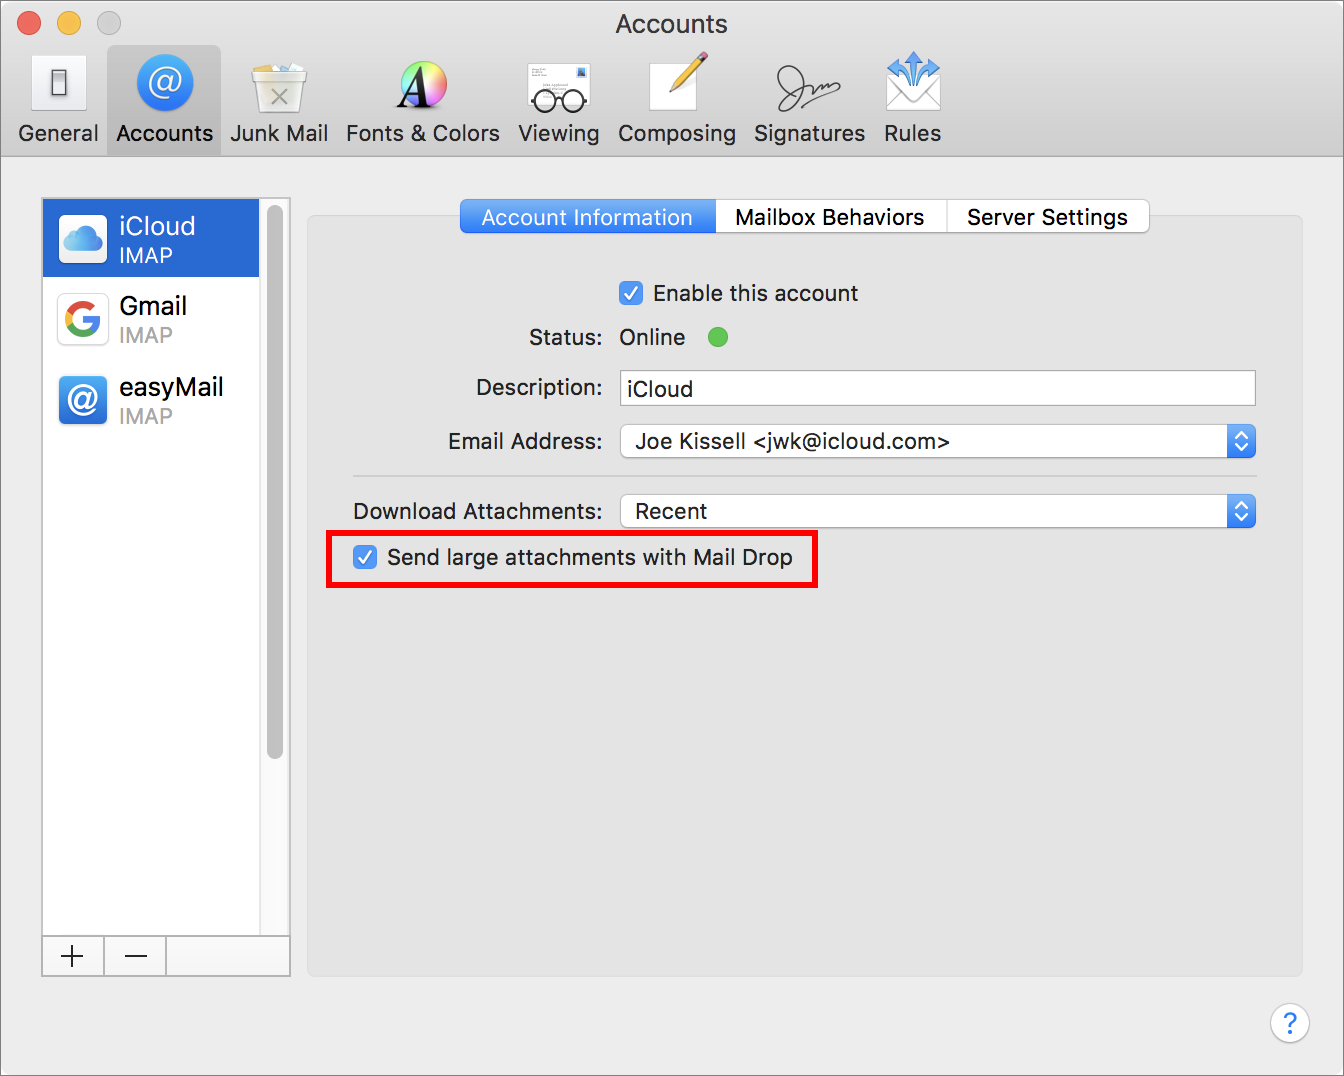
To enable Mail Drop permanently for any IMAP or Exchange account, go to Mail > Preferences > Accounts > Account Name > Account Information and select “Send large attachments with Mail Drop” (Figure 6). You can also disable it here (even for iCloud accounts) if you prefer not to use it for some reason.
Mail Drop is a terrific feature, and I’m delighted that Apple lets you use it even when sending from non-iCloud accounts. However, it’s not terribly flexible—you can’t specify how large attachments must be to trigger Mail Drop, you can’t use a cloud service other than iCloud if you prefer, and you can’t eliminate the 30-day limit on link validity. If you’d like to get all the benefits of Mail Drop but without these limitations, try a third-party plugin called Mailbutler.
Markup
Markup lets you annotate photos or PDFs attached to outgoing email messages (including forwards and replies), without opening a separate app. By “annotate,” I mean superimpose text, shapes, freeform sketches, or even your signature. You can use this feature to add silly comments to snapshots, “sign” a letter or contract, or send a colleague comments about a document.
Before Markup, you could use Preview (or a third-party app, such as PDFpen) to do these things. But it meant making a copy of the graphic or PDF, opening it in the app, saving the results, and dragging the annotated copy into a Mail message. Markup saves a few steps in this process—but you might never find it if you didn’t know where to look.
To mark up an image, start with an outgoing message—either a new message you’ve created, or one you’re forwarding or replying to—that contains a graphical attachment. Then follow these steps:
Hover your pointer over the attachment. Click the arrow
 icon that appears in the upper-right corner (Figure 7) and choose Markup from the pop-up menu.
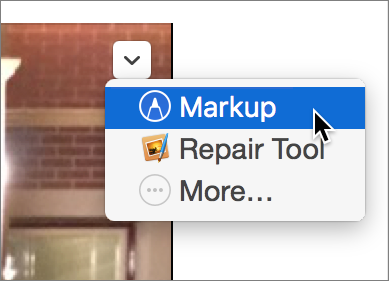
Figure 7: It’s quite subtle, but this little pop-up menu provides access to the Markup command (and any other such extensions you may have installed, such as Pixelmator’s Repair tool, shown here). A pop-up view appears over the message window (Figure 8).
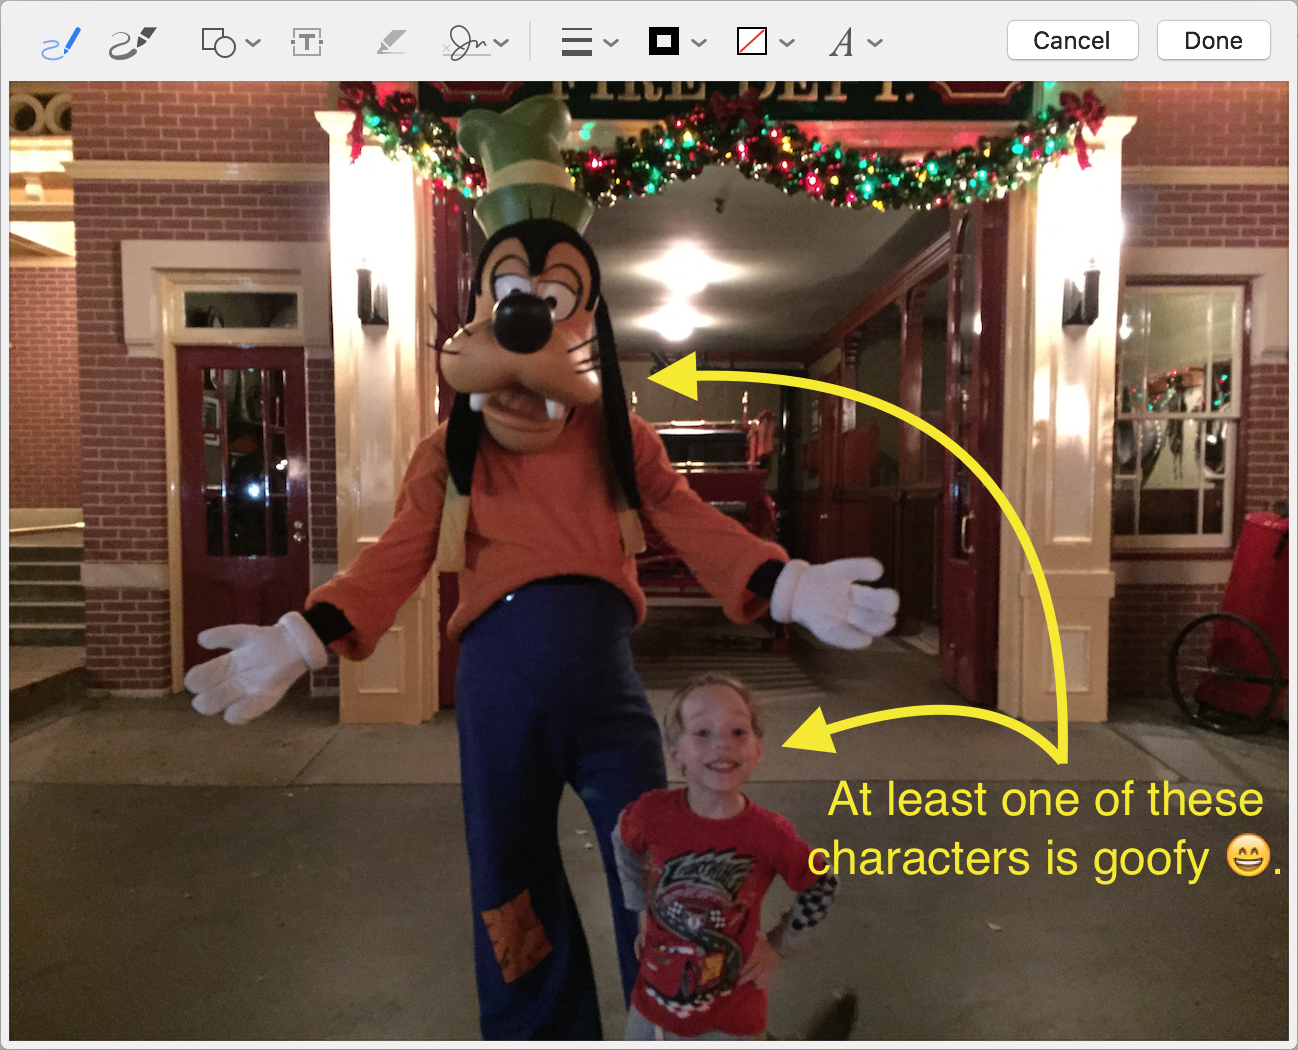
Figure 8: When you choose the Markup command, a pop-up view appears over your Mail window with annotation controls at the top. Use the controls at the top to annotate the image:
Sketch
 : Draw free-form lines, shapes, and sketches.
Draw
 : Draw with a pen that responds to pressure. Appears only on Macs with a trackpad that supports Force Touch.
Shapes
 : Draw shapes (circle, square, star, arrow, etc.).
Text
 : Type text on the image.
Highlight Selection
 : This icon apparently is intended to highlight text in a PDF, but I have been unable to find any PDF document in which it works.
Sign
 : Use your trackpad to write your signature, or capture a written signature with your Mac’s camera.
Shape Style
 : Change line style, weight, arrowheads, and similar attributes.
Border Color
 : Change the color of an object’s border or stroke.
Fill Color
 : Change the color of an object’s fill.
Text Style
 : Change font, size, style, color, and alignment of text.
When you’re finished, click Done.
Mail saves the changes you made to the copy of the attachment stored in the message—but does not alter the original file on your Mac. You can then send the message.
Continuity Camera
In Mojave, Apple added a handy feature called Continuity Camera that lets you snap a photo (or “scan” a document, complete with automatic cropping and perspective correction) using an iOS device and then insert the resulting graphic directly into any of several Mac apps. Your iOS device must have iOS 12 or later, and both your Mac and your iOS device must have Wi-Fi and Bluetooth turned on, and be signed in to the same iCloud account with two-factor authentication enabled.
To use Continuity Camera while composing a new message in Mail running in Mojave:
Position your insertion point where you want the graphic to go.
Click the Photos
 button on the toolbar and then choose either Take Photo or Scan Documents from the pop-up menu; these commands are listed separately for each of your connected devices. (Alternatively, you can right-click or Control-click at the desired location and choose Take Photo or Scan Documents from the contextual menu.)
For photos, tap the shutter release button on your iOS device and then tap Use Photo; or, for scans, adjust the corners if necessary, tap Keep Scan, and tap Save.
Mail inserts the newly created graphic into your message.
Handoff
Handoff lets you start a task on one device and continue it on another, without having to save, transfer, and open files. It works with many Apple apps—including Mail, Messages, Reminders, Calendar, Contacts, Safari, and Maps. For the purpose of this book, I’m concerned only with Mail.
For Handoff to work, the following must be true for each device:
Hardware and software must be compatible with Handoff. That means Macs introduced in 2012 or later and running Yosemite or later, and iOS devices with a Lightning connector and running iOS 8 or later. The Apple Watch also supports Handoff in a limited way.
It must have Bluetooth turned on.
It must be signed in to the same iCloud account as the device you’re sharing tasks with.
It must be on the same Wi-Fi network as the other device.
Handoff must be enabled (on a Mac, go to System Preferences > General and select “Allow Handoff between this Mac and your iCloud devices”; on an iOS device, go to Settings > General > Handoff and turn Handoff on).
To trigger Handoff from a Mac, open Mail and select a message or message thread, or open a new message window. To trigger it from an iOS device, start a new message or reply (the in-progress message must have something in the To or Subject field, or the message body).
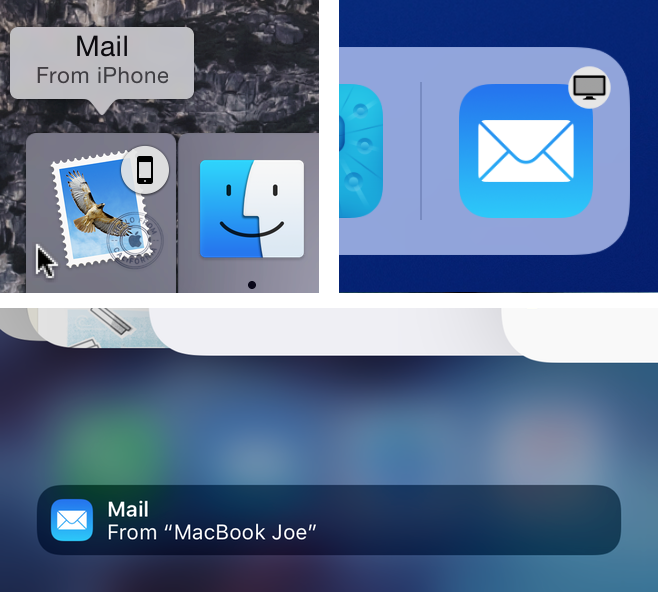
Once you’ve done this, any other compatible Mac or iOS device nearby that’s signed in to the same iCloud account allows you to pick up where you left off on the first device (Figure 9):
On a Mac: An icon showing the app from the first device pops up on the left edge of your Dock (or the top, if oriented vertically).
On an iOS device: Open the App Switcher: if your device has a Home button, double-press it; if not, swipe up from the bottom of the screen to the middle and hold there for a moment. A Handoff banner (and the name of the other device) appears at the bottom of the screen. Tap the banner to open Mail, which presents the in-progress message. On an iPad, a Handoff icon also appears in the Dock, much like it does on a Mac; tap it to open the message.
In any case, handing off a message closes it on the first device. For example, if you start composing an email message on your iPad and then hand it off to your iPhone, the in-progress draft disappears from your iPad’s screen.