
Check Events & Reminders
There are two kinds of people. Those of us who check our calendars and reminders rarely—instead, relying on alerts to remind us what to do when—and those of us who obsessively check 20 times a day. If you’re in the first category, Set Up Calendar Alerts was your chapter, and you read Sound the Alarm for help with your reminders. If you’re in the second category, this chapter is for you.
Across the chapter, I break down all the different ways you can find an overview or list of current and upcoming events and reminders on a Mac, using Siri on any Apple device, via an iPhone or iPad, on an Apple Watch, and with a HomePod.
Check on Your Mac
There is more than one way to check a calendar or view your reminders on your Mac. See whether one of these tips fits the way you work.
Put the App in its Own Space
Don’t overlook the Spaces feature. You can use it with any app, but it’s well suited to Calendar in particular because it puts Calendar full screen on its own virtual desktop where fewer event titles are cut off due to you squishing the window to make room for something else (Figure 93). This method makes the most sense when you want to be able to edit events directly in Day view, or see Month or Week view.
Click the green ![]() button in the top-left corner of the Calendar window to expand it to full screen. Move back and forth between your regular desktop and the full-screen Calendar using one of these shortcuts:
button in the top-left corner of the Calendar window to expand it to full screen. Move back and forth between your regular desktop and the full-screen Calendar using one of these shortcuts:
Press Control-← or Control-→.
Swipe from one side of your trackpad to the other using three or four fingers, or with two fingers on a Magic Mouse.

See Calendar Events in a List
If you like to scan a list of the day’s events, you may be disappointed that unlike Calendar on an iPhone, the Mac version of Calendar doesn’t offer a list option. Luckily, you can use a workaround to get much the same effect.
Make sure the calendars you’re interested are selected in the sidebar and then type two quotation marks—""—in the search field. All your events appear in the search results list. Scroll down to the date you’re interested in.
Another option is to print your calendar—either to paper or PDF—in Day, List, or Selected Events layout. (See Print Your Calendar for details).
Check Notification Center on a Mac
When you want to take a quick look at your calendar and any scheduled reminders, Notification Center may do the trick. Its sidebar slides in from the right of your screen to give you an overview of all your notifications. It’s easy to set it up so that you can check the day’s schedule without disturbing your desktop.
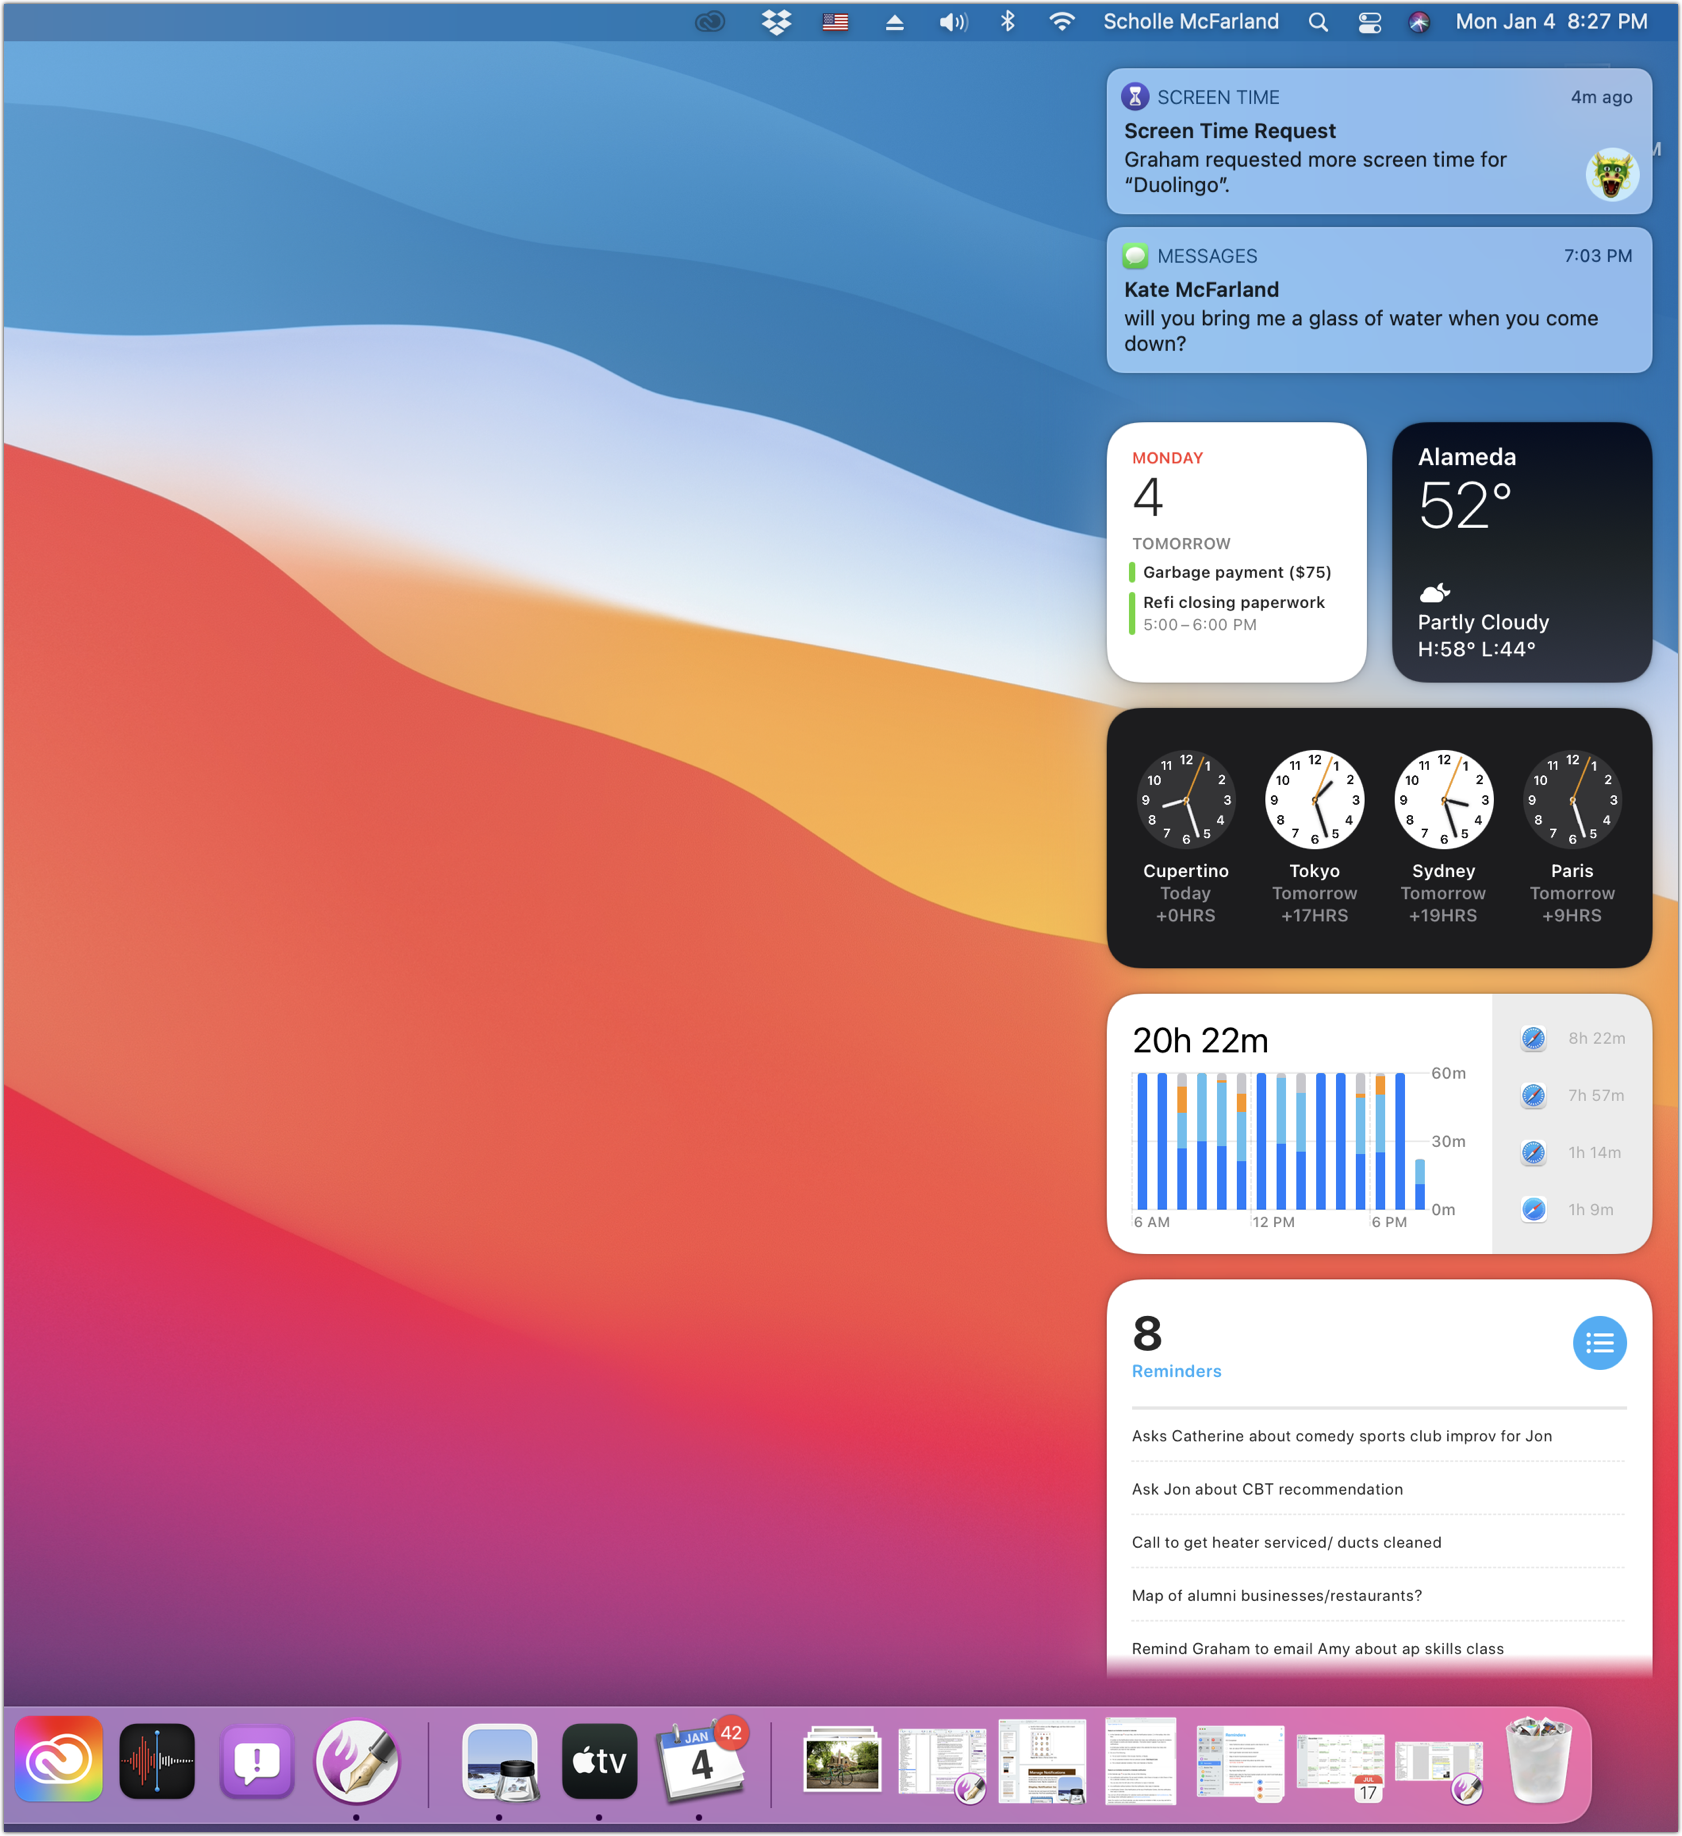
Activate Notification Center by clicking the date or time at the far right end of the menu bar. The slide-in sidebar shows recent notifications based on what you’ve chosen (see Set Up Notifications), as well as a variety of widgets (Figure 94).
You can add or modify a Calendar or Reminders widget to display a little or a lot of information that you can view at a glance. Control-click or right-click any widget and choose Edit Widgets, or scroll to the bottom of the list and click Edit Widgets. You can then select Calendar or Reminders from a list of apps on the left-hand side of the screen.
Pick a widget, like List for Calendars or Reminders, which provides a compact view of upcoming events or tasks. Click the widget or drag it and you can rearrange it. Click Done when you’re satisfied. You can Control-click or right-click a widget and choose Edit Widget to tweak settings. For instance, in the Calendar List widget, you can show the same calendars selected in the Calendar app or disable Mirror Calendar App and select calendars from which to draw events.
Print Your Calendar
Whether you like to hang up a hard copy of the month’s calendar for the family or want to share a list of events with a colleague, it’s easy to print a calendar. Here’s how:
Open Calendar on your Mac and choose File > Print.
Choose a layout from the View pop-up menu. Options include Day, Week, Month, List (Figure 95), and Selected Events.
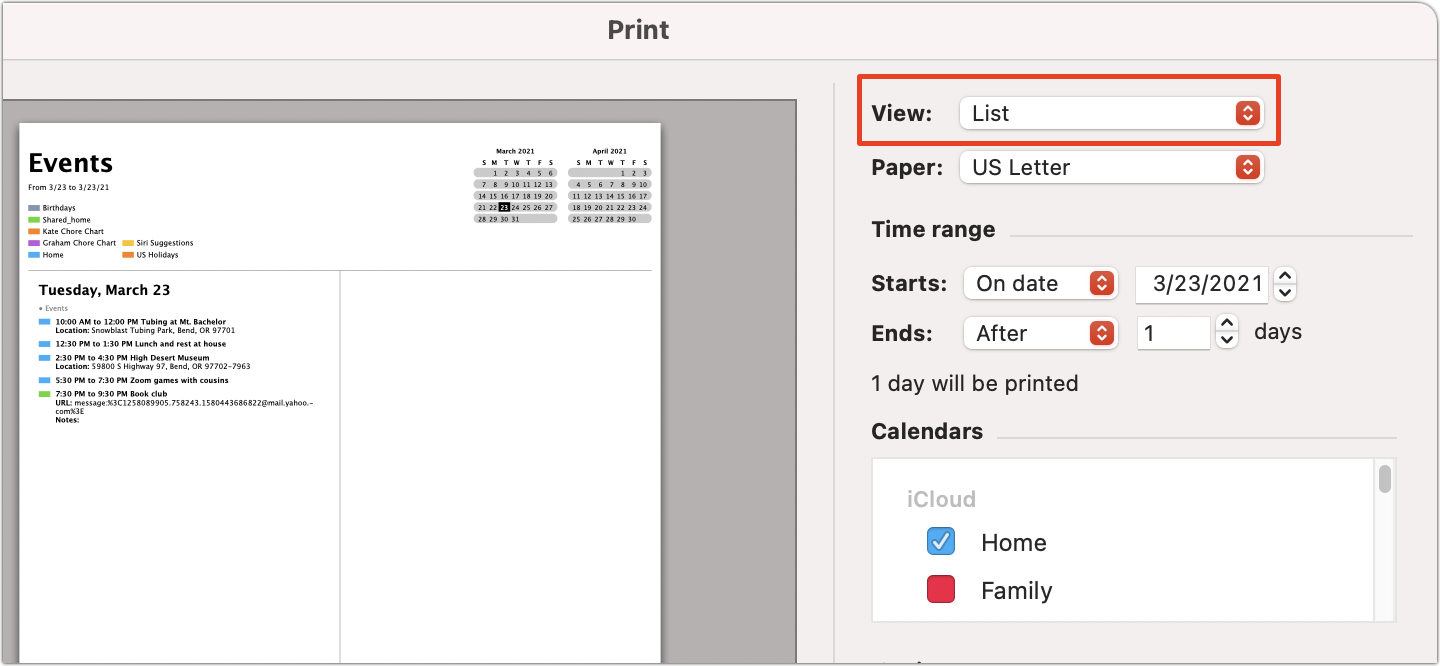
Figure 95: Choose List from the View pop-up menu (boxed) to print a list of your upcoming events, complete with notes. The Selected Events layout prints in this format, too, but includes only the events you choose. Set a time range for your printed calendar using the Starts and Ends pop-up menus (Figure 96).
Select which calendars to print using the checkboxes next to your calendars’ names. (Print a blank calendar by deselecting all of these.)
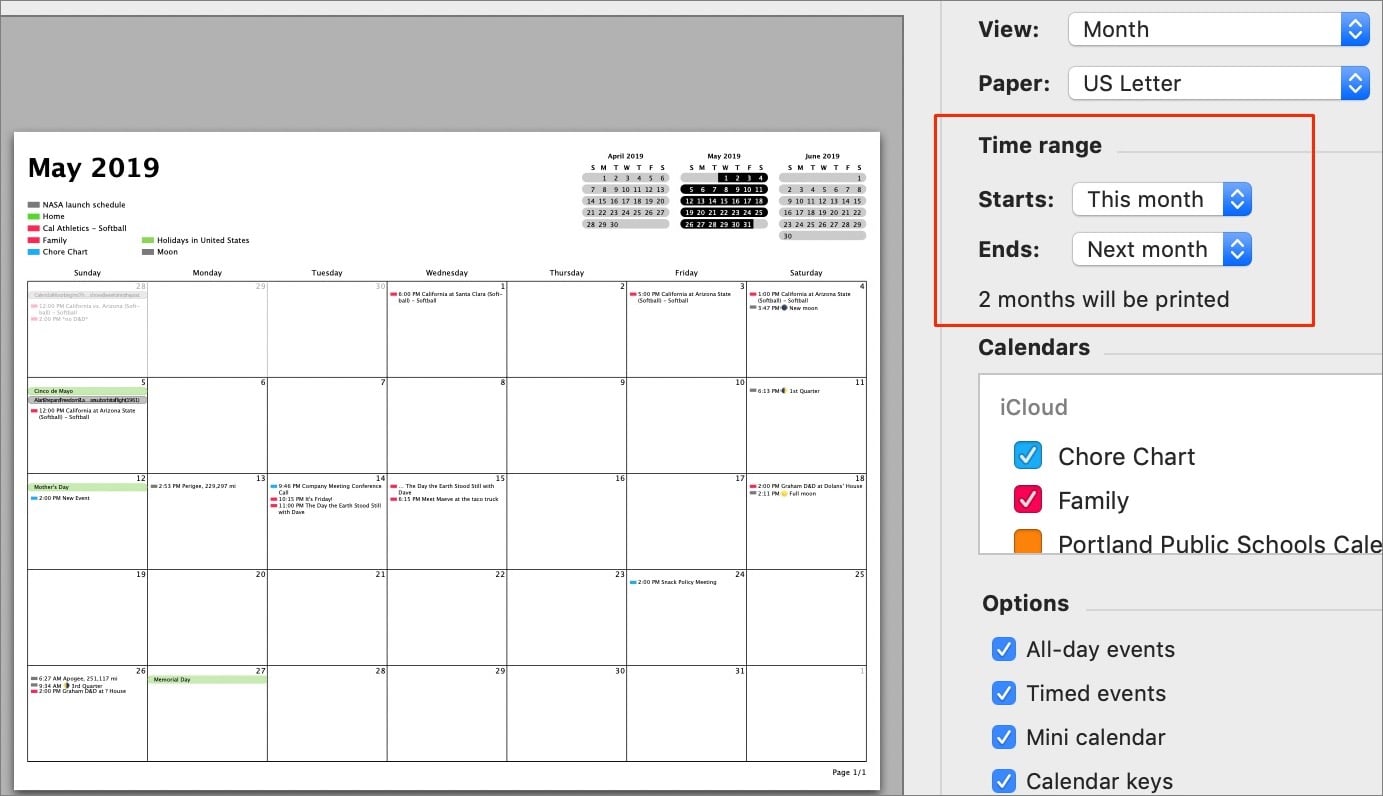
Figure 96: Set the time range for your printed calendar using the Starts and Ends pop-up menus (boxed). This is the Month layout. Under the Options header, select from choices including “Calendar keys” to add a color-coded key showing which events belong to which calendar; or “Mini calendar” to add a miniature representation of the entire month.
Choose the size of event titles by selecting Big, Medium, or Small in the “Text size” pop-up menu (Figure 97). The bigger the text, the easier it is to read, but the fewer events fit on a page.
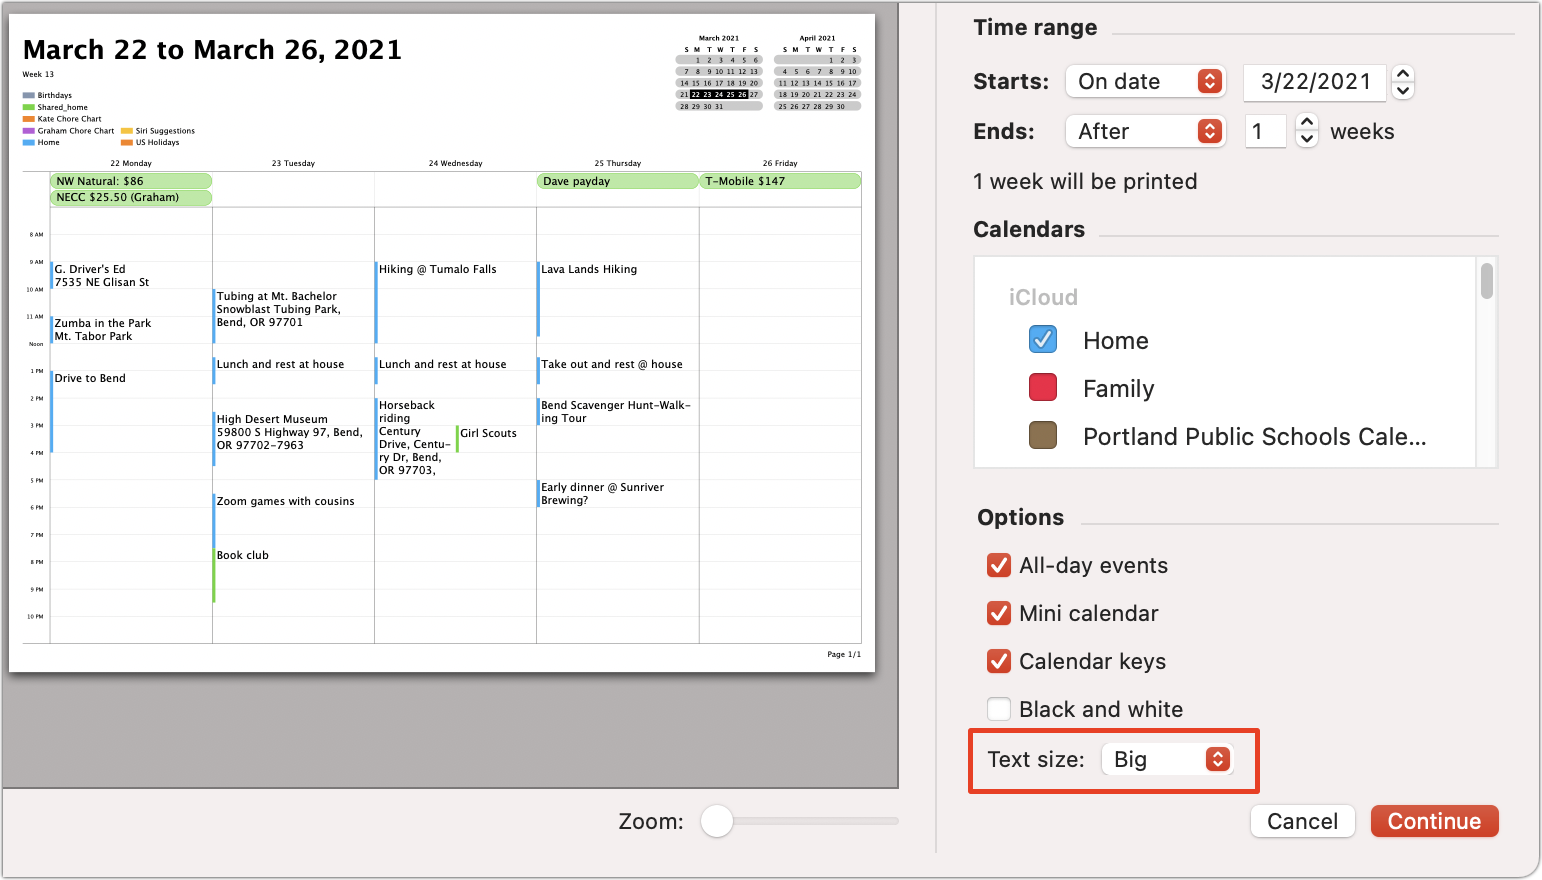
Figure 97: Choose how large event titles appear using the Text Size pop-up menu (boxed). The Week layout is shown here. Click Continue, choose a printer, and finally click Print.
If you print to PDF instead of paper, it’s easy to send a calendar or list of events to a colleague, too. Instead of clicking the Print button in the Print dialog, choose Save to PDF from the PDF pop-up menu.
Ask Siri
If you’re busy with a task or on the go, Siri offers an easy way to check your calendar or reminders—the apps don’t even have to be open. Of course, you can use Siri on your Mac, iPhone, iPad, or Apple Watch—it’s often the easiest way to do so! If you have a HomePod in your house, you can ask it to give you the rundown, too (if you’ve Set Up Personal Requests on a HomePod).
Ask Siri something like:
“What’s my next appointment?”
“Do I have a meeting at 11?”
“Where is my next meeting?”
“Read me tomorrow’s schedule.”
“What’s on my calendar for Monday?”
“When am I meeting with Buzz?”
“Do I have any reminders about Buzz?”
“Do I have any reminders that are due today?”
“What’s on my grocery list?”
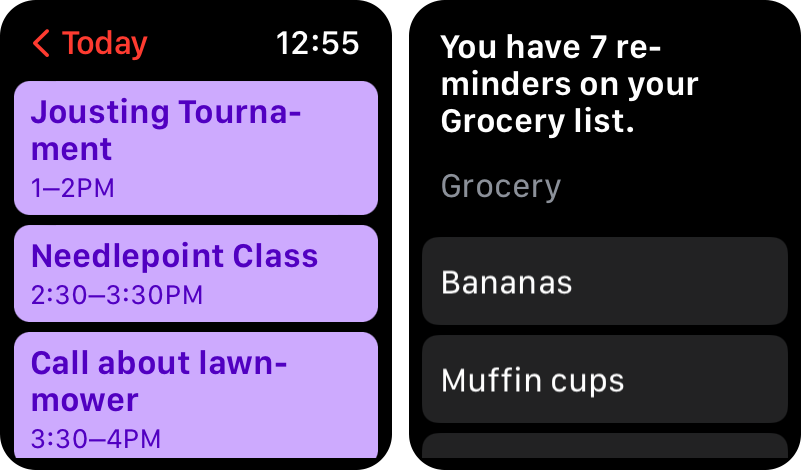
Siri tells you the answer and (if the device you’re using has a screen) displays it, too (Figure 98).
Check on Your iOS or iPadOS Device
When you’re away from your desk, it’s often more convenient to check your calendar or reminders on your iPhone, or in some cases (when you’re positioned comfortably on the couch) your iPad.
Use the App
Opening an app on these devices is a straightforward affair. Try one of these techniques:
Tap the app’s icon on the Home screen.
Swipe down on the Home screen to reveal the Search field and Siri Suggestions, including recently used apps. If the app’s icon appears here, tap to launch it. Or type enough of, for example,
Calendarin the Search field to make the icon to appear.
Once you’re in the Calendar app, here are some helpful tricks:
To see Day view, tap Today at the bottom of the screen.
To see Week view, rotate your device to landscape orientation and tap Week.
To see Month view when you’re in Day view, tap the month name in the upper-left corner.
To view a list of a day’s events in Month view, tap the Details
 icon at the top of the screen and then tap the date in the calendar.
To scroll through time, in Month or Day view, swipe up or down to go forward or backward in time. In Week view, swipe horizontally.
Tap any month in Year view to jump to it in Month view.
Once you’re in the Reminders app, try this tip:
- If you can’t remember which list holds a reminder, use the Search field to hunt for it. This field is easy to find in the upper-left corner on an iPad. On an iPhone it’s at the top of the screen.
Notification Center in iOS and iPadOS
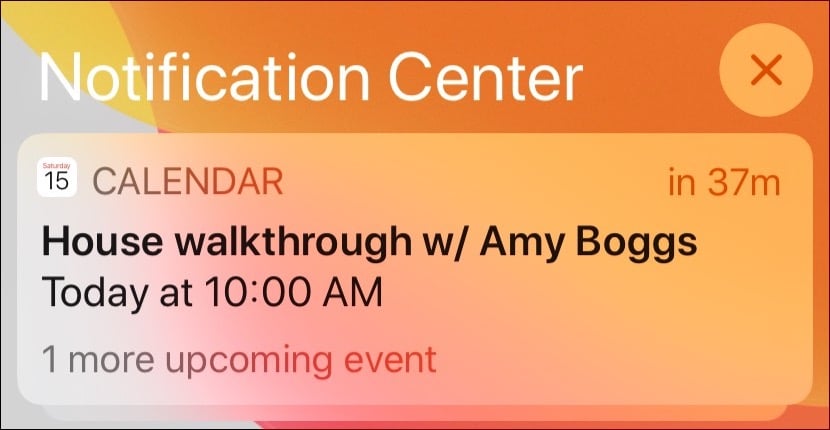
For a quick look at your most recent alerts, check Notification Center on your iPhone or iPad. Put your finger at the top of the screen and then swipe down. By default, notifications from the same app are grouped together. You may see a stack of notifications marked Calendar, for example. Tap it to see its individual notifications (Figure 99). Tap Show Less to gather the notifications back into a single group.
Notifications View
You decide which apps’ notifications appear in Notifications using the settings discussed earlier in Set Up Notifications. Include Calendar and the types of notifications you pick, from upcoming events to invitations, land here. Add Reminders and their alerts appear, too.
If you see a notification you want to view more closely, tap it to jump to it in its app. To close Notification Center, press the Home button or swipe up from the bottom of the screen.
The Notifications view of Notification Center includes only notifications. This is where you look to make sure you haven’t missed something; it’s not the place to get a comprehensive look ahead. Likewise, you’ll be able to see impending reminders with alerts here (set to either a time or a place), but not your alarm-free to-do items.
Today View
It’s easy to miss, but the iOS/iPadOS version of Notification Center includes two views. With Notification Center open, swipe right to see the Today view and its collection of widgets that show everything from the weather forecast to the top stories from Apple News. You can also add widgets to the Home screen.
First enable editing: On the Home screen, touch and hold in any empty area until items begin to jiggle. Swipe right to access the Today view or left to access Home screens beyond the main one.
Tap the Remove ![]() icon next to a widget’s name to remove it or the Add
icon next to a widget’s name to remove it or the Add ![]() icon at the top of the screen to see ones you can add (Figure 100). Swipe left to choose which size you want. Then, tap Add Widget.
icon at the top of the screen to see ones you can add (Figure 100). Swipe left to choose which size you want. Then, tap Add Widget.
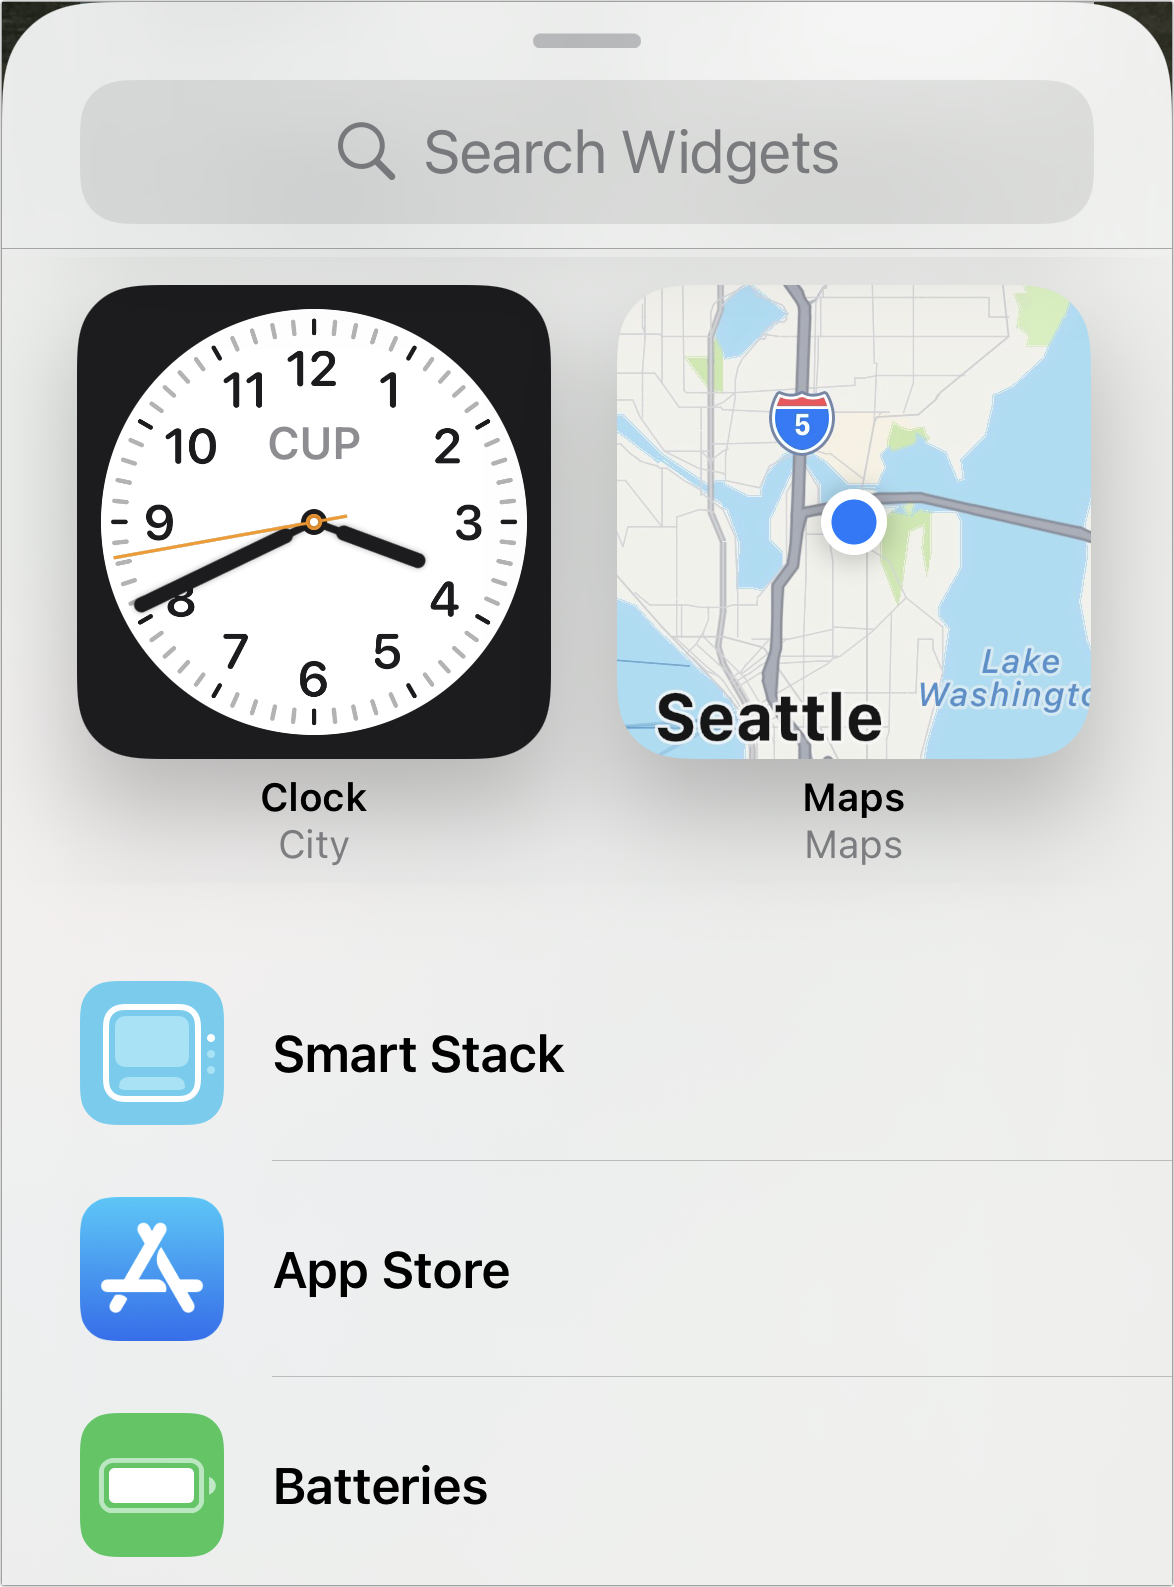
Here are the widgets you likely want to add:
Smart Stack: The Smart Stack brings together multiple widgets, automatically displaying relevant ones based on the time and your location. You can also swipe through them.
Calendar: This shows the next few hours of your calendar.
Reminders: Add this to see reminders in your default list.
Check on Your Apple Watch
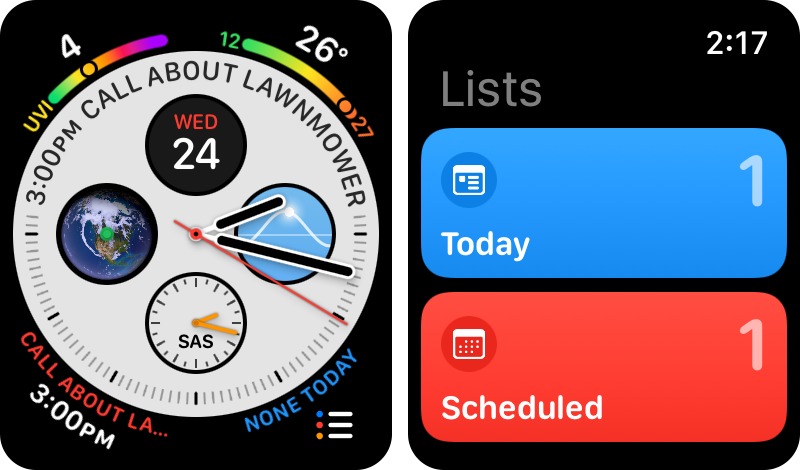
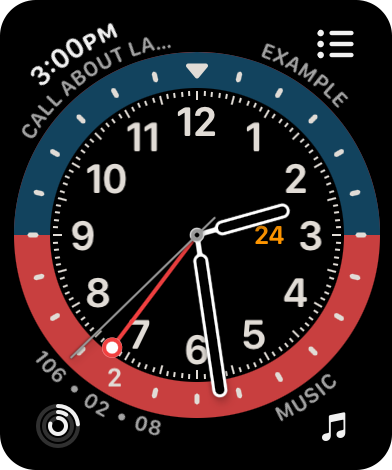
The fastest way to do anything on the Apple Watch is usually to Ask Siri, but when you add a Calendar or Reminders complication, you can see information on your watch with just a glance (Figure 101). Calendar and Reminders complications usually serve as shortcuts to your schedule or Reminders list.
One of the easiest ways to add a complication to a watch face is in the iPhone’s Watch app, especially since only a subset of currently available watch faces displays on your watch itself.
To customize a new watch face, do the following:
Open the Watch app and then tap Face Gallery at the bottom of the screen.
Look through your possibilities. When you find a watch face you like, tap it.
Scroll down to the Complications section and choose which ones to add (Figure 102). How many you complications you can add varies by watch face.
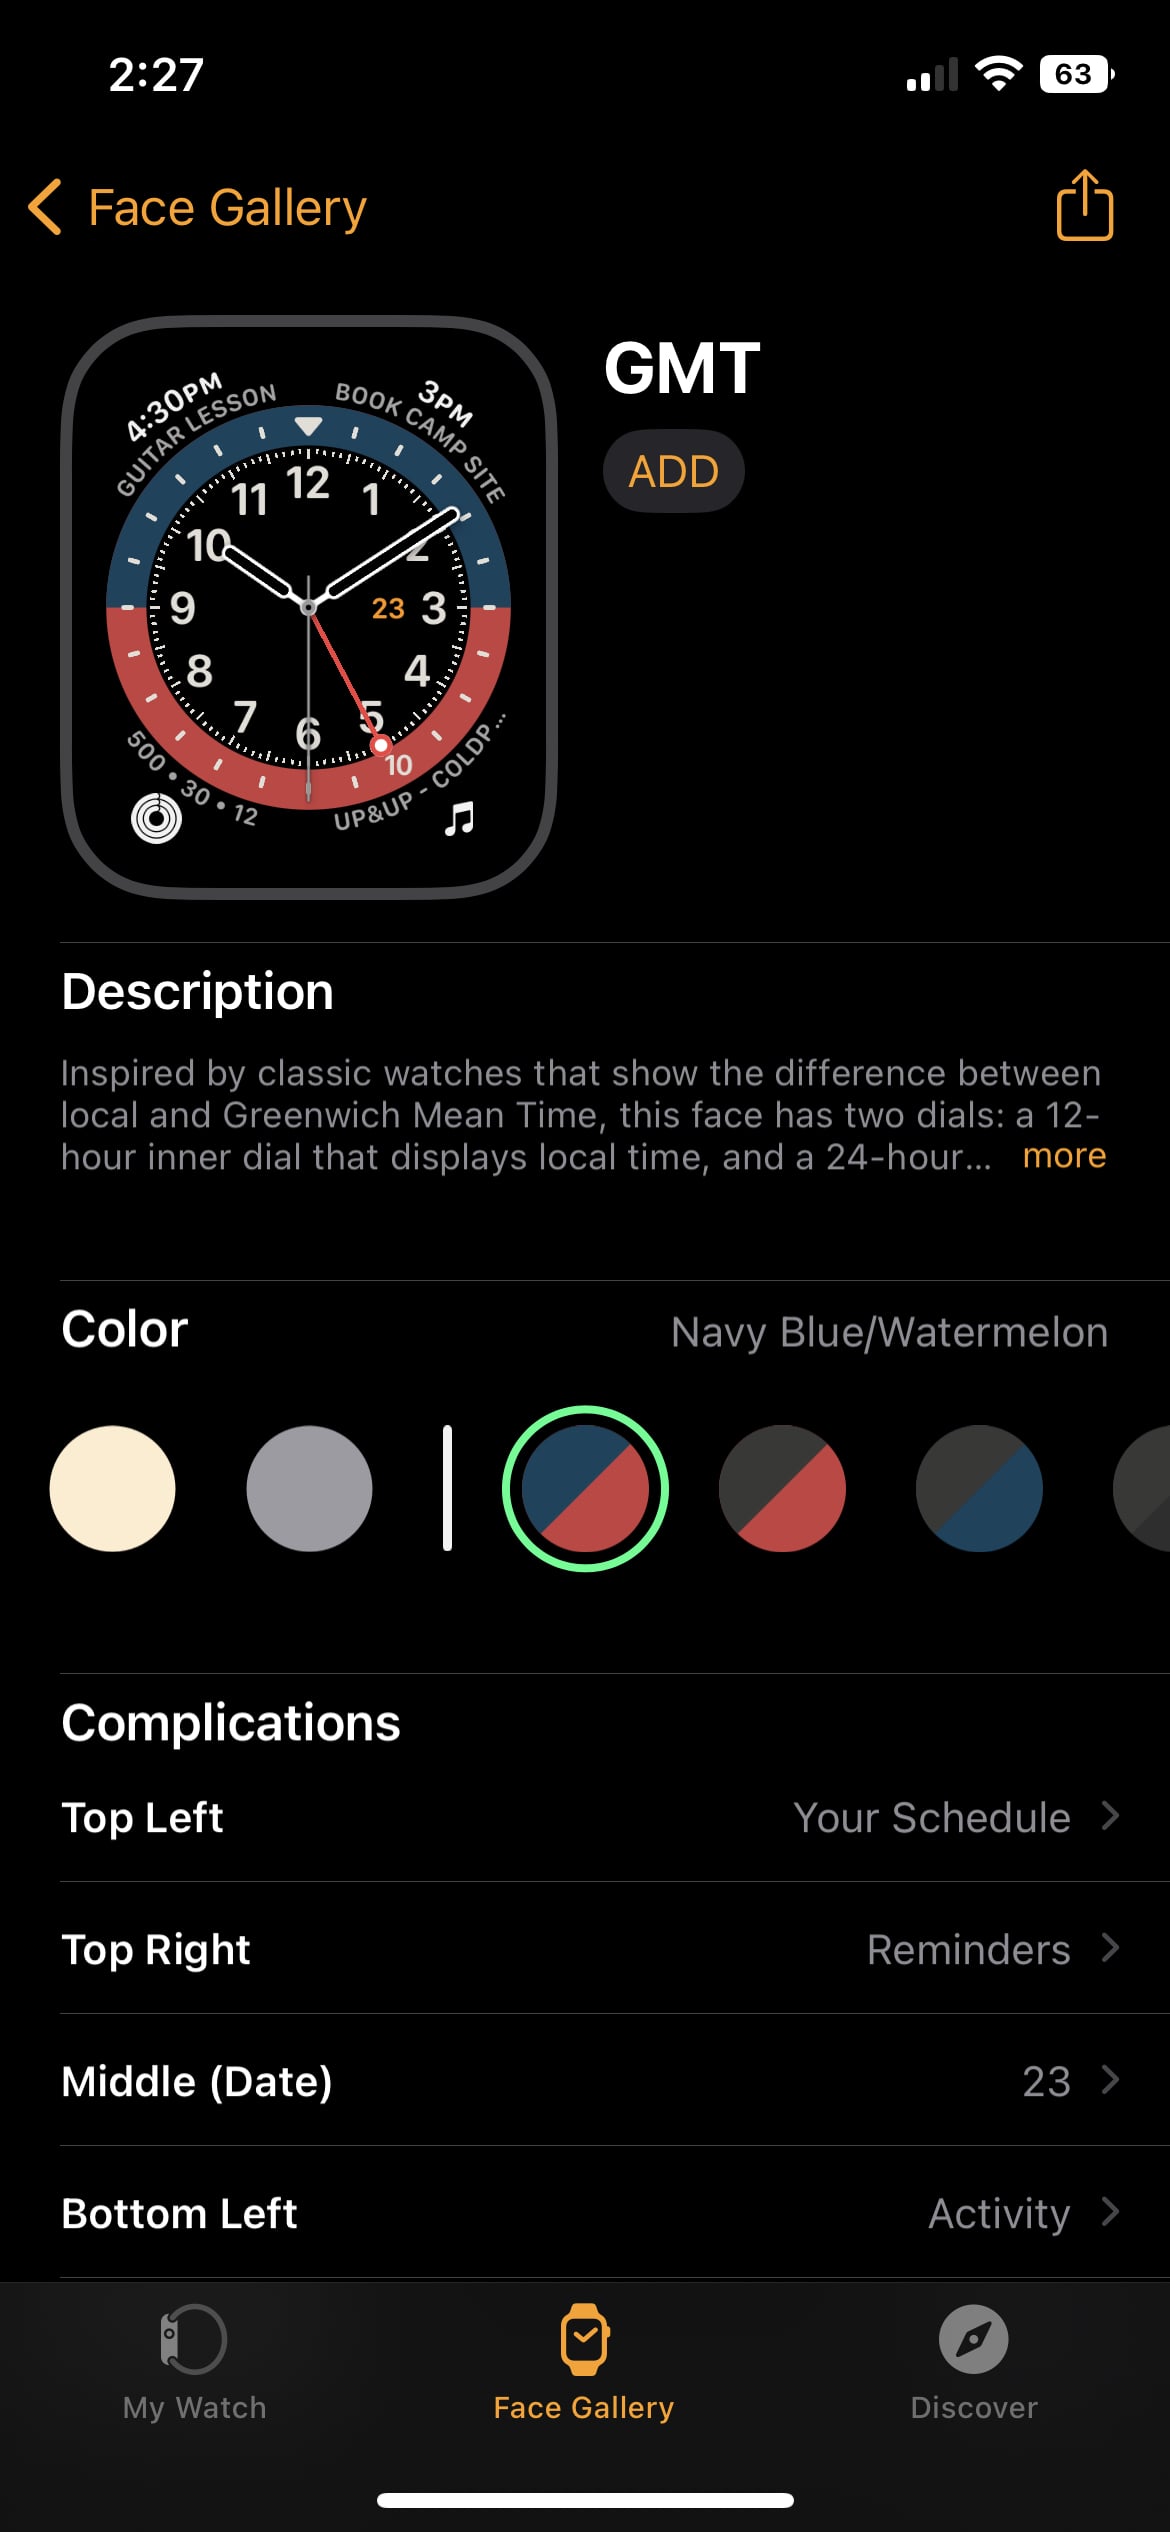
Figure 102: Tap a complication—for example, Top Right—and then scroll through the menu to see your options. Tap the complication you want. Look for complications such as:
Calendar: This includes two options, Today’s Date and Your Schedule. The first simply shows the date. The second displays a calendar
 icon. Tap it to see your next event.
Reminders: A small Reminders
 icon shows. Tap this to see your lists. Tap a list to see its items.
Once you’re done, tap Add to send the face directly to your watch (Figure 103).
To add a complication to a watch face already on your Apple Watch, do the following:
Touch and hold your watch’s face (in watchOS 7 or later) or force-touch it (in watchOS 6 or earlier) and then swipe left or right to peruse possible faces.
When you find the right one, tap the Edit button.
Swipe through the face options until you see a layout you like. Then tap one of the face’s outlined areas (this is where a complication can go). Twist the Digital Crown to scroll through the options.
Once you’re done, touch and hold (or force-touch) the screen to return to the face selector, and then tap the face to make it active.
Check on the HomePod
Apple’s smart speakers, the HomePod and HomePod mini, can do more than just play music. You can also use one to listen to voicemail, make a call, and (most importantly for the purposes of this book) work with your calendar and reminders—even if your hands are full or the device is across the room. Without a display, you interact with the HomePod almost exclusively using Siri.
Set Up Personal Requests on a HomePod
To access Calendar, Reminders, Messages, and Notes, as well as make calls and listen to voicemails, you must first set up the Personal Requests feature for a HomePod. (If you have more than one, you have to make the change on each.)
In the Home app on your Mac, iPhone, or iPad, click or tap the Home icon and choose or tap Home Settings. Click or tap your name, and then turn on Personal Requests (Figure 104).
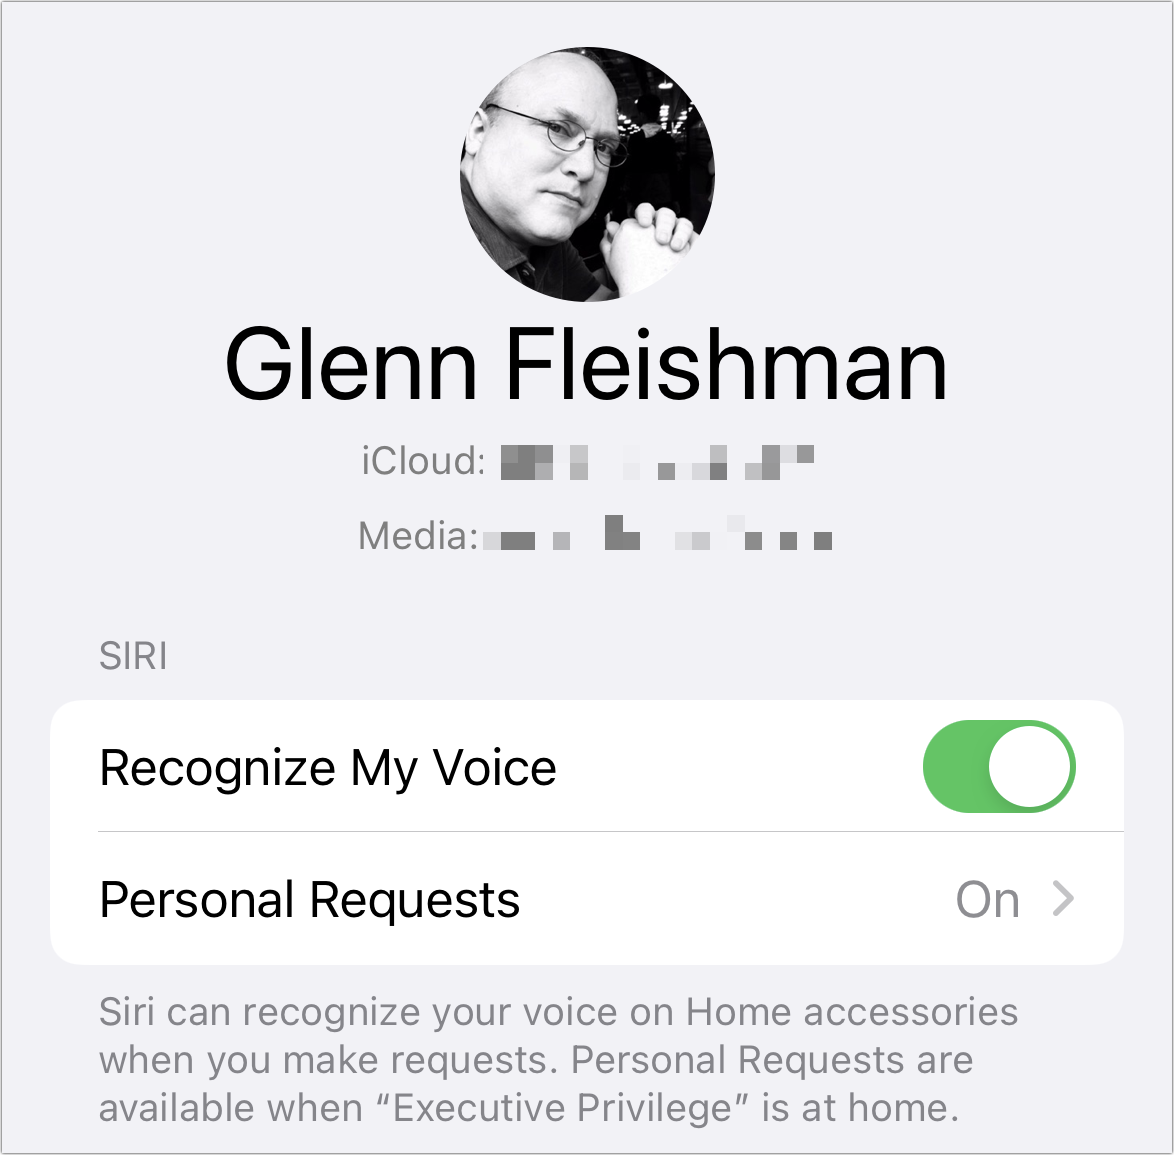
Personal Requests work only when your HomePod and the iPhone or iPad associated with it (typically, your iPhone) are connected to the same Wi-Fi network. You can set up a HomePod to recognize multiple family members’ voices and customize settings and access for each one. (See Apple’s Use multiuser on HomePod for instructions.)
You can also add another layer of protection, by requiring HomePod to ask for verification on your iPhone before allowing the HomePod to read notes, reminders or calendar events. Puzzlingly, that doesn’t apply to sending Messages. (Sharpen your pens, rom-com writers.)
Use Siri to Get the Details
To talk to your HomePod, press and hold the top of the device until you see the swirling, multi-colored lights or preface your commands with the key phrase “Hey Siri” and say something like “Hey Siri, what does my day look like?” or “Hey Siri, do I have any overdue reminders?” (To learn more about how to use Siri to check Calendar and Reminders, see Ask Siri.) The HomePod responds verbally to all your requests.