
View Locations
To view your device’s location, those of people in a Family Sharing group, or your items, use a native Find My app in iOS, iPadOS, or macOS, or the Find Devices app in watchOS or on iCloud.com. By activating Find My, you’re logged in to the app on all those operating systems and on iCloud.com. Each view in the iOS/iPadOS and macOS Find My app offers access to a different category of location finding. Those views are separate apps in watchOS (Find People, Find Devices, and Find Items) and only available as Find Devices on iCloud.com.
For each category—People, Devices, and Items—Find My shows the last time a location was updated in the list: to the right of the item in iOS/iPadOS and under the item in macOS, watchOS, and (for devices) on iCloud.com. It also shows this information in the detail view for a given selection.
Here’s what the status messages mean:
Live: Devices can provide a continuous stream of location information in the right circumstances. You can watch someone walk down a street or see their train move across the landscape. (Frankly, a little creepy, even though it’s done with permission?)
Now: If live updates aren’t possible due to battery, location, connectivity, or operating system version, Now is the second-best. It indicates an update within the last minute.
Time duration: Find My shows X minutes ago or a specific date and time for the last location update.
Find People
The People view provides a list of everyone with whom you share your location, whom you follow, or both. The list reveals some basic information, such as their current location with an address or a name, how far away they are, and the last update received. With no one selected, the portion of the view with the map plots everyone you follow for whom a current location is known. This view zooms the map to show them all (Figure 31). People are identified with the profile photo as stored in your contacts or via Messages.

Find Someone’s Location in Find My
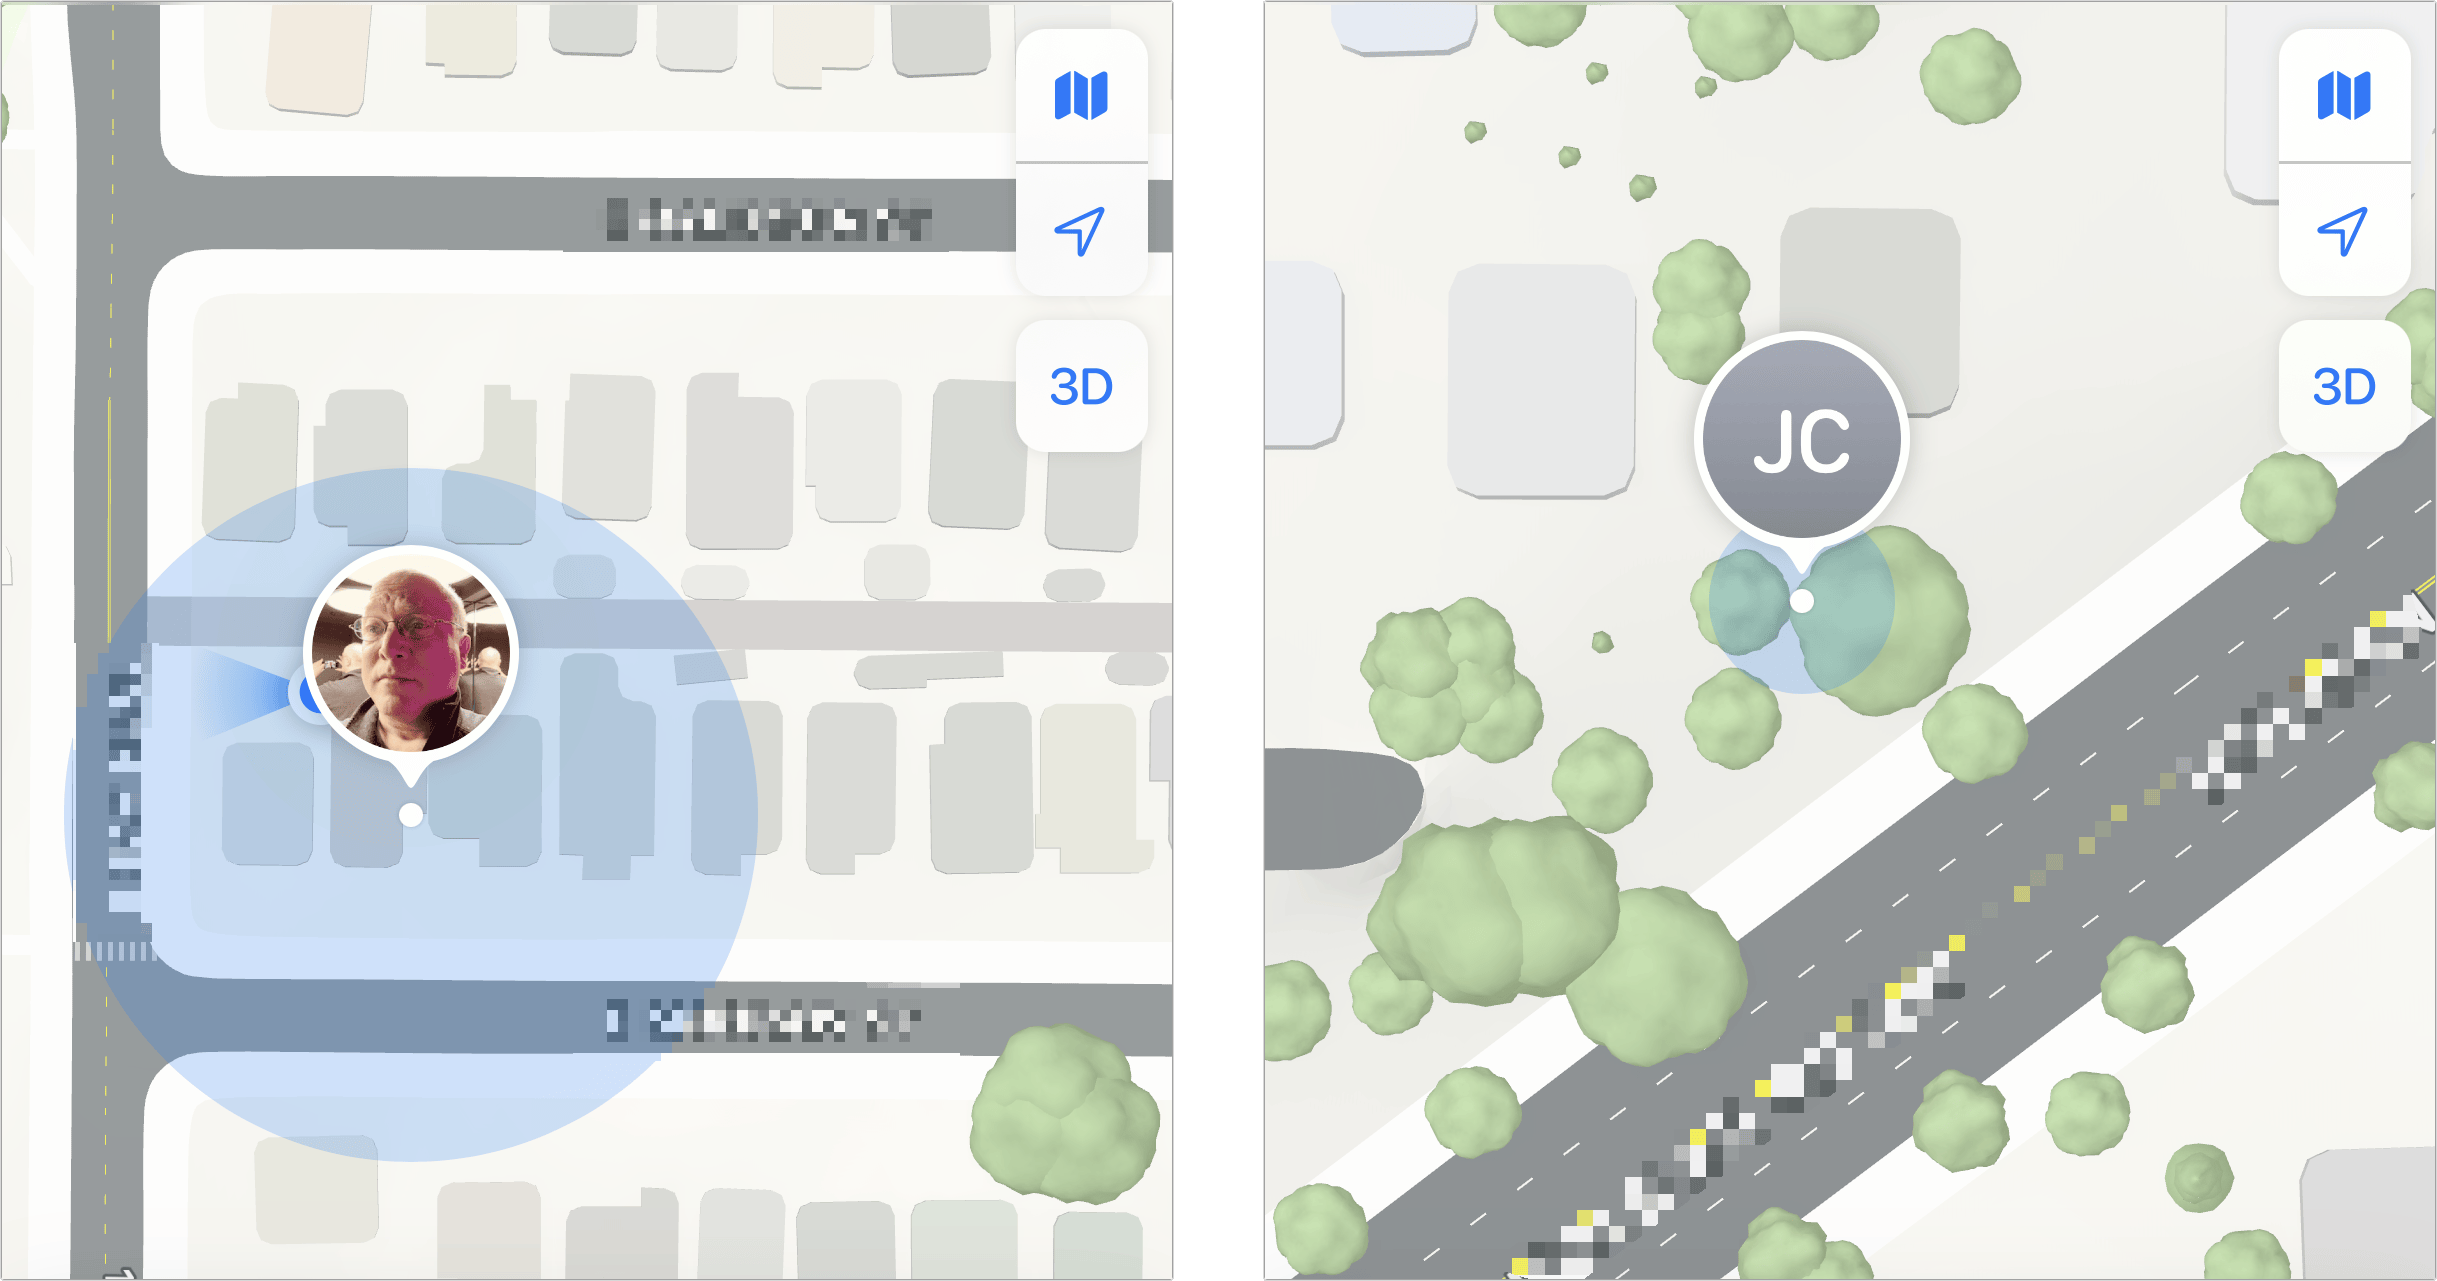
Find My indicates its confidence about someone’s location by varying the diameter of the blue area around their profile image (Figure 32). This could be described as high (within a few feet or a meter), medium (within about 100 feet or 30 meters), or low (about several city blocks).
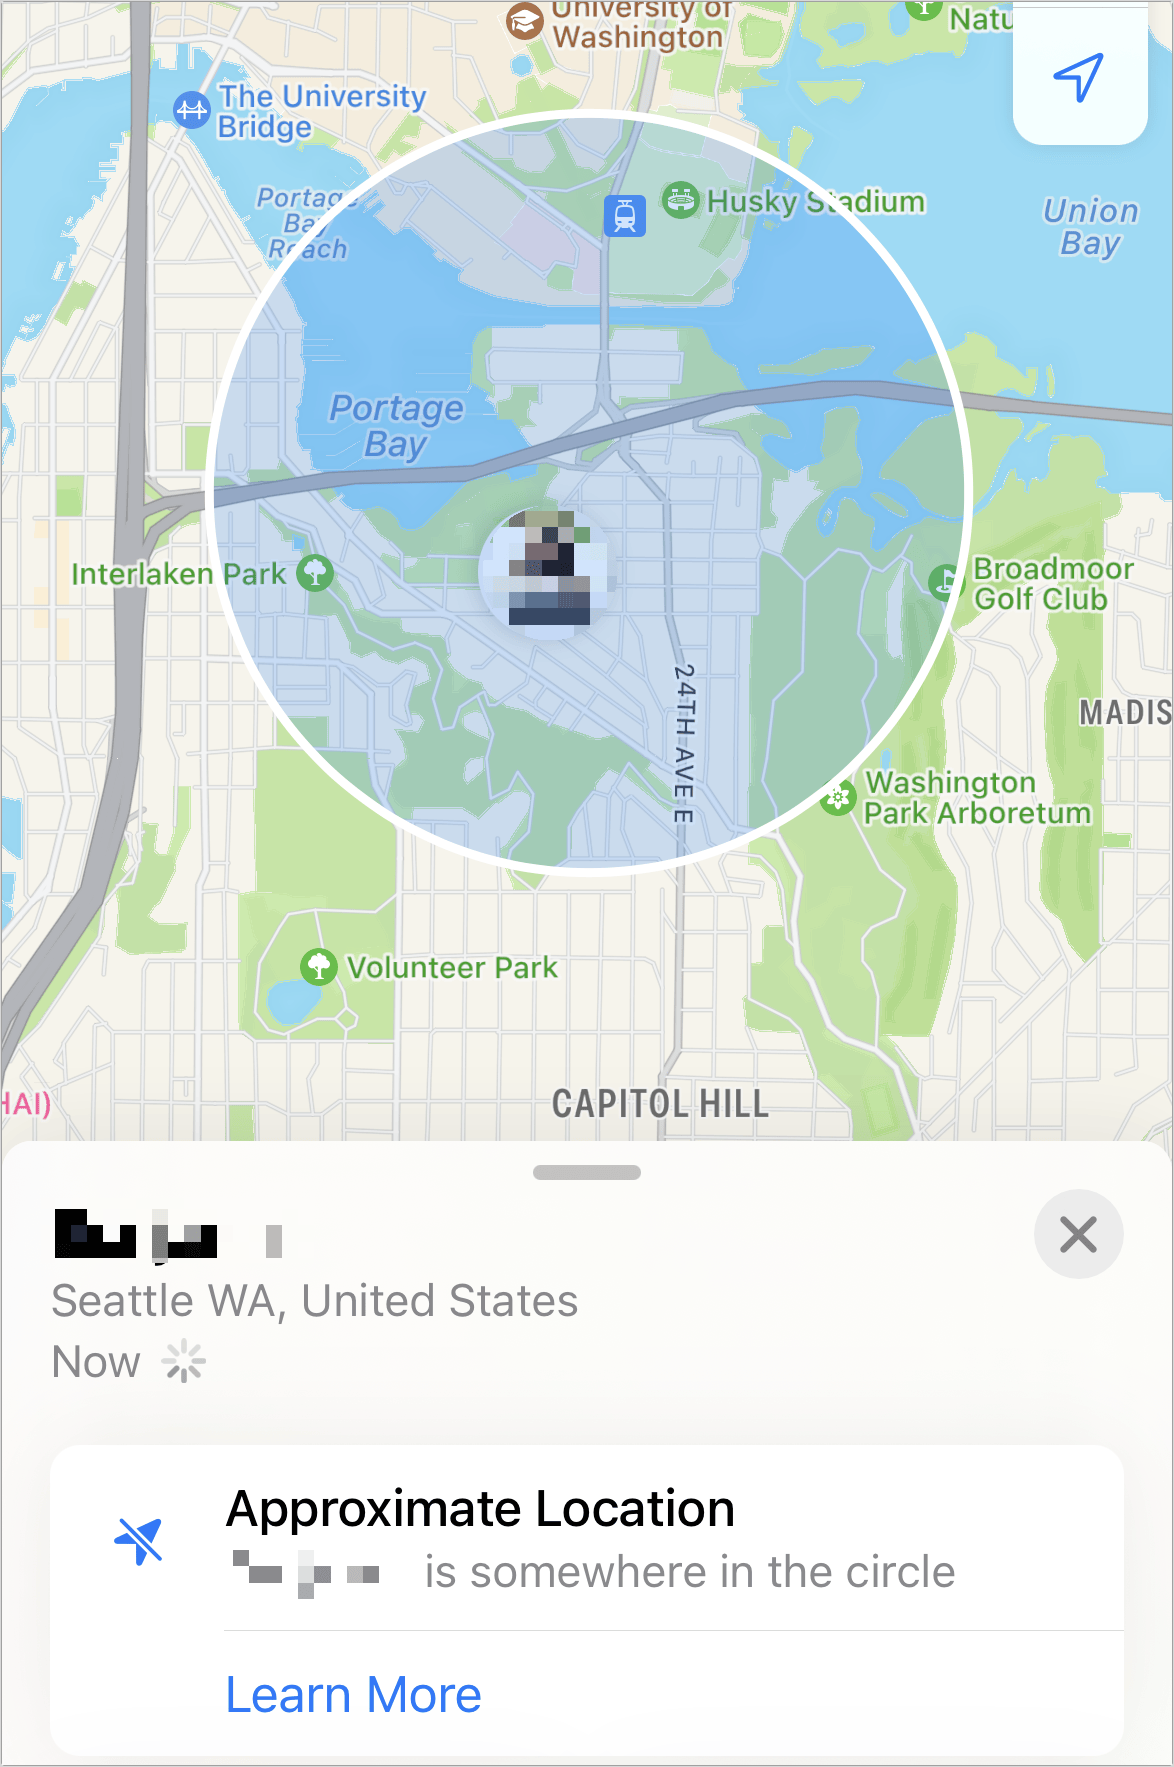
If a person can’t be plotted that precisely, the circle of confidence can be quite large, and Find My calls out the lack of exact knowledge (Figure 33).
Select a person to reveal actions and information related to them; in macOS, you must additionally click the info ![]() button to the right of their name. You can click or tap Contact to view their contact card. You can also add them to Favorites, which sorts them to the top of the list.
button to the right of their name. You can click or tap Contact to view their contact card. You can also add them to Favorites, which sorts them to the top of the list.
All the other actions are described in earlier and later chapters:
Directions: See Pull Up Driving Directions
Notifications: See Receive Notifications
Remove Person: See Manage Sharing Relationships
Share My Location and Stop Sharing My Location: See Share Location with Other People
Find Someone in Messages
You can use the Messages app in iOS/iPadOS or macOS to find a person and preview their location—either immediately or after Messages automatically triggers an update—without using the Find My app:
In iOS/iPadOS, tap the person’s icon in a conversation entry. This reveals their current location. Tap the map to reveal a larger one, still within the Messages app.
In macOS, select the person or conversation and click the info
 button in the upper-right corner. This shows their current location. Tap the map to open the Find My app with that person selected in the People view.
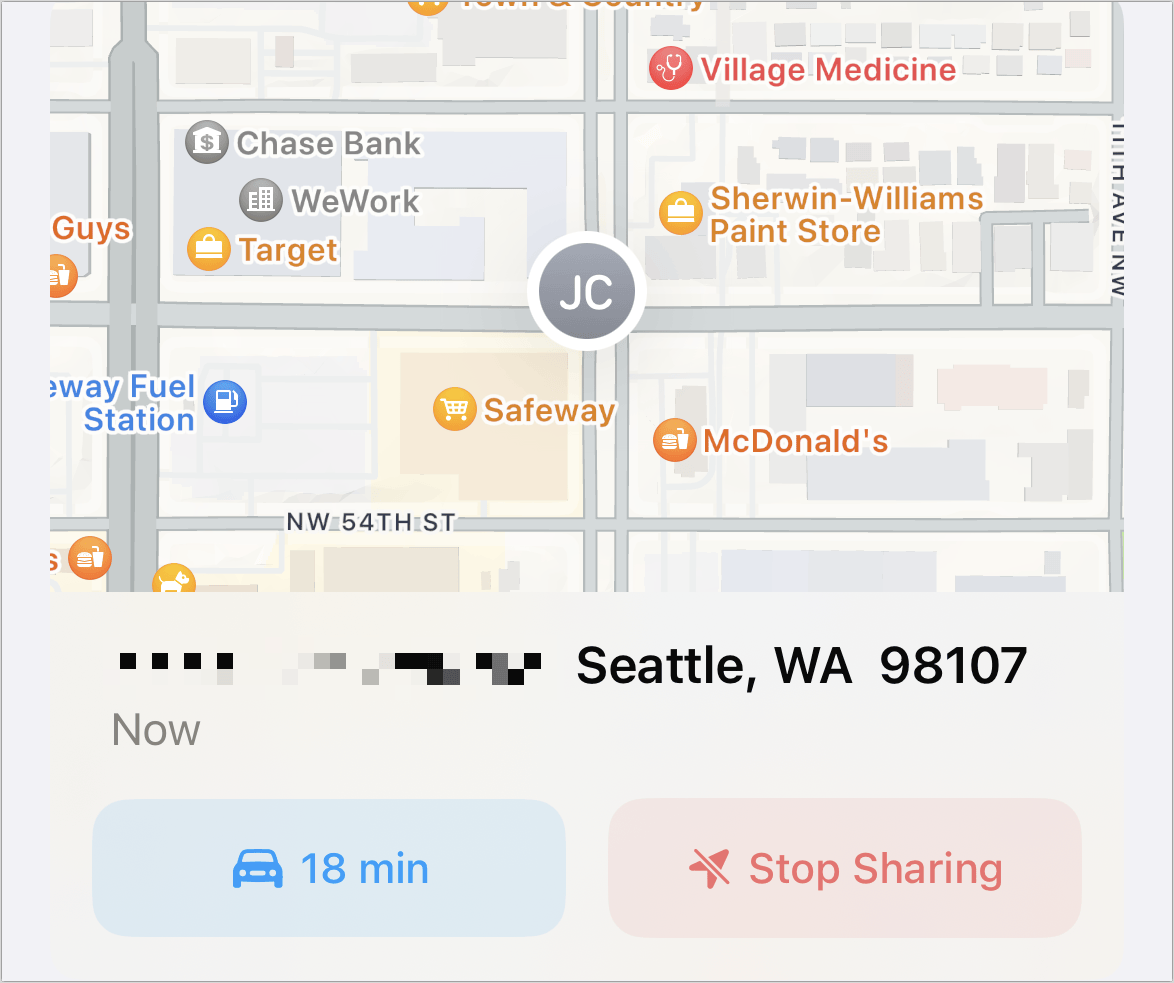
The presentation of this information within Messages changed in iOS 17/iPadOS 17 and Sonoma (Figure 34). Now it shows a map; an exact address as possible underneath it; a button indicating the distance by car, transit, or foot that you can tap to jump to the Maps app and directions; and a Stop Sharing button.
Find Devices
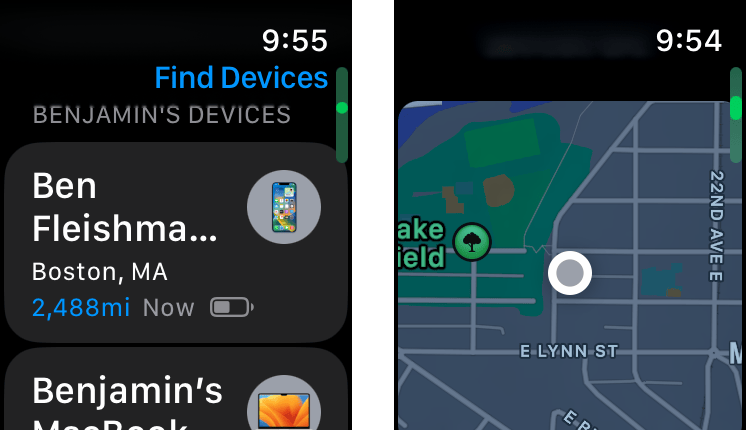
The Find My app’s Devices view and the Find Devices web app initially show a map zoomed out to plot all your devices on it. If you’re in a Family Sharing group, this includes all your family’s devices, too, for all members sharing their location with you. As you can see in Figure 35, that can be quite a few devices. In watchOS’s Find Devices, you can only view a list and tap to see a map (Figure 36).
Any iPhone, iPad, Mac, or Apple Watch you own will appear as a device, along with all Apple and Beats audio devices. Because audio-device tracking has become more useful and differentiated over time, I address that in Find Audio Devices, below.
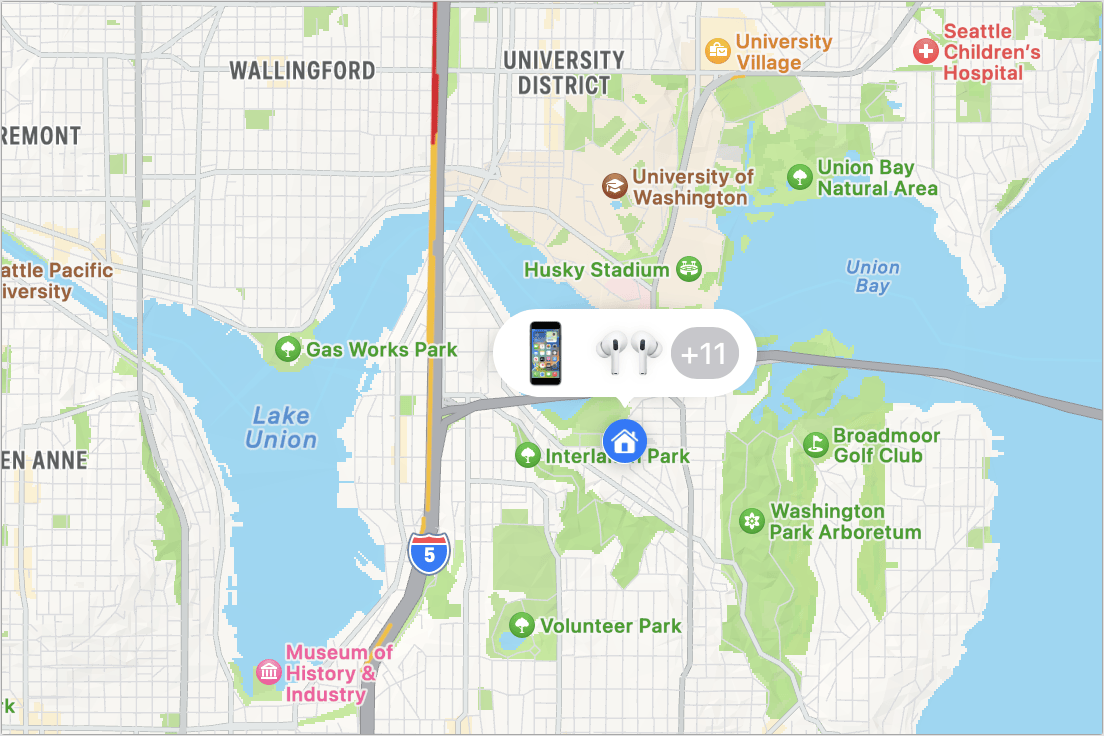
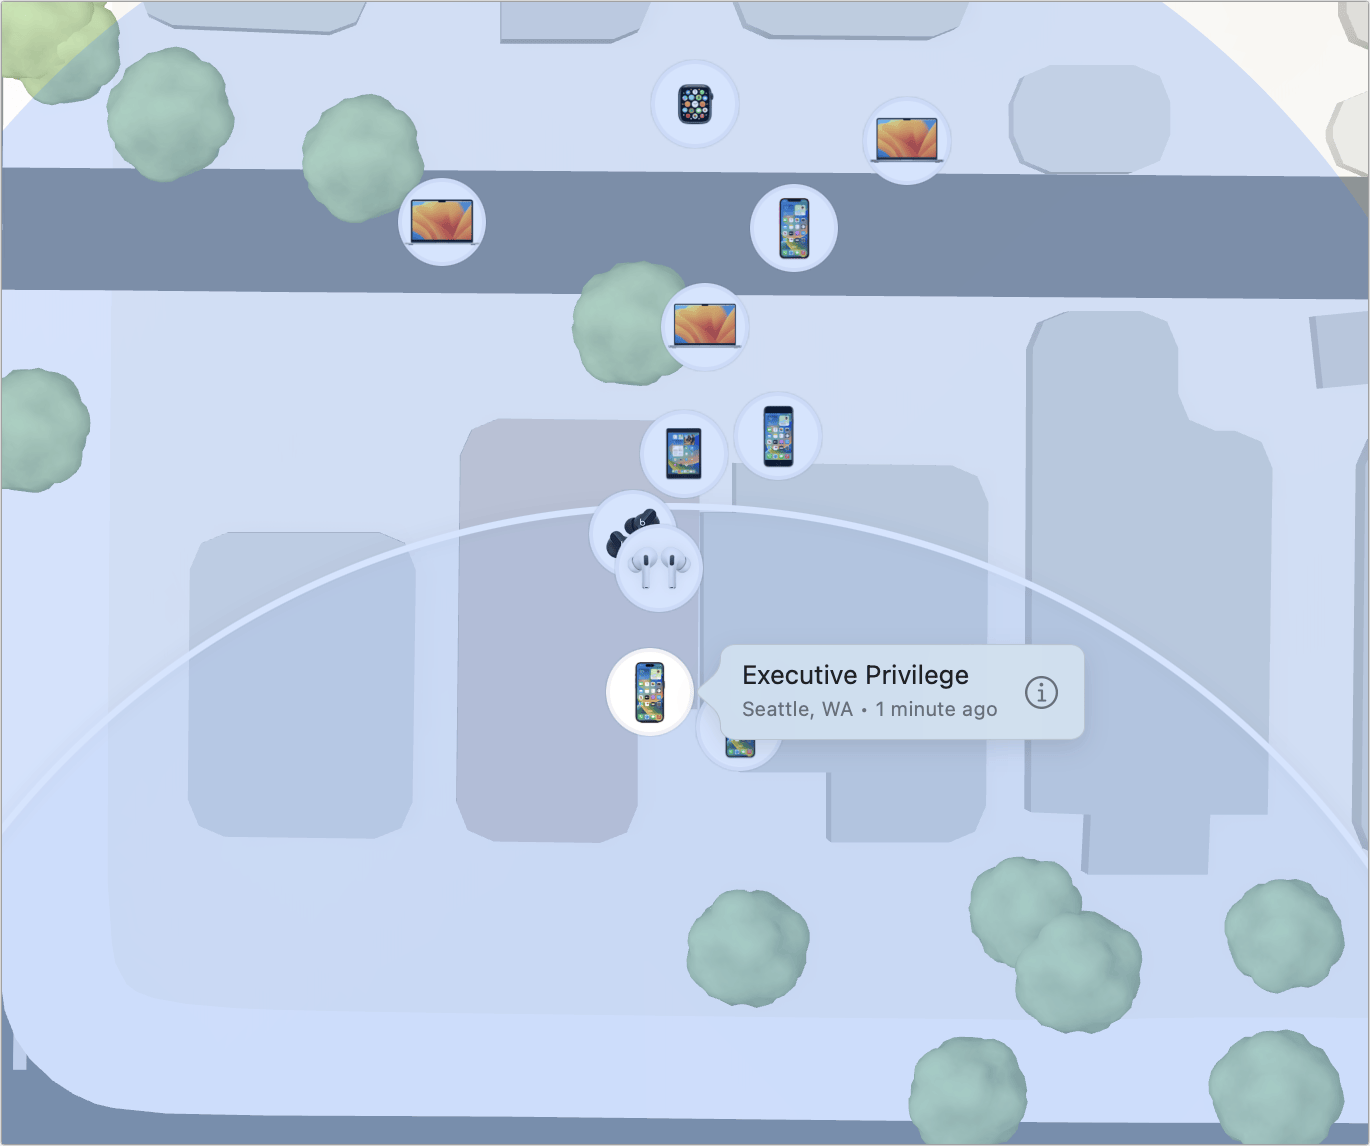
The Devices list in the Find My app and the list in Find Devices apps show all these devices with an exact icon for their model (swipe up in iOS/iPadOS). If there are too many devices to display at one location, Find My shows the icons of a couple of them and a number indicating how many more, like “+11” in Figure 35. You can select any device in the list described below to splay them out across the area in which they appear (Figure 37).
The list is organized by person for Family Sharing with you at the top (Figure 38). As with People, each device shows the name assigned to it, a rough location, the last update, and its approximate distance from your location.
Find My doesn’t differentiate devices that are located via an internet connection, proximity to equipment you own, or the Find My network.
Select a device in the list and it’s centered on in the map, typically zoomed out to show the equivalent of about a quarter to half mile radius (400 m to 800 m). You can take action on the device like this:
In iOS/iPadOS: An actions sheet appears when you select a device. Tap the close
 button in the upper-right corner to return to the full device list.
Figure 38: It’s not an addiction, but a collection of devices owned by a family, including some that we got rid of long ago! In macOS: After selecting a device, click the info
 button to the right of the device name in macOS. Click anywhere but in the actions sheet in macOS to dismiss it.
In watchOS: Tap the device and the scroll down for actions. Tap the back arrow
 button to return to the main Find Devices view.
On iCloud.com: An action sheet appears in the upper-left corner of the webpage when you select a device.
Only the Directions options and the Notifications label (with different options) also appear in the People View.
Here’s what you can view or select from in Devices (Figure 39):
Play Sound: See Play Sound.
Directions: See Pull Up Driving Directions
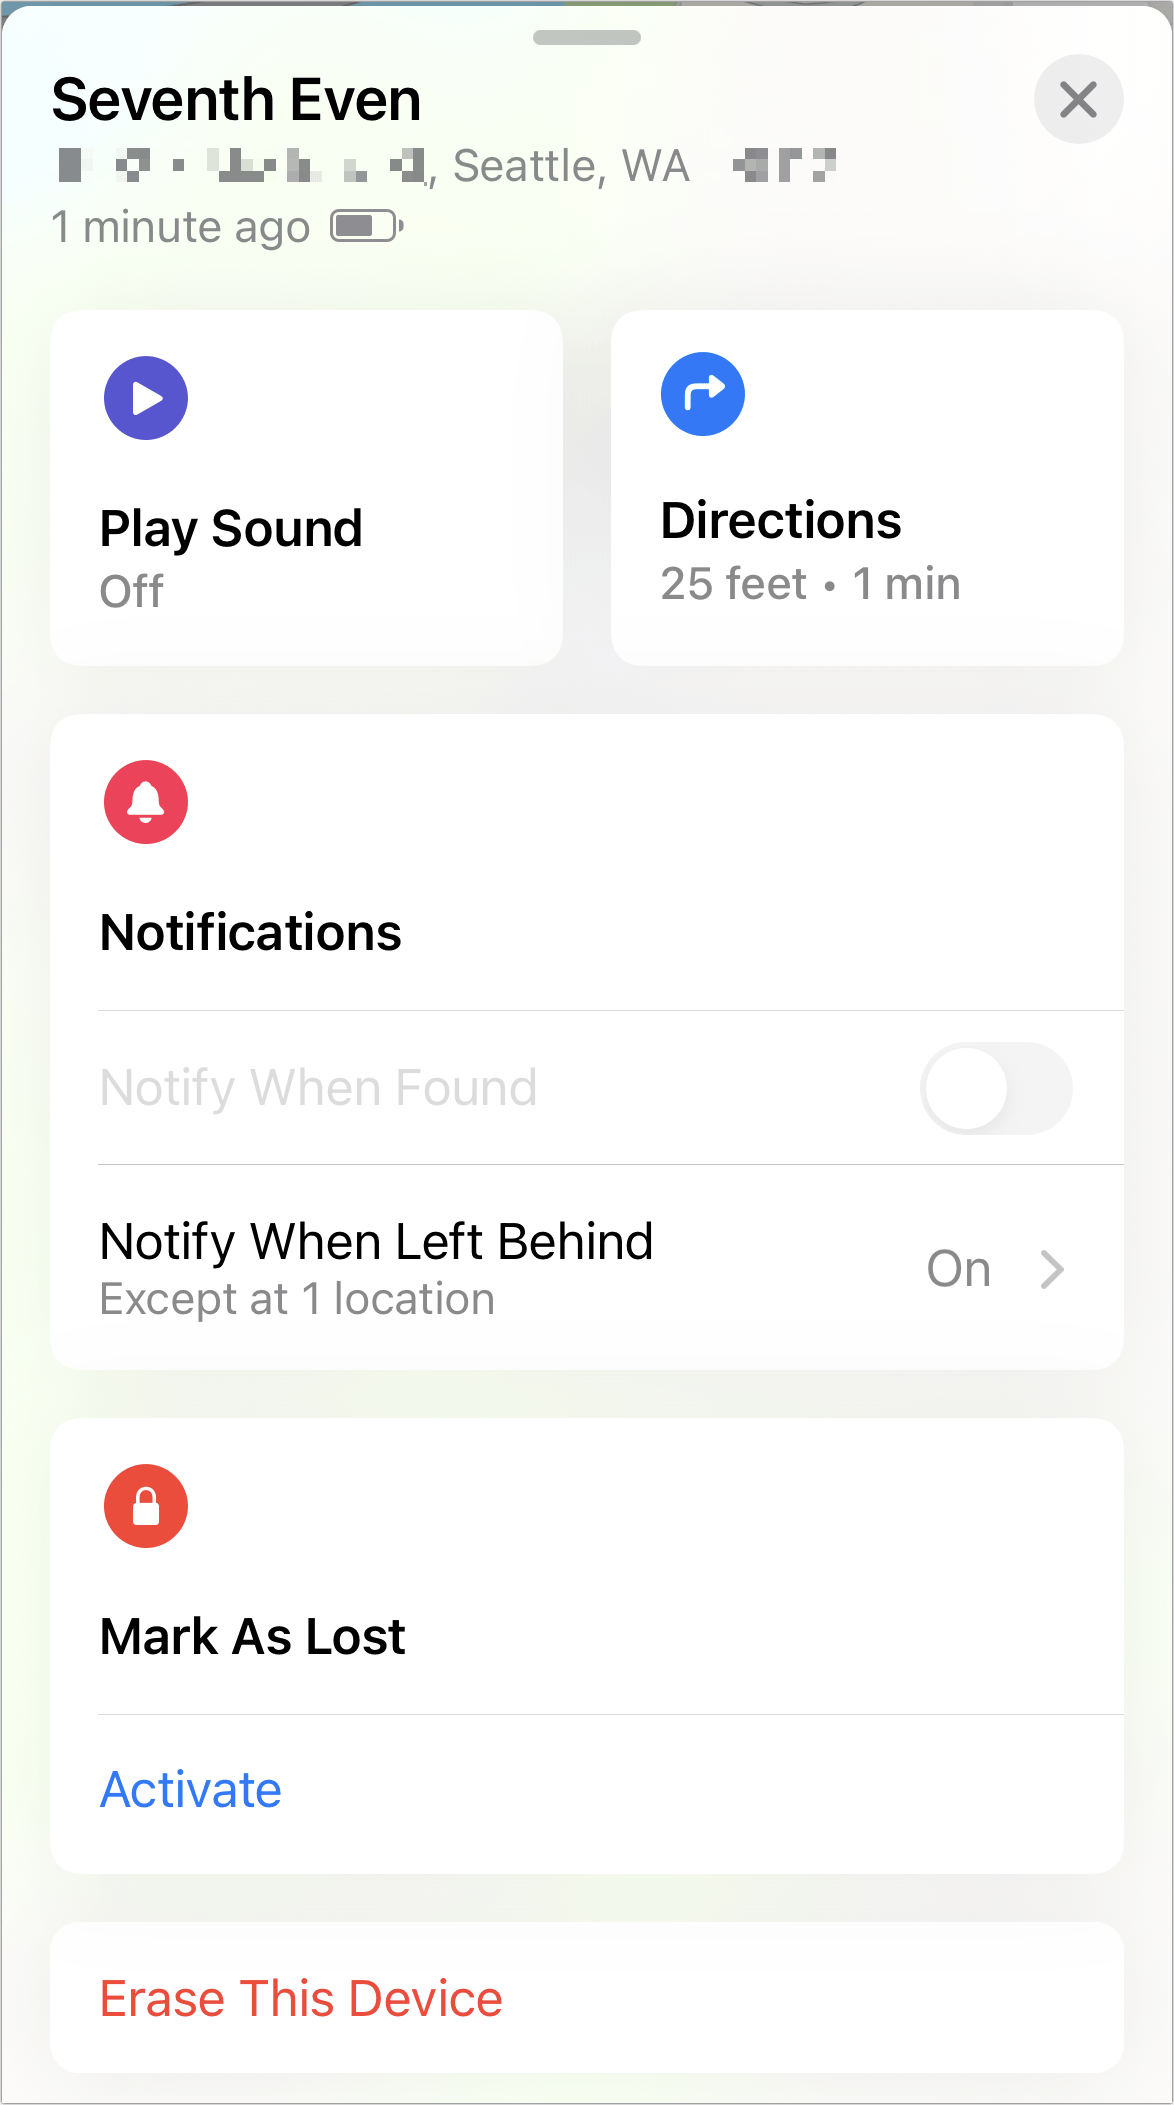
Notifications: Receive Notifications
Mark As Lost: See Mark a Device as Lost in a Find My App
Erase This Device: See Erase Everything But a Mac
Find My shows the device’s location on the map as a dot with its model icon above it. The dot is the center of a blue shaded area if a device can be pinpointed; the shaded area is larger and green otherwise. The shading radius indicates the level of confidence in the location.
Devices are listed even if they haven’t connected for months—or years! If it’s been longer than 24 hours, they appear as “No location found.” (For the full status rundown, see the introduction to this chapter at View Locations.)
Find Audio Devices
Apple started adding support back in iOS 14.5/iPadOS 14.5 to better let you see where your AirPods, AirPods Pro, AirPods Max, and Beats audio devices were located. This has expanded and changed over nearly every release since.
Audio Devices in the Devices Tab
Audio hardware is all located in the Devices tab or Find Devices apps. Here’s what and when you’ll view and be able to select:
AirPods (1st and 2nd generation) offer only in-range Bluetooth tracking with a paired device.
AirPods (3rd generation), AirPods Pro (all generations), and AirPods Max offer Bluetooth tracking; Find My network tracking appears as of OS 15.1/iPadOS 15.1.
Several Beats models track via Bluetooth and the Find My network.
You can carry out just two actions for all audio devices:
Play Sound: See Play Sound.
Directions: See Pull Up Driving Directions
AirPods (3rd generation), AirPods Pro, and AirPods MaxPull Up Driving Directionsalso offer:
Notifications: Receive Notifications.
Mark As Lost: See Mark a Device as Lost in a Find My App
Independent Earbud Tracking
Through iOS 16/iPadOS, AirPods and AirPods Pro can only be tracked one earbud at a time. If both are missing, Apple says to find one and put it in its case. This will cause your paired device (all models) or allow the Find My network (AirPods Pro) to see its location.
Starting in iOS 17/iPadOS 17, however, we finally get left and right shark…uh, left and right earbud tracking. If your AirPods (3rd generation) or AirPods Pro earbuds are separated, after a short while, they appear as Left and Right entries in Find My.
Apple doesn’t provide Precision Tracking (see Find with Precision), but uses relative signal strength to help you get close (Figure 41).

Find Items
In a native Find My app, you can discover the location of your AirTags and other Find My items in the Items view and any someone else has shared with you. The map view zooms out to show all items within a reasonable distance, just as in the Devices tab.
Find an Item Anywhere
Tap an item in iOS/iPadOS or watchOS, or select it and then click the info ![]() button in macOS, to reveal actions you can take. For AirTags, this list is nearly identical to Devices with these exceptions:
button in macOS, to reveal actions you can take. For AirTags, this list is nearly identical to Devices with these exceptions:
Share This AirTag: With iOS 17/iPadOS 17 and Sonoma, you’ll see an option to share or see the status of an item shared with you. See Share Your Find My Items.
Rename Item: In iOS/iPadOS, the Rename Item option lets you change the item’s name, required because all items lack a display or interface.
Find: When using the Find My app on any iPhone 11 series phone or later with an AirTag or AirPods Pro (2nd generation) charging case, Directions is replaced with Find if either of those kinds of hardware is close by, as explained next.
Serial number and other details: You can obtain the serial number of a Find My item in one of two ways when viewing its action sheet:
AirTag: In iOS/iPadOS, tap the name area, or in watchOS, tap the Show Details button, and the serial number (and firmware release) appear.
Find My item: On the action sheet in iOS/iPadOS or macOS, scroll or swipe down to see a panel of information, including the manufacturer’s name, the item’s model, serial number, and firmware version.
Find with Precision
On an iPhone 11 series or later, UWB is built in and can be used for short-range finding, which Apple calls Precision Finding. Find with a Nearby label beneath will appear as an option if your phone has UWB and you are trying to find an AirTag or the charging case for a set of AirPods Pro (2nd generation) earbuds. This works with your own Find My items and any that other people have shared with you.
Tap Find and Find My pops up a wayfinding mechanism that tries to find the item (Figure 42).
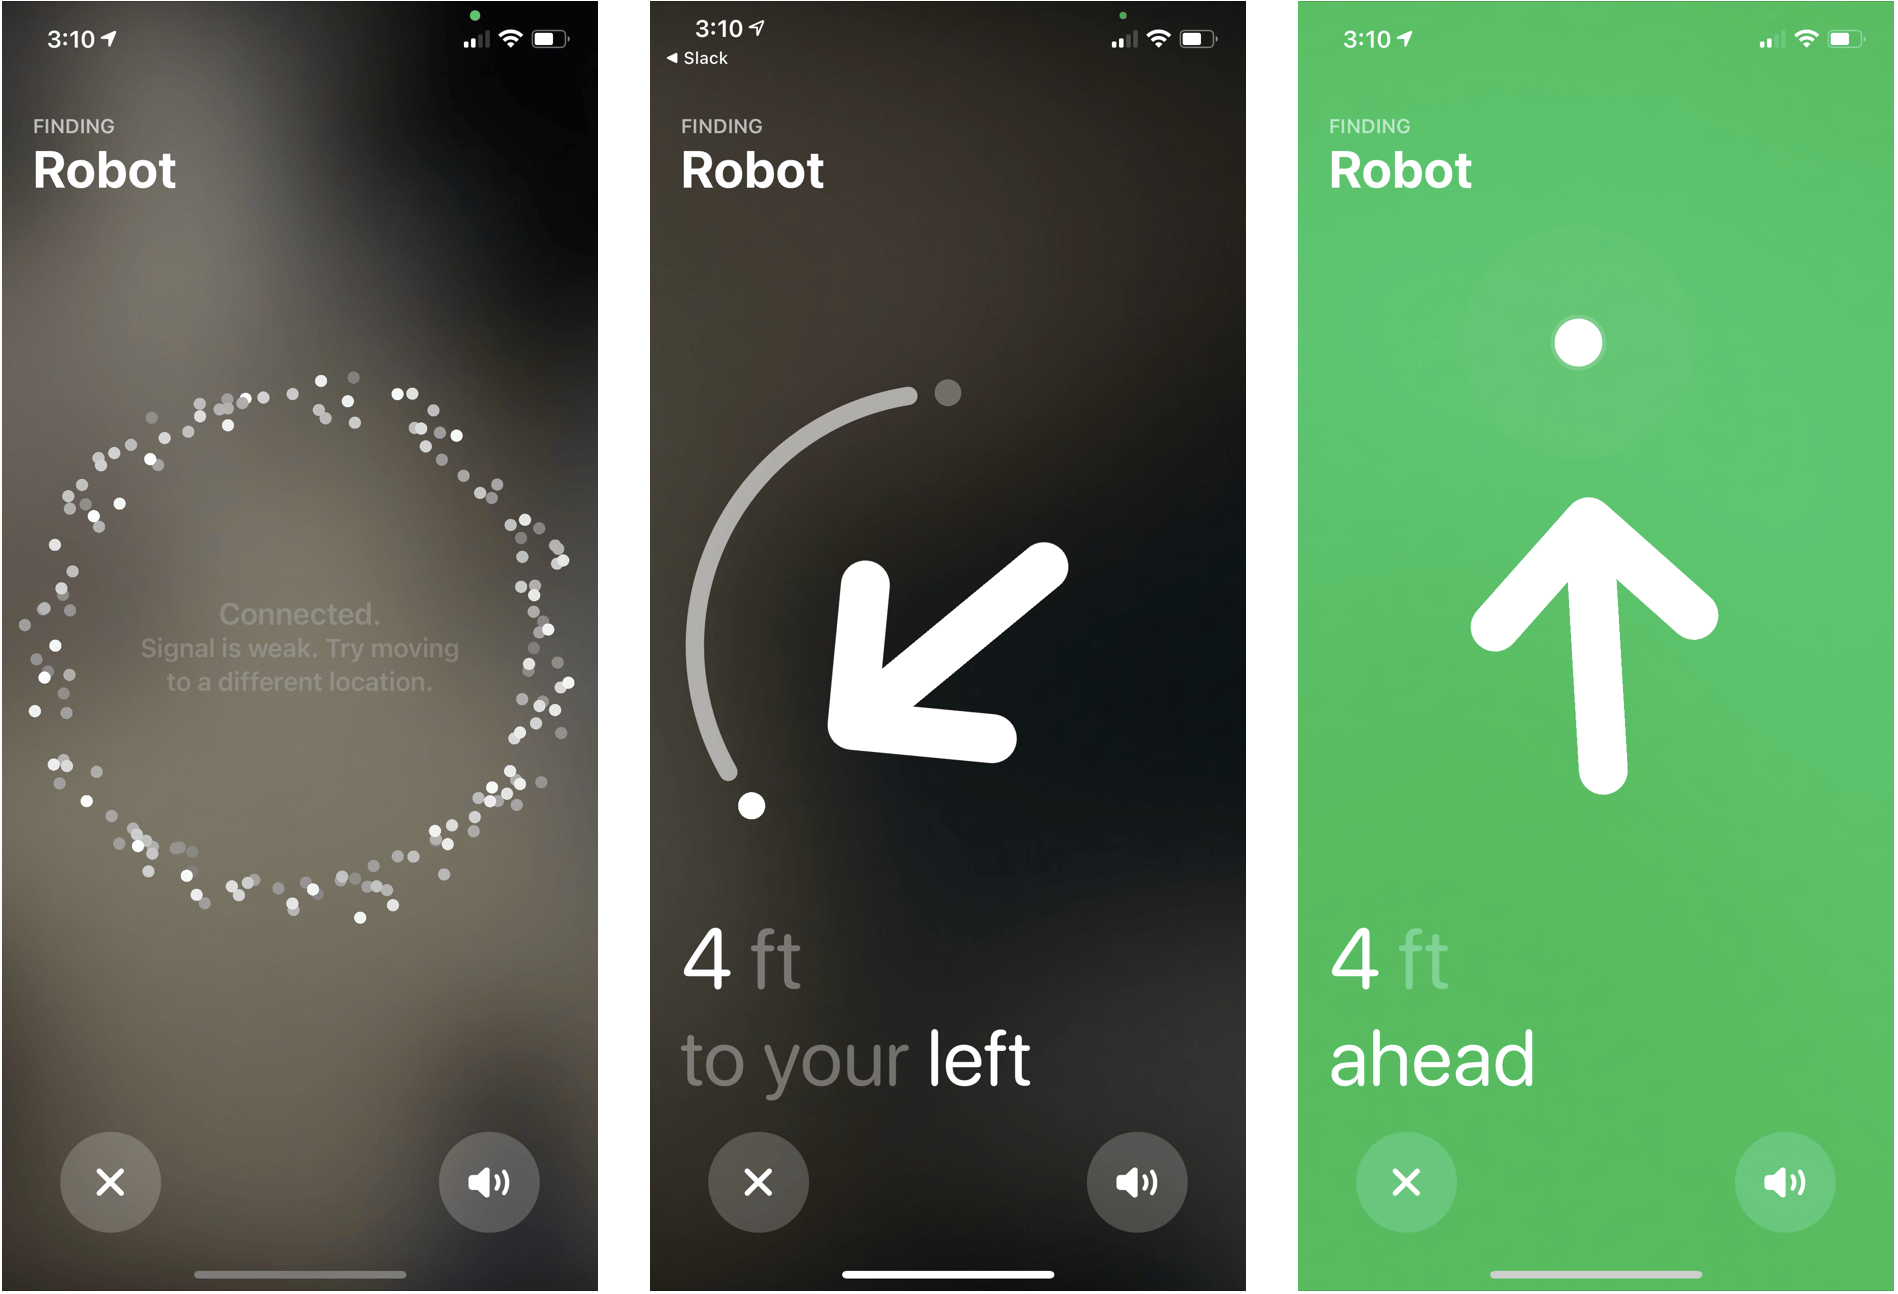
If it’s within about 30 feet (10 meters), you see a message that the signal is weak and a suggestion to move to a different location. As you get within about 10 to 15 feet (3 to 4.5 m), a proximity indicator begins to show distance and direction.
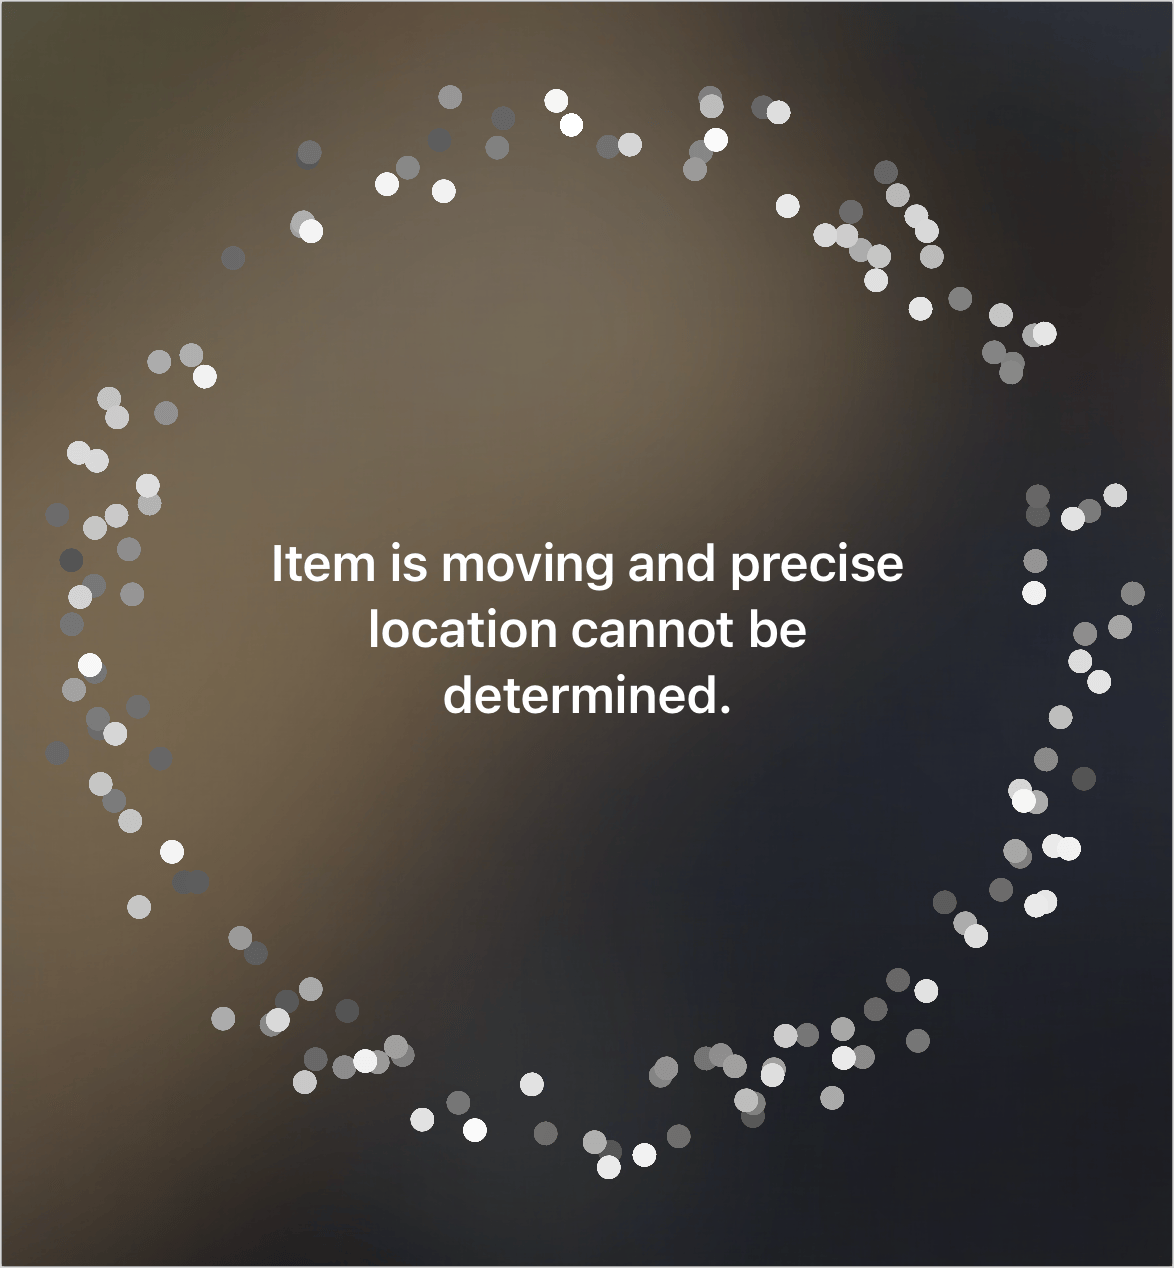
As you turn towards the AirTag or AirPods Pro (2nd generation) case, the display lights up green, indicating you’re getting warmer. If the item moves while you’re trying to find it, Find My shows a diffuse display indicating it’s in motion (Figure 43).
If your device has haptic feedback and it’s enabled, an iPhone vibrates more or less strongly as you lock onto the correct direction and come closer. You can tap the speaker icon to have a sound briefly emerge from the AirTag or charging case to aid in finding.
When you’re adjacent to the item, Find My replaces the distance with the label “here” (yes, in lowercase), and shows a 3D rotating image of the item at the center of the display.