Configure Your Software
The best OCR software in the world can still produce lousy results if you don’t set it up just so and give it the best possible input material to work with. You’re looking for a combination of settings that gives you the best balance of OCR accuracy, processing speed, image quality, and file size. I help you figure out what those are in this chapter. I also show you several ways to automate scanning so that it takes as little manual effort as possible, and provide guidance about how to file your scanned documents so you can find and use them quickly in the future.
Understand the Scanning Process
The fact that your scanner includes OCR software, or that you’ve purchased such software separately, doesn’t necessarily mean that the process of creating a searchable PDF from a scanned document will be straightforward. It might be, but more often than not, it’s necessary to think through a multi-stage process, which may involve configuring the settings in two or more pieces of software.
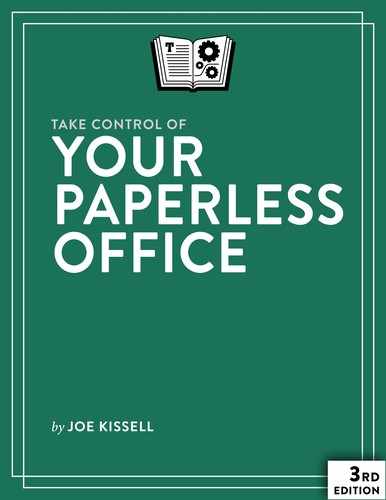
Every scanner comes with customized software that handles the low-level communication between the scanner and your computer. For example, if you have a Fujitsu ScanSnap, the scanner-specific software is called ScanSnap Manager; with a Canon imageFORMULA scanner you’d use Canon CaptureOnTouch; with an Epson scanner it would be Epson Scan; and so on. This software is responsible for taking the raw data your scanner produces and turning it into a bitmap image stored on your disk. As a result, this software always provides some means of setting preferences such as resolution, destination, and file format. The scanner’s software may include many other capabilities, too, but for the moment, assume that its only purpose is to spit out a bitmap image, as shown in the top row of Figure 1.
If you were scanning photos, then the bitmap image would be all that you’d need. But for scanned documents, an additional step is generally necessary (the bottom row in Figure 1)—another piece of software opens the bitmap image, performs OCR on it, and generates a searchable PDF file.
Since you want to avoid manual effort whenever you scan, you may feel some concern about the fact that two or more apps may be involved. Fortunately, the process has several potential shortcuts:
- Some scanner software has built-in OCR capabilities, so you can skip the second app and go straight from scanner to searchable PDF without saving an intermediate bitmap file. Similarly, some document management software can do OCR, so you can pass it a bitmap image and let it do the rest.
- Most scanner software has an option to send bitmaps directly to an OCR (or other) app, so even though the file is saved somewhere on disk in the process, you need not do anything with it yourself.
- Most OCR and document management software can be configured such that, as soon as it opens a document, it automatically performs OCR and saves your document as a searchable PDF. In other words, if your scanner’s software is set up to send a bitmap straight to your OCR software (as in the last point) and your OCR software is set up to recognize text and save the resulting document automatically, you get essentially the same end result as if OCR were built right into the scanner’s software—everything happens automatically, in the background, without any intervention.
- If your scanner’s software, OCR software, and/or document management software isn’t designed to facilitate this sort of automation, there may still be a way to coax it into behaving as though it did; I discuss this ahead, in Automate OCR.
Now that you know where we’re going, your first step is to consult the documentation that came with your scanner and open whatever app is responsible for managing those low-level settings such as resolution and destination. In the next couple of topics, I give you some guidance as to how you should configure that software to end up with a bitmap image suitable for OCR, and to send that image (if possible) directly to the software that’ll handle the OCR process.
Because space doesn’t permit me to give detailed instructions for every app, I illustrate most of the settings that follow with examples from Fujitsu’s ScanSnap Manager software. If you’re using software from another manufacturer, the options and wording will vary, but you should find roughly comparable settings.
Choose Your Main Scanning Options
Of the many settings you may want to consider, three are of particular importance because they affect file size and OCR accuracy, among other things: Resolution, Color Mode, and Compression. I look at each of those in turn, and then discuss how they fit together.
Resolution
The first decision to make is the resolution at which your scanner will save images of scanned documents. The majority of the scanners mentioned in this book and its online appendixes have an optical resolution of 600 dpi, so that’s the maximum—but they can be set to scan at lower resolutions, too. The choice of this single number has significant implications:
- OCR accuracy: Up to a point, higher-resolution scans produce more-accurate OCR results. At very low resolutions, such as 75 dpi, there’s too little data to ensure good quality OCR, especially if the text is small. Surprisingly, though, it turns out that the relationship between resolution and accuracy isn’t linear—it starts to drop off after 300 dpi for color and grayscale images (see Color Mode, next). That is, a 300-dpi scan could be twice as accurate as a 200-dpi scan, whereas a 600-dpi scan may offer only a tiny additional improvement. A very high resolution may even lead to lower accuracy, as dust, streaks, and other random marks are more likely to be misinterpreted as text.
- File size: Higher resolution equals larger files. Depending on compression settings, a 600-dpi scan can produce files up to four times the size of a 300-dpi scan. For a single file, this difference may not be significant, but once you’ve scanned hundreds or thousands of files, it can add up—and remember, all that data must be backed up, too. So, it’s logical to use the lowest resolution consistent with the desired results.
- Processing speed: With some scanner models, it takes longer for a document to travel through the scanner when being scanned at a higher resolution than at a lower resolution. Regardless of the scanning time, when your OCR software works with the document, it’ll require more time, and more CPU power and RAM, to process a higher-resolution scan than a lower-resolution one.
- Reprint fidelity: Higher-resolution scans are more accurate than lower-resolution scans, which means that if you should ever need to print a document that you’ve scanned, you’ll get clearer, crisper results with a higher resolution. The difference between printouts of a 300 dpi image and a 600 dpi image may not be readily apparent to the naked eye except at very small font sizes, but documents scanned at, say, 150 dpi will look distinctly fuzzier and more pixelated (think of faxes) than those at 300 dpi or higher. It’s possible to reduce the resolution of images after the fact (a process called downsampling), so if reprint fidelity isn’t very important but OCR accuracy is, you may want to scan at a higher resolution, do the OCR, and then downsample. I say more about this ahead, in Set Other Scanning Options.
You may have to experiment with resolution settings (in combination with color mode and compression) to find what works best for you. My experiments suggest that a good starting point is 300 dpi for grayscale and color scans and 600 dpi for black-and-white scans.
Color Mode
By color mode, I’m referring to whether the scanned image is black-and-white, grayscale, or color.
Black-and-white bitmaps take up very little disk space, while grayscale images take up more space, and color images still more. However, I’ve found that compared to black-and-white scans, grayscale or color images tend to have significantly better OCR accuracy, as well as superior reprint fidelity—even at a lower resolution (for example, a 300-dpi grayscale image produces better OCR accuracy than a 600-dpi black-and-white image). And, with careful attention to compression (discussed next), the file sizes need not be unreasonably large. In fact, because of the way some OCR software alters scanned images, you may paradoxically end up with far larger files with a black-and-white scan than with a grayscale scan at the same resolution!
OCR accuracy and file size aside, if colors or gray shades are essential for the documents you’re scanning (for example, ones that include photographs or artwork), you’ll want to set the appropriate color mode. Your scanner may have an Auto setting that enables it to figure out the proper color mode as it scans, which may be even better (but do a few spot checks to confirm that it’s making wise choices).
Compression
The bitmap files produced by your scanner can be compressed using a variety of methods in order to reduce the file size. With black-and-white images, the compression is normally lossless (no information is discarded), whereas with grayscale and color scans, lossy compression is normally used—it shrinks the files much more, but decreases clarity at higher compression settings. Excessive compression can reduce OCR accuracy, not to mention making images less attractive, while using little or no compression results in unreasonably large files. So, in my experience, a medium compression setting is usually the best compromise.
However, let me qualify that in two ways.
First, although some OCR apps (such as PDFpen) leave the bitmap image alone and simply add the recognized text to the PDF, others try to recompress the image after recognizing the text. Usually this results in smaller files, but other times—particularly with black-and-white scans—this process uses a less-effective compression method that actually increases the file size, sometimes dramatically. All that to say: no matter what you choose in terms of initial compression for your images, there’s no guarantee that your choice will be honored by software that processes the file later. File sizes may get much better—or much worse.
Second, one OCR app, Readiris, includes a proprietary compression algorithm called iHQC, which the developer claims can reduce storage space “up to 50 times,” with no loss of visual fidelity. Even if you don’t use Readiris for OCR, you can use a separate tool called IRISCompressor to shrink PDFs after the fact, if small file size is crucial. (I have not tested iHQC, so I can’t comment on its effectiveness from personal experience.)
Putting It All Together
Juggling three different variables to get the best combination of file size, OCR accuracy, and other benefits is no mean feat. I’ve performed hundreds of experiments with many combinations of settings and software in an attempt to find the sweet spot for my own needs, but there’s no single answer that’s ideal for every situation.
In general, I’ve found that 300 dpi grayscale scans, with medium compression, yield the most favorable tradeoff between file size and OCR accuracy. They also look very good and don’t tax my computer’s CPU excessively. Of course, if you work with different sorts of documents, different hardware, or different software than I do, you may reach other conclusions.
In any case, all these settings apply to the initial scanned image—before any OCR takes place. That means you must configure it in the scanner’s software package.
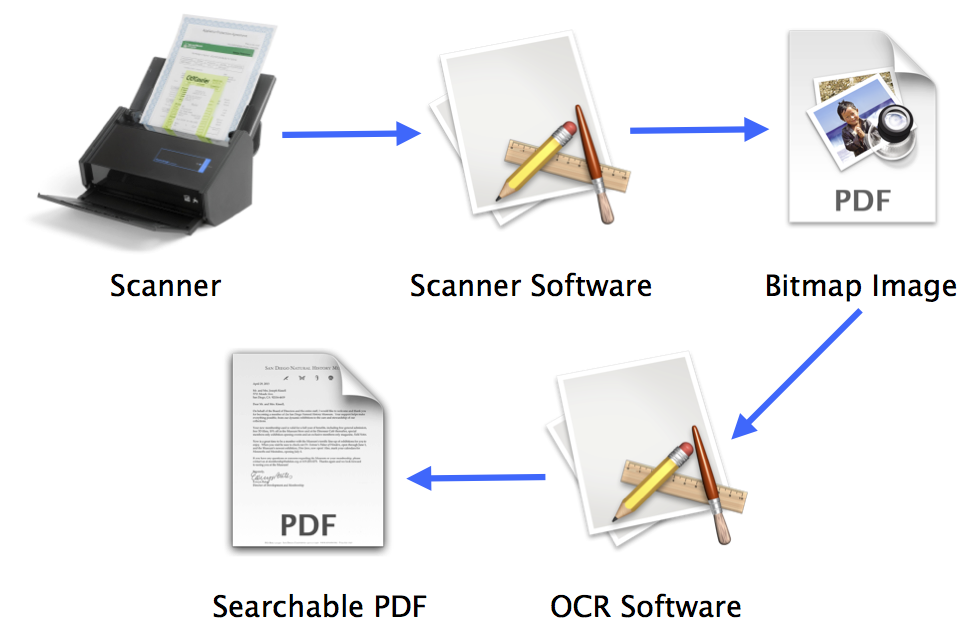
To illustrate with ScanSnap Manager, the Scanning tab (Figure 2, slightly ahead) offers the following choices:
- Automatic resolution: Uses the “Better” setting except when scanning business cards, for which it switches to “Best”
- Normal (Color/Gray: 150 dpi; B&W: 300 dpi)
- Better (Color/Gray: 200 dpi; B&W: 400 dpi)
- Best (Color/Gray: 300 dpi; B&W: 600 dpi)
- Excellent (Color/Gray: 600 dpi; B&W: 1200 dpi)
The “Excellent” option results in much slower scans as well as huge files, and I’ve never found that extra-high resolution to be helpful.
Although I had Image Quality set to Automatic Resolution and Color Mode set to Auto Color Detection for years without any apparent problems, my latest experiments have led me to prefer an Image Quality setting of Best (for improved OCR accuracy) and a Color Mode of Gray (to avoid the possibility of getting black-and-white images, which not only have lower OCR accuracy but which can grow precipitously when fed through certain third-party apps).
Set the Destination
The next choice you must make is the destination for the bitmap file. In general, you can choose either of the following:
-
Send it to an app: Not all scanner software lets you do this, but if it does, it’s a good choice, because it lets you hand the bitmap directly to your OCR software (or to a document manager that can do OCR) without any fuss or extra steps.
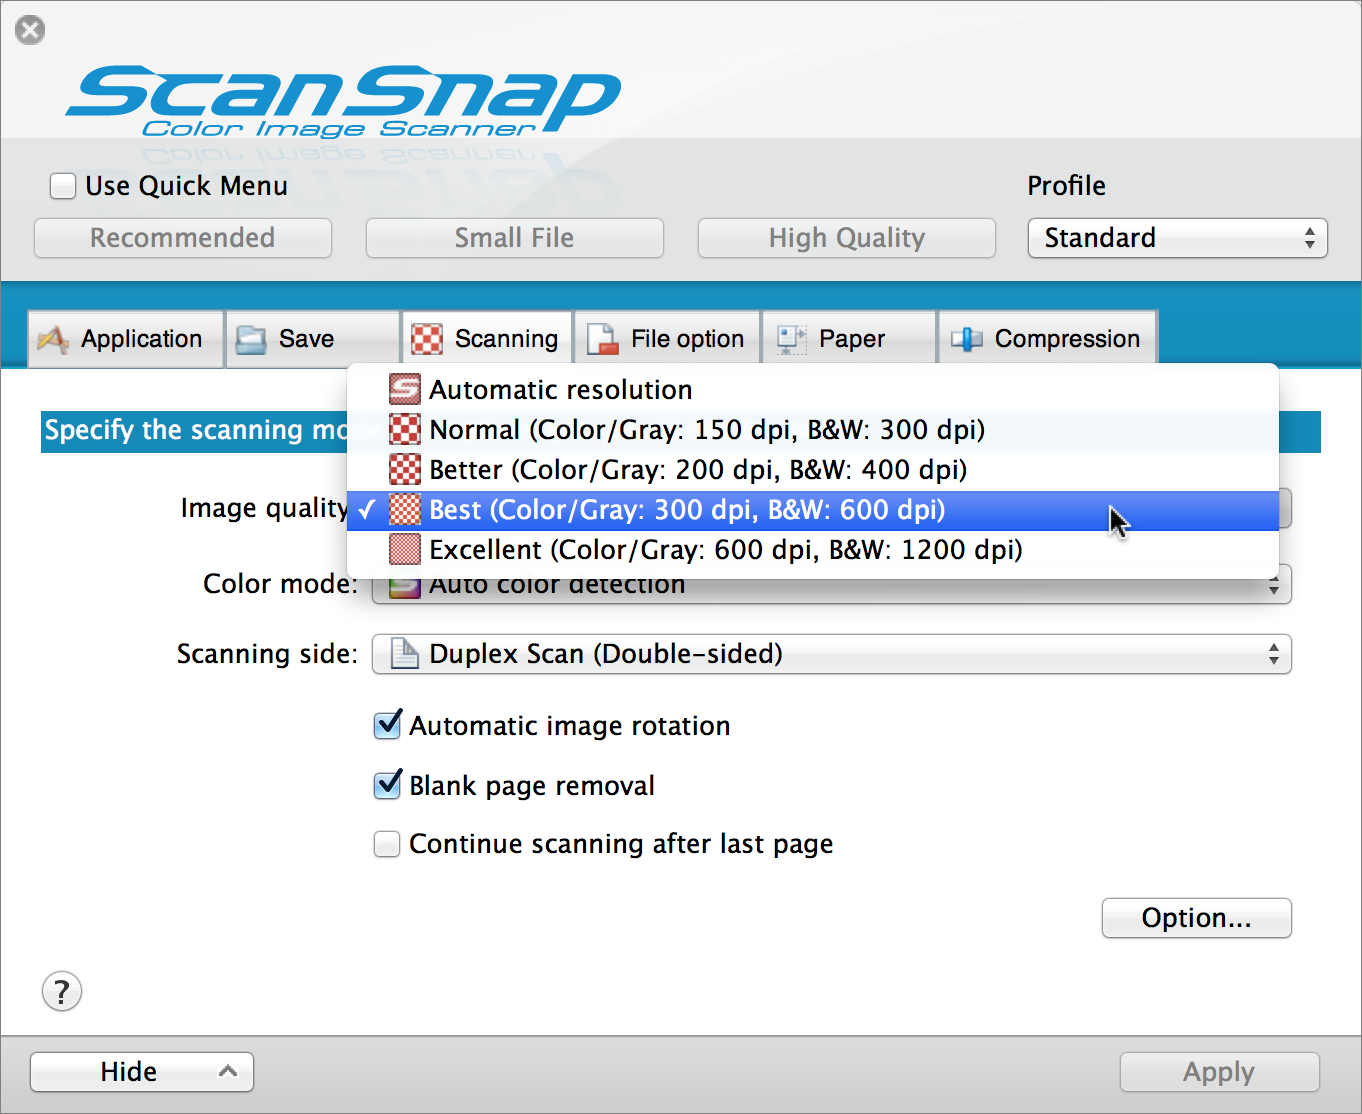
Figure 3 shows the Application pop-up menu on ScanSnap Manager’s Application tab, configured to send scanned documents direct to DEVONthink Pro Office, which is in turn set up to do OCR automatically. (But, if you prefer, you could choose any OCR app here—or even Searchable PDF Converter or ABBYY Scan to Searchable PDF, both of which I discuss just ahead, in the sidebar ScanSnap Manager and OCR.)
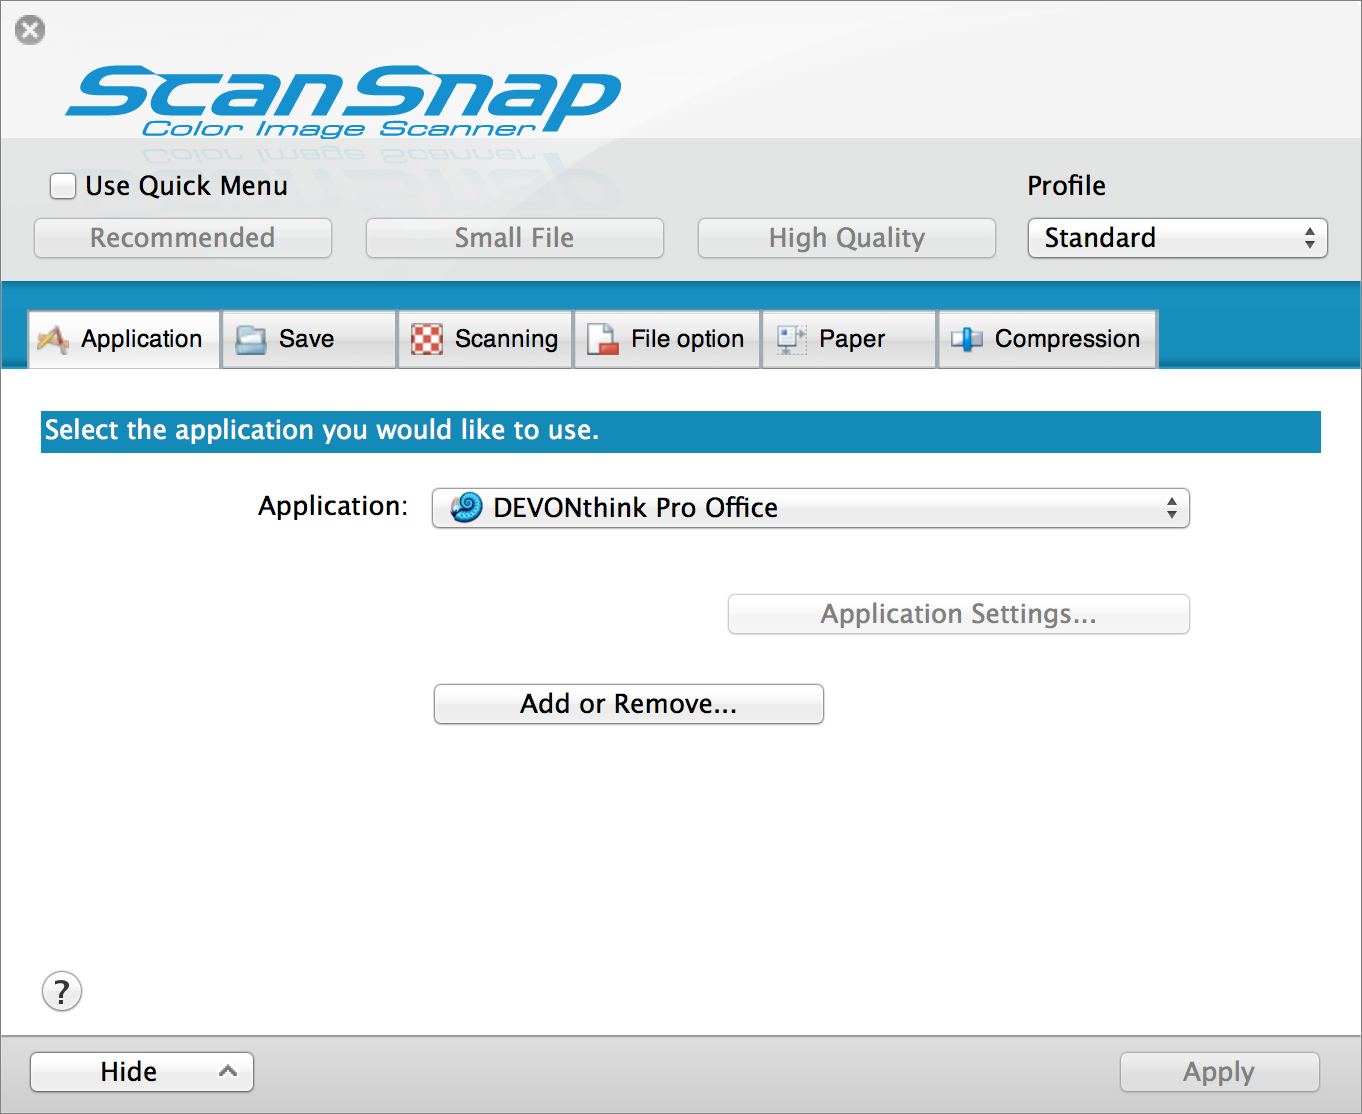
Figure 3: In ScanSnap Manager, choose an app on the Application tab to send scanned documents directly to it. -
Save it to a folder: Choose a folder—for example,
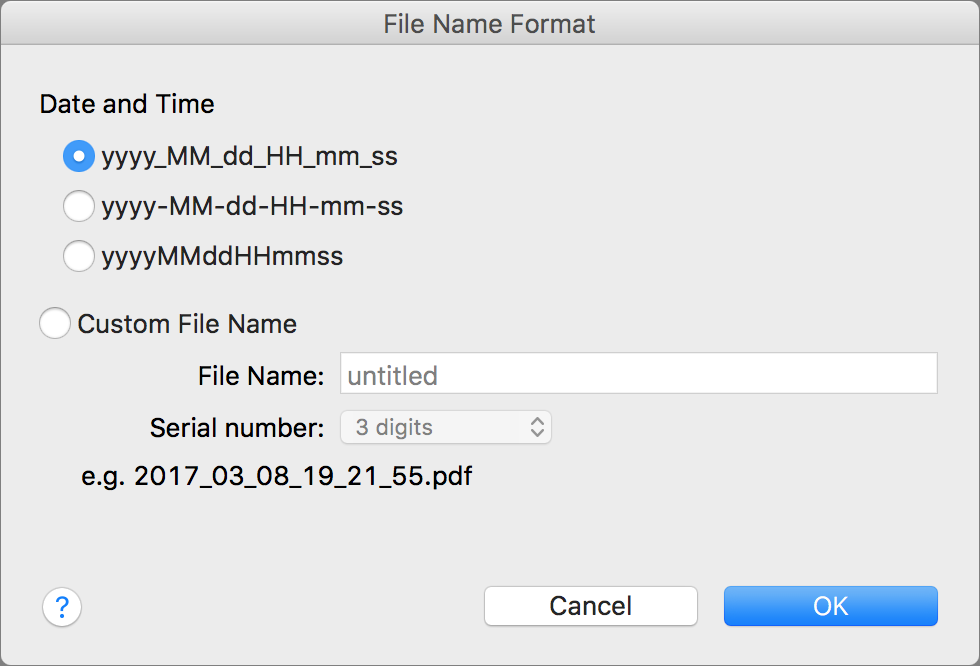
~/Picturesor a subfolder that you create there, such as~/Pictures/Scans—where all the raw bitmap files will be stored as your scanner generates them. If you prefer, you can instead choose a folder inside your Dropbox, in iCloud Drive, or in another Finder-accessible cloud location. In some cases, even if you choose to send scans directly to an app, your scanner saves a copy of the bitmap file somewhere for future reference, so you’ll still need to set a location on your disk. In ScanSnap Manager, you set the destination on the Save tab.Along with selecting a destination folder, you usually have the option to specify a pattern for naming files as they’re scanned. For example, in ScanSnap Manager, click the File Name Format button on the Save tab (or, in earlier versions of the software, the Options button) to display the dialog shown in Figure 4, where you can choose a predefined format (based on the date and time) or create a pattern of your own. Once the document has gone through the OCR step, you’ll have an opportunity to name the searchable PDF, so I don’t place much importance on the names of the bitmap files.
Your scanner software may offer more than just these two options (send scans to an app or save them to a file). For example, ScanSnap Manager lets you choose a feature called Quick Menu by selecting the “Use Quick Menu” checkbox at the top of the window. When you do this, every time you scan a document, a special window (the eponymous Quick Menu) pops up to let you choose what to do with that particular scan. This approach is useful if you do a variety of activities with scanned documents (for example, you print some, you email some, and you send still others to Photos). But since I almost always want to save my own scans as searchable PDFs, I leave this feature turned off most of the time.
Another option, particularly for scanners with built-in Wi-Fi, is to save the bitmap images directly to cloud storage (such as Dropbox) or a cloud service (such as Evernote). If you were going to choose a Finder-accessible cloud location anyway, having the scan sent there directly accomplishes basically the same thing as saving it to a folder on your Mac that’s then synced to the cloud. However, if you choose a cloud service, be aware that even though it may be able to make your scanned content searchable, it will probably not yield searchable PDFs as such, which means you’ll likely be able to search your scanned documents only on the Web or in the service’s app.
Set the File Format
Your document will eventually end up as a PDF, but the bitmap image that your scanner produces initially could in theory be in any of several common formats, such as TIFF, JPEG, PNG, and (naturally) PDF. Most scanning software lets you choose the bitmap file format, though some offer more choices than others. Here are my recommendations, in order from most to least preferable:
- PDF: Since you’re going to end up with a PDF anyway, this is the simplest choice. PDF documents can contain more than one page, unlike PNG and JPEG, so the PDF format is ideal for multipage scanned documents. It’s also a wise choice because any app that can create searchable PDFs can also read PDF files, but some other formats can’t always be used as input.
- TIFF: TIFF files can also contain multiple pages, and the format is widely supported. However, if your scanning software happens to save TIFF files in an uncompressed format, they can take up quite a bit of disk space.
- PNG: This format is often used for graphics on the Web because it produces reasonably small files with lossless compression, which doesn’t degrade the quality or throw away any data. However, PNGs are limited to one page.
- JPEG: The most common format for files created by digital cameras, JPEG is universally supported. Unfortunately, although JPEG files tend to be smaller than PNGs, they’re compressed in a way that decreases their intrinsic quality (and the effect is magnified each time they’re saved). Plus JPEGs, like PNGs, can have only one page.
Set Other Scanning Options
The list of other scanning options you may be able to set is long and highly variable. And, in general, whether or how to change any of these things is up to you—you might want to experiment and see what works best with your combination of scanner, software, and documents. (Many of these settings are also available in certain OCR apps; it’s up to you to decide where it makes the most sense to apply them.)
Examples of other commonly seen settings:
- Scanning sides: Most of the scanners that I list in the online appendixes support duplex scanning, and if you’re scanning double-sided documents, you’ll want duplex scanning enabled in your software. However, in some cases—for example, when scanning documents that have graphical patterns, but no text, on the reverse—you may want to turn off duplex scanning so you don’t waste disk space with lots of useless, effectively blank pages.
- Automatic blank page removal: If your software is set for duplex scans but some of the pages you feed into your scanner are completely blank on one side, you may want to have those empty pages removed from the resulting PDFs automatically—if so, turn on this feature.
- Brightness and/or contrast: In most cases, you can leave brightness and contrast controls at their default settings. However, if you’re scanning documents on colored papers or with very light text and find that the image quality, OCR accuracy, or both are substandard, you might be able to improve your results by playing with brightness and contrast settings.
- Deskewing: If you feed a page into a scanner at a slight angle—or if the paper is straight but the text on the page is at an angle—some scanner software can straighten it for you, within reason.
- Automatic image rotation: With this feature, it doesn’t matter whether you feed documents into the scanner upside-down or sideways; the software automatically rotates the resulting images to be right-side-up.
- Paper size: Most scanners can automatically figure out the size of the paper you feed into them, and produce bitmap images of the same size. However, you can often choose an arbitrary paper size, too—for example, if you want all your PDFs to be letter-sized, even when you’re scanning smaller pieces of paper.
- Multipage documents: Let’s say you put a stack of 15 pages in your scanner’s ADF and push the button. Do you expect to get a single 15-page PDF, or 15 single-page PDFs, or something else? You may be able to specify how your scanner’s software treats multipage documents—for example, always combining continuous scans into a single file, or automatically splitting the file every five pages.
Set OCR Options
The preceding instructions should do it for configuring the software to create the initial bitmap files themselves. But whether you’re using OCR capabilities built into your scanner’s software or a separate OCR app, you should next take a quick spin through the OCR-related preferences. They’re likely to be less involved (and may include some of the same options described just previously), but at minimum, be sure you configure the following:
- Language: Since you’re reading this book in English, I’m guessing that you’ll choose English as the primary language for your scans. But, if the documents you scan sometimes contain other languages, you may need to adjust the language setting. Most OCR software lets you select one or more secondary languages (and then it automatically uses the correct dictionary and rules as it encounters each one), but the more languages you add, the longer it will take to process each file—and the greater the chance that the software will guess wrong from time to time and produce unintelligible results.
- Recognition mode: Some OCR software, such as the version of ABBYY FineReader embedded in DEVONthink Pro Office, lets you choose between text recognition that’s faster (but less accurate) and slower (but more accurate). If you have a fast computer, you may find little benefit in the slower option, but then, as I explain in the sidebar A Few Words about OCR Accuracy, having ultra-high accuracy is not necessarily crucial for searchable PDFs. Try a few documents both ways to see what you like best.
- Output format: As you know by now, the right choice here is nearly always searchable PDF. However, if your software offers the choice, you may occasionally want to save in editable formats such as Microsoft Word or Excel documents.
- Downsampling/post-processing: Some OCR software will optionally reduce the resolution of scanned images after performing OCR, so that you get the benefit of greater accuracy on input along with a smaller output file size. I generally find that downsampling to 150 dpi retains a reasonably good image while reducing file size significantly, but you should experiment to see what you think of the results on your own setup. Whether or not it downsamples, your OCR software may recompress the original image, although as I said when discussing Compression, this may paradoxically increase file sizes in some cases. If you have the option to leave the original compression alone, that may be the wisest approach.
-
Output destination: If the app performing OCR is a document manager, then the destination for the searchable PDFs is that app itself. Otherwise, choose a folder on your hard disk (presumably inside
~/Documents) or on a network volume. (If you need help deciding where to store the documents, read Choose a Naming and Filing Strategy, next.) - Output filename: Depending on the OCR software you use and how, if at all, you automate it (as I discuss later, in Automate OCR), it may resave the document under the same name the bitmap image had originally, or it may give you the option to respond to a prompt to rename it on the spot. I say more about this choice in a moment.
The settings for those last two items—destination and filename—may be obvious to you, or they may require more thought. And, if you’ll be sharing scanned files with others, some additional questions may arise. So before you finalize your settings, read the next section for advice on naming and filing your scans.
Choose a Naming and Filing Strategy
Naming your searchable PDFs and filing them (that is, storing them in some particular location) may be entirely separate activities, but it usually makes sense to do them together. And, your OCR software may expect you to make decisions up front about how these tasks will be handled. So it’s a good idea to think through your options carefully.
Fundamentally, you have four questions to answer:
- When do you want to name and file the documents? That is, do you want to name them as you scan them, or at some later time? I cover this next, just after this list.
- What do you want to name the documents? You can choose any name you like, but for ease of finding documents later (especially if others will use them too), you should think about which conventions you’ll use. Read Choose a Naming Convention.
- How do you want to retrieve the documents? By “how” I mean: store them as regular, stand-alone documents that you’ll find and retrieve using the Finder—or store them in the database of a document management program? See Choose a Retrieval Method.
- Where do you want to store the documents? Will you keep them on your local hard disk, on a network server, in the cloud, or in some combination of these places? Read Choose a Destination.
Decide When to Name and File Documents
As you perform OCR on your scanned documents, you have three basic choices as to what happens next:
- You can be completely “hands off” and let your software name and file the documents automatically.
- You can intervene immediately by giving your documents names (and sometimes tags or categories) and filing them.
- You can name and file your scans later, at your leisure.
I can think of good reasons for choosing any of these approaches, but the important thing is to weigh the pros and cons, decide how you want to handle the process, and stick with it.
Use the Hands-off Approach
The appeal of the entirely hands-off approach is obvious: it requires no effort other than pressing a button. So, if you’re concerned that you’ll never get around to scanning otherwise, that’s a significant positive.
On the negative side, if you let your software name scanned documents, the names (usually a string of numbers based on the date and time) won’t be meaningful to you, and when it comes time to find a file, you won’t be able to distinguish one from another by name; you’ll have to examine their contents, too.
And, if you let your software file the documents too, they’ll almost certainly end up in a single big folder somewhere, which again makes it harder to find what you’re looking for later on.
For me, since I’m scanning documents in order to make my life easier, the negatives of the hands-off approach outweigh the positives.
Name and File as You Go
You can choose to name every document as soon as your OCR software turns it into a searchable PDF. At the same time, you can optionally file it in an appropriate folder or apply tags that will help you identify the document later. (Read the sidebar Tags vs. Folders.)
The big advantage to doing this is that you’ll make it much quicker to find the document later—and by doing this work right away, the subject matter of the document will be fresh in your mind, making naming easier.
The disadvantage is that it’s not merely more work, it turns scanning into a task that demands your ongoing attention, because you have to stop after every document goes through the scanner, think about it, and perform one or more extra steps.
Nevertheless, this is the procedure I use most of the time (see How I Name and File Scans, ahead).
Name and File after the Fact
As a compromise between the first two options, you can let your Mac process everything automatically at first, but then later —say, once a week—go back and review recently scanned documents, name them, file them in the proper locations, tag them, and so on.
Although this approach has the benefits of both of the other alternatives, it has a downside, too: it’s more time-consuming to identify and name documents after the fact than right away. And, if you let it go too long, the task might become so overwhelming that you never do it.
How I Name and File Scans
Each person is different, and I’d never say you need to do things the way I do them. Experiment with different processes to find the one that works best for you. However, in case you’re curious about how I approach this process, here’s the basic outline:
- I have ScanSnap Manager configured to send scanned documents directly to DEVONthink Pro Office.
- In DEVONthink Pro Office > Preferences > OCR, I have “Convert to searchable PDF” selected, which means DEVONthink will perform OCR using its built-in version of ABBYY FineReader. In addition, “Move to Trash” is selected, which prevents me from having two copies of every scanned document (one searchable, one not). I also have the “Enter metadata after text recognition” box selected. This means that after DEVONthink has performed OCR on each document, it prompts me for a name and other details. If I wanted to scan a bunch of documents in a batch and not be prompted to name each one, I’d deselect that checkbox.
- I pop a document (whether it contains just one page or fifty) into my ScanSnap’s ADF and press the button. The ScanSnap pulls the pages through and sends it to DEVONthink for processing. While DEVONthink is working on OCR, I can keep feeding in additional documents; the processing happens in the background, so there’s no need to wait.
- When I’m done feeding in documents, I switch to DEVONthink, where I see a dialog with a large thumbnail of the first document I scanned next to a form where I can fill in, at my option, a name (unless I want to keep the boring, automatic name, which I never do). I can also fill in Author, Subject, and Tags fields, and adjust the date/time stamp, but I virtually never touch those. I repeat the process to name all the remaining scanned documents.
- Once all the searchable PDFs are in my Inbox, I file them into appropriate groups—either manually or using the Auto Classify feature, depending on how confident I am that DEVONthink will automatically put them in the proper place. But I often leave this filing step until later.
For how these steps fit into the larger workflow of moving documents from an In box to an Out box (or the recycling, a paper shredder, or whatever), see the next chapter, Create a Workflow for Incoming Paper.
Choose a Retrieval Method
After OCR is complete (whether or not you’ve taken the time to choose a filename) and you have a searchable PDF, you can leave it in the folder where it started—the one where the bitmap images straight from the scanner live—or you can move it somewhere else. As I’ve mentioned, I’m a proponent of the “somewhere else” approach, but before you can decide where, exactly, to store your files, you need to know what technique you’ll use to find and view your PDFs later. In particular, you need to decide whether you will store the PDF as an ordinary file in the Finder—and if so, where? Or, will you store everything in a document manager?
Use the Finder
The default way to retrieve documents is through the Finder, possibly with the help of Spotlight. Storing PDFs in regular Finder folders is easy—it happens automatically if you don’t take any other action, and Spotlight automatically indexes the documents. Because the PDFs are now ordinary, searchable files, you can organize them just like all your other documents—for example, if you have scanned documents relating to a specific project, they might go in that project’s folder in the Finder; or if your scans are of utility bills, they might go in a folder with other financial documents. Or, you may keep all your searchable PDFs, regardless of contents, together in one place.
Before you choose Spotlight and the Finder as your retrieval tools, spend a moment pondering these questions:
-
Do you like Spotlight? Some people love Spotlight; some hate it. But if the point of creating searchable PDFs is to make them, you know, searchable, then you should keep in mind what you’ll be using to search them.
If Spotlight works well for you, then the Finder is a great destination. If it doesn’t, consider using a Spotlight enhancement such as HoudahSpot. Or, try searching with an alternative search engine such as Google Quick Search Box or FoxTrot. Or, you could use a document manager (covered next).
-
Do you need to share these files? If you’re scanning strictly personal documents, then you can store them wherever you want. But if a colleague or family member will need to use them too, then you must do two things:
- Agree on conventions for naming and organizing them. This can sometimes be a source of contention—but I return to this issue shortly ahead, in Choose a Naming Convention.
- Store them in a network-accessible location. This could be a shared folder on your Mac, a network volume, shared cloud-based storage, or a document manager that offers a sharing feature. I say more about this in Choose a Destination.
- Would you like other categorization tools? The Finder uses hierarchical filing, although you can create aliases to give yourself pointers to files in other locations—or apply tags to your documents, which reduces the need to worry about file locations (see the sidebar Tags vs. Folders). If you prefer an alternative categorizing method, or if a lot of the documents you scan require accompanying database entries (for things like receipts and business cards), keep reading to learn about document managers.
Use a Document Manager
I mentioned several document managers in the discussion of OCR software (Pick a Mac OCR Package). Essentially, they’re apps that provide their own storage, categorization, display, and search methods for files and other snippets of data. You might prefer one of these over storing files only in the Finder for any number of reasons, such as a more pleasant user interface, more-flexible (or faster) searching, or other database features.
Neat and Paperless, both of which I covered earlier in Pick a Mac OCR Package, are OCR tools with built-in document managers (or vice-versa) that are specially designed to work with structured data such as receipts. And, I’ve said that I’m personally a fan of DEVONthink Pro Office. However, a few other options are also worth considering, as long as you have some independent way to perform OCR:
- DEVONthink Personal
- DEVONthink Pro
- doxo; My Account Manager (for iPhone)
- EagleFiler
- iDocument
- Microsoft OneNote
- Yojimbo
If you’re considering one of these apps, I suggest downloading a demo version and making sure you can find a way (such as using an AppleScript folder action) to store your searchable PDFs directly in the document manager of your choice.
Depending on your needs, you may want to look for a few features in particular:
- Syncing: If you use multiple devices (more than one computer, or a computer plus an iOS device, for example), you may appreciate a document manager that can sync its data across the devices easily—either directly or using a cloud service such as Dropbox. All three DEVONthink products can do this, as can EagleFiler, iDocument, OneNote, Yojimbo, and Neat. The last three of these use paid, proprietary services for syncing.
- Sharing: For other people to access the contents of your document manager’s database, it must offer some sort of sharing mechanism—for example, a built-in Web server, as DEVONthink Pro Office does. (Most other document managers allow sharing of individual files via email or other methods, but that’s not the same thing as giving someone else ongoing access to all your documents, or a particular group of them.)
- Data portability: What would happen if your favorite document manager software stopped being updated for a new version of macOS, or if the company went out of business? Could you extract your documents and use them somewhere else? Most document managers offer some sort of export feature, and some (such as the DEVONthink products) store all the documents in their original formats, such as searchable PDF, in a package you can navigate in the Finder, should the need arise (with metadata, such as tags and comments, stored in a proprietary database).
Choose a Naming Convention
I don’t want to belabor this point, nor can I provide any universal solutions, but it’s worth giving some thought to what you’ll name your searchable PDFs so you can more easily find them later—and so anyone else who needs to use the files can clue into their contents. (If you’re content with filenames like 2017_02_26_11_27_00.pdf then feel free to skip ahead to the next section!)
Suppose you’re scanning a stack of invoices. Naming them all “invoice.pdf” may be a bit better than nothing, but then, when you search for one of these and the result is a list of 100 files named “invoice.pdf,” you won’t know which is which without examining each one individually. On the other hand, although nothing prevents you from naming a file “Invoice #416, dated April 22, 2016, from ABC Supply Corp for $432.19.pdf,” that’s cumbersome to type and equally awkward to read. So, let me offer a few suggestions:
- Think about how you’ll search. The entire contents of your OCR-processed PDFs will be searchable, but results will invariably appear in a list of filenames—so if those names don’t make it obvious what’s unique about each document, you’ll have to look at each one in turn. In other words, do yourself a favor and put uniquely identifying words in the filenames.
-
Don’t rely on folder names. Along the same lines, some people rely on a series of embedded folders to help them identify files. For example:
Banks/Citibank/statements/2016/August.pdf. As long as you’re looking at a file in a hierarchical view in the Finder, that’s fine, but if you do a search that lists 20 files all named “August.pdf,” it’ll require extra work to figure out which one you want. It’s better to include extra detail in the filename, even if it seems redundant. -
Combine generic with specific. Giving a file a generic name such as “bill.pdf” or “electricity.pdf” will only lead to frustration when you try to find it. But, “Electricity bill December 2016.pdf” adds a specific piece of information that uniquely identifies the file, and will come in handy later.
Similarly, if you’re scanning a bunch of medical receipts for family members, you could include the person’s name, the provider’s name, and the date all in the filename for clarity, as in “2016-12-08-Joe-Dr. Smith” or “Joe-Dr. Smith-2016-12-08.pdf.”
When you’re naming files that other people will be using—for example, invoices you’re sending to another company—think about what sort of name would be most useful on the other end. For example, if I send TidBITS an invoice named “TidBITS invoice 2016-10.pdf,” that’s meaningful to me but not to them. They already know who they are, but they won’t be able to tell, just by looking at the filename, that it came from me. Something that includes both names, like “Kissell invoice TidBITS 2016-10.pdf” meets both of our needs.
- Write dates in a Finder-sortable way. The Finder automatically identifies the date on which each document was created, but that’s the date the digital version was created—not necessarily the date of the paper original (which is almost certainly what you want to know). So it’s a good idea to include documents’ stated dates in their names, and I suggest using this format: YYYY-MM-DD (as in 2016-09-30). That’s because files beginning with strings like that (or including them in a consistent place—for instance, “Kissell invoice TidBITS YYYY-MM-DD.pdf”) will always sort in chronological order in the Finder’s Column view, as well as in List and Icon view when sorted by name. (Using this format can come in handy even if you use a document manager, depending on its native sorting capabilities.)
- Talk to your associates. It’s rare that two people would, on their own, come up with exactly the same scheme for naming files, but if you plan to share files with others, you should at least reach a consensus on what sorts of names everyone can live with. Or, simply designate one person as the Boss and let that person decree a convention that everyone else consents to follow, even if it’s not their favorite.
Choose a Destination
If you’re storing searchable PDFs as ordinary, Finder-accessible files rather than using a document manager, make sure you put those files in a location that makes sense for your needs.
Here are your options:
-
On your own Mac. If the files will be for your personal use only, then a location on your own disk (likely somewhere inside your
~/Documentsfolder) is logical. If you want to use macOS’s built-in file sharing feature to make the documents available to someone else, put them in a folder whose entire contents you’re willing to share. - On a network server. For sharing scanned documents with a larger number of people in a business, a network server may be a more logical location, since it doesn’t depend on your own Mac being on, awake, and available on the network all the time.
- In the cloud. You may choose a destination in the cloud, as discussed in Local vs. Cloud Storage, to be able to access your documents from any computer, and share them easily with people not on your local network. (As I mentioned earlier, in Set the Destination, if a scanner saves your documents directly to a cloud service, as opposed to saving them to a Finder-accessible folder that syncs to the cloud, you typically do not get searchable PDFs.)
- A sharing-enabled document manager. As I mentioned previously in Use a Document Manager, some apps, such as DEVONthink Pro Office, have built-in Web servers that can enable others to access your documents via a Web browser.
- Some combination of the above. I recommend using cloud storage as a secondary location; it’s essential to have a copy of your data on a local (or local network) volume too. Luckily, it’s possible to do this automatically. For example, if you’re using Dropbox as a cloud storage provider, it automatically syncs files stored in a local folder (the eponymous Dropbox folder). Other cloud storage services also can sync local and cloud-based copies in various ways.
Automate OCR
Earlier in this chapter, an option that I described was routing incoming scans to an OCR app or feature, which (if you’re lucky) then creates searchable PDFs automatically. If that’s what happens on your Mac, congratulations—you can skip this section. But if your scanner’s software doesn’t support that configuration, or if you want to use OCR software that doesn’t automatically generate a searchable PDF when it opens a document, read on for help with automating the process.
Any scanner can save bitmap files into a folder somewhere on your disk, so that’s our starting point. Fundamentally, you need to make both of the following tasks happen automatically:
- Your OCR software opens bitmap files as they appear in the folder where your scanner software saves them.
- Your OCR software recognizes the text in the open bitmap file, and then saves the result as a searchable PDF.
Luckily, you can often use the same tool to accomplish both tasks: an AppleScript folder action. A folder action is an AppleScript that runs automatically when something happens to a specified folder—for example, you open or close it, or add files to it. So, the basic idea is this: create a folder action script and attach it to the folder where incoming scans are stored so that it watches for new files being added; have the script open those files in your OCR program and then instruct your OCR program to go ahead and process the files.
What’s particularly cool about this method is that sometimes it can even automate OCR in apps that don’t inherently support AppleScript—or don’t support it robustly. This is possible due to a feature called GUI Scripting, which means that instead of AppleScript issuing a direct command to an app to perform some action, it instead simulates the user actions of choosing menu commands, clicking buttons, filling in fields, and suchlike. Unfortunately, this means the app must be in the foreground—if you were to switch to another window while this was going on, the AppleScript would no longer be able to “see” and operate the necessary controls. Still, it’s way better than going through the entire process manually every time.
I’d like to offer you prewritten AppleScripts for every OCR program and with every possible combination of settings and behaviors, but life is too short. So, instead, I’m providing a handful of scripts that can drive a few popular OCR tools, and serve as examples on which you can base your own scripts for other apps. You can also, of course, modify any of my scripts to make it work differently according to your needs.
Download the scripts. After unzipping them (if that doesn’t happen automatically), move the files into either /Library/Scripts/Folder Action Scripts (which requires authenticating with your username and password) or ~/Library/Scripts/Folder Action Scripts; in either case, if the folder doesn’t already exist, create it. (Be sure not to put the scripts in the similarly named Folder Actions folder, which may appear in the same location.) Then proceed with the instructions that follow to configure the scripts on your Mac.
Enable and Attach Folder Actions
Before you can use folder action scripts, you must enable the system-wide Folder Actions capability if you haven’t previously done so, and attach a particular script to the folder where your incoming scans are stored. Follow these steps:
- Right-click (Control-click) on the folder where your scanner stores new scans (see Set the Destination, earlier in this chapter), and from the contextual menu that appears, choose Services > Folder Actions Setup. Folder Actions Setup opens.
- In the dialog that appears, select the script you want to use, such as OCR This (PDFpen & PDFpenPro), and click Attach. (Although you can attach multiple AppleScripts to a single folder, I don’t recommend it. Pick a single script, and if need be, you can return to this dialog and change it later.)
- Make sure Enable Folder Actions is checked at the top of the Folder Actions Setup window. Your window should look something like Figure 5.
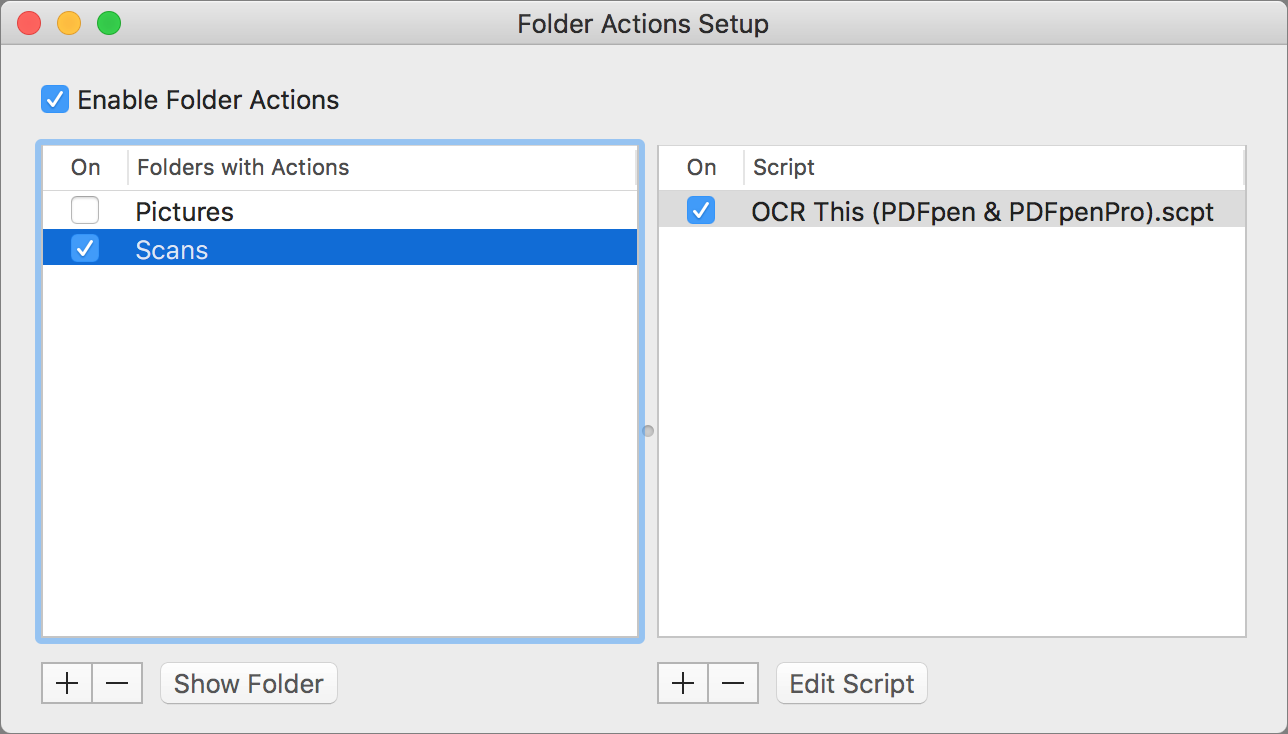
Figure 5: You’re looking for approximately this end result (folder and script names may differ) after configuring Folder Actions. - Quit Folder Actions Setup.
Use a Folder Action Script
You’re almost ready to go, but it’s best to tweak a setting or two for optimal behavior in your OCR app of choice, and to understand exactly what to expect of the scripts.
Acrobat Scripts
As I lamented earlier, Acrobat XI Pro is immune to this sort of scripting; however, if you’re running the newer Acrobat Pro DC, or if you’re still running an earlier version of Acrobat Pro (7, 8, 9, or X), you can use a folder action—but only after you’ve performed a slightly odd one-time procedure to prepare it for OCR.
In Acrobat Pro DC:
- Open a PDF file (any file at all, as long as it does not already have searchable text).
- If you see a dialog like Figure 6 about reading untagged documents, leave everything set at its default and select “Do not show this dialog again. Use the settings from the Reading Preferences.” Then click Start.
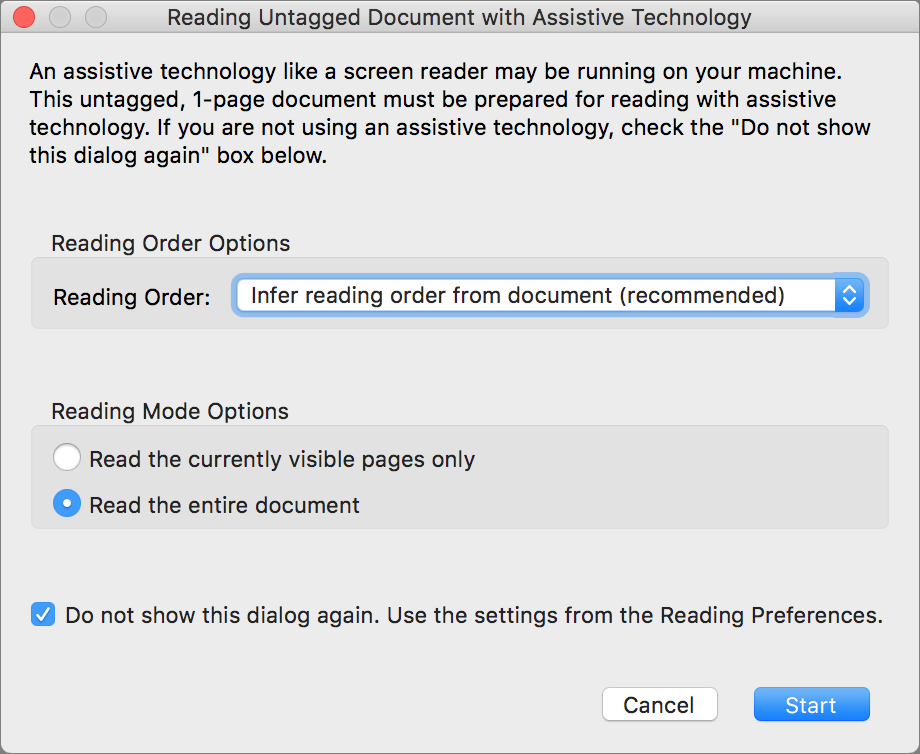
Figure 6: If this dialog appears, your best bet is usually to accept the defaults, check the box at the bottom, and click Start. - If the Tools Pane is not already visible on the right side of the window, choose View > Show/Hide > Tools Pane.
- On the Tools Pane, click Enhance Scans.
- From the Recognize Text pop-up menu on the Enhance Scans toolbar, choose In This File.
- Click Settings on the new toolbar that appears beneath the Enhance Scans toolbar.
- In the dialog that appears (Figure 7), make sure the main language of your documents—for readers in North America, most likely English (US)—is chosen in the Document Language pop-up menu. Choose Searchable Image (Exact) from the Output pop-up menu to use ClearScan (although read Pick a Mac OCR Package for information on the ClearScan feature).
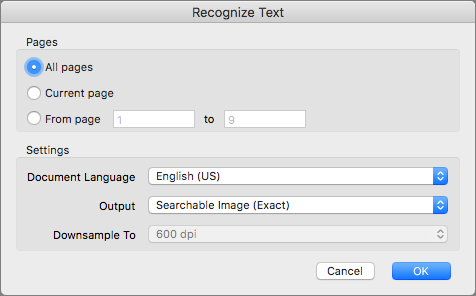
Figure 7: By setting Output to “Searchable Image (Exact)” here, you tell Acrobat Pro to use ClearScan. - Click OK to close the dialog, and then click the X on the right side of the Enhance Scans toolbar to close it.
- On the Tools Pane, click Edit PDF. The Edit PDF toolbar appears, along with a different sidebar in place of the Tools Pane. In this new sidebar, click Settings under Scanned Documents.
- In the dialog that appears (Figure 8), leave “Use available system font” deselected, and then select “Make all the pages editable,” which is deselected by default. Then click OK.
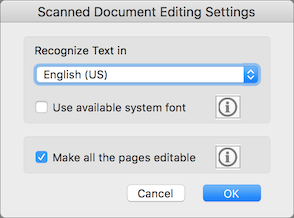
Figure 8: Here’s where you tell Acrobat Pro DC to recognize all pages in scanned documents. - Close the PDF file you opened in Step 1.
In Acrobat Pro X or earlier:
- Open a PDF file (any file at all).
- Choose the appropriate Recognize Text command:
- Acrobat X Pro: Click Tools > Recognize Text > In This File.
- Acrobat Pro 8 or 9: Choose Document > OCR Text Recognition > Recognize Text Using OCR.
- Acrobat Pro or Standard 7: Choose Document > Recognize Text Using OCR > Start.
- Click Edit. In the dialog that appears, make sure the main language of your documents—such as English (US)—is chosen in the Primary OCR Language pop-up menu. Choose Searchable Image (Exact) from the PDF Output Style pop-up menu (although read Pick a Mac OCR Package for information on the ClearScan option).
- Click OK to close the Settings dialog, and then click Cancel (yes, Cancel) to dismiss the Recognize Text dialog.
- Close the PDF file you opened in Step 1.
Try the script:
Now you’re ready to try out the script—either by scanning a document or by dragging an existing scanned image into the folder to which the AppleScript is attached. I provide two different Acrobat scripts. Both work with Acrobat Standard version 7 and Acrobat Pro versions 7, 8, 9, X, and DC, but they have slightly different behaviors:
- OCR This (Acrobat): This script causes Acrobat Pro DC and versions of Acrobat prior to X to recognize the text in PDF documents and then save the file (with the existing name, in the existing location) and close it with no need for interaction at all. For Acrobat X Pro only, it does this by running the “OCR This” Action (see the sidebar ahead), after first adding the Action if necessary.
- OCR This (Acrobat) with Save As: This script causes Acrobat Pro DC and versions of Acrobat prior to X to recognize the text and then prompt you to enter a name and select a location; after saving the file, the script instructs Acrobat to close the window. (There may be a very brief delay before the window closes.) For Acrobat X Pro only, it does this by running the “OCR This” Action (see the sidebar ahead), after first adding the Action if necessary. With this script, the original file remains in the folder to which you’ve attached the folder action; you can later delete it manually if you like.
I’ve also included a third script, contributed by reader Johannes Meller, which is entirely optional and works in conjunction with the “OCR This (Acrobat) with Save As” script, or indeed any arrangement in which the processed PDFs are moved to a new folder but the original, unprocessed PDFs are left behind in the folder that receives incoming scans. The script is called “Delete OCR’d Documents,” and its purpose is to look for new files appearing in a destination folder (that is, the place you’ll choose when you use the Save As command) and then delete the original, unsearchable PDF from the folder where it appeared originally. To use this script, first edit it in Script Editor to include the full path of your source folder. Then attach the script as a folder action to your destination folder.
PDFpen Script
The OCR This (PDFpen & PDFpenPro) script works with either version of the PDFpen software (version 5 or later), without requiring any modification. However, for best results I suggest making one small change in PDFpen’s settings before using the script:
- Choose either PDFpen > Preferences or PDFpenPro > Preferences.
- Click OCR.
- Uncheck the “Prompt for OCR when opening a scanned document” checkbox.
This last step may seem counterintuitive, but if you leave that box checked, then whenever the script runs automatically on a newly scanned document, PDFpen will display a dialog asking if you want to perform OCR on it. That isn’t actually a problem—the script still works—but there’ll be a delay of a few seconds, and that dialog (and the beep that sounds when it appears) may be distracting.
Once PDFpen is configured, scan a document (or drop an already-scanned document into your designated scans folder) to try the script.
Readiris Script
The Readiris script was created with version 16 of the app. I can’t guarantee how well the script or setup instructions will work with older or newer versions.
Before using the OCR This (Readiris) script, open Readiris and set it up as follows:
- Choose Settings > Export Options >Destination. Make sure the File radio button is selected.
- Still in the Export Options dialog, click PDF Options. Choose Image-Text from the Type pop-up menu, and uncheck the “Create bookmarks” and “Embed fonts” checkboxes if they’re checked. Leave the other settings in this dialog as they are, and click OK.
- Choose Settings > Save Settings, select a destination, and click Save. (That way, these settings should stick when you use Readiris again.)
When a new PDF file appears in the folder to which you’ve attached the script, Readiris opens the file, recognizes the text in it, and saves it as a PDF; it prompts you to enter a name and select a location. In some situations, you may also have to click OK, when the document first opens, to confirm that you want to recognize text in all its pages. (Unfortunately, because of Readiris’s poor AppleScript support, I was unable to find a good way to avoid this need for interaction.)
ABBYY FineReader Express Script
Reader Marius Vaarkamp kindly contributed a script, based on the ones I wrote for Acrobat Pro, PDFpen, and Readiris, that works with ABBYY FineReader Express. (Although FineReader Express has been superseded by FineReader Pro, the former was bundled with a number of scanners and is still commonly in use.)
The script requires no preliminary setup, but Marius notes that when it runs, it replaces the original PDFs with the searchable versions, and that it sets the Finder to hide file extensions after it runs.
Extend Folder Action Scripts
The scripts I’ve provided are all fairly simple, but depending on your needs, preferences, and willingness to tinker with AppleScript, you could enhance them to do other things.
Here are a few ideas:
- Prompt you to name each PDF (if the script doesn’t already do so).
- Save the searchable PDF to a different folder—for example, a network volume—and delete the original bitmap.
- Send the PDF to a colleague by email.
- Use one of the Services built into macOS to summarize the text.
- Use an online translation tool to translate the text into another language.
- Speak the recognized text out loud using text-to-speech.