Section 1: Before the Prop Turns
Getting the Basics Under Your Belt

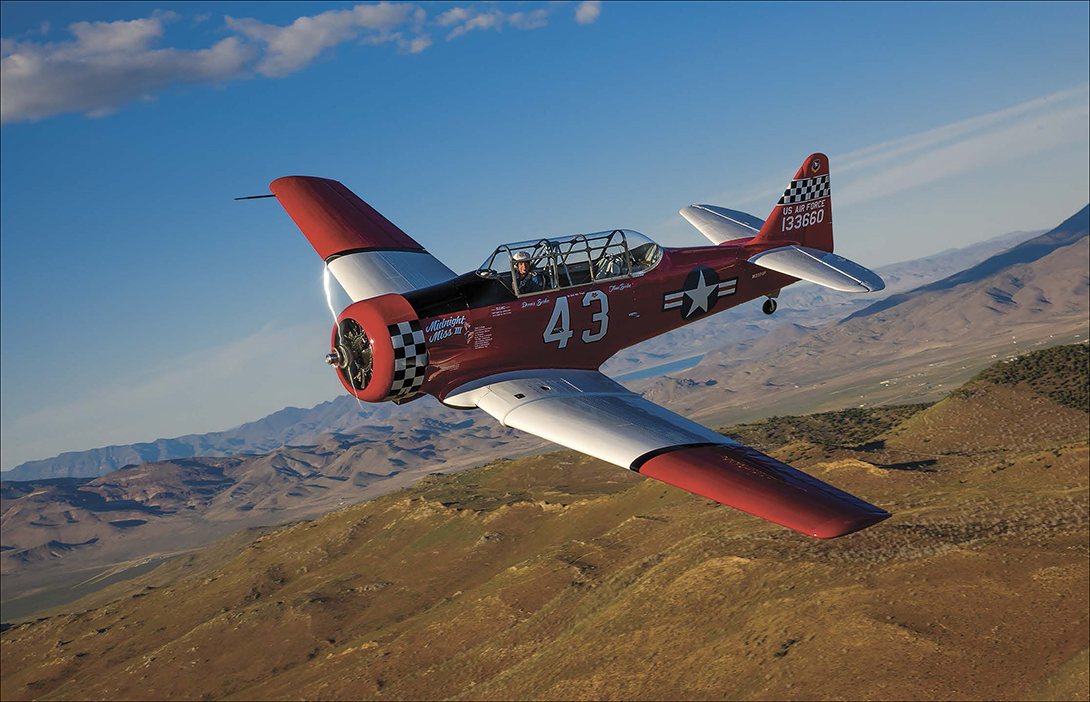
My very first air-to-air: AT-6 Texan Midnight Rendezvous | Shutter Speed: 1/250 sec
There is nothing more glamorous in photography, more challenging, adrenaline-pumping, scary, or romantic than the air-to-air photo mission! With just over a hundred air-to-air photo missions logged in slightly over six years, you could honestly say I’m hooked. As you might imagine, though, you just can’t walk up to a pilot or plane and shoot an air-to-air photo mission. Personally, it took me more than two years of really working the genre before I got my first opportunity to shoot air-to-air. And man, did I make mistakes that first time out, but survived to do better and better. As soon as that prop turns, the money is burning up. As my good friend, Flyboy, likes to remind me, “It takes three things to fly: money, money, money.” Making the most of every opportunity aviation photography can bring, we must start with the basics and that means starting on the ground.
It Started Out of the Blue for Me
It was the best breakfast place we’d been to in a long time. After the morning shoot, the DLWS (Digital Landscape Workshop Series) staff always craves good food and great coffee, and this place in Crescent City, CA, served it up by the plateful! My good friend, Scott Diussa from NPS (Nikon Professional Services), was with us this week and sitting across from me. We were chatting about this or that when he brought up the Reno Air Races. It was something my wife Sharon and I had wanted to do for a long time, but never had. And, the embarrassing thing was, it’s just three hours from our home, so we had no good reason for not going.
Well, Scott said that Nikon would be at PRS (the Pylon Racing Seminar, sponsored by the Reno Air Racing Association) in June. I said, “Gee, can I come?” Scott said he didn’t know why not and asked if I’d be willing to volunteer and help photographers. The D3 had just been introduced and, since I had one, I could spread the word. In return, I would get credentials, which otherwise I could not obtain. So, I said of course I would help. It was a date!
June came around and Sharon, our son Brent, and I were at Stead Airport in this small back room—the Media Ops Center—with the Nikon folks and gear. Simply the nicest group of volunteers and photographers! You would never know we were new or strangers. We were made to feel right at home, and the ropes were explained to us (though, at the time, it was all Greek). The best part: no one seemed to know who Moose Peterson was, so I was free to do my thing for the first day or so.
With absolutely no clue about what I was really doing, I got in a vehicle, like I was told to do, and we drove out to the pylons. I was to help folks with their Nikon questions in the field. The pylons (a telephone pole with a white trash can on top) are what the racers navigate around as they circle the course. With media credentials, we were afforded access to certain pylons as the aircraft circled the course.
AT-6 Texan Midnight Miss III
We parked out in the middle of the sage, got out of the vehicles, and like a beehive that’s been broken open, all the photographers scattered. “Draw a line between the pylons and don’t go outside of that line” was the first instruction I got. Then, the call went out, “They’re up!” as the Formula One Class took to the air for their first practice lap. When that first little, white Formula One Class plane went ripping by, just a hundred feet away from us, I was hooked! The sight, sound, looking up and seeing the pilot in the viewfinder—it was a magic I cannot put into words. I hadn’t made a single click, hadn’t even put the camera to my eye, and I was hooked! This was the start of my aviation photography.
Where Do I Recommend You Start?!
Air shows! Learn camera and aircraft basics at air shows! In all honesty, you could go out and get yourself a Nikon D500 and the 200–500mm lens, hit all the air shows, and make great photographs. You don’t need to read any further—that’s it in a nutshell. And, in my heart of hearts, that’s where I started and the most solid advice I can give. But (and you knew this was coming), there is so much more to aviation photography than air shows and great single photographs, especially if you want to get in the air with the aircraft and photograph them one-on-one. Even more, if you want to do more than one air-to-air. You’ll want to do them over and over and over again because once you experience the adrenaline rush, you can’t get enough. So then, if that’s your goal, and much more, you can’t stop reading here—you need all the trivia I have to share. With that being the case, before you get to that first air show, you want to be prepared because there is the real possibility that from that air show, great opportunities will come. So, on to the photography basics you need to take to that first air show.
Terms of Engagement
Aviation, and aviation photography, has all sorts of terms and acronyms—some of them you should learn and others you do not need to concern yourself about. For example, an airport is most often referred to by its indicator. One where I do a lot of work is KMOT in Minot, ND. You might know some, like DEN or LAX for Denver and Los Angeles International airports (the K is missing because the fixed VOR [VHF omni-directional range] is not at the airport, but close by). Then there is the actual method of saying DEN over the radio, which uses a phonetic alphabet for letters and numbers (Delta Echo November = DEN = Denver International Airport), and there are NATO and international versions of this!
There is VFR (visual flight rules), IFR (instrument flight rules), and AGL (above ground level). GA (general aviation) and GS (ground speed). And, in aviation photography, we use terms like statics (planes parked), ground-to-air (shooting aircraft in flight overhead), air-to-air (photographing planes from other planes), photo platform, and so much more. How much of this do you need to memorize and embrace?
Interestingly, AOPA (the Aircraft Owners and Pilots Association) has also put out a list of suspicious behavior for members to be on the watch for when detecting possible terrorist activities at airports. Some of the items on this list could apply to eager, new aviation photographers, like anyone who misuses aviation lingo or seems too eager to use all the lingo, or people or groups determined to keep to themselves, or anyone unfamiliar with aviation procedures—you get the idea.
Spending time memorizing all of what I call “pilot talk” is not required. You will pick up terms as you go along, and when a term is used you don’t understand, you ask—you’ll do just fine. Just understand these acronyms are used a lot by pilots to make communication clear and quick, which is so important. Don’t be afraid to ask what something means. Just be aware and open-minded to learning some new lingo.
BODY BASICS: The Fun Comes with the Autofocus
Let’s get this covered right from the start because it is really essential: I’m a Nikon shooter, so some of what I talk about will be Nikon-centric. That by no means implies that your only option is one brand, far from it. What it does mean is that you will have to do some translating for a couple of settings, but a shutter speed is a shutter speed, light is light, and a P-51D Mustang is a P-51D Mustang, no matter what camera you might shoot. So with that out of the way, let’s get back to a real important basic for aviation photography: autofocus.
The goal is really simple: remove every possible variable in the photographic process, so we concentrate on the subject and the storytelling and nothing else. Our autofocus is essential in not only making the image, but having a ton of fun in the process. When you’re out on a hot tarmac, arms and back tired from standing and shooting for hours, having an autofocus system you can depend on, makes the shooting fun, and makes everything else fade away.
Quick Brief
You want the best autofocus system? You gotta buy the latest camera body, and then keep the firmware versions up to date.
The autofocus system in the Nikon D5 and D500 has moved the ball forward, actually making some shots so simple that you’d have had to work at just a short time ago! This evolution doesn’t make up for basic, proper hand-holding (neither does VR/IS) or panning, but it makes these techniques, when used properly, produce the tack, tack, tack sharp images that get you in that plane for air-to-air photography.
With that in mind, there are two AF modes I depend on in my aviation photography: for any aircraft that is static or taxiing, I use Group-area AF; and for any aircraft in the air, I use Auto-area AF. It’s that cut-and-dried in my aviation photography. Why? The Group-area AF has five AF sensors active in a plus-sign arrangement (using all aspects of Dynamic-area AF). These five sensors make it fast and quick to lock onto specific areas of a subject, so you can use depth of field to tell your story. They work this way whether the aircraft is static or taxiing. As soon as the aircraft takes to the skies, the D5 (my principle body) is switched to Auto-area AF—this is true for ground-to-air or air-to-air photography. Auto-area AF, or what I call AAA, turns the entire viewfinder into one, big, giant, ultra-fast AF sensor. This works beautifully whether there is a single aircraft or a formation! One other aspect of Auto-area AF is that it activates “closest subject priority.” This means, when photographing a formation, the closest aircraft in the formation is what it will lock onto.
What if this is all Greek to you, whether you own a Nikon or not? You need to break out your camera’s instruction book and figure out if you have these AF modes, and if you do, how to activate them. Or, if you don’t have them, which AF modes you do have that will work for you. Then, once you have done that, you need to practice using them on subjects that are close at hand. Great practice subjects are automobiles, parked or moving. They are large and move in a somewhat predictable pattern. The time to learn which AF mode to use, or how they work, is not when you’re with aircraft. That’s when you want to make photographs.
What do you do if you don’t have a Nikon, or a newer Nikon? Let’s say you have a Canon. Most of the Canon shooters with newer bodies use AI Servo, as I understand it. At this time, Canon doesn’t have an AF system that is equivalent to Nikon’s in the D5/D500, but there are lots of successful Canon aviation photographers. Speed is everything when focusing on a moving subject, so I still use an old technique even with modern AF. In the days of manual focus, in order to be fast, we would prefocus on an object at the same distance we expected our subject to be. With this done, when you throw the camera up to your eye, the subject is close to being in focus and only requires a quick tweak to make it tack sharp. Whether that tweak is done manually or with autofocus, it’s the fastest focus you can achieve.

Douglas A-1E Skyraider
The vast majority of the time, our #1 problem in getting things sharp is acquiring the subject—the finding and tracking of the aircraft in the viewfinder. When we put our camera to our eye, if the subject is out of focus, it is hard to find, track, and then focus on it. This delay can mean missing the shot. If we prefocus our lens to the approximate distance where we think it will be, it solves a whole lot of problems quickly. If the lens is already close to the right focus point from the get-go, even with autofocus, the whole system reacts and works faster. So, even though I’m shooting with the D5, I still do this “manual prefocus” technique as it makes the photographer and the system respond to the action a whole lot quicker!
Quick Brief
Aperture priority is for planes, when their props are static, and jets, static or flying; shutter priority is for when plane props are turning.
Then There Are Exposure Modes
In aviation photography, we tend to use aperture priority and shutter priority exposure modes. They work with the same speed and accuracy as we want to obtain from our autofocus. Aperture priority is where you select the aperture and the camera selects the corresponding shutter speed for the best exposure (there is more to it than this; it’s coming). For the vast majority of our photography, we want control of the depth of field (DOF). This is a key component to our storytelling—the depth of focus in front of and behind the place we focused the lens. This mode gives you control over that and selects the correct shutter speed, based on the ISO and exposure compensation you have dialed in, the fastest. One key aspect of aperture priority is the shutter speeds are stepless. Stepless shutter speeds means the camera can select not only those shutter speeds you are familiar with, like 1/125, 1/15, 1/1000, but also 1/102, 1/21, 1/867, or any other single speed from 30sec to 1/18000. This gives you incredible control over the exposure using the speed of the computer!
Shutter priority operates the opposite of aperture priority: you select the shutter speed you want and the camera then selects the correct aperture. This is a mode you use when controlling the shutter speed is essential in making the image. It is normally used when you want to either freeze or blur a moving subject and depth of field isn’t critical because of the movement in the frame.
Why and how you might want to use these two exposure modes comes a little bit later in the book. But, understanding how they work, along with where to find them on your camera body is important. These are exposure modes you will switch back and forth from all day long while photographing aviation. Camera bodies can often be customized to make changing exposure modes fast and seamless. Look at your camera body instruction book and see if you can customize your body to make this transition as seamless as possible.
Then There Is Exposure Itself
No matter if it’s a bird, person, flower, rock, or plane, exposure is how we communicate the emotion and/or mood in our photograph! You will read over and over again in this book about bringing out the romance in your aviation photography. That concept when shooting metal might seem really strange, but I think it’s very important to photographic success. Just how do you go about doing that?
You gotta start by knowing and understanding how to change your exposure. By shooting in either of the exposure modes, aperture or shutter priority, you can bias the computer to your exposure liking by dialing in exposure compensation. There is typically a +/- button on the top of your camera body that, when you depress it and rotate a dial, lets you add or subtract exposure. This is plus/minus or over/under exposure (depending on the age of the photographer ![]() ). In most modern cameras, you can program or reprogram the buttons and dials to speed up this process. You might want to experiment with hardware, customizing for exposure comp, because along with focusing, exposure is something you wanna do fast and then not think about it, so you can concentrate on the subject.
). In most modern cameras, you can program or reprogram the buttons and dials to speed up this process. You might want to experiment with hardware, customizing for exposure comp, because along with focusing, exposure is something you wanna do fast and then not think about it, so you can concentrate on the subject.
Quick Brief
Shooting with multiple camera bodies? Make sure they all work the same way for exposure compensation, as in you push the same basic button and rotate the dial the same direction.
There is more than one effect and benefit that dialing in exposure compensation can have on your photograph. The first is the most obvious: the lightening or darkening of your image. I want to encourage you not to strive to get the perfect, technical exposure, but rather the perfect, emotional exposure. What’s the difference? In the first approach, you might look at a histogram for confirmation you’re exposing perfectly. In the second, you look for an emotional response to confirm you’re exposing perfectly. For most, this is a real challenge. Let’s look at a few photos to understand the difference.
On a gorgeous fall morning in Maine, a Cub is parked, preflighted and ready for takeoff. We have three photographs: +1, “correct,” and –1 exposures. You, the photographer, must make the call and say which exposure is the best. Best is not a correct or incorrect graph answer; best is a “which exposure tells the story best” answer. Which exposure tells the story of the misty fall morning and an aircraft ready to shake the bounds of gravity? There is a different emotional response to these three different images, and that’s what I want you to tap into. The overexposure is 1 stop brighter than the normal and 2 stops brighter than the underexposure. If you didn’t have the other two as a reference, you might think, while bright, it’s acceptable. You were there to experience the crispness in the air, the color of the light, and we weren’t. How do you bring that tangible experience into a still photograph? That answer is exposure and how you start bringing romance to your aviation work. Let’s look at each image individually and analyze their attributes.
If we look at the +1 overexposed photograph, what’s your first overall impression of the photograph? Cover the other two photographs and really look at the photograph—not as a photographer, but as the plane owner who got up early to preflight the Cub to take it for a flight over the fall color of Maine. Do you feel the early morning dew and chill, does the overall feel make it feel like it was worth your time to get up early and go through all of that? Does the yellow of the Cub look cheery and ready to fly? What is the emotional response to this exposure?
Let’s flip to the other side to the –1 underexposure image. Again, what’s your overall impression of this photograph? And again, cover up the other two photographs and look at the Cub like you just parked it on that grass. As you pushed it up to the ramp, you felt the chill as you made sure it was parked just right. You walk away from that Cub to put some items back in the hangar, you turn around to look at the Cub, and you see that glint of the morning sun on the fuselage. You know it’s going to be a good morning fly!

1 stop underexposed

1 stop overexposed

“Correct” exposure
J3C-65 Piper Cub
Okay, we’re going to head to the middle image now, the technically perfect exposure. Look back at the Cub now, then look back at the Cub in the other two photographs. What is your emotional response to it and the morning? Is the dew still on the grass, the chill in the air, romance to the fall color in the distance? Your answers to all the questions to these three images are your answers just like it’s your photography! Your response to the photographs is how you should use exposure. Understanding the pilot’s response, your response, and the story you feel and the one you want to tell all goes into the “perfect” exposure.
All these possibilities, options, are at your fingertips. The exposure compensation button is your magical tool that can quickly, radically, and skillfully take your aviation photography (all photography) to a totally different plane. I’m constantly asked what’s the secret to my aviation photography, making it so successful. You just read it, and now it’s yours to make work in your photography.
When in shutter priority mode, with exposure comp dialed in, the aperture is used to change the exposure. This is unlike aperture priority mode, where the shutter speed is altered. This means in shutter priority and with exposure comp, you could be increasing or decreasing your depth of field to achieve that change in exposure. This might be an issue as the light level sinks with the sun and you run out of aperture. Or it’s a problem if you need a certain f-stop for the amount of DOF desired. You, the photographer, have to make the call where you make the compromise to make the photograph happen (raising the ISO is an option if you’re running out of depth of field). I’m just planting the seed and encouraging you to think of exposure and emotion—record the mood by using this simple tool.
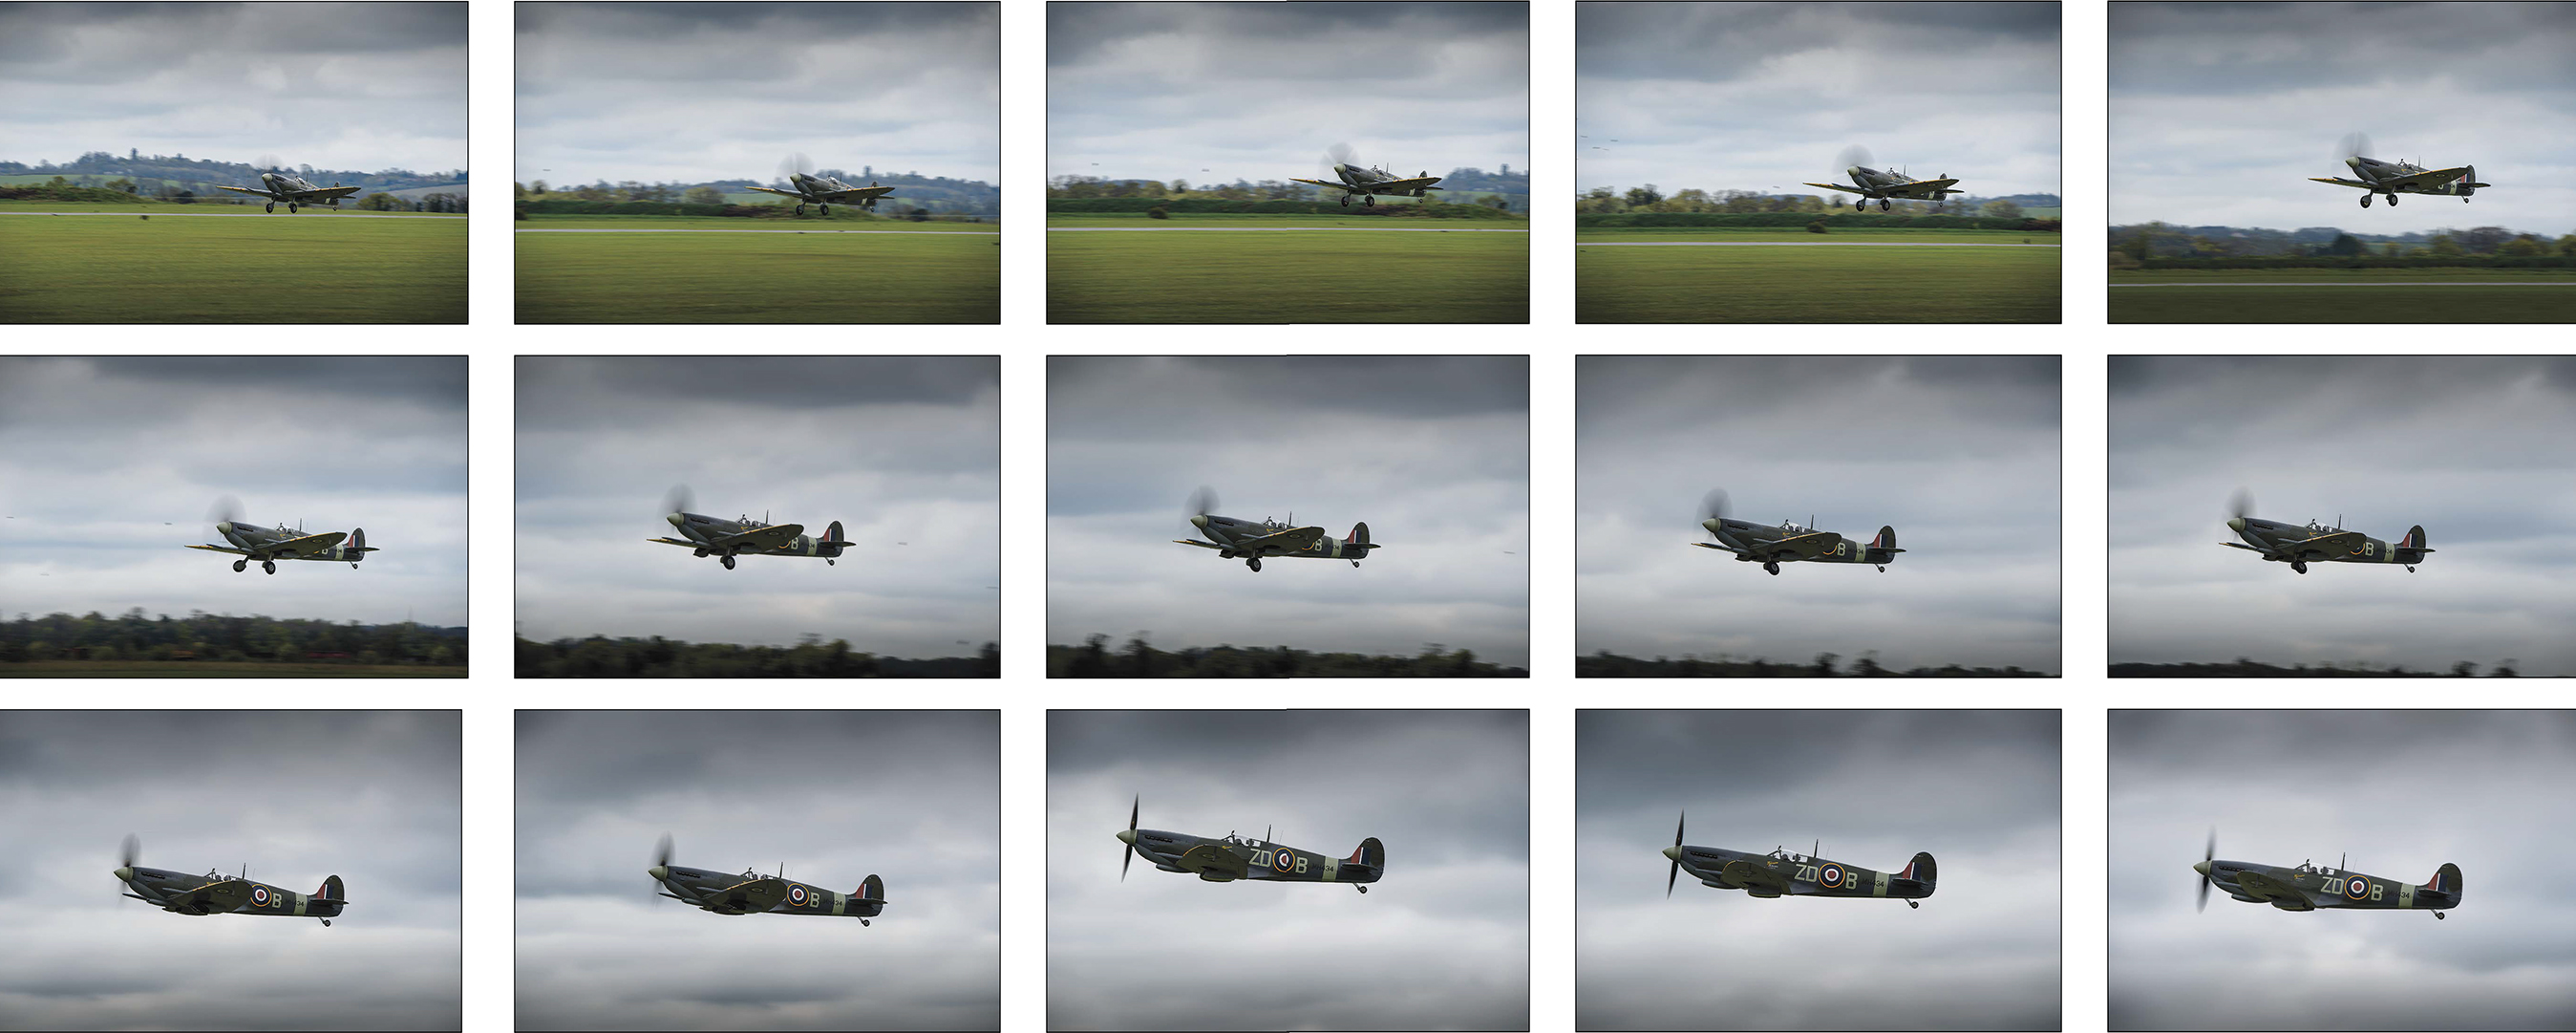
The Need for Speed
Frames per second (FPS)—the number of photographs a camera body can take in one second—is something you’ve gotta consider when thinking aviation camera body. This is in connection with the buffer the camera has to hold those frames per second. These two features can affect how you shoot as long as you understand the hows and whys. There are two options I’d like you to ponder: sniper mode and astro blast. Both are techniques accommodating different skill levels, FPS, the buffer, and making the photograph.
Sniper mode is where you take just one click to make the photo. Whether you’re shooting static, ground-to-air, or air-to-air, this approach means it doesn’t matter what your camera body’s FPS or buffer might be, you get the shot with one click. You might be wondering if this actually works. The majority of the photographs we enjoy from the ’60s and ’70s were taken just this way. They used techniques you should use: peak of action (the split second when objects are at rest even though they are moving), subject prediction, and those already mentioned and to come—the bottom line is they work. For years, I shot aviation with the Nikon D3x, a camera with a 1.8FPS. That means it fires 1.8 frames per second, where the D5 shoots 12FPS. But the D3x produced a gorgeous file. It was a sacrifice in the slow FPS (and corresponding buffer that moves the images captured to the CF card), but produced amazing images. Sniper mode was essential with the D3x to make the most of each capture and the limited buffer. A majority of the images in this book were taken with the D3x. If you think you don’t have a camera with a fast enough FPS, you have options that work! What’s the flip side? Astro blasting.
Grab a D5, and you will hear the difference in a heartbeat. The D5, with 12FPS and buffer of 200 images—there is just nothing like it! What’s the advantage of this speed and space? You don’t have to watch for peak of action or predict where you think the subject will be with the perfect background. You simply astro blast and let the law of averages work for you (planned luck). What’s astro blast? You hold down the shutter release and just let the camera rip; the motor drive goes until there is no more buffer. The sound is great, the feel is incredible, and the final image usually is amazing!
Whether you shoot sniper mode or astro blast, you can maximize the performance of your body to work the best for you. Every camera body, even from the same manufacturer, has its own unique set of settings to maximize its AF performance with the FPS. For example, my D5 has the following settings to maximize its performance: Custom Setting a1 AF-C priority selection>Focus + release and a3 Focus tracking with lock-on>Blocked shot AF response>2>Subject motion>center. If you don’t have a D5, these settings might not mean a thing, not even in your body. But, there are others and you need to explore them, learn them, exploit them, so you can get the shot. What you’re looking for is the fastest, consistent AF performance. If you don’t know what that is for your particular body, test! Program in a setting and then try to photograph a bicycle or motorcycle ripping by on the street. The setting(s) that gives you the best percentage of sharp images might be the one(s) you want to start with when photographing planes in flight.
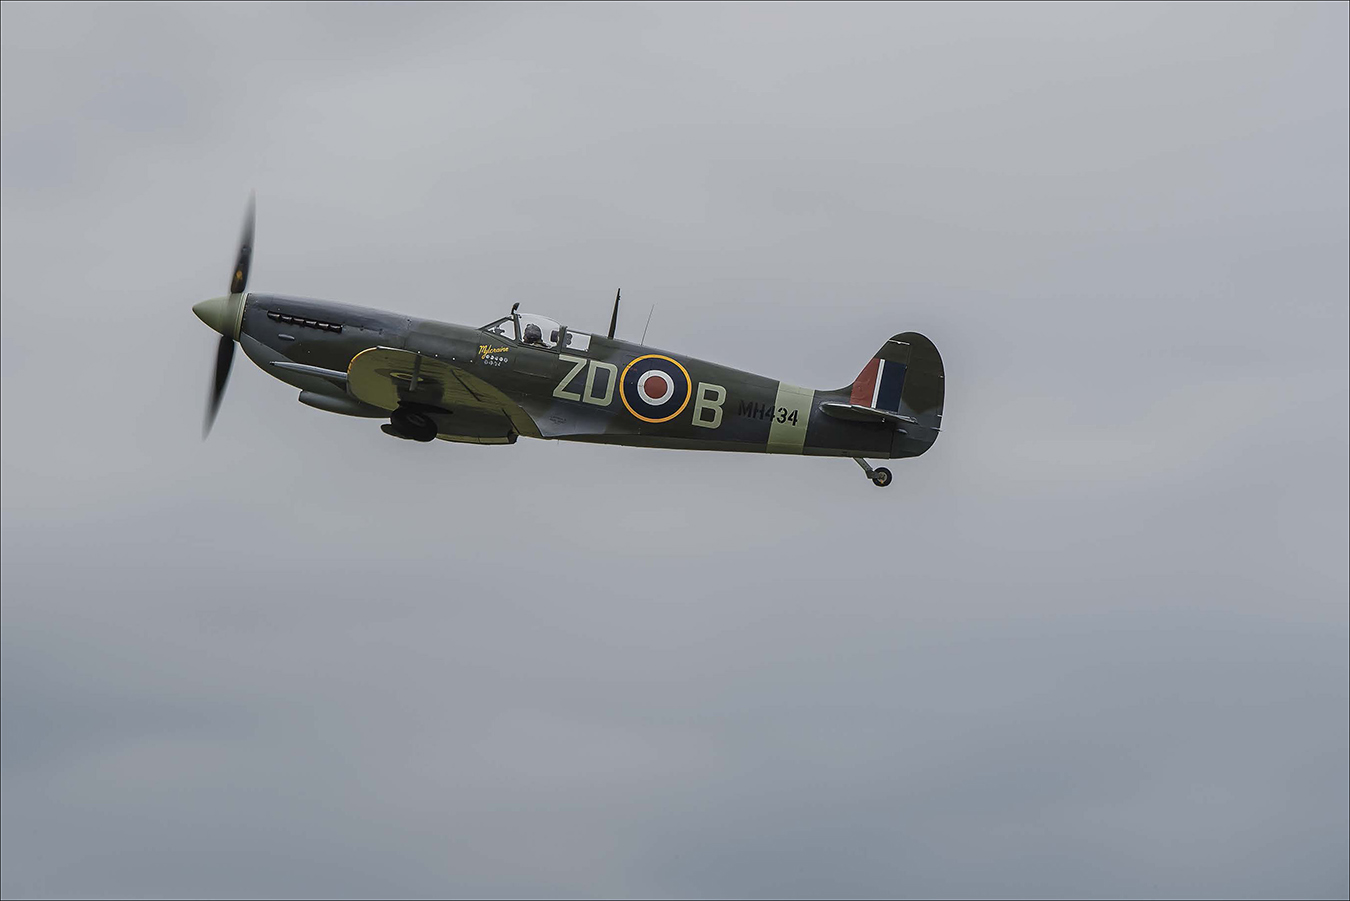
Spitfire V Mk. IXb
Spitfire V Mk. IXb

Spitfire V Mk. IXb
How are FPS and AF operations linked? In just about every way you can imagine, and then some. While not always true, you can summarize that the faster the FPS of a body, the faster the AF performance will be. When you want the fastest AF, acquire a body with the fastest FPS, after you’ve done some homework on stats.
One last thought on speed: The D5/D500 brought with them a new evolution in XQD card write speeds. Canon has made the leap with CFast. Prior to that, most camera bodies were stuck at 32x speed. When the guy next to you has to stop shooting because his buffer is full, and you have a D5/D500, you can keep on shooting. That’s food for thought.
Quick Brief
Again, keep your firmware for your cameras up to date. Manufacturers often improve AF operation in firmware updates, though not listed as such with the firmware.
Those Damn Dust Spots!
Dust spots, no matter the body, manufacturer, or setting to self-clean the sensor, are part of aviation photography. There are times when you’ll think your whole sensor has been sneezed on by a cow! And when you shoot in shutter priority, and your aperture is smaller than f/16, each small piece of dust is the size of an iceberg and as dark as a black hole. These facts mean you’ve gotta learn how to clean your sensor while understanding that as soon as it’s clean, it will be dirty again.
I have a video on my YouTube channel (youtube.com/MoosePeterson) that goes through cleaning your sensor—I mostly use the VisibleDust swab system to deal with dust. It works great at the beginning of the day and before you head up for an air-to-air. I’ve run into many photographers afraid of cleaning their sensor. And, while it’s true you can deal with it in post more easily now than ever before, it’s still time you’re spending at the computer and not behind the camera.
Quick Brief
Keeping your gear and yourself “clean” around aircraft can be a challenge. I carry, in my sling bag, Nikon Lens Wipes (you can find them on Amazon) and Fast Orange Wipes (25-count pack; also on Amazon). The lens wipes are for cleaning off all the surfaces of the gear, and the wipes are for cleaning the oil off your hands so it doesn’t get on your gear. This is important. You will read this Quick Brief more than once!
Here’s the key to dealing with sensor dust: timing! You have to plan your sensor cleaning so it fits in with your workflow and field requirements. When you first arrive at a location, travel tends to vibrate our gear, causing dust to appear, even if it just came from the factory. One of the first things I do when I arrive on a location from traveling is to check my sensor for dust. Every night after a day of shooting, I check my sensor for dust. And, every time I’m going to an air-to-air shoot, I check my sensor. Shooting all morning and changing lenses a few times on the flight line, dust is sure to arrive. This dust is not just what you might think is floating around in the air, but from inside the lens that might vibrate into the mirror box. Just being behind an aircraft when its prop turns can gain you a spot or two. If you think you’re going to be pointing your camera up toward blue sky, shooting for a long period, and you’ve experienced any of these situations, it’s time to check the sensor. If not, it might not be time to worry about it.
I see too many photographers spending too much time in the wrong locations in the field trying to clean their sensor. If you can’t check and clean your sensor in a location with no breeze, like indoors (cars don’t count as indoors), you might just live with whatever dust problem you think you have. I see folks pop off their lens on the flight line, grab a blower, and blow off their sensor in the hopes of fixing the problem. That don’t work either. There are portable sensor loops that, along with the VisibleDust swab system, are an effective tool in the field, but just think location, location, location. One new aid in this dust plague came with the D5/D500. You can run the Clean Image Sensor option multiple times until the option grays out. I have found doing this does make a difference. No, it’s not perfect, but the bigger icebergs floating about on my sensor do disappear and that helps.
More than once on the flight line, a photographer has come up to me in a panic saying, “Look inside my viewfinder! See that dust, I can’t clean it off!” Any dust you see in the viewfinder is not on the sensor, but up in the viewfinder. In time, any dust on your mirror or screen can migrate to your sensor, but directly, it will not be in your photograph. Same with dust on your front element. Personally, I have filters on all my filters because airports/aircraft simply aren’t clean environments. I’ll never forget the one time, after coming back from a shoot, putting my 80–400 VR II out on the counter standing up vertically. The next day, there was an oil puddle, literally, on the counter! Without that filter, that oil would have been blown into the lens and what a mess that would have been. Since I have to replace my filters nearly annually because of all the micro scratches, I know their protection is essential.

B-17G Sentimental Journey
Ah, the Glass
Aviation photography is one of the very few genres of photography I know of where glass doesn’t necessarily gain you the upper hand. You can be a very successful aviation photographer with just one lens: the 70–200mm. A prime example of this is this photo of the B-17G Sentimental Journey at the Sioux Falls Airshow. The photo was taken at 200mm, and that’s way back on the static line, not even standing at the flight line 300 yards closer. That’s the reason I think aviation photography has become so popular of late (the sex appeal and speed don’t hurt either. And then, there’s the romance of flight, but I’m getting off point). It’s just not gear-intensive to be really, really successful. The problem is, we’re photographers and we can never have just one lens, one body. So then, which ones to get?
When I’m asked by photographers going out to buy a lens just for aviation, “What lens should I buy,” I have a basic answer: any lens with a focal length (prime or effective) of 300mm in it is the perfect place to start—a great lens if you’re going to go with just one. You might have a Nikon 300mm f/4 PF prime on a D5 or 200mm f/4 AF-S on the D500 (300mm effective), both are killer lenses for aviation. Both are light, fast, and tack sharp, which is the combination you want to look for. You might have an 80–400mm—that zoom contains 300mm in it and is a great starting point. You might have the Nikon 70–300mm AF-S, 28–300mm AF-S, or 18–300mm AF-S—again, fast focusing, light, sharp lenses with 300mm. For planes in flight, 300mm will render a good image size from the distances you’ll normally be at an air show. This is the place to start.
Do you need a fast 300mm lens? Is a 300mm f/2.8 better than a 300mm f/4 or f/5.6? Unless you want limited DOF, generally it doesn’t matter as you’re shooting planes in flight in shutter priority with the lens closed down. What might matter is that the f/2.8 is a much heavier lens (and more expensive) than the f/4. After a long day of shooting at an air show, your arm might be a whole lot happier with the weight of the f/4. If we can’t live with just one lens, or you want to add to this, what’s next?
Really, the sky’s the limit, but I would recommend something in the wide-angle zoom category first off. You’ll hear me say over and over again in this book, statics and prints are your ticket to success. In photographing statics, you have lots of options here, and you should go with what serves your style of photography the best. Lenses in the range of 14mm through 35mm are a great starting point. They are great lenses for everything from arse shots to working with pilot portraits. If you are thinking about moving your aviation photography further in the future, into air-to-air, and want to buy just one lens, you want to consider a lens in the 24–70mm range, like the 24–70mm itself. When it comes to aviation photography, this is probably my most-used lens.
From there, where might you go? You have lots of gear options and, in large part, the selection comes down to you, your storytelling, and how much you want to carry with you—both in general, and at one time. I would suggest going even wider and then longer. How wide? The 16mm fisheye is a really common lens amongst aviation photographers. You might be saying to yourself, “fisheye?” It serves many purposes, with most of them taking advantage of that “fisheye look.” Really, longer than 300mm? You bet! You might get a converter to make that 300mm reach further or you might go to 400mm or 500mm or even longer. You rarely, if ever, see someone shooting stills at an air show with a tripod. It’s all hand-held work, so keep that in mind.
My Aviation Gear List
With all of that said, let’s cut to the chase. Here’s an ideal list of the gear I take with me whenever I set out to do aviation photography (we’ll also look at a condensed list in Section 4). All of this gear, and more, travels in the Think Tank Airport AirStream or International (carry-on) and the Logistics Manager (in the belly of the plane). Keep in mind, this should be considered the extreme or the ultimate want list. I’ve been doing this for a long time, which means I have lots of gear. It’s not the must-have gear list.
» Nikon D5
» Nikon D500
» AF-S NIKKOR 200–400mm f/4 VR II lens
» AF-S NIKKOR 70–200mm f/4 VR lens
» AF-S NIKKOR 105mm f/1.4 lens
» AF-S NIKKOR 24–70mm f/2.8 VR lens
» AF-S NIKKOR 24mm f/1.4 lens
» AF-S NIKKOR 14–24mm f/2.8 or AF-S NIKKOR 18–35mm f/3.5–4.5 lens (depending on weight)
» AF-S Fisheye NIKKOR 8–15mm lens
» Nikon TC-14E III Teleconverter
» Nikon SB-5000 Speedlight
» Nikon 67mm & 82mm Circular Polarizers
» Lexar 128 GB 2933x XQD cards
» Vulture Strap
» Pilot Portrait Project Lights
Profoto B1 500 Flash
Profoto Octa RF Softbox 5’
Profoto Softbox RF 1x3’
Profoto Softbox RF 2x3’
Profoto B2 Off-Camera Flash
Profoto OCF Octa Softbox 2’ with grid
Profoto OCF Softbox 1x3’ with grid
Profoto OCF Softbox 1.3x1.3’ with grid
» Light Stands
While all of this gear goes with me to the air show, air races, or air-to-air shoot, not all of this gear is with me when I’m actually shooting. Sun, walking, and shooting will beat you down over the course of the day chasing planes, so minimizing the gear you carry makes a huge difference. You might think that the roller bag is the way to go—just roll it along the tarmac all day. That is an option, but not one I would recommend. If the lens you need is in your roller bag, the odds of getting it out fast enough when you need it are slim. And, you’re working in crowds—let go of that handle to shoot and your concentration is somewhere else. While I’ve never heard of a theft, I’d hate for you to be the first.
There are lots of options for traveling light and prepared. You can walk with two bodies with two lenses strapped to your body, and you’ll be good to go. You might walk with just one body with the one lens and commit to that combo for the day. That’s actually not a bad idea. My preference is a combination of the two: Using the Mountainsmith Day Lumbar Pack as a sling bag (with optional strap, so it rides on the back), I carry the 70–200, 24–70, 14–24 or 18–35, and 8–15 fisheye with a flash, plus a bottle of water and business cards. I then have the 200–400 VR II with D5 attached on my shoulder using a Nikon AN-SBR2 BlackRapid Quick-Draw Strap. This combination has served me well from the beginning, permitting flexibility, speed, and comfort for a full day on the flight line with the full ability to tell the story. A great test of your system is walking Oshkosh all day. If you survive that and get the images you want, you’ve found the perfect system for you!
What about the rest of the gear on my list when I’m out shooting? This will frighten many, but it’s in the truck waiting for its turn to be used. Yes, theft is a possibility, but knock on wood, I’ve never had that issue at any event. You will have to make that call for yourself—I’m just telling you what I do.
Some Specialized Gear for Your Consideration
There is some specialized gear you might not consider that I want to bring to your attention. While my list includes specific brands, there are the same basic items made by other manufacturers that will serve the same purpose just as well.
The camera strap can be a life saver, as you walk an air show all day. Whatever you pick, make sure that it permits you to quickly bring the camera up to your eye, while securing it from all the knocks and bangs you experience walking through a crowd. I prefer the Nikon AN-SBR2, which incorporates a safety strap between the main strap and lens. This strap goes around your neck and shoulder, which prevents the 200–400 VR II and D5 from accidently being knocked off my shoulder while walking around. At the same time, you can easily and quickly swing the entire rig up to your eye to shoot without having to remove any strap.
One thing you find yourself doing a lot with aircraft is shooting from a low angle. Shooting up on a static aircraft brings another whole level of visual power to your photograph. You’re often going to be doing this in lower light levels, taking advantage of the dramatic light. There are lots of ground tripods out there and my preference is the Really Right Stuff Ground-Level Tripod. This tripod can go down to nearly ground level and up to about 18”. If you get sore knees, like me, kneeling on blacktop, be sure to include a pair of kneepads along with the tripod.
Quick Brief
Knowledge of the aircraft and event will get your photography farther than a bag of gear.
Video is becoming very common and popular now. We can shoot video easily with our HDSLR bodies, but you might want to consider expanding on that. You could start with a simple mic. I carry the Nikon ME-W1 bluetooth mic and the Rode Stereo VideoMic X because you simply can’t go cheap on sound. In addition to your HDSLR, you might want auxiliary video cameras, like the KeyMission. These little video cameras are great at capturing 1080p/4k at 360 degrees, and they can be attached anywhere, from your head to your camera barrel or the wing of an aircraft.
Lastly, I want to pass along one very useful piece of advice I received when I was just starting out: get a logbook! These are used by pilots to log their flights. Keeping notes of aircraft, pilots, airports, projects, and other shoot information is vital in this business. We’re not going flying per se, but the information we keep track of can come in really handy over time. Rather than getting an “old-fashioned” paper logbook or just a pad of paper or a Word file, I got the LogTen Pro X app for the iPhone, iPad, or Mac. I like it better because it’s always with me—always! Personally, I have a really hard time remembering names, specific dates, and places, so I’ve always written this information down. With LogTen Pro X, it’s very easy to look up information. The really important info comes from those times when you do air-to-air. You need to know times of wheels-up, wheels-down, planes, and pilots. This is important information for those times when you write captions and articles.
And, there’s the one piece of specialized gear I’d recommend to you: an iPad. You will quickly find that pilots/plane owners love great photography and nothing shows off photography better than an iPad. At the same time, I haven’t met a pilot who didn’t own an iPad. This common ground can make photographs happen better and faster than the most expensive lens. And, the combination of all the useful apps available, like Adobe Photoshop Fix, Mix, or Express, or Lightroom Mobile, gives you the ability to work on the flight line. You can finish that image, and then with something as simple as AirDrop or email, instantly share your image with a pilot. But, this doesn’t supersede putting a print in their hand!
Is That All?
It is for now, but there’s much more to come. With the basics under our belt, we can move forward, applying them as needed and expanding upon when warranted. Master these, and you’ll always have a fall back when things go wrong, and sorry to say, that does happen at times. When you have the best-suited gear for your photography, know it well, and can apply it, photography just gets easier and the results sweeter!