6. Shooting Tips from the Pros
One of the aspects of photography that makes it so interesting and that keeps us engaged over a lifetime is that there is just so much to learn. Digital has made photography much more accessible due to the instantaneous feedback it provides, but digital has also brought additional layers of complexity as well as new tools to learn. I have to assume that you wouldn’t be holding this book if you weren’t already holding a camera, but that simple fact alone doesn’t tell me much about what you already know about photography, or which photographic paths you want to follow. My primary focus in this book is to help you build a foundation for success in microstock, while helping you overcome many of the stumbling blocks encountered by all those who have gone before you. I simply cannot teach you everything you need to know about shooting every type of subject under every set of conditions.
However, there are shooting skills and knowledge—such as the importance of getting a proper exposure; how to use your camera’s built-in computer to help analyze exposure; and knowing the important tasks required before, during, and after any type of photo shoot you encounter—that will continue to build that foundation. In addition, I want to expose you to some of the most successful microstock contributors I know. There are contributor profiles throughout every chapter of the book that provide excellent tips, but for this chapter I dug a little deeper with seven top contributors, whose combined lifetime download total is nearly 1.5 million, to get some of the shooting tips that have served them well along the way.
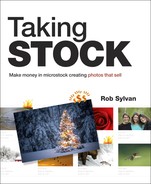
Figure 6.1. Photographer. © Joan Vicent Cantó Roig
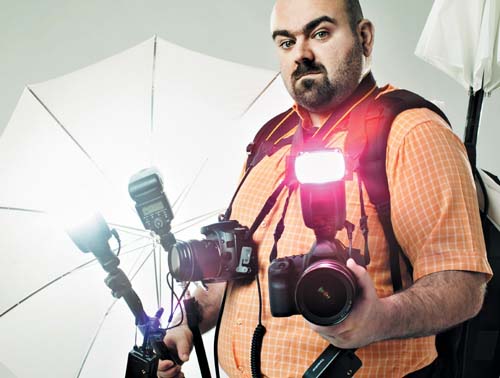
Figure 6.2. Marshmallow toasting. The image conveys a sense of fellowship of youth spirit in a positive way. It is taken from the visual perspective that makes the viewer feel like a part of the scene. There is a suggestion of people in the scene, but the girls’ faces are blurred with a very shallow depth of field to suggest the background. The background is important but functions with the fire as an integrated composition.
Nancy Louie

What is your background in photography?
I grew up with a darkroom in my basement and began developing my own film and prints when I was 10 years old. This was abandoned until I was a sophomore in art school when I took formal classes for a year and a half.
Go-to photo gear?
D700 and multiple speedlights.
Most essential gear beyond the camera?
A flash or two, with a method of diffusion.
What do you wish you knew when you started?
That Photoshop was used very differently by photographers than it is by designers. I also learned that the camera takes the image, but it’s the photographer who makes it.
Favorite stock subject, and why?
People. It’s always been people in all shapes and forms. I like relating to people and the interaction that yields results in depictions.
Snapshot of your workflow?
Shoot, offload to an external hard drive, and backup to DVDs or a second hard drive. Then I import into Lightroom with minimal keywording and perform minor tonal and white balance adjustments. If I see problematic interpretations in the RAW conversions in Lightroom, I will convert the images in Capture NX2 to note differences. All images are processed in Photoshop after initial RAW conversion. If logos need to be removed, it’s done in Photoshop.
Tips for working with models?
After making suggestions to the model(s), listen to their input. I think you’d be surprised at what they come up with. It cements the importance of working with a model in a collaborative way if you can integrate. If they trust you, they will relax. Watch their movements carefully. They will often slip into a natural pose that’s best for their depiction because they are relaxed. There’s an art to what I call the “posed candid.” If you connect to the model(s) that comes through in the results to the audience.
Strategies for coming up with concepts?
Immerse yourself in everyday living. I watch very little TV but always note commercials and look at my junk mail. I also keep a notebook. This is a great tool for setting goals, expanding ideas, and getting things on paper for those times when I’m unable to shoot. Ideas should not be tied to just the present.
Tips for shooting in urban environments?
I’ve found that the best time to shoot in a city is the very early morning on a Sunday. There is kinder light, and less traffic and people. Make sure you have enough light since tall buildings in a city often block light. If you are using artificial lighting, choose angles where it won’t reflect in street-level windows.
Any last bit of wisdom to share?
Learn the technical side of your gear so you understand its limitations. You can’t push something if you don’t know where the boundaries fall. Rules are made to be broken, but you really need to know what they are before you can break them. You can’t repeat success if you don’t know what you did to obtain it.
The Importance of Good Exposure
Focus and exposure, if done poorly, are two factors that almost always guarantee rejection. Either a shot is in focus or it is not, and when it is not, the only recourse is to refocus and reshoot.
When it comes to exposure, it is not as clear-cut because of what is possible to adjust in post-production. While it is true that when shooting in RAW mode (and to a much lesser extent in JPEG mode) you have a bit of latitude to correct minor exposure problems (which we’ll cover in Chapter 8), it is also true that the greater the corrections needed to fix exposure in post-production, the more likely you are to increase the visibility of noise or simply end up with a very overprocessed-looking photo. Remember, image inspectors are going to evaluate your photos at 100 percent (or 1:1 view), which is much less forgiving of technical flaws than you may be on your own screen.
Why give yourself less material to work with if you don’t have to? Nailing a proper exposure is really all about capturing as much of the data as possible in a given scene. The light metering capabilities of digital cameras continue to improve, but it is still up to the human operator to evaluate the exposure of each capture.
Reading the Histogram
Every digital camera is also a computer. One of the functions of your computer-camera is to arrange all the pixels in a given capture according to their brightness levels, from shadows (black) to highlights (white), and display them in a graph, called the histogram (Figure 6.3), that makes it easy to see at a glance on the camera’s LCD screen where the majority of the brightness values happen to be, and where there aren’t any at all. The distribution of these brightness values is called the tonal range. When used in conjunction with the actual captured photo, the histogram can help us evaluate if we exposed that scene in such a way as to have avoided losing any important data. Understanding the nature of the histogram now will also help when you see it later in your image editing software.
Figure 6.3. The histogram displays the pixels in your photo arranged from darkest on the left to brightest on the right.

Note
It is important to know that the in-camera histogram is based on the in-camera settings used to create a JPEG even if you are shooting in RAW mode.
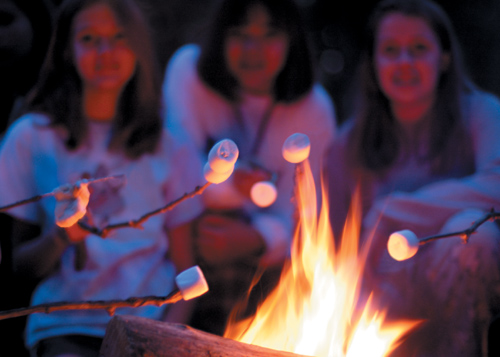
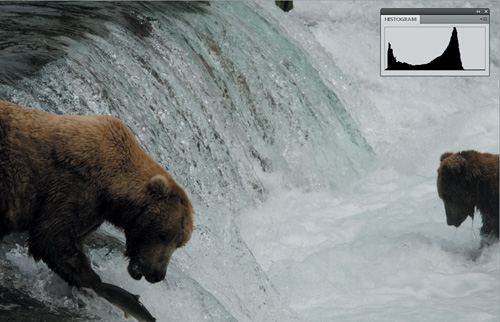
There is no single good histogram for all scenes, and the goal is not to get the best-looking histogram. The goal is always to maximize the capture of the important visual data in the scene. Let’s look at some examples. Here are three photos, taken within a span of two minutes, along with the histogram for each. This is a scene where due to the partly cloudy sky and fast-moving clouds, the intensity of the light was changing quickly. The first photo (Figure 6.4) is overexposed and potentially has lost a lot, if not all, detail in the brightest highlights of the water. Notice how its histogram shows the highest number of brightness levels stacked up against the right edge, and almost no brightness levels on the left edge.
Figure 6.4. This photo is overexposed and potentially losing highlight detail. The histogram is stacked up on the right edge.
Note
You may need to consult the manual on this one if you don’t know how to find the histogram on your camera.
In the second photo (Figure 6.5), I attempted to change my exposure settings to prevent overexposure, but went a little too far, and the result is slightly underexposed. Notice how the entire tonal range shifted to the left, pulling completely away from the right edge.
Figure 6.5. This photo is slightly underexposed. The highlight detail is captured, but recovering detail in the darker areas is likely to make existing noise more visible.
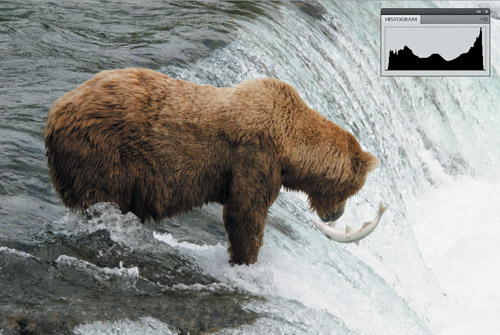
In the third photo (Figure 6.6), I readjusted my exposure settings. The light cooperated by not changing, and I was able to produce an exposure that was just right. By “just right” I mean the tonal range is distributed across the entire histogram, showing pixels in the shadows, midtones, and highlights, and while there are peaks in the highlight area of the graph, this is to be expected due to the amount of white water in the scene. I am fairly confident from looking at both the photo in Figure 6.6 and its histogram together that I can recover all important highlight data that may appear at first to be lost, while still retaining nice detail in the midtones and shadows, and overall good contrast.
Figure 6.6. This photo is properly exposed for the scene. Highlight data is recoverable, and the wide distribution of tones across the histogram suggests adequate data at all brightness levels.
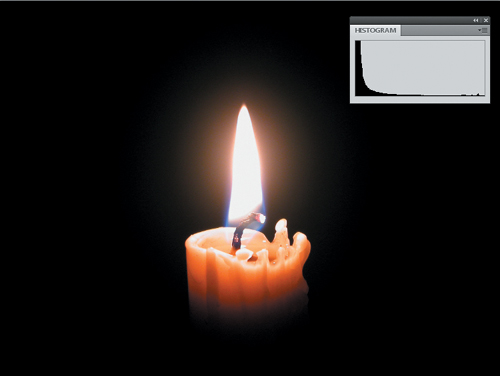
Some photos, because of the subject matter, will have a histogram that weighs heavily toward one end or the other of the tonal range without it being wrong. For example, the photo (Figure 6.7) of a single candle flame in an otherwise dark room has a histogram completely stacked up against the left edge (dark room), with just a tiny thin peak of a spike on the right (candle flame). That is the correct exposure for that scene. Similarly, you would expect that a photo of a small black ball on a pure white background would have most of its brightness levels stacked up on the right side (white background), with a small peak on the left (black ball). The detail in the photo is what matters most, and the histogram is just a tool to help you evaluate that when all you have is a small camera LCD screen, and the time to shoot is now.
Figure 6.7. It is expected that a scene composed almost entirely of black regions would have a histogram stacked to the left.
Highlight Clipping Warning
In addition to the histogram, most digital cameras have a highlight clipping warning indication mode, commonly called the blinkies, because when it is turned on, any blown-out highlight area within the photo will blink on the LCD screen. I often find myself using this indicator first, and if there is no blinking and the photo otherwise looks well exposed, I’ll just keep on shooting. At the first sign of blinking in an important highlight area, I’ll switch to the histogram to try to evaluate if the overexposure is too great. For example, if you are shooting a scene that contains a highly reflective surface, like a chrome bumper, then you would expect to see some blown highlights in any reflections of the light source. However, if you are seeing that the white shirt of your subject is blinking then you need to evaluate the situation and change your exposure settings accordingly to preserve that important detail.
Note
As with histograms, you may need to consult the manual for your particular camera on highlight clipping warning as well.
The key point to keep in mind when shooting is that if you nail focus and exposure, and can create a compelling and useful composition, then you’ve got a keeper on your hands, and that is what it is all about. It is always in your best interests to start with the best-quality capture possible, and not just hope you can fix it later in post-processing.
Figure 6.8. Game Playing. The colors complement each other while the background swirl draws your eye to the subject. It’s simple and to the point but still shows energy and good framing, allowing your eye to flow through the whole photo.

Joshua Blake

What is your background in photography?
I did take a home college course on photography while on tour in my performing group, but never really had hands-on training like I needed. It did teach me how to develop film and how the camera works, but that was also just as digital was becoming popular, and digital was definitely what I was more interested in. Most of what I’ve learned, I’ve got to credit to iStockphoto members and forums and, well, just by doing it.
Most essential gear beyond the camera?
I really love the studio lights. I work best with controlled lighting. I do enjoy working with reflectors and natural lighting outside as well, but I’m not as comfortable with them as I am in the studio.
Favorite stock subject, and why?
People playing characters! I love making “roles” for people and being crazy. People smiling are nice and OK, but if they are dramatic or theatrical in some way it is much more fun to work with and create. I love themed shots because it just makes things more fun to work with and shoot.
Advice for shooting self-portraits?
It depends on your camera and timer. My first camera had a flip screen and remote control where you could see the shot as you were in the shot so you could correct it, but if your camera does not have a way to do this, use something about the same height you are (hat rack, ladder, etc.) and place it about where you’ll be standing. Focus on it and set the timer, quickly hop into the shot (moving the object out of the way), and hope for the best! It doesn’t always work out, but eventually, you’ll get it right.
White background tips?
It seems like it should be simple, but getting the lighting right is a challenge sometimes on white. Don’t overexpose or go too bright with your lighting. I found you can always brighten up the exposure later in Photoshop or other editing software if you are unsure or just can’t get it right, but when things are blown out from the start, it’s really tough getting those details back in without reshooting.
How do you come up with concepts?
Look around you, listen to the gossip, find out what’s hot in up-and-coming themes that people will be talking about and needing news about. When there’s a story, they usually need images to support that story or theme. So find out what people need and then when you come up with an idea, try to think of a different and new way to look at that concept. That’ll make you stand out from the rest because it will be different. It doesn’t always have to be a new concept, though. You can do a very common concept all over again if you have a completely different way of looking at it.
Tips for working with models?
Don’t be afraid to tell models what you are looking for from them. They want a good shot just as much as you do. Show them what you see on the digital display on your camera. Let them see what they look like so they know what needs to be changed.
Any last bit of wisdom to share?
Just keep it clean and simple. Let your image tell the story and don’t confuse your audience. Let them see the point, easily.
Figure 6.9. Doctors Checking Test Results. There’s a variety of ethnicities and ages, but nothing that is inappropriate. There’s real concern in the expressions. Also, the “investment” in reality works: the X-ray in the wall box, the image on the monitor—these things just don’t magically appear on shoot day.

Sean Locke

What is your background in photography?
My father used to travel internationally for his work and was always shooting slide film in countries like Pakistan, India, and China. Mostly he shot street images, just to document his travels, and we had a lot of slide shows at home. So, it was inevitable that eventually I’d get my own camera. I was in a pretty large high school that had a lot of elective classes, one of which was photography. We did get to develop the negatives and print black-and-white photos. Basic camera knowledge and terms like “dodge” and “burn” come from that class. Otherwise, my “training” is from reading the manuals, reading forums, experimenting, and a couple of books, like Light: Science and Magic by Fil Hunter, Steven Biver, and Paul Fuqua (Focal Press).
Go-to photo gear?
Canon 5dMk2, Canon 70-200 2.8 IS, 4 Alien Bees for in studio, or a 48" reflector outside.
Most essential gear beyond the camera?
Definitely Photoshop. There’s always a logo popping up, or lint on a coat, or something. You can plan and plan, but things happen.
What do you wish you knew when you started?
You have to spend money to make money. I picked that up pretty quickly, though, when I got my first set of strobes very soon after I started to shoot with stock creation in mind.
Favorite stock subject, and why?
I really enjoy working with models. I like setting up for people shoots, directing the models, trying to get emotive responses to the setup, and then seeing them eventually used in an ad or article. The models seem to have a great time with it as well. It helps (I think) that I don’t intentionally create themes that could lead to uncomfortable situations, either in subject matter, posing, or which models are working together.
Snapshot of your workflow?
I shoot in the studio or on location in RAW, then transfer images from cards to a portable hard drive as needed. I transfer all content from shoot to an external hard drive when I’m done. Finally, I work through folders, previewing in Adobe Camera Raw (setting white balance, etc.) and then do final processing on my best images in Photoshop.
Tips for working with models?
Set the scene with a good description of the “theme” and the situation they are in, so they understand how they are supposed to react. It also helps if the models know each other, either by being friends or having been shot together previously.
One important thing you do before shooting?
Make sure I have plenty of flash cards ready to hold the content. Even though I copy the images to a portable hard drive as I go, I don’t want to overwrite anything until I confirm everything is there.
One important thing you do at the end of shooting day?
Turn off my Pocket Wizards (remote flash triggers) so I don’t waste another set of AA batteries!
Top Tips for Your Next Photo Shoot
There’s nothing wrong with a photo shoot that consists of simply grabbing your camera and walking out the door, but there are a number of ways to increase the chances of creating stock-worthy content, regardless of the subject matter. Put a little more thought and effort into each stage in the process, from preparing for the shoot, to the actual shooting day, and all the tasks needed at the end to wrap up successfully.
Get Ready
Over the years, I’ve noticed that one of the biggest factors that separates the pros from the rest is how much work the pros do before they even pick up the camera. Here are five tips to help you get to the top of your game:
- Create a shoot list.
This is all about pre-visualizing the themes, concepts, and ideas you want to communicate in your photos from a given shoot. Some people go so far as to create storyboards, which are a series of sketches that depict all the scenes they want to capture. I asked Josh Blake (profiled on page 78) about about his practice. “I usually draw a few hand sketches of what I’m looking for in the shoot. I also write down the main shots that I know I want to get for sure, otherwise I get so wrapped up in the shot, and getting the lighting right, and changing props/costumes/makeup, that I forget to get that one shot that I was really thinking would look cool if I tried,” he says.
Kelly Cline (profiled on page 90) adds, “It really helps to keep the shoot on track which maximizes the potential volume of output and usefulness of a particular item. This is especially true with food, since food has a tendency to have a very short life in front of the camera before it starts to droop, congeal, or wither. You really have to do everything you can to maximize your time.”
- Communicate with your models and team members well in advance.
I know that for most of us, photography can be a one-person operation most of the time. As you grow and want to reach the next level, it’s likely going to involve more people in the form of models, stylists (for food, people, animals, and even objects), and assistants. In those cases, be sure to send out multiple emails in advance of the shoot to provide information on the dates, times, locations, and requirements for a given shoot. Sean Locke (profiled on page 80), who works almost exclusively with models these days, says, “I make sure to send out several emails before the shoot, reminding them of the date/time, and what they are supposed to bring/wear. I also include the model release with the email, so they can get it signed ahead of time.”
- Scout the location.
When you first have a concept or a theme in mind, it may require a specific location to make it work. Give yourself plenty of time to explore your surroundings and find that perfect spot, and get permission if needed. The location could be just the ingredient to add the level of authenticity to your shoot that puts it head and shoulders above the competition. Once you’ve got a location nailed down, be sure to pay it another visit a few days before the shoot to make sure nothing has changed that can affect your goals. Nancy Louie (profiled earlier in this chapter) had this excellent advice to offer: “Look immediately for problems. I note large mirrors or highly reflective areas or large objects that cannot be moved. Look for adequate space for the angles you want to shoot, and that there is room for the type of lighting you will use. I always try to scout at the time of day that I’d be shooting for both indoors and out. Always look for the electric outlet locations in the space.”
- Assemble the gear.
In the 24 hours before the actual shoot, you want to use your shoot list to help gather all the gear you are going to need to get those shots, with that location in mind. This is the time to check that batteries are charged, memory cards are formatted, additional fresh batteries are on hand, and you have the specific camera body, tripod, stands, lenses, and lighting tools your shoot list requires. Do you have a backup camera body? Maybe not at the start of your career, but the next time you upgrade your camera, hold on to the old one as a backup. Make a checklist of all the gear you need, and check it twice. This list will serve as a reminder when you return, and check all the gear back in.
- Reset the camera settings to a neutral state.
I’m sure that like me, you are using your camera for all sorts of subjects and conditions. Hopefully, you are even experimenting and trying new things. Be sure to add in the pre-production step of loading your camera with a fresh battery and memory card, and firing a few test shots the night before. Check all your key camera settings, such as your ISO, white balance, metering mode, and image quality. Heaven forbid there is a technical problem with the gear, but better to know now than when you are on location.
Wrap it up with a good night’s sleep so you are at your freshest mental state, which should help reduce simple mistakes and oversights on shooting day.
Figure 6.10. Mother and daughter. Happy family concepts are really popular; you can use this type of image for almost any market. I’ve seen this image on video software packaging and on an air conditioner ad. This was shot with daylight.

Katja Govorushchenko

What is your background in photography?
I’m not formally trained. My dad tried to get me closer to photography when I was very young. I liked it, but never thought to continue the development beyond travel snapshots. Eventually, I started to seriously play around with my husband’s film SLR in 2004, and became dedicated to finishing and understanding everything in its manual. From there, I decided to make portraits of family members, and that’s how all started.
What do you wish you knew when you started?
You know, you do photography because you already have something to tell, so basically, at any point that you start, you know enough. The rest is a matter of reading manuals and understanding commerce. I wish I knew more about importance of a good model and a good concept, instead of counting megapixels available on the market.
Favorite stock subject, and why?
Beauty visuals with women. I’ve always been fascinated with fashion and beautiful faces. I like dressing models up and indulging their vanity by making images absolutely perfect. I love working in girly teams. It is certainly more fun than shooting any other subject on your own.
How do you come up with concepts?
Shooting fashion has a lot to do with understanding women. Inspiration usually comes from my everyday activities as a woman. Even on the most dolled-up image, you still want to connect to women, so you’ve got to think—what are women busy with? What are their activities? Their hopes and their fears? As it turns out, makeup artists, hairstylists, or fashion stylists you work with already have a concept when they start working on a model. My task as the photographer is just to put their idea in the right light (literally).
Snapshot of your workflow?
I shoot on several flash cards. After a shoot, I copy everything to my hard drive, make selections, and throw away failed images. Processing always starts in a RAW editor, where I can fix overall lighting and colors. After that, I go to Photoshop and do a retouching on a working TIFF file, always in 16 bit. Then I save two versions of JPEG: large one for the stock website, and a small one for my personal site and to give to my models.
Tips for working with models?
Respect people you work with. All other things will grow naturally from it. A photographer should make his model a part of the process and inspire her. Make sure you communicate all terms to your models, related to licensing, model release, and copyright. When you work with people from non-professional environments, it is different in terms of communicating your ideas and especially in terms of making arrangements. Most disappointments I’ve heard from photographers come from mismatched expectations and careless deal making.
White background tips?
There are various types of white backgrounds available. The simplest is white wall. In my home, I use a 2.5-meter-wide paper roll, and sometimes I use a projection screen. Usually, you want your background completely white. Use a separate soft light source intended for background only. Usually, it’s two sources, from left and right. It is up to you to allow fall-off onto your subject, but if you don’t want it, make sure that the subject/model is far enough from the background and is not touched by that rear light.
Any last bit of wisdom to share?
Feel the freedom that stock photography gives you as an artist, as well as a commercial photographer. Don’t feel intimidated by anything or anyone. Follow your own path and find a subject or a style you can’t get out of your head: this will most probably become your signature and your success. Never stop learning and being critical.
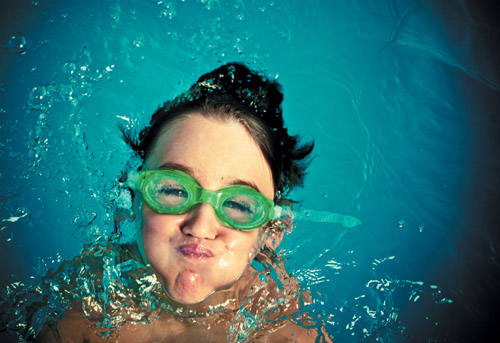
Figure 6.11. Kid Having a Good Time in the Pool. This was not planned. I was testing new remote flash triggers. This was the best shot of the day because I was pre-focusing. I tried to replicate the shot, but I never got the same happy expression. I guess luck is one of a photographer’s best friends.
Roberto A. Sanchez

What is your background in photography?
I’m a graphic designer. I worked as an art director in Sweden, but I am now a creative director in Miami. I have no background in photography, except for the experience I’ve gathered working with photographers. I have been using Photoshop as my main retouching tool over the last 15 years in the business. All I have learned is self-taught.
Canon 5d Mk2 with Canon 24-70mm 2.8, 70-200mm f4, TS 90mm 2.8, and 135mm f2 lenses. Two Alien Bees strobes with beauty dishes, one Softlighter 60-inch umbrella, and the Apollo 28-inch soft-box.
Most essential gear beyond the camera?
Lightroom, Nik Color Efex, and Photoshop.
What do you wish you knew when you started?
Don’t be afraid of working with models.
Favorite stock subject, and why?
People using weird props. The amazing possibilities that people give you—movement, feelings, expressions, poses—are endless.
Snapshot of your workflow?
I think of a concept or situation, then get props, model, and location. I shoot like a maniac—hundreds of photos—and then I bring them into Lightroom and do a lot of processing. Next is Photoshop for final retouching of each keeper image (most of the time using Nik Color Efex Pro), and after that, I upload to the site.
Tips for working with models?
I think it is good to be an easygoing person, show them respect, and act with confidence so they respect you. Most of the time I do work with my family and friends, which is easier for the level of comfort it gives you.
Any tips for a white background?
I love to shoot objects on white background. For a clear object, I like to surround it with black pieces of board (almost like a black box), and illuminate from behind with a bare-bulb flash, plus a frontal high soft light for fill. It produces very cool results.
How do you come up with concepts?
I think this comes from life experience. I’m very fortunate: I have been reading books since I was 5 years old. I’m an also a movie fanatic, and listen to music all the time. For me, it is about keeping your senses in action all of the time. Read facts, fiction, and novels, as they are your best friends.
Any last bit of stock photography wisdom to share?
Experiment with lights. Use continuous light, natural light, strobes, LED, and candles. Don’t be afraid to crank up your ISO with modern cameras.
Day of the Shoot
Starting this day fresh, with all your prep work done, is going to help you get the most in terms of quality and quantity when it comes time to shoot. Here are five more tips to help you take it to the next level:
- Double-check your gear before you walk out the door.
If you did your homework the night before, then this should be a quick confirmation that everything is as it should be. This is just too important to not take the extra five minutes to make sure you did in fact put the camera back in the bag after checking all the settings. Don’t forget your shoot list either.
- Prepare the scene.
You did the scouting, so you know right where to go. Whether it is just you and the great outdoors, or you’ve got a dozen models showing up in half an hour, take the time now to clear away distractions and set the stage. This is also a good time to be thinking about alternative options. Kelly Cline told me that she is always “making sure that I have a ‘Plan B’ in the event that an idea does not pan out or proves to be too difficult to execute.” Things always go wrong on some level, but it is the pros who are prepared to roll with the punches and keep on shooting.
- Change things up.
While your shoot list serves as an overall guide, take the time to mix up the angles you are shooting from, go high, go low, move way in, and move out. Shoot both horizontals and verticals. It is too easy, especially if you are using a tripod, to get locked into one way of shooting. Loosen that tripod up and shoot a vertical after each horizontal. You never know which angle may prove to be the most useful to your prospective customers. Once you’ve gotten everything on your list, and there is still time, circle back to any inspirations you had during the day and see what you come up with.
- Do spot checks.
It is easy to get caught up in the shooting, and there’s nothing wrong with that. Make yourself take time to spot-check the obvious things such as focus and exposure, but also on the less obvious such as the background. Is the background helping to communicate your intended message? Is it too busy, too bright, too dark? Are you noticing any problematic content that it would be easier to remove from the scene than to remove with software later? Did you brush all the lint off the model’s clothing? Would a little burst of compressed air clear the bugs off that flower? Did you wipe down all the important objects with a lint-free cloth to remove the dust? Attention to detail is another factor that separates the pros from the pack.
- Have fun!
Pulling this off can be a lot of work, so be sure to build in breaks for yourself and your subjects. Having food and water on hand keeps everyone refreshed and in a good mood. If the situation allows, have some music playing in the background. Bring some crazy props that you may not even use, but could be just the thing to change an expression, or create a mood that is fun and lighthearted.
At the end of the day, if you’ve remained true to your vision, you’ll not only have a lot of quality content to work with, but you’ll feel satisfied by having had a great time making it happen.
After the Shoot
Whether you were shooting in your spare bedroom, an abandoned factory, the great outdoors, or a studio, there are a few things you want to make sure you always do to put a successful wrap on your shoot.
1. Clean up.
Ugh. OK, easily the least sexy part of the entire process, but think of it more like helping you get set back up for the next shoot. You may have a location to put back together, so do it right so that you’ll be allowed to come back in the future. You may have props to clean up and put away. Use the gear list you made the night before and check all your gear back in to be sure you didn’t leave anything behind. Give your camera and lenses a wipe down on the outside, and learn how to clean your image sensor to keep it free of dust bunnies.
2. Back up your photos.
Arguably this could come before doing any cleanup, but it really will depend on where you are when you were shooting, and what the subject matter happened to be. If you were shooting in your home or studio, then getting the backup started while you put things away works well. If you are on location and have a portable drive or laptop, then there is nothing wrong with multi-tasking by getting a backup going as you pack up the gear. Otherwise, this should be the first thing you do when you get home.
3. Don’t forget the paperwork.
Did I say clean up was the least sexy? This is a close contender. However, if you were working with models, be sure to collect all signed (and witnessed) releases before you let them leave the location (best to do on arrival, so no one gets away by mistake). Make a practice of taking a photo of the model holding the release. This helps you remember who is who, and serves as one more bit of proof that they did sign the release.
Figure 6.12. Cheeseburger. It’s a simple cheeseburger, but it is iconic. It’s not overly styled and it doesn’t look fake. It’s also isolated on white so the end-use possibilities are endless, since you can knock it out of the background and drop it into any design.

Kelly Cline

What is your background in photography?
I’ve never had any formal training in photography. I tend to sort of go with the flow, and let the light speak to the camera, and let the camera speak to me. The first time I started taking photos was when I was very young, around 8 years old. My grandfather gave me an old Kodak Brownie. He was an avid nature photographer, so he would take us out on excursions strictly for the sake of shooting pictures. It was from him that I learned about apertures, shutter speeds, and film speed.
Bounces, bounces, bounces! Silver, gold, silver/gold, white—even paper towels and napkins can be used to bounce light. Also, I use a Canon 5D Mark II, with 85mm, 35mm, 50mm, 45mm TS-E lenses, and sometimes a Lensbaby when the moods strikes.
Most essential gear beyond the camera?
My tripod. While I don’t use it exclusively, because there are some shots where hand-holding is just better or the only way to go, but I find it to be my most essential piece of equipment beyond the camera itself.
What do you wish you knew when you started?
Since I learned on the fly when it comes to stock, I don’t feel like I really wished I knew more. About the only thing I wish I knew was that I would have enjoyed myself, and my career, this much so I could have started sooner.
Favorite stock subject, and why?
For me it is all about food. I’m a food geek, recipe developer, food writer and food stylist. It’s a list of extracurriculars that goes very well with food photography. I love learning about food, ingredients, origins, and histories of food.
Snapshot of your workflow?
I start by creating concepts, sketching out the sets, constructing the sets, shopping for props and/or organizing props and color palettes. Then, I prefer shooting in small batches—sometimes tethered to my computer; otherwise I copy the cards to the computer and review the shots, so I can make adjustments where necessary to the set or lighting, and if necessary reshooting based on review. Once the shoot is done I import into Lightroom, perform basic RAW adjustments, and then transfer to Photoshop CS5 for further touching up. I enter metadata, and save a copy of the processed image as an uncompressed TIFF for archiving, then save a JPEG at highest quality.
Most important thing to keep in mind when shooting food?
It really is all about the lighting. Hard light can make the most beautiful dish look unappealing, especially anything with sheen. I prefer natural light.
What makes food different from other stock subjects?
For one, food is not an amateur model. Two, it doesn’t talk back, and it goes right where I want it to go. It’s not a diva, it won’t get me in trouble if I need to touch it or adjust it. Food is base, and it speaks to the viewer. Everyone can relate and connect to food because we all need food to live. So I feel that food is approachable by those who view the photo, it makes you want it, touching upon that base primal need for nourishment, and it doesn’t make you feel insecure about yourself.
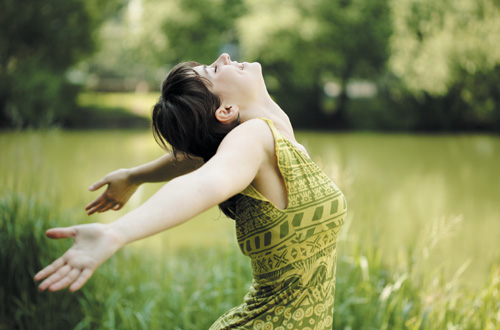
Figure 6.13. Enjoying the Sun. I just think that it’s quite simple and symbolic at the same time. It is useful for a lot of concepts: green, fresh, and happy, which are three words that people want to think their lives are like.
Anna Bryukhanova

What is your background in photography?
I was learning journalism at Moscow State University and took some photography courses there. I wasn’t interested in photography like I am now. It was just generic info about photojournalism and photography history—nothing that I could really use for stock photography. I got my first camera in 2003, and it was a surprise for myself, and everyone in my family, when I started making photos.
I’m shooting with a Canon 1Ds Mark III, and have lots of Canon lenses because I love them, and love to change them often. I would recommend any DSLR with one to two lenses for everyday use. If you shoot often, you will quickly understand exactly what piece of gear you’re missing. It’s a personal choice, depending on what you’re shooting, the subject, location, and light.
What do you wish you knew when you started?
I wish I knew at the beginning how much satisfaction I would get from this activity. I think knowing that would have made me progress much quicker.
Favorite stock subject, and why?
People, and their lifestyle, and environment. That is what I like a lot, because it stops moments of life for eternity, and that is amazing, because nothing else can stop it like this.
Snapshot of your workflow?
I’m still trying to make my workflow more effective than it is right now. Like everybody, I make my choice after shooting, delete bad pictures, choose the best ones, convert them to 16-bit TIFF in a raw processor (Lightroom or Digital Photo Professional), put them in a special folder, then do processing in Photoshop, make the final JPEG, add keywords, and put them in another folder, ready for uploading.
Tips for working with models?
Be nice, be polite, and be relaxed, so the model sees you’re in a good mood and can be relaxed, too. Humor is always very handy during shooting. Good background music is a must-have in studio. It can change the mood in a second. People will suddenly start dancing, and your shoot will be excellent with amazing results.
White background tips?
The best way to do a good shoot on white background is to make sure your lighting setup is correct. Typically, people shoot a subject on white using pretty simple setups, like two lights for background and two for model. This is a good basic setup, but you can always do more by adding a couple of lights for the model’s hair and body lighting. Placing lights behind the model and directing it to model’s shoulders and hair brings another dimension to your shoot on white.
Is there any last bit of stock photography wisdom you’d like to share?
The most important thing is to watch, to learn, to grow, to never stop shooting and uploading, and to love what you do. If you don’t love it, just find something else to do. Earning money from this business does not come quickly. You have to love, and make an effort to love, what you are doing even more.
After your photos are safely backed up, take a moment to enjoy all the work you did with a judgment-free review. You know you want to see them, so make this pass a focus on ensuring the backup is complete, the photos are corruption free, and you got all the shots on your list. Once you’ve confirmed all of this, it is safe to format those memory cards for the next shoot.
5. Unwind.
You just worked your butt off, and as much as you may have enjoyed it, do yourself a favor and decompress. Turn off the computer, stow the gear, and turn out the lights on your way out. I say this as someone who has burned the midnight oil one too many times. Eat a good meal, spend time with your loved ones, and do something that doesn’t involve a glowing screen. You earned it.
Moving Forward
It has been my experience that the majority of microstock contributors are highly motivated self-directed learners. We learn from each other as well as from books, websites, and classes. This really is a lifelong process, and you will have many teachers along the way. There are two resources in particular that I have found so valuable that I made it a goal to find ways to get to work for both of them (and I did).
The first, and the one that I have gained the most from over the years, is the National Association of Photoshop Professionals. For an annual membership fee of $99 (at this writing), you gain access to a tremendous amount of training—covering photography, Photoshop, and Lightroom—both online and in print (Photoshop User Magazine); a very active member’s online forum; and unlimited Photoshop, Lightroom, and photography gear Help Desk support. But what might be most valuable of all are the fantastic discounts on gear, training, and equipment from all the top vendors in the industry. You’ll easily recoup your membership fee in no time at all. Head over to www.photoshopuser.com to learn more.
Many years ago, when I was first getting started in shooting for stock I picked up the book called Understanding Exposure, by Bryan Peterson (Amphoto Books), and the lights finally came on. I’ve recommended this book to everyone who has ever asked me what book they should get to help their photography. In 2009, I was researching online photography schools that could be a good fit for a Lightroom class I had in mind. When I discovered that Bryan Peterson founded his own school, called the Perfect Picture School of Photography (www.ppsop.com), I was immediately intrigued. What sold me on the school, though, was the fact that there is a lot of room for interaction between instructors and students, which is a real challenge in online training. PPSOP, as it is called, offers a wide variety of photography classes, ranging from 4- to 12-week sessions. If you are looking for an extremely accessible, yet structured, approach for expanding your photography skills, this is a good place to start.
Figure 6.14. I write for Photoshop User Magazine and staff the Lightroom Help Desk for NAPP, and teach a Lightroom class at PPSOP.