Arithmetic Operations
We learned in Chapter 8 that we could apply arithmetic operations on some variables and use the {0:D} and {0:C} type placeholders to specify the number of decimal places required in the output. We also investigated the use of less familiar arithmetic operators such as +=, -=, *=, and /=. In this chapter we will use comparison operators, some of which will look similar to arithmetic operators.
Selection
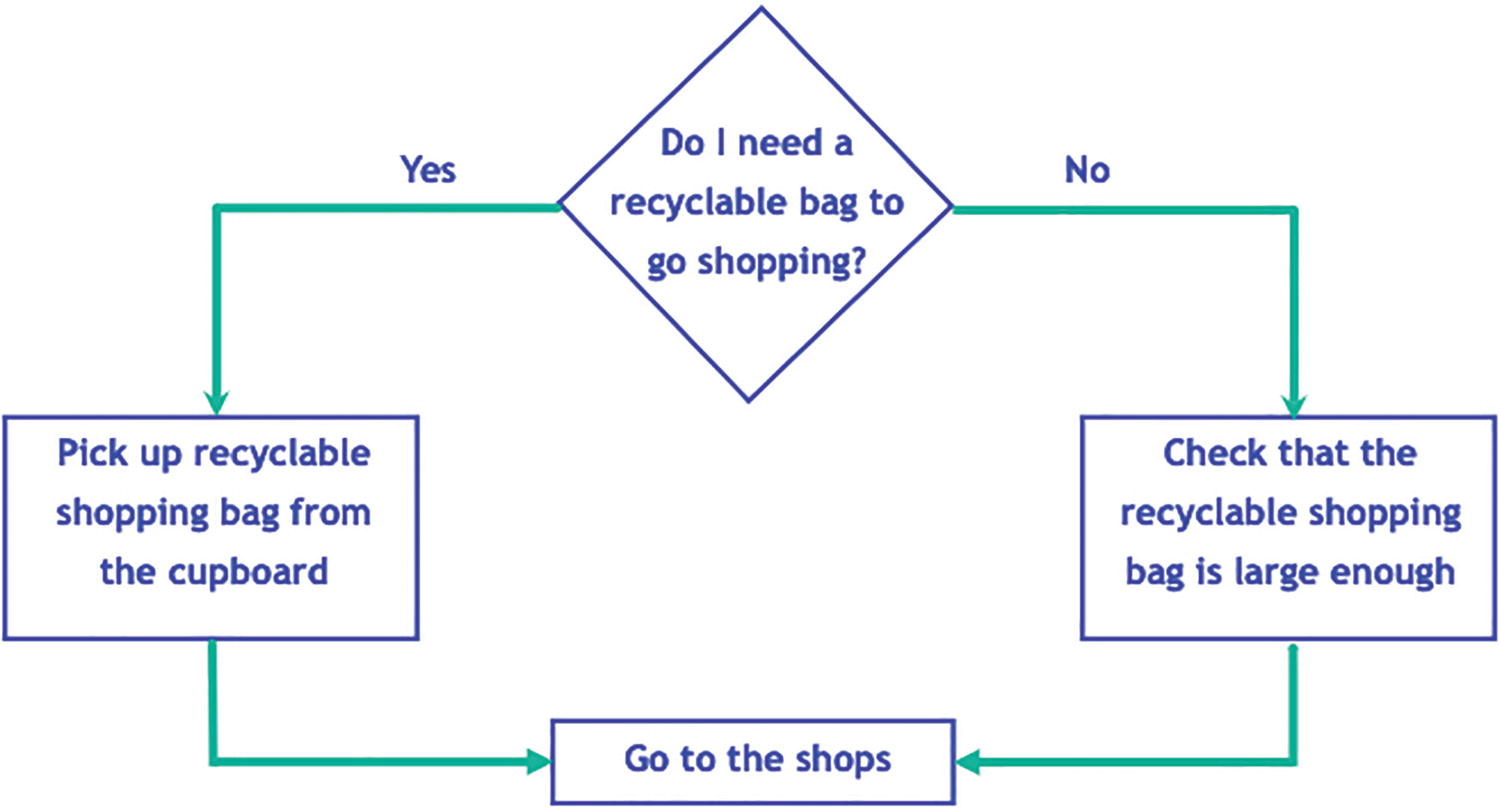
A diagram exhibits two different choices as possible paths to take regarding the need for a recycle bag to go shopping.
Everyday decision using a yes-or-no scenario
A yes decision changes execution down the yes path.
A no decision changes execution down the no path.
In Figure 9-1 the execution eventually returns to a common path, Go to the shops. In programming, making decisions can be achieved in a number of ways, and we will now look at the use of the SELECTION statements within C#.
Comparison Operators
Comparison operators
Symbol | Meaning |
|---|---|
< <= > >= == != && || ! | Less than Less than or equal to Greater than Greater than or equal to Equal to Not equal to Logical AND Logical OR Logical NOT |
It is important we fully understand that when testing if one piece of data is equal to another, we use the double equals (= =), because, as mentioned previously, a single equal symbol (=) is an assignment operation.
if
if-else
if else if construct
switch
We will also look at the logical operators AND (&&), || (OR), and ! (NOT).
if Statement
In simple terms all we are doing with the if construct is saying "Is something true?" – is it true or is it false? So the statement
if( condition ) means if( true ).
Remember true is a bool or Boolean data type.
Checking the maximum years of no claims a driver has and informing the user
That the value is within the years of no claims limit and will be used – this is the true part
Or
To just move to the next code statement
Checking the maximum amount that can be charged to a credit card and informing the user
That the insurance amount is under or equal to the credit card limit and can be processed – this is the true part
or
To just move to the next code statement
if-else Statement
In simple terms all we are doing with the if-else construct is saying "Is something true or is it false?" – is it true or is it false? So the statement
if( condition ) means if( true ).
else means it is not true – it is false.
Remember false is also a bool or Boolean data type.
The else part of the if-else construct may be omitted depending on requirements, but if it is omitted, it becomes an if statement, which is what we looked at first.
Checking the maximum years of no claims a driver has and informing the user that
The value is within the years of no claims limit and will be used – this is the true part.
or
The value is over the years of no claims limit and will be reduced to 10 years – this is the else part, the false part.
Checking the maximum amount that can be charged to a credit card and informing the user that
The insurance amount is under or equal to the credit card limit and can be processed.
or
The insurance amount is over the credit card limit and the user will need to call the company to give additional information.
The if statement will test if a particular condition statement is true, for example:
If the condition is true, then the program will execute a block of code within the curly braces following it, for example:
If the condition is false, then the program will execute a different block of code, the else part, that handles a false condition executed when the statement is not true, for example:
It is essential that the two different blocks of code are clearly indicated, and to ensure this, we use the curly braces:
{ opening (left) curly brace
} closing (right) curly brace
The two different blocks of code are separated using the else keyword:
switch Statement
Read
Debug
Maintain
In using a switch construct, we will have multiple cases, and the matching case will be the one that will have its code executed. Switch also has some disadvantages depending on the version of C# we use. From C# 7.0 we can use pattern matching, but for now we will concentrate on the switch statement for C# 6 or earlier where the matching expression uses the data types char, string, and bool, an integral numeric type, or an enum type.
- Checking the maximum years of no claims a driver has and informing the user that
If the value is 0 years, the discount is 0%.
If the value is 5 years, the discount is 5%.
If the value is 10 years, the discount is 10%.
Let's code some C# and build our programming muscle.
The if Construct

A diagram exhibits two different choices as possible paths to take regarding the need for a recycle bag to go shopping.A diagram exhibits two different choices as possible paths to take regarding the need for a recycle bag to go shopping.
The Boolean true section
We should use the same solution that we created for the earlier chapters, as we will still be able to see the code we have written for the previous chapters. The approach of keeping all our separate projects in one solution is a good idea while studying this book and coding the examples.
This chapter, while concentrating on selection, will use an insurance quote example and build on our learning from the previous chapters. Now having created five projects, we should be confident with the process of creating projects inside a solution.
- 1.
Right-click the solution CoreCSharp.
- 2.
Choose Add.
- 3.
Choose New Project.
- 4.
Choose Console App from the listed templates that appear.
- 5.
Click the Next button.
- 6.
Name the project Chapter9 and leave it in the same location.
- 7.
Click the Next button.
- 8.
Choose the framework to be used, which in our projects will be .NET 6.0 or higher.
- 9.
Click the Create button.
Now we should see the Chapter9 project within the solution called CoreCSharp.
- 10.
Right-click the project Chapter9 in the Solution Explorer panel.
- 11.
Click the Set as Startup Project option.
- 12.
Right-click the Program.cs file in the Solution Explorer window.
- 13.
Choose Rename.
- 14.
Change the name to Selection.cs, as shown in Figure 9-3.
- 15.
Press the Enter key.

A zoomed section in the left panel of the Solution Explorer window exhibits the C sharp Selection dot c s entry under Chapter 9 as the renamed file.
Program.cs file renamed
- 16.
Double-click the Selection.cs file to open it in the editor window.
Now we can set up the code structure with a namespace, and inside it will be the Selection class, and inside the class will be the Main() method. The shortcut for creating the Main() method is to type svm and press the Tab key twice. We will also create a variable inside the Main() method.
- 17.
Amend the code as shown in Listing 9-1.
Selection – setting up variables within the Main() method
- 18.
Amend the code to request user input and then convert it to an int, as in Listing 9-2.
Request user input and convert from string to int
We will now add code that will
Check if the number of years of no claims is greater than 10:
If this is true, execute some code.
Otherwise, move to the next set of code lines.
- 19.
Amend the code, as in Listing 9-3.
Use the if construct to check if value is greater than 10
- 20.
Click the File menu.
- 21.
Choose Save All.
- 22.
Click the Debug menu.
- 23.
Choose Start Without Debugging.
- 24.
Type 10 as the number of full years of no claims.
- 25.
Press the Enter key.
Figure 9-4 shows the console window with no additional data after the 10, as the code has evaluated that 10 is not greater than (>) 10, so it skips the if block of code and moves to the next line of code after the closing curly brace, which is the end of the code.

A console window depicts a skipped if block where 10 is the lone entry for the number of full years of no claims a driver has.
If block skipped
- 26.
Press the Enter key to close the console window.
- 27.
Click the Debug menu.
- 28.
Choose Start Without Debugging.
The console window will appear and ask the question.
- 29.
Type 20 and press the Enter key.
The console window will appear as shown in Figure 9-5.
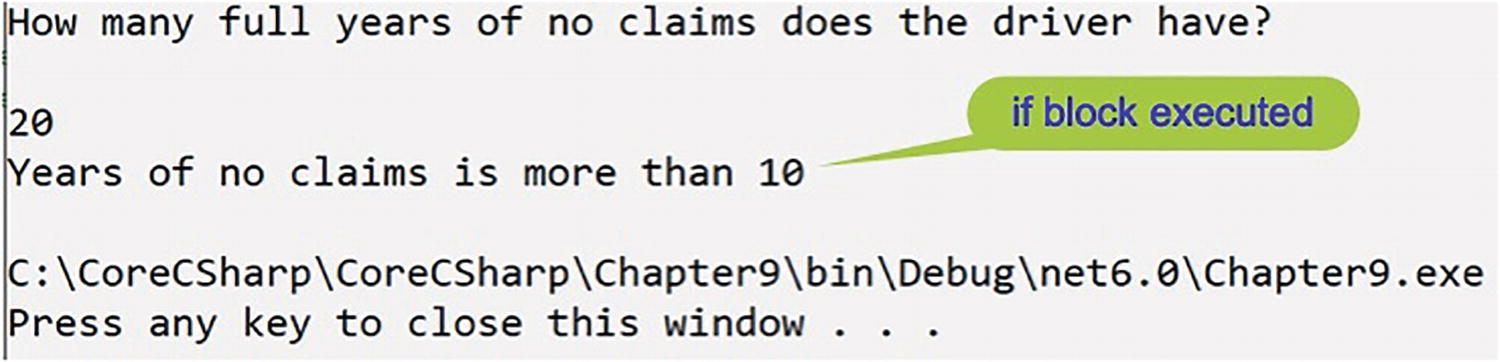
A console window depicts the execution of an if block with the years of no claims is more than 10 entry for 20.
If block executed
- 30.
Press the Enter key to close the console window.
The if-else Construct

A diagram exhibits the highlighted choice of checking that the recyclable shopping bag is large enough instead of picking one up from the cupboard to go shopping.
The Boolean false section
- 31.
Amend the code, as in Listing 9-4, to add the else part of the construct.
Use the if-else construct to check if value is greater than 10
- 32.
Click the File menu.
- 33.
Choose Save All.
- 34.
Click the Debug menu.
- 35.
Choose Start Without Debugging.
- 36.
Type 20 as the number of full years of no claims.
Figure 9-7 shows the console window, and we can see that the true block of code has been executed.

A console window depicts the execution of a true block with the years of no claims is more than 10 entry for 20.
If block executed – this is the true part
- 37.
Press the Enter key to close the console window.
- 38.
Click the Debug menu.
- 39.
Choose Start Without Debugging.
- 40.
Type 10 as the number of full years of no claims.
Figure 9-8 shows the console window, and we can see that the false, else, block of code has been executed.

A console window depicts an executed false block with the years of no claims being less than or equal to 10 entry for 10.
If block skipped – this is the false part
- 41.
Press the Enter key to close the console window.
The if else if Construct
- 42.
Amend the code, as in Listing 9-5, to add the else if parts of the construct, replacing the existing else code block.
Adding the else if parts of the if-else construct
- 43.
Click the File menu.
- 44.
Choose Save All.
- 45.
Click the Debug menu.
- 46.
Choose Start Without Debugging.
The console window will appear and ask the question. Now we can try the values 10, 8, 6, 4, and 2, which will test the five else blocks. We will start with 10.
- 47.
Type 10 as the number of full years of no claims.
- 48.
Press the Enter key.
Figure 9-9 shows the console window and we can see that the first else if block of code has been executed.

A console window depicts the execution of else block 1 with the years of no claims is either 9 or 10 entry for 10.
First else if block executed
- 49.
Press the Enter key to close the console window.
Start the program again.
- 50.
Click the Debug menu.
- 51.
Choose Start Without Debugging.
- 52.
Type 8 as the number of full years of no claims.
- 53.
Press the Enter key.
Figure 9-10 shows the console window and we can see that the second else if block of code has been executed.

A console window depicts the execution of else block 2 with the years of no claims is either 7 or 8 entry for 8.
Second else if block executed
- 54.
Press the Enter key to close the console window.
Start the program again.
- 55.
Click the Debug menu.
- 56.
Choose Start Without Debugging.
- 57.
Type 6 as the number of full years of no claims.
- 58.
Press the Enter key.
Figure 9-11 shows the console window and we can see that the third else if block of code has been executed.

A console window depicts the execution of else block 3 with the years of no claims is either 5 or 6 entry for 6.
Third else if block executed
- 59.
Press the Enter key to close the console window.
Start the program again.
- 60.
Click the Debug menu.
- 61.
Choose Start Without Debugging.
- 62.
Type 4 as the number of full years of no claims.
- 63.
Press the Enter key.
Figure 9-12 shows the console window and we can see that the fourth else if block of code has been executed.

A console window depicts the execution of else block 4 with the years of no claims is either 3 or 4 entry for 4.
Fourth else if block executed
- 64.
Press the Enter key to close the console window.
Start the program again.
- 65.
Click the Debug menu.
- 66.
Choose Start Without Debugging.
- 67.
Type 2 as the number of full years of no claims.
- 68.
Press the Enter key.
Figure 9-13 shows the console window and we can see that the fifth else if block of code has been executed.

A console window depicts the execution of else block 5 with an entry that starts with the years of no claims is either 2, 1, 0.
Fifth else if block executed
- 69.
Press the Enter key to close the console window.

A 26-line code constructed as an if-else ladder. On its right is a text that reads, There are better ways to do this in a large font.
If else ladder
So do we think the code is OK because it executes properly?
We might say yes, but that would mean we are only concerned about the code execution. Let's think differently and consider code readability, maintainability, and efficiency. These aspects of code also play an important role in the code development process. It is not aways about our view; there may be others involved in the process. We must take a wider view of code development and not just think about our own small worldview. By thinking wider, we will think about others who are required to read our code, those who will have to maintain our code, and those who will use the code.
The previous code can indeed be made better in terms of readability and maintainability, by using another selection construct called the switch construct. It is important for us to understand that, in terms of efficiency, the switch construct is not always faster than the if else if construct.
The switch Construct
- 1.
Right-click the Chapter9, Selection, project.
- 2.
Choose Add.
- 3.
Choose Class.
- 4.
Name the class Switch.cs.
- 5.
Click the Add button.
The Switch class code will appear in the editor window and will be similar to Listing 9-6. Remember using System is intrinsic and may not be displayed.
Class template when adding a class
- 6.
Amend the code as in Listing 9-7.
Main() method added and unused imports removed
- 7.
Right-click the Chapter9 project in the Solution Explorer panel.
- 8.
Choose Properties from the pop-up menu.
- 9.
Choose the Chapter9.Switch class in the Startup object drop-down list, as shown in Figure 9-15.

A zoomed Startup object section in the Solution Explorer panel exhibits a highlighted Chapter 9 dot Switch class from the drop-down list.
Changing the startup class in the C# project
- 10.
Close the Properties window.
Now we will add the variables that will be used in our code. Firstly, we will set up a variable for the years of no claims and then add the code that will ask the user for input, read the console input, and convert it to data type int. In the code there are detailed comments to help us get a full understanding of the code.
- 11.
Amend the code, as in Listing 9-8.
Ask for user input and convert the string input to int
- 12.
Amend the code , as in Listing 9-9, to add the switch construct.
The switch construct
- 13.
Click the File menu.
- 14.
Choose Save All.
- 15.
Click the Debug menu.
- 16.
Choose Start Without Debugging.
The console window will appear and ask the question. Now we can try the values 15, 10, 8, 6, 4, and 2, which will test the six case blocks. We will start with 15.
- 17.
Type 15 and press the Enter key.
Figure 9-16 shows the console window, and we can see that the first case block of code has been executed.

A console window depicts an executed first case block of code via case 15 with the years of no claims being more than 10 but less than 16 entry for 15.
Switch case 15
- 18.
Press the Enter key to close the console window.
Start the program again.
- 19.
Click the Debug menu.
- 20.
Choose Start Without Debugging.
- 21.
Type 10 and press the Enter key.
Figure 9-17 shows the console window, and we can see that the second case block of code has been executed.

A console window depicts an executed second case block of code via case 10 with the years of no claims as either 9 or 10 entry for 10.
Switch case 10
- 22.
Press the Enter key to close the console window.
Start the program again.
- 23.
Click the Debug menu.
- 24.
Choose Start Without Debugging.
- 25.
Type 8 and press the Enter key.
Figure 9-18 shows the console window, and we can see that the third case block of code has been executed.

A console window depicts an executed third case block of code via case 8 with the years of no claims is either 7 or 8 entry for 8.
Switch case 8
- 26.
Press the Enter key to close the console window.
Start the program again.
- 27.
Click the Debug menu.
- 28.
Choose Start Without Debugging.
- 29.
Type 6 and press the Enter key.
Figure 9-19 shows the console window, and we can see that the fourth case block of code has been executed.

A console window depicts an executed fourth case block of code via case 6 with the years of no claims is either 5 or 6 entry for 6.
Switch case 6
- 30.
Press the Enter key to close the console window.
Start the program again.
- 31.
Click the Debug menu.
- 32.
Choose Start Without Debugging.
- 33.
Type 4 and press the Enter key.
Figure 9-20 shows the console window, and we can see that the fifth case block of code has been executed.

A console window depicts an executed fifth case block of code via case 4 with the years of no claims as either 3 or 4 entry marked for 4.
Switch case 4
- 34.
Press the Enter key to close the console window.
Start the program again.
- 35.
Click the Debug menu.
- 36.
Choose Start Without Debugging.
- 37.
Type 2 and press the Enter key.
Figure 9-21 shows the console window, and we can see that the sixth case block, the default block, of code has been executed.

A console window depicts an executed default block via default case with the years of no claims is either less than 3 or greater than 15 entry for 2.
Switch case default
- 38.
Press the Enter key to close the console window.
The switch construct is a replacement for the if else if construct.
As we might see, the only issue in our case construct code arises for the equivalent of yearsOfNoClaims >10:In the if else if, the yearsOfNoClaims >10 handled values 11, 12, 13, 14, 15, 16, 17, etc.
In the switch statement, we had to individually state case 11, case 12, case 13, case 14, case 15, etc. But to do this for all values above 10 would be a long and wasteful process .
So we may need to think of a better way to do this. We might use an if statement in the default block to check if the value is less than 3 or greater than 15 or just use the if else if construct.
The case construct in C# 6 or lower does not always allow for the use of a range of numbers or even >10 as the case. The switch statement should not be used for condition checking.
C# 7
From C# 7 we can use a when clause to specify an additional condition that must be satisfied for the case statement to evaluate to true. The when clause can be any expression that returns a Boolean value, true or false.
The switch Construct Using when
- 1.
Right-click the Chapter9 project.
- 2.
Choose Add.
- 3.
Choose Class.
- 4.
Name the class Switch7Onwards.cs.
- 5.
Click the Add button.
- 6.
Create a Main() method within the class, as this was not produced automatically, and delete the unwanted imports, as in Listing 9-10.
The class with the Main() method
- 7.
Right-click the Chapter9 project in the Solution Explorer panel.
- 8.
Choose Properties from the pop-up menu.
- 9.
Choose the Chapter9.Switch7Onwards class in the Startup object drop-down list, as shown in Figure 9-22.

A zoomed Startup object section in the Solution Explorer panel exhibits a highlighted Chapter 9 dot Switch 7 onwards class from the drop-down list.
Changing the startup class in the C# project
- 10.
Close the Properties window.
- 11.
Amend the code, as in Listing 9-11, to add the code with the new when format for the first case block.
First case block with the when clause
Note
- 12.
Amend the code, as in Listing 9-12, to add the new when format for the second case block.
Second case block with the when clause
The when clause tells the compiler that we want this case block to execute when the yearsOfNoClaims value is greater than 8 and less than 11.
- 13.
Amend the code, as in Listing 9-13, to add the new format for the remaining case blocks.
Completed code with all when clauses
- 14.
Click the File menu.
- 15.
Choose Save All.
- 16.
Click the Debug menu.
- 17.
Choose Start Without Debugging.
The console window will appear and ask the question. Now we can try the values 15, 10, 8, 6, 4, and 2, which will test the six case blocks. We will start with 15.
- 18.
Type 15 and press the Enter key.
Figure 9-23 shows the console window and we can see that the first case block of code has been executed.

A console window depicts an entry from executing the first case block of code via case i n t number of years entered when open parenthesis years of no claims greater than symbol 10 close parenthesis colon.
Case when > 10 executed
- 19.
Press the Enter key to close the console window.
- 20.
Start the program again by clicking the Debug menu.
- 21.
Choose Start Debugging.
- 22.
Type 10 and press the Enter key.
Figure 9-24 shows the console window and we can see that the second case block of code has been executed.

A console window depicts an entry from executing the second case block of code via case i n t number of years entered when open parenthesis years of no claims greater than symbol 8 close parenthesis colon.
Case when > 8 executed
- 23.
Press the Enter key to close the console window.
Repeat the input process for the values 8, 6, 4, and 2.
switch with Strings
The C# switch programs we have been writing have switches using an integer. We have therefore executed one block of code, or another, based on the integer value in the case statement. C# also allows us to use the case construct with a string . When we use a string, the construct is the same as we have already coded, but the string must be enclosed in double quotes "".
- 24.
Right-click the Switch class.
- 25.
Choose Copy.
- 26.
Right-click the Chapter9 project.
- 27.
Choose Paste.
The new file Switch – Copy.cs will be added to the project.
- 28.
Right-click the Switch – Copy.cs file.
- 29.
Choose Rename.
- 30.
Type SwitchString.cs as the new name for this class.
- 31.
Make sure this new class is open in the editor window, not the original class.
Looking at the code for the new class in the editor window, we will see an error line under the class name in the code, as shown in Figure 9-25. This is because the class name does not match the name of the file, class, in the Solution Explorer panel and the class name Switch is therefore already in existence in the Chapter9 namespace.

An editor window exhibits an error message popping up below the underlined Switch class name in one of the lines of code. The error code is C S 0 101.
Class code has not been renamed as shown by the error
Although it says a class called Switch exists, which is correct, we just need to rename the class to match the name we gave it, SwitchString.
- 32.
Amend the word Switch in the editor window to say SwitchString.cs.
- 33.
Amend the code as shown in Listing 9-14 to change the data type of the variable to string instead of int.
Change variable type from int to string
- 34.
Amend the code as shown in Listing 9-15 to remove the conversion of the data input by the user, as we want this to remain a string, which is the default for console input.
Remove the conversion from string to int
- 35.
Amend the code as shown in Listing 9-16 to add the new format for the first case block. This will mean enclosing the numbers in double quotes as they are being entered as strings.
Case statements accepting string values (double quotes)
- 36.
Amend the code as shown in Listing 9-17 to add the new format for the second and remaining case blocks.
All case statements accepting string values (double quotes)
- 37.
Right-click the Chapter9 project in the Solution Explorer panel.
- 38.
Choose Properties from the pop-up menu.
- 39.
Choose the SwitchString class in the Startup object drop-down list, as shown in Figure 9-26.

A zoomed Startup object section in the Solution Explorer panel exhibits a highlighted Chapter 9 dot Switch String class from the drop-down list.
Set the startup class
- 40.
Click the File menu.
- 41.
Choose Save All.
- 42.
Click the Debug menu.
- 43.
Choose Start Without Debugging.
The console window will appear and ask the question. Now we can try the values 15, 10, 8, 6, 4, and 2, which will test the six case blocks. We will start with 15.
- 44.
Type 15 and press the Enter key.
Figure 9-27 shows the console window and we can see that the first case block of code that uses the string has been executed.

A console window depicts an executed first case block of code via case 15 in quotes colon with the years of no claims is more than 10 but less than 16 entry for 15.
Switch case 15
- 45.
Press the Enter key to close the console window.
Start the program again.
- 46.
Click the Debug menu.
- 47.
Choose Start Without Debugging.
- 48.
Type 10 and press the Enter key.
Figure 9-28 shows the console window and we can see that the second case block of code that uses the string has been executed .

A console window depicts an executed second case block of code via case 10 in quotes colon with the years of no claims is either 9 or 10 entry for 10.
Switch case 10
- 49.
Press the Enter key to close the console window.
Start the program again.
- 50.
Click the Debug menu.
- 51.
Choose Start Without Debugging.
- 52.
Type 8 and press the Enter key.
Figure 9-29 shows the console window and we can see that the third case block of code that uses the string has been executed.

A console window depicts an executed third case block of code via case 8 in quotes colon with the years of no claims is either 7 or 8 entry for 8.
Switch case 8
- 53.
Press the Enter key to close the console window.
Start the program again.
- 54.
Click the Debug menu.
- 55.
Choose Start Without Debugging.
- 56.
Type 6 and press the Enter key.
Figure 9-30 shows the console window and we can see that the fourth case block of code that uses the string has been executed.

A console window depicts an executed fourth case block of code via case 6 in quotes colon with the years of no claims is either 5 or 6 entry for 6.
Switch case 6
- 57.
Press the Enter key to close the console window.
Start the program again.
- 58.
Click the Debug menu.
- 59.
Choose Start Without Debugging.
- 60.
Type 4 and press the Enter key.
Figure 9-31 shows the console window and we can see that the fifth case block of code that uses the string has been executed.

A console window depicts an executed fifth case block of code via case 4 in quotes colon with the years of no claims is either 3 or 4 entry for 4.
Switch case 4
- 61.
Press the Enter key to close the console window.
Start the program again.
- 62.
Click the Debug menu.
- 63.
Choose Start Without Debugging.
- 64.
Type 2 and press the Enter key.
Figure 9-32 shows the console window and we can see that the sixth case block, the default block, of code that uses the string has been executed.

A console window depicts an executed default block via default colon with the years of no claims is either less than 3 or greater than 15 entry for 2.
Switch case default
- 65.
Press the Enter key to close the console window.
switch with Strings
Additional Example
The placeholder has the format placeholders {}.
Each placeholder has a number contained in the open and close braces.
The number represents the position of the variable name, which is in the comma-separated list at the end of the statement.
The variables are numbered starting with a 0, then a 1, etc. This means the numbers are zero indexed.
- 1.
Right-click the Chapter9 project.
- 2.
Choose Add.
- 3.
Choose Class.
- 4.
Name the class SwitchStringVehicleModel.cs.
- 5.
Click the Add button.
- 6.
Amend the code as shown in Listing 9-18 to add the required variables and make use of the new WriteLine() format within the switch construct.
Switch using strings and using WriteLine() with placeholders
- 7.
Right-click the Chapter9 project in the Solution Explorer panel.
- 8.
Choose Properties from the pop-up menu.
- 9.
Choose the SwitchStringVehicleModel.cs class in the Startup object drop-down list.
- 10.
Click the File menu.
- 11.
Choose Save All.
- 12.
Click the Debug menu.
- 13.
Choose Start Without Debugging.
The console window will appear and ask the question. Now we can try the string values Mustang, Corsa, Juke, S-Class, and Pacifica, which will test the five case blocks. We will start with Mustang.
- 14.
Type Mustang and press the Enter key.
Figure 9-33 shows the console window and we can see that the first case block of code has been executed, and the different WriteLine() formats have output the same message, but one has used concatenation and the other has used the placeholders.

A console window depicts Mustang as the case block 1 colon entry along with two of the Mustang manufacturer Ford entries displayed with concatenation and placeholders, respectively.
Switch case block 1
- 15.
Press the Enter key to close the console window.
Start the program again.
- 16.
Click the Debug menu.
- 17.
Choose Start Without Debugging.
- 18.
Type Corsa and press the Enter key.
Figure 9-34 shows the console window and we can see that the second case block of code has been executed.

A console window depicts Corsa as the case block 2 colon entry along with two of the Corsa manufacturer Vauxhall entries displayed with concatenation and placeholders, respectively.
Switch case block 2
- 19.
Press the Enter key to close the console window.
Start the program again.
- 20.
Click the Debug menu.
- 21.
Choose Start Without Debugging.
- 22.
Type Juke and press the Enter key.
Figure 9-35 shows the console window and we can see that the third case block of code has been executed.

A console window depicts Juke as the case block 3 colon entry along with two the Juke manufacturer is Nissan entries displayed with concatenation and placeholders, respectively.
Switch case block 3
- 23.
Press the Enter key to close the console window.
Start the program again.
- 24.
Click the Debug menu.
- 25.
Choose Start Without Debugging.
- 26.
Type S-Class and press the Enter key.
Figure 9-36 shows the console window and we can see that the fourth case block of code has been executed.

A console window depicts S-Class as the case block 4 colon entry along with two of the S-Class manufacturer Mercedes Benz entries displayed with concatenation and placeholders, respectively.
Switch case block 4
- 27.
Press the Enter key to close the console window.
Start the program again.
- 28.
Click the Debug menu.
- 29.
Choose Start Without Debugging.
- 30.
Type Pacifica and press the Enter key.
Figure 9-37 shows the console window and we can see that the fifth case block, the default case block, of code has been executed.

A console window depicts Pacifica as the default colon entry along with two Pacifica manufacturer unknown entries displayed with concatenation and placeholders, respectively.
Switch case block 5 – the default case block
- 31.
Press the Enter key to close the console window.
An issue to be considered when using strings with the case statement is that checking is case sensitive. This should be no surprise to us really, as we will be familiar with writing and will know that these are all different strings:Mustang
MUSTANG
mustang
mUSTANG

A window exhibits a highlighted To Upper method from a scrollable list that pops up below an underlined To in the line starting with the Switch class.
The ToUpper() method from the String class
ToUpper() method of the String class
ToUpper() method of the String class

A console window exhibits an uppercase Mustang entry in the second entry of the write line due to the upper close and open parentheses method.
The ToUpper() method from the String class
For now, do not worry about this uppercase and lowercase.
Logical Operators
We will also look at the logical operators AND (&&), || (OR), and ! (NOT).
Well, now is the time to use them, by building on the if construct we have learned.
AND
Simplified version of an AND operator
The AND, &&, operator
First part | Operator | Second part | Result |
|---|---|---|---|
TRUE | AND | TRUE | = TRUE |
TRUE | AND | FALSE | = FALSE |
FALSE | AND | TRUE | = FALSE |
FALSE | AND | FALSE | = FALSE |
OR
Simplified version of an OR operator
The OR, !!, operator
First part | Operator | Second part | Result |
|---|---|---|---|
TRUE | OR | TRUE | = TRUE |
TRUE | OR | FALSE | = TRUE |
FALSE | OR | TRUE | = TRUE |
FALSE | OR | FALSE | = FALSE |
NOT
Simplified version of a NOT, !, operator
The NOT, !, operator
Operator | First part | Result |
|---|---|---|
NOT | TRUE | = FALSE |
NOT | FALSE | = TRUE |
In C# the logical operators will only evaluate the second part of the expression if it is necessary. “Why?” we might ask. Well, we will see from the following examples that it makes sense to use this short-circuit evaluation to save needless evaluation.
AND
In our truth table , Table 9-2, we saw that the only combination that evaluates to TRUE is when both parts of the expression are TRUE. So we can short-circuit any combinations that start with a FALSE:
if(6>7 AND 9<10) equates to if(FALSE AND TRUE), which equates to FALSE.
As the first part evaluates to FALSE there is no point in evaluating the second part.
OR
In our truth table, Table 9-3, we saw that a TRUE or a FALSE as the first part could lead to an overall evaluation of TRUE. So we cannot short-circuit when using the OR construct.
Let's code some C# and build our programming muscle.
Using the AND Operator
- 1.
Right-click the Chapter9 project.
- 2.
Choose Add.
- 3.
Choose Class.
- 4.
Name the class SelectionAnd.cs.
- 5.
Click the Add button.
- 6.
Amend the code to add the Main() method as in Listing 9-24.
Adding the Main() method
- 7.
Right-click the Chapter9 project in the Solution Explorer panel.
- 8.
Choose Properties from the pop-up menu.
- 9.
Choose the SelectionAnd.cs class in the Startup object drop-down list.
- 10.
Close the Properties window.
- 11.
Amend the code to add the variables required, as in Listing 9-25.
Adding the variables
- 12.
Amend the code, as in Listing 9-26, to request user input for the years of no claims and convert it to an int.
Accept user input and convert to an int
- 13.
Amend the code, as in Listing 9-27, to request user input for the driver age and convert it to an int.
Accept user input and convert to an int
Now we will check if the number of years of no claims is greater than 10 and if the age of the driver is greater than 40:
If these are both true, we execute code in the if block.
Otherwise, move to the else block and execute the code in this block.
- 14.
Amend the code, as in Listing 9-28.
Use selection through an if-else statement
- 15.
Click the File menu.
- 16.
Choose Save All.
- 17.
Click the Debug menu.
- 18.
Choose Start Without Debugging.
- 19.
Click in the console window.
- 20.
Type 20 as the number of years of no claims.
- 21.
Press the Enter key on the keyboard.
- 22.
Type 50 as the current age of the driver.
- 23.
Press the Enter key on the keyboard.
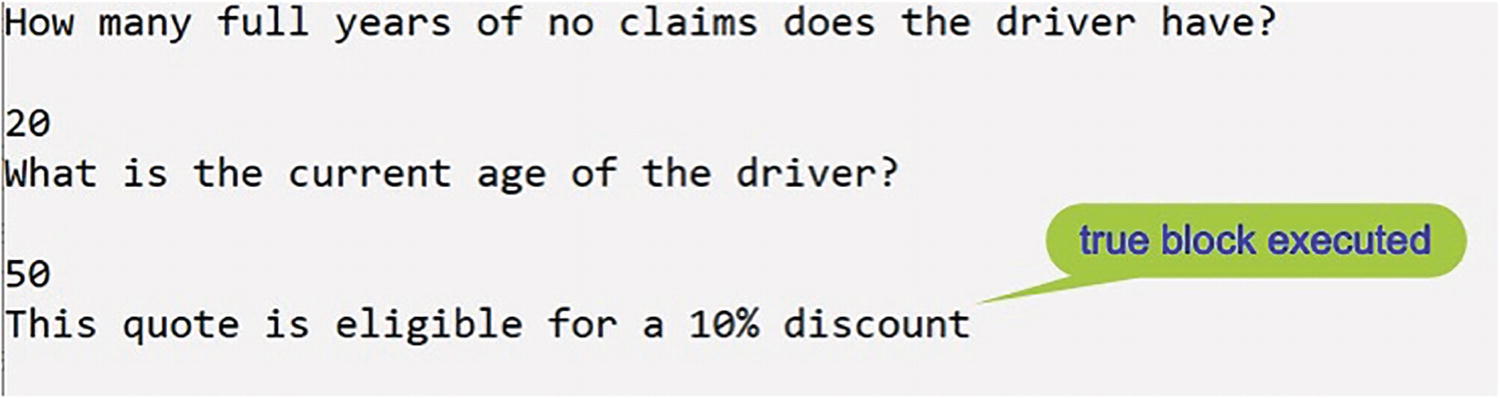
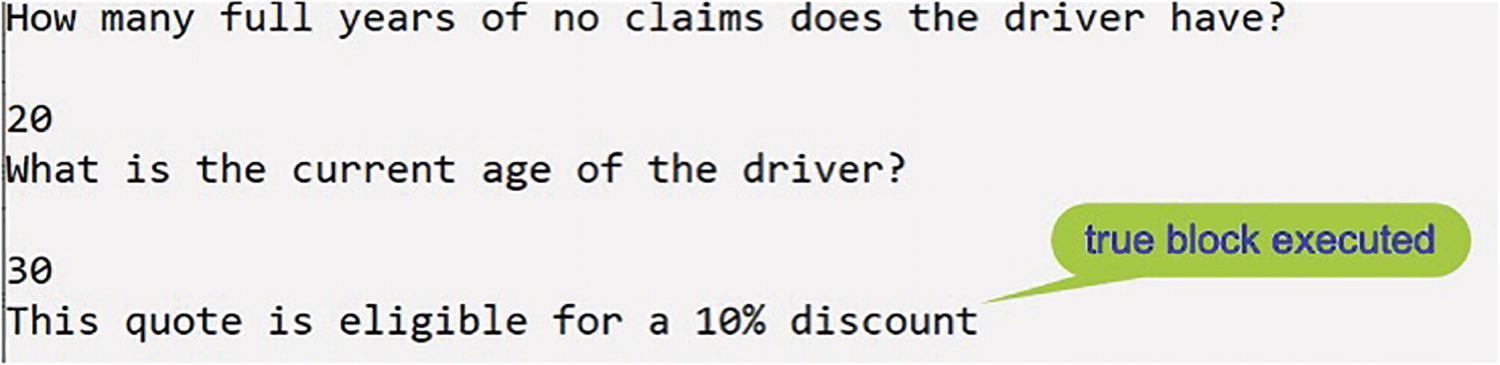
Figure 9-40 shows the console window with the message that a discount is applicable, as 20 is greater than 10 AND 50 is greater than 40.

A console window depicts the text, This quote is eligible for a 10 percent discount entry via the execution of a true block for 20 years of no claims and driver's age at 50.
True section of if-else executed
- 24.
Press the Enter key to close the console window.
Testing FALSE AND TRUE
- 25.
Click the File menu.
- 26.
Choose Save All.
- 27.
Click the Debug menu.
- 28.
Choose Start Without Debugging.
- 29.
Click in the console window.
- 30.
Type 10 as the number of years of no claims.
- 31.
Press the Enter key on the keyboard.
- 32.
Type 50 as the current age of the driver.
- 33.
Press the Enter key on the keyboard.
Figure 9-41 shows the console window with the message that no discount is applicable, as 50 is greater than 40 BUT 10 is not greater than 10.

A console window depicts the text, This quote is ineligible for a discount entry via the execution of a false block for 10 years of no claims and driver's age at 50.
False section of if-else executed
- 34.
Press the Enter key to close the console window.
Testing TRUE AND FALSE
- 35.
Click the File menu.
- 36.
Choose Save All.
- 37.
Click the Debug menu.
- 38.
Choose Start Without Debugging.
- 39.
Click in the console window.
- 40.
Type 20 as the number of years of no claims.
- 41.
Press the Enter key on the keyboard.
- 42.
Type 30 as the current age of the driver.
- 43.
Press the Enter key on the keyboard.
Figure 9-42 shows the console window with the message that no discount is applicable as 20 is greater than 10 BUT 30 is not greater than 40.

A console window depicts the text, This quote is ineligible for a discount entry via the execution of a false block for 20 years of no claims and driver's age at 30.
False section of if-else executed
- 44.
Press the Enter key to close the console window.
Let's code some C# and build our programming muscle.
Using the OR Operator
- 1.
Right-click the Chapter9 project.
- 2.
Choose Add.
- 3.
Choose Class.
- 4.
Name the class SelectionOR.cs.
- 5.
Click the Add button.
- 6.
Create a Main() method within the class, as this was not produced automatically. Type svm and press Tab twice, and then delete the unwanted imports.
Now we need to set this class as the startup class .
- 7.
Right-click the Chapter9 project in the Solution Explorer panel.
- 8.
Choose Properties from the pop-up menu.
- 9.
Choose the SelectionOR class in the Startup object drop-down list.
- 10.
Close the Properties window.
- 11.
Open the SelectionAnd file and copy the code from within the Main() method.
- 12.
Move back to the SelectionOR file in the editor and paste the copied code between the open and close curly braces, { }, of the Main() method.
We will amend the code to use the logical operator OR rather than the logical operator AND. Within the copied code, we will change the && to || and change the comments to match. This means our code willCheck if the number of years of no claims is greater than 10 OR if the age of the driver is greater than 40:
If these are both true, we execute code in the if block.
If one of these is true, we execute code in the if block.
Otherwise, move to the else block and execute the code in this block.
- 13.
Amend the code , as in Listing 9-29.
Use the OR ( || ) instead of the AND ( && )
- 14.
Click the File menu.
- 15.
Choose Save All.
- 16.
Click the Debug menu.
- 17.
Choose Start Without Debugging.
- 18.
Click in the console window.
- 19.
Type 20 as the number of years of no claims.
- 20.
Press the Enter key on the keyboard.
- 21.
Type 50 as the current age of the driver.
- 22.
Press the Enter key on the keyboard.
Figure 9-43 shows the console window with the message that a discount is applicable as 20 is greater than 10 OR 50 is greater than 40. In this case both are TRUE, which equates to TRUE.
A console window depicts the execution of a true block with the text, This quote is eligible for a 10 percent discount entry for 20 years of no claims and driver's age at 50.
True section of if-else executed
- 23.
Press the Enter key to close the console window.
Testing FALSE OR TRUE
- 24.
Click the File menu.
- 25.
Choose Save All.
- 26.
Click the Debug menu.
- 27.
Choose Start Without Debugging.
- 28.
Click in the console window.
- 29.
Type 10 as the number of years of no claims.
- 30.
Press the Enter key on the keyboard.
- 31.
Type 50 as the current age of the driver.
- 32.
Press the Enter key on the keyboard.
Figure 9-44 shows the console window with the message that a discount is applicable as 10 is not greater than 10 (FALSE) OR 50 is greater than 40 (TRUE). In this case we have FALSE OR TRUE, which equates to TRUE.

A console window depicts the text, This quote is eligible for a 10 percent discount entry via the execution of a true block for 20 years of no claims and driver's age at 50.
True section of if-else executed
- 33.
Press the Enter key to close the console window.
Testing TRUE OR FALSE
- 34.
Click the File menu.
- 35.
Choose Save All.
- 36.
Click the Debug menu.
- 37.
Choose Start Without Debugging.
- 38.
Click in the console window.
- 39.
Type 20 as the number of years of no claims.
- 40.
Press the Enter key on the keyboard.
- 41.
Type 30 as the current age of the driver.
- 42.
Press the Enter key on the keyboard.
Figure 9-45 shows the console window with the message that a discount is applicable as 20 is greater than 10 (TRUE) OR 30 is not greater than 40 (FALSE). In this case we have TRUE OR FALSE, which equates to TRUE.

A console window depicts the text, This quote is eligible for a 10 percent discount entry via the execution of a true block for 20 years of no claims and driver's age at 30.
True section of if-else executed
- 43.
Press the Enter key to close the console window.
Testing FALSE OR FALSE
- 44.
Click the File menu.
- 45.
Choose Save All.
- 46.
Click the Debug menu.
- 47.
Choose Start Without Debugging.
- 48.
Click in the console window.
- 49.
Type 10 as the number of years of no claims.
- 50.
Press the Enter key on the keyboard.
- 51.
Type 30 as the current age of the driver.
- 52.
Press the Enter key on the keyboard.
Figure 9-46 shows the console window with the message that a discount is not applicable as 10 is not greater than 10 (FALSE) OR 30 is not greater than 40 (FALSE). In this case we have FALSE OR FALSE, which equates as FALSE.

A console window depicts the text, This quote is ineligible for a discount entry via the execution of a false block for 10 years of no claims and driver's age at 30.
False section of if-else executed
- 53.
Press the Enter key.
Let's code some C# and build our programming muscle.
Using the NOT Operator
- 1.
Right-click the Chapter9 project.
- 2.
Choose Add.
- 3.
Choose Class.
- 4.
Name the class SelectionNOT.cs.
- 5.
Click the Add button.
- 6.
Create a Main() method within the class, as this was not produced automatically, and delete the unwanted imports.
Remember the shortcut to create the Main() method is to type svm and then press the Tab key twice. Now we need to set this class as the startup class.
- 7.
Right-click the Chapter9 project in the Solution Explorer panel.
- 8.
Choose Properties from the pop-up menu.
- 9.
Choose the SelectionNOT class in the Startup object drop-down list.
- 10.
Close the Properties window.
- 11.
Open the SelectionOR file and copy the code within the Main() method.
- 12.
In the Main() method of the SelectionNOT file, paste the copied code.
Now we will amend the code to use the logical operator NOT. We willChange the || to && (change the OR to an AND).
Add brackets around the expression.
Add the !, NOT, in front of the brackets.
Leave the comments the same.
The if (!(yearsOfNoClaims > 10 && ageOfDriver > 40)) code line means we are checking if the number of years of no claims is greater than 10 AND if the age of the driver is greater than 40:If these are both true, the expression in the brackets equates to true but we negate it (!) to false, and we do not execute the code in the if block.
If one of these is false, the expression in the brackets equates to false but we negate it (!) to true, and we execute the code in the if block.
If these are both false, the expression in the brackets equates to false but we negate it (!) to true, and we execute the code in the if block.
We will now change to an AND expression, add an extra set of brackets () around it, and put a !, NOT, before the new brackets. We will leave the comments as they are.
- 13.
Amend the code, as in Listing 9-30.
Use the NOT ( ! ) operator
- 14.
Click the File menu.
- 15.
Choose Save All.
- 16.
Click the Debug menu.
- 17.
Choose Start Without Debugging.
- 18.
Click in the console window.
- 19.
Type 20 as the number of years of no claims.
- 20.
Press the Enter key on the keyboard.
- 21.
Type 50 as the current age of the driver.
- 22.
Press the Enter key on the keyboard.
Figure 9-47 shows the console window with the message that a discount is not applicable as we have an overall TRUE negated to a FALSE (20 is greater than 10 AND 50 is greater than 40, which means TRUE negated to FALSE, so no discount is applicable).

A console window depicts the text, This quote is ineligible for a discount entry via the execution of a false block for 20 years of no claims and driver's age at 50.
False section of if-else executed
- 23.
Press the Enter key.
Testing FALSE AND TRUE
Start the program again.
- 24.
Click the Debug menu.
- 25.
Choose Start Without Debugging.
- 26.
Click in the console window.
- 27.
Type 10 as the number of years of no claims.
- 28.
Press the Enter key on the keyboard.
- 29.
Type 50 as the current age of the driver.
- 30.
Press the Enter key on the keyboard.
Figure 9-48 shows the console window with the message that a discount is applicable as we have an overall FALSE negated to a TRUE (10 is not greater than 10 AND 50 is greater than 40, which means FALSE negated to TRUE, so a discount is applicable).

A console window depicts the execution of a true block with the text, This quote is eligible for a 10 percent discount entry for 10 years of no claims and driver's age at 50.
False section of if-else executed
- 31.
Press the Enter key to close the console window.
Testing TRUE AND FALSE
Start the program again.
- 32.
Click the Debug menu.
- 33.
Choose Start Without Debugging.
- 34.
Click in the console window.
- 35.
Type 20 as the number of years of no claims.
- 36.
Press the Enter key on the keyboard.
- 37.
Type 30 as the current age of the driver.
- 38.
Press the Enter key on the keyboard.
Figure 9-49 shows the console window with the message that a discount is applicable as we have an overall FALSE negated to a TRUE (20 is greater than 10 AND 30 is not greater than 40, which means FALSE negated to TRUE, so a discount is applicable).
A console window depicts the execution of a true block with the text, This quote is eligible for a 10 percent discount entry for 20 years of no claims and driver's age at 30.
False section of if-else executed
- 39.
Press the Enter key to close the console window.
Conditional Operator (Ternary Operator)
if-else construct
However, there is another way to do the if-else construct, using the C# conditional operator, or ternary operator as it is also known. The ternary conditional operator will evaluate the Boolean expression and return either true or false. The syntax for the ternary conditional operator is
Condition ? First Expression : Second Expression
Condition is a “statement” that must evaluate to true or false.
If the condition is true, the First Expression gets executed.
If the condition is false, the Second Expression gets executed.
Looking at our if-else example, we could say
Condition is yearsOfNoClaims > 10
First Expression is Console.WriteLine("Years of no claims is more than 10");
Second Expression is Console.WriteLine("Years of no claims is less than or equal to 10");
But let's see how we actually write it.
- 1.
Right-click the Chapter9 project.
- 2.
Choose Add.
- 3.
Choose Class.
- 4.
Name the class Ternary.cs.
- 5.
Click the Add button.
- 6.
Create a Main() method within the class, as this was not produced automatically, and delete the unwanted imports.
Remember the shortcut to create the Main() method is to type svm and then press the Tab key twice. Now we need to set this class as the startup class.
- 7.
Right-click the Chapter9 project in the Solution Explorer panel.
- 8.
Choose Properties from the pop-up menu.
- 9.
Choose the Ternary class in the Startup object drop-down list.
- 10.
Close the Properties window.
Now we will amend the code to use the ternary conditional operator.
- 11.
Amend the code as in Listing 9-32.
Ternary operator
- 12.
Click the File menu.
- 13.
Choose Save All.
- 14.
Click the Debug menu.
- 15.
Choose Start Without Debugging.
- 16.
Click in the console window.
- 17.
Type 5 as the number of years of no claims.
- 18.
Press the Enter key on the keyboard.
Figure 9-50 shows the console window with the message for the FALSE block as 5 is not greater than 10.

A console window depicts the execution of the false block of a ternary with the years of no claims being less than or equal to 10 entry for 5.
False section of ternary executed
- 19.
Press the Enter key to close the console window.
Start the program again.
- 20.
Click the Debug menu.
- 21.
Choose Start Without Debugging.
- 22.
Click in the console window.
- 23.
Type 15 as the number of years of no claims.
- 24.
Press the Enter key on the keyboard.
Figure 9-51 shows the console window with the message for the TRUE block as 15 is greater than 10.

A console window depicts the execution of the true block of a ternary with the years of no claims is more than 10 entry for 15.
True section of ternary executed
- 25.
Press the Enter key to close the console window.
Code Analysis
If we follow this syntax, then our code could be written as
yearsOfNoClaims > 10 ? "Years of no claims is more than 10" : "Years of no claims is less than or equal to 10";
Ternary operator

A window exhibits an error message popping up below the underlined line of code that reads years of no claims greater than the symbol 10 question mark. The error code is C S 0 201.
Ternary error message when not assigned
So our quote was slightly inaccurate as we need to assign the ternary to a value.
Nested Ternary Conditional Operator
We saw that the ternary conditional operator syntax was
Condition ? First Expression : Second Expression
We can incorporate another ternary conditional operator as the second expression, and in this second ternary conditional operator, we can add another ternary conditional operator as the second expression in it. We can continue the nesting as required. Warning: This can get complex to read and understand, as we are essentially doing an if-elseif-elseif and so on.
- 26.
Amend the code as in Listing 9-34.
Ternary operator
Before we run the code, let us look at the nested ternary conditional operator in a more readable form:
yearsOfNoClaims > 10 ? "Years of no claims is more than 10" :
yearsOfNoClaims > 8 ? "Years of no claims is either 9 or 10" :
yearsOfNoClaims > 6 ? "Years of no claims is either 7 or 8" :
yearsOfNoClaims > 4 ? "Years of no claims is either 5 or 6" :
yearsOfNoClaims > 2 ? "Years of no claims is either 3 or 4": "Years of no claims is 2, 1, 0 or indeed a negative number of years because of a penalty being enforced on our policy";
The second expression of the first ternary is ternary starting with yearsOfNoClaims > 8.
The second expression of the second ternary is ternary starting with yearsOfNoClaims > 6.
The second expression of the third ternary is ternary starting with yearsOfNoClaims > 4.
The second expression of the fourth ternary is ternary starting with yearsOfNoClaims > 2.
- 27.
Click the File menu.
- 28.
Choose Save All.
- 29.
Click the Debug menu.
The console window will appear and ask the question. Now we can try the values 10, 8, 6, 4, and 2, which will test the five ternary sections. We will start with 10.
- 30.
Type 10 as the number of years of no claims.
- 31.
Press the Enter key on the keyboard.
Figure 9-53 shows the console window, and we can see that the false part of the first ternary section has executed and there is another ternary and the true section of this ternary has been executed:
yearsOfNoClaims > 8 ? "Years of no claims is either 9 or 10"

A console window depicts the execution of the first part of the nested ternary true section with the years of no claims is either 9 or 10 entry for 10.
Nested ternary – first part executed
- 32.
Press the Enter key to close the console window.
Start the program again.
- 33.
Click the Debug menu.
- 34.
Choose Start Without Debugging.
- 35.
Type 8 and press the Enter key.
The console window will appear, as shown in Figure 9-54, and we can see that the false part of the first ternary section has executed, there is another ternary and the false section of this ternary has been executed, and there is another ternary and the true section of this has been executed:
yearsOfNoClaims > 6 ? "Years of no claims is either 7 or 8"

A console window depicts the execution of the first part of the nested ternary true section with the years of no claims as either 9 or 10 entry for 10.
Nested ternary – second part executed
- 36.
Press the Enter key to close the console window.
Start the program again.
- 37.
Click the Debug menu.
- 38.
Choose Start Without Debugging.
- 39.
Type 6 and press the Enter key.
The console window will appear, as shown in Figure 9-55, and we can see that the false part of the first ternary section has executed, there is another ternary and the false section of this ternary has been executed, there is another ternary and the false section of this has been executed, and there is another ternary and the true section of this ternary has been executed:
yearsOfNoClaims > 4 ? "Years of no claims is either 5 or 6" :

A console window depicts the execution of the third part of the nested ternary true section with the years of no claims as either 5 or 6 entry for 6.
Nested ternary – third part executed
- 40.
Press the Enter key to close the console window.
Start the program again.
- 41.
Click the Debug menu.
- 42.
Choose Start Without Debugging.
- 43.
Type 4 and press the Enter key.
The console window will appear, as shown in Figure 9-56, and we can see that the false part of the first ternary section has executed, there is another ternary and the false section of this ternary has been executed, there is another ternary and the false section of this has been executed, there is another ternary and the false section of this ternary has been executed, and there is another ternary and the true section of this ternary has been executed:
yearsOfNoClaims > 2 ? "Years of no claims is either 3 or 4":

A console window depicts the execution of the fourth part of the nested ternary true section with the years of no claims as either 3 or 4 entry for 4.
Nested ternary – fourth part executed
- 44.
Press the Enter key to close the console window.
Start the program again.
- 45.
Click the Debug menu.
- 46.
Choose Start Without Debugging.
- 47.
Type 2 and press the Enter key.
The console window will appear as shown in Figure 9-57 and we can see that the final ternary false section has been executed.

A console window depicts the execution of the fifth part of the nested ternary true section with an entry that starts with years of no claims as either 2, 1, 0 for 2.
Nested ternary – fifth part executed
- 48.
Press the Enter key to close the console window.
Whoa, whoa, let us catch our breath after that nested ternary code block. The code works and gives us the same results as the if else if code block. However, are we thinking that this ternary code looks confusing compared with the if else if code block? Remember we talked about clean code, so if we see this as confusing and not as readable as the if else if code block, we should not use it. We have choice in how we write our code, but we have a responsibility to make the code readable and easy to maintain.
Chapter Summary
Selection in C# can have different formats, including
The if construct
The if-else construct
The if else if construct
The switch construct and the case label
Ternary conditional operator
The case construct can use numeric or string data types.
The case label is case sensitive.
the ternary conditional operator can replace the if else construct
There is a different way to display data to the console with the use of “placeholders” {}.
C# has a string handling class with useful methods, one of which is the ToUpper() method.
We can have more than one class in a package.
We are making great progress in our programming of C# applications and we should be proud of our achievements. In finishing this chapter and increasing our knowledge, we are advancing to our target.

An illustration of concentric circles with two differently colored regions above a text that reads, Our target is getting closer.