
By now we know that Tcl has the functionality to create networked applications. We also know how to build simple client-server communication. However, as with any programming language, being able to plug into existing protocols and communicate using standards that other systems are using as well is very important. This chapter talks about various standards, how Tcl fits into these technologies, and how to use Tcl for various types of protocols and data encoding.
First, we'll show how to manage files remotely over File Transfer Protocol (FTP). This can be used as the base for many operations, such as remote copies and filesystem synchronization. We'll also learn how to download a file from a website using Hypertext Transfer Protocol (HTTP), which can then be used to get content from the Internet. This knowledge will also be valuable when we move on to embedding and using web servers in our application in the chapters that follow.
We will also talk about communicating with users using e-mail, starting with sending simple e-mails, followed by learning how to send attachments and multipart types. Using this we'll show how to send and receive e-mails in order to do tasks such as sending information to users and/or customers. You will also learn how to read e-mails in your Tcl code, parse them, and how simple mechanisms can be built to create an automated e-mail management system.
It's worth noting that whenever we're doing checks of any data retrieved from remote systems, we should check if all conditions are satisfied instead of checking for known problems; for example, we should check if the status is one of the acceptable status values instead of checking if it is one of the known error statuses. Troubleshooting Tcl applications and more recommendations for making applications less error prone are described in more detail in Chapter 4, Troubleshooting Tcl Applications.
Before working with e-mail, we need to understand a bit about how e-mail works, as well as what it provides and what our application needs to perform on its own. In general, e-mails are easy to understand—someone sends a message, the e-mailing system takes care of delivering it to the correct target machine(s), and the recipients are then able to retrieve that message. From the e-mail system's perspective, it does not care about what the e-mail contains, as long as it knows who it is from and who it should be delivered to.
From the user's perspective, he/she does not need to know how it is delivered—their mail application delivers the message to the server handling their e-mail, and all messages can be retrieved from that same server. When we interact with e-mails, it works the same way for us. In the majority of cases, our application only needs to interact with our e-mail server.
All e-mail messages are built using a common structure—each message consists of headers that describe the message and the body. Headers describe who the message is from, its recipients, and the subject of the message. They also provide the content type, which tells e-mail applications what type of data the message contains. Message headers can also contain a history of the servers it passed, additional information such as the e-mail application used to generate this message, and any other information that the e-mail application has added. The message body is the actual text and/or data that was sent. Information about what is in the message body is described in the headers, for example we can send plain text, HTML message, or simply an image.
Multipurpose Internet Mail Extensions (MIME) is a standard that extends the e-mail format. It defines how messages can include character sets other than 7-bit ASCII in the message headers and body, and introduces the concept of multiple parts of an e-mail along with attachments. Over time, MIME became such an integral part of e-mail handling that all e-mails are now sent in accordance with MIME standards.
MIME introduced the concept of content type, which was originally meant for defining types of files in an e-mail. This was introduced so that e-mail applications could present the content of a message differently, depending on the actual file type. This grew to other protocols and can now be referred to as the Internet media type standard. The standard consists of two parts—MIME type and MIME subtype separated by a slash. The content type describes the type of a piece of media, for example, image. The subtype defines file format—for example, jpeg. In this example, the MIME type is image/jpeg.
A full list of standardized format types can be found on the following page: http://www.iana.org/assignments/media-types/
Whenever an application needs to use its own content type, it is recommended that an x- prefix is appended to the subtype—for example, application/x-tcl-dict could be used to transmit a dictionary's contents.
The MIME standard defines several possibilities for embedding data that is outside a 7-bit ASCII character set, that is, data such as binary files, messages using different character sets, and so on. The Base64 standard is commonly used for encoding binary files within an e-mail—this standard uses 64 characters only, and requires 4 bytes to encode 3 bytes of actual data. This means that a 1M file will use up over 1.3M when sent via e-mail. Base64 is described in more detail at: http://en.wikipedia.org/wiki/Base64
The standard also defines the quoted-printable standard that is used for sending 8-bit data. Characters outside of 7-bit character set are encoded as multiple characters; this idea is described in more detail at: http://en.wikipedia.org/wiki/Quoted-printable
For the purpose of this book, we do not need to go into details of how both Base64 and quoted-printable encodings work.
MIME also introduces the concept of multipart content. An e-mail message can only consist of a single item. However, the MIME standard provides ways to send multipart content by enclosing multiple items in a single message. It can also be used recursively, one of the elements can also contain additional parts. We'll see this in the following example:
There are multiple types of multipart contents:
multipart/relatedis used to send messages that should be treated as a whole. The first part is the content that the e-mail application should use and other parts are related to it, for example, images that are used in a HTML message. However, adding a part that should be inline requires that this element also has specific headers, which is discussed in more detail later in this chapter.multipart/mixedis used for sending mixed content types. It is up to the e-mail application to decide how to handle this, but parts that it can show inline will be shown within e-mail application, and parts that it cannot show directly will be shown only as attachments. A typical example is attaching images and documents—e-mail applications will show images inline, but require documents to be opened in an external application.multipart/alternativeis used to define multiple parts, where each part is an alternate version of the same content. A typical example is sending plain text and HTML messages. E-mail applications choose the best format that they can handle. Representations should be sent in a way they are ordered by—preferable representation should be the last part.
Multipart content types allow each part to have its own individual headers—this is required in order to define which content type each part is, along with how it should be treated. Also, as each part can have its own type, each part can also be a multipart element on its own.
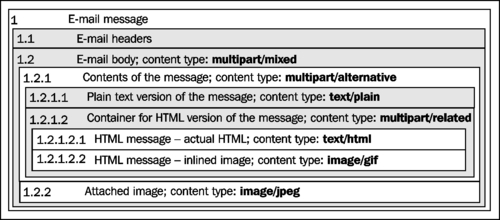
The following diagram illustrates how both multipart/mixed, multipart/alternative, and multipart/related can be used to send e-mail that contains plain text message and HTML message, inlined images as well as attachments. This is actually how the majority of e-mail applications will embed such a message. The structure of the entire message would look as follows:
Now that we know how our e-mail might appear, let's proceed to building such a structure from within Tcl.
In order to send such an e-mail from within Tcl, we will need to use Tcl's mime package. It is a part of the tcllib package and is available in ActiveTcl distributions of Tcl.
This package allows the building and parsing of messages and handles all aspects of a message—headers, content, and support for multipart messages. It also handles conversion between various content encodings such as base64 and quoted-printable. Thanks to this we'll only need to build the message parts and combine them into a final message.
The command mime::initialize is used to set up a part or the content of the entire message. This command accepts one or more options and returns a new token that identifies the new MIME part. Based on the options specified, there are two modes in which it can be used— the first is to parse content (such as parse a received e-mail message), and the second is to create content. We will focus on the second case and leave parsing for sections that talk about receiving e-mail.
Whenever we want to create a MIME part we need to specify the -canonical option and provide the content type for this part. Type is the MIME type described earlier. There are three possibilities for creating MIME objects—from a file or from a string, and when creating multipart content.
- To create it from a file or a string, we need to specify the
-fileor-stringoption and provide either the path to the file or the content of this part as string or binary data. We should also specify the-encodingoption that states how content should be handled so that it can be passed over a 7-bit protocol such as SMTP. For binary files, we should usually usebase64encoding and for text files, it is best to usequoted-printable. - When creating a MIME part, we can also specify one or more headers that it should have by adding the
-headeroption. This option can be specified multiple times and each parameter to this option should be a list containing a header name and corresponding value. These headers are then added to the actual MIME body. Their names and corresponding values are part of MIME's specifications. We'll cover a small subset that we need to know in order to send an e-mail with both inlined elements and attachments.
For example, in order to create a simple plaintext element, we can run the following command:
set token [mime::initialize -canonical "text/html"
string "Hello world!"]
If we want to send it, all we would need to do is use the smtp package:
smtp::sendmessage $token -recipients "[email protected]"
Sending e-mails is described in more detail later in this section—the preceding code simply shows that both packages can be combined very easily.
In order to multipart content, we should provide the -parts option to the mime::initialize command. The value for this option should contain a list of all parts that should be included in this multipart content. Parts are included in the same order as provided in the list.
Let's walk through an exercise of building up an e-mail that we described earlier.
This code uses several files, mainly message.html and message.txt for the text of the e-mail, companylogo.gif for logo that is used in message.html, and attachment.jpg as an attachment.
Note
The files as well as the complete source code for the example in this section are located in the 01mime directory in the source code examples for this chapter.
First we have to load the mime package and create an HTML part:
package require mime
multipart elements, MIMEHTML part, creating# create actual HTML part
# (1.2.1.2.1 from diagram)
set part_html [mime::initialize -canonical "text/html"
-encoding quoted-printable -file message.html]
# create logo as inlined image
# (1.2.1.2.2 from diagram)
set part_logo [mime::initialize -canonical "image/gif"
-encoding base64 -file companylogo.gif
-header [list Content-Disposition "inline"]
-header [list Content-ID "companylogo.gif"]
]
This code builds up two elements—a part containing HTML version of the message and an image that we add, inline, in the message. Following that, we use these to build up the multipart/related part (element 1.2.1.2 from preceding diagram) that contains two elements created using the preceding code:
set part_htmlrelated [mime::initialize
-canonical multipart/related
-parts [list $part_html $part_logo]]
Next it's time to create a plain text version of the e-mail (element 1.2.1.1 from diagram) and build the multipart/alternative element that binds the HTML message and the plain text message into one piece, which is element 1.2.1.
set part_txt [mime::initialize
-canonical "text/plain"
-encoding quoted-printable -file message.txt]
set part_alternative [mime::initialize
-canonical multipart/alternative
-parts [list $part_txt $part_htmlrelated]]
Finally, we create a part for the attachment (element 1.2.2 from diagram) and create an element that combines the previously created container for the plain text and HTML message along with the attachment—element 1.2 from diagram.
set part_attachment [mime::initialize
-canonical "image/jpeg"
-header [list Content-Disposition
"attachment; filename=attachment.jpg"]
-header [list Content-ID "attachment.jpg"]
-encoding base64 -file attachment.jpg]
set all [mime::::initialize -canonical multipart/mixed
-parts [list $part_alternative $part_attachment]]
This makes our code complete and a full version of the message is now ready.
There are three types of elements that we are building:
- HTML and plain text messages: Their context is defined by multipart elements they are included in, therefore, we only need to define content type.
- JPEG image: It is an attachment, therefore, we need to provide more information in the part headers—filename, Content-ID, and disposition.
- Multipart elements: These are used to combine other types of elements into a structure that we've described earlier.
Sending text messages also relates to character sets, encodings, and issues with internationalization. When sending messages that contain characters outside of 7-bit ASCII, we need to be aware of two things.
First of all, Tcl sends both strings and file contents in binary form. If we want to send text from a file, then that file needs to be encoded properly, using encodings such as UTF-8. If we want to send text from Tcl, we need to convert that text to proper encoding. Secondly, we need to specify the encoding of a part when specifying the canonical type—usually this means appending a semi-colon and charset=<charsetName>. For example:
set part_html [mime::initialize -canonical
"text/html; charset=UTF-8"
-encoding quoted-printable string [encoding
convertto utf-8 "u25ba Omega symbol: u2126 u25c4"]]
The previous example will cause our e-mail message to contain the text ► Omega symbol: Ω ◄—in our example, uxxxx means the Unicode characters for ►, Ω, and ◄ accordingly.
The command encoding convertto converts text to specified encoding and is described in more detail in Chapter 4. For more information about standardized character encodings, please refer to: http://www.iana.org/assignments/character-sets .
Next we have an inlined image—in this case, we need to define additional headers. The first header is Content-Disposition, which specifies how this part should be handled. Specifying inline means that this is an element that will be referenced from the main document and should not be shown as an attachment. The second header is Content-ID, which identifies and names an element. This is how an element can then be referenced from other parts. Any references should be made in the format of cid:<Content-ID>, so in our case, it would be cid:companylogo.gif. For example, our message.html file can contain the following HTML tag:
<img src="cid:companylogo.gif" 400" height="40" />
Elements that are regular attachments should have Content-Disposition set to attachment. Also, it is recommended to add filename=<name> to this parameter, separated from the disposition type by a semi-colon. Content-ID in this case specifies an attachment name and should be the same as the filename specified in the Content-Disposition header. This is how the attachment.jpg file is sent.
There is also a difference between naming parts within an e-mail and actual filenames. However, this example names files from MIME's perspective in the same way as files are named on disk. It is common to add prefixes and/or suffixes to avoid naming collisions, especially when a message contains parts from different sources. For example, we add create inlined image in the following way:
set part_logo [mime::initialize -canonical "image/gif"
-encoding base64 -file "/path/to/template/logo.gif"
-header [list Content-Disposition "inline"]
-header [list Content-ID "template.logo.gif@$messageId"]
]
We can then build the HTML to include such an image from Tcl by doing something like:
set html "<img src="cid:template.logo.gif@$messageId" />"
It is a good idea to generate unique identifiers for each message and append them to inlined parts' identifiers. This prevents poorly written e-mail applications from having issues with forwarding or replying to e-mails with such images. It can be done using the uuid package and the uuid::uuid generate command, but any mechanism for generating a unique ID, such as from a related database entry, will work.
Cleaning up a MIME item requires running the mime::finalize command and passing the token of a MIME part to it. In order to delete all elements that are used in that element recursively, we can add the -subordinates option with the value all. For example:
mime::finalize $all -subordinates all
The preceding code will delete the token created for the entire message along with all other elements we've created.
Information about all commands from mime package can be found in its documentation available at: http://tcllib.sourceforge.net/doc/mime.html
Now that we're able to build MIME parts and the contents of messages, we can send our message. Messages are sent over the Simple Mail Transfer Protocol (SMTP), which is the most popular standard for the delivery of e-mail messages. This is the protocol that almost all e-mail applications use to send e-mail and all service providers give you an SMTP server to send messages through.
From the Tcl perspective, we need to use the smtp package. This package uses the same tokens as MIME to send messages, which means that if you have created a message using the mime package, sending it requires only a few lines of code.
The package smtp offers a single command—smtp::sendmessage. This command requires passing a token to MIME part and accepts additional options. The first one is -servers, which is a list of SMTP servers to try. If this is not specified, then message is sent using the SMTP server on the local machine. If the machine our code is run on has an SMTP server, it is okay to not specify this option. If our SMTP server is using a non-standard port, the option -ports can be used to specify which ports we should try to connect to. For the majority of users, it is not necessary to use this flag.
We can also specify additional headers that should be added when building this e-mail by adding the -header option in one or multiple times. Similar to the mime package, it accepts a list where the first element is the header name and the second is the value. Usually when sending an e-mail, we want to set the From, To, and/or the Cc and Subject header fields. For fields such as To and From, we need to specify addresses in a specific way. If we want to specify both the full name and e-mail address, it should be in the form of"[Full Name]" <email@address>. If only the e-mail address is to be passed, it should be in the form of<email@address>. Multiple items should be separated by a comma succeeded by a space. For example:
smtp::sendmessage $token -header
[list To "<[email protected]>, <[email protected]>"]
We should pass the -originator option in order to specify address from which an e-mail is sent. Specifying who the message should be delivered to can be done using the -recipients option. If -originator is not passed, the value is taken from the From or Resent-From header field. If -recipients was not specified, the value is taken from the To, cc, Bcc, or Resent-To header fields and is concatenated to one list. Please note that only headers specified to smtp::sendmessage are parsed, not headers set in the MIME token provided to the command.
Based on the previous example, we can use the message we have just created and add to it the code that will send it:
package require smtp
smtp::sendmessage $all
-recipients $recipient -originator $sender
-header [list Subject $mailsubject]
-header [list From ""$senderName" <$sender>"]
-header [list To ""$recipientName" <$recipient>"]
-servers $smtpservers
And a sample initialization of configuration variables needed for this code is as follows:
set sender sender@localhost
set senderName "My Tcl Application"
set recipient recipient@localhost
set recipientName "My Tcl Application User"
set mailsubject "Screenshot of Eclipse and DLTK"
set smtpservers 127.0.0.1
Note
The complete example along with code from the previous example that creates all MIME elements is located in the 02smtp directory in the source code examples for this chapter.
If our SMTP server requires authentication, we will need to pass this information to the smtp::sendmessage command. The options -username and -password can be used to specify credentials and if server requires authentication, the smtp package will use these. Usually authentication is needed if your e-mail server is being accessed remotely. In these cases, the username and password are provided by your ISP or network administrators.
Now that we know how to send an e-mail from start to end, we can move on to more advanced issues. Often our application will just send e-mails sporadically. However, there are many applications that mainly send e-mails. Many companies run their business by sending customized information to their customers and need a robust system that can send large volumes of e-mails, which handles failures of e-mail servers and needs to be customizable from both business logic and template perspectives.
If we plan on sending e-mail messages, we need to automate the process of building them and creating a system that will allow other people to customize both content and the appearance of our e-mails. We can either create a set of standalone tools or libraries that we can then use in our applications, depending on our needs.
One of the most important things that such an application will offer is an easy way to change contents of messages easily. In many cases, it is enough to have a separate directory for content of a message along with standardized file naming.
For example, let's assume our messages are stored in a separate directory. Files called message.txt and message.html will be used for body of the message. The subject of the message is in the subject.txt file. All files starting with the inline_ prefix will be included and contained within multipart/related along with a HTML version of the message. We'll also assume our messages are in UTF-8 encoding, which allows support for various encodings around the world.
We'll reuse some of the ideas from the previous code sample and make it more generic. Let's start with creating a namespace, and create a procedure called readText for reading text files. This procedure will also use the subst command to allow substitution of commands and variables. We'll also load packages that we'll use throughout this example and initialize the proper namespace, which is needed before creating any procedures within that namespace:
namespace eval emailtemplate {}
package require mime
package require uuid
package require fileutil::magic::mimetype
proc emailtemplate::readText {filename messageId data} {
set fh [open $filename r]
fconfigure $fh -encoding utf-8 -translation auto
set text [read $fh]
close $fh
set text [subst $text]
return $text
}
This procedure also requires the messageId variable to be passed, which we'll later use to add inline images in the correct way. Our code reads a file as UTF-8, runs subst, and returns result of that command, which causes any occurrence of [command] or $variable to be evaluated as if it was part of Tcl code.
For example, we can add this to our HTML part of the message:
Welcome <b>[dict get $data firstname]</b>,
This causes value of firstname key from $data dictionary to be shown in bold.
Variable $data is passed to emailtemplate::readText command in the first place. We can use it for passing data to our templates as dictionaries. For example, if we were to send a notification that a payment is due, data would contain first name, last name, and other information about the recipient, and the amount and payment date. Our template would then include these values in the text by using dict get command as seen in this section.
We've loaded the uuid and fileutil::magic::mimetype packages. The first one is used to generate the message's unique identifier, whereas the second one is used to get the MIME content type from files, so that these don't have to be specified explicitly by e-mail template providers.
Next we'll create a buildMessage procedure that builds a MIME part containing each element based on directory where the template is placed and provided data. It also accepts an optional list of attachments, which allows us to add additional files, such as invoices as PDF files, if this is needed.
proc emailtemplate::buildMessage {directory data {files ""}} {
set messageId [uuid::uuid generate]
The following steps are performed as part of emailtemplate::buildMessage:
The first step is to read the subject and both versions of messages. We'll also make sure that the subject does not include any newline characters as this will create errors when either building or parsing the message. We do this by splitting the subject into a list of lines and choose the first element from that list.
set subject [readText
[file join $directory subject.txt] $data]
set msgtext [readText
[file join $directory message.txt] $data]
set msghtml [readText
[file join $directory message.html] $data]
set subject [lindex [split $subject
] 0]
After we've read the subject and both types of messages, we now build the MIME parts for these. Please note that, at this point, our messages are already formatted using the data that was provided. This step is very similar to how it was previously built for our first message.
set part_text [mime::initialize
-canonical "text/plain; encoding=UTF-8"
-string $msgtext -encoding quoted-printable]
set part_html [mime::initialize
-canonical "text/html; encoding=UTF-8"
-string $msghtml -encoding quoted-printable]
The third step is to build a list of parts for the multipart/related element that contains an HTML message along with sending images inline. We create a list of parts and add only one element to it for now—the actual HTML part.
set parts_related [list $part_html]
We then list all files in the template directory beginning—matching inline_* pattern. The variable file contains full path to the file and filename contains just the filename.
foreach file [glob -directory $directory
-nocomplain -type f inline_*] {
set filename [file tail $file]
For each of these files, we'll find the proper MIME content type to use and add it to the list of items. We specify that this item should be added inline and that its identifier is<filename>@<messageId>.
set ftype [fileutil::magic::mimetype $file]
lappend parts_related [mime::initialize
-canonical $ftype -encoding base64 -file $file
-header [list Content-Disposition "inline"]
-header [list Content-ID "$filename@$messageId"]
]
}
Finally, we'll build a multipart/related element by combining HTML along with the inline images and add this to a multipart/alternative element so that the e-mail application reading this message can choose between plain text or HTML.
set part_related [mime::initialize
-canonical "multipart/related"
-parts $parts_related]
set result [mime::initialize
-canonical "multipart/alternative"
-parts [list $part_text $part_related]]
The steps that follow take place only if this procedure has been passed any attachments. If this is the case, we create a new list of items for multipart/mixed. We initialize it to just one element—the result from previous step, the complete message containing plaintext, HTML, and images added inline.
Now we iterate through the list of attachments, taking two elements from the list at a time. The first one is the path to attachment file and the second one is the name that will be shown to the recipients.
if {[llength $files] > 0} {
set elements [list $result]
foreach {file name} $files {
For each of the attachments, we guess its MIME content type, and build its MIME element and add that to the list of elements.
set ftype [fileutil::magic::mimetype $file]
lappend elements [mime::initialize
-canonical $ftype
-encoding base64 -file $file
-header [list Content-Disposition
"attachment; filename=$name"]
-header [list Content-ID "$name"]
]
}
Finally, we create a final multipart/mixed element that will contain the message and all attachments.
set result [mime::initialize
-canonical "multipart/mixed"
-parts $elements]
}
The last thing is to set the Subject header to indicate the subject that was provided by the template and return the element back to the caller of this procedure.
mime::setheader $result Subject $subject
return $result
}
This provides a complete mechanism for sending messages based on templates.
Setting the Subject header before sending the message is different from the previous example. Although the From, To, Cc and Bcc fields should be set during the smtp::sendmessage step, Subject and all other headers that are not related to message delivery can be set before sending the message.
Now that we have completed our code for preparing the messages, we can proceed with adding a small piece of code to send it:
set data [dict create firstname "John" lastname "Doe"]
set token [emailtemplate::buildMessage "template1" $data]
smtp::sendmessage $token
-recipients $recipient -originator $sender
-header [list From ""$senderName" <$sender>"]
-header [list To ""$recipientName" <$recipient>"]
-servers $smtpservers
This code is based on the same variables as the previous example. We're also passing two values to the message—firstname and lastname. If we want to send an attachment, all we need to do is add such a list to the emailtemplate::buildMessage invocation similar to the following example:
set token [emailtemplate::buildMessage "template1" $data
[list "attachment/attachment.jpg" "screenshot.jpg"]]
The directory template1 is the location where the template of the e-mail is kept. It has to contain subject.txt and message.txt, and message.html which are the subject and content of the message in plain text and HTML respectively. The directory can also contain files that should be embedded as part of the message.
The list provided as the last argument is the list of attachments to include. While the actual file is called attachment.jpg, the user will actually see it named as screenshot.jpg. It is common to use this approach, for example, when file names are unique identifiers of the content, such as customerinvoice_0013_0143.pdf while we want the user to see a more readable filename such as Invoice.pdf.
Note
The example in this section is located in the 03emailtemplate directory in the source code examples for this chapter. It also contains a sample template that uses data variables for passing information.
Documentation on mime and smtp packages can be found on the tcllib project website at SourceForge: http://tcllib.sourceforge.net/doc/mime.html and http://tcllib.sourceforge.net/doc/smtp.html
In many cases, apart from sending e-mails, our application should also be able to receive messages sent via e-mail. One example is that if we send out mass e-mails to users, we might also want to be able to receive messages for unsubscribing from them and process them. Also, our application can also receive "delivery failed" notifications and process them—for example, starting with temporarily not sending messages and ending with removing failing e-mail addresses from our records permanently.
One of the most flexible options is to set up a dedicated SMTP server that will accept e-mails from other systems. This option, however, requires more setup and is discussed in the next chapter.
A simpler option that will allow us to receive e-mails is to use existing servers and read e-mails from them. This is similar to how e-mail applications work—the e-mail is stored on a remote server and you receive and/or delete it whenever your computer is online.
For this purpose, we'll use the Post Office Protocol version 3 (POP3), which all e-mail servers offer. In order to read e-mail over POP3, we need to know the POP3 server name, and the username and password required to access our account. Usually, this is provided by our system administrators. For the majority of Unix servers, the hostname, username, and password are the same as for accessing it over SSH, Telnet, FTP, or any other protocol. POP3 works so that applications connect, list and read messages, delete the ones they have already read, and then disconnect. This is then repeated periodically.
POP3 uses positive integers to identify all messages. These messages range from 1 to the number of messages—therefore, if our inbox has 23 messages, they are 1, 2, 3, ..., 23 accordingly. Throughout the entire connection to a POP3 server, each number is guaranteed to point to the same message. Therefore, until we disconnect, message 19 will always point to the same message.
If we delete a message, we can no longer reference that particular message, but all other messages will still have the same index—for example, if we delete message 4, messages from 5 and up will still have the same identifiers. Also, when new messages arrive during our connection to the server, our connection will not be able to access them.
POP3 is designed so that the application logs in, reads messages, and disconnects. Our program might be doing this frequently, but it should always set up a new connection to the server.
Tcl offers a pop3 package that allows you to retrieve e-mails from POP3 servers. Unlike SMTP, it is not integrated with the MIME package, but it can easily be used along with MIME to process messages.
In order to initialize a connection, we need to run the pop3::open command by providing it with the hostname, username, and password. Optionally, we can specify the TCP port to connect to as the next argument, otherwise the POP3 default port 110 is the used. This command returns a channel that is used by all other commands from this package.
For example, the following will connect to your Gmail account:
set h [pop3::open "pop.gmail.com" "[email protected]" "password"]
After that variable h will keep a handle, which we can use to issue commands later on. This token is used by all other commands from the pop3 package and is always passed to these commands as the first argument.
We can also provide this command with several options, which should be put before the host name. The first one is -socketcmd, which allows us to specify the command that should be used for creating the socket. Its main use is to support Secure Socket Layer (SSL) and for providing a command that connects using a proxy server if this is needed. While SSL is described in detail in Chapter 12, it is worth mentioning that if we are using SSL, we also need to specify the port to use, which is 995 for POP3 over SSL. For example:
set h [pop3::open socketcmd tls::socket "pop.gmail.com"
"[email protected]" "password" 995]
Another flag is -msex, which takes a Boolean value and specifies whether the server we are communicating with is a Microsoft Exchange server. If this is the case, the POP3 package needs to work around some non-standard behavior that occurs when communicating with a Microsoft Exchange server.
Having the channel to a mail server open, we can now retrieve information. The command pop3::status can be used to find out about the total number of messages and bytes used, and requires passing only the POP3 channel. It returns two numbers— the first one being number of messages in your inbox and the second one specifies the total number of bytes used by all messages. For example:
lassign [pop3::status $h] numMessages bytesUsed
This will retrieve the status and assign it to numMessages and bytesUsed variables. The command lassign is described in more detail in Chapter 1. The number of messages specifies both how many messages are present in our inbox as well as the maximum value that we can use for specifying message identifier.
We can also list all messages—by receiving either their sizes or their unique identifiers. The command pop3::list returns a list of messages that we can access as a list. The list consists of two elements for each message—its identifier (integer number) and size in bytes. For example, in order to list size of all messages, we can run the following:
foreach {id size} [pop3::list $h] {
puts "Message $id has $size byte(s)"
}
The command pop3::uidl works similarly, but returns the unique identifier of a message instead of the size. For example:
foreach {id uidl} [pop3::uidl $h] {
puts "Message $id is $uidl"
}
Both pop3::list and pop3::uidl can be run by specifying message number—in this case, data is returned for a single message only.
Please note that unique identifiers might not be supported by all e-mail servers and this command might return an error in this case. Otherwise, these identifiers allow for identifications of e-mails across POP3 sessions. The POP3 standard does not define the format of these identifiers, so our application should not assume anything about it and about the ways of comparing identifiers.
Unique identifiers combined with a persistent storage can be used to track which messages are new and should be processed, and which ones our application has already processed. This is especially useful if our application does not delete messages after receiving them.
Once we know which messages we want to retrieve, we can either retrieve just part of the message or the entire message. In order to retrieve headers and part of the message, we can use the pop3::top command. It accepts the POP3 channel, the number of the message, and the number of lines from the actual message to retrieve. For example, in order to retrieve the headers and 5 topmost lines from the first message, we can run the following:
puts [pop3::top $h 1 5]
Retrieving an entire message or a group of messages can be achieved by using the pop3::retrieve command, by specifying the channel name as the first argument and the index of message as the second argument. This command always returns a list of the messages, even if only one index was specified. For example, we can retrieve and print the entire first message by running:
puts [lindex [pop3::retrieve $h 1] 0]
We can also specify two indexes—the first being the start index and the second being the end index. In this case, the command will retrieve multiple messages and return a list containing them. For example, we can retrieve messages 1, 2, and 3 by running:
pop3::retrieve $h 1 3
We can also specify special values for the start and/or end indexes. The special index start means the first message and is the same as 1. The special index end specifies the last message, based on how many messages are present on the server. For example:
set id 0
foreach msg [pop3::retrieve $h start end] {
incr id
puts "Message $id has [string length $msg] bytes"
}
This will print out the size of each message. The same values can be retrieved using the pop3::list command, because in both cases, the message is handled in a binary way—without encoding and/or newline translations.
Deleting one or more messages can be done using the pop3::delete command. It accepts the channel name, followed by one or two indexes. Similar to pop3::retrieve, if a single index is specified here, then only this message is deleted. If two indexes are specified, then multiple messages are deleted. The special keywords start and end can also be used. For example, deleting all messages can be done by invoking:
pop3::delete $h start end
As the POP3 protocol does not support retrieving or deleting multiple messages at a time, internally, both pop3::retrieve and pop3::delete iterate through the specified range.
When we have finished working with our remote e-mails, we should close the connection. The command pop3::close is used for this. The only argument it needs is the POP3 channel name. For example:
pop3::close $h
After retrieving our messages, we can parse them to properly handle their content. This can be done by using the mime package for this purpose, similar to how we built messages.
In order to have the mime package parse an already built message, we can use the mime::initialize command. It will parse the message, parse headers ,and split it into appropriate parts if we don't provide the -canonical flag. For example:
set message [lindex [pop3::retrieve $h $id] 0]
set token [mime::initialize -string $message]
It is a good idea to catch exceptions from mime::initialize, because if the message is not correctly formatted, the command will throw an error. As our messages can come from an unknown source, it is a good idea not to assume all messages can be properly handled.
We can use the token to access information in it and subsequent parts. In order to do this, we'll use three commands: mime::getheader, mime::getproperty, and mime::getbody.
The first command can be used to retrieve MIME headers such as From, To, Subject or Content-ID. The command mime::getproperty returns information about a particular token. The property content specifies content type, encoding specified content transfer encoding (base64 or quoted-printable), and size provides the size of the content before decoding it. The parts property provides a list of subordinates (children) of this node and it is only set if this node has children.
Both commands accept a MIME token as the first argument and, optionally, a property or header name as the second argument. If a name is not specified, the commands return a name-value pair list. Both commands also throw an error if a header or property is not set for this token.
The command mime::getbody decodes and returns the body of a message or a subordinate. It is used to extract the non-multipart elements of a message.
Let's use these methods in a more practical example. Assume we want to create an application that will check e-mails, look for messages that have an attachment with jobdata.raw filename and insert the contents of each of these attachments to a database. We'll also keep track of messages we've already parsed and will not delete them.
For the database, we'll use SQLite3, because it will not require the reader to set up any database server. SQLite3 is included in ActiveTcl, so we should have it installed already. More details about databases can be found in Chapter 5.
We'll start by initializing our code and database. We'll load the appropriate packages and initialize the database:
package require pop3
package require tls
package require sqlite3
package require mime
if {![file exists "database.db"]} {
sqlite3 db "database.db"
db eval {
CREATE TABLE emails
(uidl TEXT, status INTEGER)
}
db eval {
CREATE TABLE jobs
(uidl TEXT, id INTEGER, jobdata TEXT)
}
} else {
sqlite3 db "database.db"
}
If the database file does not exist, we'll create the appropriate tables. If the database exists, we'll assume it already has the proper tables set up. We're creating a table called emails that keeps unique identifiers of messages we've already parsed and a table called jobs which keeps track of jobs along with source messages.
As one of the first steps, we open the POP3 connection:
set h [pop3::open -socketcmd tls::socket
$hostname $username $password 995]
Now let's fetch the unique identifier information and iterate through it. We'll store a list of IDs and unique identifiers that we do not know in the idlist variable, which we'll initialize using an empty string:
set idlist [list]
# read all messages and find out which ones we should process
foreach {id uidl} [pop3::uidl $h] {
Following that, we fetch information for this UIDL from our local database and see if it is not empty:
set status [lindex [db eval
{SELECT status FROM emails WHERE uidl=$uidl}
] 0]
if {$status == ""} {
If the status is empty, it means that the entry in the database does not exist— the database returned 0 items and first element from this list is empty. In this case, we'll add our message to the list of messages to process. Otherwise, we'll skip it. In both cases, we'll also print out the status to standard output.
lappend idlist $id $uidl
puts "We'll process message $id ($uidl)"
} else {
# this entry was already processed
puts "Message $id ($uidl) was already processed
and has status $status"
}
And that finishes our loop as well:
}
Now the idlist variable contains a list of messages that we need to process kept as id-uidl pairs. We'll iterate through it and fetch the messages:
foreach {id uidl} $idlist {
puts "Retrieving message $id"
set message [lindex [pop3::retrieve $h $id] 0]
if {[catch {
set token [mime::initialize -string $message]
} error]} {
puts "Error while parsing message: $error"
db eval {
INSERT INTO emails (uidl, status)
VALUES($uidl, "ERROR")
}
} else {
Our application retrieves a message and tries to parse it. If the parsing fails, we mark this fact in our database. If not, we proceed to handling the message:
set attachments [findAttachments $token jobdata.raw]
set aid 0
foreach attachment $attachments {
incr aid
set jobdata [mime::getbody $attachment]
db eval {
INSERT INTO jobs (uidl, id, jobdata)
VALUES($uidl, $aid, $jobdata)
}
}
set status "FETCHED; COUNT=[llength $attachments]"
db eval {
INSERT INTO emails (uidl, status)
VALUES($uidl, $status)
}
mime::finalize $token -subordinates all
Once we have the token, we invoke findAttachments procedure. It's described in the following code, but returns a list of all MIME tokens that are an attachment and their filename is jobdara.raw. We'll go through this procedure in detail after finalizing our main part of the application.
Next we need to close our condition and loop, and close the POP3 connection:
}
}
pop3::close $h
Our helper procedure to find attachments looks like:
proc findAttachments {token filename} {
set result [list]
# if it is a multipart node, iterate over children
# otherwise process this part
if {[catch {
set children [mime::getproperty $token parts]
}]} {
# getting parts failed - it's a leaf
# in this case, get Content-ID header
# and compare it to requested filename
if {![catch {
set contentID [mime::getheader
$token "Content-ID"]
}]} {
# if filename matches Content-ID
if {$contentID == $filename} {
lappend result $token
}
}
} else {
# for multipart/*, we'll iterate over children
# to see if any of them contains the attachment
foreach token $children {
set result [concat $result
[findAttachments $token $filename]
]
}
}
return $result
}
What we do here is try to get parts property for the token. If this fails, we proceed with finding Content-ID header. If this does not fail, and is what we expected to find, we add this token to results. If this part had children, we iterate through them and recursively call our procedure again. We also combine results from all of these calls so that it is possible to send multiple attachments, and/or they can be put in various parts of the e-mail.
Note
The example in this section is located in the 05pop3andmime directory in the source code examples for this chapter.
Documentation on pop3 package can be found on the tcllib project website on SourceForge: http://tcllib.sourceforge.net/doc/pop3.html