CHAPTER 6
Formatting Text
Change the Font, Size, and Color
You can change the font (also called the typeface), text size, and color to alter the appearance of text in a document. For example, you might change the font, size, and color of your document’s title text to emphasize it. You can also use Word’s basic formatting commands — Bold, Italic, Underline, Strikethrough, Subscript, and Superscript — to quickly add formatting to your text. By default, when you type text in a Word document, the program uses an 11-point Calibri font, but you can change that font to one you prefer.
Change the Font, Size, and Color
Change the Font
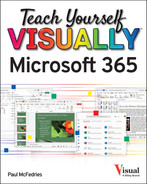
![]() Select the text that you want to format.
Select the text that you want to format.
![]() If you drag to select, the Mini toolbar appears faded in the background, and you can use it by moving the mouse (
If you drag to select, the Mini toolbar appears faded in the background, and you can use it by moving the mouse (![]() ) over the Mini toolbar.
) over the Mini toolbar.
![]() To use the Ribbon, click the Home tab.
To use the Ribbon, click the Home tab.
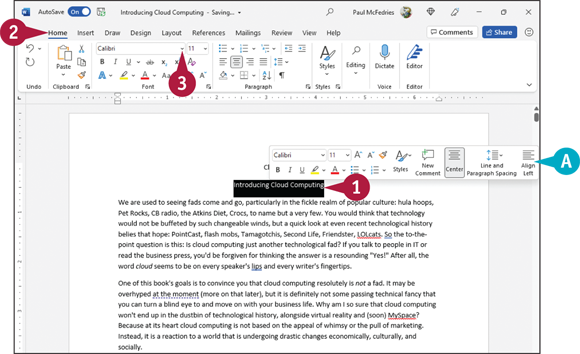
![]() Click the Font
Click the Font ![]() .
.
Word displays the Font list.
Note: When you point the mouse (![]() ) at a font in the list, Word temporarily formats the selected text with a preview of the font.
) at a font in the list, Word temporarily formats the selected text with a preview of the font.
![]() Click the font you want to use.
Click the font you want to use.
![]() Word assigns the font to the selected text.
Word assigns the font to the selected text.
![]() Click anywhere outside the selection to continue working.
Click anywhere outside the selection to continue working.
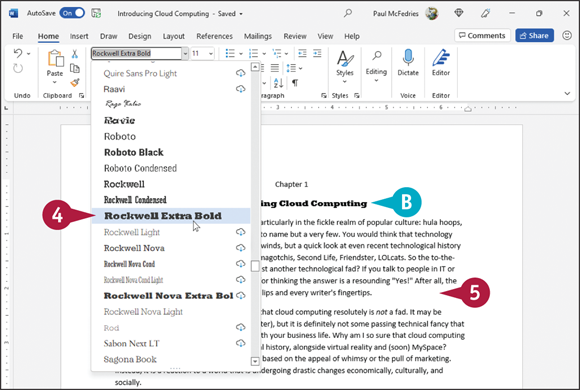
Change the Text Size
![]() Select the text that you want to format.
Select the text that you want to format.
![]() Click the Home tab.
Click the Home tab.
![]() Click the Font Size
Click the Font Size ![]() .
.
Note: When you point the mouse (![]() ) at a font size in the list, Word temporarily formats the selected text with a preview of the font size.
) at a font size in the list, Word temporarily formats the selected text with a preview of the font size.
Word displays the Font Size list.
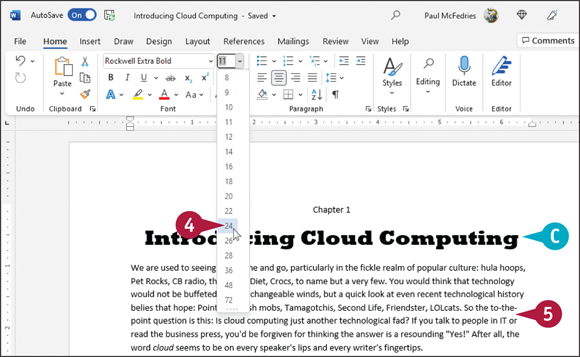
![]() Click a size.
Click a size.
![]() Word changes the size of the selected text.
Word changes the size of the selected text.
This example applies a 24-point font size to the text.
Note: You also can change the font size using the Increase Font Size (![]() ) and Decrease Font Size (
) and Decrease Font Size (![]() ) buttons on the Home tab. Word increases or decreases the font size with each click of the button.
) buttons on the Home tab. Word increases or decreases the font size with each click of the button.
![]() Click anywhere outside the selection to continue working.
Click anywhere outside the selection to continue working.
Changing the text color can go a long way toward emphasizing the text on the page. For example, if you are creating an invitation, you might make the description of the event a different color to stand out from the other details. Likewise, if you are creating a report for work, you might make the title of the report a different color from the information contained in the report, or even color-code certain data in the report. When selecting text colors, avoid choosing colors that make your text difficult to read, such as light gray text on a white background.
Change the Color
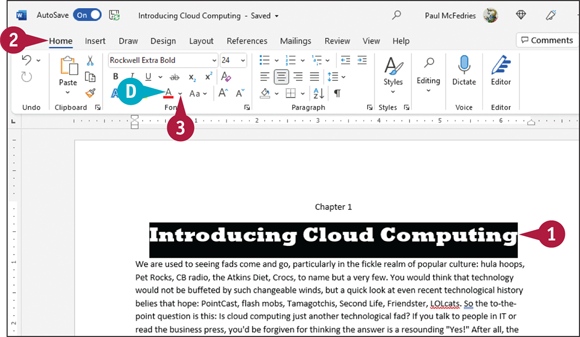
![]() Select the text that you want to format.
Select the text that you want to format.
![]() Click the Home tab.
Click the Home tab.
![]() To apply the currently selected color (red, in this example), click the Font Color button (
To apply the currently selected color (red, in this example), click the Font Color button (![]() ), and then skip the rest of the steps in this subsection.
), and then skip the rest of the steps in this subsection.
![]() Click the Font Color
Click the Font Color ![]() .
.
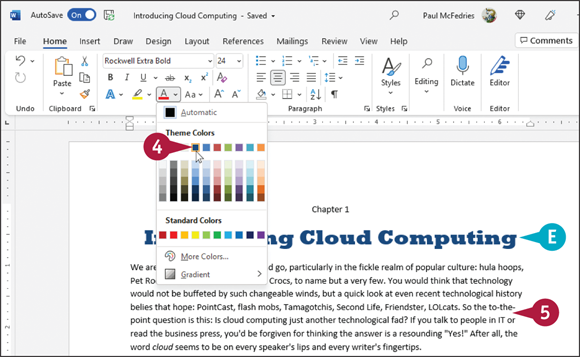
Word displays the Font Color menu.
Note: When you point the mouse (![]() ) at a font color in the menu, Word temporarily formats the selected text with a preview of the font color.
) at a font color in the menu, Word temporarily formats the selected text with a preview of the font color.
![]() Click a color.
Click a color.
![]() Word assigns the color to the text.
Word assigns the color to the text.
This example applies a blue color to the text.
![]() Click anywhere outside the selection to continue working.
Click anywhere outside the selection to continue working.
Using the Font Dialog Box
![]() Select the text that you want to format.
Select the text that you want to format.
![]() Click the Home tab on the Ribbon.
Click the Home tab on the Ribbon.
![]() Click the dialog box launcher (
Click the dialog box launcher (![]() ) in the Font group.
) in the Font group.
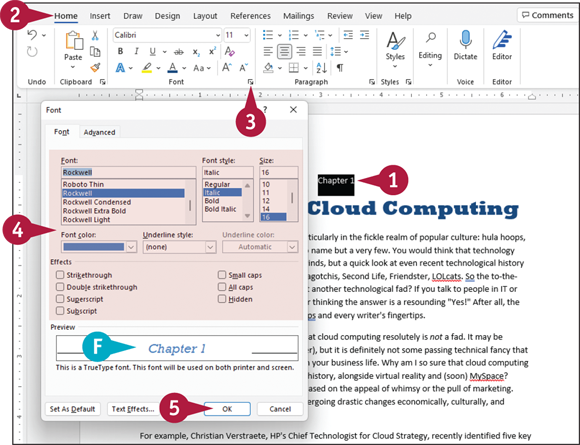
The Font dialog box appears.
![]() Click the font, style, size, color, underline style, or effect that you want to apply.
Click the font, style, size, color, underline style, or effect that you want to apply.
![]() A preview of your choices appears here.
A preview of your choices appears here.
![]() Click OK.
Click OK.
![]() Word applies the font change.
Word applies the font change.
![]() Click anywhere outside the selection to continue working.
Click anywhere outside the selection to continue working.
Align Text
You can use Word’s alignment commands to change how text and objects are positioned horizontally on the page. By default, Word left-aligns text and objects. You can also choose to center text and objects on the page (using the Center command), align text and objects to the right side of the page (using the Right Align command), or justify text and objects so that they line up at both the left and right margins of the page (using the Justify command). You can change the alignment of all the text and objects in your document or change the alignment of individual paragraphs and objects.
Align Text
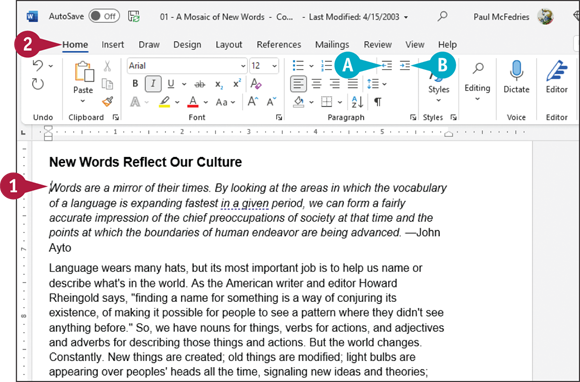
![]() Click anywhere in the paragraph that you want to align or select the paragraphs and objects that you want to align.
Click anywhere in the paragraph that you want to align or select the paragraphs and objects that you want to align.
![]() Click the Home tab.
Click the Home tab.
![]() Click an alignment button.
Click an alignment button.
The Align Left button (![]() ) aligns text with the left margin, the Center button (
) aligns text with the left margin, the Center button (![]() ) centers text between the left and right margins, the Align Right button (
) centers text between the left and right margins, the Align Right button (![]() ) aligns text with the right margin, and the Justify button (
) aligns text with the right margin, and the Justify button (![]() ) aligns text between the left and right margins.
) aligns text between the left and right margins.

Word aligns the text.
This example centers the text on the document page.
![]() This text is aligned with the left margin.
This text is aligned with the left margin.
![]() This text is centered between both margins.
This text is centered between both margins.
![]() This text is aligned with the right margin.
This text is aligned with the right margin.
![]() This text is justified between both margins.
This text is justified between both margins.
Set Line Spacing
You can adjust the amount of spacing that appears between lines of text in your paragraphs. For example, you might set 1.5 spacing to make paragraphs easier to read. By default, Word assigns 1.08 spacing for all new documents.
You can also control how much space appears before and after each paragraph in your document. You might opt to single-space the text within a paragraph, but to add space before and after the paragraph to set it apart from the paragraphs that precede and follow it.
Set Line Spacing

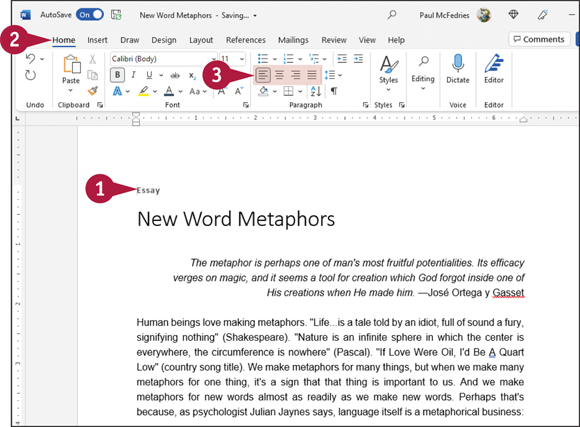
![]() Click anywhere in the paragraph that you want to format.
Click anywhere in the paragraph that you want to format.
Note: To format multiple paragraphs, select them.
![]() Click the Home tab.
Click the Home tab.
![]() Click the Line Spacing button (
Click the Line Spacing button (![]() ).
).
![]() Click a line spacing option.
Click a line spacing option.
![]() Word applies the new spacing.
Word applies the new spacing.
This example applies 2.0 line spacing.
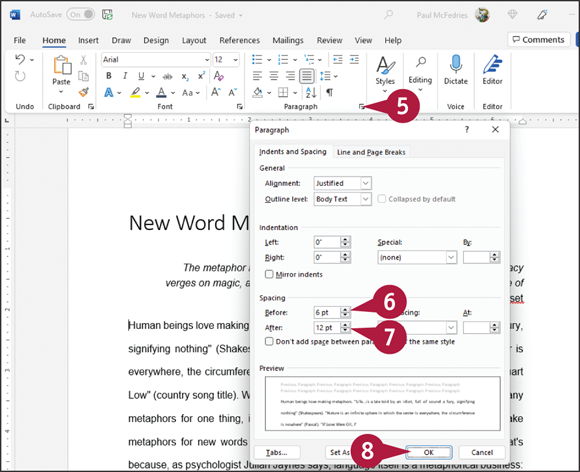
![]() To control the spacing that surrounds a paragraph, click the dialog box launcher (
To control the spacing that surrounds a paragraph, click the dialog box launcher (![]() ) in the Paragraph group.
) in the Paragraph group.
The Paragraph dialog box opens.
![]() Use the Before
Use the Before ![]() to specify how much space should appear before the paragraph.
to specify how much space should appear before the paragraph.
![]() Use the After
Use the After ![]() to specify how much space should appear after the paragraph.
to specify how much space should appear after the paragraph.
![]() Click OK to apply the spacing settings.
Click OK to apply the spacing settings.
Indent Text
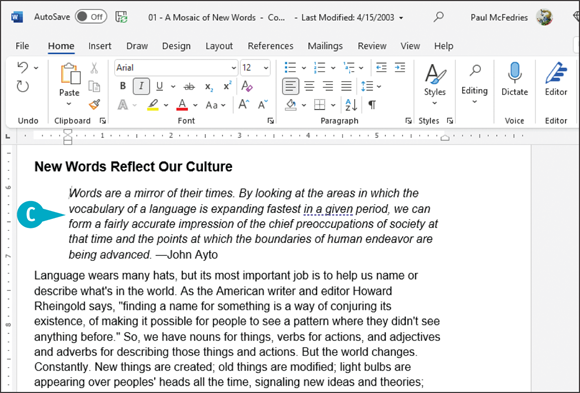
You can use indents as a way to control the horizontal positioning of text in a document. Indents are margins that affect individual lines or entire paragraphs. You might use an indent to distinguish a particular paragraph on a page — for example, a long quote.
You can indent paragraphs in your document from the left and right margins. You also can indent only the first line of a paragraph or all lines except the first line of the paragraph. You can set indents using buttons on the Ribbon, the Paragraph dialog box, and the ruler.
Indent Text
Set Quick Indents
![]() Click anywhere in the paragraph you want to indent.
Click anywhere in the paragraph you want to indent.
![]() Click Home.
Click Home.
![]() Click an indent button.
Click an indent button.
![]() You can click the Decrease Indent button (
You can click the Decrease Indent button (![]() ) to decrease the indentation.
) to decrease the indentation.
![]() You can click the Increase Indent button (
You can click the Increase Indent button (![]() ) to increase the indentation.
) to increase the indentation.
![]() Word applies the indent change.
Word applies the indent change.
Set Precise Indents
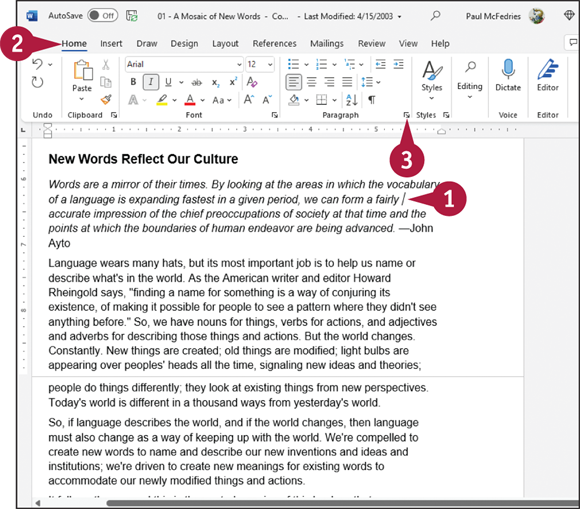
![]() Click anywhere in the paragraph you want to indent or select the text you want to indent.
Click anywhere in the paragraph you want to indent or select the text you want to indent.
![]() Click Home.
Click Home.
![]() Click the dialog box launcher (
Click the dialog box launcher (![]() ) in the Paragraph group.
) in the Paragraph group.
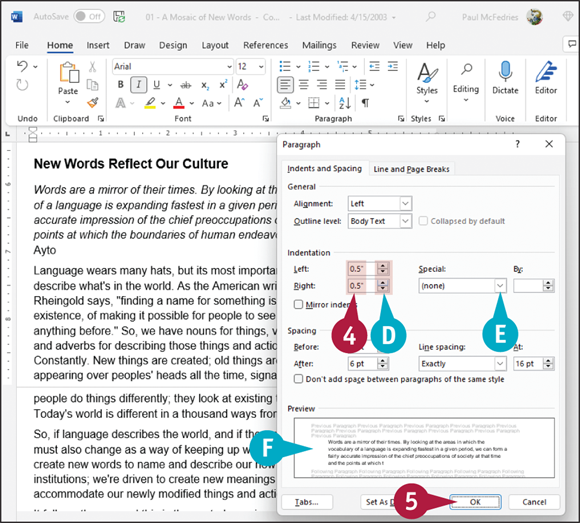
The Paragraph dialog box appears.
![]() Type a specific indentation in the Left or Right indent box.
Type a specific indentation in the Left or Right indent box.
![]() You can also click a spin arrow (
You can also click a spin arrow (![]() ) to set an indent measurement.
) to set an indent measurement.
![]() To set a specific kind of indent, you can click the Special
To set a specific kind of indent, you can click the Special ![]() and then click an indent.
and then click an indent.
![]() The Preview area shows a sample of the indent.
The Preview area shows a sample of the indent.
![]() Click OK.
Click OK.
Word applies the indent to the text.
Set Tabs
You can use tabs to create vertically aligned columns of text in your Word document. To insert a tab, press ![]() on your keyboard; the insertion point moves to the next tab stop on the page.
on your keyboard; the insertion point moves to the next tab stop on the page.
By default, Word creates tab stops every 0.5 inch across the page and left-aligns the text on each tab stop. You can set your own tab stops using the ruler or the Tabs dialog box. You can also use the Tabs dialog box to change the tab alignment and specify an exact measurement between tab stops.
Set Tabs
Set Quick Tabs
![]() Click here until the type of tab marker that you want to set appears.
Click here until the type of tab marker that you want to set appears.
Note: If you do not see the ruler, click View and then click Ruler (![]() changes to
changes to ![]() ).
).
![]() sets a left-aligned tab.
sets a left-aligned tab.
![]() sets a center-aligned tab.
sets a center-aligned tab.
![]() sets a right-aligned tab.
sets a right-aligned tab.
![]() sets a decimal tab.
sets a decimal tab.
![]() sets a bar tab (displays a vertical bar at the tab location).
sets a bar tab (displays a vertical bar at the tab location).
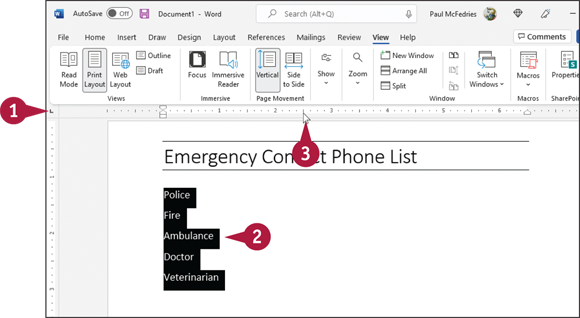
![]() Select the lines to which you want to add the tab.
Select the lines to which you want to add the tab.
![]() Click the ruler at the tab location you want.
Click the ruler at the tab location you want.
![]() On each selected line, Word adds a tab at the location you clicked.
On each selected line, Word adds a tab at the location you clicked.
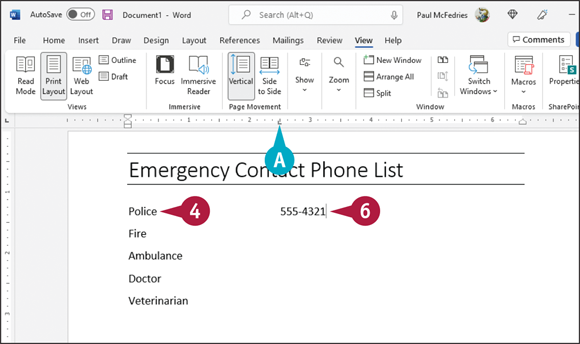
![]() Click at the end of the text after which you want to add a tab.
Click at the end of the text after which you want to add a tab.
![]() Press
Press ![]() .
.
![]() Type the text that should appear in the next column.
Type the text that should appear in the next column.
Set Precise Tabs
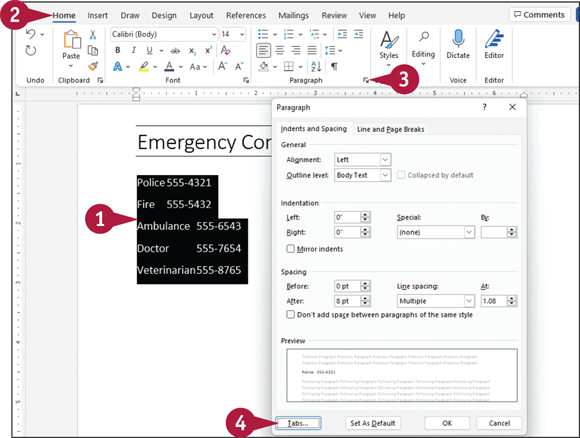
![]() Select the lines to which you want to add the tab.
Select the lines to which you want to add the tab.
![]() Click Home.
Click Home.
![]() Click the dialog box launcher (
Click the dialog box launcher (![]() ) in the Paragraph group.
) in the Paragraph group.
The Paragraph dialog box appears.
![]() Click Tabs on the Indents and Spacing tab.
Click Tabs on the Indents and Spacing tab.
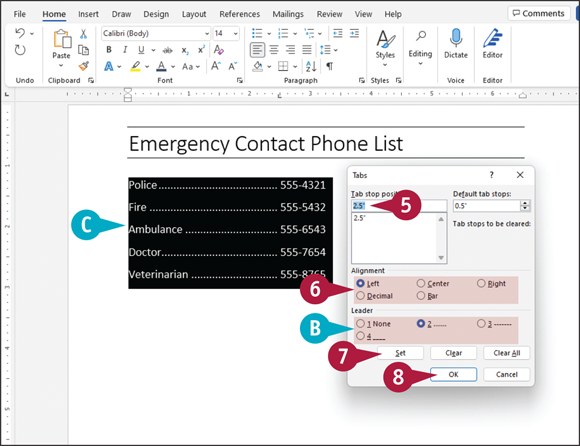
The Tabs dialog box appears.
![]() Click in this box and type a new tab stop measurement.
Click in this box and type a new tab stop measurement.
![]() Select a tab alignment (
Select a tab alignment (![]() changes to
changes to ![]() ).
).
![]() You can also select a tab leader character (
You can also select a tab leader character (![]() changes to
changes to ![]() ).
).
![]() Click Set.
Click Set.
Word saves the new tab stop.
![]() Click OK.
Click OK.
![]() Word closes the dialog box and applies the new tab stops.
Word closes the dialog box and applies the new tab stops.
Set Margins
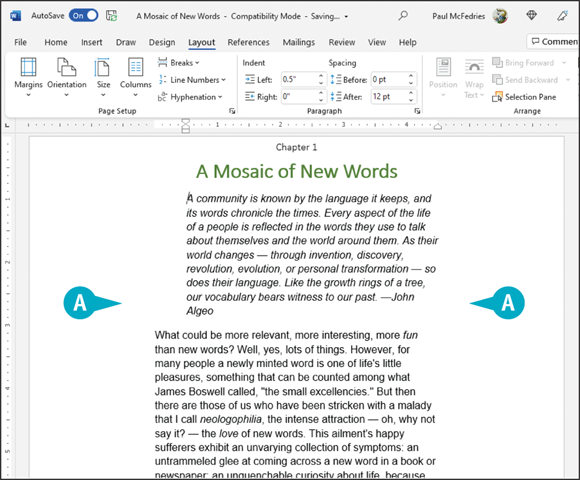
Word assigns a default 1-inch margin all the way around the page in every new document, but you can change these margin settings. For example, you can set wider margins to provide more room around the text or set smaller margins to fit more text on a page. You can apply your changes to the current document only or make them the new default setting for all new documents. Word applies the new margins to the entire document, but you can opt to apply the new margins only from the insertion point to the end of the document.
Set Margins
Set Margins Using Layout Tools
![]() If you do not want to apply the new margins to the entire document, click at the point where you want to the new margin setting to begin (not shown).
If you do not want to apply the new margins to the entire document, click at the point where you want to the new margin setting to begin (not shown).
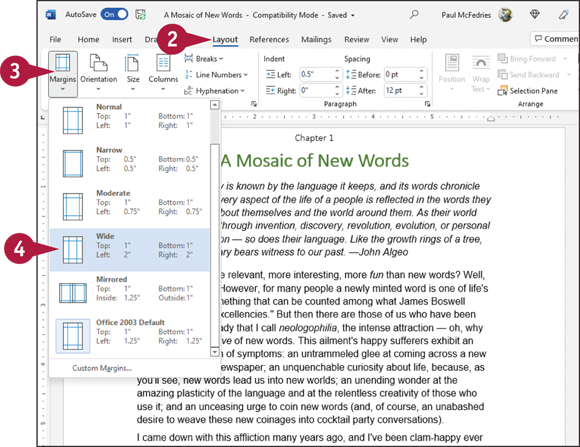
![]() Click Layout.
Click Layout.
![]() Click Margins.
Click Margins.
The Margins Gallery appears.
![]() Click a margin setting.
Click a margin setting.
![]() Word applies the new setting.
Word applies the new setting.
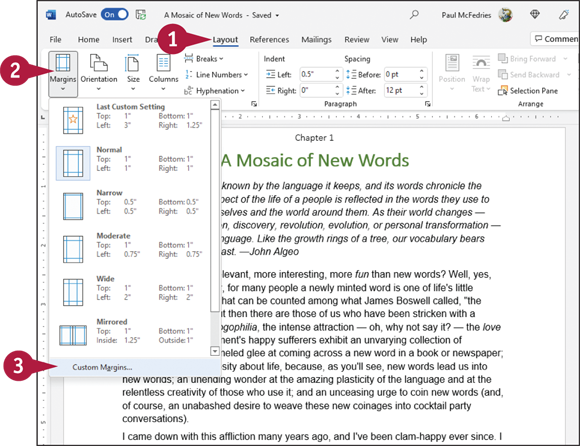
Set a Custom Margin
![]() Click Layout.
Click Layout.
![]() Click Margins.
Click Margins.
The Margins Gallery appears.
![]() Click Custom Margins.
Click Custom Margins.
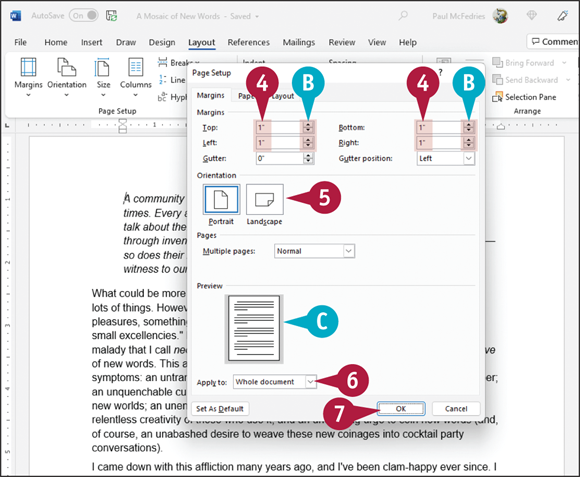
The Page Setup dialog box appears, displaying the Margins tab.
![]() Type a specific margin in the Top, Bottom, Left, and Right boxes.
Type a specific margin in the Top, Bottom, Left, and Right boxes.
![]() You can also click a spin arrow (
You can also click a spin arrow (![]() ) to set a margin measurement.
) to set a margin measurement.
![]() Choose a page orientation.
Choose a page orientation.
![]() Preview the margin settings here.
Preview the margin settings here.
![]() Click the Apply to
Click the Apply to ![]() and specify whether the margin should apply to the whole document or from this point forward.
and specify whether the margin should apply to the whole document or from this point forward.
![]() Click OK.
Click OK.
Word adjusts the margins in the document.
Create Lists
You can draw attention to lists of information by using bullets or numbers. Bulleted and numbered lists can help you present your information in an organized way. A bulleted list adds dots or other similar symbols in front of the list items, whereas a numbered list adds sequential numbers or letters in front of the list items. Use bullets when the items in your list do not follow any particular order and use numbers when the items in your list are sequential. You can create a list as you type it or after you have typed the items.
Create Lists
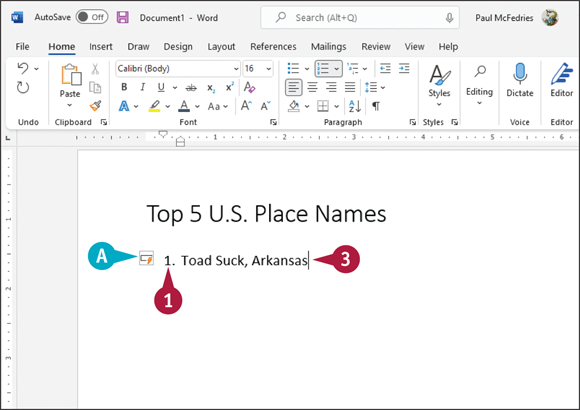
Create a List as You Type
![]() Type 1. to create a numbered list or * to create a bulleted list.
Type 1. to create a numbered list or * to create a bulleted list.
![]() Press
Press ![]() or
or ![]() .
.
![]() Word automatically formats the entry as a list item and displays the AutoCorrect Options button (
Word automatically formats the entry as a list item and displays the AutoCorrect Options button (![]() ) so that you can undo or stop automatic numbering.
) so that you can undo or stop automatic numbering.
![]() Type a list item.
Type a list item.

![]() Press
Press ![]() to prepare to type another list item.
to prepare to type another list item.
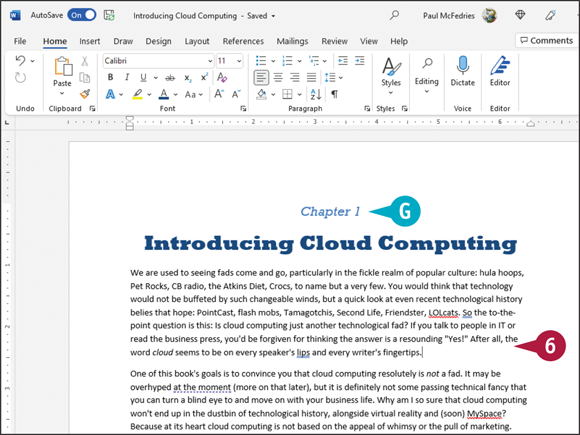
![]() Word automatically adds a bullet or number for the next item. In this example,
Word automatically adds a bullet or number for the next item. In this example, ![]() was pressed after item 5 and Word automatically created item 6.
was pressed after item 5 and Word automatically created item 6.
![]() Repeat steps 3 and 4 for each list item.
Repeat steps 3 and 4 for each list item.
To stop entering items in the list, press ![]() twice.
twice.
Create a List from Existing Text
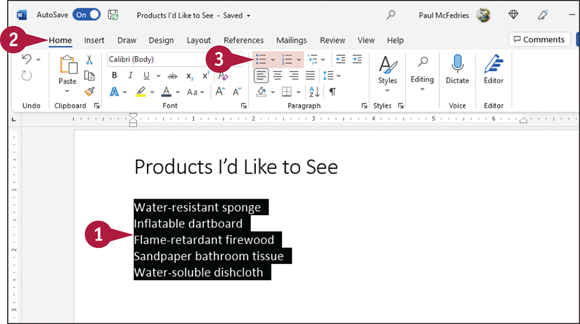
![]() Select the text to which you want to assign bullets or numbers.
Select the text to which you want to assign bullets or numbers.
![]() Click Home.
Click Home.
![]() Click the Numbering button (
Click the Numbering button (![]() ) or the Bullets button (
) or the Bullets button (![]() ).
).
This example uses bullets.
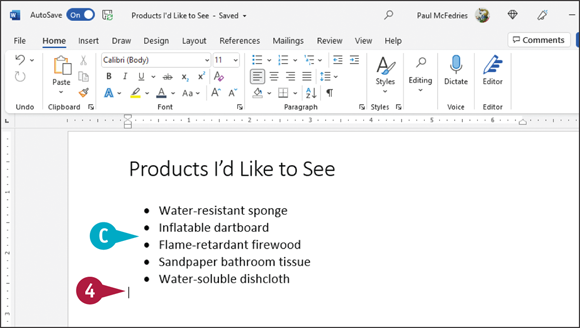
![]() Word applies numbers or bullets to the selection.
Word applies numbers or bullets to the selection.
![]() Click anywhere outside the selection to continue working.
Click anywhere outside the selection to continue working.
Copy Formatting
Suppose you have applied a variety of formatting options to a paragraph to create a certain look — for example, you changed the font, the size, the color, and the alignment. If you want to re-create the same look elsewhere in the document, you do not have to repeat the same steps as when you applied the original formatting, again changing the font, size, color, and alignment. Instead, you can use the Format Painter feature to “paint” the formatting to the other text in one swift action.
Copy Formatting
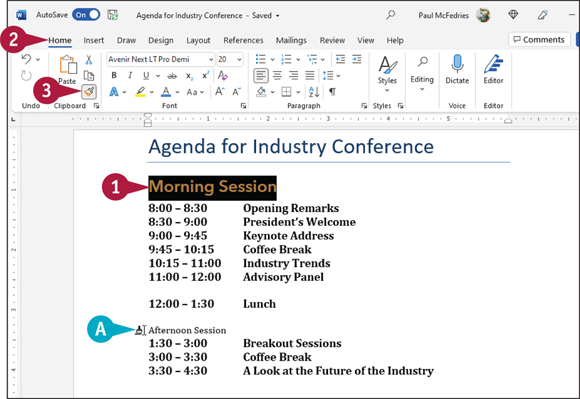
![]() Select the text containing the formatting that you want to copy.
Select the text containing the formatting that you want to copy.
![]() Click Home.
Click Home.
![]() Click the Format Painter button (
Click the Format Painter button (![]() ).
).
![]() The mouse (
The mouse (![]() ) changes to
) changes to ![]() when you move the mouse over your document.
when you move the mouse over your document.
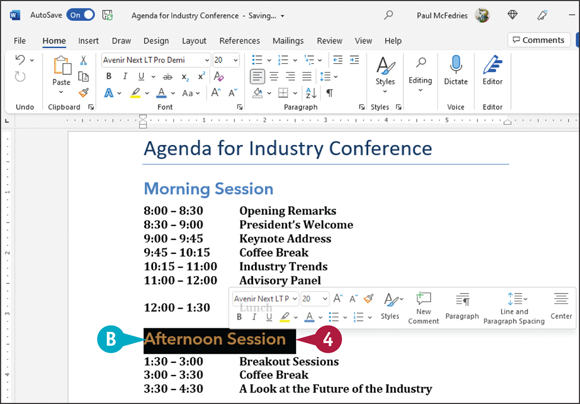
![]() Click and drag over the text to which you want to apply the same formatting.
Click and drag over the text to which you want to apply the same formatting.
![]() Word copies the formatting from the original text to the new text.
Word copies the formatting from the original text to the new text.
To copy the same formatting multiple times, you can double-click the Format Painter button (![]() ).
).
You can press ![]() to cancel the Format Painter feature at any time.
to cancel the Format Painter feature at any time.
Clear Formatting
Sometimes, you may find that you have applied too much formatting to your text, making it difficult to read. Or perhaps you applied the wrong formatting to your text. In that case, instead of undoing all your formatting changes manually, you can use the Clear Formatting command to remove any formatting you have applied to the document text. When you apply the Clear Formatting command, Word removes all formatting applied to the text and restores the default settings.
Clear Formatting
![]() Select the text from which you want to remove formatting.
Select the text from which you want to remove formatting.
Note: If you do not select text, Word removes text formatting from the entire document.
![]() Click Home.
Click Home.
![]() Click the Clear All Formatting button (
Click the Clear All Formatting button (![]() ).
).
![]() Word removes all formatting from the selected text.
Word removes all formatting from the selected text.
Format with Styles
You can make formatting faster and easier by using styles. A style is a set of text-formatting characteristics that you can apply all at once. These characteristics can include the text font, size, color, alignment, spacing, and more. Instead of assigning multiple formatting settings repeatedly, you can create a style with the required formatting settings and apply it whenever you need it.
In addition to creating your own styles for use in your documents, you can apply any of the preset styles that Word supplies. These include styles for headings, normal text, quotes, and more.
Format with Styles

Create a New Quick Style
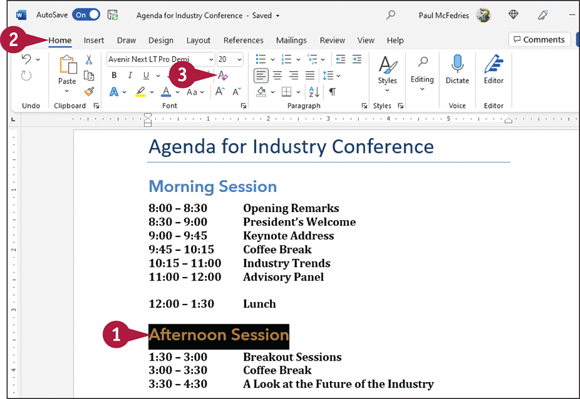
![]() Format the text as desired and then select the text.
Format the text as desired and then select the text.
![]() Click Home.
Click Home.
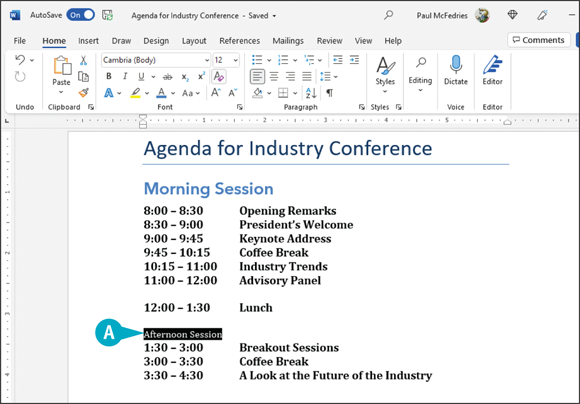
![]() Click the More button (
Click the More button (![]() ) in the Styles group.
) in the Styles group.
![]() Click Create a Style.
Click Create a Style.
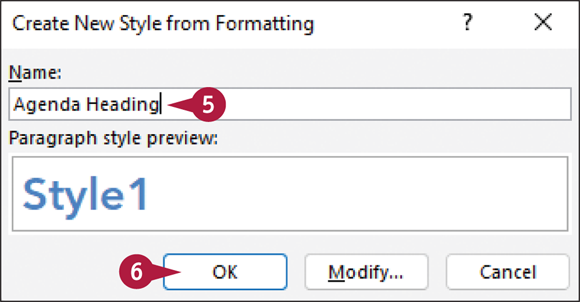
The Create New Style from Formatting dialog box appears.
![]() Type a name for the style.
Type a name for the style.
![]() Click OK.
Click OK.
Word adds the style to the list of Quick Styles.
Apply a Style
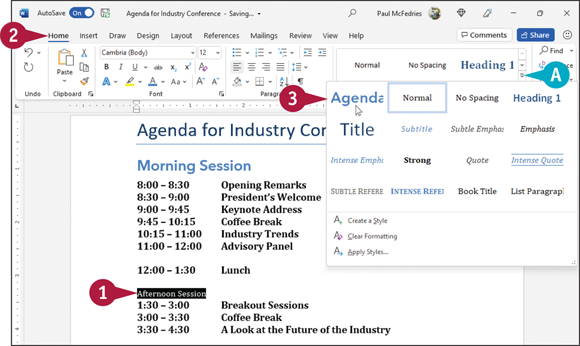
![]() Select the text that you want to format.
Select the text that you want to format.
![]() Click Home.
Click Home.
![]() Click a style from the Styles list.
Click a style from the Styles list.
![]() You can click the More button (
You can click the More button (![]() ) to see the full gallery of available styles.
) to see the full gallery of available styles.
![]() Word applies the style.
Word applies the style.
Using a Template
A template is a special file that stores styles and other Word formatting options. When you create a Word document using a template, the styles and options in that template become available for you to use with that document. Word comes with several templates preinstalled, and you can also create your own.
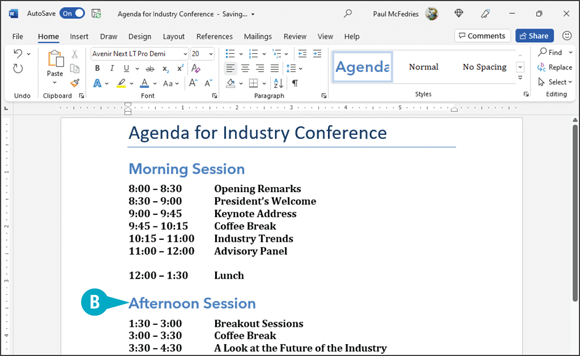
Pre-existing templates come typically with boilerplate text you can use as a model for your document. Select the boilerplate text and replace it with your own text. Use the template’s styles in the Styles gallery to format headings and other text.
Using a Template
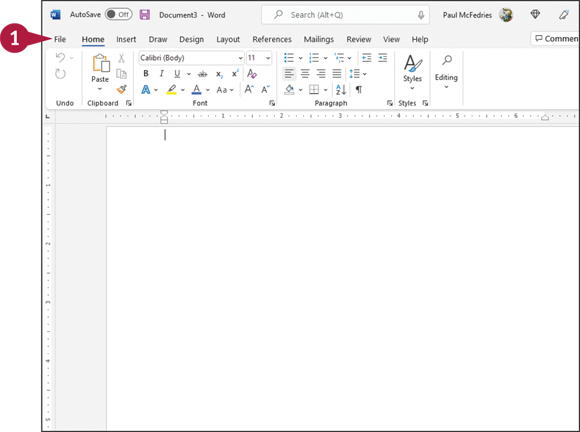
![]() From any document, click File.
From any document, click File.
Backstage view appears.
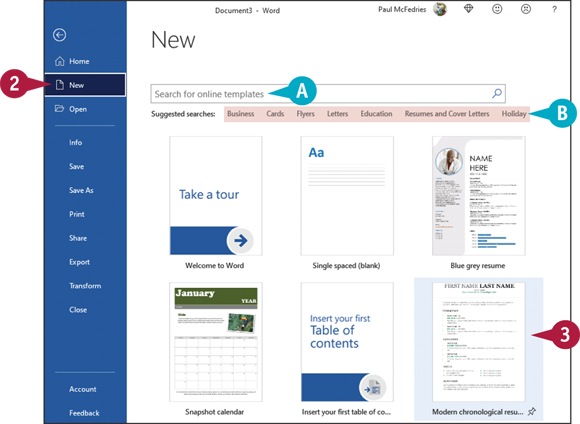
![]() Click New.
Click New.
![]() You can type a description here of the type of template you need to search online for an appropriate template.
You can type a description here of the type of template you need to search online for an appropriate template.
![]() You can click one of these categories to see online templates related to that category.
You can click one of these categories to see online templates related to that category.
![]() Click a template.
Click a template.

Word displays a window like this one that describes and shows a preview of the template you selected.
![]() Click Create.
Click Create.
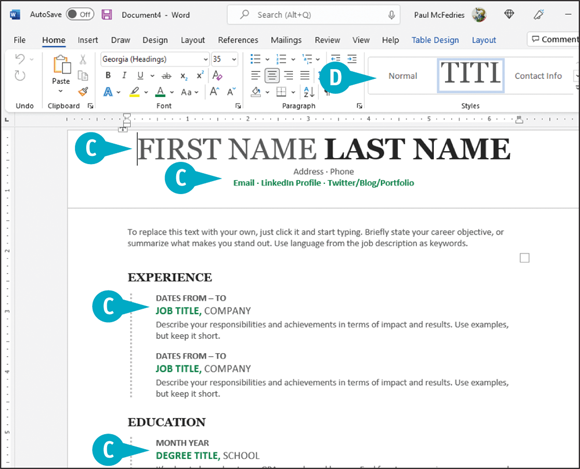
A document containing the template’s styles appears.
![]() You can replace boilerplate text with your own text.
You can replace boilerplate text with your own text.
![]() You can use styles in the Styles Gallery to continue formatting the document.
You can use styles in the Styles Gallery to continue formatting the document.
Note: See the previous section, “Format with Styles,” for details on using and creating styles.