
CHAPTER 11
Making Your Site Social
Understand How to Make a Site Social
There are many different ways in which owners can make their sites social, and WordPress accommodates them all while making the technical aspects straightforward.
Connecting with Social Media
Whether you want to provide links to your social media accounts, or enable visitors to share what they have found on your site with their social media friends, it is vital that your site be able to connect in as many ways as possible with social media.
Your Website as the Hub of Social Activity

You can easily get caught up with particular social media and lose sight of your website’s role. As much as possible, everything you do on the web should begin and end with your website. Got something fun to share? Put it on your website and link your social media to that post. Those viewing your social media accounts should always know that you have a website and that it has the final word on your online presence.
Socialize Where Your Audience Socializes

There are literally thousands of social media sites on the web. Even if you consider only the top ten, it is very hard to participate well on all of them, nor do you need to. Go where your audience is. That might be Twitter and LinkedIn, or it could be Facebook and a niche social media site for your field. Do a great job on the social media sites that matter instead of spreading yourself too thin and being ineffective.
Do Not Forget about Email
Social media may get all the attention, but working quietly and effectively away from the spotlight is the email list. Receiving an email from a trusted source is a more personal experience and a very powerful one. Alongside your social media strategy you need a mailing list strategy. What you use the list for will vary greatly: Authors emailing about a new book, stores sending out specials, or plumbers sending out reminders about seasonal issues are just a few examples.
Make Your Mailing List as Diverse as Your Audience
Even with a focused mailing list of interested visitors, there will always be groups within that list: by gender, by how recently they signed up, by the circumstances of the sign-up (website versus trade show), by which incentive they signed up for, and so on. The more you can segment your list — and people can be in more than one segment — the more likely you can deliver an effective message based on the segment’s needs.
Comments as Conversations
Comments have long been a staple of website blogs, but do not take them for granted. View each comment as part of a conversation that you help to foster by replying to each comment in some way. And listen to those comments. They help to shape what you do on your site and in your business because they are like votes for good topics or suggestions for new topics.
Testimonials as Social Proof
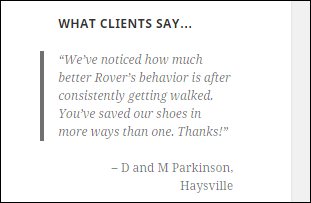
You can get so caught up in the rush to be liked on social media that you forget the classic way to show that you are liked: testimonials. Useful and heartfelt testimonials have always and continue to be a powerful tool in proving that you are trustworthy and helpful. WordPress.org sites have dozens of plugins to help with testimonials; but even if you are manually inserting them into pages, solicit testimonials and display them.
Let Visitors Share Your Content
One of the most powerful features of social media is sharing. All of us love to let our friends know about something new, and Share buttons on a website enable us to instantly and easily tell everyone in our circles about what we have found.
Let Visitors Share Your Content
Share on WordPress.com and Sites Using Jetpack
![]() Click Sharing under Settings in the left admin menu.
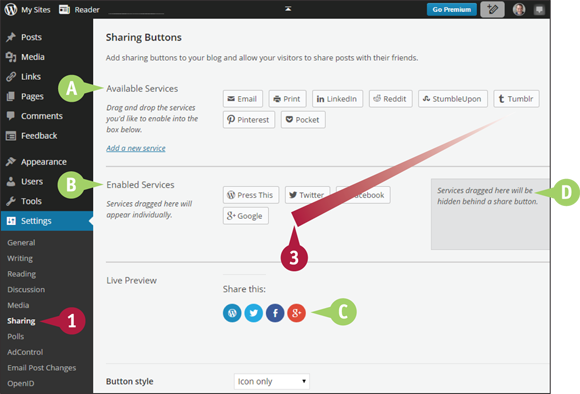
Click Sharing under Settings in the left admin menu.
![]() Scroll down to Sharing Buttons.
Scroll down to Sharing Buttons.
![]() Available Services appear here as buttons.
Available Services appear here as buttons.
![]() Enabled Services appear here.
Enabled Services appear here.
![]() Drag a service from Available to Enabled.
Drag a service from Available to Enabled.
![]() This area shows a preview of how the buttons will appear.
This area shows a preview of how the buttons will appear.
![]() Services dragged here become part of a single Share button.
Services dragged here become part of a single Share button.
![]() Click
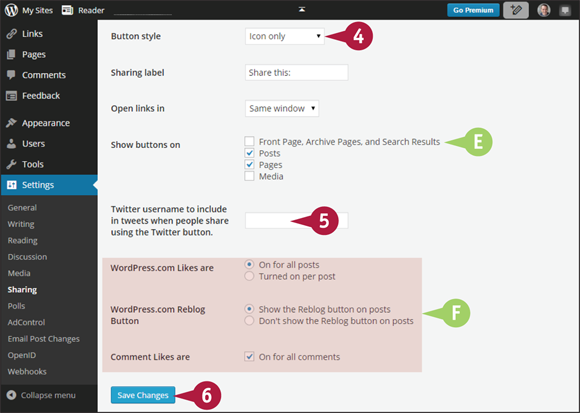
Click ![]() to change the style of buttons, the group label, and whether links open in a new window.
to change the style of buttons, the group label, and whether links open in a new window.
![]() Check boxes for locations where you want the buttons to appear.
Check boxes for locations where you want the buttons to appear.
![]() If you use Twitter, type your username here.
If you use Twitter, type your username here.
![]() Only
Only WordPress.com sites display these three settings for Likes, Reblogging, and Comment Likes.
![]() Click Save Changes.
Click Save Changes.
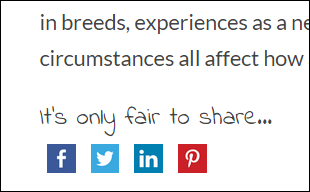
On the site, Share buttons appear at the end of content.
Use a Share Plugin on WordPress.org Sites
![]() Install and activate the plugin Simple Share Buttons Adder.
Install and activate the plugin Simple Share Buttons Adder.
Note: See Chapter 10 for more about plugins.
![]() Click Share Buttons under Settings on the left admin menu.
Click Share Buttons under Settings on the left admin menu.
![]() Under Basic Settings, choose where buttons will appear, either before or after the content.
Under Basic Settings, choose where buttons will appear, either before or after the content.
![]() Type text to accompany the buttons.
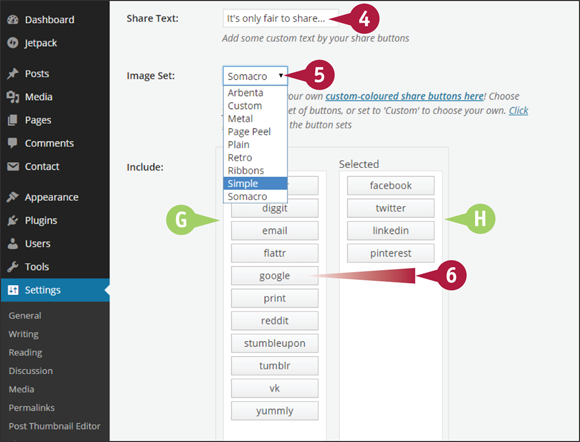
Type text to accompany the buttons.
![]() Click the Image Set
Click the Image Set ![]() and select the style.
and select the style.
![]() The left column of buttons shows available services.
The left column of buttons shows available services.
![]() The right column shows the services you have selected.
The right column shows the services you have selected.
![]() Drag a button from Available to Selected.
Drag a button from Available to Selected.
![]() Scroll down and click Save All Changes.
Scroll down and click Save All Changes.
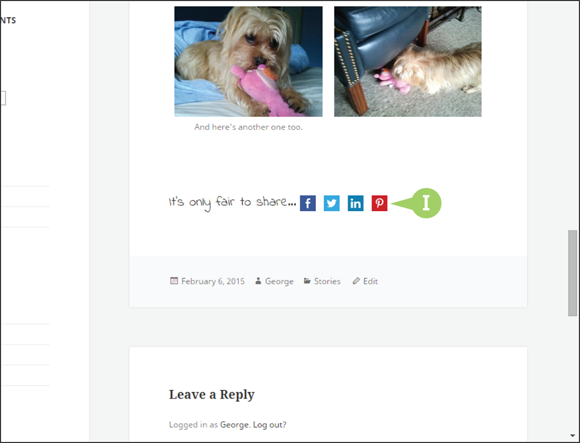
![]() The Share buttons appear on your site in the locations specified.
The Share buttons appear on your site in the locations specified.
Add Follow Buttons
Following, joining; whatever you call it, visitors need to know where they can be part of your social media circles. Follow buttons provide those links. This section explains some ways you can place them on your WordPress site.
Add Follow Buttons
Use a Plugin on WordPress.org Sites
![]() Install and activate the plugin Simple Social Icons.
Install and activate the plugin Simple Social Icons.
Note: See Chapter 10 for more about plugins.
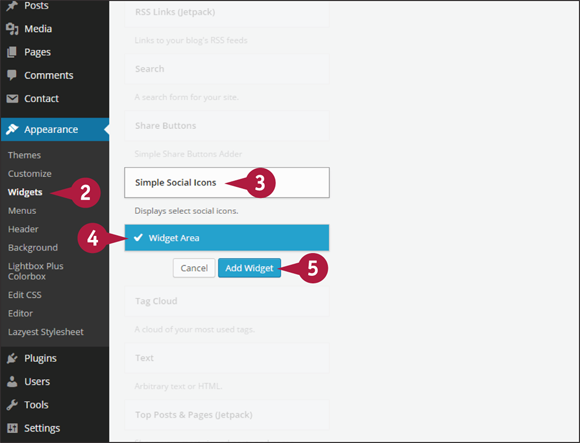
![]() Click Widgets under Appearance on the left admin menu.
Click Widgets under Appearance on the left admin menu.
![]() Locate the widget and click it.
Locate the widget and click it.
![]() Click the widget area where you want your Follow buttons to appear.
Click the widget area where you want your Follow buttons to appear.
![]() Click Add Widget.
Click Add Widget.
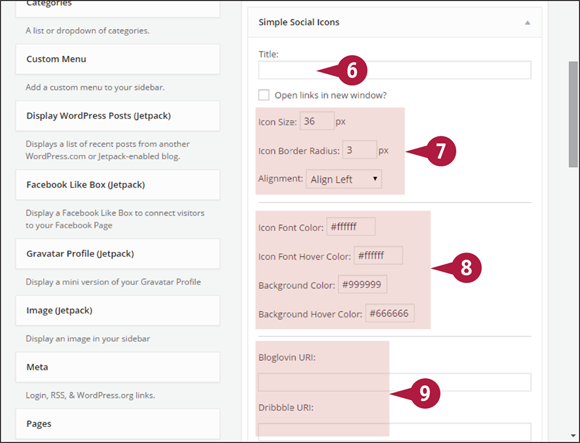
The widget settings appear.
![]() Type a title to accompany the icons.
Type a title to accompany the icons.
![]() Adjust the size, border radius, and alignment of the icons here.
Adjust the size, border radius, and alignment of the icons here.
Note: Border radius sets the rounding of the corners. Set it to 50 px to make circles.
![]() Change the font and background colors of the buttons as well as the hover colors here.
Change the font and background colors of the buttons as well as the hover colors here.
Note: There is no color picker; you enter a hexadecimal value. Colorexplorer.com is one place to pick a color, or consult your theme’s CSS.
![]() For each service that you want to display, type the full URL to your account.
For each service that you want to display, type the full URL to your account.
![]() Scroll down and click Save.
Scroll down and click Save.
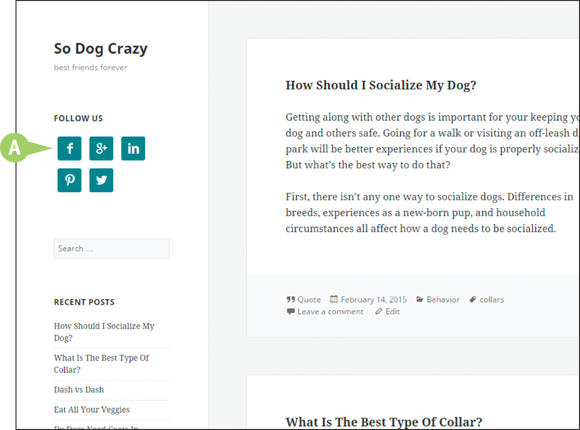
![]() The follow icons appear where you placed them in the widget area.
The follow icons appear where you placed them in the widget area.
Note: All the icons use the same color scheme. You can target individual icons to change their color using CSS. For more information on CSS, see Chapter 9.
Use a Widget on WordPress.com Sites
![]() Click Widgets under Appearance on the left admin menu.
Click Widgets under Appearance on the left admin menu.
![]() Look for widgets that allow visitors to follow you on services like Facebook or Twitter.
Look for widgets that allow visitors to follow you on services like Facebook or Twitter.
Note: In the case of Twitter and other services, a feed also appears along with the ability to follow.
![]() A widget is available here that allows visitors to follow your
A widget is available here that allows visitors to follow your WordPress.com site.
Note: See Chapter 8 for more about widgets.
Display Social Feeds
In some circumstances you may want to share the feed from one of your social media accounts with your website visitors. This section discusses some ways you can do that using WordPress. And keep in mind that the same can be done with other people’s feeds — for example, an organization you are involved with.
Display Social Feeds
Use a Plugin on WordPress.org Sites
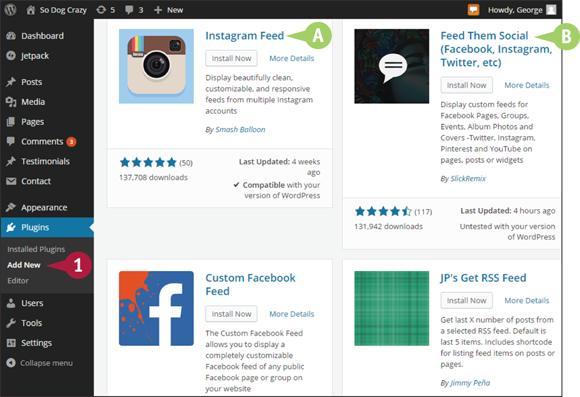
![]() Click Add New under Plugins on the left admin menu.
Click Add New under Plugins on the left admin menu.
![]() Search for “social media feeds” or a particular social media site you are interested in.
Search for “social media feeds” or a particular social media site you are interested in.
![]() There are plugins that display the feed of a specific social media site, like Instagram.
There are plugins that display the feed of a specific social media site, like Instagram.
![]() Some plugins allow you to choose from several social media sites, and others combine several feeds into a single display.
Some plugins allow you to choose from several social media sites, and others combine several feeds into a single display.
Note: See Chapter 10 for more about plugins.
Use a Widget on WordPress.com Sites
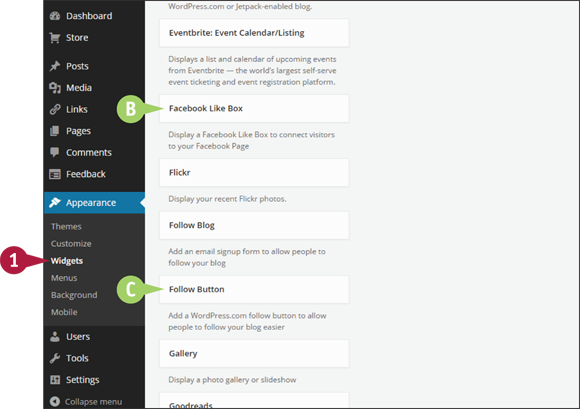
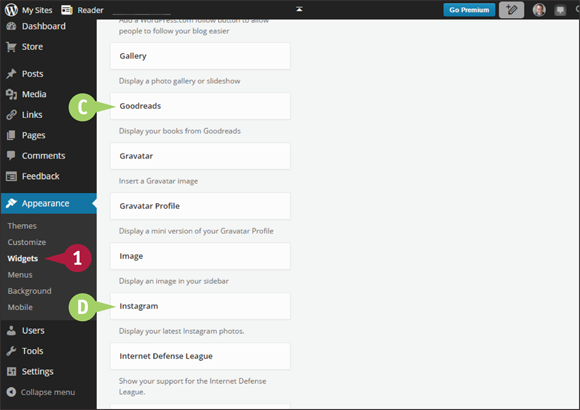
![]() Click Widgets under Appearance on the left admin menu.
Click Widgets under Appearance on the left admin menu.
![]() Look for widgets that display a feed from a social media site, such as Goodreads.
Look for widgets that display a feed from a social media site, such as Goodreads.
![]() Instagram is another example of a feed you can display.
Instagram is another example of a feed you can display.
Note: See Chapter 8 for more about widgets.
Manually Add a Feed Using HTML
![]() Log in to your account. The example is from Twitter.
Log in to your account. The example is from Twitter.
![]() Locate your account settings and click Widgets or Promotion or whatever link leads to creating feeds.
Locate your account settings and click Widgets or Promotion or whatever link leads to creating feeds.
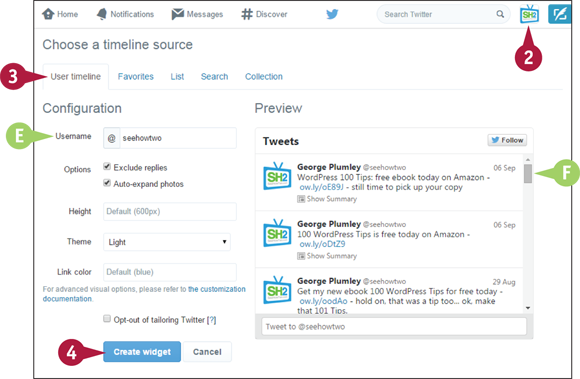
![]() Choose the source of the feed. In this example, you display your own timeline.
Choose the source of the feed. In this example, you display your own timeline.
![]() Options appear on the left side of the screen for how your feed will display.
Options appear on the left side of the screen for how your feed will display.
![]() On the right side you see a preview.
On the right side you see a preview.
![]() Click Create widget.
Click Create widget.
![]() A box with HTML appears below the preview. Copy all the HTML.
A box with HTML appears below the preview. Copy all the HTML.
![]() Click Widgets under Appearance on the left admin menu.
Click Widgets under Appearance on the left admin menu.
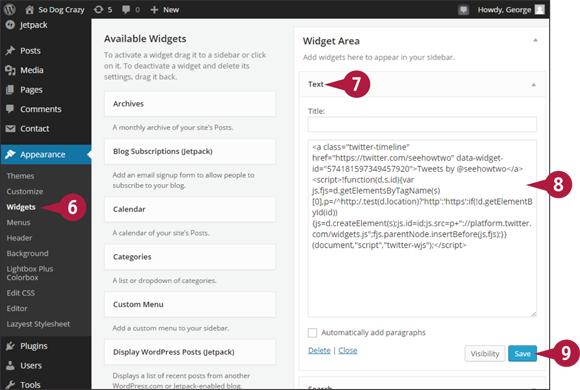
![]() Add a Text widget where you want the feed to appear.
Add a Text widget where you want the feed to appear.
Note: See Chapter 8 for more about widgets.
![]() In the text area of the widget, paste the HTML from step 5.
In the text area of the widget, paste the HTML from step 5.
![]() Click Save.
Click Save.
The feed appears on your site.
Publicize Posts on Social Media
Posting to social media about something new on your website is one of the most important parts of a social media strategy. But that can be time consuming and therefore is seldom done in our busy schedules. The publicize function at WordPress.com, or the same functionality provided by a plugin, allows you to publish and promote at the same time.
Publicize Posts on Social Media
Use the Publicize Function on WordPress.com and Jetpack-enabled Sites
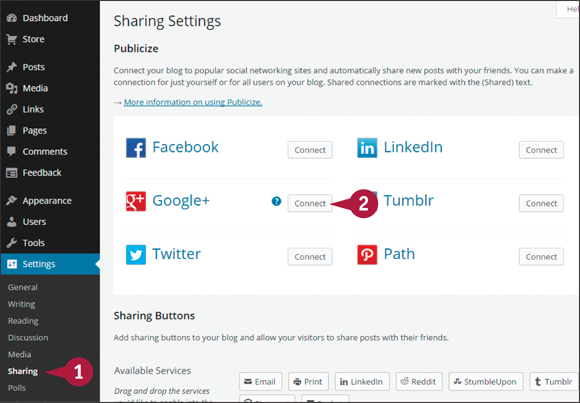
![]() Click Sharing under Settings on the left admin menu.
Click Sharing under Settings on the left admin menu.
![]() Choose a social media site to which you want to post content and click Connect.
Choose a social media site to which you want to post content and click Connect.
If you are not already logged into the social media site, you are first asked to log in.
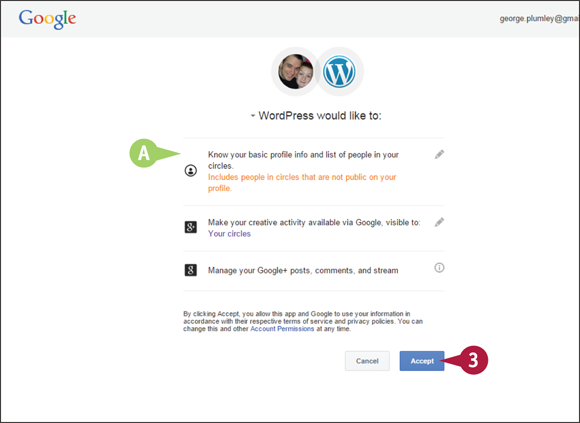
![]() Depending on the site, you are asked to grant various permissions for WordPress to access your account. Some of these permissions may have settings you can edit.
Depending on the site, you are asked to grant various permissions for WordPress to access your account. Some of these permissions may have settings you can edit.
![]() Click Accept.
Click Accept.

![]() When you add a new post, you see your social media site listed under Publicize in the Publish meta box.
When you add a new post, you see your social media site listed under Publicize in the Publish meta box.
![]() If you want to add a custom message to the posting on your social media account, you can type it here too.
If you want to add a custom message to the posting on your social media account, you can type it here too.
If you have connected to more than one social media site, they all appear here with check boxes. You can choose not to post to a particular social site.
Use a Plugin on WordPress.org Sites
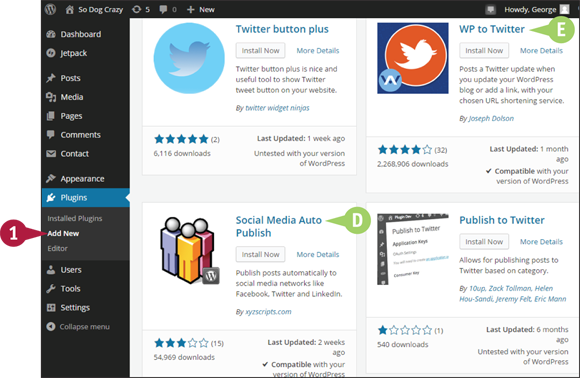
![]() Click Add New under Plugins on the left admin menu.
Click Add New under Plugins on the left admin menu.
![]() Search for “post social networks” or the name of a particular social media site.
Search for “post social networks” or the name of a particular social media site.
![]() Some plugins allow you to publish to multiple social media sites.
Some plugins allow you to publish to multiple social media sites.
![]() Other plugins are for publishing to particular social media sites.
Other plugins are for publishing to particular social media sites.
Note: See Chapter 10 for more about plugins.
Understand Mailing Lists
Having website visitors join a mailing list means that you can stay in touch with them even when they are not visiting. Those who sign up for your list should occupy a very important place in your marketing strategy — they have told you they are interested in what you do and have let you into their email program.
What Is a Mailing List?
A website mailing list is a set of email addresses and possibly other information you collect using a form on your site or other locations, such as Facebook pages. A mailing list manager is a service or program that collects the emails and enables you to send out messages to all subscribers.
Why Not Use My Email Program?
There are three key reasons: Your email program cannot collect and verify sign-ups automatically; it cannot track responses, bounce-backs, or other important data; and your email program sends email through a normal server — which limits emails to about 200 per hour — rather than a specialized email server. On top of that, your email program does not have the drag-and-drop email design tools that a mailing list manager has.
Why Not Use a Plugin?
Although plugins exist for WordPress.org sites that manage a mailing list, and many people are using them, they usually cannot match the features of third-party services — plus you still have the potential problems of sending emails from your hosting account. In addition, running an effective mailing list requires a complex plugin and, the more complex, the more potential for problems. Let a third party manage the software side of things.
Do I Need to Offer an Incentive?

Whatever form it takes, visitors need a reason for joining your mailing list, and a bonus for signing up helps. It could be information in the form of a PDF, it could be access to a video, or it may be a discount on a product or service. Of course, being on the list needs to be of value too, but a valuable incentive helps to build initial trust with subscribers.
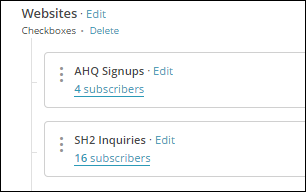
What If I Do Not Want to Send to Everyone?
A mailing list manager should offer some way of segmenting your list and send only to one or more segments at a time. Some of the segmenting will be built in: Send only to those who did not click on a link in the previous mailing. Some of the segmenting is up to you: Group everyone who signed up to the mailing list from a recent webinar.
What Do I Send to My List?
Whatever is useful to your subscribers: tips, special offers, downloadable items, and links to important information. Remember, they have allowed you to send them emails and you do not want to break that trust by sending them useless information. Keeping in mind that you should segment your list — or have separate lists, depending on the provider — what you send to one segment may differ from what you send to another.
How Often Should I Send?
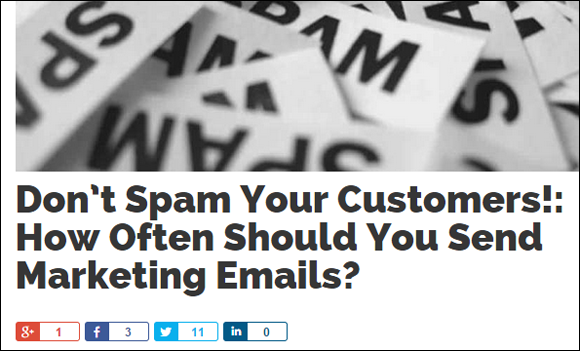
We have all subscribed to a list, only to discover that we are getting messages every other day or worse. Of course it depends on what your subscribers are expecting or what you are sending, but even great material can be annoying if it is arriving too often. At the other end of the spectrum, make sure you are emailing at least once a month or people tend to forget they are on your list — and some will even report it as spam.
Offer Email Subscriptions
Even if someone is not interested right now in being on your mailing list or receiving your newsletter, he or she may well be interested in knowing when you have updated your website. An email subscription allows people to keep up with your latest posts, without having to remember to return to your site.
Offer Email Subscriptions
Use the Subscription Function on WordPress.com and Jetpack-enabled Sites
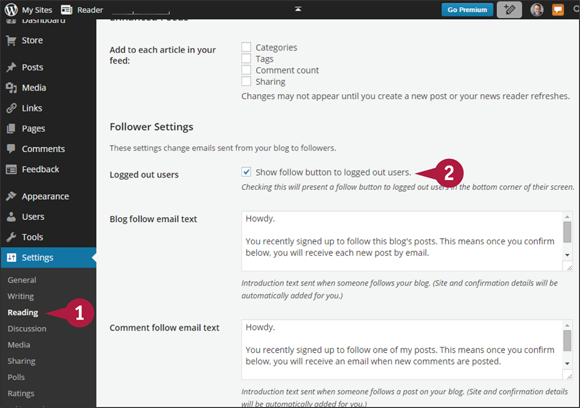
Note: Steps 1 and 2 display a Follow tab at the bottom right of every web page.
![]() Click Reading under Settings on the left admin menu.
Click Reading under Settings on the left admin menu.
![]() Under Follower Settings, click the box (
Under Follower Settings, click the box (![]() changes to
changes to ![]() ) under Logged Out Users to make the tab appear.
) under Logged Out Users to make the tab appear.
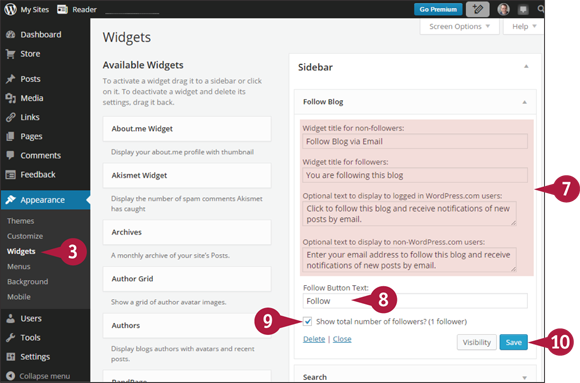
Note: Steps 3 to 10 allow you to use a widget for the sign-up form.
![]() Click Widgets under Appearance on the left admin menu.
Click Widgets under Appearance on the left admin menu.
![]() Click the Follow Blog widget.
Click the Follow Blog widget.
![]() Click the widget area you want.
Click the widget area you want.
![]() Click Add Widget.
Click Add Widget.
The widget opens to display its settings.
![]() Change the default wording of various elements here.
Change the default wording of various elements here.
![]() Change the sign-up button text here.
Change the sign-up button text here.
![]() Click this option to display the total number of followers (
Click this option to display the total number of followers (![]() changes to
changes to ![]() ).
).
![]() Click Save.
Click Save.
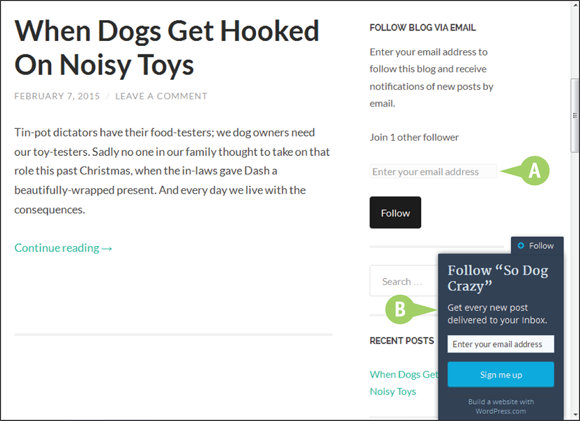
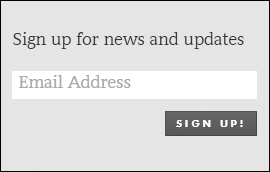
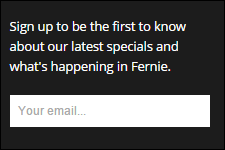
![]() The form now appears in the widget area, asking for the visitor’s email address.
The form now appears in the widget area, asking for the visitor’s email address.
![]() If you use the Follow tab method from steps 1 and 2, this is what visitors see when they click the tab.
If you use the Follow tab method from steps 1 and 2, this is what visitors see when they click the tab.
Use a Mailing List Manager for WordPress.org Sites without Jetpack
![]() Log in to your mail list account.
Log in to your mail list account.
![]() Look for an option called something like RSS to Email, or RSS Feed to Subscription or Blog Subscription.
Look for an option called something like RSS to Email, or RSS Feed to Subscription or Blog Subscription.
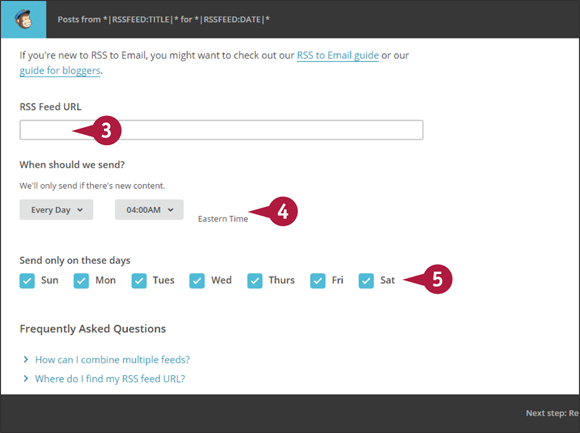
![]() Type the URL for your RSS feed. With self-hosted WordPress, adding/feed to the end of your site URL or a category URL produces an RSS feed.
Type the URL for your RSS feed. With self-hosted WordPress, adding/feed to the end of your site URL or a category URL produces an RSS feed.
![]() Choose how often new content will be emailed to subscribers.
Choose how often new content will be emailed to subscribers.
![]() Choose the days of the week when emails can be sent.
Choose the days of the week when emails can be sent.
After you finish setting up the mailing, it will work automatically as new content is posted.
Add a Mailing List Manager
The technical aspects of running a useful mailing list are enormous. Automating the sign-up process, tracking clicks within emails, segmenting the list according to past behavior, or simply keeping track of bounced emails — this is not something your email program can handle or something you should be trying to run on your server. Third-party mailing list managers do the heavy lifting; you just communicate with your list members. Integration with your WordPress site can be as simple as copying and pasting.
Add a Mailing List Manager
Manually Add a Sign-up Form
![]() Log in to your mailing list manager.
Log in to your mailing list manager.
![]() Look for a link to Embedded Forms or Website Forms or a similar name.
Look for a link to Embedded Forms or Website Forms or a similar name.
![]() Choose Signup Form.
Choose Signup Form.
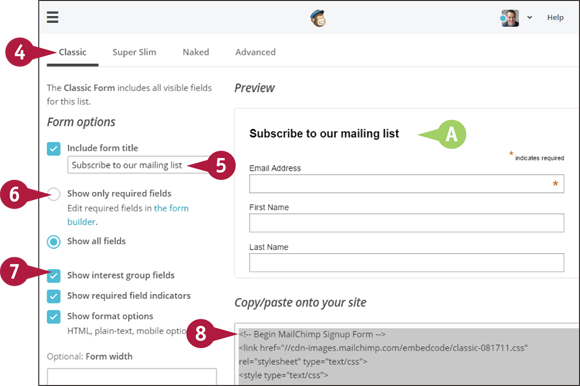
![]() Choose the type of form you want.
Choose the type of form you want.
![]() Type the form title.
Type the form title.
![]() Your changes appear in a preview.
Your changes appear in a preview.
![]() Choose whether to show only required fields.
Choose whether to show only required fields.
![]() Click any other options you may be offered.
Click any other options you may be offered.
![]() Copy the HTML from this box to use on your site.
Copy the HTML from this box to use on your site.
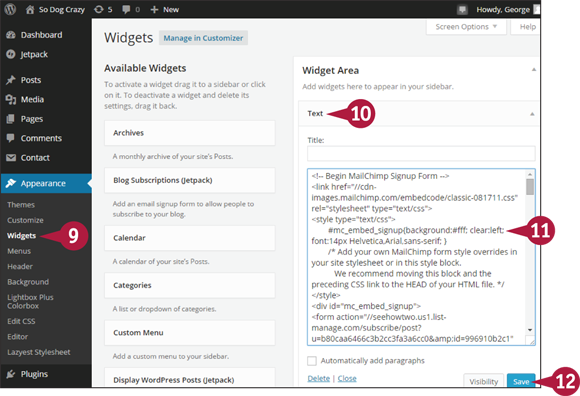
![]() Click Widgets under Appearance on the left admin menu.
Click Widgets under Appearance on the left admin menu.
![]() Add a Text widget where you want the feed to appear.
Add a Text widget where you want the feed to appear.
Note: See Chapter 8 for more about widgets.
![]() In the text area of the widget, paste the HTML.
In the text area of the widget, paste the HTML.
Note: If the form already has a title, leave the widget title blank.
![]() Click Save.
Click Save.
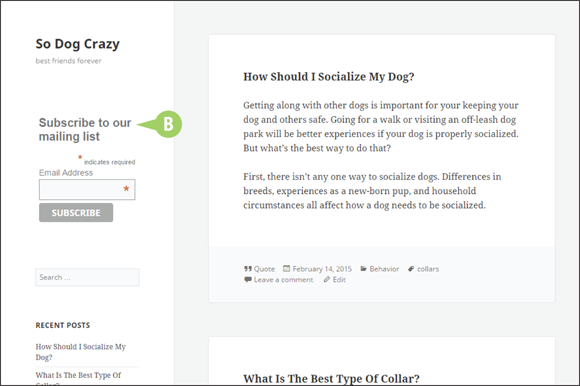
![]() The mailing list sign-up form appears in the sidebar.
The mailing list sign-up form appears in the sidebar.

Use a Plugin to Integrate a Sign-up Form
Note: Although adding a sign-up form manually is easy, a plugin for a WordPress.org site can make it even easier, or offer additional tools for design or integration.
![]() Click Add New under Plugins on the left admin menu.
Click Add New under Plugins on the left admin menu.
![]() Search by the name of your mailing list manager. There are plugins for Aweber, Mailchimp, Constant Contact, and many other providers.
Search by the name of your mailing list manager. There are plugins for Aweber, Mailchimp, Constant Contact, and many other providers.
![]() Install and activate the plugin and follow its instructions.
Install and activate the plugin and follow its instructions.
Note: See Chapter 10 for more about plugins.
Understand Comments
Good communication is at the heart of any relationship, and comments are a great way to communicate with visitors. WordPress has an excellent commenting system built in. It is up to you to use it to your advantage.
Allow Comments?
The first thing you need to decide is whether you want to accept comments at all. If so, then you need to decide where. The most common place is on blog posts, but perhaps not on all of them; comments on posts about events are great, but not necessarily on posts about press releases, for example. You also may have individual WordPress pages that could benefit from comments.
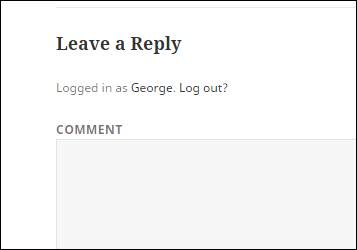
Reply to Comments
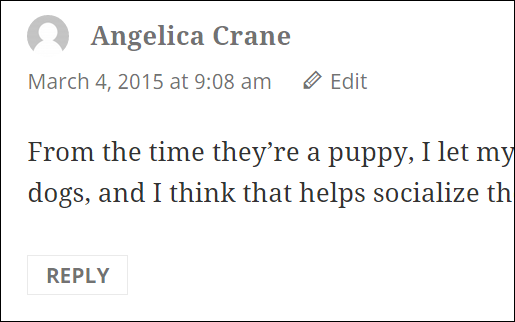
Someone making a comment on your site represents a potential conversation. Even if someone is just making an observation, it is good to respond, even if just to agree. It shows you are listening. Other kinds of comments lead to expanding on the topic of the post or taking it in a new direction. You do not need to reply to every comment if your site is very busy, but then busy is good.
Threaded Comments
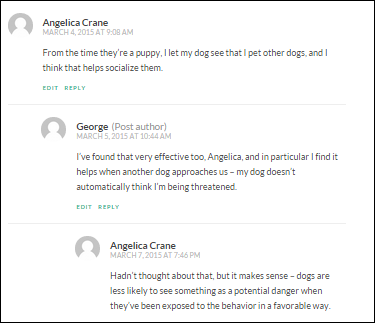
By default WordPress comes with threaded comments turned on, which is good. Being able to read responses to a comment right there rather than having to jump back and forth in the stream of comments is a huge boost for creating conversations.
Special Uses for Comments
The comment system in WordPress does not always have to be used for comments. You could use it as a way of gathering testimonials or as a kind of trouble-ticket system or for gathering user-submitted stories. And you could use it differently for different areas of your site. Whatever kind of communication you want to have publicly with your audience, the comment system may be a great tool.
Comment Spam
Unfortunately, opening your site to comments also opens it to spammers. In fact, even without turning on comments it is possible to get spammed, so you will want some form of spam protection. WordPress.com sites are automatically covered, whereas WordPress.org sites have many options through plugins. Typically this protection covers more than just comments, such as a contact form or a registration form.
Third-Party Comments

Although WordPress has a great built-in comment system, there are also third-party servers, such as Disqus. Not only do they provide a comment system for you, but they have become social networks where visitors share comments and interact with one another through their individual feeds, which means comments about you can extend beyond your site.
Choose Comment Settings
WordPress’s default settings for comments do a good job of balancing between comment settings that are too lax and ones that are too restrictive. Knowing how those settings work and possible ways to adjust them is important to an effective and hopefully busy comment environment on your site. This section talks about the key discussion settings instead of trying to explain them all.
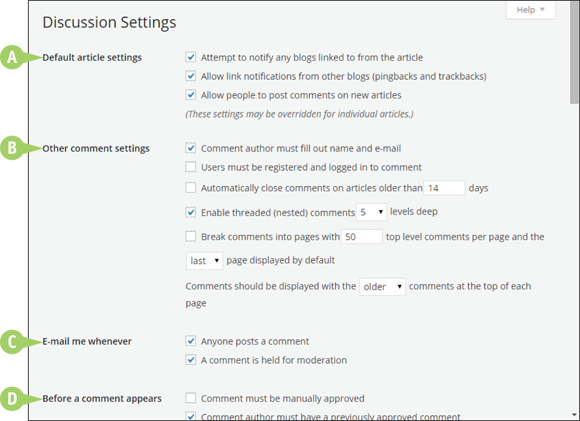
Find comment settings by clicking Discussion under Settings on the left admin menu.
WordPress.com and WordPress.org Settings
![]() Default Article Settings
Default Article Settings
The setting to allow people to post comments on new articles is turned on by default, which means comments will appear on all posts or pages. A note reminds you that you can override this setting on individual posts or pages.
![]() Other Comment Settings
Other Comment Settings
The three settings turned on by default are: Comment authors must fill out their name and email, threaded comments are enabled, and the order of comments is set to oldest first. Those are best left as is; the first helps manage spam, and the second two are for readability.
![]() E-Mail Me Whenever
E-Mail Me Whenever
By default, the administrator will receive an email whenever anyone posts a comment or when one is held for moderation. Unless comments are extremely busy, it is good to leave this turned on.
![]() Before a Comment Appears
Before a Comment Appears
By default, comments are automatically approved if the author has had one comment approved manually. The other setting, which is turned off, would require every comment to be manually approved.
More WordPress.com and WordPress.org Settings
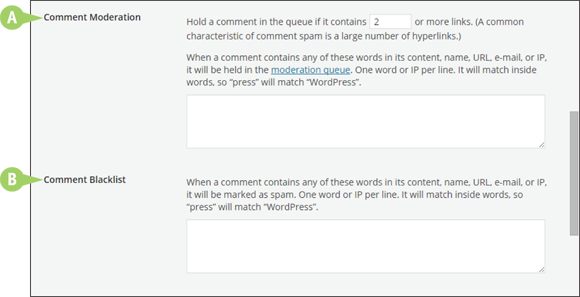
![]() Comment Moderation
Comment Moderation
Because a lot of spam is filled with links, the default setting is to hold a comment for moderation (even if the author has been approved before) if it contains two or more links. There is also a box for triggers to hold a comment for moderation if the listed words appear in the content, name, URL, email, or IP address.
![]() Comment Blacklist
Comment Blacklist
Similar to the moderation box, but in this case, matched words cause the comment to be marked as spam.
WordPress.com Additional Settings
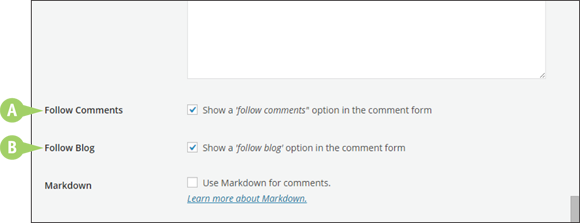
![]() Follow Comments
Follow Comments
By default, WordPress.com creates a button on the comment form allowing visitors to follow the comments for that post or page.
![]() Follow Blog
Follow Blog
By default, WordPress.com creates a button on the comment form allowing visitors to follow the site as a whole.
Moderate Comments
No site should have a completely open comment policy; that is, where a comment from anyone is automatically published on your site. The previous section “Choose Comment Settings” makes it clear how important some form of moderation is required. Here you learn about how to do the moderating.
Moderate Comments
Moderate an Individual Comment
Note: WordPress notifies you in a number of ways that comments need moderation.
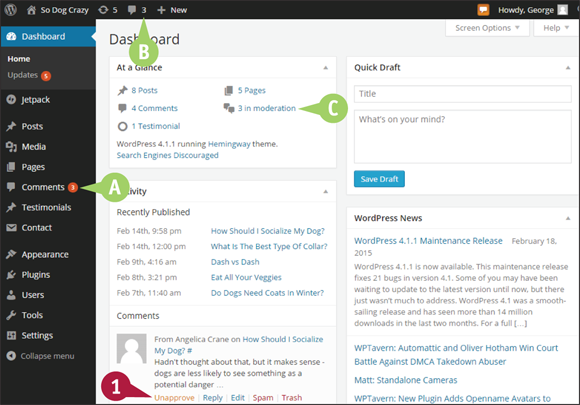
![]() Watch for the circle icon next to Comments on the left admin menu.
Watch for the circle icon next to Comments on the left admin menu.
![]() Watch for a number next to the dialog icon in the toolbar menu.
Watch for a number next to the dialog icon in the toolbar menu.
![]() On the Dashboard under At a Glance, a notice of comments awaiting moderation appears.
On the Dashboard under At a Glance, a notice of comments awaiting moderation appears.
![]() Click Approve to moderate the most recent comments appearing on the Dashboard.
Click Approve to moderate the most recent comments appearing on the Dashboard.
Note: The wording of the link changes to Unapprove.
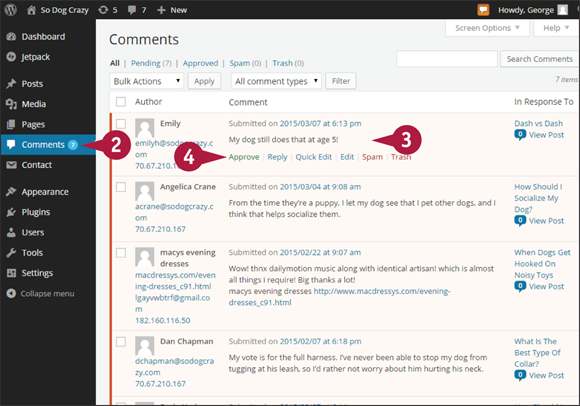
![]() Click Comments on the left admin menu.
Click Comments on the left admin menu.
All comments awaiting moderation have a light orange background.
![]() Mouse over a comment to reveal a menu.
Mouse over a comment to reveal a menu.
![]() Click Approve to make the comment go public.
Click Approve to make the comment go public.
Moderate Multiple Comments
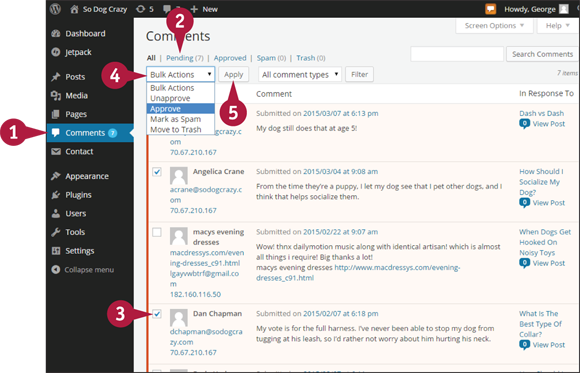
![]() Click Comments on the left admin menu.
Click Comments on the left admin menu.
![]() Click the Pending link to show only comments awaiting moderation.
Click the Pending link to show only comments awaiting moderation.
![]() Click the box beside each comment you want to approve (
Click the box beside each comment you want to approve (![]() changes to
changes to ![]() ).
).
Note: If you want to approve them all, check the box in the header row to select all.
![]() Click
Click ![]() and choose Approve.
and choose Approve.
![]() Click Apply.
Click Apply.
All chosen comments are approved.
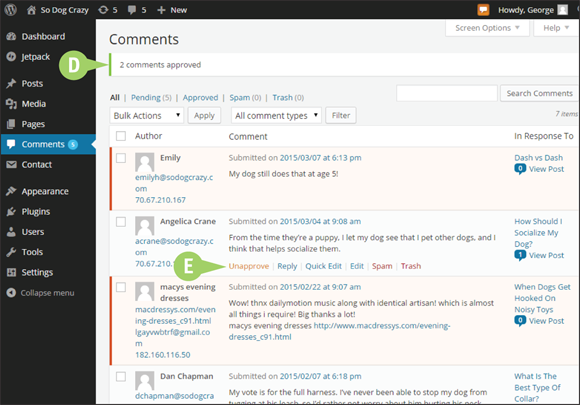
![]() The success message at the top of the screen shows how many comments were approved.
The success message at the top of the screen shows how many comments were approved.
![]() All approved comments now show a gray background. Mouse over any of the comments you approved and you can click Unapprove to return it to pending or moderation status again.
All approved comments now show a gray background. Mouse over any of the comments you approved and you can click Unapprove to return it to pending or moderation status again.
Edit Comments
Editing comments lets you correct typos, tone down rhetoric, or make comments conform to a particular comment policy. Editing often is a nicer alternative to approving or deleting troublesome comments.
Edit a Comment
Note: There are several points from which you can edit a comment in WordPress.
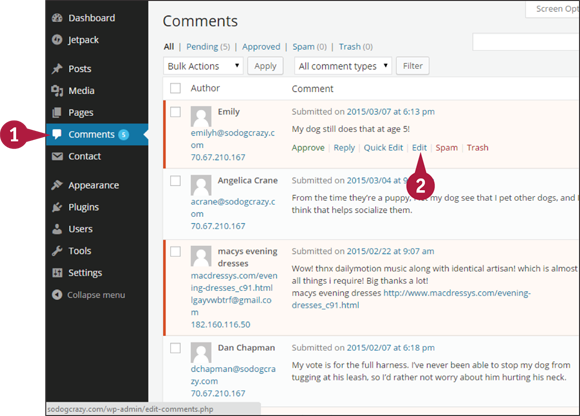
From the Comments Screen
![]() Click Comments on the left admin menu.
Click Comments on the left admin menu.
![]() Mouse over the comment you want to edit and click the Edit link.
Mouse over the comment you want to edit and click the Edit link.
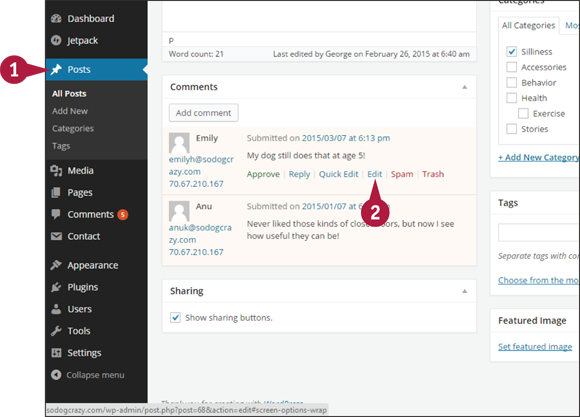
From the Posts Screen
![]() Open a post and scroll down past the content editor where you see all comments relating to that post.
Open a post and scroll down past the content editor where you see all comments relating to that post.
![]() Mouse over the comment you want to edit and click the Edit link.
Mouse over the comment you want to edit and click the Edit link.
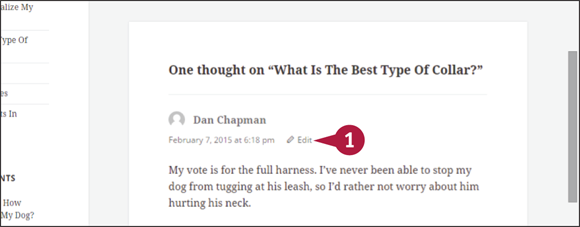
From Your Blog
![]() While you are logged on to your blog, click Edit next to the published comment you want to change.
While you are logged on to your blog, click Edit next to the published comment you want to change.
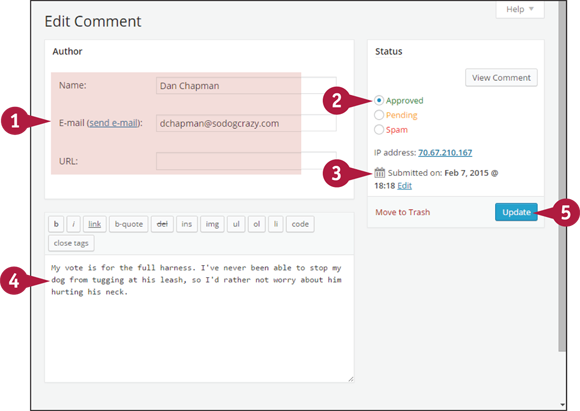
Edit a Comment
Note: All three Edit links described in the previous steps lead to an Edit Comment screen.
![]() Edit the author’s information here.
Edit the author’s information here.
![]() Change the status of the comment here (
Change the status of the comment here (![]() changes to
changes to ![]() ).
).
![]() Edit the date the comment was posted here.
Edit the date the comment was posted here.
![]() Edit the content of the post using the HTML editor box.
Edit the content of the post using the HTML editor box.
![]() Click Update.
Click Update.
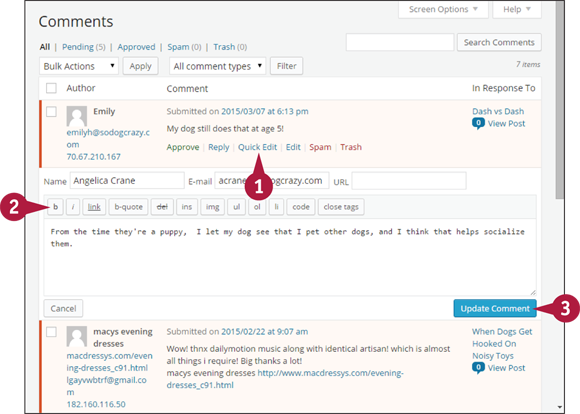
Use Quick Edit to Edit a Comment
Note: If you need to change only the content of a comment, the steps that follow are a faster way of doing it.
![]() Mouse over the comment and click Quick Edit.
Mouse over the comment and click Quick Edit.
![]() Make any changes you want, including spelling, grammar, and HTML formatting, in the HTML editing box.
Make any changes you want, including spelling, grammar, and HTML formatting, in the HTML editing box.
![]() Click Update Comment when you are done.
Click Update Comment when you are done.
The changes are saved, and the Quick Edit pane closes.
Deal with Comment Spam
The less time spent worrying about or dealing with spammers, the better. That is why it is important you have a tool in place to do the worrying and the dealing. WordPress.com has a built-in system called Akismet, which is highly effective. It is also available as a plugin to any WordPress.org site, though it does cost money for commercial sites. Other effective plugins are also available.
Deal with Comment Spam
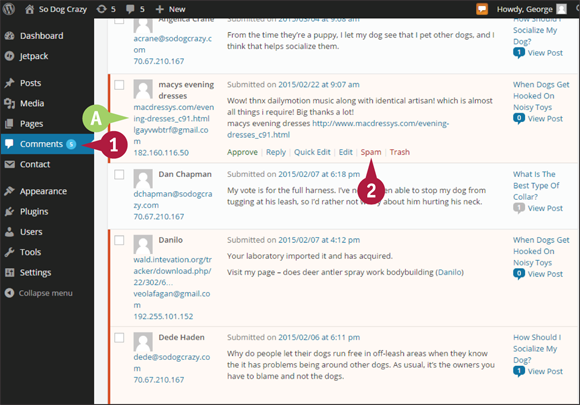
Access Comments
![]() Click Comments on the left admin menu.
Click Comments on the left admin menu.
![]() Spotting spam comments is generally pretty easy. They often have crazy names and long email addresses filled with advertising terms, and the comments rarely make any sense or are simplistically complimentary — they love your site.
Spotting spam comments is generally pretty easy. They often have crazy names and long email addresses filled with advertising terms, and the comments rarely make any sense or are simplistically complimentary — they love your site.
![]() Mouse over the comment you want to mark as spam and from the menu that appears, click the Spam link.
Mouse over the comment you want to mark as spam and from the menu that appears, click the Spam link.
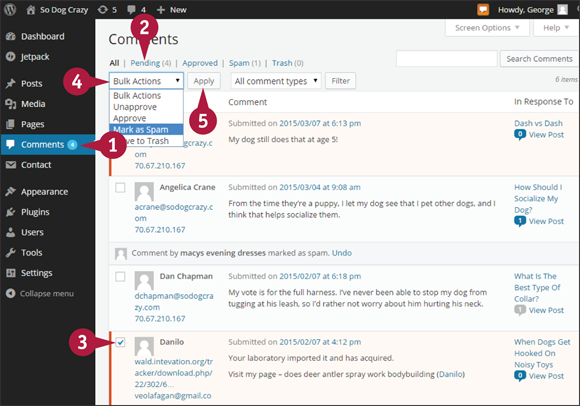
Mark Multiple Comments as Spam
![]() Click Comments on the left admin menu.
Click Comments on the left admin menu.
![]() Click Pending to show only comments awaiting moderation.
Click Pending to show only comments awaiting moderation.
![]() Click the box beside each comment you want to mark as spam (
Click the box beside each comment you want to mark as spam (![]() changes to
changes to ![]() ).
).
![]() Click
Click ![]() and choose Mark as Spam.
and choose Mark as Spam.
![]() Click Apply.
Click Apply.
All chosen comments are marked as spam and are moved to the spam screen.
Understand the Spam Comments Screen
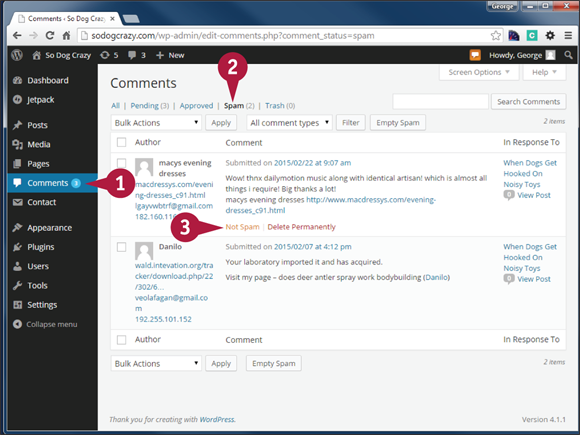
![]() Click Comments on the left admin menu.
Click Comments on the left admin menu.
![]() Click Spam to show only comments marked as spam.
Click Spam to show only comments marked as spam.
![]() Mouse over a particular comment and you can unmark it as spam or you can delete it permanently.
Mouse over a particular comment and you can unmark it as spam or you can delete it permanently.
Note: You can use the Bulk Actions function to take these actions for several or all of the spam comments.
Anti-Spam Plugins for WordPress.org Sites
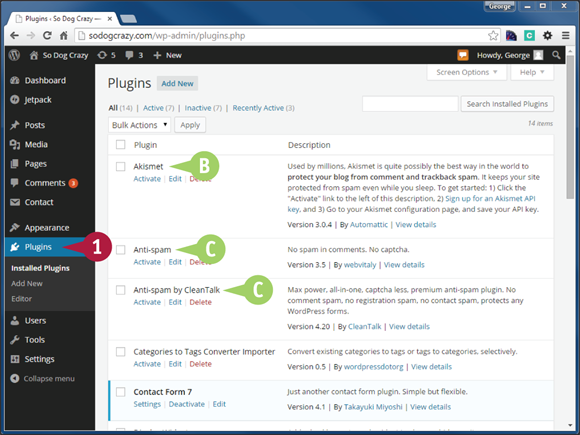
![]() Click Plugins on the left admin menu.
Click Plugins on the left admin menu.
![]() The Akismet anti-spam service, run by
The Akismet anti-spam service, run by WordPress.com, is available as a plugin that comes installed with WordPress. To activate it, you need to sign up with Akismet or have a WordPress.com account. It is free for personal sites, but there is a small monthly fee for commercial sites.
![]() Two other anti-spam plugins have been installed here to illustrate some of the alternatives to Akismet — there are many others. Click Add New under Plugins and search for “anti-spam.”
Two other anti-spam plugins have been installed here to illustrate some of the alternatives to Akismet — there are many others. Click Add New under Plugins and search for “anti-spam.”
Display Testimonials
Building trust is one of the most important goals of any website, and quality testimonials do exactly that. One method is to create a category of posts for testimonials, but for WordPress.org sites there are plugins that give you even more control over how individual testimonials can be displayed throughout your site.
Display Testimonials
Testimonials in Existing Pages and Posts
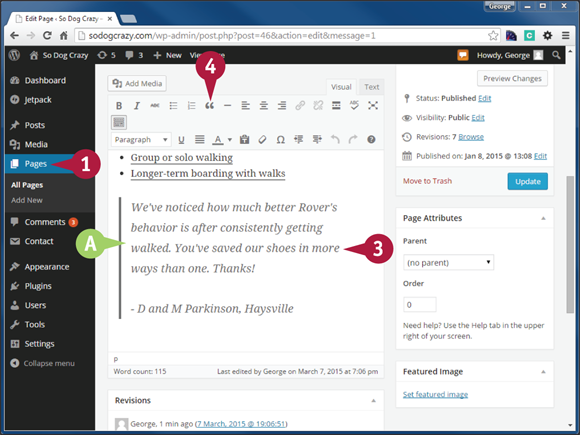
![]() Click Posts or Pages on the left admin menu to find the post or page where you want to place your testimonial.
Click Posts or Pages on the left admin menu to find the post or page where you want to place your testimonial.
![]() Click Edit to edit the post or page.
Click Edit to edit the post or page.
![]() Type the testimonial text where you want it to appear in the content editor.
Type the testimonial text where you want it to appear in the content editor.
![]() Highlight the testimonial and click the Block Quote button (
Highlight the testimonial and click the Block Quote button (![]() ).
).
![]() Your testimonial is styled by your theme.
Your testimonial is styled by your theme.
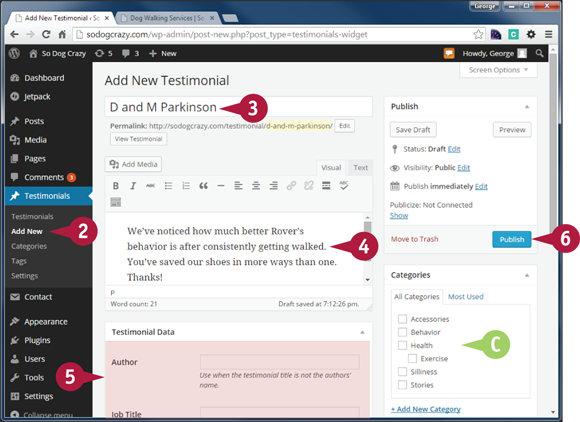
Input Testimonials as Individual Posts
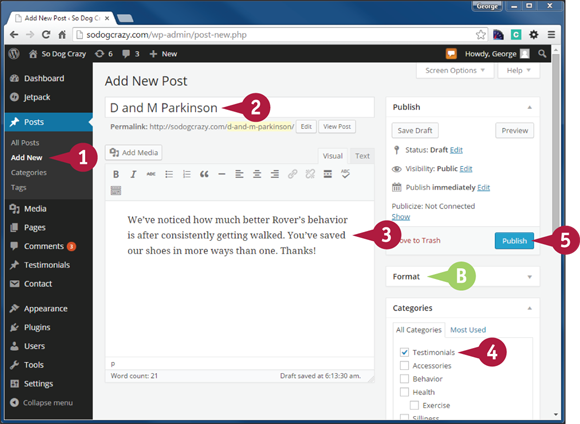
![]() Click Add New under Posts on the left admin menu.
Click Add New under Posts on the left admin menu.
![]() Type the name of the person who gave the testimonial.
Type the name of the person who gave the testimonial.
![]() Type the testimonial in the content editor.
Type the testimonial in the content editor.
![]() If your theme supports the Quote format, you could assign that to the post.
If your theme supports the Quote format, you could assign that to the post.
![]() Assign the post to the Testimonials category (
Assign the post to the Testimonials category (![]() changes to
changes to ![]() ).
).
Note: If the category does not exist, see the section “Add New Categories” in Chapter 7.
![]() Click Publish.
Click Publish.
Use a Testimonials Plugin on WordPress.org Sites
![]() Install and activate the Testimonials Widget plugin.
Install and activate the Testimonials Widget plugin.
Note: See Chapter 10 for more about plugins.
![]() Click Add New under Testimonials on the left admin menu.
Click Add New under Testimonials on the left admin menu.
![]() Type the name of the person who gave the testimonial.
Type the name of the person who gave the testimonial.
![]() Type the testimonial.
Type the testimonial.
![]() Type information such as location, company, URL, and email in the Testimonial Data meta box.
Type information such as location, company, URL, and email in the Testimonial Data meta box.
![]() You can categorize the testimonial (
You can categorize the testimonial (![]() changes to
changes to ![]() ).
).
![]() Click Publish.
Click Publish.
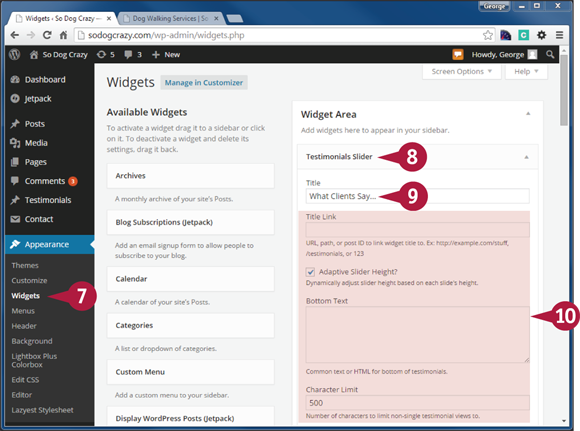
![]() Click Widgets under Appearance on the left admin menu.
Click Widgets under Appearance on the left admin menu.
![]() Add the Testimonials Slider widget to the widget area you want.
Add the Testimonials Slider widget to the widget area you want.
![]() Type a title to appear above the testimonials.
Type a title to appear above the testimonials.
![]() Go through all the settings for this widget, such as how many testimonials to revolve, and how long to display each.
Go through all the settings for this widget, such as how many testimonials to revolve, and how long to display each.
![]() Scroll down and click Save.
Scroll down and click Save.
The Testimonial Slider appears in the widget area of your blog.