
CHAPTER 12
Managing Your WordPress Site
Whether you are tracking site statistics or making your site search'engine friendly, there are many ways you can make it easier to manage your WordPress site.
Change What Your Front Page Displays
Edit Content for Search Engines
Change What Your Front Page Displays
By default, WordPress displays your latest posts on the home page, but you can change that by using a WordPress setting. Or on WordPress.org sites, your theme may have a particular way of handling content on the front page.
Change What Your Front Page Displays
For WordPress.com and WordPress.org Sites
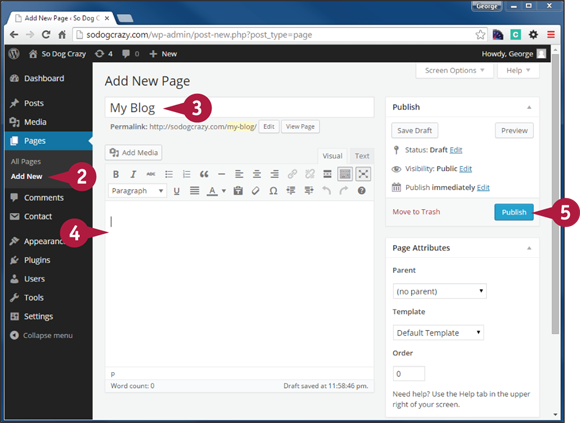
![]() Add a new page with the content you want to appear on the front page, and publish the page.
Add a new page with the content you want to appear on the front page, and publish the page.
Note: See Chapter 5 to add a new page.
![]() Click Add New under Pages on the left admin menu.
Click Add New under Pages on the left admin menu.
![]() Type the title for your blog.
Type the title for your blog.
![]() Leave the content editor blank.
Leave the content editor blank.
Note: Any content you place in here will not be shown. This is a placeholder page only.
![]() Click Publish.
Click Publish.
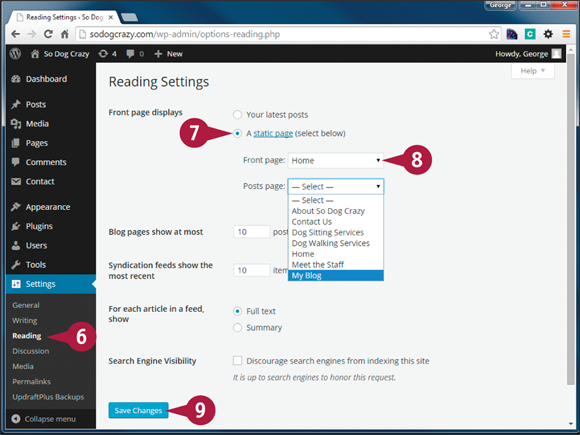
![]() Click Reading under Settings on the left admin menu.
Click Reading under Settings on the left admin menu.
![]() For Front Page Displays, click the A static page option (
For Front Page Displays, click the A static page option (![]() changes to
changes to ![]() ).
).
![]() Click the Front page
Click the Front page ![]() and select the page you created as your home page — in this case, Home.
and select the page you created as your home page — in this case, Home.
![]() Click Save Changes.
Click Save Changes.
Now, when visitors arrive at your domain name, the front page displays the contents of the Home page. And all blog posts will appear on the Posts or Blog page.
For WordPress.org Sites
Note: Some themes on WordPress.org sites operate in a third way: by controlling the front page through Theme Options or Widgets or a combination of the two.
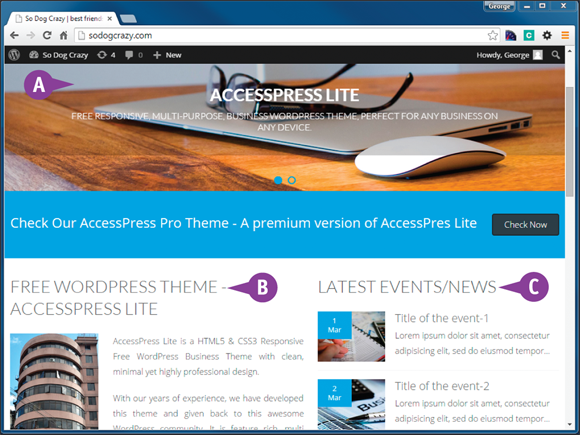
![]() The top portion of the default home page for the theme Accesspress contains images from a slider.
The top portion of the default home page for the theme Accesspress contains images from a slider.
![]() The text and featured image of one of the site’s posts.
The text and featured image of one of the site’s posts.
![]() The events section is a list of the latest posts from one of the site’s categories.
The events section is a list of the latest posts from one of the site’s categories.
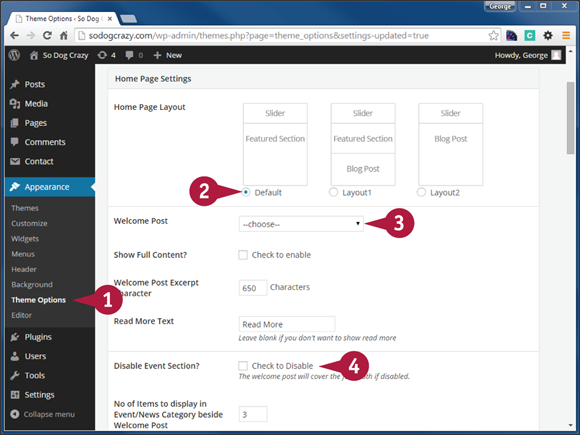
![]() Click Theme Options under Appearance on the left admin menu.
Click Theme Options under Appearance on the left admin menu.
![]() Click the layout of the top portion of the home page (
Click the layout of the top portion of the home page (![]() changes to
changes to ![]() ).
).
![]() Click
Click ![]() and choose the content of any post to appear as the welcome text at the top left of the home page.
and choose the content of any post to appear as the welcome text at the top left of the home page.
![]() Click this option to disable the events section next to the welcome text (
Click this option to disable the events section next to the welcome text (![]() changes to
changes to ![]() ). This theme offers a number of possible home page sections which are not visible on this screenshot.
). This theme offers a number of possible home page sections which are not visible on this screenshot.
Use a Page Builder Plugin
Although WordPress themes have continually added more and better choices for site design, the layout and design of post and page content has remained limited. With the introduction of shortcode and page builder plugins, all that has changed. Shortcode plugins make it easy to add elements like columns or tabbed content, whereas page builder plugins add drag-and-drop functionality to the use of shortcodes.
Use a Page Builder Plugin
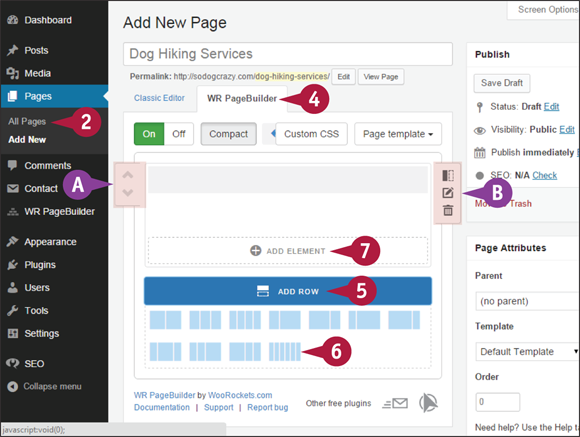
![]() Install and activate
Install and activate Page Builder by WooRockets.com from the Add Plugins screen.
Note: See Chapter 10 for more about plugins.
![]() Click All Pages under Pages on the left admin menu.
Click All Pages under Pages on the left admin menu.
![]() Choose a page and click Edit.
Choose a page and click Edit.
![]() Click the WR PageBuilder tab on the content editor.
Click the WR PageBuilder tab on the content editor.
![]() Click Add Row to begin adding content.
Click Add Row to begin adding content.
![]() From the list that drops down, choose one column or any of a number of combinations of columns.
From the list that drops down, choose one column or any of a number of combinations of columns.
![]() If you have more than one row, you rearrange them using the arrow buttons (
If you have more than one row, you rearrange them using the arrow buttons (![]() and
and ![]() ).
).
![]() From the menu at the right of each row, you can add columns (
From the menu at the right of each row, you can add columns (![]() ), edit the row (
), edit the row (![]() ), or delete it (
), or delete it (![]() ).
).
![]() Click Add Element to add content.
Click Add Element to add content.
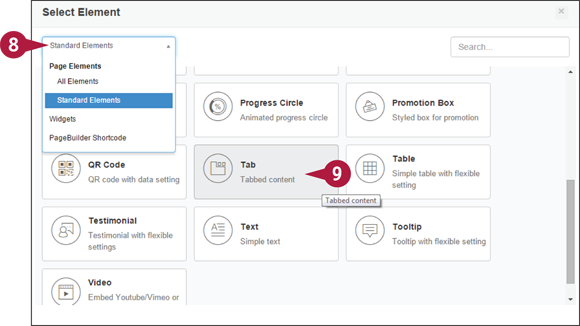
The Select Element window opens.
![]() From the dropdown at the top left, select which elements or WordPress widgets you want to choose from.
From the dropdown at the top left, select which elements or WordPress widgets you want to choose from.
![]() Click the item you want.
Click the item you want.
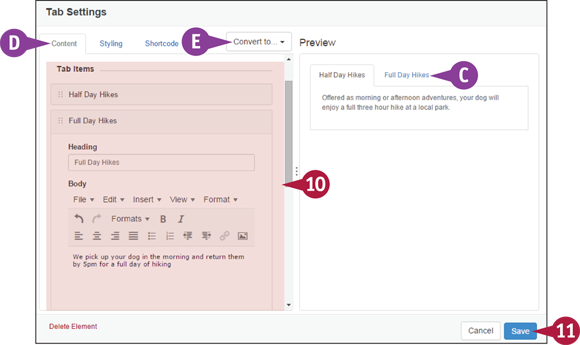
The settings for the element you chose appear.
![]() Type your content in the left panel. How it is entered and what options you have depend on the type of element.
Type your content in the left panel. How it is entered and what options you have depend on the type of element.
![]() A preview of how your content will appear on the live site is shown on the right.
A preview of how your content will appear on the live site is shown on the right.
![]() The tabs at the top switch you between Content, Styling, and Shortcode, which is the actual coding of the element.
The tabs at the top switch you between Content, Styling, and Shortcode, which is the actual coding of the element.
![]() If there are similar elements, a dropdown allows you to convert your content to one of those other elements.
If there are similar elements, a dropdown allows you to convert your content to one of those other elements.
![]() When you are finished, click Save.
When you are finished, click Save.
The window closes and you return to the post or pages you are editing.
![]() Click Publish or Update.
Click Publish or Update.
![]() View your content on the live site. In this example, tabs are added to the page.
View your content on the live site. In this example, tabs are added to the page.
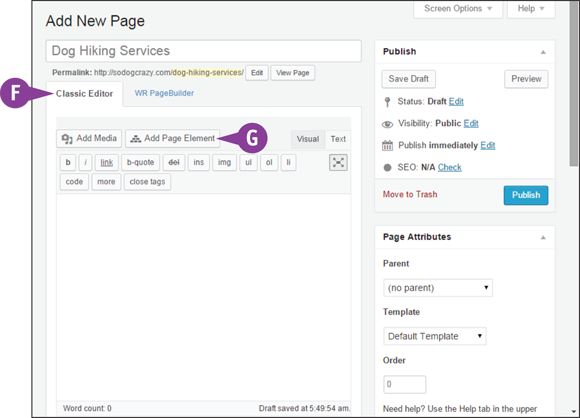
![]() You can use the regular content editor by clicking the Classic Editor tab.
You can use the regular content editor by clicking the Classic Editor tab.
![]() You can still use the Page Elements in the regular content editor, but they will appear as shortcodes within the text.
You can still use the Page Elements in the regular content editor, but they will appear as shortcodes within the text.
Edit Content for Search Engines
Although not specific to WordPress, making your content search-engine friendly is important. The best rule of thumb is to write for visitors and edit for search engines. A large part of that editing involves making sure you are using a keyword or phrase that searchers tend to use.
Focus Every Piece of Content
Keeping web pages narrowly focused is important for visitors, and that makes it important for search engines. If visitors need their kitchen faucet fixed, they do not want to be reading through your air conditioning services to get to their topic. And search engines get blamed if kitchen faucet searchers do not get to the kitchen faucet page right away. The narrower your page topic, the better, and the keyword will describe the topic.
Write Enough Content

In most cases, if a web page is going to have some value to visitors, it has to have at least a reasonable amount of content. No one knows exactly what search engines consider reasonable, but a common number you will hear is 300 words. Not all pages need this; it does not take a lot to tell visitors how to contact you, for example. But for pages where keywords are important, you need to have a minimum amount of content.
Put Effort into Your Titles
Titles are the gateway to web pages, and in turn to your entire site. If searchers arrive to find a title that seems unrelated to what they are searching for, they hit the Back button and try the next result. The more you can word your titles in a way that directly addresses the kind of search visitors might make for that topic, the more likely they will stop to read more. The keyword for the page should be in the title, near the beginning if possible.
Make Great Openings
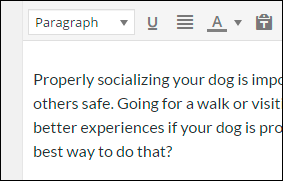
Just as the title of a web page is the immediate first impression, so too must the first paragraph confirm that visitors are going to get what they are after. So make sure the keyword is in the first sentence and that the paragraph gives a summary of what visitors will get from the page.
Put Useful Alt Tags on Images
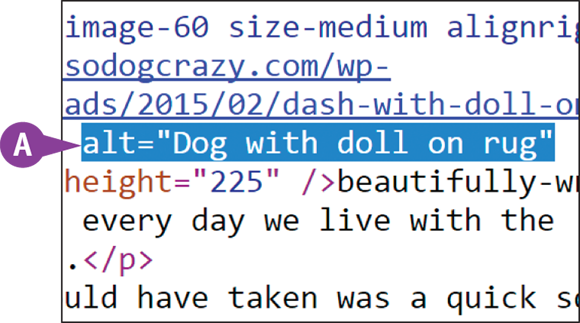
Visitors love images, and to help search engines know an image is relevant to the topic of the page, use the alt attribute (![]() ) of an image to accurately describe what it shows. Do not simply say “a car,” but say what make or model, what color, where it is located, and so on. If you can include the keyword while sounding natural, great.
) of an image to accurately describe what it shows. Do not simply say “a car,” but say what make or model, what color, where it is located, and so on. If you can include the keyword while sounding natural, great.
Create Quality Links Inside and Out
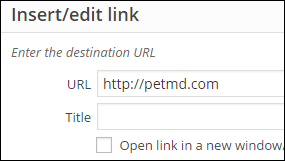
HTML stands for HyperText Markup Language, and the hypertext stands for text that takes you somewhere else. Linking is how search engines find their way around. So link to relevant, quality external sites and relevant material on your own site. Search engines love both.
Break Up Longer Content with Headings

And longer content means anything more than two or three paragraphs. Headings help to break up the page for visitors so they can jump to specific content or quickly map what is on a page. Search engines do the same. Remember that H1 is the most important heading — the page title — and as the number goes up, the importance goes down: H2 would be a sub-heading, H3 would be a sub-sub-heading, and so on.
Use an SEO Plugin
Having focused content that visitors want is the important first step in search engine optimization, but there are also key elements for SEO that need to be in place behind the scenes. For WordPress.org sites, plugins are available that can help with that. This example uses the WordPress SEO by Yoast plugin.
Use an SEO Plugin
![]() Install and activate WordPress SEO by Yoast from the Add Plugins screen.
Install and activate WordPress SEO by Yoast from the Add Plugins screen.
Note: See Chapter 10 for more about plugins.
![]() From the Page or Post links on the left admin menu, open a page or post and look for the plugin’s meta box just below the content editor.
From the Page or Post links on the left admin menu, open a page or post and look for the plugin’s meta box just below the content editor.
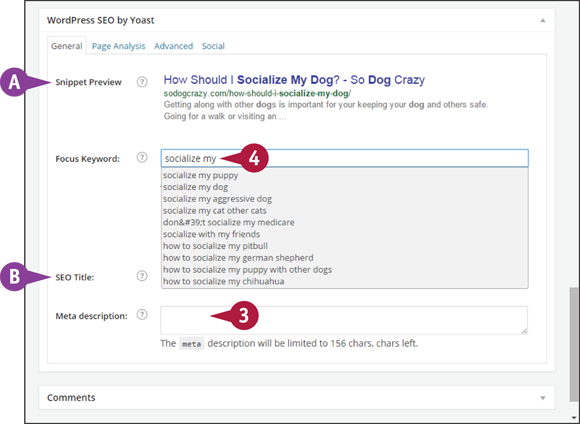
![]() Snippet Preview shows what the post or page’s listing would look like in search results.
Snippet Preview shows what the post or page’s listing would look like in search results.
![]() The SEO Title field allows you to override the default HTML title tag.
The SEO Title field allows you to override the default HTML title tag.
![]() Type a meta description. The ideal number of characters and how many you have are both shown.
Type a meta description. The ideal number of characters and how many you have are both shown.
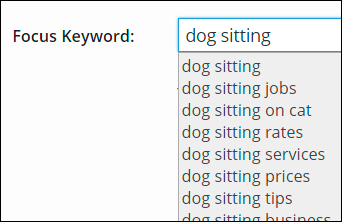
![]() Type a keyword; a series of suggestions appears from actual search terms.
Type a keyword; a series of suggestions appears from actual search terms.
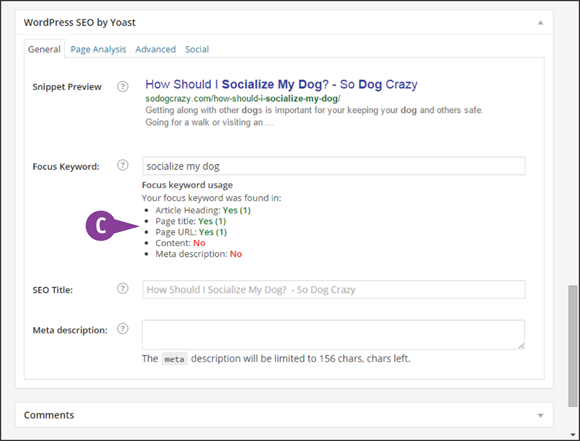
![]() The plugin reports on how the keyword is used on the post or page.
The plugin reports on how the keyword is used on the post or page.
The report tells you where and the total number of times the keyword is found in crucial places: Article Heading, Page Title, Page URL, Content, and Meta Description.
![]() As you correct missing keywords, the report reflects the changes. For example, as you add the keyword to the meta description field, this report updates the meta description total.
As you correct missing keywords, the report reflects the changes. For example, as you add the keyword to the meta description field, this report updates the meta description total.
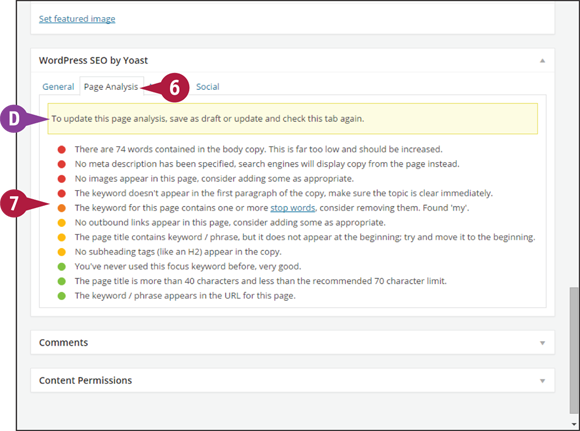
![]() Click the Page Analysis tab to view a report card on the SEO qualities of the post or page.
Click the Page Analysis tab to view a report card on the SEO qualities of the post or page.
![]() Check the colored dots to see where your content could use improvements.
Check the colored dots to see where your content could use improvements.
Note: These ratings are combined into a single rating which is shown in the Publish meta box and on page and post listings.
![]() You need to save or update for the report card to reflect any changes you make.
You need to save or update for the report card to reflect any changes you make.
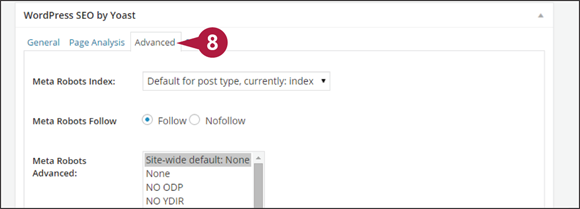
![]() Click the Advanced tab.
Click the Advanced tab.
Do not touch any of the Advanced tab settings unless you know what you are doing. Setting them improperly can block search engines.
Note: By default, the plugin disables this tab for anyone except Administrators.
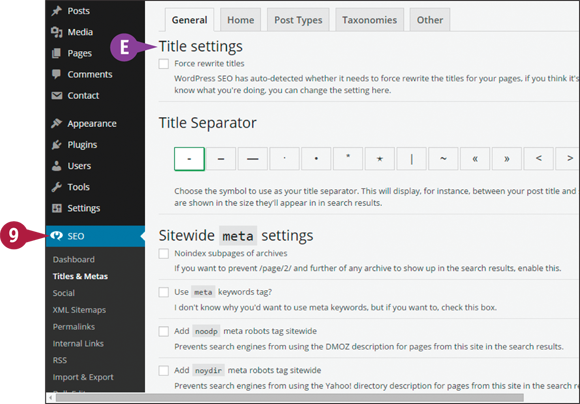
![]() Click links under the SEO section of the left admin menu to control site-wide optimization settings.
Click links under the SEO section of the left admin menu to control site-wide optimization settings.
![]() Some settings can be used to control all instances of posts, pages, or other WordPress elements.
Some settings can be used to control all instances of posts, pages, or other WordPress elements.
Track Site Statistics
Whether you want help to make more money or simply want to know who is visiting, website statistics are crucial. WordPress.com has a built-in visitor tracking system, whereas for WordPress.org sites, you can easily add Google Analytics using a plugin.
Track Site Statistics
Use Google Analytics on WordPress.org Sites
![]() Install and activate the plugin
Install and activate the plugin Google Analytics by Yoast from the Add Plugins screen.
Note: See Chapter 10 for more about plugins.
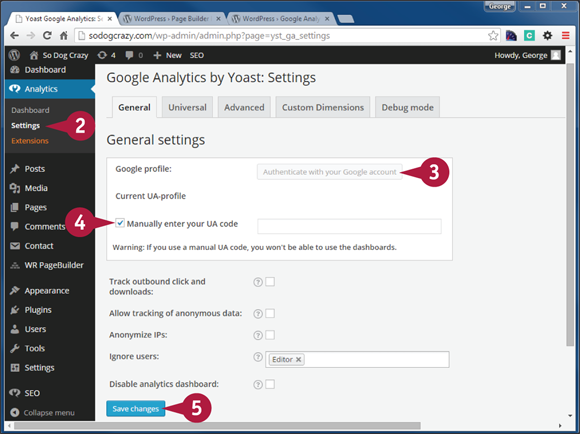
![]() Click Settings under Analytics on the left admin menu.
Click Settings under Analytics on the left admin menu.
![]() Click to set up the Google Analytics code by authenticating through your Google Account. Log in to Google and accept the terms. You are given a code to paste into the plugin.
Click to set up the Google Analytics code by authenticating through your Google Account. Log in to Google and accept the terms. You are given a code to paste into the plugin.
![]() Click this option to manually enter the UA code you are given when you set up Analytics yourself (
Click this option to manually enter the UA code you are given when you set up Analytics yourself (![]() changes to
changes to ![]() ).
).
Note: Manually entering the UA code means statistics from Google cannot display on the plugin’s dashboard.
![]() Click Save Changes.
Click Save Changes.
In a few hours or less you see statistics from Google Analytics.
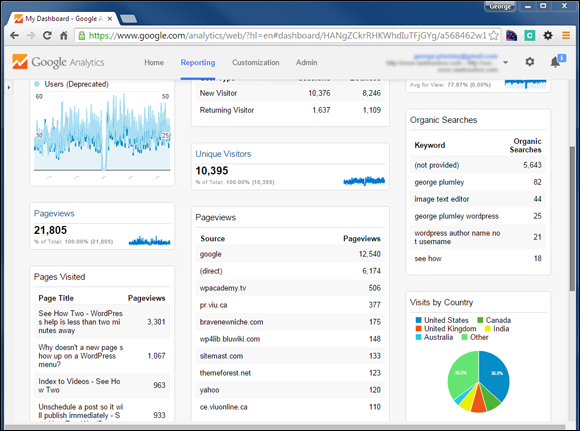
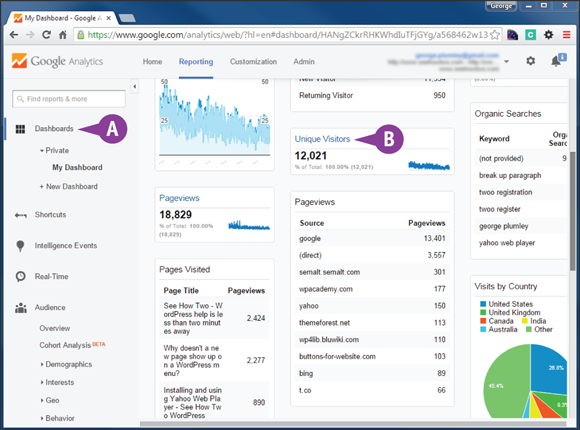
![]() The left panel displays a list of available reports, of which there are dozens, all of them customizable.
The left panel displays a list of available reports, of which there are dozens, all of them customizable.
![]() On the right is where report details appear, as well as dashboards. You can create multiple dashboards, pulling in elements of any report.
On the right is where report details appear, as well as dashboards. You can create multiple dashboards, pulling in elements of any report.
Use WordPress.com and Jetpack Stats
Note: These statistics are also available on WordPress.org sites using the Jetpack plugin.
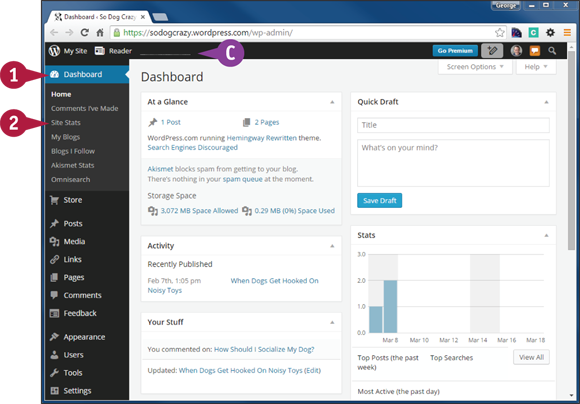
![]() Click Dashboard on the left admin menu of your
Click Dashboard on the left admin menu of your WordPress.com site to see some key statistics in the Stats meta box.
![]() From any admin screen, the toolbar has a small graph showing visits from the last 48 hours with a link to the statistics screen.
From any admin screen, the toolbar has a small graph showing visits from the last 48 hours with a link to the statistics screen.
![]() From any admin screen, click Site Stats under Dashboard on the left admin menu.
From any admin screen, click Site Stats under Dashboard on the left admin menu.
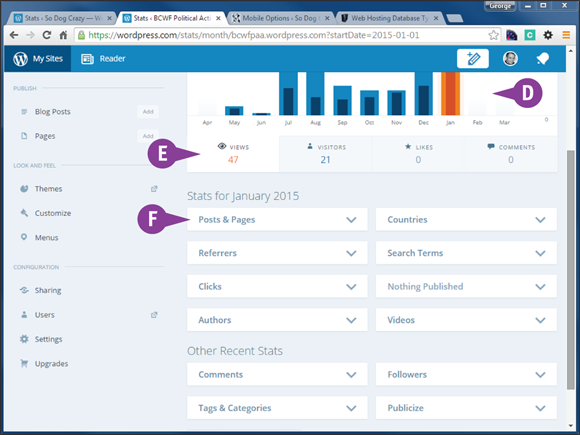
![]() The graph displays statistics according to a chosen time range.
The graph displays statistics according to a chosen time range.
![]() You can choose which statistics to display on the graph: Views, Visitors, Likes, and Comments.
You can choose which statistics to display on the graph: Views, Visitors, Likes, and Comments.
![]() A wide range of statistics can be displayed by toggling the individual boxes.
A wide range of statistics can be displayed by toggling the individual boxes.
Understand Site Statistics
The amount of information gathered by statistics services such as Google Analytics or WordPress.com is staggering. Sorting through it becomes the real issue, so here are a few tips. As you will see, the value of statistics is to raise questions and prompt experiments or changes.
How Many Unique and Repeat Visitors?
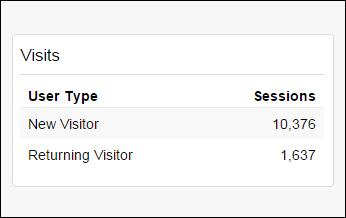
Unique visitors filters out those who come back to your site more than once in a day, so you have a sense of how many individuals actually visited. A repeat visitor is someone who has been to your site on other days. Having a good percentage of repeat visitors is important because it shows your site is holding their interest.
What Is the Bounce Rate?
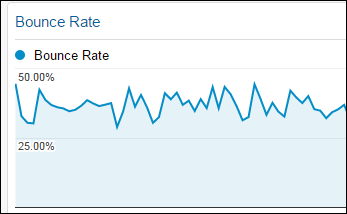
A bounce is when someone visits a page for a few seconds and does not go anywhere else on your site. On the face of it, that is not a good thing, but context is important. On a contact page, a high bounce rate may be due to many people simply wanting your phone number or address. Is the bounce rate fairly consistent across all pages? That could mean visitors do not find your site useful, or it could mean visitors are getting to the wrong site.
Where Are Visitors Coming From?
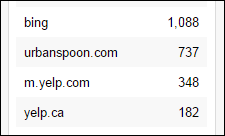
There are a number of ways this question applies: What percentage of people arrive from search engines and how many from links on other sites? What sorts of sites are they coming from? What countries or regions are they coming from? Knowing where they are coming from can tell you if current marketing strategies, such as advertising or link building, are working. Not knowing why people are arriving from a certain place is an opportunity to focus more marketing there.
What Search Terms Are Visitors Using to Find Your Site?
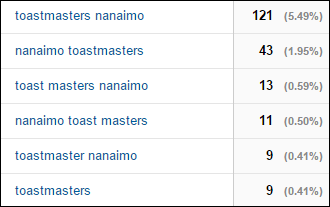
This can tell you if your current keyword strategies are working or if new ones would make sense. Unfortunately, in 2011 Google began hiding the search terms of those who are logged in to their Google accounts. However, if you connect Google Analytics to Google Webmaster Tools, then looking at Acquisition > Search Engine Optimization > Queries can tell you at least something more about search terms.
What Are the Most Popular Pages?
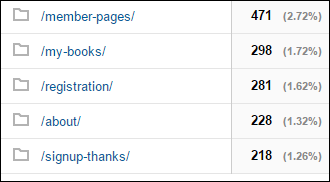
Knowing what people like on your site tells you what related material is worth creating. And what they do not visit tells you which content may need more promotion; or if they visit, but only for a few seconds, that suggests you might need to make the content more useful, more focused, and so on.
How Do Visitors Move through Your Site?
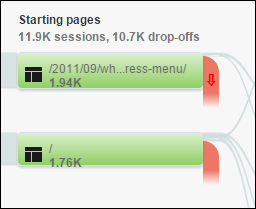
You may have a picture of how visitors use your site, but the truth may be far different. Having a flow chart of the order in which people clicked from page to page is invaluable for considering new ways to promote the pages you want them to click through to, or for placing information at a certain point within a common flow.
Are Visitors Fulfilling Your Goals?
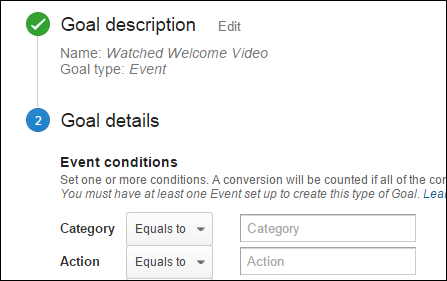
All the other statistics aside, the question remains: Are visitors taking the actions you want them to take? Buying products, watching videos, signing up for mailing lists, taking quizzes; these are just a few of the possible goals you would want to track. But if people take these actions, would you know about it from the results? However, the more interesting questions are ones such as: How many people did not try to take the action, or how many did but stopped partway through?
Understand User Roles and Capabilities
When you create a WordPress site, you are the Administrator, which means you can do what you want. But there are other types of roles in WordPress, with varying capabilities, and these can be handy when you need others working on your site.
Capabilities
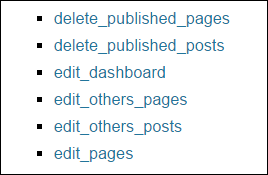
As the name implies, a capability is something you are able to do using WordPress, such as write a post or add items to a menu. But being able to write a post is a separate capability from being able to publish a post or to edit other users’ posts. By narrowly defining capabilities, it becomes possible to assign very specific tasks to different users.
Roles
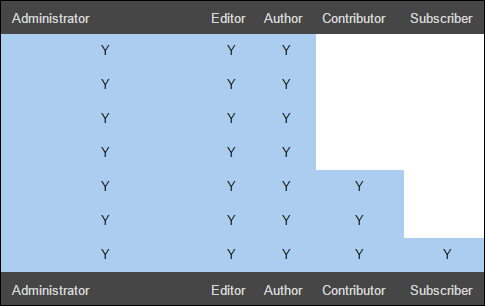
The way that capabilities are assigned to users is through roles. WordPress has five different roles by default, each with its own set of capabilities: Administrator, Editor, Author, Contributor, and Subscriber (or Follower for WordPress.com sites). Every user must be assigned one role. You can change a user’s role, but there can be only one at a time.
Use Roles
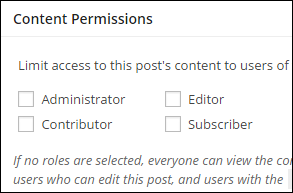
The point of assigning roles is to limit the actions users can take. For example, you may want a staff person to publish news items to the website, but not be able to edit material he or she has not written, let alone change themes. So you would assign the role of Author. Roles can be used for other purposes, such as to hide content. For example, Subscribers could be shown content that the public cannot access.
Add New Users
You can manually add or, in the case of WordPress.com, invite new users to work on your site in various roles.
Add New Users
Add a User to a WordPress.org Site
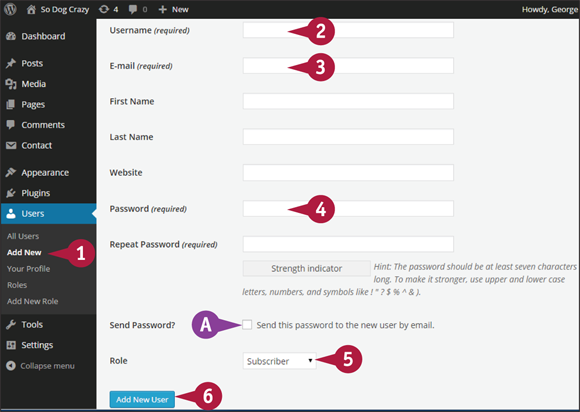
![]() Click Add New under Users on the left admin menu.
Click Add New under Users on the left admin menu.
![]() Type a username.
Type a username.
![]() Type an email address.
Type an email address.
![]() Type a strong password.
Type a strong password.
![]() Click
Click ![]() and choose the user role.
and choose the user role.
![]() You can send the password to the user by email if you click this option (
You can send the password to the user by email if you click this option (![]() changes to
changes to ![]() ).
).
![]() Click Add New User.
Click Add New User.
Invite People to be Users on a WordPress.com Site
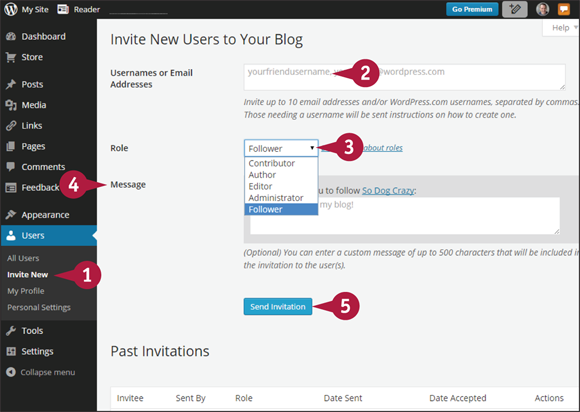
![]() Click Invite New under Users on the left admin menu.
Click Invite New under Users on the left admin menu.
![]() Type one or more
Type one or more WordPress.com usernames or email addresses.
Note: If the person you are inviting does not have a WordPress.com account, he or she is given instructions on how to register.
![]() Click
Click ![]() and choose the role to be assigned to the people you are inviting.
and choose the role to be assigned to the people you are inviting.
![]() You can customize the message sent to each invitee.
You can customize the message sent to each invitee.
![]() Click Send Invitation.
Click Send Invitation.