
CHAPTER 5
Creating Written Content
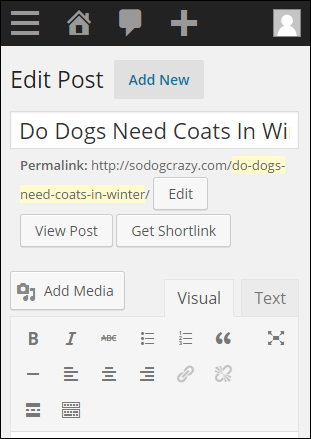
Get to Know the Add New Post Screen
The Add New Post screen is the primary location for creating new posts. After you save or publish a post, the title of the screen changes to Edit Post.
Find the Add New Post screen by clicking Add New under Posts in the left admin menu. You can also use the New menu on the toolbar and select Post.
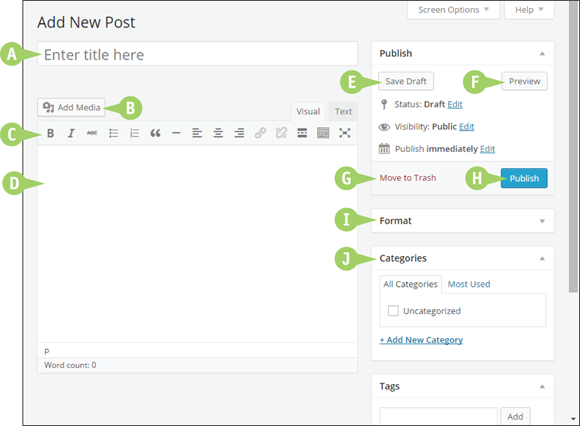
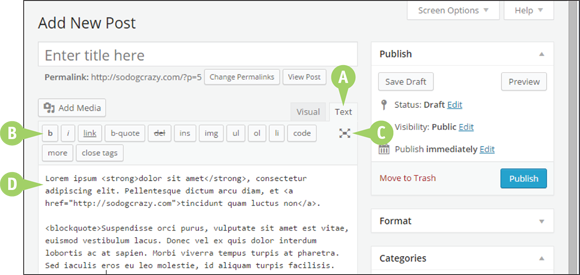
![]() Title Box
Title Box
Where you type your post’s title.
![]() Add Media Button
Add Media Button
Clicking this button opens the Media Uploader window where you can add images, documents, video, and audio, or select from previously uploaded content, all of which is covered in Chapter 6. WordPress.com has three more buttons here: Add Poll, Add Contact Form, and Add Location.
![]() Button Bar
Button Bar
Provides tools for styling and formatting text, adding links, and more. In Visual mode, the bar is a set of icons; in Text mode, the bar is a set of text buttons.
![]() Content Editor
Content Editor
Where you type and work with your content. The default display is like a word processor — what you see is what you get (WYSIWYG) — but you can also view content in pure HTML, the language of the Internet.
![]() Save Draft Button
Save Draft Button
Saves your content without publishing it to your site. Note: Each time you save a draft, WordPress keeps a copy of that revision.
![]() Preview Button
Preview Button
Displays how your draft post would look if published.
![]() Move to Trash Link
Move to Trash Link
Puts an unwanted post into the Trash, but you can recover it within 30 days.
![]() Publish Button
Publish Button
Publishes the post to your site for visitors to read.
![]() Format Box
Format Box
If your theme supports multiple formats for posts, you can select one here.
![]() Categories Box
Categories Box
Every post must be in at least one category, and here you find all available categories. You can also add new categories from here.

![]() Writing Helper
Writing Helper
WordPress.com offers these two writing tools: Copy a Post and Request Feedback, which solicits comments from other users.
![]() Likes and Shares
Likes and Shares
WordPress.com has a built-in tool for choosing whether to display how many Likes your post has and buttons that make sharing your post easy. WordPress.org users can add these functions using plugins.
![]() Tags Box
Tags Box
Lets you assign tags, which are more specific than categories, to your posts.
![]() Featured Image
Featured Image
Lets you assign an image to be the thumbnail used in lists of posts and so on. How that thumbnail is used varies by theme.
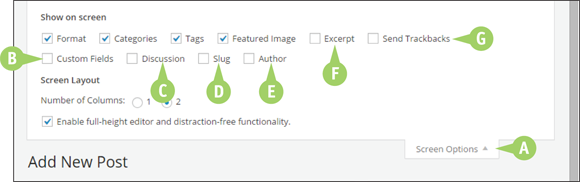
![]() Screen Options
Screen Options
Toggles the Screen Options panel open and closed. Not all meta boxes are shown by default on a Post screen. Screen Options allows you to choose which ones appear.
![]() Custom Fields
Custom Fields
WordPress.org has an area where users can edit additional fields used by plugins or themes. You can also add your own fields, but unless they are coded into theme files, nothing will happen.
![]() Discussion
Discussion
Lets you choose whether to allow comments on an individual post. Overrides default selection under Discussion Settings.
![]() Slug
Slug
Another way of editing the post’s permalink.
![]() Author
Author
Presents a drop-down list of authors, which is helpful for multiauthor sites.
![]() Excerpt
Excerpt
Provides a text area to write a summary or teaser for your post. It may be used in some themes or in RSS feeds.
![]() Send Trackbacks
Send Trackbacks
Lets you notify non-WordPress blogs when your post has linked to them.
Introducing the Visual Mode Button Bar
With the WordPress content editor, you can view your content two different ways. The default is called Visual mode and it looks like a word processor — what you see is what you get — or WYSIWYG. The button bar contains the functions for the content editor and varies depending on which mode you are in.
Mousing over any button shows the name of its function. Most buttons work like a toggle switch, turning the effect off or on.
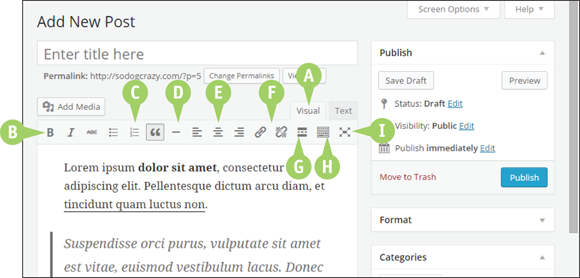
![]() Visual Mode Tab
Visual Mode Tab
Is bright when active, which means you are using the WYSIWYG editor to write or edit your post. The other tab is Text mode and is described in the next section.
![]() Text Styling
Text Styling
These three buttons make text bold, italic, or strikethrough, respectively.
![]() Text Formatting
Text Formatting
These three buttons format text in the following ways: bulleted list, numbered list, and block quote, used primarily when quoting others.
![]() Horizontal Line
Horizontal Line
Inserts a horizontal line.
![]() Text Alignment
Text Alignment
Three buttons that align text to the left, center, or right.
![]() Links
Links
Two buttons that allow you to insert or remove links.
![]() Read More
Read More
Inserts a More tag to tell WordPress where to stop displaying text and create a Read More link to the remainder of the post.
![]() More Buttons
More Buttons
Shows or hides an additional row of buttons. WordPress.com also has a spell-check button.
![]() Distraction-Free Writing
Distraction-Free Writing
Removes all screen boxes except the content editor.
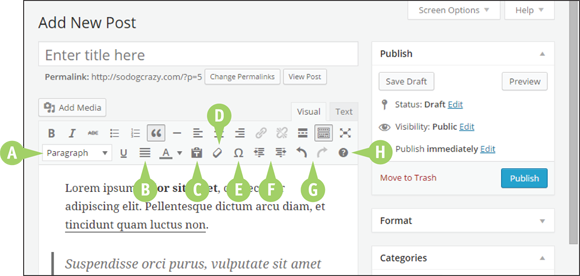
![]() Headings
Headings
Drop-down menu primarily used for the headings of sections of text.
![]() More Styles and Formats
More Styles and Formats
Three buttons for underlined text, justified alignment, and coloring text.
![]() Pasting Tool
Pasting Tool
Lets you paste text from browsers or other applications without formatting errors.
![]() Format Eraser
Format Eraser
Removes formatting from selected text.
![]() Special Characters
Special Characters
Opens a pop-up window in which you can choose special characters such as mathematical operators, bullets, letters with accents — or diacritics — and dashes.
![]() More Indentions
More Indentions
Changes the indention on paragraphs you select but does not add bullets or block quote formats.
![]() Undo and Redo
Undo and Redo
Undoes actions in order since the last save/update, or redoes what was undone.
![]() Help
Help
Provides added information about the visual editor, including keyboard shortcuts.
Introducing the Text Mode Button Bar
The WordPress content editor displays a WYSIWYG view of your content by default. If you want to work with the HTML underlying what appears in Visual mode, you can switch to Text mode.
You can find Text mode by clicking the Text tab at the top right of the content editor.
![]() Text Mode Tab
Text Mode Tab
The lighter color tells you Text mode is active.
![]() Quicktag Buttons
Quicktag Buttons
Only a few of the buttons from Visual mode are available here. If you select text and then click a button, opening and closing HTML tags are inserted around the text. Simply clicking a button inserts an opening tag; when you are finished typing, click again to insert the closing tag. Note: You are not limited to the HTML tags created by these buttons.
![]() Distraction-Free Writing
Distraction-Free Writing
Removes all screen boxes except the content editor.
![]() Content Editor
Content Editor
You see the post’s content with only its HTML tags instead of how it would appear in a web browser. There is no syntax highlighting, but WordPress.org users can add a plugin to provide that.
Try the Alternative Post Screen at WordPress.com
As of early 2015, WordPress.com is making available an alternative version of the post admin screen. Some form of this will likely be the new default screen in the future.
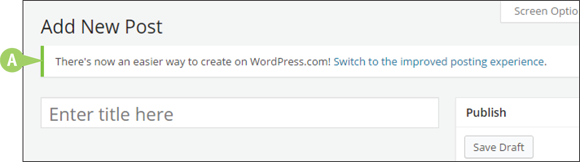
![]() On
On WordPress.com, at the top of post screens, you see this message, inviting you to try a new version of the post admin screen. Click the link to be taken to the alternative post screen.
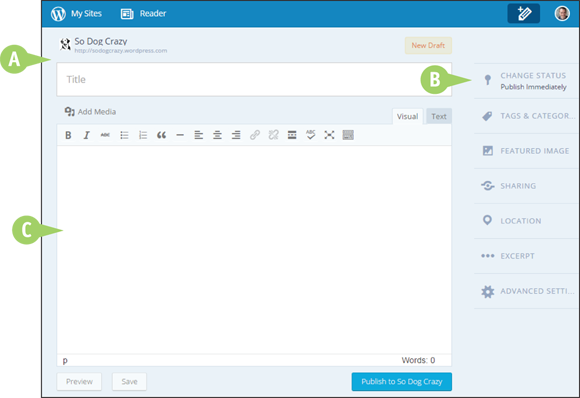
![]() No Left Admin Menu
No Left Admin Menu
There is no admin menu running down the left side of the screen. As of this writing, you must click My Sites and then click the WP Admin link to access other admin screens.
![]() Drop-Down Functions
Drop-Down Functions
Meta boxes have been replaced with a series of dropdowns which reveal the various functions for controlling the post you are working on, such as Publish, Categories, or Featured Image. Click a heading to reveal the functions. Click again to close.
![]() Content Editor
Content Editor
This functions the same way as the old design: Visual and Text modes, each with its respective button bar.
Write and Publish Your First Post
There may be many options in WordPress for writing and publishing a post, but there are only four steps you must take to make a post live on the web.
Write and Publish Your First Post
Write and Publish a Post
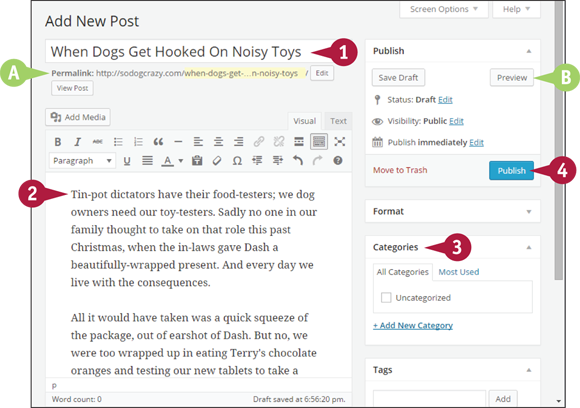
![]() Click in the title box and start typing.
Click in the title box and start typing.
![]() If you have a permalinks structure other than the default one, your title will appear in the permalink area with dashes between each word. It is possible to edit that portion of the permalink before publishing.
If you have a permalinks structure other than the default one, your title will appear in the permalink area with dashes between each word. It is possible to edit that portion of the permalink before publishing.
![]() Click in the text area of the content editor and type your post’s content.
Click in the text area of the content editor and type your post’s content.
![]() If you want to see what your post will look like when published, click Preview.
If you want to see what your post will look like when published, click Preview.
![]() You must choose at least one category for your post.
You must choose at least one category for your post.
![]() When you are finished, click Publish and watch for the success message. You can now see your post on your site.
When you are finished, click Publish and watch for the success message. You can now see your post on your site.
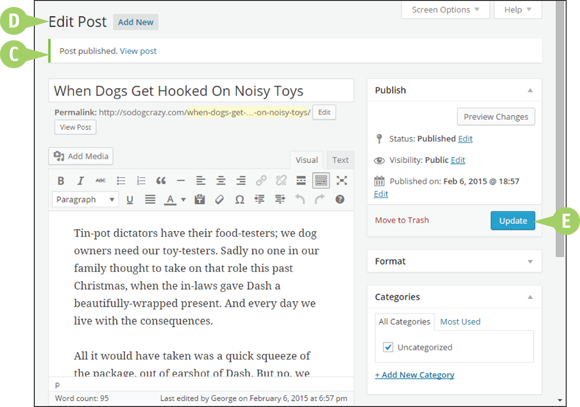
![]() If the post is successfully published, you see this success message.
If the post is successfully published, you see this success message.
![]() The title of the screen changes to Edit Post.
The title of the screen changes to Edit Post.
![]() The main button in the Publish box changes to Update.
The main button in the Publish box changes to Update.
Publish Later
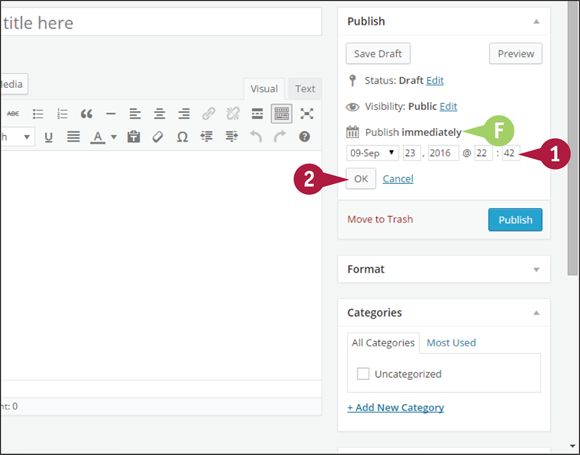
![]() When adding a new post, a line appears in the Publish meta box that says Publish Immediately. A date selector drops down.
When adding a new post, a line appears in the Publish meta box that says Publish Immediately. A date selector drops down.
![]() Change the date and time.
Change the date and time.
![]() Click OK.
Click OK.
![]() WordPress displays the scheduled time. The Publish button changes to read Schedule, which you click.
WordPress displays the scheduled time. The Publish button changes to read Schedule, which you click.

Change Visibility
![]() WordPress defaults to making new posts publicly visible.
WordPress defaults to making new posts publicly visible.
![]() If you do not want your post to be moved off the home page by newer posts, click Stick this post to the front page (
If you do not want your post to be moved off the home page by newer posts, click Stick this post to the front page (![]() changes to
changes to ![]() ).
).
![]() Clicking Password protected (
Clicking Password protected (![]() changes to
changes to ![]() ) limits viewing to visitors who have the unique password you enter here.
) limits viewing to visitors who have the unique password you enter here.
![]() If you want only visitors logged in to WordPress to see the post, click Private (
If you want only visitors logged in to WordPress to see the post, click Private (![]() changes to
changes to ![]() ).
).
![]() Click OK.
Click OK.
Add Styling and Formatting to Your Text
Styling and formatting your text is partly about making it look good, but it is also about making it easy for visitors to read and understand.
Styling involves qualities like bold and italic, whereas formatting refers to the layout of the text, such as when creating lists.
Add Styling and Formatting to Your Text
Change Text Styling
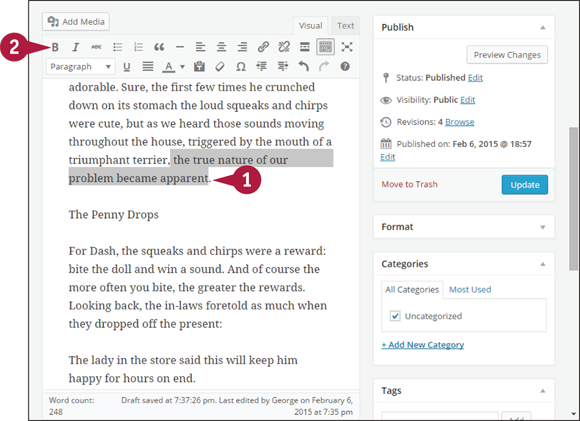
![]() Select the text you want to style.
Select the text you want to style.
![]() Click the appropriate button on the button bar.
Click the appropriate button on the button bar.
In this example, the Bold button is being clicked, but the process is the same for italic, strikethrough, and underline.
WordPress applies the styling to the selected text.
Change Text Formatting
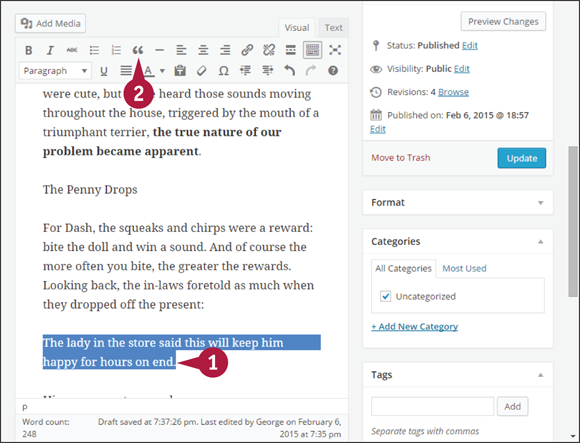
![]() Text formatting applies to paragraphs of text. You can select the whole paragraph, or position your mouse pointer anywhere inside the paragraph.
Text formatting applies to paragraphs of text. You can select the whole paragraph, or position your mouse pointer anywhere inside the paragraph.
![]() Click the appropriate button, or use the drop-down menu on the second row of the button bar.
Click the appropriate button, or use the drop-down menu on the second row of the button bar.
In this example, the Block Quote button is being clicked.
WordPress formats the paragraph.
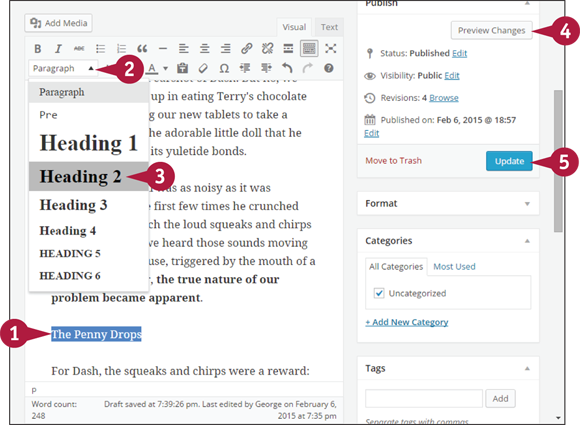
Create Subheadings
Note: It is important to create subheadings in your text when the post is long or has clearly separate ideas within it.
![]() Make sure your heading text is on its own line.
Make sure your heading text is on its own line.
![]() Click
Click ![]() on the second row of the button bar in Visual mode.
on the second row of the button bar in Visual mode.
![]() Choose from one of the heading levels other than Heading 1, which is generally reserved for your post title.
Choose from one of the heading levels other than Heading 1, which is generally reserved for your post title.
WordPress changes the paragraph format as you specified — in this example, as Heading 2.
![]() Click Preview Changes to see how your changes will look.
Click Preview Changes to see how your changes will look.
![]() Click Update to save changes.
Click Update to save changes.
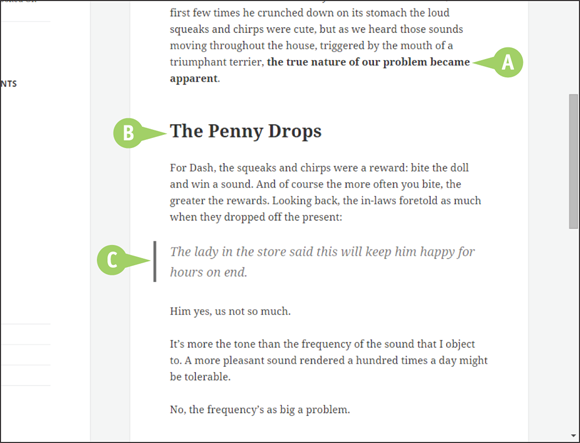
View Your Changes
![]() An example of boldface.
An example of boldface.
![]() An example of a Heading 2.
An example of a Heading 2.
![]() An example of a block quote.
An example of a block quote.
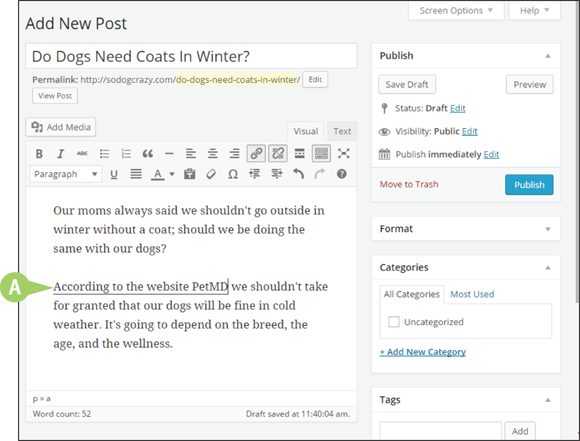
Add Text Hyperlinks to Your Content
A hyperlink allows visitors to jump to another location on the web — including elsewhere on your site. This allows visitors to verify a quote, read a recommended article, use an online tool that was reviewed, or take any number of valuable actions.
WordPress makes it easy for you to include links within your posts or pages.
Add Text Hyperlinks to Your Content
Link to Other Sites
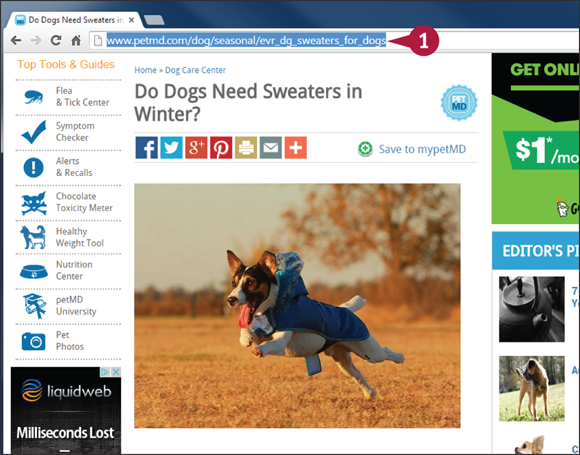
![]() Select the URL on the page you want to link to and copy it.
Select the URL on the page you want to link to and copy it.
Note: With most browsers, you can copy the URL by pressing ![]() +
+ ![]() (
(![]() +
+ ![]() on a Mac). Or, you can select Copy from the Edit menu.
on a Mac). Or, you can select Copy from the Edit menu.
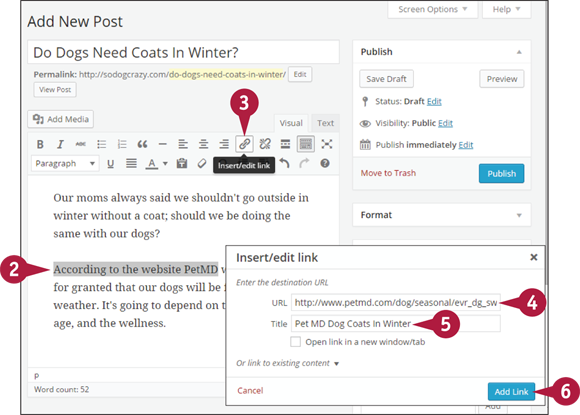
![]() Highlight the text that you want to make into a hyperlink.
Highlight the text that you want to make into a hyperlink.
![]() Click the link icon (
Click the link icon (![]() ) on the button bar. The Insert/Edit Link window appears over the top of your post.
) on the button bar. The Insert/Edit Link window appears over the top of your post.
![]() In the Insert/Edit Link window, paste the URL in the URL field.
In the Insert/Edit Link window, paste the URL in the URL field.
Note: Make sure you overwrite the default http:// in the field or you end up with two and break the link. The default is there just to remind you that a full URL is required.
![]() Type a descriptive title for the page to which you are linking.
Type a descriptive title for the page to which you are linking.
Note: Although the Title text is optional, readers see it when they mouse over the link, and search engines use it in assessing your content.
![]() Click Add Link.
Click Add Link.
The Insert/Edit Link window closes.
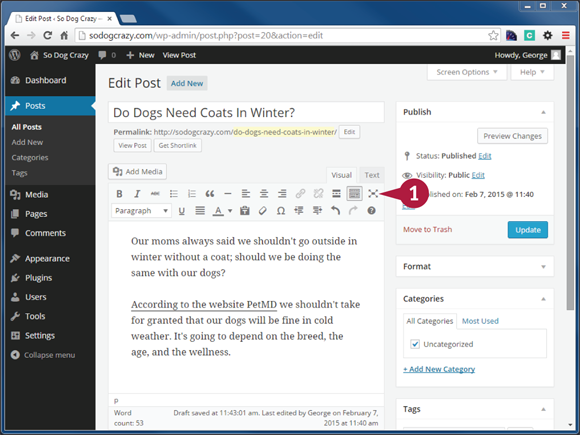
![]() The text you highlighted is now linked to the website you referred to in your post.
The text you highlighted is now linked to the website you referred to in your post.
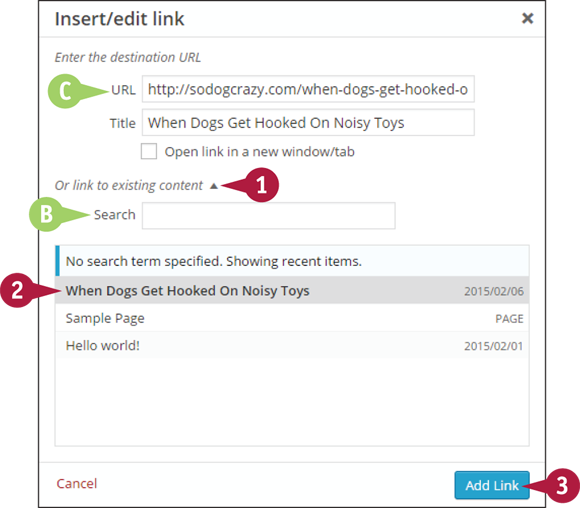
Link to Your Own Site
Note: The process of linking to your own site is no different, except WordPress provides an even handier tool.
![]() In the Insert/Edit Link window, click the Or link to existing content link near the bottom.
In the Insert/Edit Link window, click the Or link to existing content link near the bottom.
![]() A search function and a scrollable list of all content drop down.
A search function and a scrollable list of all content drop down.
![]() Click the item when it appears on the list.
Click the item when it appears on the list.
![]() WordPress automatically fills in the URL and the content title for you.
WordPress automatically fills in the URL and the content title for you.
![]() Click Add Link to create the link on whatever text you highlighted in your content.
Click Add Link to create the link on whatever text you highlighted in your content.
Use Distraction-Free Writing Mode
If you find the Add New Post screen a bit distracting for writing — crowded as it is with menus and meta boxes — then you will appreciate distraction-free writing mode.
Use Distraction-Free Writing Mode
![]() With a post open, click the Distraction-Free Writing button (
With a post open, click the Distraction-Free Writing button (![]() ).
).
Note: The same button is on the button bars of Visual and Text modes. It toggles Distraction-Free Writing mode off and on.
Clicking the Distraction-Free Writing button (![]() ) moves everything off-screen except for the title box and the content editor.
) moves everything off-screen except for the title box and the content editor.
The screen remains minimized until you move your mouse outside the content editor.
Even though all elements are back on screen, they disappear again if you move the mouse back over the content editor.
However, if you click one of the elements while it is momentarily displayed, then the screen returns to normal.
The elements stay visible until you begin making additions or changes in the content area. Then they disappear again.
![]() These actions continue until you click the Distraction-Free Writing button again (
These actions continue until you click the Distraction-Free Writing button again (![]() ).
).
Publish from Your Mobile Device
With more and more people using smartphones and tablets, often as their primary device, being able to manage their website from these devices is crucial, and WordPress is mobile-friendly in a couple of ways.
Responsive Admin Screens for Smartphones
When your device has a very narrow screen, WordPress collapses the admin screens so that the menu drops down from the top. Although all functions can be run from a smartphone, some are complicated by the narrowness of the screen, such as trying to edit images.
Responsive Admin Screens for Tablets

Although tablets can vary greatly in screen width, a typical size produces a collapsed version of the left admin menu and a single column in the main content area. This is plenty of room to manage all WordPress functions.
Apps for Administering WordPress
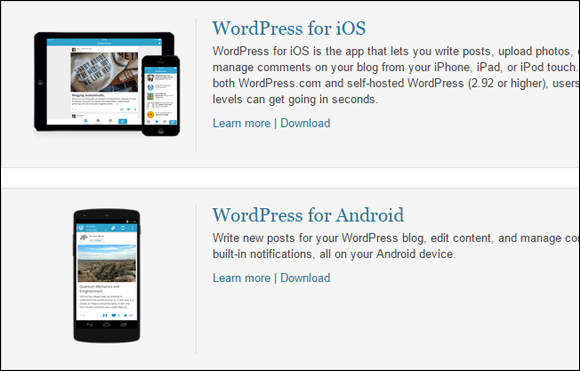
The ability of WordPress admin screens to conform to mobile devices means having to open a browser and log in, in addition to other functions that are awkward to perform on very small screens. That is why some people prefer using an app focused on key tasks like adding new posts, and WordPress has one each for iOS and Android.
Create Post Teasers
When WordPress lists posts, say, on the home page, most themes display the entire post. Instead of forcing visitors to scroll through the full content of each, it is better to use the Read More tag and give them a taste of each post.
Create Post Teasers
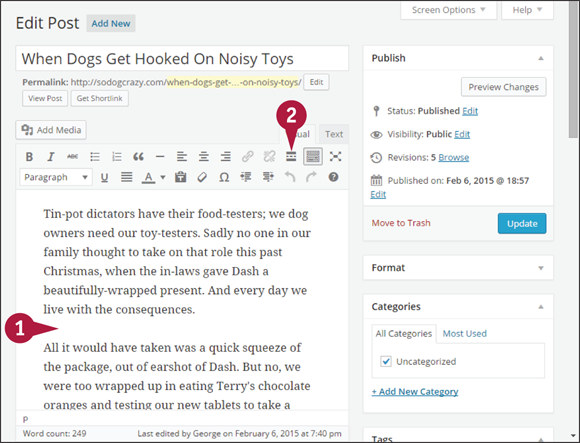
![]() Position your cursor at the point in the text where you want to insert the Read More tag.
Position your cursor at the point in the text where you want to insert the Read More tag.
The content before your cursor will be visible to the public, and what comes after will be hidden until they click the resulting link to the full post.
![]() Click the Insert Read More tag button (
Click the Insert Read More tag button (![]() ).
).
![]() A Read More tag appears at the point in the text that you chose.
A Read More tag appears at the point in the text that you chose.
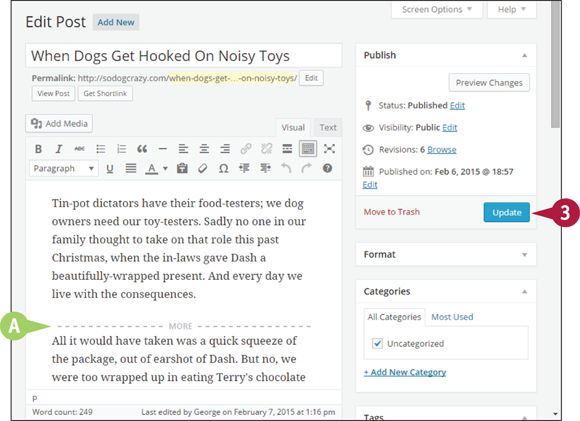
![]() Click Update.
Click Update.
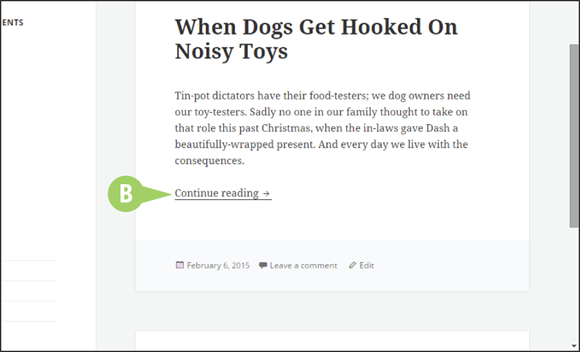
![]() On your site, the post now appears in listing pages with just the opening paragraph and a Continue Reading link to the full contents.
On your site, the post now appears in listing pages with just the opening paragraph and a Continue Reading link to the full contents.
The wording of the Continue Reading link can vary by theme, and some themes allow you to change the wording yourself. On WordPress.org sites, there are also plugins that provide that function.
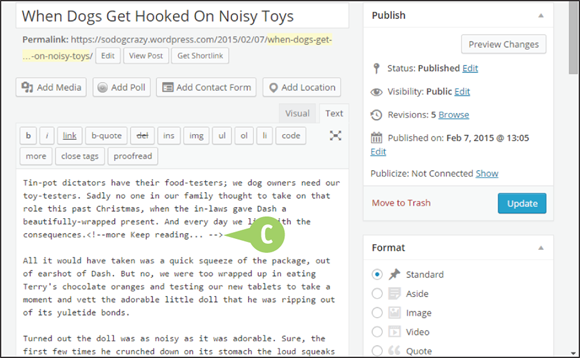
WordPress.com enables you to very easily change the wording of the Read More link.
In Text mode, you are able to modify the Read More tag. By default, it looks like this:
<!--more-->
![]() But by adding your own text, you can change the wording of the link:
But by adding your own text, you can change the wording of the link:
<!--more Keep reading…-->
Note: Be careful not to change the opening and closing tags or you will break the function.
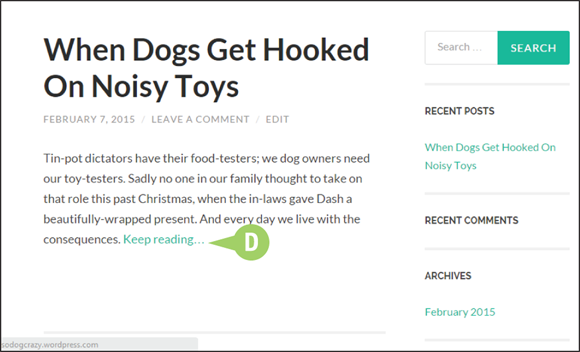
![]() The Read More link now uses the wording you specified.
The Read More link now uses the wording you specified.
Write and Publish a Page
With the exception of personal blogging sites, WordPress pages play just as important a role — if not more so — as posts do. Although most of what you have learned about posts applies to the creation and editing of WordPress pages, there are some differences.
Find the Add New Page screen by clicking Add New under Pages in the left admin menu. You can also click the New menu on the toolbar and select Page.
Write and Publish a Page

![]() Under Pages in the left admin menu, click Add New.
Under Pages in the left admin menu, click Add New.
The Add New Page screen opens.
![]() Type a title in the title field.
Type a title in the title field.
Note: Make your title descriptive of the page content. Do not worry if it does not fit on the navigation menu because WordPress lets you customize the navigation label.
![]() Type your text in the content editor.
Type your text in the content editor.
![]() Click Save Draft.
Click Save Draft.
![]() Watch for the success message to indicate that your page was saved.
Watch for the success message to indicate that your page was saved.
![]() The screen title changes to Edit Page.
The screen title changes to Edit Page.
![]() If pretty permalinks are turned on, as shown in the section “Set the Permalinks Structure” in Chapter 4, and you need to edit this page’s link, do it before publishing.
If pretty permalinks are turned on, as shown in the section “Set the Permalinks Structure” in Chapter 4, and you need to edit this page’s link, do it before publishing.
Note: If you have a good descriptive title, the permalink should need no editing.
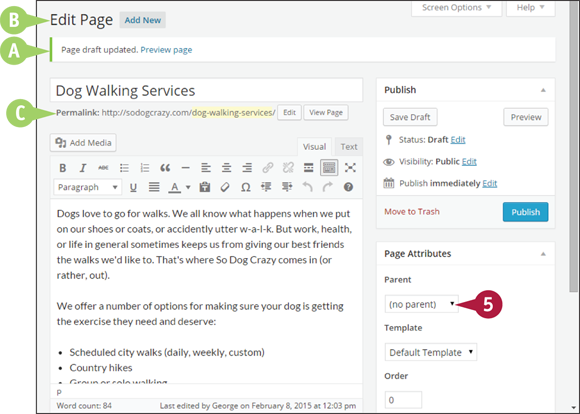
![]() Click the Parent
Click the Parent ![]() .
.
The default setting is (no parent).
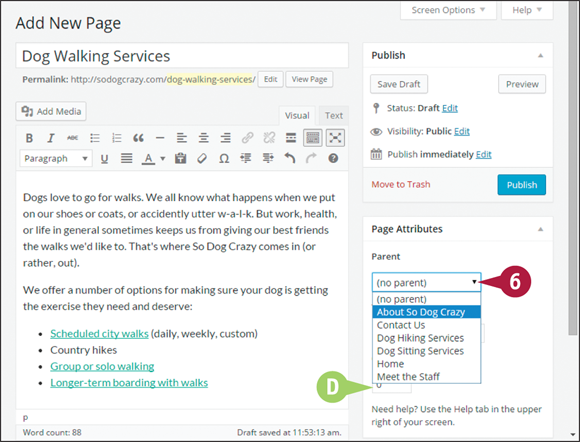
![]() Click
Click ![]() and click a page from the dropdown to make that page the parent of the new page you just created. If you prefer to keep your page as a main page rather than a subpage, simply collapse the menu and proceed.
and click a page from the dropdown to make that page the parent of the new page you just created. If you prefer to keep your page as a main page rather than a subpage, simply collapse the menu and proceed.
![]() Pages usually appear in alphabetical order in default WordPress page listings, but you can assign each page a number to specify the order.
Pages usually appear in alphabetical order in default WordPress page listings, but you can assign each page a number to specify the order.
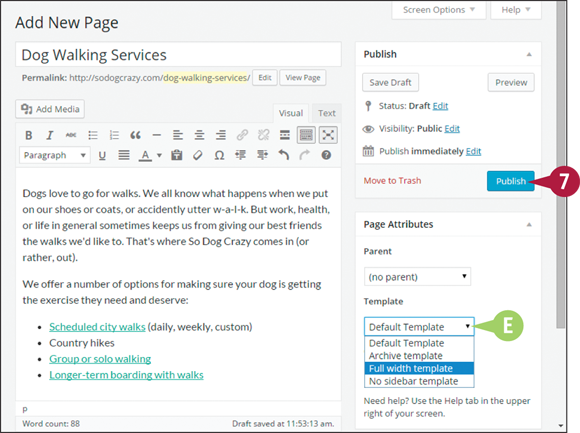
![]() If your theme offers more than one page layout, called templates, then a drop-down menu appears here. The number of templates varies widely. Simply choose the template you want for this page.
If your theme offers more than one page layout, called templates, then a drop-down menu appears here. The number of templates varies widely. Simply choose the template you want for this page.
![]() When you are ready to publish your page to your website, click Publish.
When you are ready to publish your page to your website, click Publish.
Note: The Publish box works the same for pages as it does for posts. See the section “Write and Publish Your First Post” for more.
Restore an Earlier Version of Posts or Pages
The WordPress content editor has an undo function, but once you have saved a draft or published, the ability to go back with undo is lost. However, WordPress also keeps copies of saved revisions so you can go back and retrieve what you had written earlier.
WordPress.com saves the last 25 revisions of a post or page. On WordPress.org sites, the number of revisions is unlimited, but there are plugins to set a limit.
Restore an Earlier Version of Posts or Pages
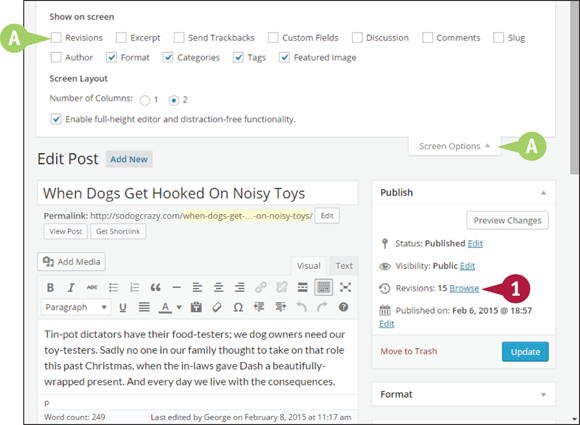
Note: You can access the revisions screen in two ways, if any revisions exist. In the Publish box, you see the number of revisions available.
![]() Click Browse to get to the revisions screen.
Click Browse to get to the revisions screen.
![]() Alternatively, you can click Screen Options and then click Revisions (
Alternatively, you can click Screen Options and then click Revisions (![]() changes to
changes to ![]() ).
).
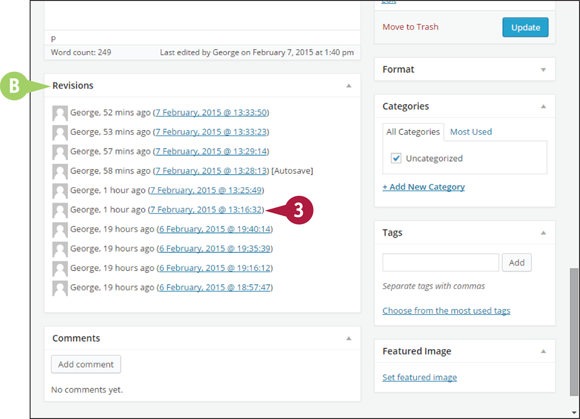
![]() Scroll to the bottom of your Edit Post screen.
Scroll to the bottom of your Edit Post screen.
![]() A list of post revisions appears.
A list of post revisions appears.
![]() Click the version that you think you would like to restore.
Click the version that you think you would like to restore.
WordPress opens the revision screen with that version selected.

![]() WordPress displays two consecutive versions side by side and highlights places in which the two versions are different. The older version is on the left, the newer on the right.
WordPress displays two consecutive versions side by side and highlights places in which the two versions are different. The older version is on the left, the newer on the right.
![]() A timeline of all revisions appears. Mouse over it to see the date and time of each revision.
A timeline of all revisions appears. Mouse over it to see the date and time of each revision.
![]() Moving the indicator along the timeline changes the revisions that appear.
Moving the indicator along the timeline changes the revisions that appear.
![]() If you want to compare two nonconsecutive revisions, click this option (
If you want to compare two nonconsecutive revisions, click this option (![]() changes to
changes to ![]() ) and two indicators appear on the timeline.
) and two indicators appear on the timeline.
![]() When you have identified the desired previous version and it appears on the right-hand side, click Restore This Revision.
When you have identified the desired previous version and it appears on the right-hand side, click Restore This Revision.
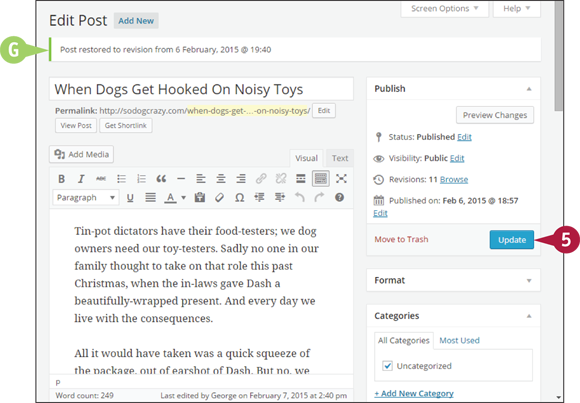
![]() WordPress restores the desired version and returns you to the Edit Post page. Check the success message for the correct date of the revision.
WordPress restores the desired version and returns you to the Edit Post page. Check the success message for the correct date of the revision.
![]() Make any changes you want and then click Update if the post already has been published (or Save Draft if the post has not been published).
Make any changes you want and then click Update if the post already has been published (or Save Draft if the post has not been published).
Import Posts from Existing Sites
If you have been writing a blog on platforms like Blogger or Tumblr and would like to import that material into a WordPress.com or a self-hosted WordPress.org site, WordPress provides tools to help you make the transition.
Another common scenario is to move from WordPress.com to a self-hosted site.
Import Posts from Existing Sites
Import Posts from a Non-WordPress Platform
Note: In this example, the move is from a Blogger account to a self-hosted WordPress site.
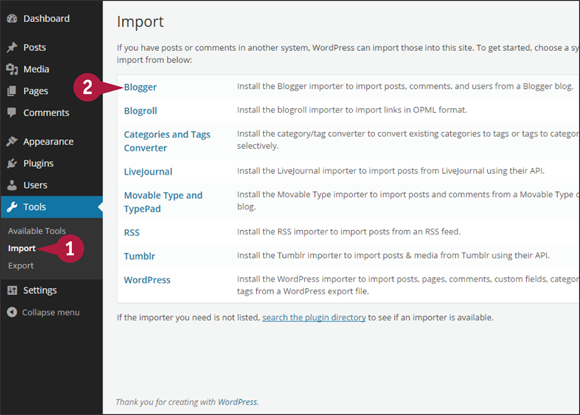
![]() Under Tools in the left admin menu, click Import.
Under Tools in the left admin menu, click Import.
The Import screen opens.
Note: WordPress.com offers many more choices of platforms from which to import, including Posterous, Storylane, GoDaddy Quick Blogcast, and more.
![]() Click Blogger.
Click Blogger.
On WordPress.org sites the import tools are not built in, so they must be loaded as needed.
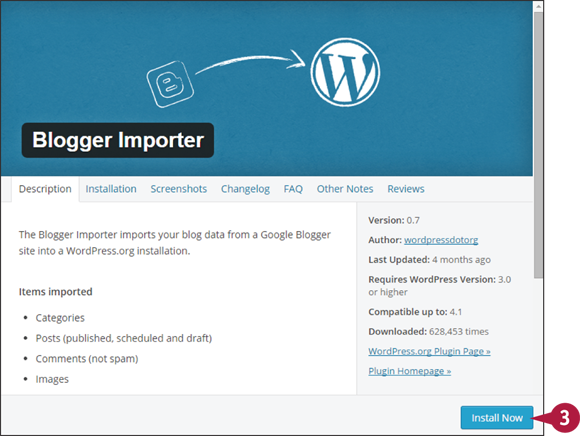
A Blogger Importer window opens.
![]() Click Install Now.
Click Install Now.
![]() Click Activate Plugin & Run Importer on the next screen.
Click Activate Plugin & Run Importer on the next screen.
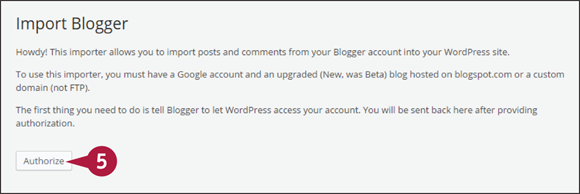
The Import Blogger screen opens.
![]() Click Authorize to allow Google to send your Blogger data.
Click Authorize to allow Google to send your Blogger data.
![]() The Google Accounts window opens. If you are already logged in to Google, you can click Grant access. Otherwise, log in to Google first.
The Google Accounts window opens. If you are already logged in to Google, you can click Grant access. Otherwise, log in to Google first.
If authorization was successful, you are returned to the Import Blogger screen, which now shows all Blogger blogs associated with your Google account.
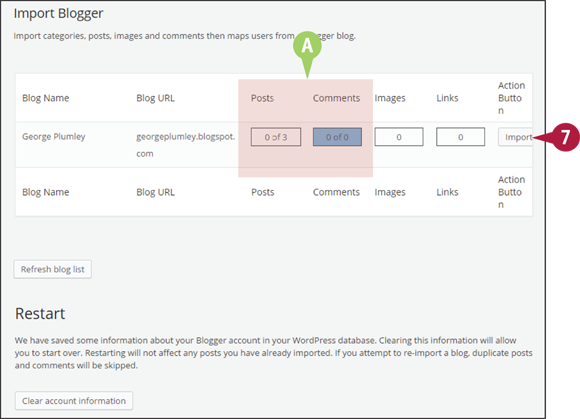
![]() Click Import for the blog you want to import.
Click Import for the blog you want to import.
![]() The Posts and Comments columns indicate the progress of your import. If your previous blog was large, the import process may take a while.
The Posts and Comments columns indicate the progress of your import. If your previous blog was large, the import process may take a while.
![]() When the import is complete, the boxes for posts and comments change color, and the Import button at the far right changes to Set Authors. Click Set Authors.
When the import is complete, the boxes for posts and comments change color, and the Import button at the far right changes to Set Authors. Click Set Authors.
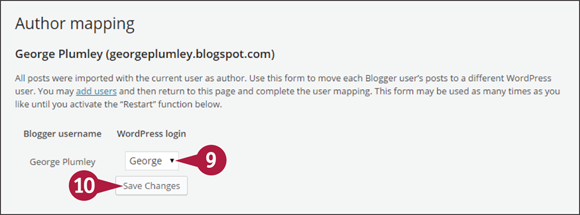
The Author Mapping screen opens.
![]() Click
Click ![]() to choose a WordPress user to associate with the Blogger username.
to choose a WordPress user to associate with the Blogger username.
![]() Click Save Changes.
Click Save Changes.
The process of moving from WordPress.com to a self-hosted site is very similar to importing content from Blogger and other platforms. On your WordPress.com site, you need to create an export file of your content.
Import Posts from WordPress.com to a Self-Hosted Site
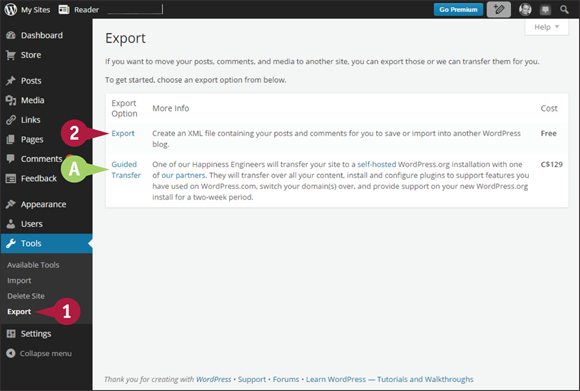
![]() Click Export under Tools in the left admin menu.
Click Export under Tools in the left admin menu.
![]() There is also a paid service for moving your site to a self-hosted version of WordPress, but if you already have a hosting account and WordPress installed, you do not need this.
There is also a paid service for moving your site to a self-hosted version of WordPress, but if you already have a hosting account and WordPress installed, you do not need this.
![]() Click Export.
Click Export.
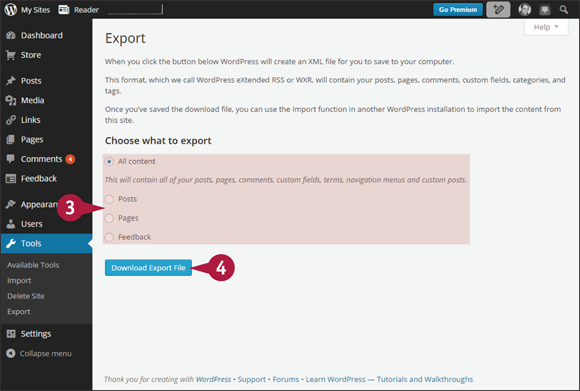
The Export screen opens.
![]() Choose what parts of your content you want to export.
Choose what parts of your content you want to export.
![]() Click Download Export File.
Click Download Export File.
![]() Save the file to a location on your device where you can easily find it later.
Save the file to a location on your device where you can easily find it later.
![]() Switch to the admin screen of your self-hosted WordPress site.
Switch to the admin screen of your self-hosted WordPress site.
![]() Click Import under Tools in the left admin menu. On the list of import tools, click WordPress.
Click Import under Tools in the left admin menu. On the list of import tools, click WordPress.
![]() A WordPress Importer window opens. Click Install Now, and then click Activate Plugin & Run Importer on the next screen.
A WordPress Importer window opens. Click Install Now, and then click Activate Plugin & Run Importer on the next screen.
The Import WordPress screen opens.
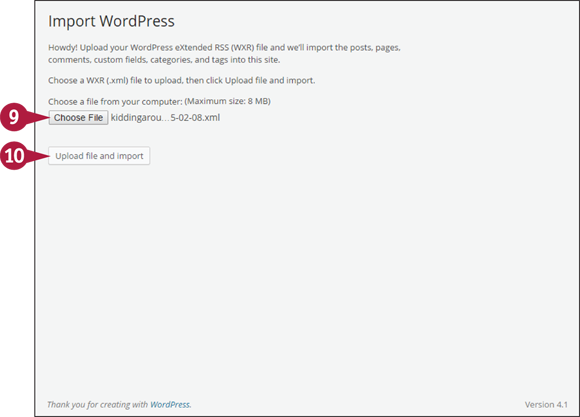
![]() Click Choose File and find the file you exported from
Click Choose File and find the file you exported from WordPress.com.
![]() Once the name of the file appears, click Upload file and import.
Once the name of the file appears, click Upload file and import.
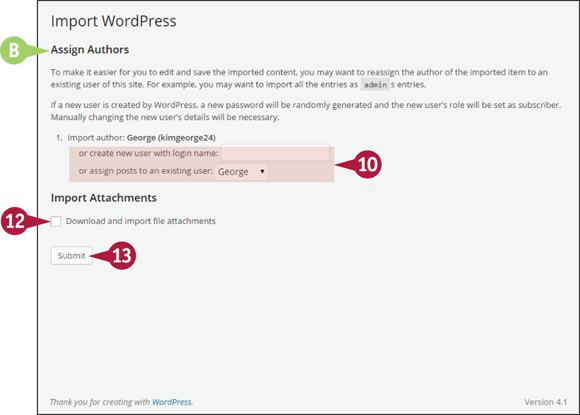
![]() The Import WordPress screen changes to the Assign Authors function.
The Import WordPress screen changes to the Assign Authors function.
![]() You can assign any available WordPress user as the author of the imported content using the drop-down menu, or you can create a new user.
You can assign any available WordPress user as the author of the imported content using the drop-down menu, or you can create a new user.
Note: If you create a new user, you will need to go to the created account afterwards and add email and other details, as well as change the role from the default Subscriber to Author or higher.
![]() To import attachments such as images and documents, check the box for Download and import file attachments (
To import attachments such as images and documents, check the box for Download and import file attachments (![]() changes to
changes to ![]() ).
).
![]() Click Submit to begin the import.
Click Submit to begin the import.