
CHAPTER 6
Creating Visual and Audio Content
Think Visually about Content
Every month, the Internet becomes a more and more visual medium. The ability to instantly capture and upload images or video, and the bandwidth required to be able to view them on any device, has captured the attention of the world. That is why your content needs to be as visual as possible. Making it so may not be obvious at first, until you begin to think visually.
Capture Everything on Camera
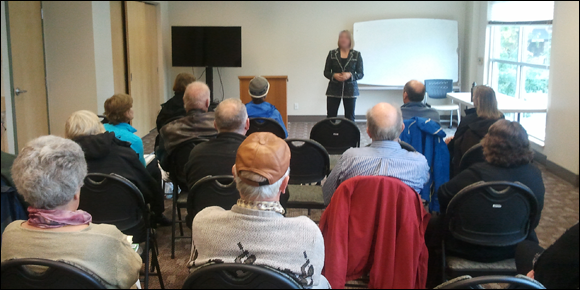
The ability of smartphones to capture high-quality images, video, and audio makes the job of gathering material for your website a snap. The trick is remembering to do it. Fresh fruit just delivered to your restaurant? Good crowd at your event? Unusual cause of a flat tire? Get at least a few images and a bit of video. Even if you are not sure how it will be used — grab it!
One Image per Post or Page
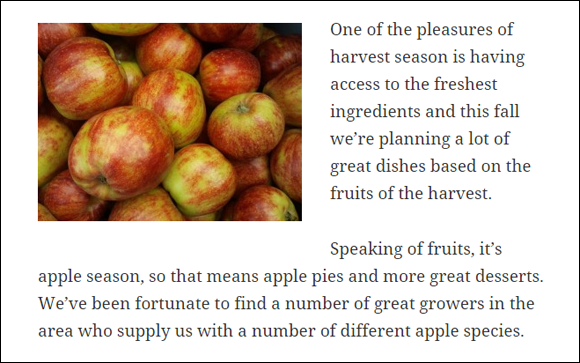
Aim to have at least one image for every post or page you create. Do not worry about getting overly creative; think relevance. It is as simple as a box of fresh apples in an article about fresh ingredients for your restaurant, or a close-up of a dripping outdoor tap in an article about preparing your home for winter. Of course you have the option of adding more than one image, or even a video, where appropriate.
Put a Human Face on It
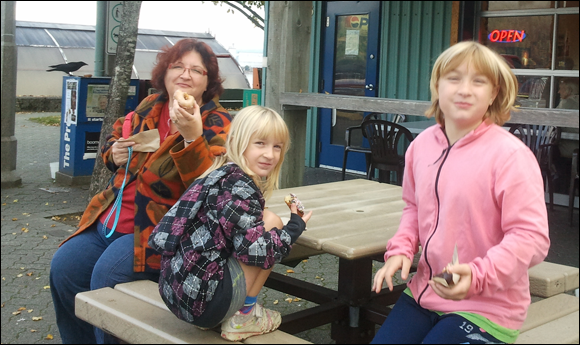
We all know — and studies confirm — that we respond more to human faces. When possible, and when appropriate, try to include faces in your images or videos. And use real people. Stock photo models come off as fake for most websites. Encourage testimonial providers to include a picture or even a video. And yes, puppies and kittens do well too, if it makes sense for the content.
Look for Visual WordPress Themes
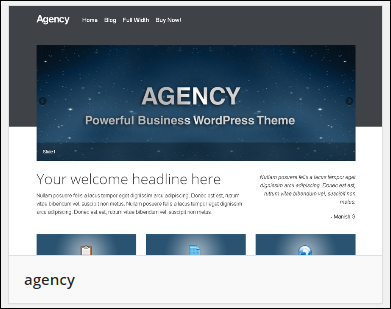
With all your hard work finding imagery, make sure your WordPress theme is going to use them effectively too. You may control what goes in your content, but the theme controls the other elements on the page. For example, does the theme place a large version of a post’s featured image at the top of the content? Does it use large thumbnails when listing posts?
Join the Infographics Revolution
Infographics are not new, just more sophisticated and, more importantly, easier to create. All it takes is a bit of imagination, and a free online image editing program, like Sumopaint.com, or even PowerPoint or Word to turn your statistics into a compelling visual. You can also use PowerPoint and Word as photo composition programs — mixing images, adding text, and so on.
Clear Text Is Worth a Thousand Pictures
Thinking visually is not just about images and video. Styling and laying out your text clearly helps the eye of the reader take in information. Can that paragraph be broken up into a list? Single-sentence paragraphs, used every once in a while, help create emphasis. Breaking up longer text with headings lets visitors scan more easily.
Prepare Images for Uploading
When you take the time to edit and resize images before you post them on your site, you ensure your images look their best and do not make your site load slowly.
Although WordPress has an image-editing tool, you will do better to prepare your images before uploading using image editors like Irfanview, GIMP, Picasa, or the do-it-all Adobe Photoshop. Your digital camera may provide a basic editing program, too.
Give Yourself Something to Work With

All the editing in the world cannot save a poor quality image. Lighting is one of the biggest problems for both images and video; position yourself or your subject for the best lighting possible. Framing your subject nicely, particularly for video, saves trying to fix it in the editor. And take photos or video at the highest quality possible. You can reduce size and quality in editing; you cannot increase them.
Crop to Focus Interest
Cropping is the term that editors use for trimming images. Use your editor’s cropping tool to eliminate distracting activity, objects, or blank areas, or to zero-in on the item of particular interest. And save an unedited version of the photo — although your editor may do so automatically, in case you change your mind.
Adjust the Image
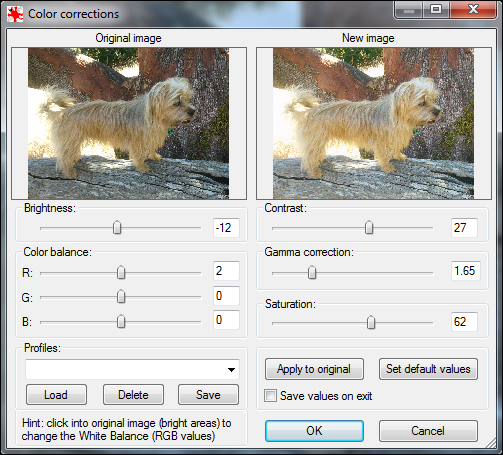
Take advantage of the editor’s tools to eliminate “red eye” in flash photos, to straighten out sloping horizons, and to correct poorly rendered color, contrast, and other image flaws. You want people to see the image, not be put off by its shortcomings.
Resize the Image
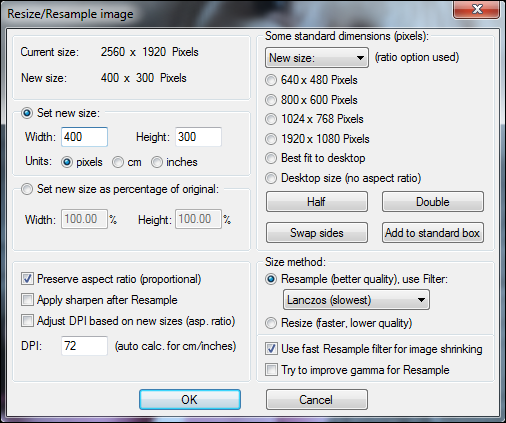
The images that come out of the average digital camera or phone these days are at least 4 times larger than you need for the web. An image of 1,000 pixels in width essentially fills a screen; your camera generates images of 4,000 pixels or more. So resize the dimensions and save as a new image; never alter the original.
Save for Web
Whether you work in an image editor or a video program, always save your file for the web after fixing and resizing it. The Save for Web function (the name may vary) applies various types of compression to the file, making it as small as possible for faster loading in browsers. The editing program should advise you on the best settings, or you can search online.
Choose the Right File Format
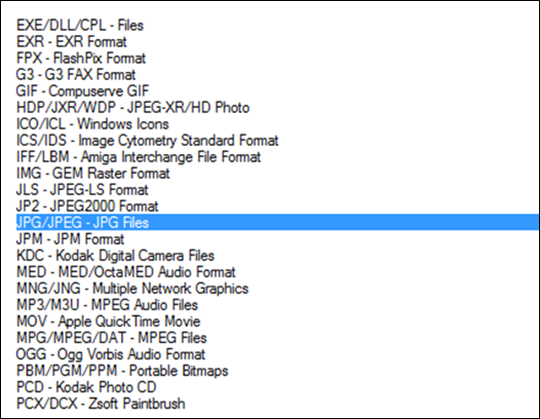
For photographs, the best file format to use is JPG (sometimes spelled JPEG). Do not use PNG because the file will be unnecessarily large. You want to use PNG or GIF for graphics, such as logos and icons. PNG is best for transparencies; GIF can handle animations. When it comes to video, it is best to export and save the file as an MP4. If your program does not save that format, free converters are available online that do.
Upload and Insert an Image to a Post
You can upload and insert images to a post or a page while you are writing, or at any time. The advantage of doing it while you write is so you do not forget to add the image or images later.
If you are not sure where you want to use an image, you can upload it to the media library for use later. That is covered in the section “Upload Images to the Media Library.”
Upload and Insert an Image to a Post
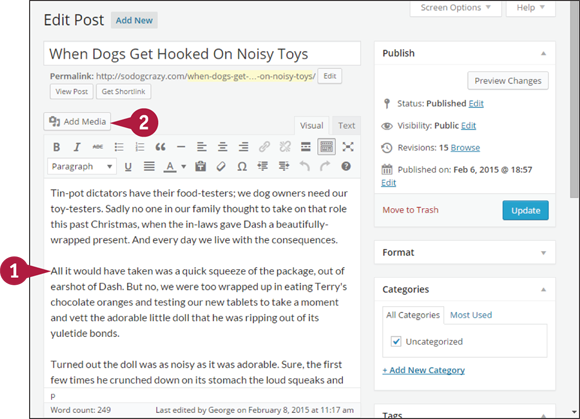
![]() From the Add New Post or Edit Post page, click in your post at the location where you want to insert your image.
From the Add New Post or Edit Post page, click in your post at the location where you want to insert your image.
![]() Click Add Media.
Click Add Media.
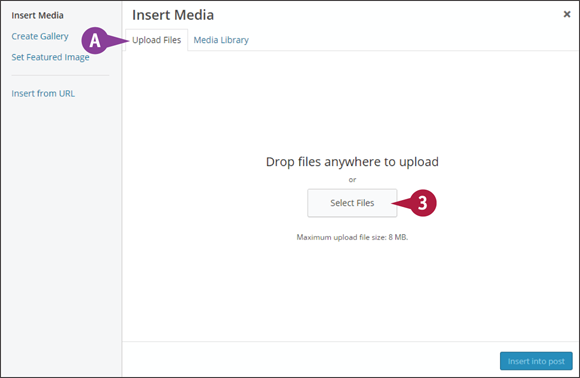
![]() The Media Uploader window opens on the Upload Files tab of Insert Media.
The Media Uploader window opens on the Upload Files tab of Insert Media.
![]() Click Select Files or drag an image from a folder on your computer to the upload window, and release the mouse button when the border of the drop-files area changes color.
Click Select Files or drag an image from a folder on your computer to the upload window, and release the mouse button when the border of the drop-files area changes color.
The window switches to the Media Library tab; where the image thumbnail will eventually show, a bar indicating the upload progress appears.
![]() When the image has uploaded, it is outlined and displays a check mark.
When the image has uploaded, it is outlined and displays a check mark.
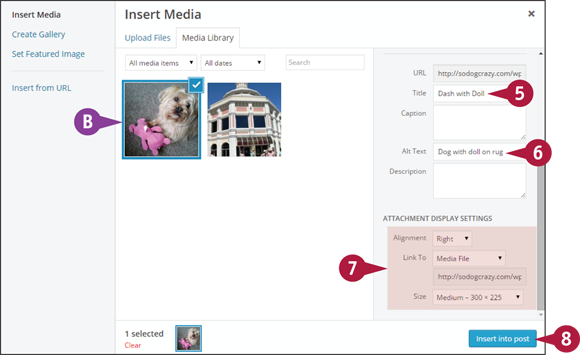
![]() Scroll down so you can see all the fields of attachment details.
Scroll down so you can see all the fields of attachment details.
![]() Change the title to something descriptive. The default title is the image’s filename.
Change the title to something descriptive. The default title is the image’s filename.
![]() Type alt text or alternate text to describe the image.
Type alt text or alternate text to describe the image.
![]() Choose the display settings: how you want the image aligned relative to the text, whether you want the image linked to anything, and finally the size of the image.
Choose the display settings: how you want the image aligned relative to the text, whether you want the image linked to anything, and finally the size of the image.
![]() Click Insert into post.
Click Insert into post.
The Media Uploader window closes.
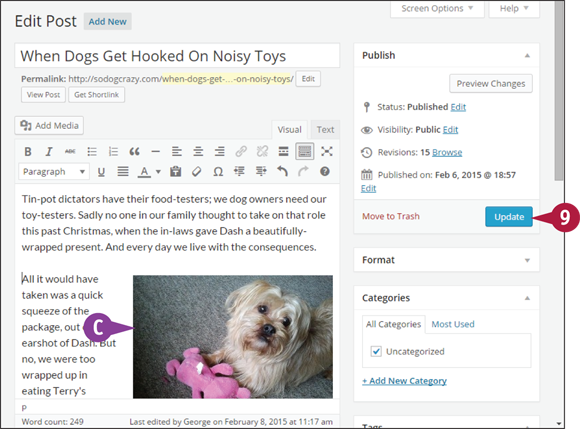
![]() The Edit Post window displays the image at the cursor location.
The Edit Post window displays the image at the cursor location.
![]() Click Save Draft or Update, depending on whether the post is a new draft or an existing post, to save the change.
Click Save Draft or Update, depending on whether the post is a new draft or an existing post, to save the change.
Work with Images in the Content Editor
After you have inserted an image into a post or page, you can easily make changes to various settings — alignment, position, size, and more — all from within the content editor.
Work with Images in the Content Editor
Edit Image Settings in the Content Editor
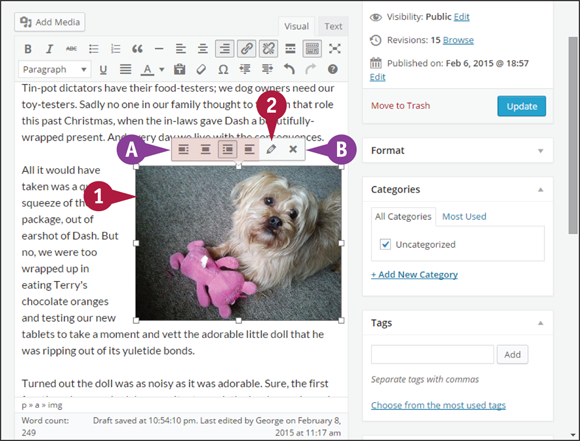
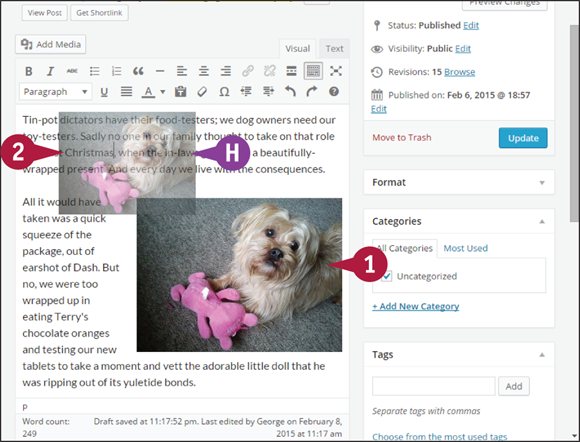
![]() Click an image in the content editor; a small menu appears above the image.
Click an image in the content editor; a small menu appears above the image.
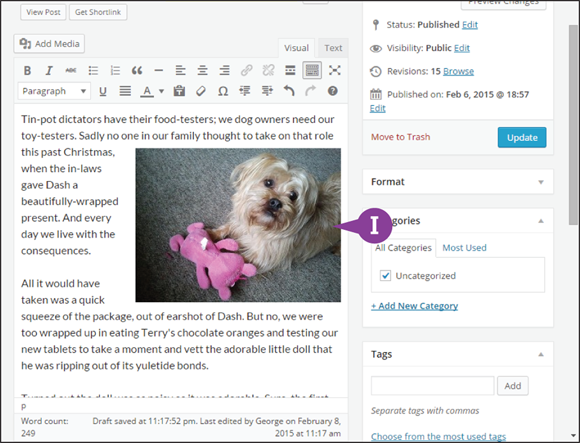
![]() You can change the image alignment relative to the text.
You can change the image alignment relative to the text.
![]() You can delete the image from the post by clicking
You can delete the image from the post by clicking ![]() .
.
Note: The image is not deleted from WordPress and can still be found in the media library.
![]() Click the pencil icon (
Click the pencil icon (![]() ).
).

The Image Details window opens.
![]() You can edit the caption and the alternative text.
You can edit the caption and the alternative text.
![]() You can access display settings: alignment, size, and whether the image links to anything.
You can access display settings: alignment, size, and whether the image links to anything.
![]() You can click the Advanced Options
You can click the Advanced Options ![]() to add CSS classes and more.
to add CSS classes and more.
![]() You can click Edit Original to go to the WordPress image editor.
You can click Edit Original to go to the WordPress image editor.
![]() When you are finished making changes, click Update.
When you are finished making changes, click Update.
![]() To close the window without changing the image, you can click
To close the window without changing the image, you can click ![]() .
.
Move an Image
![]() Click anywhere in the image, press and hold your left mouse button, and drag.
Click anywhere in the image, press and hold your left mouse button, and drag.
![]() A small transparent version of the image moves with you. If you cannot see the text cursor below the image, your mouse pointer also indicates where the image will be moved to.
A small transparent version of the image moves with you. If you cannot see the text cursor below the image, your mouse pointer also indicates where the image will be moved to.
![]() When you reach the new position, let go of your mouse.
When you reach the new position, let go of your mouse.
![]() The image appears in its new location. The alignment remains the same.
The image appears in its new location. The alignment remains the same.
Resize Images in Real Time
Note: Although you can use the Image Details window to enter a custom width and height for your image, many people prefer to see what the change will look like in real time.
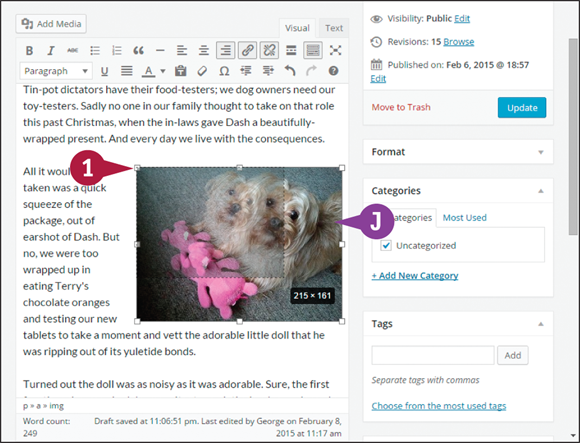
![]() Drag one of the handles that appear after clicking anywhere in an image to resize.
Drag one of the handles that appear after clicking anywhere in an image to resize.
![]() As you drag, the new-sized image appears as a transparency and a small box shows the dimensions.
As you drag, the new-sized image appears as a transparency and a small box shows the dimensions.
When you stop dragging, the image is resized.
Upload Images to the Media Library
If you have images you think would be useful for your site, you can upload them without putting them into any particular post or page. They will simply remain in the media library until you need them.
You access the Upload New Media page by clicking Add New under Media on the left admin menu. You can also click Media on the New menu of the toolbar.
Upload Images to the Media Library

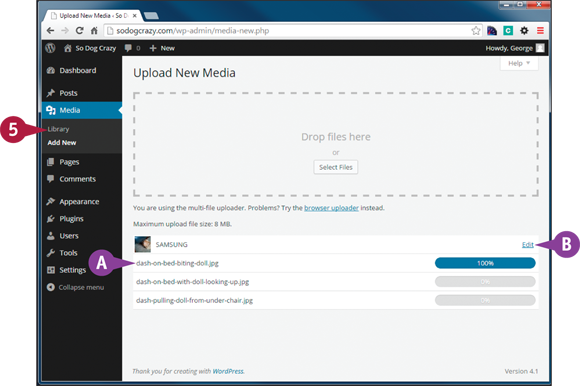
![]() Click Add New under Media on the left admin menu.
Click Add New under Media on the left admin menu.
The Upload New Media screen appears.
![]() Click Select Files to open a window for browsing your device.
Click Select Files to open a window for browsing your device.
You can also drag files to the outlined box.
A browse window opens, enabling you to find files on your device.
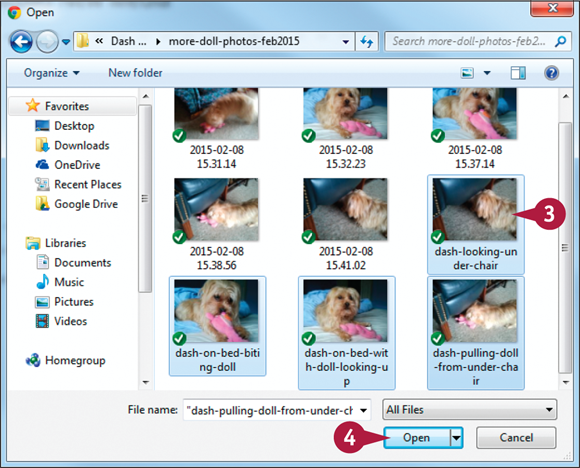
![]() Select one or more images to upload.
Select one or more images to upload.
Note: To select multiple files, press ![]() (
(![]() on a Mac) while clicking.
on a Mac) while clicking.
![]() Click Open when you are finished selecting.
Click Open when you are finished selecting.
The browse window closes.
![]() A list of all images appears at the bottom of the Upload New Media screen, with a progress bar for each.
A list of all images appears at the bottom of the Upload New Media screen, with a progress bar for each.
![]() When all the files have uploaded, click Library under Media on the left admin menu.
When all the files have uploaded, click Library under Media on the left admin menu.
![]() You can also edit any one of the uploaded images directly from this screen.
You can also edit any one of the uploaded images directly from this screen.
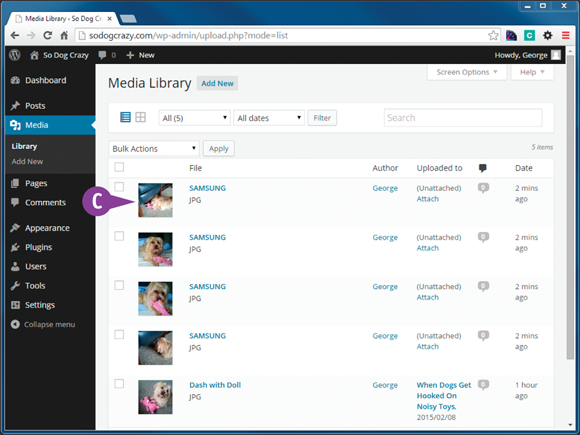
![]() You can see all the new images at the top of the Media Library listings.
You can see all the new images at the top of the Media Library listings.
Note: Depending on your viewing habits, the media library may be in Grid view — a series of thumbnails in rows and columns.
The images are now ready to use anywhere on your site.
Edit Images in WordPress
Although it is better to edit your images before uploading them to WordPress, some edits you can make from within WordPress. In particular, you can edit the thumbnail versions that WordPress automatically creates for each image uploaded.
You can find the Edit Image or Edit Original button in multiple locations: the Edit Media screen, the Media Uploader window, the Attachment Details window, and the Image Details window.
Edit Images in WordPress
Edit an Image
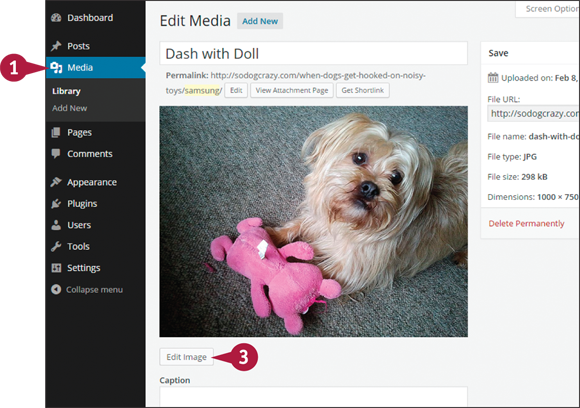
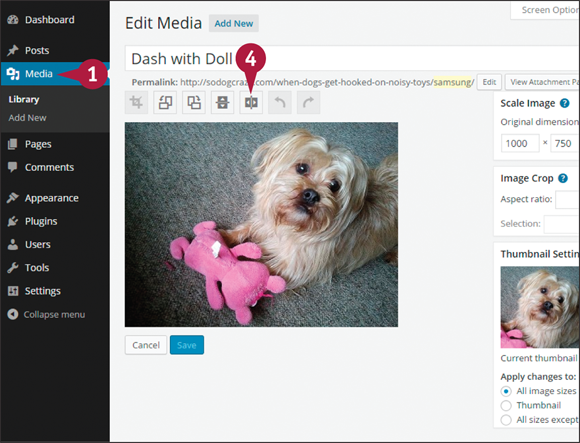
![]() Click Media on the left admin menu and make sure you are in List mode rather than Grid mode.
Click Media on the left admin menu and make sure you are in List mode rather than Grid mode.
![]() Locate your image and click Edit.
Locate your image and click Edit.
The Edit Media screen opens.
![]() Click Edit Image.
Click Edit Image.
The Edit Media screen changes to show the image editing tools.
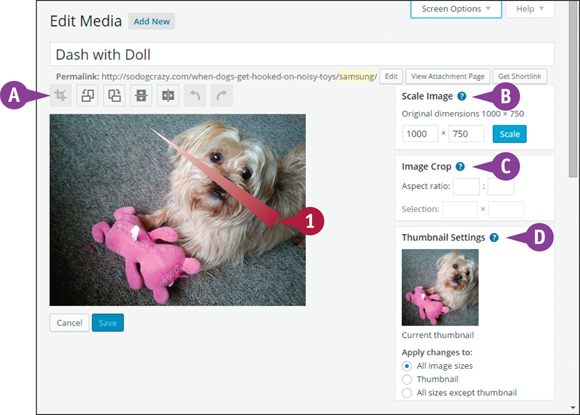
![]() The button bar: Crop, Rotate, Flip, Undo, and Redo.
The button bar: Crop, Rotate, Flip, Undo, and Redo.
![]() The Scale Image box.
The Scale Image box.
![]() The Image Crop box, where you can choose an aspect ratio or edit the selection box.
The Image Crop box, where you can choose an aspect ratio or edit the selection box.
![]() The Thumbnail Settings box, which displays the current thumbnail and allows you to choose which version or versions the changes will be applied to.
The Thumbnail Settings box, which displays the current thumbnail and allows you to choose which version or versions the changes will be applied to.
Re-Crop the Thumbnail
Note: Because of the way WordPress creates thumbnail versions of images, they may not always look good.
![]() To begin, click the image and drag.
To begin, click the image and drag.
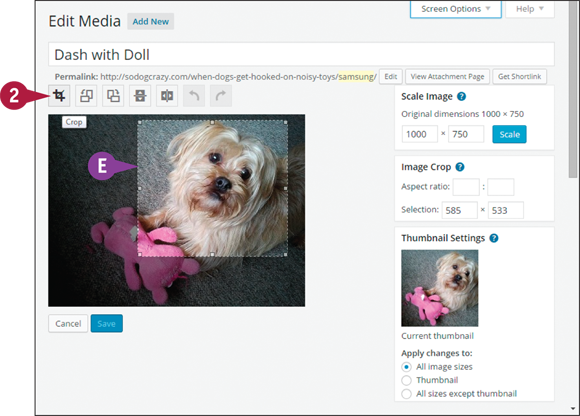
Dragging creates a box with dashed borders.
The image goes darker except for the area inside the box.
![]() You can resize the box by clicking any edge and dragging. Position your cursor in the center of the box to drag it around the image.
You can resize the box by clicking any edge and dragging. Position your cursor in the center of the box to drag it around the image.
The goal is to find the portion of the image you want as the thumbnail.
![]() When you are ready, click the Crop button (
When you are ready, click the Crop button (![]() ), which is now active.
), which is now active.
The image now changes to show only the area you selected.
Even if the image is the way you want it, do not click Save yet.
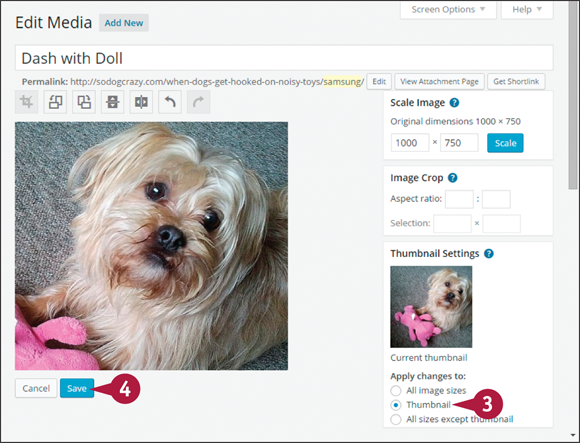
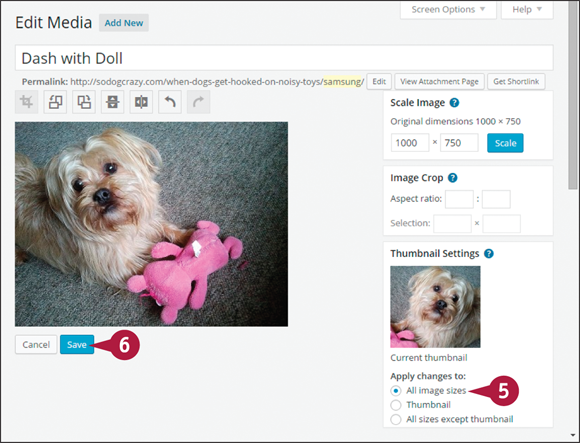
![]() Click Thumbnail under Apply Changes To (
Click Thumbnail under Apply Changes To (![]() changes to
changes to ![]() ). You want the cropping to apply only to the thumbnail and no other size of the image.
). You want the cropping to apply only to the thumbnail and no other size of the image.
![]() Click Save.
Click Save.
The new thumbnail version will be visible under Thumbnail settings.
Note: You could also crop if you wanted to remove a portion of the image in all its versions — just be sure you correctly set Apply Changes To.
Two other common image edits you can make through WordPress are: horizontally flipping an image and scaling the dimensions of the entire image.
Horizontally Flip an Image
Note: Sometimes you find that an image would be better facing the opposite direction.
![]() Click Media on the left admin menu and make sure you are in List mode rather than Grid mode.
Click Media on the left admin menu and make sure you are in List mode rather than Grid mode.
![]() Locate your image and click Edit.
Locate your image and click Edit.
The Edit Media screen opens.
![]() Click Edit Image.
Click Edit Image.
![]() Click the Flip horizontally button (
Click the Flip horizontally button (![]() ).
).
The image changes to face the other direction.
![]() Choose which images this change should apply to (
Choose which images this change should apply to (![]() changes to
changes to ![]() ).
).
![]() When you are satisfied with your settings, click Save.
When you are satisfied with your settings, click Save.
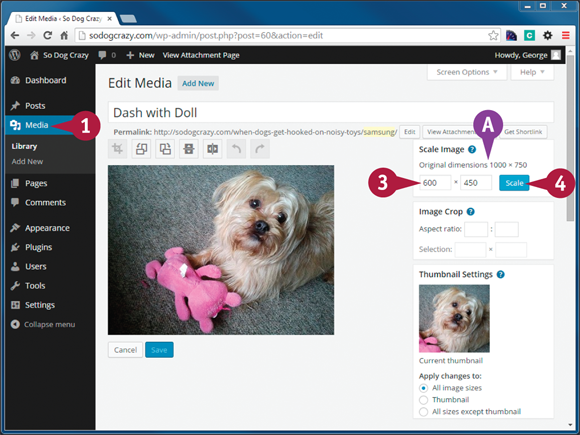
Scale an Image
Note: WordPress automatically creates smaller versions of every image you upload. If you need a smaller image, use one of those. The Scale Image function reduces the dimensions of the full-size version of your image.
![]() Click Media on the left admin menu and make sure you are in List mode rather than Grid mode.
Click Media on the left admin menu and make sure you are in List mode rather than Grid mode.
![]() Locate your image and click Edit.
Locate your image and click Edit.
![]() On the Edit Media screen, the current full-size dimensions appear here.
On the Edit Media screen, the current full-size dimensions appear here.
![]() Enter either a new width or new height. The other dimension is calculated automatically to keep the image proportions.
Enter either a new width or new height. The other dimension is calculated automatically to keep the image proportions.
![]() Click Scale.
Click Scale.
The changes are applied. There is no Save required for this function.
![]() The original dimensions change to reflect the scaling.
The original dimensions change to reflect the scaling.
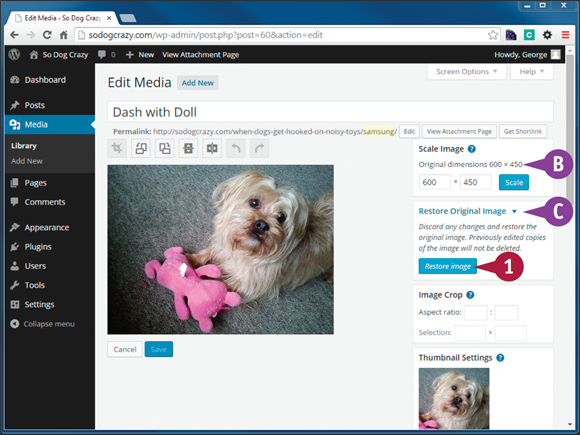
Restore Original Image
![]() When you make changes of any kind, except for cropping the thumbnail, the Restore Original Image box appears.
When you make changes of any kind, except for cropping the thumbnail, the Restore Original Image box appears.
![]() Click Restore image to discard any changes — in this case, the scaling of the image.
Click Restore image to discard any changes — in this case, the scaling of the image.
Understand Featured Images
WordPress posts and pages can be assigned a featured image, which is meant to be representative of the content. That image then gets used in various ways by themes.
Use of Featured Images Varies by Theme

Many themes use a small version of the featured image when listing posts. Others place the featured image at the top of the content area when viewing the full post. Some use the featured image as part of the Next and Previous links that may appear on posts. Featured images are sometimes used to replace the header image of the site. Check a theme’s demo or documentation for an idea of how it would use a featured image.
A Featured Image Is Not a Thumbnail Image
In WordPress coding, the technical name of featured images is post thumbnail (![]() ), so you sometimes hear them referred to that way. The confusion is compounded by the fact that featured images are often used as thumbnails. In fact, it is important to have a featured image whose original is large, in case a theme requires a large version in certain places.
), so you sometimes hear them referred to that way. The confusion is compounded by the fact that featured images are often used as thumbnails. In fact, it is important to have a featured image whose original is large, in case a theme requires a large version in certain places.
Use Any Image Uploaded to WordPress
When choosing a featured image, you are not limited to images you have used within the post. You can upload an image specifically to be the featured image, or you can use any existing image from the media library. The key is that the image is representative of or related to the content of the post or page.
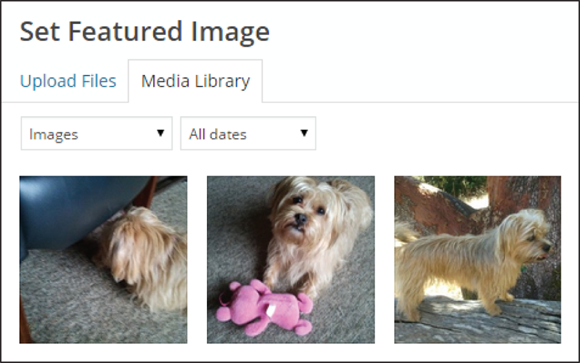
Add a Featured Image
Whether or not your current theme uses featured images, it is good to get in the habit of assigning one to every post or page you create. The process is as simple as uploading an image to WordPress or selecting an existing one from the media library.
You can find the Featured Image meta box on any individual post or page screen. If it is not visible, use the Screen Options panel to restore the box.
Add a Featured Image
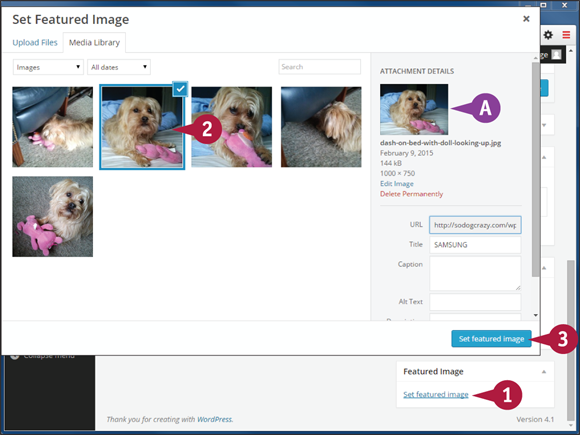
![]() While writing or editing a post or page, click Set featured image in the Featured Image meta box.
While writing or editing a post or page, click Set featured image in the Featured Image meta box.
The Media Uploader window opens, with only Set Featured Image as an option.
![]() Click an image from the media library.
Click an image from the media library.
Note: Alternatively, click the Upload Files tab and follow the steps in the section “Upload and Insert an Image to a Post.”
![]() The selected image appears in the Attachment Details section.
The selected image appears in the Attachment Details section.
![]() Click Set featured image.
Click Set featured image.
The Media Uploader window closes.
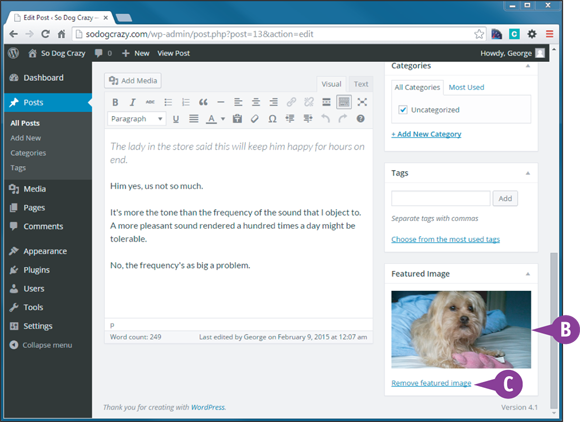
![]() The image you chose now appears in the Featured Image box.
The image you chose now appears in the Featured Image box.
![]() The link has changed to Remove Featured Image. Click this and the image disappears and the link changes to Set Featured Image.
The link has changed to Remove Featured Image. Click this and the image disappears and the link changes to Set Featured Image.
![]() Save your changes to the post or page. Depending on its status, click Update, Publish, or Save Draft.
Save your changes to the post or page. Depending on its status, click Update, Publish, or Save Draft.
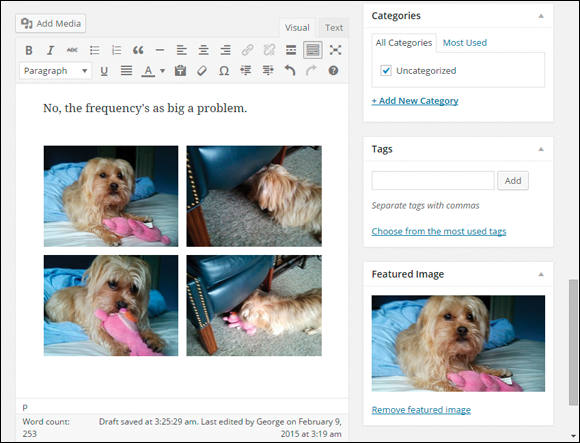
Insert an Image Gallery
The WordPress Image Gallery gives you a quick and easy way to display a set of photos or other images on your website. The gallery displays thumbnails of the images, and then you can click the individual images to view larger versions.
Insert an Image Gallery
![]() Position your cursor in the content editor where you want the gallery to appear.
Position your cursor in the content editor where you want the gallery to appear.
Note: Galleries cannot have text flowing around them, so your cursor needs to be on its own line.
Note: Commonly, galleries are placed at the end of a post or a page, but you can put them anywhere you want.
![]() Click Add Media.
Click Add Media.
The Media Uploader window opens to the Create Gallery section.
If there are images in the media library, they appear by default. But you can upload images too.
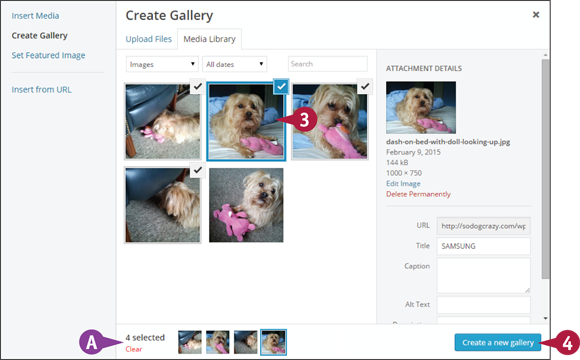
![]() Click each image you want. A check mark appears beside each.
Click each image you want. A check mark appears beside each.
![]() Small thumbnails of all selected images appear at the bottom of the screen. This is a helpful reminder when you have a lot of images to scroll through.
Small thumbnails of all selected images appear at the bottom of the screen. This is a helpful reminder when you have a lot of images to scroll through.
![]() When you are ready, click Create a new gallery.
When you are ready, click Create a new gallery.
The Media Uploader window changes to Edit Gallery.
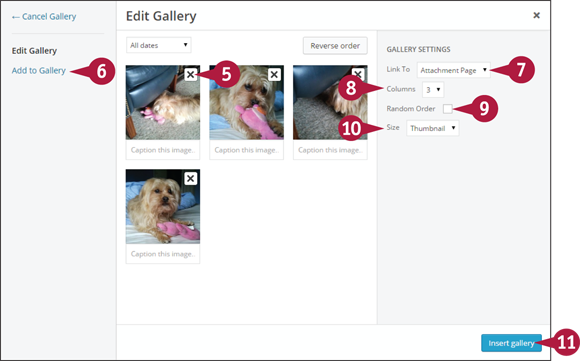
![]() Click to remove images, drag them to rearrange the order, or add captions.
Click to remove images, drag them to rearrange the order, or add captions.
![]() Click Add to Gallery to add more images.
Click Add to Gallery to add more images.
![]() Click the Link To
Click the Link To ![]() to determine what happens when visitors click an image: see just the full-sized image or see it on its attachment page.
to determine what happens when visitors click an image: see just the full-sized image or see it on its attachment page.
![]() Click
Click ![]() and choose how many columns wide the gallery will be. This depends on the width of your content area and the image size you choose in step 10.
and choose how many columns wide the gallery will be. This depends on the width of your content area and the image size you choose in step 10.
![]() Click Random Order (
Click Random Order (![]() changes to
changes to ![]() ) to have the order of images to vary.
) to have the order of images to vary.
![]() Click
Click ![]() and choose the size of the images displayed: thumbnail, medium, large, or full-size.
and choose the size of the images displayed: thumbnail, medium, large, or full-size.
![]() Click Insert gallery and return to the content editor.
Click Insert gallery and return to the content editor.
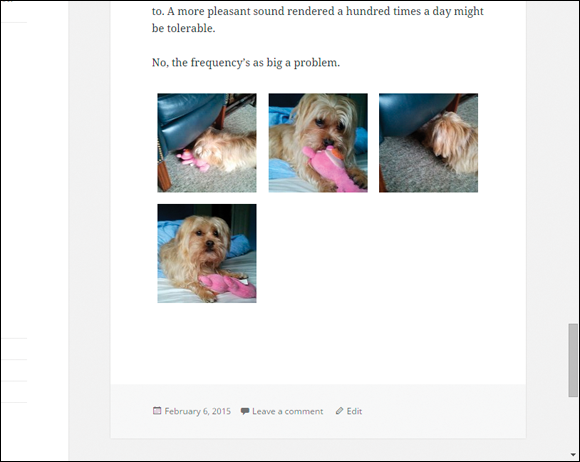
In Visual mode, you will see the gallery images. In the example, you see what the gallery looks like live on the site.
Edit an Image Gallery
When you have created a WordPress gallery, you can edit it any time. That includes adding or removing images, and changing their order and sizing.
Edit an Image Gallery
![]() Click Posts or Pages on the left admin menu and locate the post or page with the gallery to be edited.
Click Posts or Pages on the left admin menu and locate the post or page with the gallery to be edited.
![]() Click Edit to open the post or page.
Click Edit to open the post or page.
![]() Click the Visual tab.
Click the Visual tab.
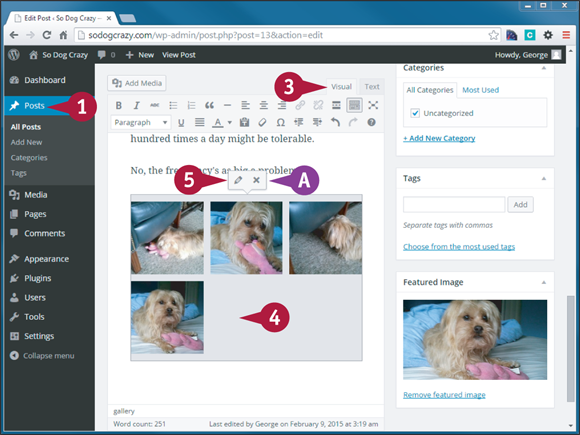
![]() Click anywhere on the gallery images or the area around them, and a gray box appears, outlining the gallery area.
Click anywhere on the gallery images or the area around them, and a gray box appears, outlining the gallery area.
![]() Click the pencil icon (
Click the pencil icon (![]() ) in the small menu that appears at the top of the gallery.
) in the small menu that appears at the top of the gallery.
![]() You can delete the gallery by clicking
You can delete the gallery by clicking ![]() .
.
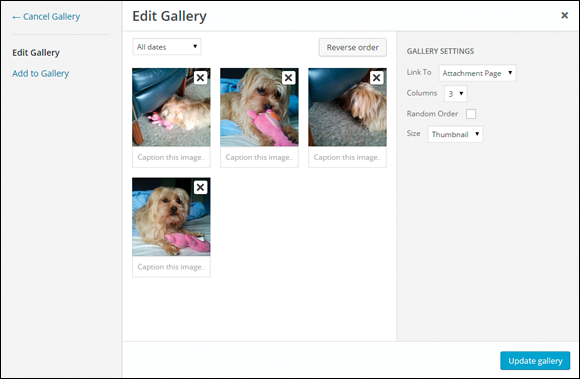
The Media Uploader window opens to display the Edit Gallery section.
The options here are the same as the ones described in the previous section, “Insert an Image Gallery.”
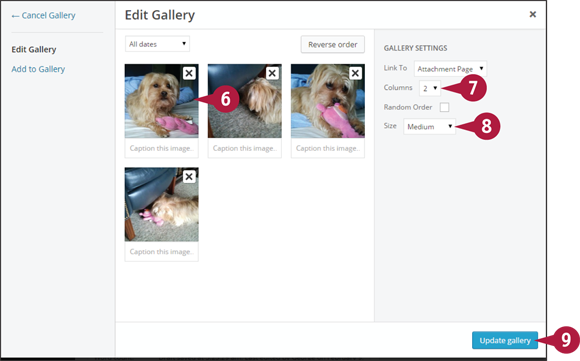
![]() Click an image and drag it to change the order of images.
Click an image and drag it to change the order of images.
![]() Click the Columns
Click the Columns ![]() to change the number of columns (2 in this example because of the size change in step 5).
to change the number of columns (2 in this example because of the size change in step 5).
![]() Click the Size
Click the Size ![]() to change the image size (medium in this example).
to change the image size (medium in this example).
![]() Click Update gallery.
Click Update gallery.
The new order, sizing, and columns are reflected in the content editor.
![]() Click Update for the post or page.
Click Update for the post or page.
Embed YouTube (and Other) Videos
If you have a YouTube channel or store videos on a major video sharing site, such as Vimeo, you can play your videos on any post or page. In fact, you can play any public video from YouTube or other sites.
Embed YouTube (and Other) Videos
Embed a Video
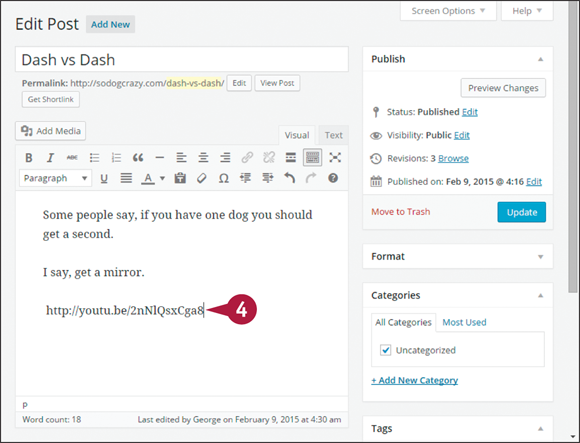
![]() After you find the video you want to post on your site at
After you find the video you want to post on your site at YouTube.com, click Share. Along with the share icons, you see the URL for the video.
![]() Click in the field and copy the URL.
Click in the field and copy the URL.
![]() Return to the tab or window with your post or page admin screen.
Return to the tab or window with your post or page admin screen.
![]() Paste the URL on its own separate line.
Paste the URL on its own separate line.
Note: You may not see the URL because WordPress immediately begins trying to load the video.
Note: If there is anything else on the line where you paste the URL, the embedding of the video will not work.
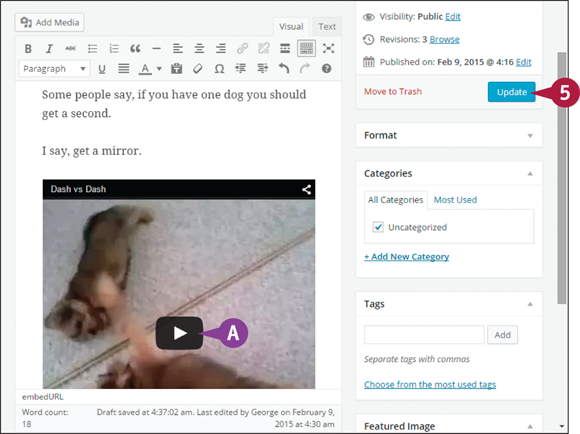
![]() A video player appears where you pasted the URL. Test the video by playing it right from the content editor.
A video player appears where you pasted the URL. Test the video by playing it right from the content editor.
![]() Save your changes to the post or page. Depending on its status, click Update, Publish, or Save Draft.
Save your changes to the post or page. Depending on its status, click Update, Publish, or Save Draft.

Control the Size of the Video
Note: WordPress tries to fill the content area with the video, but if you want to control the sizing, you can, using a shortcode.
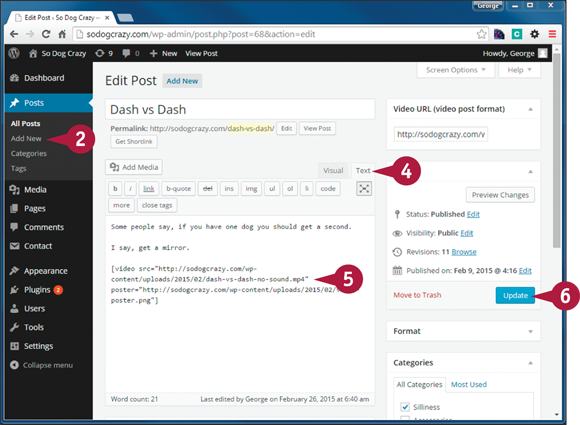
![]() Click the Text tab in the content editor.
Click the Text tab in the content editor.
![]() Type the following shortcode:
Type the following shortcode:
[video src="http://the'url-to-the-video.com" width="200" height="150"]
The dimensions are in pixels, and you would use whatever values you want. This example is deliberately small to show the effect.
Note: This shortcode can also be used in situations when you need the video to be on the same line as other content.
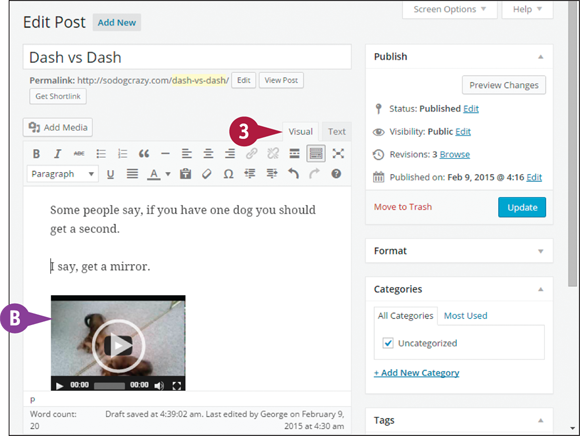
![]() Click the Visual tab.
Click the Visual tab.
![]() Switching to Visual mode shows the new sizing of the video.
Switching to Visual mode shows the new sizing of the video.
Note: This shortcode works with embeddable video links from third-party sites or any link to an MP4 video file.
Upload and Insert Video to a Post
While it is better to let YouTube or other video services store and serve your video files, there can be situations where you want to upload them to your site. On WordPress.com, you will need to buy the Premium upgrade to be able to upload video files.
Upload and Insert Video to a Post
Upload and Insert a Video File to a Post
![]() Click Add New under Media on the left admin menu.
Click Add New under Media on the left admin menu.
![]() Click Select Files and upload your video file.
Click Select Files and upload your video file.
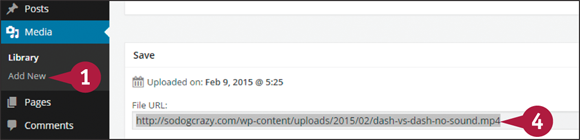
![]() When the upload finishes, click the Edit link next to the filename.
When the upload finishes, click the Edit link next to the filename.
The Edit Media screen opens.
![]() Copy the URL for the video.
Copy the URL for the video.
![]() Navigate to the post or page where you want to insert the video file.
Navigate to the post or page where you want to insert the video file.
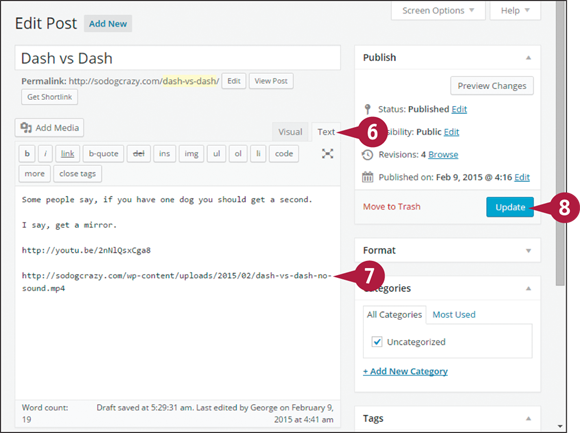
![]() Click the Text tab in the content editor.
Click the Text tab in the content editor.
![]() Paste the URL on its own line in the content editor. This example uses Text mode, so no player appears.
Paste the URL on its own line in the content editor. This example uses Text mode, so no player appears.
![]() Save your changes to the post or page. Depending on its status, click Update, Publish, or Save Draft.
Save your changes to the post or page. Depending on its status, click Update, Publish, or Save Draft.
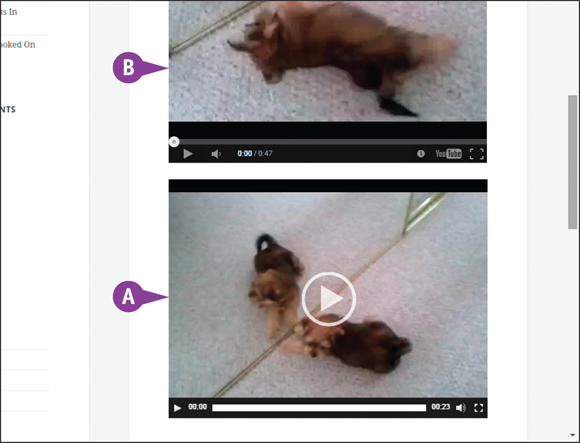
![]() WordPress automatically creates a player for your video file.
WordPress automatically creates a player for your video file.
![]() An embedded YouTube video has been left in this post to illustrate how the player for the uploaded file is equal in look and feel.
An embedded YouTube video has been left in this post to illustrate how the player for the uploaded file is equal in look and feel.
Add an Image to the Video Player
![]() In an image editing program, create an image that the video player will display until play is started.
In an image editing program, create an image that the video player will display until play is started.
![]() Click Add New under Media in the left admin menu, and upload the image to WordPress.
Click Add New under Media in the left admin menu, and upload the image to WordPress.
![]() When the image finishes uploading, click Edit, and copy the URL for the image.
When the image finishes uploading, click Edit, and copy the URL for the image.
![]() Click the Text tab in the content editor.
Click the Text tab in the content editor.
![]() Type the following shortcode:
Type the following shortcode:
[video src="http://yoursite.com/wp-content/uploads/year/month.name-of-file.mp4" poster="http://yoursite.com/wp-content/uploads/year/month/name-of-file"]
Note: Substitute the URLs for your video and image files.
![]() Save your changes to the post or page. Depending on its status, click Update, Publish, or Save Draft.
Save your changes to the post or page. Depending on its status, click Update, Publish, or Save Draft.
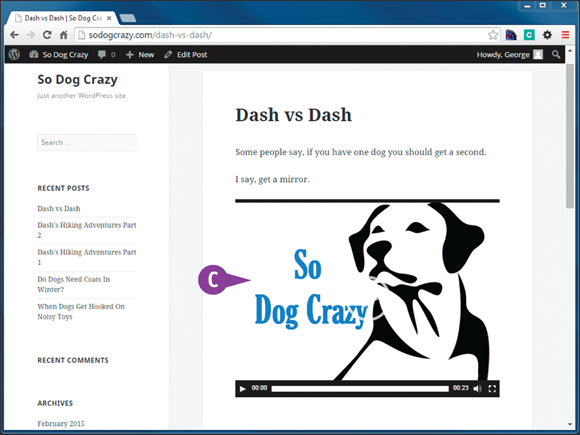
![]() The image whose URL you placed in the shortcode now appears at the start of the video rather than the first frame of video.
The image whose URL you placed in the shortcode now appears at the start of the video rather than the first frame of video.
Upload and Insert Audio to a Post
Whether it is music, a recording of a teleseminar, a speech, or you reading a post, audio is a valuable but often overlooked type of content for your site. Like video files, you can embed audio from sharing sites, or simply paste a URL to any MP3 file, including ones you have uploaded to your site.
Upload and Insert Audio to a Post
Upload and Insert Your Own Audio to a Post
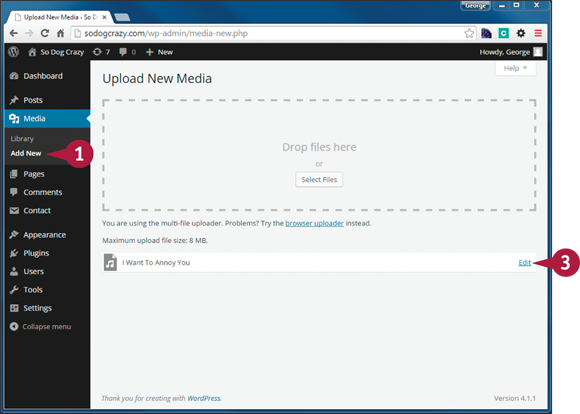
![]() Click Add New under Media in the left admin menu.
Click Add New under Media in the left admin menu.
![]() Upload your MP3 file to WordPress.
Upload your MP3 file to WordPress.
Note: On WordPress.com, you need to buy an upgrade if you want to upload audio files. See http://en.support.wordpress.com/audio for the options.
![]() When the upload finishes, click the Edit link next to the filename.
When the upload finishes, click the Edit link next to the filename.
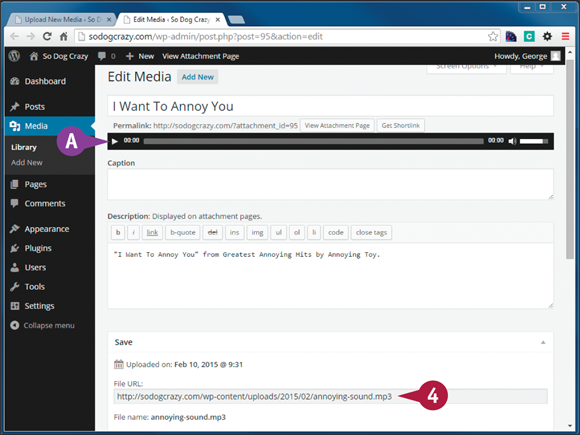
The Edit Media screen opens.
![]() An audio player appears at the top of the screen where you can test that your file is working.
An audio player appears at the top of the screen where you can test that your file is working.
![]() Copy the URL for the audio file.
Copy the URL for the audio file.
![]() Navigate to the post or page where you want the audio to be played.
Navigate to the post or page where you want the audio to be played.
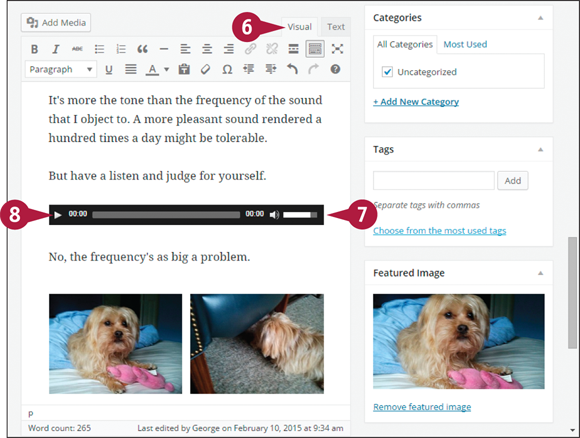
![]() Click the Visual tab.
Click the Visual tab.
![]() Paste the URL on its own line in the content editor.
Paste the URL on its own line in the content editor.
Note: If there is anything else on the line where you paste the URL, then the audio player will not appear.
![]() Click the Play button to make sure the audio works.
Click the Play button to make sure the audio works.
![]() Save your changes to the post or page. Depending on its status, click Update, Publish, or Save Draft.
Save your changes to the post or page. Depending on its status, click Update, Publish, or Save Draft.

Upload and Insert Someone Else’s Audio to a Post
![]() Navigate to the website of the podcast you are interested in.
Navigate to the website of the podcast you are interested in.
![]() Check for permission to use podcasts on your site.
Check for permission to use podcasts on your site.
![]() If you want a particular episode, download the MP3 file and follow the instructions in the previous set of steps.
If you want a particular episode, download the MP3 file and follow the instructions in the previous set of steps.
![]() If the site has an embed code, copy and paste it into a widget, as described in the section “Display Social Feeds” in Chapter 11.
If the site has an embed code, copy and paste it into a widget, as described in the section “Display Social Feeds” in Chapter 11.