
CHAPTER 7
Organizing and Managing Your Site Content
A good-looking blog is all well and good, but in the end the content is king. You can improve your content’s appeal with careful editing and attention to typography and organization.
Understand Categories and Tags
Well-thought-out categories and tags provide a convenient way for readers to navigate your content. Think of them as another way for visitors to search your site. Although you can add categories and tags as you go along, doing a little planning will make them more useful.
Categories versus Tags
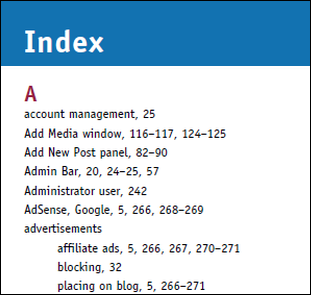
If you think of your site as a book, categories are the chapters and tags are the index terms. In other words, categories work best for bigger concepts, such as flowers, shrubs, and trees, whereas tags are very specific, like the name of a particular flower and so on. Also, every post must be assigned to at least one category, but tags are optional.
Categories and Subcategories

You have the option of creating subcategories, or child categories, for any category. For example, you may have a category Flowers with subcategories such as Mixed Bouquets and Seasonal Bouquets. Subcategories, in turn, can have their own subcategories. This is referred to as a hierarchical structure. Tags, on the other hand, are not hierarchical.
Why Use Tags?
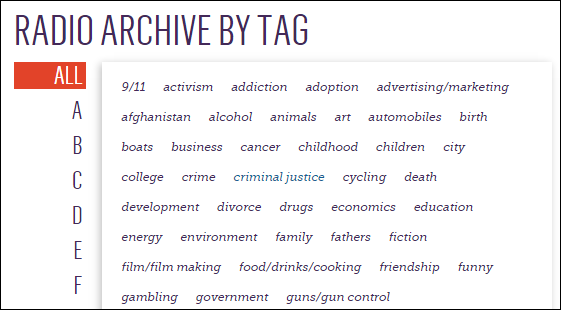
Although tags are optional, they are useful because they provide another means to help and encourage readers to find content on your site. At the same time, they provide another means for search engines to index and rank your web pages. Imagine not having an index for a nonfiction book.
Default Category

If you do not specify a category when you create a post, WordPress assigns it to the default category, which initially is Uncategorized. One of your first tasks in setting up a site should be to rename this category to something useful; Google “uncategorized” to see how many WordPress users have not.
Custom Taxonomies
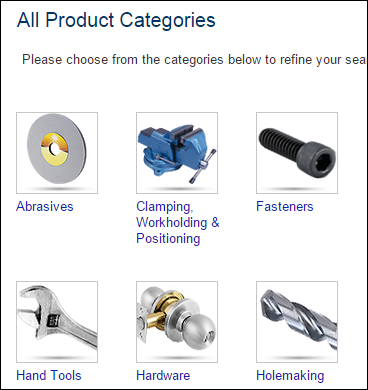
A taxonomy is the technical term in WordPress for a classification structure. Categories and tags are the default taxonomies for posts in WordPress, but themes, plugins, or your developer can create custom taxonomies. An e-commerce plugin, for example, could have a custom taxonomy called Product Categories.
Best Practices
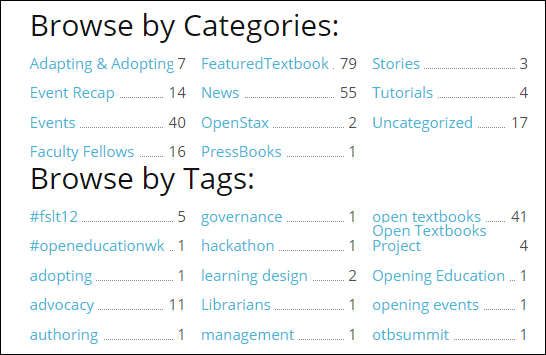
There are no hard-and-fast rules for creating categories and tags. Flowers may be a category on one site, but a tag on another; it all depends on the content and the focus of the site. One helpful rule of thumb is to keep categories to a minimum (a clear overview) and have as many tags as you can think of (for digging deeper).
Add New Categories
The Categories screen lets you add new categories, but you also can add them while you add or edit posts. Either way, you add them to the same set of categories that help organize your content.
Add New Categories
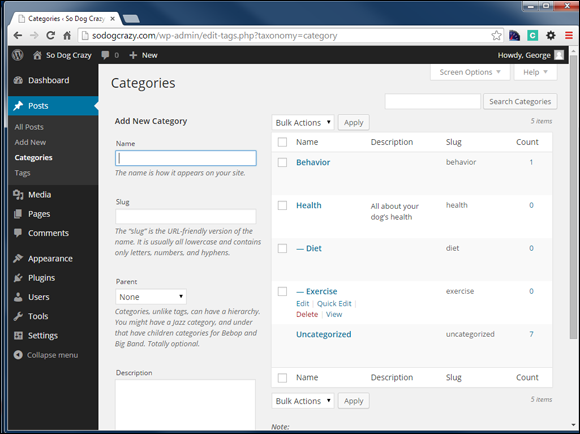
Add a Category from the Categories Screen
![]() Under Posts in the left admin menu, click Categories.
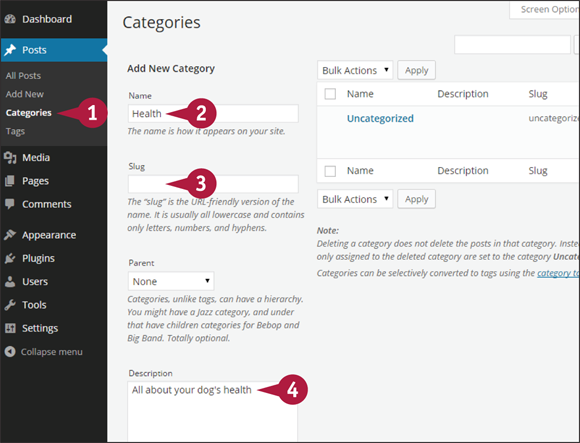
Under Posts in the left admin menu, click Categories.
![]() Type a name.
Type a name.
![]() WordPress automatically creates a category slug using the name, but you can type one here.
WordPress automatically creates a category slug using the name, but you can type one here.
Note: The Slug field does not appear on WordPress.com sites.
![]() Type a description.
Type a description.
![]() Scroll down and click Add New Category.
Scroll down and click Add New Category.
![]() The screen refreshes and the category appears on the list at the right.
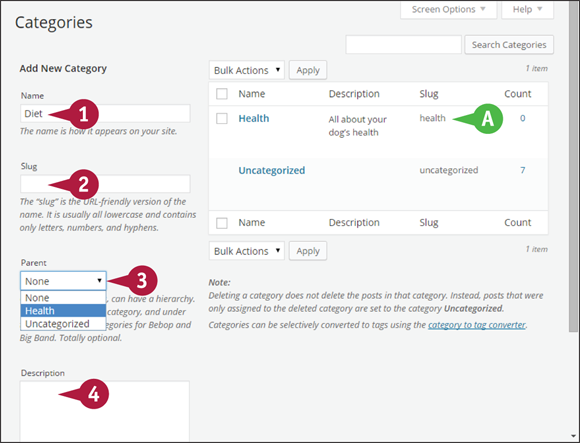
The screen refreshes and the category appears on the list at the right.
Add a Subcategory
![]() Type a subcategory name.
Type a subcategory name.
![]() If you want a slug other than the name, type it here.
If you want a slug other than the name, type it here.
![]() Click the Parent
Click the Parent ![]() and choose the category you want as the parent of your subcategory.
and choose the category you want as the parent of your subcategory.
![]() Type a description.
Type a description.
![]() Scroll down and click Add New Category.
Scroll down and click Add New Category.
The subcategory, preceded by a dash, appears under the parent category in the list at right on the Categories screen.

Add a Category from a Post Screen
![]() On the New Post or Edit Post screen, click Add New Category at the bottom of the Categories meta box.
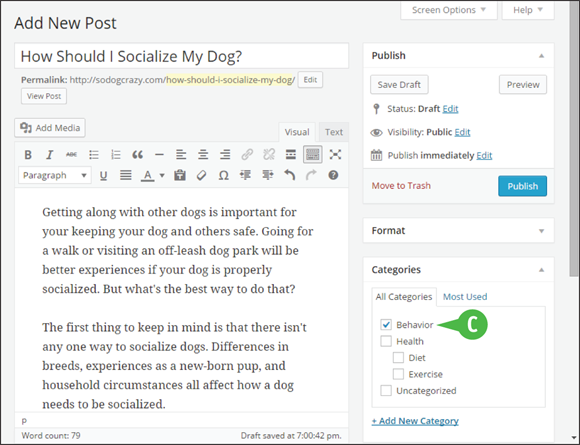
On the New Post or Edit Post screen, click Add New Category at the bottom of the Categories meta box.
![]() A form for adding categories appears below the link.
A form for adding categories appears below the link.
![]() Type the new category in the text field.
Type the new category in the text field.
![]() If the new category is a subcategory, click the Parent Category
If the new category is a subcategory, click the Parent Category ![]() and choose a category.
and choose a category.
![]() Click Add New Category.
Click Add New Category.
![]() The new category appears in the Categories box as checked, meaning the post is assigned to it.
The new category appears in the Categories box as checked, meaning the post is assigned to it.
Note: Normally categories appear in alphabetical order, but when you assign a category to a post, it jumps to the top of the list. This makes it easier to see what categories you have assigned without having to scroll down the list.
Manage Categories
Once you have created some categories, you can change their names, slugs, parent-child relationships, and delete them using the Categories screen. Remember that changing category slugs after your site is live breaks existing links to those categories.
If you want to add a category to multiple posts at one time, see the section “Bulk Edit Posts and Pages” later in this chapter.
Manage Categories
Quick Edit a Category Name
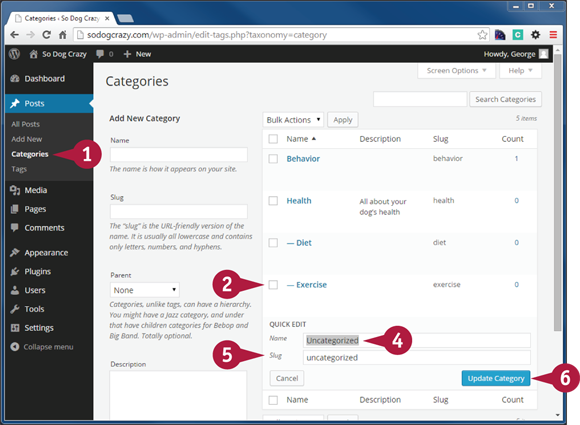
![]() Under Posts in the left admin menu, click Categories.
Under Posts in the left admin menu, click Categories.
![]() Mouse over the category you want to edit to display a menu. The menu includes the Edit, Quick Edit, Delete, and View options.
Mouse over the category you want to edit to display a menu. The menu includes the Edit, Quick Edit, Delete, and View options.
![]() Click Quick Edit.
Click Quick Edit.
![]() In the Quick Edit area, type a new name.
In the Quick Edit area, type a new name.
![]() Type a new slug.
Type a new slug.
![]() Click Update Category.
Click Update Category.
The new category name appears.
Change the Hierarchy of a Category
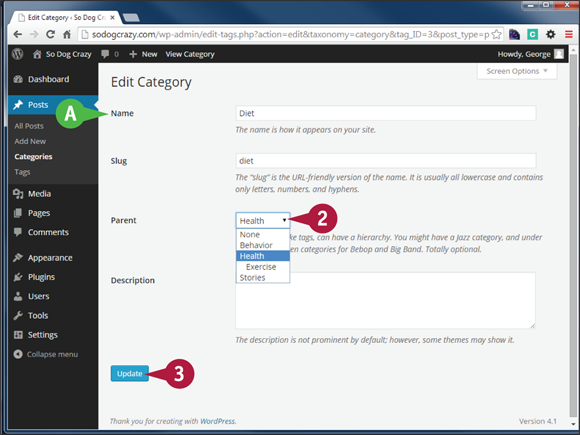
![]() On the Categories screen, click a category name or the Edit menu item to display the Edit Category screen.
On the Categories screen, click a category name or the Edit menu item to display the Edit Category screen.
![]() You can edit the Name, Slug, and Description from this screen. You can also make the category a child of another category.
You can edit the Name, Slug, and Description from this screen. You can also make the category a child of another category.
![]() Click the Parent
Click the Parent ![]() and choose the category you want to be the parent.
and choose the category you want to be the parent.
![]() Click Update.
Click Update.
The subcategory, preceded by a dash, appears under the parent category on the right-hand list of the Categories screen.
Delete a Category
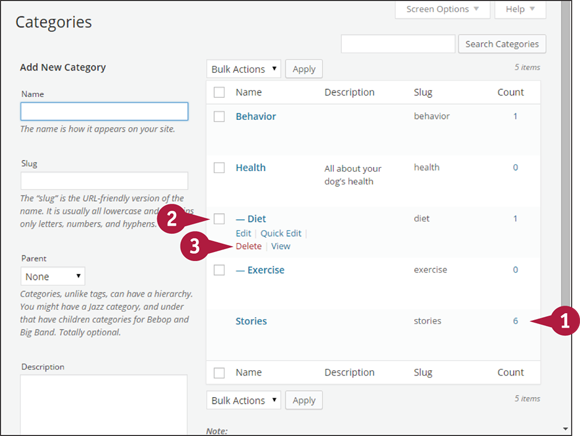
![]() Note the Count for the Stories category: 6. Stories is currently the default category for posts.
Note the Count for the Stories category: 6. Stories is currently the default category for posts.
![]() Mouse over the category you want to edit to display a menu.
Mouse over the category you want to edit to display a menu.
![]() Click Delete.
Click Delete.
The category disappears from the list.
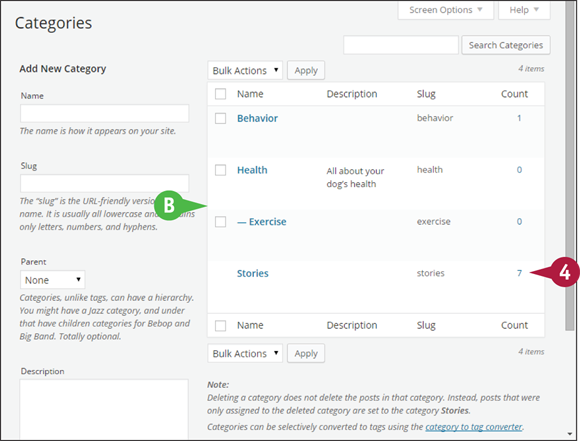
![]() The category disappears from the list.
The category disappears from the list.
![]() Notice that the Count on the Stories category is now 7.
Notice that the Count on the Stories category is now 7.
When you delete a category, any posts that were assigned only to that category are automatically assigned to the default category.
Add New Tags
Like categories, new tags can be created from their own screen or from any post screen. You can also add new tags from the post’s listing, but that is covered in the section “Quick Edit Posts and Pages” later in this chapter.
Because tags are for very specific items, it is hard to know in advance what tags you will need. It is easier to enter tags while working on a post, because that is where they first come up in your content.
Add New Tags
Add a Tag from the Add New Post or Edit Post Screens
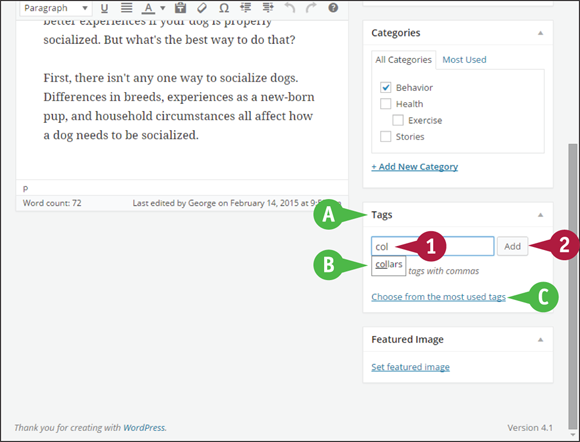
![]() When you are adding or editing a post, look for the Tags box at the bottom right. Typically you need to scroll to see it.
When you are adding or editing a post, look for the Tags box at the bottom right. Typically you need to scroll to see it.
![]() Begin typing your tag into the field.
Begin typing your tag into the field.
Note: Type fairly slowly to give WordPress time to search existing tags.
![]() As you type, a box pops up revealing existing tags using the same letters.
As you type, a box pops up revealing existing tags using the same letters.
If you see the tag you want on the list, click it to place it into the field.
If the tag you want is not on the list, continue typing in the field.
Usually you will be adding more than one tag to a post. Simply put a comma between each tag.
![]() This link displays a list of the most used tags.
This link displays a list of the most used tags.
![]() Click Add.
Click Add.
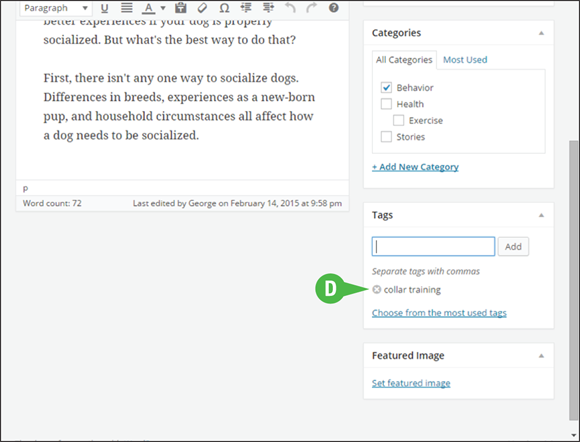
![]() The tag or tags appear below the Add Tags field with
The tag or tags appear below the Add Tags field with ![]() next to each. If the tag is new, it will be added to the list on the Tags screen and be available to other posts.
next to each. If the tag is new, it will be added to the list on the Tags screen and be available to other posts.
![]() Click Update or Save Draft or Publish, depending on the type of screen you are on.
Click Update or Save Draft or Publish, depending on the type of screen you are on.
Delete Tags from a Post
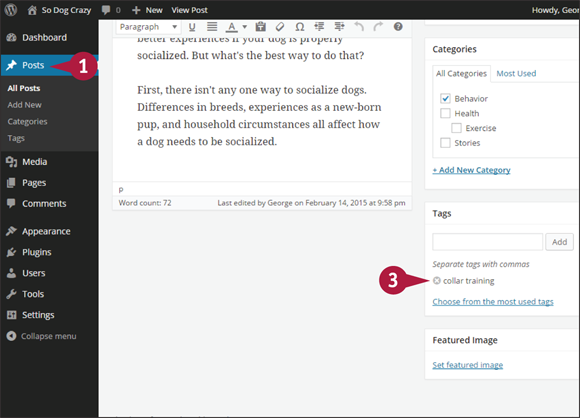
![]() Click Posts on the left admin menu and locate the relevant post.
Click Posts on the left admin menu and locate the relevant post.
![]() Click Edit.
Click Edit.
![]() Mouse over
Mouse over ![]() beside a tag until it turns red and then click.
beside a tag until it turns red and then click.
The post is no longer assigned to that tag and the tag disappears from the Edit Post screen.
![]() Click Update or Save Draft or Publish, depending on the status of the post or page.
Click Update or Save Draft or Publish, depending on the status of the post or page.
Add New Tags from the Tags Screen
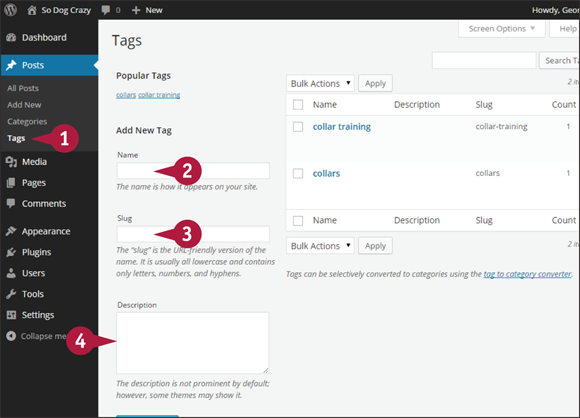
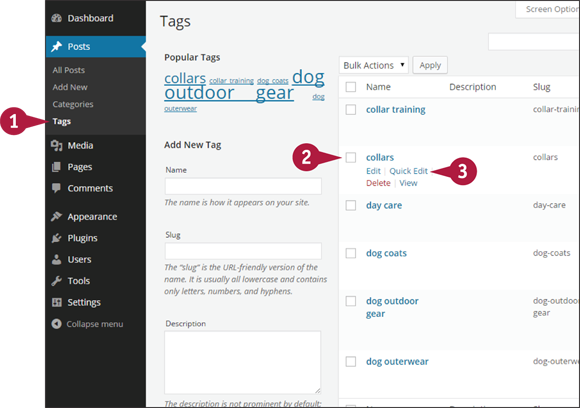
![]() Under Posts in the left admin menu, click Tags.
Under Posts in the left admin menu, click Tags.
![]() Under Add New Tag on the left, type a name in the Name field.
Under Add New Tag on the left, type a name in the Name field.
![]() WordPress automatically creates a tag slug using the name, but if you want a different slug, type it here.
WordPress automatically creates a tag slug using the name, but if you want a different slug, type it here.
Note: The Slug field does not appear on WordPress.com sites.
![]() Type a description.
Type a description.
![]() Scroll down and click Add New Tag.
Scroll down and click Add New Tag.
The new tag is added to the listing on the right.
Manage Tags
Whether it is adding a new tag, changing the name or slug of an existing tag, or deleting tags, you can manage it all from the Tags screen. Remember that changing tag slugs after your site is live breaks existing links to those tags.
If you want to add a tag to multiple posts at one time, see the section “Bulk Edit Posts and Pages,” later in this chapter.
Manage Tags
Edit a Tag from the Tags Screen
![]() Under Posts in the left admin menu, click Tags.
Under Posts in the left admin menu, click Tags.
![]() Mouse over the tag you want to edit to display a menu.
Mouse over the tag you want to edit to display a menu.
![]() Click Quick Edit.
Click Quick Edit.
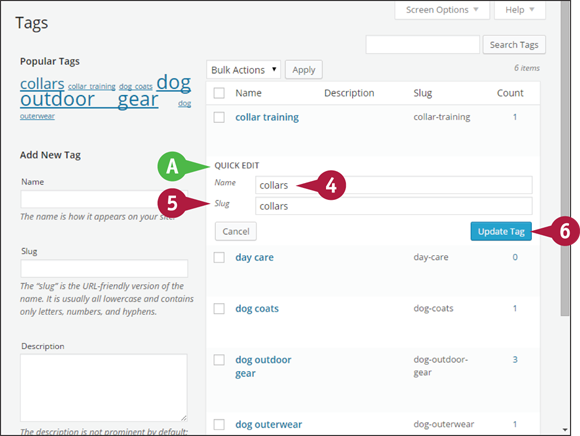
![]() The Quick Edit area appears.
The Quick Edit area appears.
![]() Type a new name in the Name field.
Type a new name in the Name field.
![]() Type a slug name. It must be changed as well. It can just be a lowercase version of the name or slightly different.
Type a slug name. It must be changed as well. It can just be a lowercase version of the name or slightly different.
![]() Click Update Tag.
Click Update Tag.
The new tag name appears.
Deleting Multiple Tags Using Bulk Actions
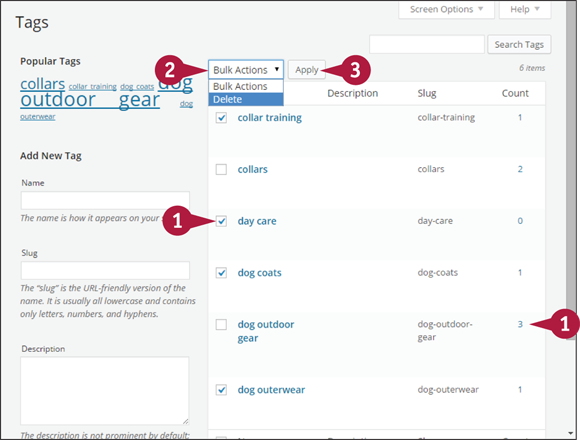
![]() On the Tags screen, click the box beside each tag you want to delete (
On the Tags screen, click the box beside each tag you want to delete (![]() changes to
changes to ![]() ).
).
![]() From the Bulk Actions dropdown at the top or bottom of the screen, click Delete.
From the Bulk Actions dropdown at the top or bottom of the screen, click Delete.
![]() Click Apply.
Click Apply.
View All Posts Using a Particular Tag
![]() On the Tags screen, find the Count column for the tag of interest and click the number.
On the Tags screen, find the Count column for the tag of interest and click the number.
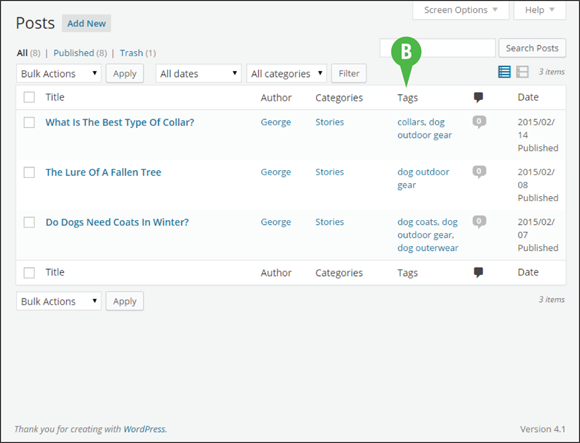
The Posts screen opens.
You now see all posts, three in this example, that have been assigned the tag you selected. This example was for “dog outdoor gear.”
![]() You can verify that all the posts share the particular tag by checking the Tags column.
You can verify that all the posts share the particular tag by checking the Tags column.
Note: This same action can be taken for categories on the Categories screen.
Convert Categories and Tags
If you imported your content to WordPress from another platform, you may find that all your old tags are now categories. Or maybe a tag has taken on more importance and should now be a category. Fortunately, WordPress has a tool that lets you convert categories to tags and vice versa.
Find the conversion tool by clicking the Available Tools link under Tools on the left admin menu. On WordPress.org sites, you can save a step by clicking the Import link under Tools.
Convert Categories and Tags
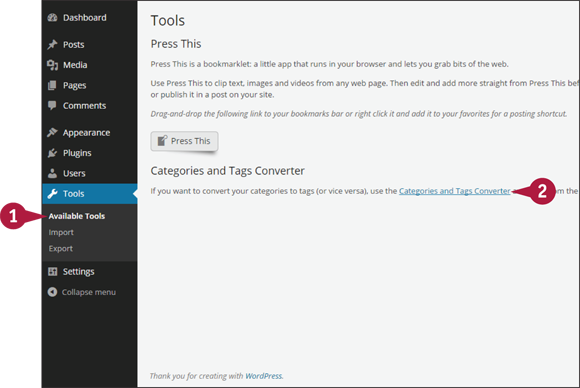
![]() Under Tools in the left admin menu, click Available Tools.
Under Tools in the left admin menu, click Available Tools.
![]() Click Categories and Tags Converter.
Click Categories and Tags Converter.
On WordPress.com sites, the Convert Categories to Tags screen opens.
Note: WordPress.com users skip to step 6.
On WordPress.org sites, the Import screen opens.
![]() Click Categories and Tags Converter.
Click Categories and Tags Converter.
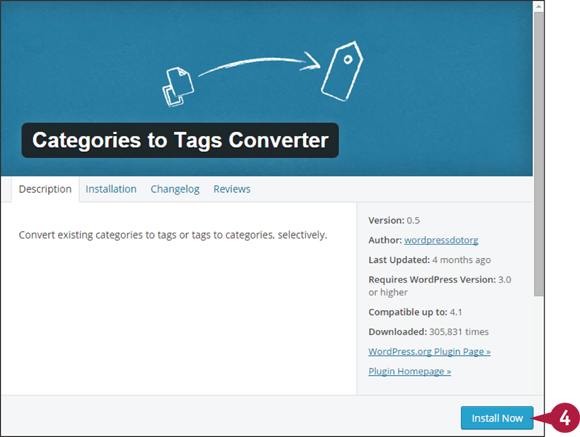
A plugin window opens.
![]() Click Install Now.
Click Install Now.
![]() After WordPress installs the plugin, click Activate Plugin & Run Importer.
After WordPress installs the plugin, click Activate Plugin & Run Importer.
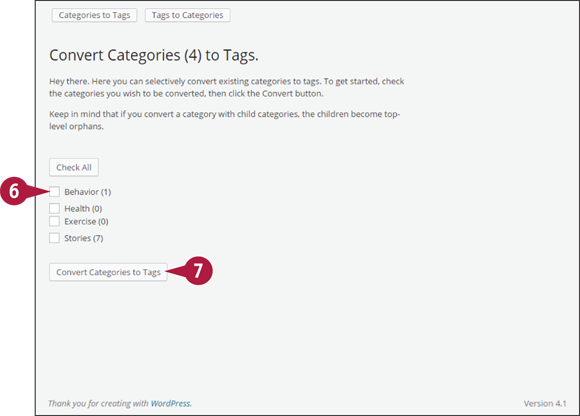
The Convert Categories (n) to Tags screen opens, where n represents the number of categories available to convert.
![]() Click each category that you want to convert to a tag (
Click each category that you want to convert to a tag (![]() changes to
changes to ![]() ), or click Check All to convert all categories.
), or click Check All to convert all categories.
![]() Click Convert Categories to Tags.
Click Convert Categories to Tags.
WordPress displays the progress and confirms the conversions.
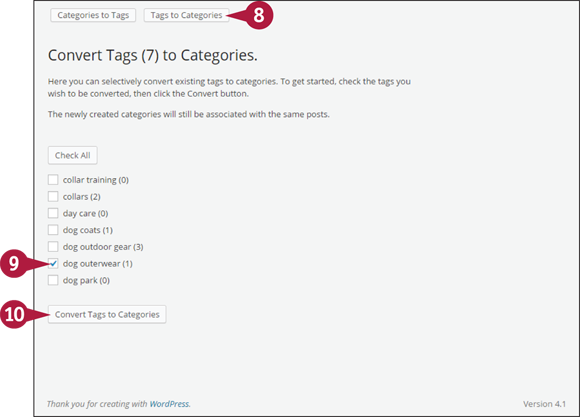
![]() Click Tags to Categories from the progress screen or the category conversion screen, which opens the Convert Tags (n) to Categories screen, with n as the available tags.
Click Tags to Categories from the progress screen or the category conversion screen, which opens the Convert Tags (n) to Categories screen, with n as the available tags.
![]() Click each tag that you want to convert to a category (
Click each tag that you want to convert to a category (![]() changes to
changes to ![]() ), or click Check All to convert all tags.
), or click Check All to convert all tags.
![]() Click Convert Tags to Categories.
Click Convert Tags to Categories.
The tag is now a category. It will need to be edited and capitalized.
Find Posts and Pages
As you add more and more content to your site — in particular, posts — finding the content you want to edit becomes a challenge. WordPress has a number of tools on its listings pages to make the task simpler.
Find Posts
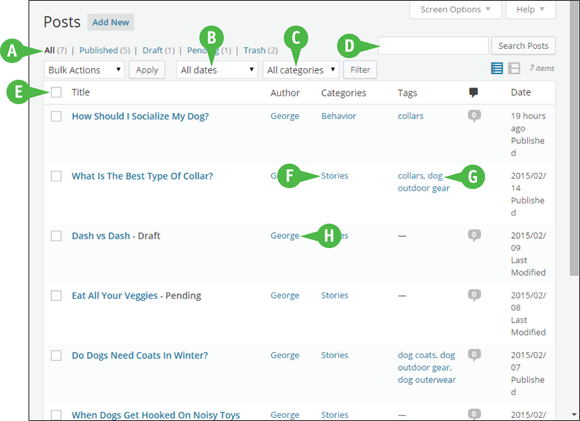
![]() Filter by Status
Filter by Status
Click a link to show all posts or only published, draft, pending, or trashed posts. The number of posts is shown in brackets. Note: This menu displays a status only if there are posts with that status.
![]() Filter by Date
Filter by Date
Drop down the menu to choose a month and then click Filter.
![]() Filter by Category
Filter by Category
Drop down the menu to choose a category and then click Filter.
![]() Search by Title
Search by Title
Type a term or terms and click Search Posts.
![]() Sort Listings
Sort Listings
Click on column headings Title, Comments (![]() ), or Date to sort the listings by the given parameter; toggles between ascending and descending order.
), or Date to sort the listings by the given parameter; toggles between ascending and descending order.
![]() Filter by Category
Filter by Category
Click a category name to filter by that category.
![]() Filter by Tag
Filter by Tag
Click a tag name to filter by that tag.
![]() Filter by Author
Filter by Author
Click an author’s name to show only posts by that author.
Find Pages
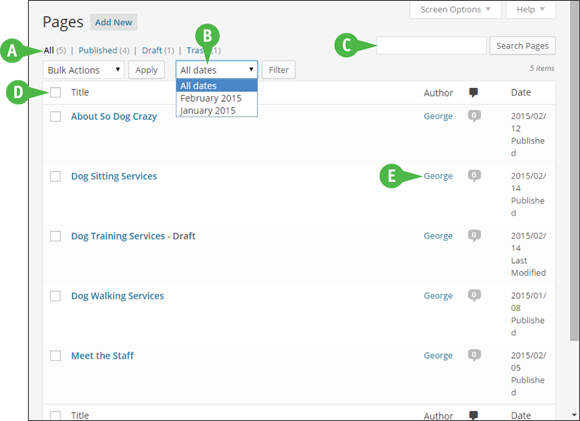
![]() Filter by Status
Filter by Status
Click a link to show all pages or only published, draft, or trashed posts. The number of pages is shown in brackets. Note: This menu displays a status only if there are pages with that status.
![]() Filter by Date
Filter by Date
Drop down the menu to choose a month and then click Filter.
![]() Search by Title
Search by Title
Type a term or terms and click Search Pages.
![]() Sort Listings
Sort Listings
Click column headings Title, Comments (![]() ), or Date to sort the listings by the given parameter; toggles between ascending and descending order.
), or Date to sort the listings by the given parameter; toggles between ascending and descending order.
![]() Filter by Author
Filter by Author
Click an author’s name to show only pages by that author.
Use Screen Options
To display more than the default 20 listings, use the Screen Options link at the top right of both post and page listings to control the number of results shown at one time. You can also control which columns appear. WordPress.org sites may have more column choices depending on what plugins are installed, and there are plugins which allow even more control over what columns are shown.
Total Counts Explained
The Filter By status menu at the top shows the number of posts or pages with that status. However, trashed items are not counted on the All link, which is why the numbers do not always add up. Also, the Trash total will vary over time as trashed items are automatically deleted after 30 days.
Quick Edit Posts and Pages
When you are on post and page listings screens, WordPress makes it easy to edit certain elements without having to open the individual post or page.
The Quick Edit function is accessed by mousing over a particular post or page and clicking the Quick Edit link.
Quick Edit Posts
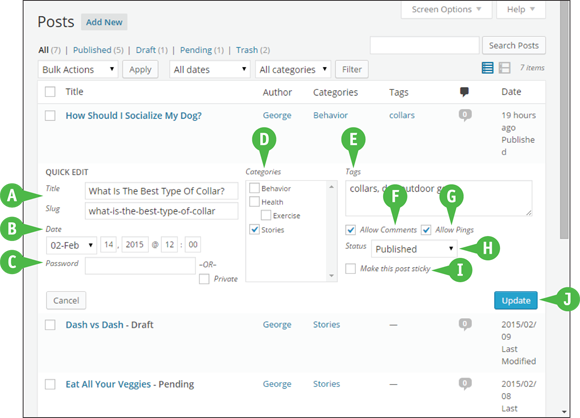
![]() Edit the Title or Slug
Edit the Title or Slug
Edit either the title of the post or its slug. Note: Changing the slug after publishing a post breaks existing links to that post.
![]() Edit the Date
Edit the Date
Edit the publication day, month, year, or time. If the post is already published, this affects the default order in which WordPress displays it. If the post is scheduled to publish, this changes that scheduled date.
![]() Password Protect
Password Protect
Type a password here if you want the post to be visible only to those who know the password.
![]() Assign Categories
Assign Categories
Assign or unassign the post to available categories. You cannot add new categories from here.
![]() Assign Tags
Assign Tags
Assign or unassign the post to available tags. You can also add new tags here.
![]() Allow Comments
Allow Comments
Allow or disallow comments for this post.
![]() Allow Pings
Allow Pings
Allow or disallow pings for this post.
![]() Change Status
Change Status
Choose Published, Draft, or Pending Review from the drop-down menu.
![]() Make the Post Sticky
Make the Post Sticky
Checking this box makes the post remain at the top of any post listings.
![]() Update
Update
Always remember to click Update when finished.
Quick Edit Pages
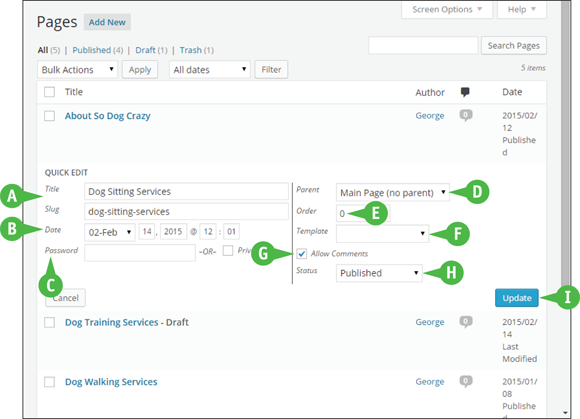
![]() Edit the Title or Slug
Edit the Title or Slug
Edit either the title of the page or its slug. Note: Changing the slug after publishing a page breaks existing links to that page.
![]() Edit the Date
Edit the Date
Edit the publication day, month, year, or time. If the page is scheduled to publish, this changes that scheduled date.
![]() Password Protect
Password Protect
Type a password here if you want the page to be visible only to those who know the password.
![]() Assign a Parent
Assign a Parent
If you want the page to be the child or subpage of another, choose it from the dropdown.
![]() Order
Order
Override WordPress’s default alphabetical ordering of pages.
![]() Assign a Template
Assign a Template
If your theme has page templates, you can choose from them using this drop-down menu.
![]() Allow Comments
Allow Comments
Allow or disallow comments for this page.
![]() Change Status
Change Status
Choose Published, Draft, or Pending Review from the drop-down menu.
![]() Update
Update
Always remember to click Update when finished.
Bulk Edit Posts and Pages
Sometimes you need to make the same change to multiple posts or pages at a time, such as adding posts to a category or changing pages to a new page template. The Bulk Edit function makes tasks like this a snap.
Bulk Edit Posts
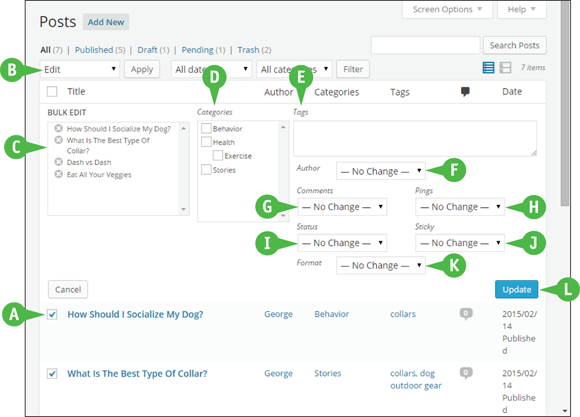
![]() Check Posts You Want to Edit
Check Posts You Want to Edit
Check the box next to each post you want to edit, or if you want to select all posts, click the box in the column heading next to Title.
![]() Choose Edit
Choose Edit
From the Bulk Actions dropdown, choose Edit then click Apply.
![]() Edit the List of Posts
Edit the List of Posts
All the posts you selected are shown with ![]() beside each. Remove posts from the editing process by clicking
beside each. Remove posts from the editing process by clicking ![]() .
.
![]() Assign Categories
Assign Categories
Assign the posts to available categories. You cannot remove posts from a category nor can you add new categories.
![]() Assign Tags
Assign Tags
Assign the posts to available tags. You can also add new tags here.
![]() Change Author
Change Author
Drop-down menu of all authors on the site.
![]() Allow Comments
Allow Comments
Allow or disallow comments.
![]() Allow Pings
Allow Pings
Allow or disallow pings.
![]() Change Status
Change Status
Choose Published, Draft, or Pending Review from the drop-down menu.
![]() Make Posts Sticky
Make Posts Sticky
Choose whether posts remain at the top of post listings.
![]() Change Format
Change Format
Choose from available post formats.
![]() Update
Update
Click Update when finished.
Bulk Edit Pages
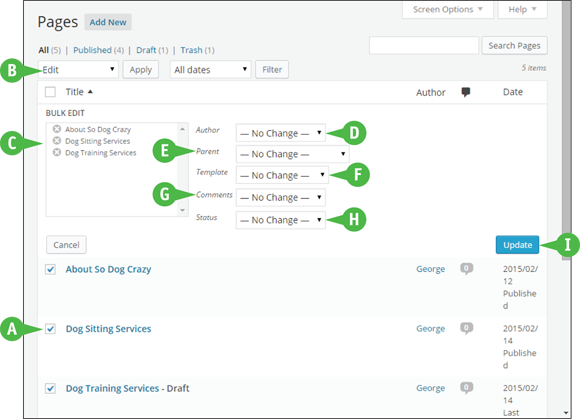
![]() Check Pages You Want to Edit
Check Pages You Want to Edit
Check the box next to each page you want to edit, or if you want to select all pages, click the box in the column heading next to Title.
![]() Choose Edit
Choose Edit
From the Bulk Actions dropdown, choose Edit and then click Apply.
![]() Edit the List of Pages
Edit the List of Pages
All the pages you selected are shown with ![]() beside each. Remove pages from the editing process by clicking
beside each. Remove pages from the editing process by clicking ![]() .
.
![]() Change Author
Change Author
Drop-down menu of all authors on the site.
![]() Assign a Parent
Assign a Parent
If you want the pages to be children or subpages of another, choose it from the dropdown.
![]() Assign a Template
Assign a Template
If your theme has page templates, you can choose from them using this drop-down menu.
![]() Allow Comments
Allow Comments
Allow or disallow comments.
![]() Change Status
Change Status
Choose Published, Draft, or Pending Review from the drop-down menu.
![]() Update
Update
Always remember to click Update when finished.