Chapter 4. Using Chef with Tools
In the last chapter we installed Chef itself, a user, an IRC client, and Git. Now we move on to develop our infrastructure and our understanding further by installing and using Ruby, VirtualBox, and Vagrant.
Exercise 1: Ruby
Objectives
After completing this exercise, you will:
-
Understand the differences between
chef-soloand a server-based Chef setup - Understand the node object in more detail
- Be set up to use Opscode’s Hosted Chef service
- Understand the authentication mechanism used by Hosted Chef
- Have installed a modern Ruby on your system using Chef
- Understand the roles primitive in Chef
- Understand the idea of attribute precedence
- Have examined the components of a Chef run
Directions
- Create an Opscode community login (if you don’t have one already).
- Download your user’s private key.
- Navigate to the Hosted Chef Operations Console.
- Create an organization, if you don’t already have one, selecting the free tier.
- Download your organization’s validation key.
- Download the knife.rb configuration file for your organization.
- Create a .chef directory under your chef-repo directory, and place your two keys and knife.rb inside this directory.
-
Read the
knife configuredocumentation, and use it to create a client.rb file and validation certificate in /etc/chef. -
Validate your setup by running
knife client list. -
Look at the
chef-clienthelp page, and identify how to pass JSON to achef-clientrun. -
Run
chef-clientwith the dna.json file created in the previous exercise. - Upload the cookbooks required to satisfy the run list to the Chef server.
-
Run
chef-clientagain with the dna.json file created in the previous exercise. -
Download the chruby, ark, and ruby_build cookbooks and place them in your
chef-repo. - Upload the cookbooks to the Chef server.
- Read the documentation shipped with the chruby cookbook to understand which attributes can be set.
-
Create a role that, in addition to the
gitandircrecipes, applies thesystemrecipe from the chruby cookbook, and set the attributes to install the latest Ruby 1.9.3, and set it as default. - Upload the role and cookbooks to Hosted Chef.
-
Update the node’s run list, replacing the
ircandgitrecipes with the role you created. -
Run
chef-client. - Verify that your user has the version of Ruby you desired.
Worked Example
I already have an Opscode user and I use Hosted Chef, so I decided I’d create another user for the purpose of demonstration. I browsed to the community website, and clicked the sign up link.
On the sign up page, I filled out the form with a username, password, name, company name, country, and state, and agreed to the terms and conditions.
This took me to a welcome page that read:
Your new Opscode account has been created, but some features of your account will not work until you verify your email address. To complete your verification, please check your email. Open the email from Opscode and click the enclosed link.
It also read:
Your User Key
Opscode uses two private keys: an organization-wide key and a user account-specific key (or “user key”). Opscode does not keep a copy of any private keys, so please store it somewhere safe. Learn more about private keys used by Chef.
A private key was displayed on the screen. However, I’d had experiences where copying and pasting the key gave unexpected results, so I elected to download the key as a file. I did this by clicking on my username at the top-right of the screen, and then clicking “Get a new private key.”
This page read:
Get a new private key
If you’ve lost your private key, or would like to replace it, click the button below. When you get a new key, your old key will stop working. This private key replaces your old key. We do not keep a copy so please store it somewhere safe.
I clicked “Get a new key,” and the key was downloaded to my local machine.
Next I checked my email, and found one that read:
Hello TDI Example,
Thank you for signing up with us!
Please click this link to verify that you’ve signed up for this account:
Your Account has been created with the following information: User Name : tdiexample Email Address : [email protected]
Thanks, The Opscode Team
I clicked the link and found myself on a landing page with options for what to do next:
- Read the Getting Started Guide
- Manage your org with the Operations Console
- Need Help?
I selected the middle option, which took me to the Opscode Hosted Chef Operations Console. This page invited me to create an organization. I filled out the form and selected the free tier.
On the resulting page, there was a link to download the validation key and to generate a knife.rb. I clicked both links and saved the resulting files. At the end, I had three files:
- tdiexample.pem
- hunterhayes-validation.pem
- knife.rb
I created a .chef directory under my chef-repo and moved these three files under it:
$ ls -1F chef-repo/.chef/
hunterhayes-validator.pem
knife.rb
tdiexample.pem
I read the manual page for knife configure and determined that knife configure client would read my knife.rb and create a client.rb file and a validation certificate. I ran the following to create the files:
$ knife configure client /tmp
Creating client configuration
Writing client.rb
Writing validation.pem
I then assumed administrator privileges, ensured the /etc/chef directory existed, and copied the client.rb and validation.pem files into the /etc/chef directory, with the following result:
# find /etc/chef/
/etc/chef/
/etc/chef/validation.pem
/etc/chef/client.rb
I returned to my tdi user, changed into my chef-repo directory, and validated my setup as follows:
$ cd ~/chef-repo
$ knife client list
hunterhayes-validator
I ran chef-client --help and noted that with the -j, --json-attributes flag, I could pass JSON to the client. Armed with this knowledge, I returned to my empowered user (sudo sns or root), and ran the following:
$ sudo chef-client -j .chef/dna.json
Starting Chef Client, version 11.4.4
[2013-06-27T09:25:51+01:00] INFO: *** Chef 11.4.4 ***
[2013-06-27T09:25:51+01:00] INFO: [inet6] no default interface, picking the first ipaddress
Creating a new client identity for ubuntu using the validator key.
[2013-06-27T09:25:52+01:00] INFO: Client key /etc/chef/client.pem is not present - registering
[2013-06-27T09:25:54+01:00] INFO: Setting the run_list to ["recipe[irc]", "recipe[git]"] from JSON
[2013-06-27T09:25:54+01:00] INFO: Run List is [recipe[irc], recipe[git]]
[2013-06-27T09:25:54+01:00] INFO: Run List expands to [irc, git]
[2013-06-27T09:25:54+01:00] INFO: Starting Chef Run for ubuntu
[2013-06-27T09:25:54+01:00] INFO: Running start handlers
[2013-06-27T09:25:54+01:00] INFO: Start handlers complete.
resolving cookbooks for run list: ["irc", "git"]
[2013-06-27T09:25:55+01:00] INFO: HTTP Request Returned 412 Precondition Failed: {"message"=>"Run list contains invalid items: no such cookbooks irc, git.", "non_existent_cookbooks"=>["irc", "git"], "cookbooks_with_no_versions"=>[]}

================================================================================
Error Resolving Cookbooks for Run List:
================================================================================


Missing Cookbooks:
------------------
The following cookbooks are required by the client but don't exist on the server:
* irc
* git


Expanded Run List:
------------------
* irc
* git


[2013-06-27T09:25:55+01:00] ERROR: Running exception handlers
[2013-06-27T09:25:55+01:00] FATAL: Saving node information to /var/chef/cache/failed-run-data.json
[2013-06-27T09:25:55+01:00] ERROR: Exception handlers complete
Chef Client failed. 0 resources updated
[2013-06-27T09:25:55+01:00] FATAL: Stacktrace dumped to /var/chef/cache/chef-stacktrace.out
[2013-06-27T09:25:55+01:00] FATAL: Net::HTTPServerException: 412 "Precondition Failed"
I checked the cookbooks I had in my cookbooks directory:
$ ls -1F cookbooks
build-essential/
chef_handler/
dmg/
git/
irc/
README.md
runit/
windows/
yum/
And uploaded them all using:
$ knife cookbook upload -a
Uploading build-essential [1.4.0]
Uploading chef_handler   [1.1.4]
Uploading dmg            [1.1.0]
Uploading git            [2.5.2]
Uploading irc            [0.1.0]
Uploading runit          [1.1.6]
Uploading windows        [1.10.0]
Uploading yum            [2.3.0]
Uploaded all cookbooks.
I returned to my power user and ran chef-client again, this time noting that the node converged, but without taking any action, as the system was already configured from the previous chef-solo exercise:
$ sudo chef-client -j .chef/dna.json
Starting Chef Client, version 11.4.4
[2013-06-27T09:41:40+01:00] INFO: *** Chef 11.4.4 ***
[2013-06-27T09:41:40+01:00] INFO: [inet6] no default interface, picking the first ipaddress
[2013-06-27T09:41:41+01:00] INFO: Setting the run_list to ["recipe[irc]", "recipe[git]"] from JSON
[2013-06-27T09:41:41+01:00] INFO: Run List is [recipe[irc], recipe[git]]
[2013-06-27T09:41:41+01:00] INFO: Run List expands to [irc, git]
[2013-06-27T09:41:42+01:00] INFO: Starting Chef Run for ubuntu
[2013-06-27T09:41:42+01:00] INFO: Running start handlers
[2013-06-27T09:41:42+01:00] INFO: Start handlers complete.
resolving cookbooks for run list: ["irc", "git"]
[2013-06-27T09:41:43+01:00] INFO: Loading cookbooks [build-essential, chef_handler, dmg, git, irc, runit, windows, yum]
Synchronizing Cookbooks:
  - yum
  - build-essential
  - runit
  - chef_handler
  - windows
  - dmg
  - git
  - irc
Compiling Cookbooks...
Converging 5 resources
Recipe: irc::default
  * user[tdi] action create[2013-06-27T09:41:43+01:00] INFO: Processing user[tdi] action create (irc::default line 1)
 (up to date)
  * package[irssi] action install[2013-06-27T09:41:43+01:00] INFO: Processing package[irssi] action install (irc::default line 8)
 (up to date)
  * directory[/home/tdi/.irssi] action create[2013-06-27T09:41:43+01:00] INFO: Processing directory[/home/tdi/.irssi] action create (irc::default line 12)
 (up to date)
  * cookbook_file[/home/tdi/.irssi/config] action create[2013-06-27T09:41:43+01:00] INFO: Processing cookbook_file[/home/tdi/.irssi/config] action create (irc::default line 17)
 (up to date)
Recipe: git::default
  * package[git] action install[2013-06-27T09:41:43+01:00] INFO: Processing package[git] action install (git::default line 24)
 (up to date)
[2013-06-27T09:41:44+01:00] INFO: Chef Run complete in 1.996144727 seconds
I finally returned to the tdi user, and downloaded the chruby, ark, and ruby_build cookbooks in the usual way:
$ for cb in ark chruby ruby_build; do knife cookbook site download $cb && tar xvf $cb*gz -C ~/chef-repo/cookbooks/; done
I attempted to upload the cookbooks, beginning with the chruby cookbook, but discovered that I needed to upload them in order:
$ knife cookbook upload chruby
Uploading chruby         [0.1.5]
ERROR: Cookbook chruby depends on cookbook 'ark' version '>= 0.0.0',
ERROR: which is not currently being uploaded and cannot be found on the server.
I checked the dependencies in the metadata file, and first uploaded the cookbook on which chruby depended:
$ cd ~/chef-repo
$ knife cookbook upload {ark,ruby_build,chruby}
Uploading ark            [0.2.2]
Uploading ruby_build     [0.8.0]
Uploading chruby         [0.1.5]
Uploaded 3 cookbooks.
I read the documentation of the chruby cookbook, and identified that I needed to specify the Rubies I wanted to install and the version I wanted to use by default. Armed with this information, I created a role as follows:
$ cat developer.rb
name "developer"
description "For Developer machines"
run_list(
  "recipe[irc]",
  "recipe[git]",
  "recipe[chruby::system]"
)

default_attributes(
  "chruby" => {
    "rubies" => {
      "1.9.3-p392" => false,
      "1.9.3-p429" => true
    },
    "default" => "1.9.3-p429"
  }
)
I uploaded the role to the Chef server using Knife:
$ knife role from file developer.rb
To alter the run list, I used knife node edit. This required me to set an EDITOR environment variable:
$ export EDITOR=vi
$ knife node edit ubuntu
$ knife node edit centos
I updated the JSON to set the run list to role[developer], and saved the file. After checking the run list, I ran chef-client:
$ knife node show centos -r
romanesco:
  run_list: role[developer]
$ sudo chef-client
Starting Chef Client, version 11.4.4
resolving cookbooks for run list: ["irc", "git", "chruby::system"]
Synchronizing Cookbooks:
  - runit
  - ruby_build
  - windows
  - irc
  - ark
  - yum
  - git
  - build-essential
  - chef_handler
  - dmg
  - chruby
Compiling Cookbooks...
Converging 22 resources
Recipe: irc::default
  * user[tdi] action create (up to date)
  * package[irssi] action install (up to date)
  * directory[/home/tdi/.irssi] action create (up to date)
  * cookbook_file[/home/tdi/.irssi/config] action create (up to date)
Recipe: git::default
  * package[git] action install (up to date)
Recipe: ruby_build::default
  * package[tar] action install (up to date)
  * package[bash] action install (up to date)
  * package[curl] action install (up to date)
  * package[git-core] action install (skipped due to not_if)
  * execute[Install ruby-build] action nothing (skipped due to not_if)
  * directory[/var/chef/cache] action create (up to date)
  * git[/var/chef/cache/ruby-build] action checkout (up to date)
Recipe: chruby::system
  * ruby_build_ruby[1.9.3-p429] action installRecipe: <Dynamically Defined Resource>
  * package[build-essential] action install
    - install version 11.6ubuntu4 of package build-essential

  * package[bison] action install
    - install version 2:2.5.dfsg-3ubuntu1 of package bison

  * package[openssl] action install (up to date)
  * package[libreadline6] action install (up to date)
  * package[libreadline6-dev] action install
    - install version 6.2-9ubuntu1 of package libreadline6-dev

  * package[zlib1g] action install (up to date)
  * package[zlib1g-dev] action install
    - install version 1:1.2.7.dfsg-13ubuntu2 of package zlib1g-dev

  * package[libssl-dev] action install
    - install version 1.0.1c-4ubuntu8 of package libssl-dev

  * package[libyaml-dev] action install
    - install version 0.1.4-2build1 of package libyaml-dev

  * package[libsqlite3-0] action install (up to date)
  * package[libsqlite3-dev] action install
    - install version 3.7.15.2-1ubuntu1 of package libsqlite3-dev

  * package[sqlite3] action install
    - install version 3.7.15.2-1ubuntu1 of package sqlite3

  * package[libxml2-dev] action install
    - install version 2.9.0+dfsg1-4ubuntu4 of package libxml2-dev

  * package[libxslt1-dev] action install
    - install version 1.1.27-1ubuntu2 of package libxslt1-dev

[2013-06-02T20:47:16+00:00] WARN: Cloning resource attributes for package[autoconf] from prior resource (CHEF-3694)
[2013-06-02T20:47:16+00:00] WARN: Previous package[autoconf]: /var/chef/cache/cookbooks/ark/recipes/default.rb:25:in `from_file'
[2013-06-02T20:47:16+00:00] WARN: Current  package[autoconf]: /var/chef/cache/cookbooks/ruby_build/providers/ruby.rb:84:in `block in install_ruby_dependencies'
  * package[autoconf] action install
    - install version 2.69-1ubuntu1 of package autoconf

  * package[libc6-dev] action install (up to date)
  * package[ssl-cert] action install
    - install version 1.0.32 of package ssl-cert

  * package[subversion] action install
    - install version 1.7.5-1ubuntu3 of package subversion

  * execute[ruby-build[1.9.3-p429]] action run
    - execute /usr/local/bin/ruby-build "1.9.3-p429" "/opt/rubies/1.9.3-p429"

  * package[build-essential] action nothing (up to date)
  * package[bison] action nothing (up to date)
  * package[openssl] action nothing (up to date)
  * package[libreadline6] action nothing (up to date)
  * package[libreadline6-dev] action nothing (up to date)
  * package[zlib1g] action nothing (up to date)
  * package[zlib1g-dev] action nothing (up to date)
  * package[libssl-dev] action nothing (up to date)
  * package[libyaml-dev] action nothing (up to date)
  * package[libsqlite3-0] action nothing (up to date)
  * package[libsqlite3-dev] action nothing (up to date)
  * package[sqlite3] action nothing (up to date)
  * package[libxml2-dev] action nothing (up to date)
  * package[libxslt1-dev] action nothing (up to date)
  * package[autoconf] action nothing (up to date)
  * package[libc6-dev] action nothing (up to date)
  * package[ssl-cert] action nothing (up to date)
  * package[subversion] action nothing (up to date)
  * execute[ruby-build[1.9.3-p429]] action nothing (up to date)
Recipe: ark::default
  * package[unzip] action install
    - install version 6.0-8ubuntu1 of package unzip

  * package[libtool] action install
    - install version 2.4.2-1.2ubuntu1 of package libtool

  * package[rsync] action install (up to date)
  * package[autoconf] action install (up to date)
  * package[make] action install (up to date)
  * package[autogen] action install
    - install version 1:5.17.1-1ubuntu2 of package autogen

Recipe: chruby::default
  * ark[chruby] action install_with_makeRecipe: <Dynamically Defined Resource>
  * directory[/usr/local/chruby-1] action create
    - create new directory /usr/local/chruby-1

  * remote_file[/var/chef/cache/chruby.tar.gz] action create
    - copy file downloaded from [] into /var/chef/cache/chruby.tar.gz
        (new content is binary, diff output suppressed)

  * execute[unpack /var/chef/cache/chruby.tar.gz] action nothing (up to date)
  * execute[autogen /usr/local/chruby-1] action nothing (skipped due to only_if)
  * execute[configure /usr/local/chruby-1] action nothing (skipped due to only_if)
  * execute[make /usr/local/chruby-1] action nothing (up to date)
  * execute[make install /usr/local/chruby-1] action nothing (up to date)
  * execute[unpack /var/chef/cache/chruby.tar.gz] action run
    - execute /bin/tar xzf /var/chef/cache/chruby.tar.gz --strip-components=1

  * execute[autogen /usr/local/chruby-1] action run (skipped due to only_if)
  * execute[configure /usr/local/chruby-1] action run (skipped due to only_if)
  * execute[make /usr/local/chruby-1] action run
    - execute make

  * execute[make install /usr/local/chruby-1] action run
    - execute make install

Recipe: chruby::default
  * link[/usr/local/chruby] action create
    - create symlink at /usr/local/chruby to /usr/local/chruby-1

  * template[/etc/profile.d/chruby.sh] action create
    - create template[/etc/profile.d/chruby.sh]
        --- /tmp/chef-tempfile20130602-3703-1u9rms9    2013-06-02 20:53:55.387078184 +0000
        +++ /tmp/chef-rendered-template20130602-3703-1jtacvw    2013-06-02 20:53:55.387078184 +0000
        @@ -0,0 +1,7 @@
        +source /usr/local/chruby/share/chruby/chruby.sh
        +source /usr/local/chruby/share/chruby/auto.sh
        +RUBIES+=(/opt/chef/embedded)
        +
        +
        +
        +chruby 1.9.3-p429

Chef Client finished, 26 resources updated
Chef ran, installed dependent software, and compiled and made Ruby available. I verified as follows:
$ ruby --version
ruby 1.9.3p429 (2013-05-15 revision 40747) [x86_64-linux]
Discussion
At its simplest, the process of developing infrastructure with Chef looks like this:
- Declare policy using resources.
- Collect resources into recipes.
- Package recipes and supporting code into cookbooks.
- Apply recipes from cookbook to nodes.
- Run Chef to configure nodes.
A useful abstraction in this process is the idea of a role. A role is a way of characterizing a class of node. If you could hold a conversation with someone and refer to a node as being a certain type of machine, you’re probably talking about a node. If you were to say “zircon is a mysql slave” you’d be talking about a role called “mysql_slave”.
Of all the primitives available in Chef, roles are at the top of the evolutionary tree.[3] Everything points to roles, and roles can encompass everything. In this respect, what they achieve is arguably the most important concept to understand. A role can be very simple. A common pattern is to have a base role, which every machine might share. This could be responsible for configuring an NTP server, ensuring Git is installed, and could include sudo and users.
Roles are composed of two sections: a run list and a set of attributes. In this respect, they mirror nodes. Nodes are objects that represent the machine that is being configured, and also contain a set of attributes and a run list.
We’ve already encountered the run list—it’s simply a list of recipes and/or roles that should be present on the node. If a node has an empty run list, it will remain unconfigured. If a node has a run list containing the memcached recipe, the resources and actions specified in that recipe will be applied to that node. This process is known as node convergence. Importantly, the run list can contain recipes or roles, resulting in the ability to nest roles for certain types of infrastructure modeling.
We’ve also touched on the idea of attributes—attributes are data associated with the node. Some of this data is collected automatically, such as the hostname, IP address, and a large amount of other pieces of information. However, arbitrary data can be associated with the node as well. This is particularly useful for specifying configuration defaults, while enabling the user to override them with values that suit themselves. Cookbooks are typically shipped with some sane default values. Roles provide an opportunity to change that sane default. Any machines that then have the role on their run list will get the value of the attribute set in the role rather than the one set by default in the cookbook. In our case, the chruby cookbook set the version of Ruby to be installed to a patch version older than the one we wanted, and also elected to set the default Ruby to the one embedded with the Chef package:
$ cat cookbooks/chruby/attributes/default.rb
default['chruby']['version'] = '0.3.4'
default['chruby']['gpg_check'] = false
default['chruby']['use_rvm_rubies'] = false
default['chruby']['use_rbenv_rubies'] = false
default['chruby']['auto_switch'] = true
default['chruby']['rubies'] = {'1.9.3-p392' => true}
default['chruby']['default'] = 'embedded'
default['chruby']['user_rubies'] = {}
We didn’t want those defaults, so we changed them in the role:
default_attributes(
  "chruby" => {
    "rubies" => {
      "1.9.3-p392" => false,
      "1.9.3-p429" => true
    },
    "default" => "1.9.3-p429"
  }
)
So far in our examples, we’ve only used either chef-solo or chef-apply. This is fine, in that it allows recipes to be executed on an individual node and gives access to the core recipe DSL, together with all the configuration primitives it provides. It’s easy to get started with these tools, and it’s fast. It also provides great power for little investment. However there are a number of constraints that are quickly felt.
First, chef-solo doesn’t have a trivial implementation of persistent node data. During node convergence, the data produced by ohai is available, but any other data needs to be provided in the form of JSON files. This is simple enough for a few attributes for a few nodes, but it quickly becomes a pain and requires the creation of a solution to store, distribute, and update these JSON files. chef-solo can take the JSON from an HTTP URL, but this requires the construction and maintenance of that service.
Second, chef-solo requires that the cookbooks be provided to it prior to node convergence. This means that all changes to cookbooks need to be distributed to all nodes. Additionally, chef-solo does not have a dependency solver, so either a dependency solver needs to be written or located that can check each cookbook’s metadata and ensure that the required cookbooks are delivered to the node, or every cookbook is delivered for good measure. Notwithstanding the realization that it isn’t very elegant or efficient to do this—sometimes there can be large binary files in cookbooks. This is certainly an anti-pattern, but it’s not uncommon, and the inability to select which cookbooks are or are not needed on a node rapidly gets painful. There are also questions around the security implications of having the infrastructure code that builds your entire environment on every server, visible in the event of a compromise. In addition to this, not only do the cookbooks need to be distributed to each node, a careful decision needs to be made about which exact versions of which cookbooks are distributed to each node. It’s not unusual to run different versions of cookbooks on different nodes—either for development reasons, or simply because some nodes serve a subtly different purpose. Accommodating this requirement makes the cookbook distribution problem exponentially harder. Again, chef-solo can take an HTTP URL, and the cookbooks can be cleared away afterwards, but now there’s another service that needs to be built, and for which access control, security, and hosting need to be considered.
Third, one of the core ideas of Chef is that there should be a canonical, searchable source of information about the infrastructure that can be used dynamically to build infrastructure accordingly. In simple terms, we want to find things out about our infrastructure. We want to be able to ask questions such as, “Which machines have the web server role?” or “Tell me nodes in Rackspace that use the postgresql::client recipe”. We also want to be able to look at a record of convergence: how many machines haven’t had Chef run on them in the last 24 hours? How many machines are running a certain version of OpenSSL? Using a server-based implementation immediately provides this functionality—every node attribute, plus arbitrary, system-wide data, is stored and indexed, and available for querying at any stage.
The result of these constraints is that people determined to use Chef Solo end up trying to build the basic primitives of a Chef Server—node storage, search, and cookbook distribution.
In my view, it boils down to this: a significant amount of thought went into deciding how to build an outstanding automation framework. This thought was informed by deep experience of using other configuration management approaches and of having to solve infrastructure automation, at scale and complexity, across a large number of different technical environments and commercial applications. A significant amount of thought went into working out how to separate data and configuration to allow maximum power and flexibility in modeling infrastructure. A significant amount of thought went into how to model the storage of canonical infrastructure data. The result of that thought wasn’t “let’s write a DSL and ship JSON around via random websites or Rsync or Git.” The solution was to build a REST API with a dependency solver, an index, and a publishing service. This is the function of the Chef Server.
The Chef Server is available in three forms:
- The open source Chef Server
- Opscode ships a free version of the Chef Server in the same easy-to-use format as the Chef Client package.[4] This represents the reference API for Chef and provides all the core functionality that is required to build and maintain infrastructure with Chef. Certain enterprise features around security and access control are not available, and while Opscode remains committed to trickling down advanced features as they are developed, there is a time delay, and under certain circumstances, the decision may be made that a feature will not be released into the open source product at all. When running the open source Chef Server (OSC), it is incumbent upon the infrastructure developer or sysadmin to configure and manage each instance of the server locally. If any data migrations are needed, or updates or patches required, these must be carried out. Additionally, ensuring the system scales in line with the infrastructure it supports is also the responsibility of the engineer(s) who elected to use OSC. Support is available from within the Chef community; Opscode does not directly support users of OSC.
- Hosted Chef
- Hosted Chef (OHC) is a fully managed, multitenant, highly available version of a Chef Server that is hosted by Opscode. OHC is cloud-based, very scalable, supported 24/7/365. It includes enterprise features such as resource-based access control and, on account of its design, allows for multiple sandboxed servers to be run in one location. Functionally identical to OSC, Hosted Chef has the advantage of not needing any local setup or management.
- Private Chef
- Private Chef (OPC) is effectively the same code base as OHC, delivered on-premise, to be run behind your firewall. Managed by the purchasing organization with support from Opscode, OPC is identical to OHC. Hosted Chef is the largest Private Chef deployment in the world.
Space does not permit a detailed discussion of setting up and running a local Chef server, however, Opscode provides Omnibus packages and a fully featured configuration toolkit. The documentation is excellent, and support from the community is equally good. For our examples, we’re going to use Hosted Chef.
I’ve emphasized a number of times already—the Chef framework, at its core, is simply a REST API. Every single interaction with the Chef server is over HTTP using the API. This means that every time you interact with the Chef server you are using an API client. This includes the web interface, which is itself an API client. A Chef client running on a node we are managing is also an API client, as is the Knife command-line utility. The Chef Shell can also function as an API client. However, the need to secure API traffic is paramount, especially in a hosted, multitenant environment. For this reason, each API transaction is digitally signed, and each API client needs a valid identity in order to interact with the Chef server, and to authenticate using RSA public/private key pairs.
The authentication process is designed to ensure the API request has not been tampered with, is from the client claiming to make the request, and has arrived in reasonable time, not having been subjected to a replay attack. To achieve this, a string is compiled by combining four pieces of data to form a unique signature, and then encrypted with a private RSA key. This is decrypted on the server side and validated. The data used to form the signature includes the HTTP method, the timestamp, the API client ID, and the request body itself. This requires every API client to have its own public/private key pair.
Because Hosted Chef is multitenant, there needs to be a way to divide up API requests into meaningful groups. Hosted Chef uses the idea of organizations to achieve this. An organization is like a sandboxed Chef server and represents a way of grouping bits of infrastructure that you wish to manage using Chef. You can think of it as your own dedicated Chef server in the cloud. In Hosted Chef, when you read “organization,” you can think “dedicated Chef server.”
Each organization has its own private key. This key can be considered the master key; it is the key that enables other API clients to be granted keys. Sometimes called the validation key, it must be kept safe—without it, your ability to interact with Hosted Chef will be restricted. Although it can be regenerated from the web console, it still needs to be kept very secure, as it allows unlimited use of the platform, which could be very dangerous in the wrong hands.
Users of Hosted Chef also need an Opscode user account. An Opscode user account is shared across the Opscode Platform, the Hosted Chef Management Console, the community site, and Opscode’s support page. This user also has a public/private key pair that is used to authenticate with the Chef server. Usually this interaction will use the Knife command-line tool; however, using that key, you can make direct API calls if you so desire. As an API client, Knife needs a configuration file: knife.rb. Amongst other settings, this specifies the URL of the API, and where to find the private key for the API requests.
As an infrastructure developer, you want to be able to build new machines using Chef. This means you need to be able to create new API clients for nodes you wish to configure, and key pairs for authentication. To do this, there is a special sort of API client called a validation client. This is used in the situation where an API client cannot yet make authenticated requests to the server because it lacks an identity and a key pair. This key is highly powerful and allows the creation of API clients.
Your Opscode user is associated with one or more organizations, allowing you to interact with the API either directly or via Knife. Similarly, the validation client is also tied directly to an organization.
To summarize, these five components are required to operate with Hosted Chef:
- An Opscode user, which grants access to the Hosted Chef Management Console
- An organization—effectively a sandboxed, dedicated Chef Server in the cloud
-
A private key associated with your Opscode user and used by
Knifeto interact with the Chef server - A validation client (and key) with the power to create API clients for an organization
-
A
Knifeconfiguration file, ensuring you interact with the correct organization using the correct keys
We satisfied these requirements in our example by ensuring we had:
- Our Opscode user’s private key
- Membership of an organization
- The validation key for the organization
- A knife.rb configuration file
As an infrastructure developer, the majority of your interaction with the Chef server is via the Knife command-line tool. Let’s take a look at the knife.rb file that was generated and downloaded from the operations console:
$ cat .chef/knife.rb
current_dir = File.dirname(__FILE__)
log_level                :info
log_location             STDOUT
node_name                "tdiexample"
client_key               "#{current_dir}/tdiexample.pem"
validation_client_name   "hunterhayes-validator"
validation_key           "#{current_dir}/hunterhayes-validator.pem"
chef_server_url          "https://api.opscode.com/organizations/hunterhayes"
cache_type               'BasicFile'
cache_options( :path => "#{ENV['HOME']}/.chef/checksums" )
cookbook_path            ["#{current_dir}/../cookbooks"]
We’ve already seen that most of Chef’s configuration files are written in Ruby. This is no exception. Let’s pick this file apart a little.
First we set the current_dir directory to the directory in which the knife.rb file resides. Then we set the log level and location; these can be safely left at their defaults. The node_name is a slightly confusing term, but in your Knife configuration this basically maps to your Opscode Username. We next set the path of the client key to be the same location as where we have our knife.rb. We also specify that the validation key is in the same place, and we explicitly name the validation client. The Chef Server URL is always the same—it’s just api.opscode.com with the organization tacked on the end. Cache type and cache options again can be overlooked, and finally we tell Knife that our cookbooks are found in a directory called cookbooks in the directory above the location of our Knife config file and our keys. All this represents standard Ospcode convention, which can be met by ensuring the following are in place:
- A directory called chef-repo
- Another directory called .chef inside the chef-repo directory
-
Knifeconfig and keys located inside the .chef directory -
Be in your chef-repo directory when using
Knife
This file, then, allows the tdiexample user to interact with the Chef API for the hunterhayes organization. Incidentally, the tdiexample user, being a global Opscode user, is also handy for a number of other interactions. It can be used to interact with other Chef users on the Opscode community portal, and also it is your mechanism for logging into the Hosted Chef operations console, which provides a useful web interface to your infrastructure.
A little more on the subject of organizations: organizations are a convenient way of grouping together related systems that are going to be managed using Chef. In actual fact, a system cannot be managed unless it belongs to an organization, and an Opscode user cannot do anything meaningful without also being associated with an organization. Users can belong to more than one organization, and can be invited to join the organizations belonging to other users. As each organization has a private key associated with it, knife needs to be configured on a per organization basis. At some stage, you may find you need to work with many organizations. In that case, something akin to the following knife.rb may be a convenient solution:
current_dir = File.dirname(__FILE__)
user = ENV['OPSCODE_USER'] || ENV['USER']
log_level                :info
log_location             STDOUT
node_name                user
client_key               "#ENV['HOME']}/.chef/#{user}.pem"
validation_client_name   "#{ENV['ORGNAME']}-validator"
validation_key           "#{ENV['HOME']}/.chef/#{ENV['ORGNAME']}-validator.pem"
chef_server_url          "https://api.opscode.com/organizations/#{ENV['ORGNAME']}"
cache_type               'BasicFile'
cache_options( :path => "#{ENV['HOME']}/.chef/checksums" )
cookbook_path            ["#{current_dir}/../cookbooks"]
This allows you to keep all Chef-related keys in a .chef directory in the home directory. This has the added benefit of preventing the accidental checking-in of user keys into Git! All that is required to use knife is to export the ORGNAME and OPSCODE_USER environment variables in your shell, and then to be the username you used to sign up for the Opscode community pages. For example:
$ export ORGNAME=hunterhayes
$ export OPSCODE_USER=tdiexample
With the keys and Knife configuration file in place, we can now test that we can successfully speak to the Chef server. The simplest approach is to ask the Chef server which API clients it knows about. If chef-client has not been run on any servers, the only client it would know about is the so-called validation client. Since by now we’ve run chef-client on our machine, we should also see our own machine in the client list. Consequently, running knife client list should yield an entry, matching the organization name you set up on Hosted Chef, and the name of your machine:
$ knife client list
hunterhayes-validator
romanesco
An important workflow difference between chef-solo and using a Chef server is that when using a Chef server, it’s necessary to publish or upload cookbooks to the Chef server. Then, when Chef runs, the Chef server can solve dependencies and make available whatever cookbooks are needed. The chef-client then downloads the required cookbooks and converges the node. The process of uploading the cookbooks to the Chef server is achieved using knife cookbook upload. You’ll have noticed in our example, the Chef server rejected the chruby cookbook, when the cookbooks upon which chruby depended were not on the Chef server. Later in the book, I’ll introduce a workflow that removes these headaches, both in terms of downloading and uploading cookbooks, but for now the important concept to grasp is simply that dependencies exist between cookbooks, and all cookbooks in the dependency chain need to be on the Chef server. While the Chef server solves dependencies for the chef-client run, Knife does not; it is necessary for you to either solve the dependencies yourself (or with a tool, as we’ll see later), or rely on error messages from the Chef server.
Let’s quickly run through the steps that are followed when Chef is run on a node, and compare and contrast chef-client and chef-solo:
- Build the node
- Synchronize cookbooks
- Compile the resource collection
- Converge the node
- Notify and handle exceptions
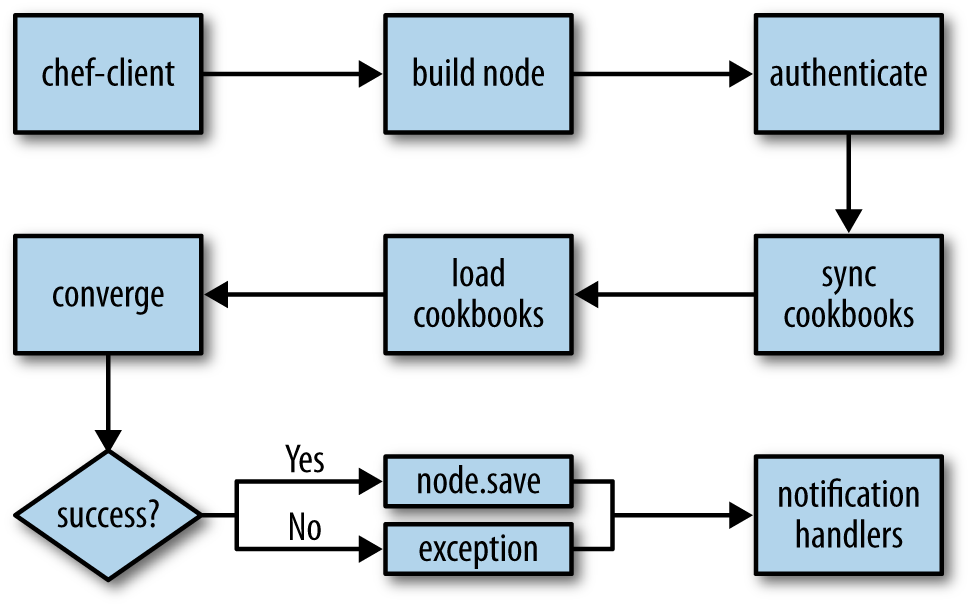
Remember, the node is a Ruby object that represents the machine we’re configuring. It contains attributes and a run list. This object is rebuilt every time, merging input from the local machine (via Ohai, the system profiler that provides basic information about the node), the Chef API (which contains the last known state of the node), and attributes and run lists from roles. In the case of chef-solo, since there is no API to speak to, information about the node must be passed directly to chef-solo in the form of JSON.
Cookbooks contain a range of data—recipes, attributes, and other supporting data and code. chef-client requests this data via an API call. The Chef server performs some complex dependency management and serves only those cookbooks that are required for the node in question. By contrast, chef-solo simply ingests every cookbook, either from the local filesystem or over HTTP.
The resource collection, which we mentioned in our introductory discussion, is simply a list of resources that will be used to configure the node. In addition to the results of each evaluated recipe (and strictly speaking before), supporting code and attributes are loaded. This step is the same for chef-solo and chef-client.
Once the resource collection has been compiled, the required actions are taken by the appropriate providers. chef-client then saves the node status back to the server, where it is indexed for search. chef-solo takes no such action by default, and although community projects exist to extend chef-solo in this direction, my feeling is that once you start wanting to use the full power of Chef to index nodes for search and provide an API-addressable source of information in this manner, it’s time to bite the bullet and use the tool in the way it was fundamentally designed to be used.
Finally, once the run has completed, action is taken dependent upon whether the run was successful or not. Chef provides the ability to write and use custom reporting and exception handlers, allowing sophisticated reporting, analytics, and notification strategies to be developed. We’ll cover this in a bit more detail later, as this capability opens up some very interesting opportunities for making and verifying assertions about the Chef run.
We can see these steps in the output of the Chef run:
Starting Chef Client, version 11.4.4
resolving cookbooks for run list: ["irc", "git", "chruby::system"]
Synchronizing Cookbooks:
  - runit
  - ruby_build
  - windows
  - irc
  - ark
  - yum
  - git
  - build-essential
  - chef_handler
  - dmg
  - chruby
We don’t see the node being built at this log level. Had we run with -l debug we’d have seen output like this:
[2013-06-03T12:11:36+01:00] INFO: *** Chef 11.4.4 ***
[2013-06-03T12:11:36+01:00] DEBUG: Loading plugin os
[2013-06-03T12:11:36+01:00] DEBUG: Loading plugin kernel
[2013-06-03T12:11:36+01:00] DEBUG: Loading plugin ruby
[2013-06-03T12:11:36+01:00] DEBUG: Loading plugin languages
...
This is ohai profiling the system. After all the plug-ins finish, we’d see, among other things, lines like these:
[2013-06-03T12:11:36+01:00] DEBUG: Building node object for romanesco
[2013-06-03T12:11:37+01:00] DEBUG: Extracting run list from JSON attributes provided on command line
[2013-06-03T12:11:37+01:00] DEBUG: Applying attributes from json file
[2013-06-03T12:11:37+01:00] DEBUG: Platform is ubuntu version 13.04
Returning to the output from our non-debug chef-client run, we see:
Compiling Cookbooks...
Converging 22 resources
We then see, for each recipe, the resources, and what was done. For example:
Recipe: irc::default
  * user[tdi] action create (up to date)
  * package[irssi] action install (up to date)
  * directory[/home/tdi/.irssi] action create (up to date)
  * cookbook_file[/home/tdi/.irssi/config] action create (up to date)
Here, Chef takes no action (idempotence); we’ve already applied the default irc recipe to the node, using chef-solo. The providers can see that the system is in the desired state, so chef-client does not need to do anything.
However, in the Recipe: chruby::system recipe, we see action being taken:
* package[build-essential] action install
    - install version 11.6ubuntu4 of package build-essential

* package[bison] action install
    - install version 2:2.5.dfsg-3ubuntu1 of package bison
...
* execute[ruby-build[1.9.3-p429]] action run
    - execute /usr/local/bin/ruby-build "1.9.3-p429" "/opt/rubies/1.9.3-p429"
We also need to the final step—handling reporting and exceptions—under debug mode to see the following:
[2013-06-03T12:32:07+01:00] INFO: Chef Run complete in 5.191436914 seconds
[2013-06-03T12:32:07+01:00] INFO: Running report handlers
[2013-06-03T12:32:07+01:00] INFO: Report handlers complete
The standard handlers are just to print to screen, but this is configurable to send email, alert via IRC or Hipchat, make a Nabaztag Rabbit’s ear flap, or whatever you feel is appropriate!
The fundamental additions that are necessary to these steps when using a Chef server are those around authentication. New users tend to find this a little perplexing, but it’s not actually that tricky to understand. I liken it to a scenario in which a group of people want to have a drink in a private members bar. I’m a member of such an establishment in Oxford. If I want to find somewhere quiet to sit down, have a drink, and read the newspaper, I can do so with ease. The authentication process looks like this:
Me: Good morning!
Doorkeeper: Good morning, sir, may I see your members' card?
Me: Certainly...<fx>presents membership card</fx>
Doorkeeper: Thank you very much, sir.
Now, suppose a friend of mine wants to meet me for coffee and a chat. The authentication process looks like this:
Friend: Good morning!
Doorkeeper: Good morning, sir, may I see your member's card?
Friend: I'm sorry, I'm not a member.
Doorkeeper: I'm sorry, sir, this is a members' only club.
Friend: Actually I'm meeting a friend here. I believe you have a guest policy?
Doorkeeper: That's correct, sir.  May I take your name?
Friend: George Romney.
Doorkeeper: Very good, sir.  And the member you are meeting?
Friend: Stephen Nelson-Smith.
Doorkeeper: Please wait a moment, sir.
Doorkeeper (to me): Sir, do you know a gentleman by the name of George Romney?
Me: Absolutely, I'm meeting him for coffee.
Doorkeeper (to friend): Come with me, please, sir.
Now, my friend might like the club so much, that he decides to join. In which case, I can recommend him, he can fill out the appropriate forms, pay his membership fee, and join the club. Thereafter if he wants to spend time in the club, the authentication process looks like this:
George: Good morning!
Doorkeeper: Good morning, sir, may I see your member's card?
George: Certainly...<fx>presents membership card</fx>
Doorkeeper: Thank you very much, sir.
The final option, of course, looks like this:
Chancer: Hello!
Doorkeeper: Good morning, sir, may I see your member's card?
Chancer: Oh, I'm sorry, I forgot it...
Doorkeeper: I'm sorry, sir, without your membership card, I can't permit you to enter.
Chancer: Oh...but I know...umm...John Smith!
Doorkeeper (consults records): I'm sorry, I don't have a record of John Smith, sir.
Chancer: Umm...I know...George Romney!
Doorkeeper: Please wait a moment, sir.
Doorkeeper (to George): Sir, do you know a gentleman by the name of Chancer?
George: No! Never heard of him!
Doorkeeper (to Chancer): I'm sorry, sir, we can't help you. Have a splendid day.
This process is very similar to the process that happens when chef-client authenticates against the Chef server. For a machine that is an existing API client and has a client key, the discussion looks like this:
Node: Hello Chef server, I'd like to use your API, please.
Server: Do you have a private key?
Node: I do! Here it is!
Server: Great, let me just use that to sign your request, and we'll be converging in no time!
In the case of a brand new node, which we wish to set up to speak to a Chef server, the discussion looks like this:
Node: Hello Chef server, I'd like to use your API, please.
Server: Do you have a private key?
Node: I'm sorry, not yet.
Server: OK...do you have an organization's validation key?
Node: I do! Here it is!
Server: Excellent, bear with me one moment while I create a key for you. OK, here's your client key for future reference.  Let's get converging!
The final case looks like this:
Node: Hello Chef server, I'd like to use your API, please.
Server: Do you have a private key?
Node: I'm sorry, not yet.
Server: OK...do you have an organization's validation key?
Node: I'm sorry, I don't.
Server: Then I'm afraid I can't help you.
We can see this transaction in the debug log, too. If we run Chef again, we’ll see the client key has been created and is used to sign requests:
[2013-06-03T12:11:36+01:00] DEBUG: Client key /etc/chef/client.pem is present - skipping registration
[2013-06-03T12:11:36+01:00] DEBUG: Building node object for romanesco
[2013-06-03T12:11:36+01:00] DEBUG: Signing the request as romanesco
If I install and run Chef on a completely new machine, we see:
Creating a new client identity for ip-10-35-147-80.eu-west-1.compute.internal using the validator key.
[2013-06-03T11:46:53+00:00] INFO: Client key /etc/chef/client.pem is not present - registering

================================================================================
Chef encountered an error attempting to create the client "ip-10-35-147-80.eu-west-1.compute.internal"
================================================================================
When I make the client.rb file available, but not the validation.pem, we see:
[2013-06-03T11:49:18+00:00] INFO: Client key /etc/chef/client.pem is not present - registering
[2013-06-03T11:49:18+00:00] WARN: Failed to read the private key /etc/chef/validation.pem: #<Errno::ENOENT: No such file or directory - /etc/chef/validation.pem>
[2013-06-03T11:49:18+00:00] FATAL: Chef::Exceptions::PrivateKeyMissing: I cannot read /etc/chef/validation.pem, which you told me to use to sign requests!
And when I make both the client.rb and validation.pem files available we see:
[2013-06-03T11:51:30+00:00] INFO: Client key /etc/chef/client.pem is not present - registering
[2013-06-03T11:51:30+00:00] DEBUG: Signing the request as hunterhayes-validator
...
[2013-06-03T11:51:32+00:00] DEBUG: Signing the request as ip-10-35-147-80.eu-west-1.compute.internal
The one final aspect that is different with Chef server is that upon successful completion of a Chef run, the node object is saved on the Chef server, recording the state of the machine and its attributes, indexing them for search. We can search for data using knife search:
$ knife search node 'platform:ubuntu'
2 items found

Node Name:   carrot
Environment: _default
FQDN:        ip-10-228-118-28.eu-west-1.compute.internal
IP:          54.246.56.172
Run List:    role[developer]
Roles:       developer
Recipes:     irc, git, chruby::system
Platform:    ubuntu 13.04
Tags:

Node Name:   romanesco
Environment: _default
FQDN:        romanesco
IP:          192.168.26.2
Run List:    recipe[developer]
Roles:
Recipes:     developer
Platform:    ubuntu 13.04
Tags:
A full discussion of the search facilities of Chef is outside the scope of this book. Refer to the Chef documentation for further examples and explanation.
The attributes system in Chef is one of the most complex facets of the Chef framework. First, a quick recap: an attribute is that which inherently belongs to and can be predicated of anything. They describe the detail of a machine we’re configuring and have three underlying purposes: they can be used to indicate the current state of a node; they can be used to store the state of the node when Chef last ran and the node object was saved; and they can be used to specify desired state—the state the machine should be in after Chef runs.
Digging a little deeper, attributes have a type, corresponding to the source of the data. We can derive attributes from five places:
-
The node itself (via
ohai, or byknife node edit) - Attribute files in a cookbook
- Recipes in a cookbook
- Roles
- Environments
Additionally, in each of these five places, there are up to six types of attributes that can be set. When Chef runs, all these sources and types are merged together, and Chef calculates what the definitive state of the node attribute list should be. At the end of the Chef run, this is saved and indexed for search.
The result is a rather complex matrix of precedence. The rationale for this lies in the philosophical position of the creators of Chef. The underpinning view is that the tool should provide power and flexibility. Chef provides the framework and the primitives. The infrastructure developer is the expert; they are in possession of domain knowledge, and understand deeply the various unique ways in which the configuration of the systems they manage relate to one another. All Chef needs to know is the desired state, how to achieve it, and what the functionality of that intended state should be, once achieved. The cost of this flexible philosophy is—at times—a complex implementation lurking beneath the surface. Thankfully, the design of Chef is such that for the vast majority of cases, you need never know about or use the hidden depths of flexibility, and can thrive on a few simple rules.
For the gory details, please see the Opscode documentation. However, the general rules are as follows:
Set sane defaults in your cookbook attribute files, using the
defaultmethod:default['apache']['dir'] = '/etc/apache2'
Overwrite the sane defaults either on a per role basis, using the
default_attributesmethod:default_attributes({ "apache" => {"dir" => "/etc/apache2"}})Or overwrite the sane defaults within a so-called wrapper cookbook, either in a recipe with the
node.defaultmethod or in an attribute file with thenormalmethod:node.default["apache"]["dir"] = "/etc/apache2" normal["apache"]["dir"] = "/etc/apache2"
If you need to set an attribute on the basis of a calculation or expression in a recipe, use the
node.override!method:node.override!["something"]["calculated"] = some_ruby_expression
These rules of thumb will serve you more than 80% of the time. By the time you realize you need something more flexible, you’ll have enough experience and understanding to work out the right approach from the documentation.
This has been a pretty content-heavy discussion. I recommend you read over the example again and digest the information presented in this section. Take a coffee break—go on, you deserve it!
Exercise 2: Virtualbox
So far the infrastructure we’ve built has provided the following:
- An installation of the various Chef client tools and commands
- An unprivileged tdi user
- The Git source code management system
- A Git repository containing a mixture of community and hand-built cookbooks
- An IRC client, preconfigured to allow you to ask for help in any of the main channels
- A modern version of Ruby
As well as providing a useful set of tools for future work, building this infrastructure has allowed us to cover many of the fundamentals of Chef. We’re now going to put in place the final pieces that will allow us to iterate more quickly on cookbook development using local virtualization.
If you’ve been unable to follow the examples up to this point, as long as you have installed Chef, you should be able to get started here, as we’re going to be using community cookbooks for both VirtualBox and Vagrant, both of which support Windows and OSX.
Objectives
Upon completing this exercise you will have:
- VirtualBox installed on your local machine
- Familiarity with using Lightweight Resources and Providers (LWRPs)
- An understanding of how to structure resource declarations for multiplatform support
Directions
- Install the Chef Rubygem.
- Download and extract the VirtualBox cookbook from the community site.
-
Solve any dependencies recursively and ensure all cookbooks are in your
chef-repo. - Upload the new cookbooks to the Chef Server.
- Open up the default recipe in the VirtualBox and look at the resources.
- Update the developer.rb role and append the default VirtualBox recipe to the run list, and upload the role to the Chef server.
- If you’re on a Red Hat–derived system, ensure your kernel, kernel headers, and kernel devel packages are in sync.
-
Run
chef-client. -
Verify VirtualBox installed correctly by running
vboxmanage list vms.
Worked example
I installed the Chef Ruby gem as follows:
$ gem install chef --no-ri --no-rdoc
Fetching: mixlib-config-1.1.2.gem (100%)
Fetching: mixlib-cli-1.3.0.gem (100%)
Fetching: mixlib-log-1.6.0.gem (100%)
Fetching: mixlib-authentication-1.3.0.gem (100%)
Fetching: mixlib-shellout-1.1.0.gem (100%)
Fetching: systemu-2.5.2.gem (100%)
Fetching: yajl-ruby-1.1.0.gem (100%)
Building native extensions.  This could take a while...
Fetching: ipaddress-0.8.0.gem (100%)
Fetching: ohai-6.16.0.gem (100%)
Fetching: mime-types-1.23.gem (100%)
Fetching: rest-client-1.6.7.gem (100%)
Fetching: net-ssh-2.6.7.gem (100%)
Fetching: net-ssh-gateway-1.2.0.gem (100%)
Fetching: net-ssh-multi-1.1.gem (100%)
Fetching: highline-1.6.19.gem (100%)
Fetching: erubis-2.7.0.gem (100%)
Fetching: chef-11.4.4.gem (100%)
Successfully installed mixlib-config-1.1.2
Successfully installed mixlib-cli-1.3.0
Successfully installed mixlib-log-1.6.0
Successfully installed mixlib-authentication-1.3.0
Successfully installed mixlib-shellout-1.1.0
Successfully installed systemu-2.5.2
Successfully installed yajl-ruby-1.1.0
Successfully installed ipaddress-0.8.0
Successfully installed ohai-6.16.0
Successfully installed mime-types-1.23
Successfully installed rest-client-1.6.7
Successfully installed net-ssh-2.6.7
Successfully installed net-ssh-gateway-1.2.0
Successfully installed net-ssh-multi-1.1
Successfully installed highline-1.6.19
Successfully installed erubis-2.7.0
Successfully installed chef-11.4.4
17 gems installed
Downloading and extracting the VirtualBox cookbook was a straightforward matter of using the following:
$ cd
$ knife cookbook site download virtualbox
$ tar xzvf virtualbox*gz -C chef-repo/cookbooks
I checked the metadata, as previously, and identified that I needed the apt cookbook, so I obtained this, and uploaded the two cookbooks to the Chef server:
$ cd ~/chef-repo
$ knife cookbook site download apt
$ tar xzvf apt*gz -C cookbooks
$ knife cookbook upload {apt,virtualbox}
I opened the default recipe and looked at the resources, noting that this recipe included conditional logic, and new resources that we hadn’t yet investigated.
I updated the developer role, adding the virtualbox recipe to the run list:
name "developer"
description "For Developer machines"
run_list(
  "recipe[irc]",
  "recipe[git]",
  "recipe[chruby::system]",
  "recipe[virtualbox]"
)

default_attributes(
  "chruby" => {
    "rubies" => {
      "1.9.3-p392" => false,
      "1.9.3-p429" => true
    },
    "default" => "1.9.3-p429"
  }
)
I uploaded the role:
$ knife role from file roles/developer.rb
On my CentOS machine, I ensured I was running the latest kernel, and installed the kernel-devel package to match the kernel:
# yum -y update
# yum -y install kernel-devel
# uname -r
2.6.32-358.el6.x86_64
# rpm -q kernel-{devel,headers}
kernel-devel-2.6.32-358.11.1.el6.x86_64
kernel-headers-2.6.32-358.11.1.el6.x86_64
From previous experience, I opted to reboot the system, as I’ve found without doing so, the VirtualBox kernel modules don’t install. When the system came back up, I ran chef-client and observed the resources taking action, and the repository and packages being set up accordingly. I verified that VirtualBox was operational using the vboxmanage -version and vboxmanage list vms command:
[root@centos ~]# VBoxManage -version
4.2.12r84980
[root@centos ~]# VBoxManage list vm
sns@ubuntu:~$ VBoxManage -version
4.2.12r84980
sns@ubuntu:~$ VBoxManage list vms
I also checked that the vboxdrv service was running:
sns@ubuntu:~$ sudo service vboxdrv status
VirtualBox kernel modules (vboxdrv, vboxnetflt, vboxnetadp, vboxpci) are loaded.
[root@centos ~]# service vboxdrv status
VirtualBox kernel modules (vboxdrv, vboxnetflt, vboxnetadp, vboxpci) are loaded.
Warning
At the time of this writing, there’s a bug introduced in VirtualBox 4.12.14, which breaks the import functionality. In practice, this means that Vagrant and VirtualBox 4.12.14 won’t function together. My expectation is that by the time you read this, the bug will be fixed, and you’ll get version 4.12.16 or some such, and everything will work. However, if it doesn’t, you’ll need to downgrade to 4.12.12. There isn’t an easy way to do this in the current VirtualBox cookbook, so you’ll probably need to do that manually. Hopefully this issue will be fixed by the time you read this, but I include this note by way of warning. For more details, see https://www.virtualbox.org/ticket/11895 and https://github.com/mitchellh/vagrant/issues/1850.
Discussion
VirtualBox is a freely available virtualization tool, originally created by innotek GmbH, purchased by Sun Microsystems (before Oracle’s purchase of Sun) and now maintained and developed by Oracle. Although not ideal for heavy workloads, it’s very handy for testing systems. VirtualBox emulates PC-like hardware and allows various operating systems to be installed and tested alongside one another on one host operating system. We’re installing it, as it’s a simple and free virtualization backend to Vagrant, which we’ll introduce in the next exercise.
The VirtualBox cookbook is pretty straightforward. It simply sets up the relevant Oracle package repository and then installs the VirtualBox package. The two noteworthy items are the way multiplatform support is implemented, and the use of lightweight resource providers in the default recipe.
If we look at the default recipe, we’ll see some basic conditional logic in place:
case node['platform_family']
when 'mac_os_x'

  sha256sum = vbox_sha256sum(node['virtualbox']['url'])

  dmg_package 'VirtualBox' do
    source node['virtualbox']['url']
    checksum sha256sum
    type 'mpkg'
  end

when 'windows'

  sha256sum = vbox_sha256sum(node['virtualbox']['url'])
  win_pkg_version = node['virtualbox']['version']
  Chef::Log.debug("Inspecting windows package version: #{win_pkg_version.inspect}")

  windows_package "Oracle VM VirtualBox #{win_pkg_version}" do
    action :install
    source node['virtualbox']['url']
    checksum sha256sum
    installer_type :custom
    options "-s"
  end

when 'debian'

  apt_repository 'oracle-virtualbox' do
    uri 'http://download.virtualbox.org/virtualbox/debian'
    key 'http://download.virtualbox.org/virtualbox/debian/oracle_vbox.asc'
    distribution node['lsb']['codename']
    components ['contrib']
  end

  package "virtualbox-#{node['virtualbox']['version']}"
  package 'dkms'

when 'rhel'

  yum_key 'oracle-virtualbox' do
    url 'http://download.virtualbox.org/virtualbox/debian/oracle_vbox.asc'
    action :add
  end

  yum_repository 'oracle-virtualbox' do
    description 'Oracle Linux / RHEL / CentOS-$releasever / $basearch - VirtualBox'
    url 'http://download.virtualbox.org/virtualbox/rpm/el/$releasever/$basearch'
  end

  package "VirtualBox-#{node['virtualbox']['version']}"
end
Platform family is a convenient method that allows infrastructure developers to test whether the node under management matches one of the listed “families”—for example rhel or debian. This is then used to execute different resources based on the value.
Now if we look at the default attribute file, we’ll see similar logic to set the correct URL for the package repositories from which the packages will be downloaded:
default['virtualbox']['url'] = ''
default['virtualbox']['version'] = ''

case node['platform_family']
when 'mac_os_x'
  default['virtualbox']['url'] = 'http://download.virtualbox.org/virtualbox/4.2.8/VirtualBox-4.2.8-83876-OSX.dmg'
when 'windows'
  default['virtualbox']['url'] = 'http://download.virtualbox.org/virtualbox/4.2.8/VirtualBox-4.2.8-83876-Win.exe'
  default['virtualbox']['version'] = Vbox::Helpers.vbox_version(node['virtualbox']['url'])
when 'debian', 'rhel'
  default['virtualbox']['version'] = '4.2'
end
Within these conditional blocks, the resources make use of platform-specific providers—apt_repository, windows_package, yum_repository, and so on. These are examples of Lightweight Resource Providers (LWRPs).
If we think about the way Chef operates at its core, it breaks down to resources and providers. Every yin has its yang, and every resource has its provider. Like any great two-person team—Watson and Holmes, Cagney and Lacey, Bostridge and Drake—one would be ineffective without the other. Behind the scenes of every resource, there is Ruby code in the core Chef libraries, which knows how to take the actions we specified. Not only that, it knows how to take those actions on any platform. It knows how to create users on Windows, Solaris, FreeBSD, and Linux. It knows how to install packages on distributions like Debian, CentOS, Gentoo, and Suse. It also knows how to check if the action has already been taken, how to verify whether the node is already in the desired state. However, there are only a few dozen resources and providers built into Chef. Not infrequently, there comes a time when we want to abstract a repeated pattern of behavior with a declarative interface, but find that no Chef resource exists for this. Sometimes this happens when we realize we’re making the same set of calls to resources, and we’d like to tidy them up. Sometimes we might need to call specialist library code to perform an action, but we’d like to address this in the recipe DSL. There are a large number of these use cases dotted throughout the community and Opscode cookbooks.
I remember many years ago, as a keen Puppet user, I wanted to be able to manage some Solaris machines that used pkgsrc as the main package management system. I understood I would need to create a provider for this, but the process was very difficult for me at the time. I needed to understand how the internals of Puppet functioned, and then I’d have had to monkey-patch Puppet, or submit pull requests, and wait for my changes to be accepted and then released. Really all I wanted to do was run pkg-add with a few arguments. I gave up.
Chef provides a DSL for building resources and providers, with the aim of making it easy to extend Chef with custom resources and providers, or to chain existing resources and providers together to carry out a given task. There isn’t scope in the present work to cover the writing of LWRPs, and the examples used here—especially the yum or apt examples—are probably more complex than I’d like at this stage. However, you’ll come across these in community cookbooks, and soon enough you’ll want to write your own.
Exercise 3: Vagrant
VirtualBox is a powerful, easy-to-use, and flexible desktop virtualization solution. However, initial setup and ongoing maintenance of virtual machines (VMs) is rather a pain. Vagrant takes that pain away by providing a convenient command-line wrapper around creating and managing virtual machines. The Vagrant documentation provides a good summary of what Vagrant provides, and how it works:
Vagrant provides easy to configure, reproducible, and portable work environments built on top of industry-standard technology and controlled by a single consistent workflow to help maximize the productivity and flexibility of you and your team.
To achieve its magic, Vagrant stands on the shoulders of giants. Machines are provisioned on top of VirtualBox, VMware, AWS, or any other provider. Then, industry standard provisioning tools such as shell scripts, Chef, or Puppet can be used to automatically install and configure software on the machine.
— http://docs.vagrantup.com/v2/why-vagrant/
Objectives
Upon completing this section, you will have:
- Vagrant installed on your local machine
- A CentOS basebox downloaded and available
- An understanding of how to start, stop, and interact with Vagrant boxes
- An understanding of the Vagrant plug-in architecture
-
Installed the
vagrant-omnibusplug-in -
Used
vagrant sshto connect to a machine -
Become familiar with the
Vagrantfile, which configures the behavior of Vagrant - Familiarity with the idea of a platform-based role
Directions
-
Download and extract the
vagrantcookbook. - Browse to http://downloads.vagrantup.com, select the latest release, and then identify the URL to the download package.
- Create a role for your platform family (e.g., windows, rhel, or debian).
- Set the default[vagrant][url] to the URL of the appropriate download for your platform in your platform role.
-
Append the default
vagrantrecipe to the run list in thedeveloperrole, and prepend the platform role to the run list of your node. - Upload the roles and Vagrant cookbook to the Chef server.
-
Run
chef-clienton your machine. - Identify the URL of a CentOS base box for your architecture from GitHub.
-
Read the
vagrant box adddocumentation. -
Add a Vagrant box called
opscode-centos-6.4-yourarch. -
Read the
vagrant initdocumentation. - Make a temporary directory, and initialize it for Vagrant use with the box you added.
-
Read the
vagrant updocumentation. - Launch the Vagrant box.
-
Read the
vagrant sshdocumentation. - Connect to the Vagrant machine, check the kernel and Chef version, then exit again.
-
Read the
vagrant plug-indocumentation. -
Install the
omnibus-berkshelfplug-in, read its documentation, and integrate it with Vagrant. -
Read the
vagrant destroydocumentation. - Destroy and recreate the box, then connect, checking the kernel and Chef version again.
Worked Example
As the tdi user, I downloaded and extracted the Vagrant cookbook in the usual way:
$ cd
$ knife cookbook site download vagrant
$ tar xzvf vagrant*gz -C chef-repo/cookbooks
I checked on the Vagrant downloads page and selected version 1.2.2. I noted the packages for both RPM and .deb packages.
I created a role for the Ubuntu machine as follows:
name "debian"
description "Attributes specific to the Debian platform family"
run_list(
)

default_attributes(
  "vagrant" => {
    "url" => "http://files.vagrantup.com/packages/7e400d00a3c5a0fdf2809c8b5001a035415a607b/vagrant_1.2.2_x86_64.deb"
  }
)
I created a role for the CentOS machine as follows:
$ cat roles/rhel.rb
name "rhel"
description "Attributes specific to the RHEL platform family"
run_list(
)

default_attributes(
  "vagrant" => {
    "url" => "http://files.vagrantup.com/packages/7e400d00a3c5a0fdf2809c8b5001a035415a607b/vagrant_1.2.2_i686.rpm"
  }
)
I altered the developer role to be as follows:
$ knife role show developer
chef_type:           role
default_attributes:
  chruby:
    default: 1.9.3-p429
    rubies:
      1.9.3-p392: false
      1.9.3-p429: true
description:         For Developer machines
env_run_lists:
json_class:          Chef::Role
name:                developer
override_attributes:
run_list:
  recipe[irc]
  recipe[git]
  recipe[chruby::system]
  recipe[virtualbox]
  recipe[vagrant]
I edited the run list of the machine to appear as follows:
$ knife node show ubuntu -r
tk00.cheftraining.eu:
  run_list:
    role[debian]
    role[developer]

$ knife node show centos -r
tk01:
  run_list:
    role[rhel]
    role[developer
I uploaded the roles and the cookbook:
$ knife role from file roles/{debian,developer,rhel}.rb
Updated Role debian!
Updated Role developer!
Updated Role rhel!

$ knife cookbook upload vagrant
Uploading vagrant        [0.2.0]
Uploaded 1 cookbook.
I ran Chef and observed the relevant recipe being applied:
Recipe: vagrant::rhel
  * remote_file[/var/chef/cache/vagrant.rpm] action create
    - copy file downloaded from [] into /var/chef/cache/vagrant.rpm
        (file sizes exceed 10000000 bytes, diff output suppressed)

  * rpm_package[vagrant] action install
    - install version 1.2.2-1 of package vagrant

  * rpm_package[vagrant] action install (up to date)
Chef Client finished, 3 resources updated
I looked on the Bento page and selected a 64-bit box, and having read the vagrant box add, vagrant init, vagrant up, vagrant ssh, vagrant plugin, and vagrant destroy documentation, added a box as follows:
# vagrant box add opscode-centos-6.4-x86_64 https://opscode-vm.s3.amazonaws.com/vagrant/opscode_centos-6.4_provisionerless.box
Downloading or copying the box...
Extracting box...te: 1537k/s, Estimated time remaining: 0:00:01)
Successfully added box 'opscode-centos-6.4-x86_64' with provider 'virtualbox'!
Next I made a temporary directory, and initialized it for use with Vagrant:
$ mkdir /tmp/vagrant-example
$ cd /tmp/vagrant-example
$ vagrant init opscode-centos-6.4-x86_64
A `Vagrantfile` has been placed in this directory. You are now
ready to `vagrant up` your first virtual environment! Please read
the comments in the Vagrantfile as well as documentation on
`vagrantup.com` for more information on using Vagrant.
I launched the machine:
# vagrant up
Bringing machine 'default' up with 'virtualbox' provider...
[default] Importing base box 'opscode-centos-6.4-x86_64'...
[default] Matching MAC address for NAT networking...
[default] Setting the name of the VM...
[default] Clearing any previously set forwarded ports...
[default] Creating shared folders metadata...
[default] Clearing any previously set network interfaces...
[default] Preparing network interfaces based on configuration...
[default] Forwarding ports...
[default] -- 22 => 2222 (adapter 1)
[default] Booting VM...
[default] Waiting for VM to boot. This can take a few minutes.
[default] VM booted and ready for use!
[default] Configuring and enabling network interfaces...
[default] Mounting shared folders...
[default] -- /vagrant
And connected to it:
# vagrant ssh
Last login: Sat May 11 04:55:22 2013 from 10.0.2.2
[vagrant@localhost ~]$ uname -a
Linux localhost.localdomain 2.6.32-358.el6.x86_64 #1 SMP Fri Feb 22 00:31:26 UTC 2013 x86_64 x86_64 x86_64 GNU/Linux
[vagrant@localhost ~]$
[vagrant@localhost ~]$ chef-client --version
-bash: chef-client: command not found
I installed the vagrant-omnibus plug-in:
# vagrant plugin install vagrant-omnibus
Installing the 'vagrant-omnibus' plugin. This can take a few minutes...
Installed the plugin 'vagrant-omnibus (1.0.2)'!
I edited the Vagrantfile and added the configuration directive to use the omnibus plug-in:
# -*- mode: ruby -*-
# vi: set ft=ruby :

Vagrant.configure("2") do |config|
  # All Vagrant configuration is done here. The most common configuration
  # options are documented and commented below. For a complete reference,
  # please see the online documentation at vagrantup.com.

  # Every Vagrant virtual environment requires a box to build off of.
  config.vm.box = "opscode-centos-6.4-x86_64"
  config.omnibus.chef_version = :latest
...
...
I destroyed and recreated the machine, logged in, and verified that Chef had been installed:
# vagrant destroy
Are you sure you want to destroy the 'default' VM? [y/N] y
[default] Forcing shutdown of VM...
[default] Destroying VM and associated drives...
root@tk00:/tmp/example# vagrant up
Bringing machine 'default' up with 'virtualbox' provider...
[default] Importing base box 'opscode-centos-6.4-x86_64'...
[default] Matching MAC address for NAT networking...
[default] Setting the name of the VM...
[default] Clearing any previously set forwarded ports...
[default] Creating shared folders metadata...
[default] Clearing any previously set network interfaces...
[default] Preparing network interfaces based on configuration...
[default] Forwarding ports...
[default] -- 22 => 2222 (adapter 1)
[default] Booting VM...
[default] Waiting for VM to boot. This can take a few minutes.
[default] VM booted and ready for use!
[default] Ensuring Chef is installed at requested version of 11.4.4.
[default] Chef 11.4.4 Omnibus package is not installed...installing now.
Downloading Chef 11.4.4 for el...
Installing Chef 11.4.4
warning: /tmp/tmp.PTLPHw62/chef-11.4.4.x86_64.rpm: Header V4 DSA/SHA1 Signature, key ID 83ef826a: NOKEY
Preparing...                ##################################################
chef                        ##################################################
Thank you for installing Chef!
[default] Configuring and enabling network interfaces...
[default] Mounting shared folders...
[default] -- /vagrant
root@tk00:/tmp/example#
# vagrant ssh
Last login: Sat May 11 04:55:22 2013 from 10.0.2.2
[vagrant@localhost ~]$ chef-client --version
Chef: 11.4.4
Discussion
When it was introduced in 2010, Vagrant revolutionized the infrastructure development world. I remember recommending people take a look at it during my keynote at the second ever devopsdays conference in Hamburg, and sitting in on an open space session where a bunch of people started hacking on it. What does Vagrant do that’s so awesome?
Vagrant is a tool for creating, managing, and distributing portable development environments. It enables complete machines to be automatically created, configures them repeatably, and allows the entire lifecycle to be managed from the command line or via an API. These machines (called boxes) can be shared with other team members and are portable; they can run on a wide range of platforms and allow a unified development and testing experience. It allows a user to go from nothing to a fully functioning local machine of pretty much any desired flavor, in one minute. As an infrastructure developer, this is an excellent boost to productivity and reliability. It tightens the feedback loop and allows machines to be rapidly destroyed and created, reducing the chance that one’s cookbooks work because of historical side effects. It reduces the familiar cry of “It worked on my machine!” Every user, whether Linux, Windows, or Mac, can have a machine of the same sort used in production, with the same cookbooks that are used in production.
Vagrant is well-documented, and its author, Mitchel Hashimoto, has just released his book, Vagrant Up and Running (O’Reilly).
Actually, we won’t be using Vagrant directly very much in this book, as my recommended integration test harness actually wraps Vagrant (among other provisioning strategies), but it’s a powerful and valuable tool, and I believe in understanding things from first principles, so it’s worth understanding some of the fundamentals of Vagrant.
The Vagrant cookbook is nothing particularly interesting. It simply performs some platform-conditional logic, and downloads a package and installs it. It provides an LWRP for installing plug-ins, but we elected to install our plug-in manually to understand the concept.
In Chef terms, the interesting pattern we saw was that of the platform role. In a heterogenous environment, a common strategy is to build out roles of the sort:
- Base
- Something that all machines get, regardless of platform or function
- Platform
- Attributes or recipes that are specific to the OS (for example yum, Windows cookbooks, or URLs)
- Service
- Something that describes a functional component, such as web server or database server
The Vagrant cookbook explicitly sets the URL from which to pull the package to nil. This is because there’s no trivial way to work out what the path to the package will be—the path is made from the Git commit hash. Rather than have to maintain a complex attributes file, the cookbook maintainer has left setting the URL as an exercise for the user.
In my experience, this was a case of creating a debian and a rhel role, and setting the attribute there. Attributes in a role are at a higher precedence level than default attributes in a cookbook attributes file, and so the version from the role will take effect.
Vagrant, as a technology, is pretty easy to understand. The place to begin is the Vagrantfile. The Vagrantfile resides at the root of the directory of your project. Vagrant will build a virtual machine, but for what purpose? Not just because it can, but to test or demonstrate software. In Chef terms, it makes sense to keep a Vagrantfile within the cookbook to test the functionality of the cookbook. The Vagrantfile is a kind of manifest that describes how the Vagrant box you will be launching will behave. You can craft one manually, but Vagrant provides a generator in the form of the vagrant init command, which will create one for you in the current directory. The Vagrantfile itself is heavily commented and pretty easy to navigate. If you need to do anything more complex or advanced, check out the documentation.
The simplest possible Vagrantfile would simply contain the following:
Vagrant.configure("2") { |config| config.vm.box = "opscode-centos-6.4-x86_64" }This tells Vagrant to launch a machine based on the “opscode-centos-6.4-x86_64” box, with some default configuration. This must match a box on the system. The available boxes can be listed with the following:
# vagrant box list
opscode-centos-6.4-x86_64 (virtualbox)
Note that the provider is specified after the box name. Vagrant supports multiple alternative providers—VMware, EC2, Rackspace, LXC—we’re currently using the (default) VirtualBox provider.
Vagrant boxes are the templates from which Vagrant constructs a VM. The format of a box is described in Vagrant docs, but broadly speaking, they’re just archives of a specially prepared virtual machine for the provider required, together with a metadata file. We need to make Vagrant boxes available to Vagrant. Many Vagrant boxes are available on the Internet—some prepared and published by vendors, for example, Canonical or Opscode. Adding a Vagrant box is as simple as running the following:
vagrant box add name url
The name is how the machine will be referred to by the Vagrantfile or command line, and the URL is a remote or local path to the box itself, which you will need to download or create. We used the Opscode Bento boxes. Bento is a tool for automating the creation of VirtualBox–based Vagrant boxes, using defintions to work with Patrick Debois’ Veewee utility. It tries to remain as close as possible to upstream vendor standards. You can read more at GitHub.
Vagrant up is the command that builds the local instance of a virtual machine.[5] It takes the template box and configures it using the Vagrantfile, and then launches the machine. The output explains the steps it goes through: it imports the machine, sorts out networking, ensures the system is clean, boots the machine, and sets up a shared directory. The two most noteworthy features are the networking and the shared directory. By default, Vagrant will use a VirtualBox configuration where the network interfaces on the virtual machine are running in NAT mode. That is, they are not externally routable. VirtualBox provides a port-forwarding service that allows the user to connect to the virtual machine from their local machine on a specified port; the connection will be forwarded to the port on the local machine. By default, Vagrant sets up a forwarder on localhost:2222, which connects to port 22 on the VM (i.e., it allows the user to connect to the virtual machine using ssh).
The vagrant ssh command uses a pre-prepared ssh key pair, which it stores in ~/.vagrant.d/insecure_private_key. Running vagrant ssh will initiate a passwordless connection direct to the virtual machine, using the forwarded port.
The shared folder allows the running virtual machine to have access to the project directory in which the Vagrantfile exists. So, in the case of a cookbook, the virtual machine would be able to see the metadata, readme, recipes, templates, and so forth. By default, this will be available under /vagrant on the local machine. We can demonstrate this by creating a file on the local system, watching it appear on the Vagrant box, and then touching a different file within the VM:
root@tk00:/tmp/example# ls -al
total 20
drwxr-xr-x 3 root root 4096 Jun  4 20:01 .
drwxrwxrwt 6 root root 4096 Jun  4 19:17 ..
-rw-r--r-- 1 root root    0 Jun  4 20:01 this-is-a-local-file
drwxr-xr-x 3 root root 4096 Jun  4 13:08 .vagrant
-rw-r--r-- 1 root root 4421 Jun  4 13:17 Vagrantfile

[vagrant@localhost ~]$ cd /vagrant/
[vagrant@localhost vagrant]$ ls
this-is-a-local-file  Vagrantfile

[vagrant@localhost vagrant]$ touch this-is-a-vm-file
[vagrant@localhost vagrant]$ ls -l
total 8
-rw-r--r-- 1 vagrant vagrant    0 Jun  4 19:01 this-is-a-local-file
-rw-r--r-- 1 vagrant vagrant    0 Jun  4 19:01 this-is-a-vm-file
-rw-r--r-- 1 vagrant vagrant 4421 Jun  4 12:17 Vagrantfile

root@tk00:/tmp/example# ls -l
total 8
-rw-r--r-- 1 root root    0 Jun  4 20:01 this-is-a-local-file
-rw-r--r-- 1 root root    0 Jun  4 20:01 this-is-a-vm-file
-rw-r--r-- 1 root root 4421 Jun  4 13:17 Vagrantfile
Vagrant is designed from the ground up to be extensible and pluggable. Much of the core functionality of Vagrant is implemented using plug-ins, and there is a large range of external plug-ins available. Rubygems lists over 100 gems beginning with “vagrant-”. All of these can be installed using Vagrant’s vagrant plugin install command. The plug-in we installed works with Vagrant boxes that do not have Chef installed, and adds a hook to vagrant up to install Chef using the omnibus package, just as we did in Exercise 1: Install Chef. This helps keep the Vagrant box slim and as close to upstream as possible, and does not require a fleet of Vagrant boxes to be created with every Chef patch release.
The final command we used was vagrant destroy. This simply powers off the virtual machine and deletes all traces of it. The idea is to return the host system to a clean state.
Conclusion
The objective of this and the previous chapter was to give you a hands-on, from-first-principles introduction to the fundamentals of Chef. We have covered:
- Installing Chef
- The idea of resources
- The recipe DSL
- Some common resources—package, user, file
- The idea of roles
- The node object, node attributes, and node attribute precedence
- The roles primitive
- Use of Chef Server and Chef Solo (and apply)
- The architecture of the Chef server
- The components of a Chef run
- Getting started with Opscode’s Hosted Chef Service
In the process, we have introduced the following resources for additional documentation and support:
- The in-line documentation shipped with Chef
- http://docs.opscode.com
- http://wiki.opscode.com
- The #chef, #chef-hacking, #learnchef, and ##tdi IRC channels
Hopefully, if you’ve followed the examples as I intended, you’ve developed the habit of reading (or at least skimming) documentation and helping yourself. Of course we’ve been able to skim only the surface of the Chef framework, but my hope is that the present and previous chapters have given you a solid grounding in the fundamentals of Chef. As we work through the book, further aspects of Chef will be introduced, including Chef environments, the use of templates and service notifications, as well as enhanced workflow models to make your life as an infrastructure developer more effective.
Regardless of what else we learn, the infrastructure we’ve built in this series of exercises has laid the foundation for our future work; we have a modern Ruby, we have VirtualBox and Vagrant set up and installed, and we have a configured IRC client should we need online help.
In the next chapter, we’ll turn to Ruby and some of the core Ruby testing ideas, before moving on to discuss the ideas of test-driven and behavior-driven development.
[3] In recent times it has been argued that roles have some disadvantages, and alternative approaches have become popular. We discuss this in more detail in Chapter 7.
[4] This is for Chef 11. If you need the older, Chef 10 server, you might like to take a look at http://fnichol.github.io/knife-server, which simplifies the process of installing a Chef server and provides some other helpful capabilities.
[5] Vagrant does support alternative providers, for example, EC2 or Rackspace. Obviously in these cases, the machine being built will be remote.