- TestComplete Cookbook
- Table of Contents
- TestComplete Cookbook
- Credits
- About the Author
- About the Reviewers
- www.PacktPub.com
- Preface
- 1. Getting Started
- Introduction
- Installing TestComplete
- Creating your first project
- Choosing a scripting language for the project
- Recording your first test
- Modifying the recorded test
- Saving and restoring user settings
- Creating code templates
- Delaying script execution
- Adding and removing project items
- Understanding how TestComplete interacts with tested applications
- Understanding Object Browser
- Using Object Spy
- 2. Working with Tested Applications
- Introduction
- Adding a tested application project item
- Running a tested application from the script
- Terminating a tested application
- Killing several instances of a tested application
- Closing a tested application
- Running a tested application in the Debug mode
- Running a tested application under a different user account
- Changing tested application settings dynamically from the script
- Running external programs and DOS commands
- Testing installers – running an MSI file
- 3. Scripting
- Introduction
- Entering text into text fields
- Using wildcards to process objects with variable names
- Structuring code using loops
- Creating property checkpoints
- Creating object checkpoints
- Using global variables
- Testing multilingual applications
- Working with nonstandard controls
- Organizing script code in the project
- Handling exceptions
- Handling exceptions from a different unit
- Creating framework using the OOP approach
- 4. Running Tests
- Introduction
- Running a single function
- Verifying test accuracy
- Creating a test plan for regular runs
- Running tests from the command line
- Passing additional parameters to test from the command line
- Organizing test plan runs
- Scheduling automatic runs at nighttime
- Running tests via Remote Desktop
- Changing playback options
- Increasing run speed
- Disabling a screensaver when running scripts
- Sending messages to Indicator
- Showing a message window during a script run
- 5. Accessing Windows, Controls, and Properties
- Introduction
- Choosing Object Tree Model
- Understanding the window's life cycle
- Ignoring overlapping windows
- Dragging one object into another
- Calling methods asynchronously
- Verifying if an object has a specific property
- Finding objects by properties' values
- Waiting for an object to appear
- Waiting for a property value
- Mapping custom control classes to standard ones
- Using text recognition to access text from nonstandard controls
- Using Optical Character Recognition (OCR)
- Dealing with self-drawn controls not supported by TestComplete
- 6. Logging Capabilities
- Introduction
- Posting messages to the log
- Posting screenshots to the log
- Creating folders in the log
- Changing log messages' appearance
- Assessing the number of errors in the log
- Changing pictures' format
- Comparing screenshots with dynamic content
- Decreasing log size
- Generating log in our own format
- Exporting log to MHT format
- Sending logs via e-mail
- 7. Debugging Scripts
- 8. Keyword Tests
- 9. Data-driven Testing
- Introduction
- Generating random data for tests
- Accessing a specific cell in a table
- Reading all data from a table
- Using DDT tables for storing expected values
- Changing CSV delimiter and other parameters
- Driving data without using loops
- Accessing Excel spreadsheets without having MS Office installed
- Auto-detecting Excel driver
- 10. Testing Web Applications
- 11. Distributed Testing
- 12. Events Handling
- Introduction
- Creating event handlers
- Disabling the postage of certain error messages
- Clicking on disabled controls without an error message
- Handling unexpected windows that affect TestComplete
- Handling unexpected windows that don't affect TestComplete
- Saving the log to a disk after each test
- Sending a notification e-mail on timeouts
- Creating preconditions and postconditions for tests
- Index
As in run-of-the-mill scripts in Keyword Tests, we can add the checkpoints. In this recipe, we will consider a simple example of Object Checkpoint creation.
Launch the Calculator Plus application (C:Program Files (x86)Microsoft Calculator PlusCalcPlus.exe).
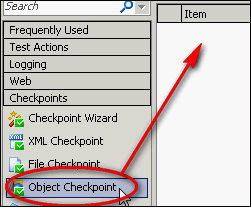
To create an Object Checkpoint, it is necessary to complete the following actions:
- In the list of Operations, select the Checkpoints element and drag-and-drop the Object Checkpoint element to the place in the test where you are going to add the checkpoint (in our example, we are using a new test with no actions whatsoever).
- In the opened Create Object Checkpoint window, drag-and-drop the sign of the target onto the text field of the calculator.
- Click on Next three times, and then click on Finish.
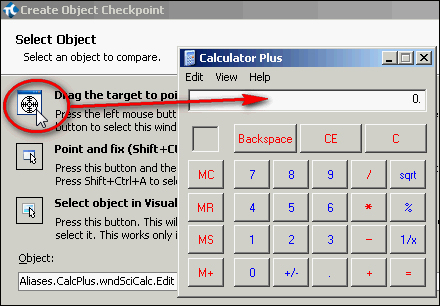
- In the result, checkpoints of the object, that is, the text field of the calculator, will be added to the test.

With the help of Object Checkpoint, it is possible to check several properties of the object at once (for example, text, visibility, availability, and any others).
The object itself will be stored in the project element of Stores | Objects. In the future, all the verifiable properties can be changed, if needed.
- In this recipe we have taken up the process of Object Checkpoint creation, and that—quite briefly. If you would like to learn in greater detail about creation parameters and checkpoint editing possibilities, refer to the Creating object checkpoints recipe from Chapter 3, Scripting.
-
No Comment
..................Content has been hidden....................
You can't read the all page of ebook, please click here login for view all page.