Before getting down to TestComplete, make sure it is installed to begin with.
Installing TestComplete is quite simple; it is no different from installing most Windows applications.
To install TestComplete, we will need to download installation file from the SmartBear website:
- If you are up for using a trial version of TestComplete, please follow the link http://smartbear.com/products/qa-tools/automated-testing-tools/free-testcomplete-trial, enter all the required data (name, e-mail, company, and so on), and click on the Sign Up Now button. Thus, you will receive a letter with a download link and activation code for a 30-days trial version of TestComplete.
- If you are registered as a SmartBear client and have an account on their website, please follow the link https://my.smartbear.com/login.asp, enter your account data, and click on the Login button. After this, you will be redirected to the page with available programs to download and install. Clicking on the link with the version near the TestComplete, you will find yourself on the page for the download with the link and the license key.
After this you will have an installation file named TestCompleteXYY.exe (where XYY stands for the current TestComplete version).
To accomplish successful TestComplete installation, follow these steps:
- Launch the downloaded
.exefile and wait for the InstallShield Wizard window to appear. - Click on Next.
- In the License Agreement window, check the I agree… option and then click on Next.
- In the Customer Information window enter a user name and that of a company (it may be arbitrary, not necessarily corresponding with the information from the TestComplete license). Select the type of installation (for any users or only for the current one), and then click on Next.
- In the Choose Destination Location window, select the destination folder to install TestComplete and then click on Next.
- In the Select Program Folder window, signify the folder in the main menu to target the shortcut of the program and click on Next.
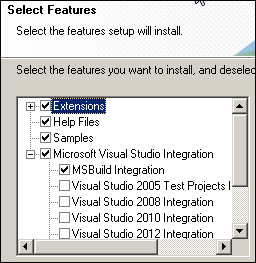
- In the Select Features window, select necessary components to install and click on Next. If you are not sure which components to install, leave all the options by default.

- Click on Next in the Start Installation window and wait for the installation to complete.
- Click on Finish.
- Now, all we have got left to do is activate the TestComplete. In order to do so launch TestComplete application.
- In the new popped-up window, click on the Activate license button.
- Check the Automatic activation option and then click on Next.
- Enter your data (name, company, e-mail, and key) that you signified for the registration and activation code that you have received by the e-mail. Click on Next.
- If necessary, input the parameters of your proxy server and click on the Activate button.
- In a matter of several minutes, necessary to connect to the server and validate registration data, you will receive the notification: Your license has been activated successfully. Thank you.. Click on the Finish button. TestComplete will fire up to the starting pane. Now you are able to begin your working expertise.
During the installation process TestComplete verifies programs installed on your computer. The Select Features window displays only components which are installable at the moment. All other features (which are not accessible at the moment) will be turned off.
So far, we have considered the simplest method of activation: automatic activation of the trial TestComplete license on the SmartBear server. Automatic activation of the node-locked license is not complex either.
TestComplete uses two license types:
- Node-locked license: This type of license is attached to one computer and cannot be used on virtual machines
- Floating license: This type of license allows running several copies on multiple workstation in the local network (the number of copies is determined by the license key) and can be used on virtual machines
If you are occupied as a system administrator in your company and need to install TestComplete on several computers, you can cut back on the installation time by using silent installation mode from command prompt.
In order to do that, you should extract the content of the downloaded archive TestCompleteXYY.exe and launch the installation file Setup.exe with the /r parameter:
<path_to_extracted_files>Setup.exe /r
The downloaded archive file can be opened with the help of any archiver that supports RAR SFX formats (for example, WinRAR or 7-Zip).
Having done so, you should carry out the previously listed steps. As a result, there will appear the Setup.iss file in the Windows folder. Move this file to the folder with the files for TestComplete installation and copy the content of the folder to the targeted computers for TestComplete installation. Launch the installation file with the /s parameter:
<path_to_extracted_files>Setup.exe /s
As a result of this TestComplete will be installed with the same settings as the first installation.
