Before getting down to the tested applications, it is necessary to add a corresponding project item to the project and come to an understanding of its parameters and settings.
Any project can contain only one tested application project item, therefore prior to performing the following steps, make sure that the TestedApps element doesn't exist in the project. Otherwise, remove it by right-clicking on its name and selecting the Remove menu item.
For adding tested application project item perform the steps given as follows:
- Right-click on the name of the project and opt for the Add | New Item menu item.
- In the Create Project Item window select the Tested Applications element and click on the OK button.
There will appear a new TestedApps element in the project.
- Right-click on the TestedApps element and opt for the Add | New Item menu item.
- In the Parameters window enter the full path to the executable file (in our case, it is
C:Program FilesMicrosoft Calculator PlusCalcPlus.exe) in the Application field or click on the button next to the Application field and locate this file with the help of the Select Tested Application window.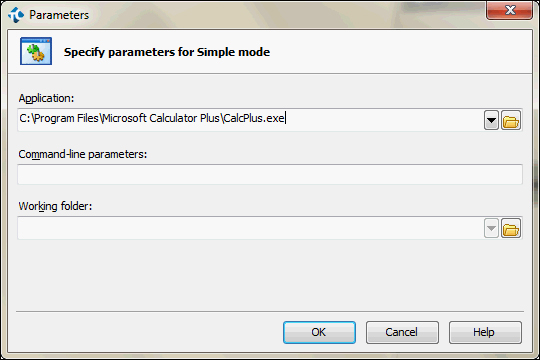
- Click on the OK button.
- Double-click on the TestedApps element in the project. On the Workspace panel there will appear a list of tested applications.
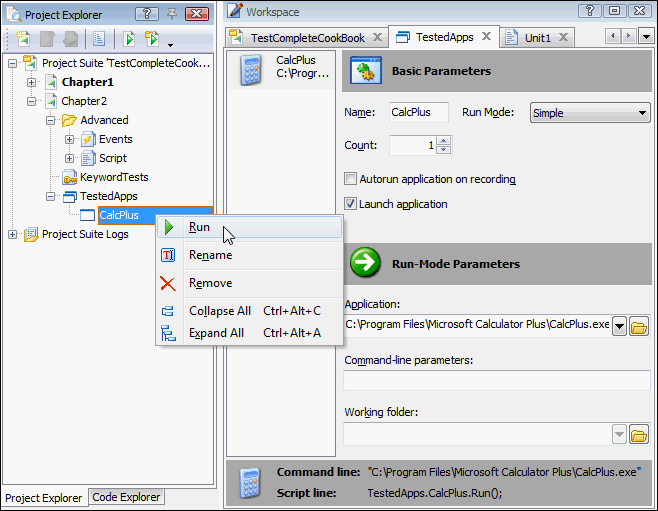
- To launch the added application, right-click on the CalcPlus element in the project tree and opt for the Run menu item.
We can add as many applications to TestedApps as we see fit to work in TestComplete, and even several clones of the same application. For example, if you need to launch an application with different parameters, it is possible to add several copies of the same application and uncheck the Launch Application option for those clones that are not necessary at the moment.
All the parameters of the tested application (for example, Name, Run Mode, Working folder, and so forth) can be changed at any given moment of time, and not only in the TestedApps window, but also via the scripts directly.
If you need to launch several clones of the application, change the Count parameter for the tested application by signifying the necessary number of launchable copies in it.
In order to launch all the applications from the list, right-click on the TestedApps element and opt for the Run All menu item.
- If you want to learn more about tested applications in TestComplete, please visit the following link on the SmartBear website:
- More information about running tested applications can be found in the following recipes:
- The Running a tested application from the script recipe
- The Changing tested application settings dynamically from the script recipe