
In TestComplete, there are several components and processing images such as testing log, region checkpoints, and Visualizer. In all the cases, TestComplete uses a specific image format for storing pictures.
In this recipe we will learn the ropes concerning the alteration of these images' format, which TestComplete is processing.
In order to change pictures' format we need to perform the following steps:
- Navigate to Tools | Options and open the group of Engines in the General options.
Here in the Images group, the currently used format is displayed (for example, PNG).
- Click on the Configure button in the Images group.
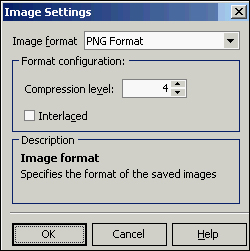
- In the opened Image Settings window, opt for the necessary format.
- In the group of Format Configuration options, set other parameters for the selected image (for example, quality or depth of the color gamut).
- Click on OK.
- Now TestComplete will use the currently selected format.
TestComplete supports four image formats, each of them having certain advantages and shortcomings as follows:
- BMP: This is the uncompressed format, used in cases where we need precision in imaging. The major drawback of this format is its humongous size.
- JPEG: This is the most thrifty format (form the viewpoint of the size of the file); however, its image can be less precise.
- PNG: This is a better trade-off in-between quality and size criteria and is usually used when you need to have images with lossless compression.
- TIFF: This is used in specific cases (for example, for typography), if it's necessary for the project in a certain case.
For the vast majority of cases, the variant with the PNG format is of a greater avail than others.
If, in majority of the cases, you are better off with one of the economizing formats (PNG or JPEG), and it is seldom you need to create precise images in the BMP format, you can still change the format of the images on the fly.
The following example demonstrates creation of a screenshot with the use of the following two differing formats:
function testPirtureFormat()
{
  Options.Images.ImageFormat = "BMP";
  Log.Picture(Sys.Desktop.Picture(), "BMP screenshot");
  Options.Images.ImageFormat = "PNG";
  Log.Picture(Sys.Desktop.Picture(), "PNG screenshot");
}