
This book is one in a series of travel guides written for photographers. If your photographic ambitions begin and end with a cell phone camera, this book may offer little beyond pleasing images. But if photography plays a large role in your travel plans, this book is equal parts photo essay and how-to guide for capturing some amazing shots on your trip. Have you ever seen a published photograph and wondered just how it was created? Well, this is your chance to go behind the scenes as I walk you through all the steps necessary to re-create what’s in the book. You’ll come away with professional-quality images that will have friends and family marveling at your vacation photos.
Taking a vacation snapshot is easy; just press the shutter button. Creating memorable photographs of your travels is another thing entirely. Thumb through any magazine of travel photos, and you’ll find that the best contain three basic elements—a compelling subject, an interesting vantage point, and appealing light.
Pros may make it look easy, but the truth is that long before the camera comes out of the bag, a good deal of research and planning are required to combine these three factors in a single image. While on assignment, a travel photographer may spend days choosing subjects, exploring different vantage points, and waiting for the right weather before getting the shot that’s finally published. For amateur shutterbugs in an unfamiliar city with only a limited amount of time to photograph, such in-depth preparation is rarely possible. The result? Disappointing photos.
This book helps you make the most of your photography in Washington, DC by presenting 50 of the best photo opportunities the District has to offer. I’ll show you exactly where to find the most interesting and least obstructed views, give you the best times of day to shoot, and guide you through the steps I used to photograph the images in these pages. Think of this book as your personal assistant. The research, location scouting, and planning have already been done, allowing you to dedicate your time to capturing stunning photographs of this amazing city.
The capital city of the United States, Washington, DC is a reflection of the diversity of the United States. Its city life is as urban as any other metropolis, while its position at the heart of the nation reflects the scale and grandeur of the country as a whole. DC, however, is not a flashy city, but one of magnificent, understated elegance. The city was constructed under the initial guidance of French architect Pierre Charles L’Enfant beginning in 1791, and as a result of his classic hand, the layout of Washington, DC presents the sensitive photographer with formal, painterly compositions at almost every turn.
Washington, DC contains an extraordinary concentration of significant architecture and monuments and is a metropolis that is maintained to the highest standards, presenting the opportunity for elegant and rich photography. But it is also a city pulsing with creativity and vibrant energy—every weekend there occurs a plethora of international, cultural, and sporting events. The photo opportunities presented in this book represent a mixture of the traditional views of DC (often taken from a superior vantage point) and views of the atypical, uncovered through research, observation, or serendipity (or a combination of all three!). Personally, I am drawn to make visually arresting photographs that can be supported most often by an interesting storyline, and I hope you will see that my selection of photo opportunities reflects this.
DC is, as a rule, a straightforward city for photography. The people of Washington, DC are a welcoming and convivial bunch and will often proudly suggest ideas for your next photograph. Handy websites for searching for events, festivals, and accommodations include www.culturaltourism.org and www.washington.org. The Metrobus and the Metrorail (www.wmata.com) provide excellent access to neighborhoods throughout the city, but given DC’s relatively manageable area of 10 square miles, cycling (www.bikethesites.com) and walking are fantastic alternatives for the more energetic.
However, a word of caution with respect to photographic access—this is the nation’s capital, and security restrictions, especially since 9/11, have been tightened. On federal sites, photographic access and/or use of tripods can be limited, and efforts to achieve the best shot may bring you to the attention of the security officers. If this is the case, polite withdrawal is the best response. On the other hand, certain sites, such as any national park property, are quite restrictive of only professional photography. (For permits, see www.nps.gov.) As a general rule, a small camera, light gear, and an amateur’s enthusiastic demeanor will get you through. I have found that the more professional you appear, the more restricted your access may become.
Each chapter in this book covers a particular theme, with photo opportunities arranged in alphabetical order. At the start of each photo opportunity, you will see weather icons followed by the best times of day to shoot. Taken together, this information helps you plan your daily itinerary based on optimal photographic conditions.
These icons indicate, from left to right, sunny, partly cloudy, overcast, and rainy conditions.
Accompanying text gives a brief overview of the history and significance of what’s being photographed. Next, two shots for each photo opportunity are paired with detailed information showing you step by step how to get an identical shot. A photo caption provides lens and exposure information, as well as the time of day and the month the image was photographed. You’ll also find travel directions and admission information.
With this book you’ll learn where to go, what to shoot, and how to photograph it for professional-looking results. But snapping the shutter is, in many ways, only the start to making a great picture. The skills involved in transferring high-quality images to your computer; making adjustments for contrast, color, and saturation; and then printing them are thoroughly covered in numerous books on digital photography. The focus of this book is on everything that happens up until the shutter button is pressed.
The appeal of a book like this is that you learn in great detail how to compose shots identical to those of a professional photographer. But please don’t stop there. Everyone has his or her own way of seeing, and you may find that a different angle, time of day, or weather condition makes a more compelling statement about your personal experience in Washington, DC.
I’ve identified 50 interesting subjects to photograph, and I’ll show you how I went about doing it. Whether you choose to duplicate every shot in the book or use these images to spark your own creative take on the city, my goal is for you to enjoy photographing this town as much as I did.
The desire to capture professional-quality images doesn’t mean you have to own the most expensive equipment. But you will need the flexibility that a single lens reflex (SLR) camera/lens system offers to duplicate the images between these covers. In many instances, a tripod will be required for a sharp image. I promise to keep the tech jargon to a minimum, but you should be familiar with terms such as aperture, shutter speed, depth of field, and focal length to get the most out of the sections describing how I set up each shot. These images were shot with a digital camera, but the concepts and techniques apply equally to film shooters.
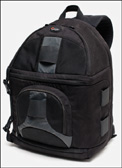
My camera bag is a Lowepro SlingShot 300 AW.
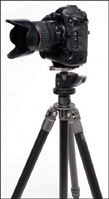
My equipment includes a Canon EOS 1 Ds and a Gitzo G1297 tripod. Mounted on the tripod is a Really Right Stuff ball head.
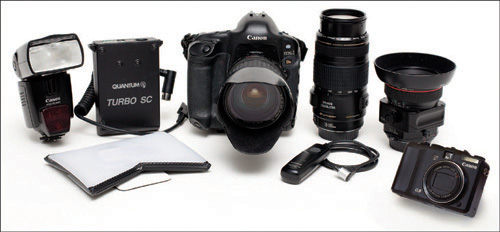
Images in this book were shot with, from left to right, the Canon 580 EX1 electronic flash with the Quantum Turbo SC battery and LumiQuest diffuser, 28-135mm f/3.5-5.6 IS (mounted on camera), EF 70-300mm f/4-5.6 IS, an electronic cable release, 24mm f/2.8 PC, and the Canon G9.
I try to keep to a minimum the gear that I carry with me when I travel. The weight of camera, lenses, flash, and tripod adds up very quickly, and it does not take much to make your pack feel like a sandbag only a few hours into your day. On the other hand, you don’t want to slim down excessively—it is disheartening to be faced with a potentially beautiful photograph, only to be without your tripod or the appropriate lens. For this book, I photographed solely with 35mm digital equipment, as it is relatively lightweight, affordable, and comes with a vast choice of accompanying lenses and accessories. In the images on the previous page, you can see my current choice of camera gear. In addition to the Canon EOS 1Ds, I also carried, as a backup apparatus, my little Canon PowerShot G9. This camera may be small, but it packs a punch and makes lovely files.
Unlike in the film days, when all SLR cameras used the same size of film, today’s digital models vary in the size of the sensor that records the image. With an identical lens, two different cameras can provide different angles of view based solely on the physical dimensions of their sensors. On a full-frame sensor—one that measures 24×36mm—a 50mm lens is considered a standard view. But put that same lens on a camera with a smaller sensor, and a significant portion of the image is cropped off. To achieve a comparable view, you need to use a wider focal length. Table I.1 shows approximate focal length equivalents between a full-frame sensor and two reduced-size sensors. For simplicity’s sake, all lens focal lengths listed in this book will correspond to their full-frame equivalents. If the dimensions of your camera’s sensor are smaller than the 24×36mm film standard, you’ll need to use a wider lens to achieve the same field of view.
A great convenience of shooting in Washington, DC is the availability of camera equipment for rent. If there’s a particular shot detailed in this book that requires equipment you don’t own, the place to go is Penn Camera, conveniently located on E Street in the downtown area. The folks behind the counter are super-friendly and very knowledgeable, and they repeatedly went the extra mile to help me. They stock cameras, lenses, tripods, and more, and you can rent by the day or the week. This store caters to working pros, so the equipment is kept in perfect working order.
Okay, enough about gear. Let’s get to the photos.