CHAPTER 3
MEASURING AND PROPORTION
The five questions you learned about in chapter 1 are an excellent way to capture the general proportions of your subject. But for a higher level of accuracy, you need more precise measuring techniques. In this chapter, I will teach you how to observe and analyze the proportions of your subject.
One of the most common and useful measuring techniques is to compare the dimension of one part of a subject to another part to determine their proportional relationship. This is referred to as comparative measuring or proportional measuring. Proportion refers to the size relationships between different parts of your subject. When a drawing accurately reflects the relative sizes of all parts of a subject it is in proportion. But if parts of a drawing are too big or too small in relationship to other parts, it is out of proportion. Common proportional errors include drawing a head too big for its body or drawing the legs too short.
To create drawings that accurately reflect the proportions of a subject we need to measure as many parts of the subject as possible and compare them to one another. Before we apply proportion to the drawing process, let’s explore the concept of proportion on its own.
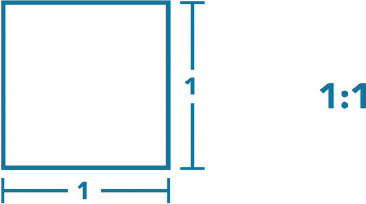
Let’s start with a square. The distance from one side of the square to the other is its width. The distance from the bottom of the square to the top is its height. The width and height of a perfect square are equal to one another. Therefore, the ratio of width to height is 1:1.
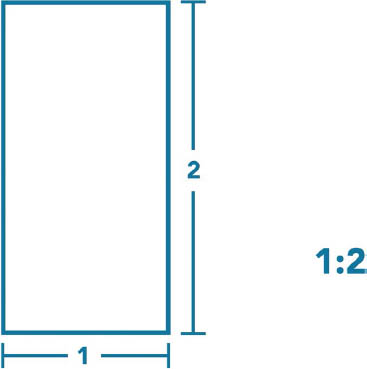
If we double the height of this shape the height becomes twice as long as the width. The ratio of width to height is now 1:2. The number for the width is on the left side of the colon and the number for the height is on the right.
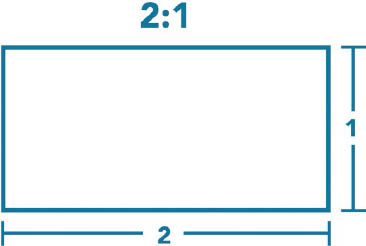
Here is a shape that is twice as wide as it is tall. The ratio of width to height is now 2:1.

Here is a rectangle that is one-and-a-half times higher than it is wide. The ratio of width to height can be expressed as 1:1.5.
Now let’s apply these ideas to an actual subject. There is no single, correct process to use when measuring. What I will demonstrate is just one plausible way to measure and compare the dimensions of your subject, thereby determining its proportions. I could have gone through a number of alternate processes, even using the same measurements. The goal is to compare the measurements of the various parts of your subject to one another and to use the proportions you discover to draw your subject on the page.
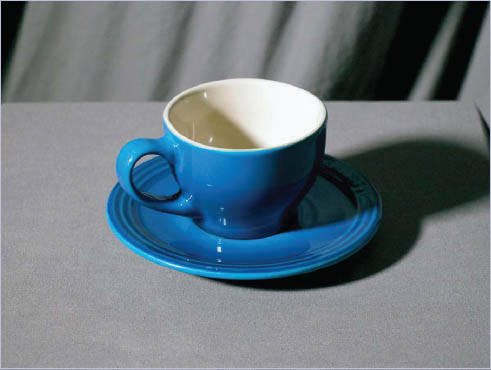
Take a look at this coffee cup and saucer. We can clearly see that, together, they are wider than they are tall. But by how much? To find out we will measure and compare the various dimensions of the subject. To do this you can use any straight, rigid object. I’ll demonstrate this using the end of my pencil. A fresh pencil works best as a measuring tool. As your pencil becomes shorter from use and sharpening, it may not be long enough to capture the proportions of larger subjects. Aluminum knitting needles, slender paint brush handles or any other straight, rigid object will work.
Set up your drawing station as you normally would with your subject placed a few feet away. During the process of measuring, you will remain at your drawing station. All measurements will be taken from a distance. At no point will you come into physical contact with your subject.
While measuring, you need to get your body into position. Hold your measuring tool straight out in front of you with your arm extended and your elbow locked. Tilt your head toward the shoulder of your measuring arm. Close one eye. Hold your measuring tool up to the subject. You can capture the width or height of any part of the subject on your measuring tool and then compare that unit to any other part of your subject to see how it relates. Once you begin measuring you need to remain in one position. If you lean side to side or raise or lower your position relative to the subject, your point of view will change along with the proportions of your subject.

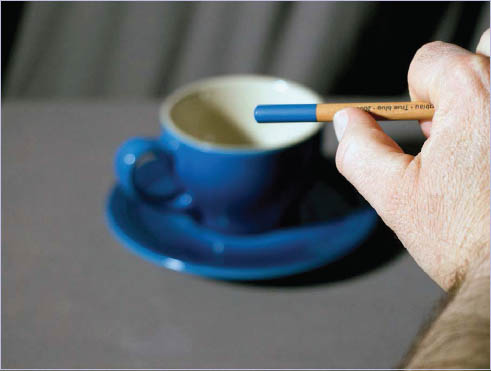
Now I will demonstrate how to capture a measurement on my pencil using this technique. I will measure the height of the outer ellipse of the rim of the coffee cup. To do this I’ll position my measuring tool so that one end of it appears to touch the top of the ellipse. I will then move my thumb down the shaft of the pencil until it appears to mark the bottom of the ellipse. It’s important to note that, as I measure, I remain at my drawing station and take these measurements from afar.

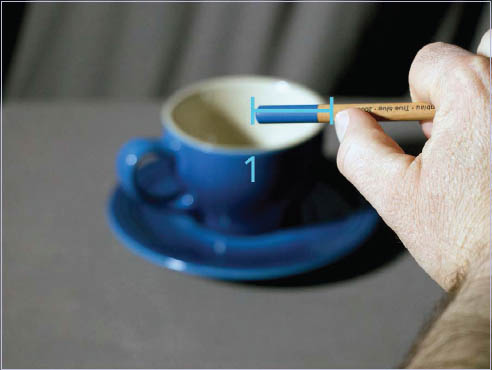
The height of the outer ellipse equals 1 unit of measurement. I will compare this unit of measurement to all other parts of this subject.
I chose the height of the ellipse of the rim of the cup because, generally, it is easier to compare smaller units to larger ones, rather than the other way around. But I could have chosen nearly any dimension on the subject to compare with others.
Remember, the goal is to compare various proportions of your subject to one another, but there is no concrete process you must follow.
Here you see me comparing the height of this ellipse to its width. With the height of the ellipse still marked on my pencil, I turn the pencil horizontally and position it so my thumb appears to be touching the far right side of the ellipse.
This shows me how far 1 unit of measurement goes across the width of the ellipse.
I then make a mental note of where the end of the pencil is and then move the pencil until my thumb is now where the end of the pencil was a moment ago.

Here, we can see that the ellipse is slightly more than twice as wide as it is high, or slightly more than 2:1. Although this is not a precise measurement, it is more information than we had before. It’s important to get used to approximating because proportional relationships are often imprecise.
Now let’s compare some other proportions. With the height of the ellipse still marked on my pencil with my thumb, I can see how many of these units it takes to go from the top of the coffee cup to the bottom of the saucer.

Using the same technique I just demonstrated to arrive at the width of the ellipse, I will march my unit of measurement down the height of the coffee cup, from the highest point at the top of the ellipse, down to the lowest point at the bottom edge of the saucer. Here we can see that I can fit two full units within the height of the cup and saucer. But they do not reach the bottom edge of the saucer. If we add an entire third unit, it reaches far below the bottom edge of the saucer. I need to know what portion of my unit of measurement will get us to the lower edge of the saucer.
Let’s pause here for a moment. Even though I am not currently looking for the location of the bottom of the cup, you can see above that it is just below the 2-unit mark. While measuring, you will likely have a number of these happy accidents. This is one of the things that makes comparative measuring so useful. The process of comparing measurements will likely reveal useful information you weren’t even looking for.

Now, back to the height of the cup and saucer. As you can see, an entire unit of measurement drops far below the bottom of the saucer.
I need to know what portion of this unit will get us to the bottom of the saucer. As you learn to measure, it’s important to be able to visualize what fractions of a unit look like. Ask yourself: What portion of the unit of measurement would get us closest to the bottom of the saucer? One third? Perhaps a bit too short. Two thirds? Perhaps a bit too long.
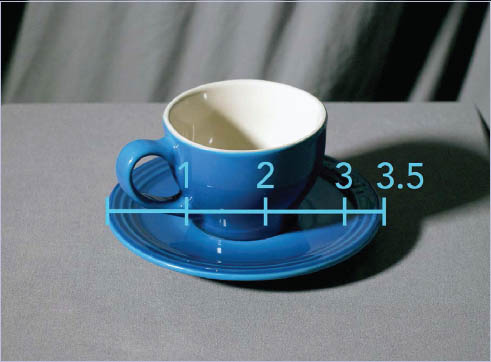
Hopefully, you can see the remainder is approximately one half of one unit, or 0.5 units. We now know that the height of the cup and saucer is slightly more than 2.5 units of measurement.

We now know the height and width of the ellipse as well as the height of the cup and saucer together. How about the width of the saucer at its widest point? By using this same method and my same unit of measurement I find that the width of the saucer is 3.5 times as long as the height of the ellipse of the cup. This tells us that the ratio of the entire subject at its farthest edges is 3.5:2.5
By comparing the height of the ellipse to other parts of the subject I was able to determine the width of the ellipse, the height of the cup and saucer together at their highest and lowest points, as well as the width of the saucer at its widest points.