3 Drama through the Use of Filters
Various colored filters are used in analog black and white photography to change and determine gray scale distribution and subject contrast. Good digital cameras calculate this filter effect. Which filters should you use when photographing digitally in color mode?
In analog black and white photography, filters influence the translation of the various colors to gray values and consequently affect contrast as well. The most important color filters are yellow, orange, red, green, and blue.
Essentially, a filter allows the light waves of its own color to pass through but absorbs the light of its complementary color. For black and white photography, this means that colors in the image that are the same as the filter appear brighter in the photo, whereas those of the complementary color appear darker. The following colors are complementary: red and blue green, orange and blue, yellow and purple blue, yellow green and purple, green and purple red.
Filters are particularly useful in analog landscape photography, and Ansel Adams is the premier practitioner of this technique. His most famous photograph, Moonrise, Hernandez, New Mexico, would not have had such a dark sky without the help of a red filter. As a matter of fact, he took most of his landscape photographs with filters.
The so-called blue-absorbing filters are extremely useful for landscape and architectural photography because they darken the sky. After yellow and orange filters, the red filter is the strongest variant of a blue-absorbing filter. It has a marked effect not only on the sky, but on other exterior objects as well. Light at noon, for example, has a very high color temperature, so a red filter darkens the sky and the objects that reflect the blue of the sky; shadows especially are often infused with blue light, but our eyes do not notice this effect. Thus, in a photo taken with a red filter, shadows will appear darker. A red filter also reproduces green in a darker tone, because green is the complementary color of red. With regard to design, it can be said that red filters generally create images with considerably darker areas than images taken without them. However, when used properly, this filter creates a kind of magic because it magically brings out light from the darkness. Thus, it creates a pictorial effect that is similar in style to the effects used by painters like Rembrandt, and especially Caravaggio. Nevertheless, the danger with the red filter is that shadows can “drown,” so it’s a good idea to overexpose photos taken with this filter. A red filter swallows almost two apertures, so a tripod is often a must.
On the other hand, a yellow filter swallows only half an aperture, but it doesn’t darken the sky as much. In analog black and white photography, a yellow filter is a good all-around filter.
If you want to photograph a very green landscape, a green filter would be a good choice because it brightens the green of the landscape and darkens the sky, at least somewhat.
Some photography schools also recommend placing two filters on top of one another, such as a red filter plus a polarizing filter. But I don’t think it’s a good idea because each additional filter causes a loss of image quality, albeit a very slight one. Because color filters are generally screwed onto the lens and, therefore, become another lens element, this is not the time to save money and buy a cheap product. With some very long telephoto lenses, you can also screw the filter onto the back of the lens. If possible, all filters should be from a well-known manufacturer and feature good antireflective coating so they reflect as little light as possible and, therefore, do not lengthen exposure time unnecessarily.
Examples of Color Filter Effects—The Same Subject Photographed with Different Filters
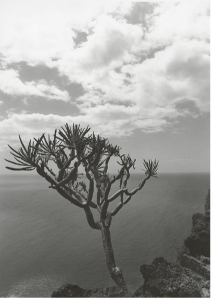
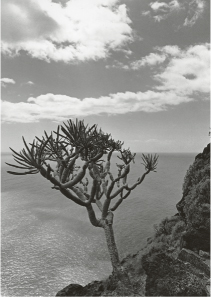
With the help of a landscape photo taken of the Atlantic Ocean from the island of La Palma, let’s look at the effects that the most important filters have on analog photography. Yellow, red, and green filters are, in my opinion, part of the essential equipment that an ambitious black and white photographer should have. The prints shown in figure 3–1 through figure 3–4 were enlarged on grade 3 paper with the same exposure times and without any burning. They show very clearly the effects of these three important filters, but no enlargement looks convincing without extensive, additional manipulation. This example reminds us that for enlargements, image postprocessing is at least as important as filter use. The best procedure is to use both because they supplement each other.
The unfiltered photo (figure 3–1) is unsatisfactory because the pretty clouds in the sky appear too pale and lack contrast.
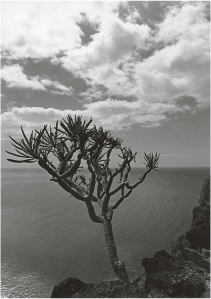
The photo taken with a yellow filter (figure 3–2) shows a little more contrast in the sky that could look okay with some subsequent manipulation of exposure, but then the blue sea would look darker compared to the trunk of the exotic tree.
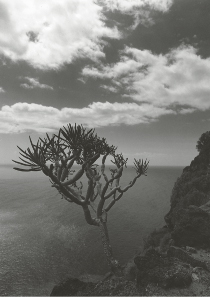
The image taken with a red filter (figure 3–3) shows a dramatic, contrasty sky without subsequent exposure correction, but the blue-green sea that is complementary to the color of the filter becomes so dark that it can no longer be distinguished from the tree trunk.
A very different effect is achieved with the green filter (figure 3–4). The blue-green light of the sea is not absorbed (as was the case with the red filter), but almost all of it passes through the filter and, therefore, makes the sea appear brighter. The tree trunk and the leaves also look brighter and more differentiated than in all previous photos. Only the sky leaves something to be desired and still has a somewhat lower contrast than in the photo taken with the yellow filter.
The previous examples clearly show how strongly you can determine tonal values in a black and white photo. If you want a rather dark image in which only the clouds stand out brightly, then I recommend using a red filter and dodging the lower part a little bit (figure 3–5). You can see that differentiations remain all over the negative, yet the tones of the tree trunk can barely be distinguished from the tones of the sea.
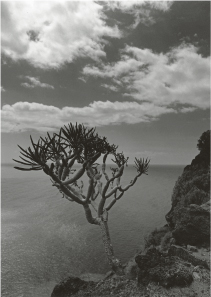
Figure 3–5 With red filter and dodging lower part
If, on the contrary, you want a bright image in which the sea stands out, I recommend taking the photo with a green filter and then burning in the sky in the darkroom (figure 3–6). Now, the tonal values of all areas are clearly separated and differentiated; even the green tones in the landscape’s lower-right corner are noticeably more brilliant than in the photo taken with a red filter. This is certainly the photo that does the most justice to the subject.
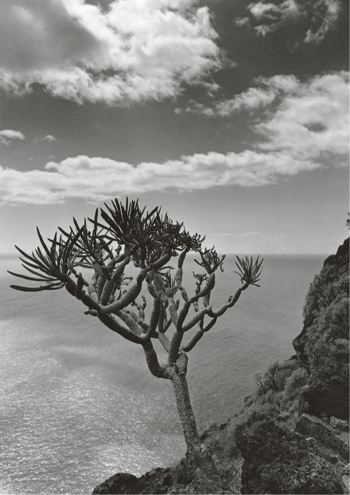
Figure 3–6 With green filter and burning in the sky
Filters in Digital Photography
Using filters in digital photography is completely different than in analog photography: The color filters just described lose their effect, lead to flat images, and are therefore useless in digital photography. Good digital cameras have a black and white mode that applies the effect of yellow, orange, or red filters. However, I still recommend shooting in color mode and later using Photoshop’s many tools to make your conversions. Starting with Photoshop CS3, however, the effects of yellow, green, blue, and two different red filters can be simulated when converting to black and white. Here, I’ll deal with the most suitable filters for photographing digitally. Naturally, ultraviolet (UV) and skylight filters should be mentioned in digital photography:
• The UV filter blocks out the ultraviolet light that causes some lack of sharpness.
• The skylight filter is a very slight conversion filter with a smooth pink tone that lowers color temperature a little bit, thus giving a pleasant, warmer color tone in photos taken at noon with a blue sky.
However, conversion filters such as these are useful mostly in analog photography because digital cameras have a white balance adjustment. The most prevalent filters are the bluish KB filters that increase color temperature, the reddish KR filters that throttle color temperature, and the FL filters that eliminate the green cast of fluorescent lights. But, as a digital photographer, you might as well forget all about them.
The Polarizing Filter
Mainly, two filters are a must in digital black and white photography: the polarizing filter and the gradient filter. (Note: The gradient filter is discussed later in this chapter.)
The most widely used filter is the polarizing filter, and its effect should already be well known. By rotating the filter in a cross position (i. e., at 90° with respect to the subject), two kinds of polarizing light are especially blocked: reflections of nonmetallic objects and the sky’s polarized light vibrations, thus intensifying the contrast between sky and clouds. Whereas light waves normally propagate by oscillating as a bundle around an axis on many planes going in one direction, polarized light oscillates only on one plane. To simplify matters, the polarizing filter can be understood as an infinite number of small mailbox slots that, in the instant in which they are perpendicular to the oscillating plane of polarized light, filter it out almost entirely. After all, the oscillations cannot pass through the “mailbox slots” positioned obliquely to the polarization plane.
In practice, the polarizing filter has two main effects: First, it intensifies the object’s actual colors (almost all objects are more or less suffused by scattered light, and this scattered light lies on top, so to speak, of the object’s actual color as a slight veil). Second, because these reflections are polarized light beams, the polarizing filter filters them out and the object’s actual color becomes more apparent.
There are also many polarized light beams that scatter the light in the atmosphere and make the sky look brighter, especially in hazy conditions. This scattered light is also filtered out by the polarizing filter, especially when the camera is held at a 90° angle with respect to the sun. The sky appears a lot darker, almost black, but the clouds remain bright, thus intensifying the contrast between sky and clouds.
You can now transform the sky—which already has a higher contrast owing to the polarizing filter—using the various Photoshop presets to perfectly imitate the effect of a red, orange, or yellow filter. You can even digitally re-create an infrared filter effect, although not as thoroughly as a red filter effect.
Creating Digital Drama Using Photoshop
You can achieve the dramatic effect conveyed by an orange or red filter digitally. Figure 3–7 was taken with a Canon EOS 5D and a 17–40 mm lens at a 17 mm focal length. Although this camera has a red filter simulation for black and white mode, it is better to turn the polarizing filter to the cross position and photograph in color mode, as recommended earlier. During conversion to black and white, you can control the effects of the blue-absorbing filters more precisely using Photoshop. Thus, you can simulate the effect of an analog yellow, orange, or red filter as in this color photo of a gigantic wave in Lanzarote. If you were to convert the image to black and white without applying any filters (figure 3–7), the sky would remain relatively bright compared to the original color photo, but the polarizing filter effect would make it a little darker with respect to reality. If you want to achieve a yellow filter effect, you can simply select the appropriate preset in the Photoshop conversion tool. This brightens the yellow and red tones while significantly darkening the blue component (figure 3–8). This is the most convincing image because it has a strong contrast coupled with a dark and dramatic sky. The photo with a red filter effect (figure 3–9) is almost a little too dramatic; some may think the sky is too black.
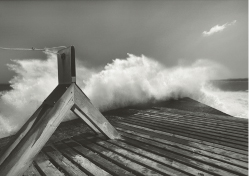
Figure 3–7 Conversion without filter effects
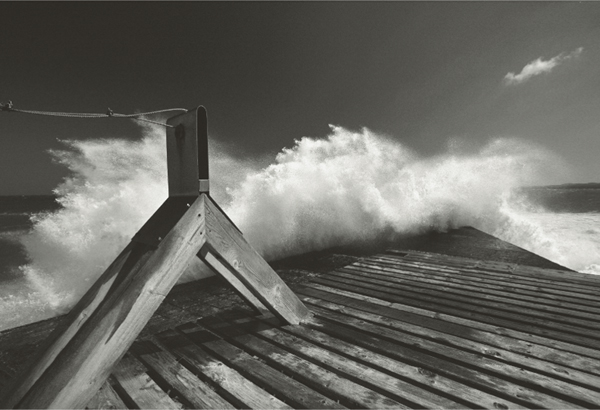
Figure 3–8 Conversion with yellow filter effect
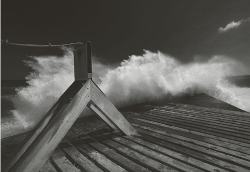
Figure 3–9 Conversion with red filter effect
Unfortunately, with photos not taken in RAW format the gray-scale tonality in the sky is no longer smooth enough after the contrasty transformation produced by color filter presets. But even in this case, you can mask this undesired effect using Photoshop tools.
A sky with a slightly unsteady tonal gradient is barely noticeable if you add grain structure to the image. A size 14 grain structure with 50% contrast comes quite close to an analog image taken with 100 ASA film. Once you have converted a photo to black and white, the grain still appears in color, making it necessary to eliminate the color effect using the “reduce saturation” tool, even if you already processed the image in black and white. This is only an emergency measure; it is better to photograph in RAW format in the first place because then the transitions remain smooth if you convert your images using filter presets.
In this image, the attachment point for the rope is included in this photo to serve as a graphically interesting element in the composition because, without it, an essential fixed point for the eye would be lacking.
Infrared Simulation in Photoshop
Photoshop can be used to produce relatively convincing infrared photo effects. However, contrary to the simulation of blue-absorbing filters, infrared simulation is not really convincing with every subject. Let’s look at two examples that really cry out for a touch of infrared.
Example One
If you use the Photoshop infrared conversion preset, objects often lose sharpness. In infrared photography, this effect is especially sought after because infrared film reacts with chlorophyll in the green of leaves. If a subject you have converted using the infrared preset appears unsharp or burned out, you can simply adjust each color channel separately until detail once again becomes visible. If you are still experiencing a lack of sharpness, applying a coarse grain effect can also help to remedy the situation. I recommend a size of 50 for the grain structure placed over the image. (Clicking “reduce saturation” will convert it again to black and white.) Such a coarse grain (size 50) is characteristic of infrared film. The created image (figure 3–11) is quite attractive. The green of the trees, and especially the grasses in the meadow, are much brighter than in the image converted without using filter effects (figure 3–10). The overall impression of this park in Fürstenlager Auerbach in the south of Germany is rather mysterious, almost mystical. The trees look as if they will lay down on the hollow, as if they are taken with a fisheye lens. In fact, the trees were crooked and this is the result of using a full-format Canon EOS 5D camera with a 17 mm wide-angle lens.
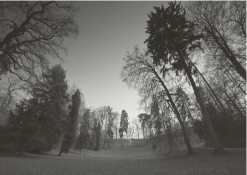
Figure 3–10 Conversion without filter effects
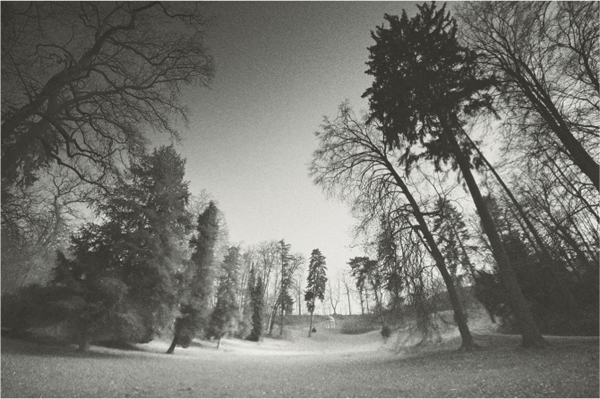
Figure 3–11 Conversion with infrared filter effect and added grain
Example Two: Infrared Adds a Mystical Effect
The infrared effect is even more suitable for this old Irish ruin (figure 3–13). Here, the brightening effect of the green as opposed to the image converted without using a color filter effect (figure 3–12) is more easily seen.
If you look at the detail in the grass, you can notice that—as opposed to the image of the grass converted to gray tones (figure 3–14)—the detail has lost resolution and looks outshone (figure 3–15). This effect closely resembles an infrared representation and fits the character of this old ruin found in south-western Ireland very well; the mystical effect of the ruin has been increased a great deal. The photo was taken with the 17 mm focal length of a 17–40 mm lens and a Canon EOS 5D.
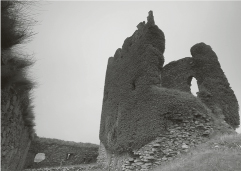
Figure 3–12 Conversion without filter effects
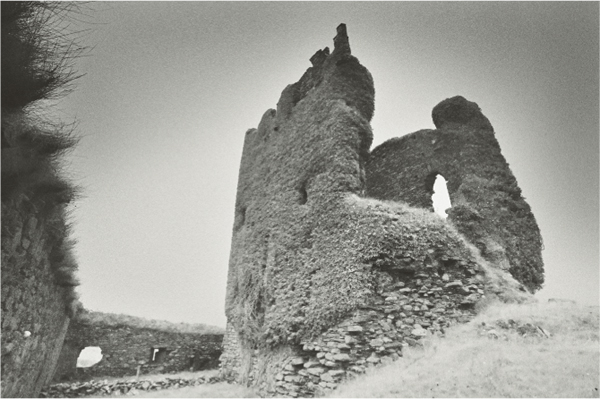
Figure 3–13 Conversion with infrared filter effect
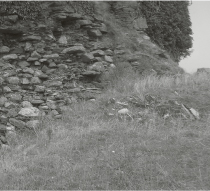
Figure 3–14 Conversion without filter effects (detail)
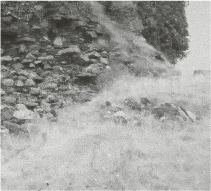
Figure 3–15 Conversion with infrared filter effect (detail)
You can still find many enchanting and untouched ruins in Ireland. These ruins are relics from the past, from another era, in which the mystery of time can still be clearly felt. The infrared effect enhances this mysterious impression.
The Gradient Filter
Surprisingly, the gradient filter is rarely used, but it is virtually essential for digital photography. The color of a gradient filter starts in the middle of the filter and becomes denser toward the top. In typical filters, the difference between coated and clear surfaces is one to two aperture stops. I recommend neutral gray filters with a 2-stop rating because they achieve a pleasant light balance in backlit conditions. In principle, the gradient filter is used especially in landscape photography to balance the considerable difference in brightness between sky and foreground, especially under backlit conditions. A gradient filter is primarily useful when the skyline is not crooked because all elements jutting above the skyline (skyscrapers, for example) will also be gradually darkened—an undesirable effect. Naturally, you can brighten the elements again in both analog printing and digital processing with the dodging technique.
The gradient filter is unjustifiably included with effect filters, but generally you can barely notice its “effect.” Used correctly, the gradient filter achieves no more than adding detail to a sky that lacks detail in backlit photos. In analog photography the gradient filter is often indispensable, especially when using slide film because the image cannot be subsequently manipulated any further, at least not without digitizing.
A risk in digital photography is that lit areas can burn out in backlit situations, thus losing all their detail. This risk is greater than when you use a good film. Therefore, when you take a backlit photo such as this one (figure 3–16), a gradient filter is essential. Without a gradient filter, all the clouds in the sky lose their detail and not even Photoshop can restore it. The photo taken with a gradient filter (figure 3–17) shows the difference: Although the brightest areas in the clouds have some detail, the lower part of the image is not darker. The photo has the right amount of drama because the bright clouds create an oval-shaped frame over the sunken ship.
When buying a gradient filter, I recommend a disc type that you can simply place in front of the lens to precisely set the gradient. Another option is an adapter that you can screw onto the filter thread. This type of adapter has a support for the gradient disc so you can displace it upward or downward as needed. The Cokin Company makes good, economical gradient filters.

Figure 3–16 Without the use of a gradient filter
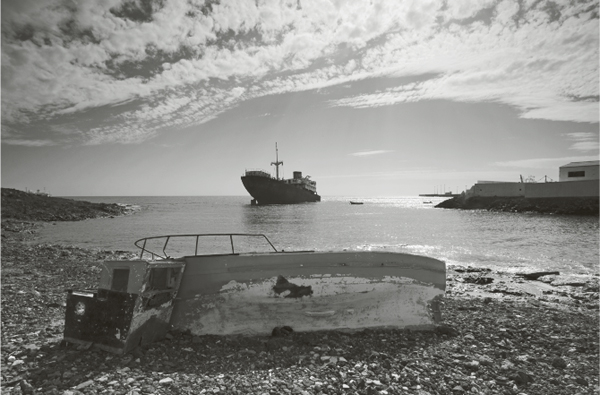
Figure 3–17 With the use of a gradient filter
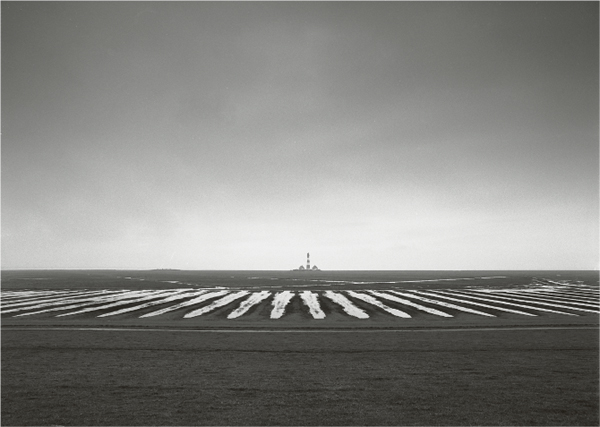
You can use a gradient filter to add drama to a picture that otherwise would have been rather gray and boring. The lighthouse of Westerhever near St. Peter Ording has often been used in advertisements, but on a gray day the sky certainly doesn’t provide much drama (figure 3–18). No problem: The gradient filter adds drama. You can place the filter higher or lower to enhance or lessen the dramatic effect of the sky (figure 3–19). As a result, the photo of the Westerhever lighthouse has drama and depth.

Figure 3–18 Without the use of a gradient filter