
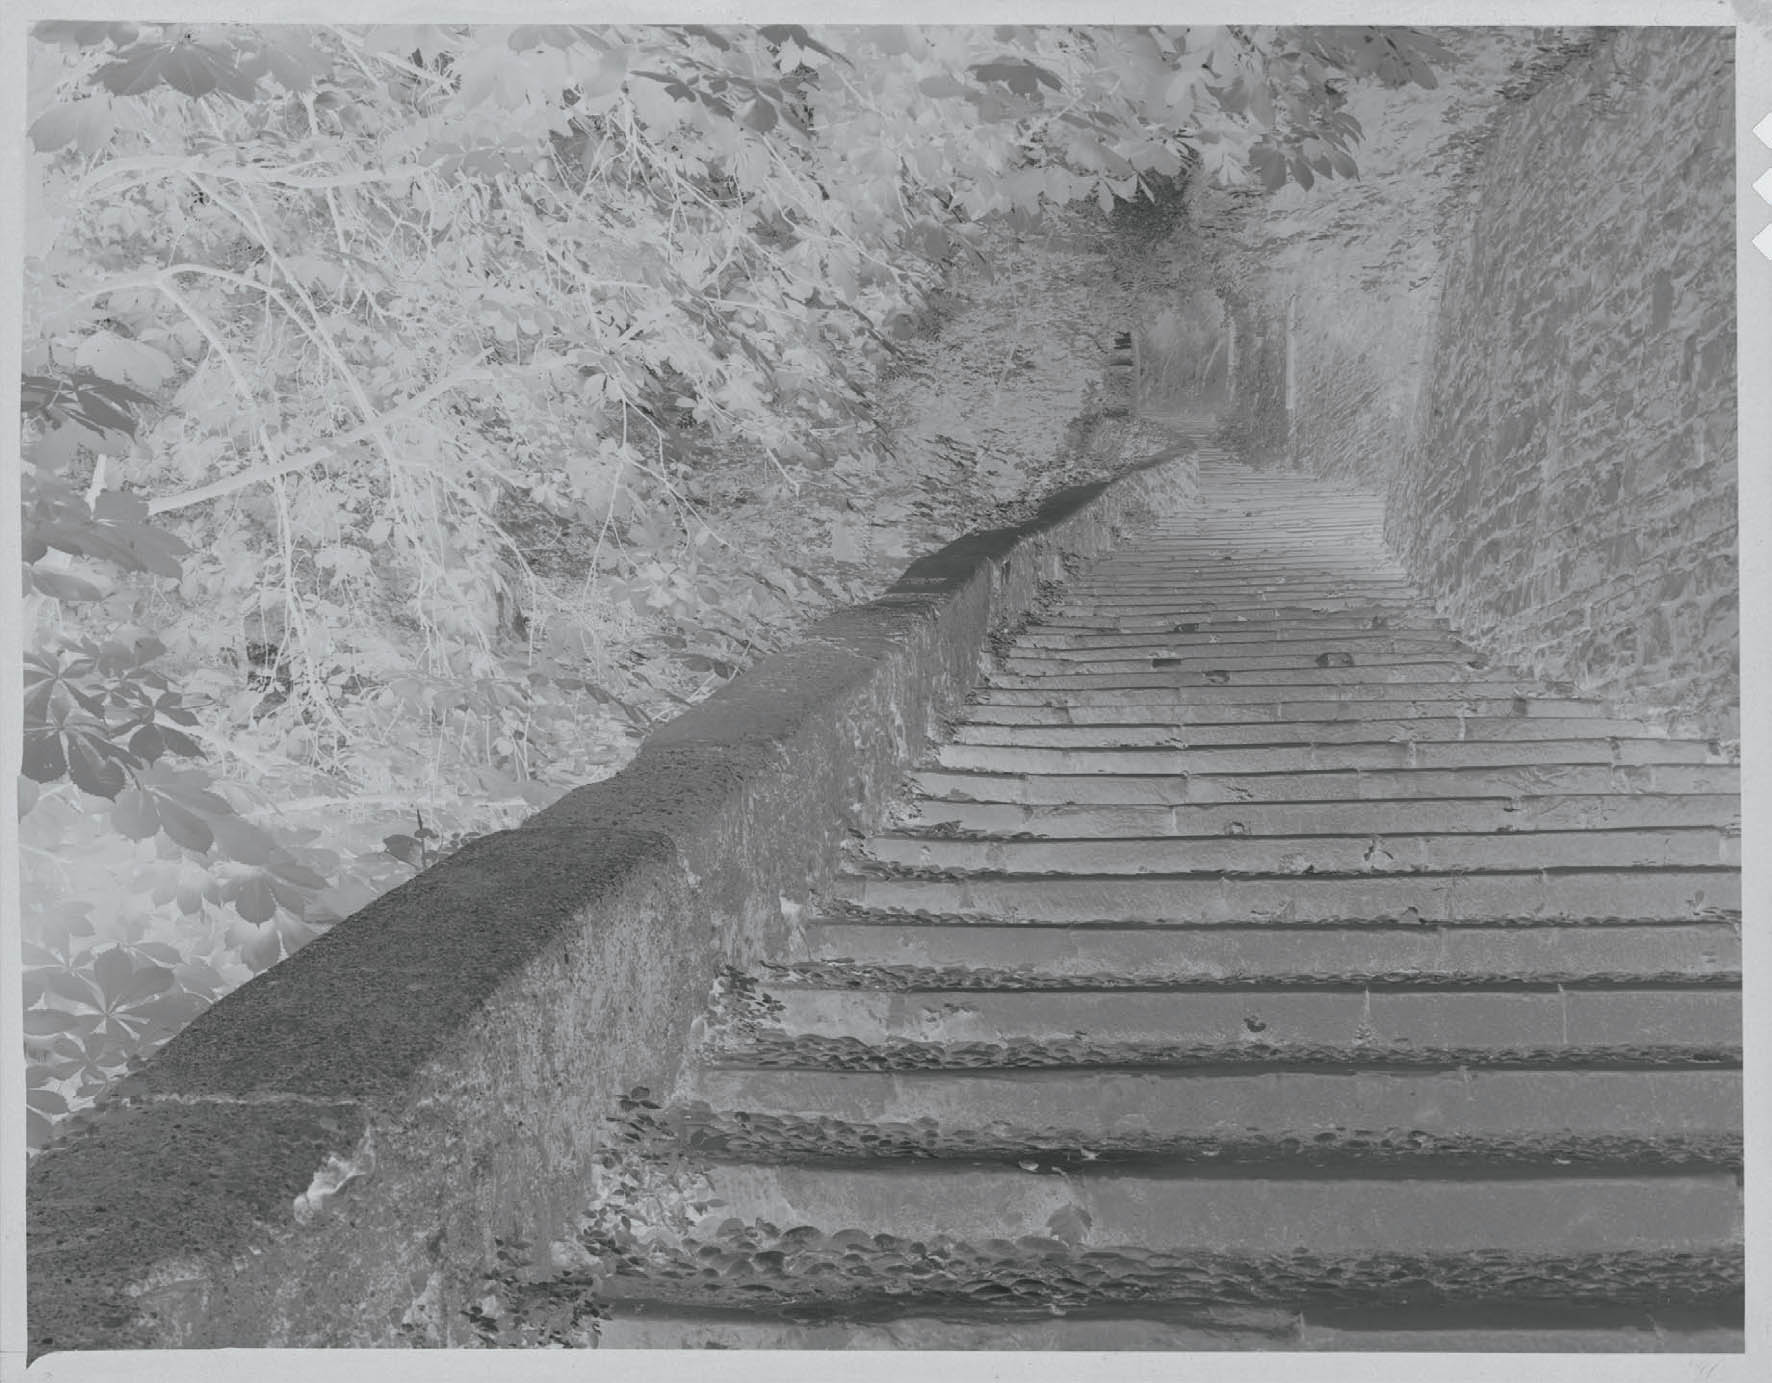
Figure 8-1: Negative of Stairway to Cittá Alta, Bergamo, Italy
This is the look of a typical negative under common lighting conditions. You can see density on the negative throughout the image, with no area so dense that it is impossible—or even very difficult—to print.
CHAPTER 8
The Zone System of Exposure for Black-and-White Film
![]()
THE NEXT FIVE CHAPTERS deal with the practical aspects of making a photograph, first traditionally with black-and-white negative film followed by traditional darkroom printing, and then digitally. Chapters 8 through 10 deal with traditional film exposure and printing. Chapter 8 explains exposure of the film negative or transparency for optimum effect. Chapter 9 explains development of the black-and-white negative for creative, personal interpretative purposes. Chapters 8 and 9, negative exposure and development, are so closely tied together that it is difficult to separate them effectively without leaving a temporary gap. The gap is tied together early in chapter 9, so please read on until the explanation is complete. Chapter 10 discusses methods of printing the negative as a black-and-white silver gelatin print in the traditional darkroom to express your vision in the most personal manner.
These are the methods I employ for all of my black-and-white photography, because I feel it still affords immense control, while yielding the richest results. Furthermore, I enjoy the process of working with film, developing it, and then printing it in the classic darkroom. The darkroom is my sanctuary, a truly magical place. Hence, I enjoy both the final product and the process employed to get me there. Furthermore, as oft-stated in this book, the film/darkroom process slows me down considerably, allowing me to think more, which I feel is critically important for self-expression. And still today, the traditional silver-gelatin print remains the gold standard for fine black-and-white printing.
While I have switched to digital procedures for my color work because I feel its options and tools now render it superior for fine color image making, I do not see the same being true for black-and-white. (In fact, as a working photographer, it would be foolish for me to stay with traditional methods if I felt that digital methods yielded better results.) Today I have a wide range of excellent films available to me (though I lament the loss of a few fine, specialized ones), and I am currently working with the finest black-and-white enlarging papers that I have ever used in more than 45 years of darkroom printing. Therefore, knowing that the final product is the richest of all imagery, a stable market of the best products ever available for traditional black-and-white photography, and with an inherent love of the process, itself, I see no reason to switch to digital for my black-and-white work.
Chapter 11 concentrates on the digital workflow from image exposure to printing, and chapter 12 takes us through the use of many of the tools available for fine digital image making from the RAW file exposure to the finished TIFF file. I am now a confirmed user of traditional methods for black-and-white and of digital methods for color. Hence, I am firmly involved in both worlds. I recommend that everyone read all five of the following chapters, even if your approach is strictly film or digital, because they provide important insights into how the photographic process unfolds. Such knowledge is never useless.
A Brief Overview
In the 1940s, Fred Archer and Ansel Adams first developed the zone system of exposure as a means of making an exposure in a scientifically accurate manner. It is fully applicable to both black-and-white and color. The explanation that follows is expressed in terms of black-and-white tonalities; for readers interested exclusively in color, please think in terms of how these tonalities translate into colors on the color sphere (chapter 6). After the explanation is complete in terms of black-and-white, the chapter concludes with specifics on how the zone system applies directly to color.
I’ll explain the first part of the zone system—exposure of the film—by meshing two concepts: first, how film reacts to incoming light when the shutter is open; and second, how light meters give an exposure reading. There are only two things that can be done with a negative. First, it can be exposed. Second, it can be developed. That’s it! There’s nothing more to it.
When you expose film, you can use greater or lesser amounts of exposure. That’s the limit of your control (except for changes brought about by filtration, which can alter the relative brightness of objects). In the next chapter, you’ll see that when you develop black-and-white film, you can reduce the scene’s inherent contrast (by reducing the normal development time); maintain it (by developing for the normal development time); or increase it (by extending the normal development time). Development of color film will not be explored, since it does not allow significant changes in contrast.
Film’s Response to Light: Building the Zone System
What happens to a negative when it is exposed to light? The camera lens focuses light from the scene onto the film, which is sensitized in proportion to the amount of light that hits it. Those areas receiving the most light are sensitized to the greatest extent; those receiving the least light are sensitized to the least extent. Later, when the negative is developed, the areas sensitized to the greatest extent become the darkest, or “densest,” portions of the negative; the areas least sensitized become the lightest, or “thinnest,” portions of the negative.
Some portions of the negative may receive so little light that they are not sensitized at all. The unexposed edges of the film fall into this category, as do all portions of the film within the exposed area that are “below threshold,” i.e., areas that show no density in the developed negative except for the negative material itself, the so-called “film base fog” density. We will call all such sub-threshold areas Zone 0.
There may be an area within the image space receiving just enough light to produce visible density in the developed negative, the so-called “threshold level.” We will call this developed density Zone 1. Zone 1 is an easily perceptible density, yet very thin. If you look at a portion of a negative and have to scratch your chin wondering whether or not there is density, we won’t consider it Zone 1. Only if the density is obvious, although light (thin), will we call it Zone 1.
If we were to double that exposure, the same area would receive twice the sensitization and the developed negative would show greater density. In a “normally” developed negative, we will call the density of that area Zone 2. (This is the temporary gap in the explanation referred to at the start of this chapter; the exact definition of “normal development” will be explained in chapter 9. Here, it’s not critical to be specific about the term, so please read on.)
Now, if we again double the exposure, the Zone 2 area would receive double the sensitization, which we call Zone 3 sensitization, followed by greater density in the developed negative. Continuing to double the exposure, we obtain Zone 4, 5, 6, 7, and onward. Each successive zone represents a doubling of exposure from the previous zone and a corresponding increase in developed density (figure 8-1).
Of course, since each zone above the Zone 1 threshold represents a doubling of exposure, those zones can be reached by successively doubling the amount of light within the scene while using the same exposure. Thus, we can obtain progressively higher zones either by doubling exposures via the lens apertures (the f/stops) or shutter speed, or by doubling the ambient light levels.
Zone 1 density—the threshold density—is the same on all negatives. It is always thin but easily perceived. Since all higher zones are obtained by successively doubling either exposure or light levels, Zone 2 density is the same on all negatives, as is Zone 3 density, Zone 4 density, Zone 5 density, and so on. Keep this in mind: Zone densities are the same for all negatives.
You can continue doubling the exposure, thereby increasing the negative density of the developed negative—but there is a limit. Eventually you’ll reach a density level that cannot be increased; the negative will “max out.” It turns out that on nearly all black-and-white films, the maximum density usually goes up to Zone 16 or even 18! Most photographers think it goes only to Zone 10, but in fact, it goes well beyond that. Zone 10 is just above the halfway mark on the density scale. When you fully comprehend how much the negative can encompass and learn how to control that immense range (which will become clear in the next two chapters), you can then appreciate how extraordinarily flexible and powerful photography can be.
![]() On nearly all black-and-white films, the maximum density usually goes up to Zone 16 or even 18! Most photographers think it goes only to Zone 10, but in fact, it goes well beyond that.
On nearly all black-and-white films, the maximum density usually goes up to Zone 16 or even 18! Most photographers think it goes only to Zone 10, but in fact, it goes well beyond that.
Translating Negative Densities to Print Tonalities
Negative densities mean nothing until a print is made. What happens to those densities when they are printed, when the negative is placed in the enlarger and exposed onto a normal grade enlarging paper?
We begin this determination by defining a “standard exposure.” A standard exposure is the minimum length of exposure time through the enlarger required to achieve a maximum black from the Zone 0 portion of the negative. Suppose we require a 20-second exposure of the negative under the enlarger to achieve a maximum black on your enlarging paper from Zone 0 (i.e., the clearest portion of the negative). Any exposure greater than 20 seconds will produce a black that is no blacker; anything less fails to achieve maximum black. At best, any exposure less than 20 seconds will yield a very dark gray, but not black. Using the 20-second exposure on a normal contrast paper (generally a grade 2 paper or a mid-contrast level on variable contrast paper), you get the table shown on the next page.
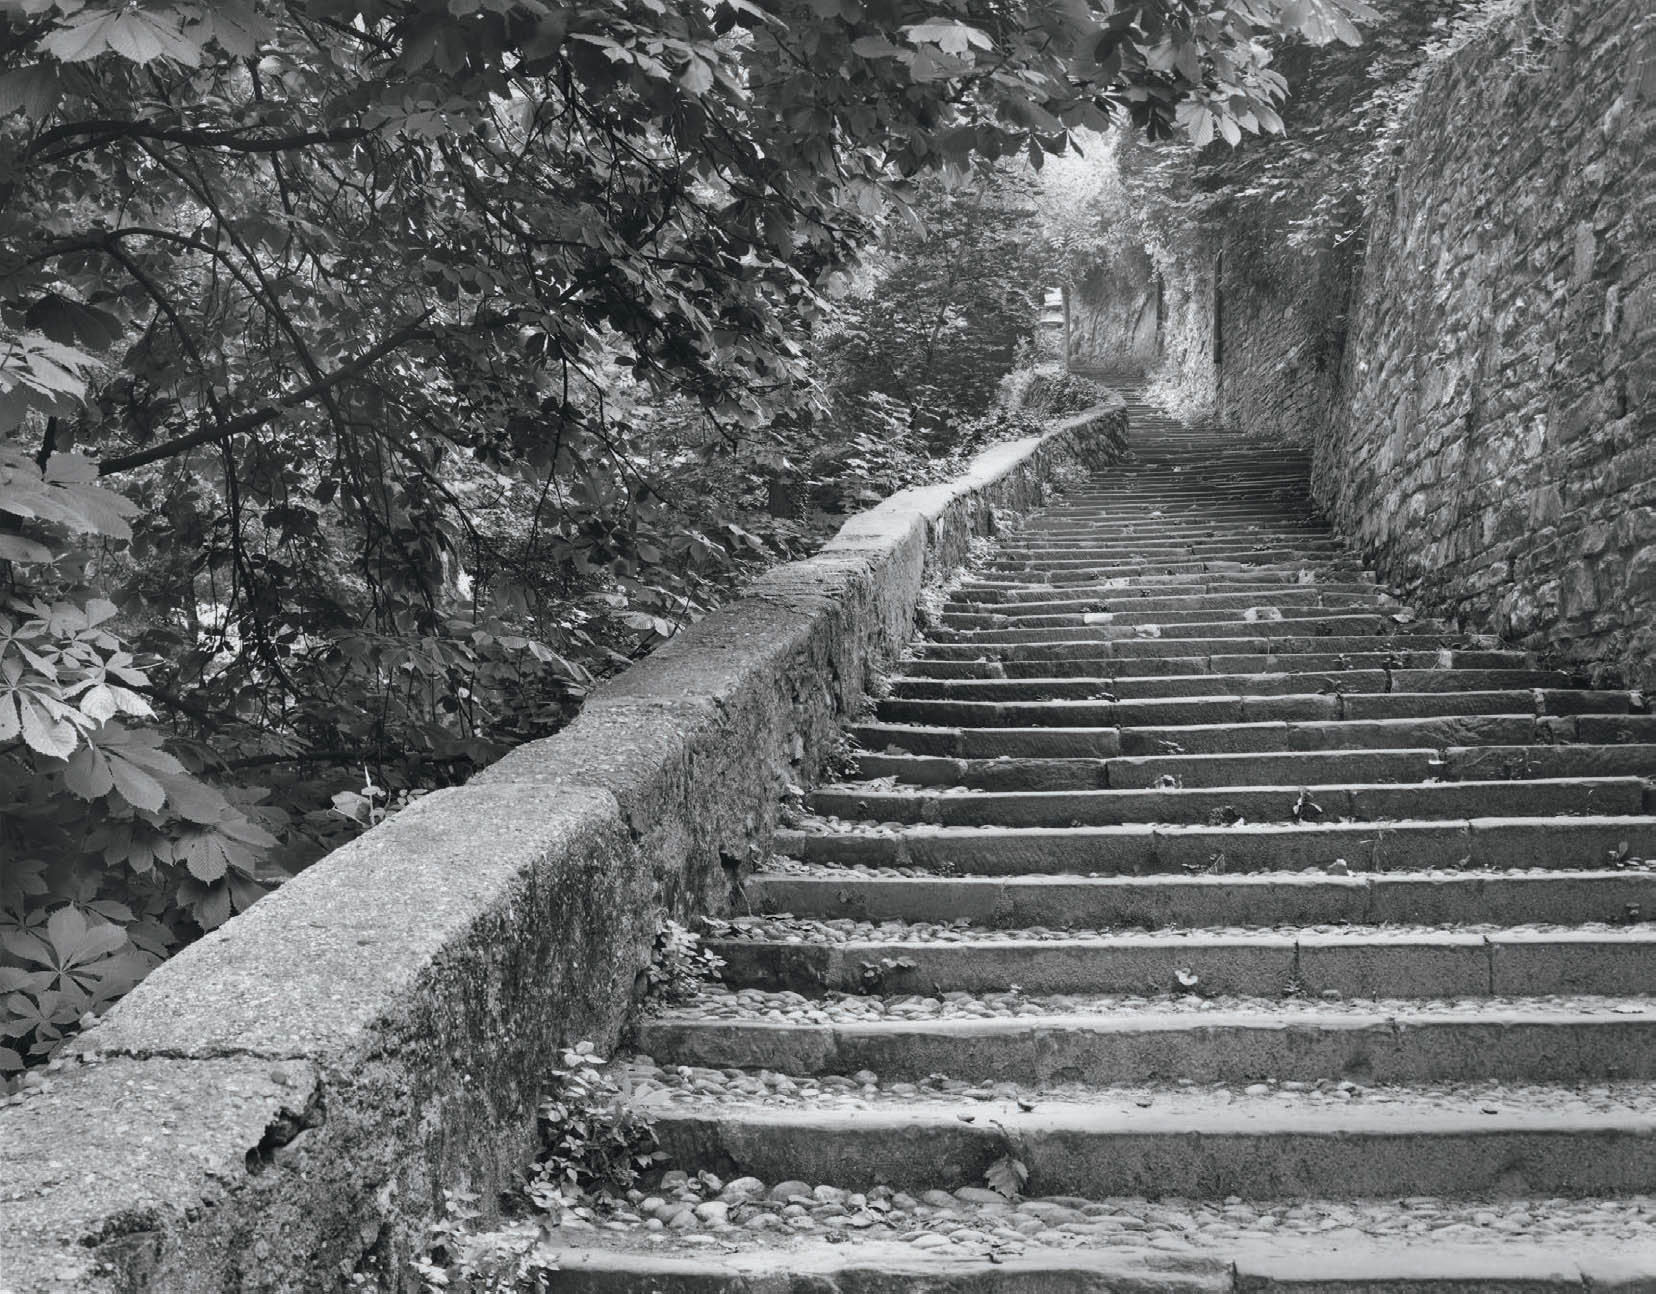
Figure 8-2: Stairway to Cittá Alta, Bergamo, Italy
The photograph contains a full range of tonalities from black to white, yet there appear to be no jarring contrasts. There are small amounts of dodging and burning, but no extensive alterations.
At first glance the table seems to indicate that Zone 1 has no real meaning, since it is essentially as black as Zone 0 in the print. But remember, Zone 1 represents the amount of light needed to sensitize the film just enough to produce visible density when the negative is developed, i.e., the threshold exposure. From this level of exposure, we begin the doubling of exposures (or light levels) to obtain the successive zones. For this reason, Zone 1 is especially important—though it is essentially unimportant for printing purposes. Because it has so little density, it blocks almost none of the light coming from the enlarger, so it prints virtually as black as Zone 0.
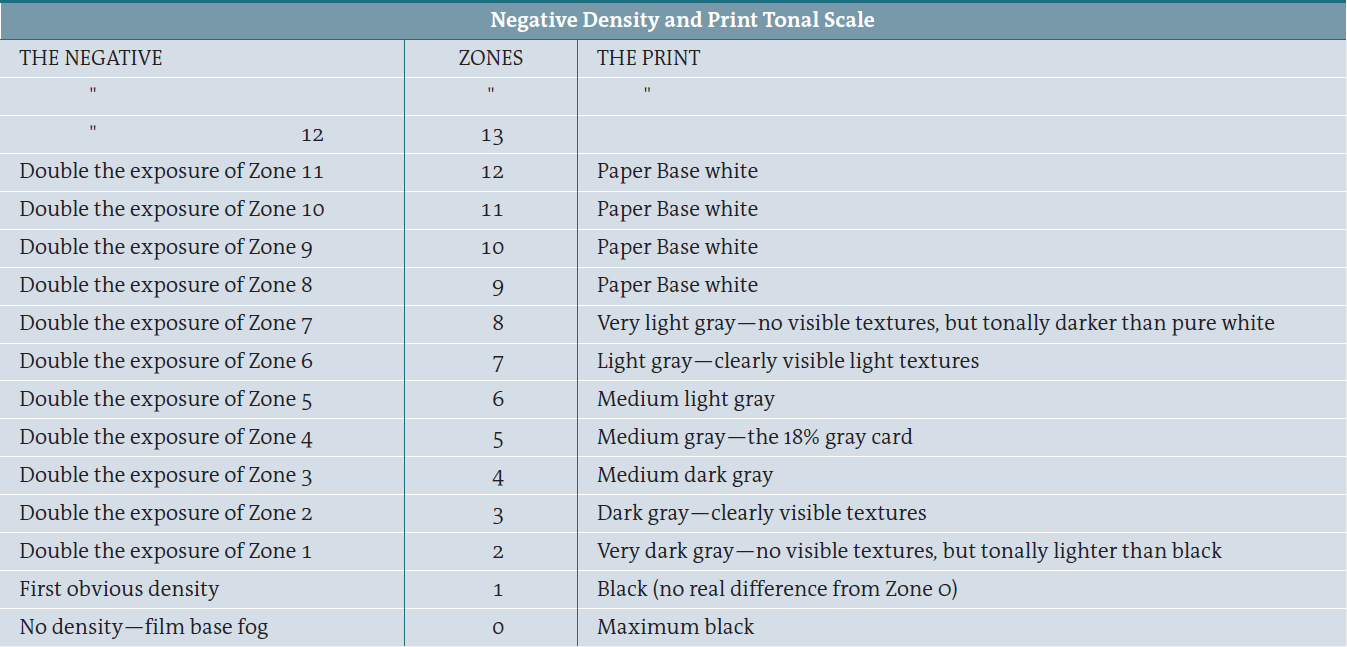
Diagram 8.1:
Negative density and print tonal scale
Surprisingly, the print reaches pure white by Zone 9, although the negative continues to show separations up to Zone 15, 16, 17, and even 18 (beyond the table)! These extremely dense zones will print as pure white in a “straight print,” but they are very usable. (A straight print is one with a single exposure; no additional exposure, known as “burning,” is used on any portion of the image.) In chapter 9 you’ll see how those zones can be controlled in development, and in chapter 10 you’ll see further methods of making the higher zones visible, meaningful, and essential in the print. They should not be excluded from consideration in exposure. Those zones are part of the zone system, and you’ll soon see how to fully use them. At that point, your artistic and creative potential will rocket upward immeasurably (figure 8-2).
For now, however, we will confine ourselves to the range of printable values in a straight print, Zone 0 to 9. I have mentioned several times that by doubling the exposure, you can jump from one zone to the next higher one; but how do you double the exposure? Simple! A quick glance at your camera shows that the shutter speeds are (in fractions of a second) 1, ½, ¼, ⅛, 1/15, 1/30, 1/60, 1/125, 1/250, 1/500, and perhaps 1/1000. Each speed is half the exposure of the previous one. If you go the other way, each is twice the speed of the previous one. Thus, if your exposure is 1/60 second, you double the exposure by going to 1/30 second. If your exposure is ¼ second, you double it by going to ½ second. So the camera’s shutter speeds tie in immediately with the zones.
There is another way to open up or close down a zone: by closing the aperture (i.e., the opening) of the lens. Look at the aperture settings, also known as the f/stops. They are f/2, f/2.8, f/4, f/5.6, f/8, f/11, f/16, f/22, and perhaps f/32, f/45, and f/64. Each of these numbers represents a halving of the aperture from the previous setting. Thus, f/5.6 admits half the light that f/4 admits. F/16 allows only half the light through the lens that f/11 allows. The higher the number, the smaller the aperture and the less light passes through the lens. Again, the camera and the zone system work together in harmony.
![]() All gray meters do the same thing: they average light within the viewing angle of the meter and give you a reading of the proper exposure for Zone 5. That is the only thing they do!
All gray meters do the same thing: they average light within the viewing angle of the meter and give you a reading of the proper exposure for Zone 5. That is the only thing they do!
The other confusion comes from the fact that the f/stop number is actually a ratio of the lens opening to the focal length of the lens, so we are really dealing with an inverse amount, or ¼, ⅛, 1/16, 1/32, 1/64, 1/128, 1/256, 1/512, etc. This is how we end up with the rule, “The bigger the number, the smaller the hole,” i.e., the larger the f/stop number, the smaller the aperture.
The two methods of doubling or halving the exposure, via aperture or shutter speed, point out a very important relationship: one zone is equal to one stop. When you “open up a stop—for example from f/11 to f/8—you are at the same time giving one zone more exposure. In the same way, when you change the shutter speed from, say, 1/125 second to 1/60 second, you are also “opening up one stop” or giving one stop greater exposure.
Now that you know what the zones are and how you can jump from one to another with your camera, set that information aside for a while as we look at the workings of the light meter. By combining the knowledge of the zones with an understanding of the light meter, the zone system becomes immediately clear.
The Light Meter—How It Works
In order to fully understand the light meter, let’s refer to it by a different name for awhile. The name “light meter” is a bit confusing. We’ll call it a “gray meter” because its only function is to tell the proper exposure for medium gray, or Zone 5. All gray meters do the same thing: they average light within the viewing angle of the meter and give you a reading of the proper exposure for Zone 5. That is the only thing they do!
The gray meter has no idea what it’s pointed toward. It could be a dark coat in a hallway, a field of snow under bright sun, a person’s face under overcast skies, or anything else you can think of. All it knows is the amount of light that impinges on its light-sensitive cells. Since it has no idea what it’s looking at, it cannot give the proper exposure for the item, so it gives the Zone 5 exposure! For this reason, it should logically be called a gray meter.
Zone 5 may be just the right exposure for many things—perhaps a person’s face under overcast skies (though it seems a bit too dark to me)—but it surely is not the proper exposure for sunlit snow! The difference between you and the gray meter is that you can think! Recognizing that the meter always gives a Zone 5 reading, you can supply your knowledge of the tonal scale to determine the proper exposure (figure 8-3).
Let’s take the case of sunlit snow. If the snow has modulations—small hills and valleys—and perhaps even some shadows, you may want it somewhere between Zone 7 (easily seen light gray textures) and Zone 8 (very light gray, almost white—no real textures). Even though snow is white, you probably want to avoid a blank white area lacking in detail. Suppose the gray meter reads f/16 @ 1/250 second exposure. Of course that exposure would yield medium gray (Zone 5) snow! So, how do you get from the metered reading to the desired reading?
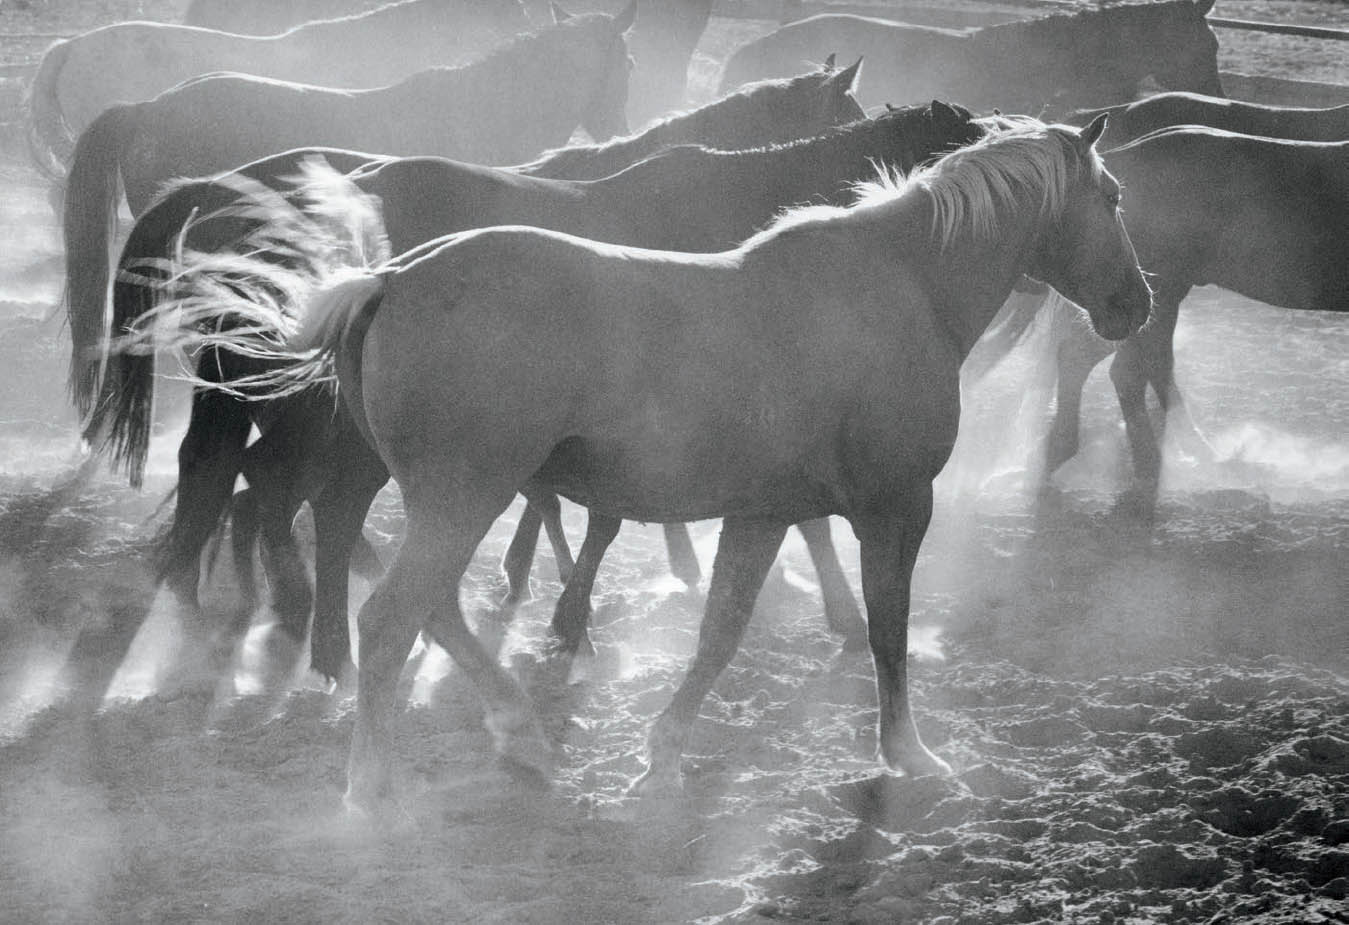
Figure 8-3: Morgan Yazee’s Corral
Morgan Yazee is a Navajo rancher and show horse producer. I visited his ranch in 2003. Using a handheld medium format camera (Mamiya 645), standing on the second rail of the corral fence and propping my elbows on the top rail for stability, I followed the horses around the corral, making this exposure when they briefly stopped, lining up almost like a chorus line of dancers. Using a relatively fast film—Ilford HP5, rated by Ilford at ASA 400, but at ASA 300 by me—I was able to make the photograph at 1/60 second, placing the shadowed side of the horses just above Zone 5.
Start with the metered reading and first double the exposure by opening up one stop, which is the equivalent of increasing the exposure by one zone. From f/16 @ 1/250 second, you can go to f/16 @ 1/125, which doubles the exposure and places the snow in Zone 6. (Remember that 1/125 second is twice as long as 1/250 second.) Alternatively, you could change the aperture instead of the shutter speed and achieve Zone 6 with a setting of f/11 @ 1/250 second.
Next, double the exposure again to place the snow in Zone 7. From f/16 @ 1/125 second, you can go to f/16 @ 1/60 second, again using the shutter speed to double the exposure. (By changing the aperture you can achieve the same thing, going from f/16 @ 1/125 second to f/11 @ 1/125 second.) If you want to go to Zone 8, you can again change either the aperture or shutter speed to move up another zone on the scale.
Each doubling of the exposure makes the snow one zone lighter in tone. You can even go a half tone lighter by using the aperture setting between the f/stops shown on the camera. Thus, to place the snow in Zone 7½, go from the Zone 7 setting of f/16 @ 1/60 second to a point halfway between f/16 and f/11 @ 1/60 second. With this exposure setting, the snow will come out at Zone 7½, and it will show very light textures without being blank white.
With this example, you have learned how to expose negatives using the zone system. The critical point to remember is that the gray meter always gives a Zone 5 reading. You must open the aperture or increase the shutter speed if you want lighter tones than Zone 5. You must close down the aperture or decrease the shutter speed if you want tones darker than Zone 5. Then, by maintaining a mental image of the tonal value of each zone, you can determine exactly how much to open up or close down to obtain your desired exposure.
It may be confusing at first to realize that when you are standing in front of a bright object (such as sunlit snow), you must open up the lens to make it bright. It seems logically correct to close down the aperture from your meter reading because the object is so bright, but the opposite is true. You always start from the Zone 5, medium gray meter reading, and if you want your subject to have tones lighter than Zone 5 you must give it additional exposure above the meter reading to make it light. Similarly, starting with the Zone 5 medium gray meter reading, if you want your subject to have darker tones than Zone 5, you must give it less exposure than the meter reading to make it dark. Just as you must interpret the scene rather than merely “shoot” it to make your point of view visible, you must also control the negative densities. You can do so if you recognize that your starting point is always medium gray, the exposure that the gray meter always gives you!
Review of Negative Exposure Procedure
Let’s quickly review the procedure for obtaining a proper exposure. In a sense, you must start at the end, jump to the beginning, then work back to the end. It works this way: when you see something you want to photograph, first decide the tonalities you want in the final print (that is the end point!). Then take your meter reading, which always gives you a Zone 5 exposure (that is the starting point!). Then decide how many stops (i.e., zones) you must open up or close down to reach the desired tones (that is working back toward the end point!).
This tells you that the use of the zone system is integrally tied together with previsualization, for you must be able to visualize the way you want the final print to look in order to follow this procedure. Most of the time, if you follow your light meter (the gray meter) blindly, you’ll probably come out relatively close to the proper exposure because the eye is somewhat of a gray meter also. After all, you see things almost equally well outdoors or indoors, even though the light levels are very far apart. This is due to the fact that the eye and brain compensate wonderfully within a very wide range of brightness levels—in other words, you average out the light levels, just like the meter does. But when you encounter an exceptional situation such as the sunlit snow, following the gray meter can be disastrous. You will end up with Zone 5 snow! Therefore, keep in mind that the gray meter is a dumb robot. It is your tool, and it gives you a starting point—middle gray—a point of departure. It is up to you to depart with intelligence.
Consider another example, along with several variations, to help solidify these ideas. Suppose you travel to Hawaii and are standing on a field of black lava rock on a cloudy day. You decide you want to photograph the rock. First, look at it and decide what tonal values you want it to have. Using a mental picture of the zone scale, you might choose an average tone of about Zone 3½, so that the textures are quite dark yet easily seen.
Next, take a meter reading with your gray meter. Suppose the meter reads f/5.6 @ 1/30 second. Of course, if you use that shutter speed and aperture, you will get Zone 5 (medium gray) textures. So, if you stop down one stop (i.e., one zone), either by cutting the shutter speed in half or closing down the aperture one stop, you will get Zone 4 textures.
This time, let’s leave the shutter speed at 1/30 and close the aperture down to f/8. Then stop down another ½ stop to a point between f/8 and f/11. That puts you at Zone 3½. (Remember, you can always place the aperture at intermediate points between listed settings. However, the shutter speed must be on a listed setting; otherwise, it won’t open or it will make a choice between the two nearby speeds.)
In this example, you cut down on the exposure from the meter reading in order to make the object (the lava rock) appear as dark in the print as it did to your eye. You started with the Zone 5 reading and closed down 1½ zones to Zone 3½. Suppose the field of lava rock also includes a bush with delicate, lacy branches that sway gently in the breeze. If you want to arrest the movement of those branches, 1/30 second may not be a short enough exposure, but 1/60 second may. In this case, close down the shutter speed from 1/30 second to 1/30 second and compensate for the loss of one zone by opening up the aperture from the halfway point between f/8 and f/11 to the halfway point between f/5.6 and f/8. The total exposure will be the same, but the faster shutter speed may stop the motion of the bush, as you desired. You can always use this reciprocal relationship (i.e., ½ × 2 = 1) between f/stops and shutter speeds to gain the optimum exposure for your purposes.
Now, suppose there is no wind and you want maximum depth of field. Smaller apertures (i.e., the higher f/stop numbers) yield greater depth of field, and the setting between f/8 and f/11 may not yield sharpness from the immediate foreground to distant areas. If you stop down to a point halfway between f/11 and f/16, and compensate for the loss of one zone by increasing the shutter speed from 1/30 second to 1/15 second, you may get just what you want. Now you have achieved your goals of getting the rock texture at Zone 3½ while obtaining great depth of field.
As in the first example, you start by defining the tonalities you want to have in the print. Then you meter the scene with your gray meter to determine what exposure will yield a Zone 5 result. Then you change the metered exposure by the amount needed to go from Zone 5 to your desired exposure. It’s really quite simple! It’s also very exact, and that’s the chief attraction of the zone system. By using it carefully, you can get precisely the exposure you want.
Using the Zone System to Depart from Reality
Although the two examples just presented show how to obtain a literal rendition of the objects photographed, the zone system can be employed perfectly well in creative departures from reality—ones that may present your interpretation more effectively. Suppose, for instance, that you want to present the tones of the lava rock in a high key (i.e., light-toned) rendition of Zone 6, 7, and 8. Perhaps you feel that a section of rock is sharded, with jagged edges that remind you of broken glass or crystal, and you want to render it as such. This would not be a literal rendition of the scene, but a fascinating transformation of it to something abstract or unreal, perhaps even surreal.
The method of obtaining this interpretation is exactly the same as for the literal rendition. First, determine the tone you want (the end point; in this case, Zone 6, 7, and 8). Then take the meter reading (the starting point), which is f/5.6 @ 1/30 second. This time, however, you want to make the tones lighter than the gray meter’s Zone 5 reading by an average of two zones (working back to the end point by using Zone 7 as the average of the three desired zones). Open up two stops via either the shutter speed or aperture. If you want to maintain depth of field and you have a tripod, then do it via shutter speed, going from 1/30 second exposure to 1/30 second (remember that doubling the shutter speed from 1/30 second exposure to 1/15 second adds one stop, and then opening from 1/15 second to ⅛ second adds another stop). Now the exposure will yield the rocks with an average Zone 7 tonality. This could produce a spectacular departure from the reality of the scene.
Since the camera is on a tripod and you have no worries about movement with a long exposure, why not also go for greater depth of field by closing down to f/8 while lengthening the shutter speed to ¼ second? . . . or even going to f/11 @ ½ second? After all, the rocks won’t move, nor will the camera on the tripod. But remember, if a bush is in the scene and a breeze is blowing, you may have to rethink that approach. These are the real problems of photography.
![]() The zone system is a method of precise exposure, and that precision can be applied to literal interpretations or to vast departures from reality. It is a remarkably useful and flexible system of exposure for creative photographers.
The zone system is a method of precise exposure, and that precision can be applied to literal interpretations or to vast departures from reality. It is a remarkably useful and flexible system of exposure for creative photographers.
Now you can see that the zone system becomes not only a tool for “correct,” literal exposure, but also a creative tool for departures from reality. So many people forget this aspect of the system despite the fact that it is one of its greatest virtues. All aspects of photography should be meshed for creativity and personal expression, and the zone system should be an integral part of that process. The zone system is a method of precise exposure, and that precision can be applied to literal interpretations or to vast departures from reality. It is a remarkably useful and flexible system of exposure for creative photographers.
One final example will begin to expand the concept of the zone system to its full usage. When you look at a scene, you are generally concerned with several objects and several tones, not just one. The zone system explains how to relate these tones.
Suppose you want to make a portrait of a white male wearing a dark shirt. Suppose the gray meter reading of the man’s face is f/11 @ 1/60 second, and the shirt reads f/8 @ 1/15 second. (The shirt is darker, thus it requires a greater exposure for a Zone 5 rendition. Brighter objects always require less overall exposure on the gray meter. Make sure you fully understand this point before going further!)
How far apart are the readings? F/8 is one zone more than f/11. 1/15 second is two stops more exposure than 1/60 second. Therefore, the man’s face is three stops brighter than the shirt. If you make the exposure at the reading on the man’s face, the face would be in Zone 5 and the shirt would automatically be in Zone 2. Both would be too dark. If you make the exposure at the reading on the shirt, the shirt would be in Zone 5 and the man’s face would be in Zone 8. Both would be too bright.
Whatever the zone of the man’s face, the shirt is three zones lower. That cannot be changed during exposure (except possibly through filtration, which we will not consider here). So, if you place the man’s face at Zone 6½ by opening up the aperture 1½ stops above the meter reading on his face, then the shirt would end up at Zone 3½. To do this, first open up one stop from the meter reading of f/11 @ 1/60 second, to f/8 @ 1/60 second (or to f/11 @ 1/30 second, which would be the same). This places the tone of the face at Zone 6. Then open up another ½ stop to place the face in Zone 6½. The final exposure would be halfway between f/5.6 and f/8 @ 1/60 second. Now both the man’s face and the shirt are reasonably placed for a meaningful portrait.
In chapter 9, the discussion will continue with methods of altering contrast between two objects. If a scene is too contrasty for your desires, appropriate negative exposure and subsequent development can be used to lower contrast while still maintaining detail throughout the negative. Conversely, if the scene is too flat for your purposes, appropriate exposure and development can be used to increase contrast to a more desirable level.
The Zone System for Color Negatives
In color, contrast is inherent in the film. It cannot be altered easily unless you learn very sophisticated methods of color negative development, which are beyond the scope of this book. This chapter, dealing with exposure, is therefore even more important for color negatives than for black-and-white negatives because it’s the only control you have. The only contrast control you have is to change from one film to another that is inherently higher or lower in contrast.
Exposure of color negatives must be more precise than black-and-white negatives, because when attempting to correct an overexposed color negative at the printing stage, you may encounter color shifts that alter the entire color balance. Underexposure of color negatives poses the same problems as it does with black-and-white negatives: loss of shadow detail. Once detail is lost in the negative, it cannot be regained in the print. But, if the negative is slightly overexposed, it gains excess density that can be corrected in printing.
The Zone System and the Inverse Square Law
At the end of chapter 5, I pointed out that the inverse square law presents major problems for zone placements indoors. If objects are placed one foot, two feet, and three feet from a light source, the second object receives ¼ the amount of light of the closest one, and the third object receives only the light of the first. The same ratios hold if the objects are placed two feet, four feet, and six feet from the light source. (The closest object receives 1/22 = 1/(2 × 2) = ¼ unit of light; the second receives 1/42 = 1/(4 × 4) = 1/16 unit of light; the third receives 1/62 = 1/(6 × 6) = 1/36 unit of light. Thus the ratios remain the same.)
Suppose those objects were people, and you wanted to do a portrait of the three people sitting side by side on a couch with a lamp lighting the scene from the far right edge. As we know, successive zones represent doublings or halvings of light levels. Therefore, if the middle person receives only ¼ the light of the person on the right, he or she will be two zones lower on the scale. (One zone difference is half the light; two zones is a quarter the light, and so on.) The person on the left will be more than three zones darker. (One eighth of the light would be exactly three zones.)
As a result, if the person nearest the lamp is placed in Zone 7 (which would be an extremely light rendition of any skin tone), the one in the center will be Zone 5, and the one on the left below Zone 4! (This assumes the skin tones are the same in equal lighting.) This is a major problem for all indoor photography, and it explains the necessity for so much extra lighting in most studio photography just to balance light levels.
In chapter 9 you will see how appropriate negative exposure and development, alone, without the need for extra lighting to balance out the inverse square law, could overcome the problems outlined here.
The eye/brain combination tends to smooth over these large discrepancies in light levels, so gray meter readings are essential indoors for determining the light levels that the film will encounter. If the light source is a window in the daylight hours, the distance from the windowpane (which is, effectively, the light source) also answers to the inverse square law. This explains the difficulty of photographing with natural light indoors. The problem is increased by the fact that every part of the room does not receive direct light from the window. Some parts, such as the walls immediately around the window, receive no direct light whatsoever but only reflected light within the room. Therefore, those walls may be many zones lower than an object in front of—and very near—the window.
Methods of dealing with surprising situations like this, as well as other situations with excessively high or low contrast, are the focus of chapter 9.
In Summary
Knowledge of the zone system of exposure, coupled with knowledge of your film’s characteristics, is the most effective means of obtaining excellent negatives or transparencies. These tools can be combined either for literal renditions of reality or for departures from reality. The important thing is that they will bring precision to your interpretation. For this reason, they are indispensable tools for creativity.