About the Book
Social networking sites see an average of 350 million uploads daily - a quantity impossible for humans to scan and analyze. Only AI can do this job at the required speed, and to leverage an AI application at its full potential, you need an efficient and scalable data storage pipeline. The Artificial Intelligence Infrastructure Workshop will teach you how to build and manage one.
The Artificial Intelligence Infrastructure Workshop begins taking you through some real-world applications of AI. You'll explore the layers of a data lake and get to grips with security, scalability, and maintainability. With the help of hands-on exercises, you'll learn how to define the requirements for AI applications in your organization. This AI book will show you how to select a database for your system and run common queries on databases such as MySQL, MongoDB, and Cassandra. You'll also design your own AI trading system to get a feel of the pipeline-based architecture. As you learn to implement a deep Q-learning algorithm to play the CartPole game, you'll gain hands-on experience with PyTorch. Finally, you'll explore ways to run machine learning models in production as part of an AI application.
By the end of the book, you'll have learned how to build and deploy your own AI software at scale, using various tools, API frameworks and serialization methods.
Audience
Our goal at Packt is to help you be successful, in whatever it is you choose to do. The Artificial Intelligence Infrastructure Workshop is the ideal tutorial for experienced Python developers and software architects who are getting started with data storage for AI. It is assumed that you understand and have used various filesystems, file formats, databases, and storage solutions for digital data and that you also have some experience in the field of big data.
Familiarity with basic Natural Language Processing (NLP) concepts would also be beneficial. Pick up a Workshop today and let Packt help you develop skills that stick with you for life.
About the Chapters
Chapter 1, Data Storage Fundamentals, introduces you to some real-world scenarios where AI plays a role. You'll take a close look at different kinds of hardware that are used to optimize AI systems, and gain some hands-on experience by building a basic text classification model.
Chapter 2, Artificial Intelligence Storage Requirements, contains a comprehensive overview of the requirements for an AI solution. We will explore the typical layers of a data lake and discuss topics such as security, scalability, and maintainability. The exercises will give you some practice with these subjects and prepare you for setting the requirements for AI applications in your organization.
Chapter 3, Data Preparation, is a hands-on chapter that lets you practice several forms of data processing, with the end goal of evaluating a machine learning model. You'll learn a few common ways to clean data and do feature engineering.
Chapter 4, The Ethics of AI Data Storage, shows you how AI systems can be used in malicious ways, intentionally or through ethical oversights. You'll walk through some examples of AI systems that have brought harm to people or society as a whole, and you'll build your own prejudiced AI so that you can learn how to avoid some common pitfalls.
Chapter 5, Data Stores: SQL and NoSQL Databases, teaches you about SQL and NoSQL databases and the decision-making process for choosing the ideal database. You will learn how to execute common queries on databases such as MySQL, MongoDB, and Cassandra. The chapter will give you hands-on experience with different databases.
Chapter 6, Big Data File Formats, explores popular file formats for big data environments and shows you how to choose between them. You will walk through various code snippets to get started with understanding different file types and executing queries to measure performance.
Chapter 7, Introduction to Analytics Engines (Spark) for Big Data, is about Spark, Resilient Distributed Datasets (RDDs), and Spark transformations and actions. We will use Databricks, a popular integrated cloud-based Spark analytics engine, for our hands-on learning.
Chapter 8, Data System Design Examples, takes a step back from the implementation details to look at the bigger picture of data system design. You'll see why this birds-eye view is often important for collaboration, optimization, and scaling. You'll also design your own AI trading system to get a feel for a pipeline-based architecture.
Chapter 9, Workflow Management for AI, takes you through the journey of prototyping your AI data pipeline, automating the pipeline from end to end, and finally managing your pipelines using the Airflow workflow management system.
Chapter 10, Introduction to Data Storage on Cloud Services (AWS), introduces you to data storage solutions on Amazon Web Services (AWS). You will become familiar with using the AWS CLI and SDK to perform common data tasks. You will implement a data pipeline that integrates with AWS S3.
Chapter 11, Building an Artificial Intelligence Algorithm, gives you hands-on experience with PyTorch in building deep learning training algorithms. You will implement a deep Q-learning algorithm to play the CartPole game.
Chapter 12, Productionizing Your AI Applications, is the final chapter of this book, where we'll explore a few ways to run machine learning models in production as part of an AI application. You'll get hands-on experience with API frameworks (such as Flask), serialization methods (such as Pickle and PMML), container solutions (such as Docker and Kubernetes), and running models as part of a stream processing application with Flink. After this, you'll be ready to build and deploy your own AI software.
Conventions
Code words in the text, database table names, folder names, filenames, file extensions, pathnames, dummy URLs, user input, and Twitter handles are shown as follows: "Import the pandas module and read the downloaded data using the read_csv method."
Words that you see on the screen, for example, in menus or dialog boxes, also appear in the text like this: "Create a cluster by clicking the Clusters button on the left pane."
A block of code is set as follows:
if __name__ == "__main__":
import os
import sys
from os import path
# read data from cache
try:
df_vids = pd.read_csv('./tmp/data_vids.csv')
df_cats = pd.read_csv('./tmp/data_cats.csv')
New terms, abbreviations, and important words are shown like this: "There are many types of encryption possible. Advanced Encryption Standard (AES) and Rivest-Shamir-Adleman (RSA) are two examples of popular asymmetric encryption algorithms."
Long code snippets are truncated and the corresponding names of the code files on GitHub are placed at the top of the truncated code. The permalinks to the entire code are placed below the code snippet. It should look as follows:
filter_data.py
28 # filter
29 df_filtered = filter_by_date(df_data, date)
30 # cache
31 dir_cache = './tmp'
32 try:
33 df_filtered.to_csv(os.path.join(dir_cache, 'data_vids.csv'), index=False)
34 except FileNotFoundError:
35 os.mkdir(dir_cache)
36 df_filtered.to_csv(os.path.join(dir_cache, 'data_vids.csv'), index=False)
37 print('[ data pipeline ] finish filter data')
The complete code for this step is available at https://packt.live/2DhTEK3.
Code Presentation
Lines of code that span multiple lines are split using a backslash ( ). When the code is executed, Python will ignore the backslash, and treat the code on the next line as a direct continuation of the current line.
For example:
history = model.fit(X, y, epochs=100, batch_size=5, verbose=1,
validation_split=0.2, shuffle=False)
Comments are added into code to help explain specific bits of logic. Single-line comments are denoted using the # symbol, as follows:
# Print the sizes of the dataset
print("Number of Examples in the Dataset = ", X.shape[0])
print("Number of Features for each example = ", X.shape[1])
Multi-line comments are enclosed by triple quotes, as shown below:
"""
Define a seed for the random number generator to ensure the
result will be reproducible
"""
seed = 1
np.random.seed(seed)
random.set_seed(seed)
Setting up Your Environment
Before we explore the book in detail, we need to set up specific software and tools. In the following section, we shall see how to do that.
Installing Anaconda
Anaconda is a tool that is used to manage your Python environment. After installation, Anaconda takes care of package management by enabling multiple environments on your machine.
Follow the installation instructions at https://docs.anaconda.com/anaconda/install/. Make sure to download the Python 3.7 version (from https://python.org).
Note
Anaconda for Windows comes with a useful tool called Anaconda Prompt. This is a command-line interface, like Terminal for Linux and macOS, with all the necessary libraries installed. We will use Anaconda Prompt in some exercises and activities, so anyone who is using Windows should make sure that this works.
Installing Scikit-Learn
Scikit-learn is a simple but powerful machine learning library, providing a common API for many machine learning algorithms. It also interfaces with Python's other scientific libraries to provide a common interface to efficient data structures, and some additional tools to help with data preparation and reporting.
To install scikit-learn, follow the instructions at https://scikit-learn.org/stable/install.html#install-official-release.
Installing gawk
The GAWK tool is used for parsing comma-separated files. All documentation can be found at https://www.gnu.org/software/gawk/manual/gawk.html, with detailed installation instructions at https://www.gnu.org/software/gawk/manual/gawk.html#Installation.
Short versions of the installation instructions for the binary distributions are as follows:
- Windows:
Download the gawk package from http://gnuwin32.sourceforge.net/downlinks/gawk.php and install it.
- Linux:
Install gawk with your package manager. For example, for Debian/Ubuntu-based distributions, use this:
sudo apt-get install gawk
- macOS
Install gawk with the Homebrew package manager:
brew install gawk
Installing Apache Spark
You can download Apache Spark by visiting the following link: https://spark.apache.org/downloads.html. You can find the installation steps further down in this Preface in Step 8 of the section titled Installing Apache Spark and Scala. On Windows, you may refer to the following link for detailed instructions: https://medium.com/big-data-engineering/how-to-install-apache-spark-2-x-in-your-pc-e2047246ffc3.
Installing PySpark
PySpark is the Python interface that is used to communicate with a Spark environment. It is distributed as an Anaconda package and comes with a local Spark cluster.
Make sure that Java 8, 9, or 10 is installed on your system. Java 11 is not supported by Spark yet. You can install Java by following the instructions at https://docs.oracle.com/javase/10/install/overview-jdk-10-and-jre-10-installation.htm. Also, make sure that your JAVA_HOME environment variable is set; if not, do so by pointing it to your local java folder – for example, export JAVA_HOME=/usr/lib/jvm/java-1.8.0-openjd-amd64:

Figure 0.1: Setting the JAVA_HOME variable
To install PySpark, type one of the following commands in your Terminal or Anaconda Prompt:
pip install pyspark
Or:
conda install -c conda-forge pyspark
After installation, verify that Spark is running by executing the pyspark command in Terminal or Anaconda Prompt. You'll see output similar to the following:

Figure 0.2: Running PySpark
Installing Tweepy
To connect to Twitter, we'll use the Tweepy library. Follow one of the following installation instructions to install it:
- If you're going for a pip installation, go to http://docs.tweepy.org/en/latest/install.html.
- If you're going for a conda installation, go to https://anaconda.org/conda-forge/tweepy.
Installing spaCy
spaCy is a powerful Natural Language Processing (NLP) library for Python. It has pre-trained models built-in, which makes it very easy to get up and running with. It has a focus on speed and efficiency.
To install spaCy, follow the instructions at https://spacy.io/usage.
You will also have to install the pre-trained statistical models spaCy provides by following the instructions at https://spacy.io/models/en.
In the examples, we use v2.2.5 of the en_core_web_lg model, which can be installed by running the following command:
python -m spacy download en_core_web_lg
Installing MySQL
MySQL is easy to install, and there are various ways to do so. It's part of the LAMP stack and it can be downloaded separately as well:
- The 32-bit or 64-bit version of MySQL Server and the MySQL Client can be downloaded from https://dev.mysql.com/downloads/installer/. Choose the type of server according to your requirements if you are using a UI tool for installation.
Alternatively, if you are using Linux, you can use any package-management utility to install mysql-server, as in either of the following snippets:
sudo apt-get install mysql-server
Or:
sudo yum install mysql-server
Note
For further information, refer to the MySQL documentation at the following link:
- On Linux, after installation, the security script needs to be executed for the default security options, such as remote root logins and sample users. This can be done using the following command:
- The MySQL Client can then be accessed and a database can be created:
mysql> create database <database_name>;
mysql> use <database_name>;
The preceding code will create a database for later use.
macOS Setup
MySQL can be installed on macOS using Homebrew (https://brew.sh/) and can be used via Homebrew services:
brew update
brew install [email protected]
This will install the latest version of MySQL. You can then start it as follows:
- Install Homebrew services first:
brew tap homebrew/services
- Start the mysql service:
brew services start [email protected]
- Check whether the mysql service has been loaded:
brew services list
- Force-link the appropriate version of MySQL:
brew link [email protected] --force
- Verify the installed MySQL instance:
mysql -V
Installing MongoDB
MongoDB is supported by macOS, Linux, and Windows. In this section, we will take a look at how to set up single-node and multi-node clusters of this database.
- We can use Homebrew, a package manager for macOS (https://brew.sh/). Let's update it if it is already installed:
$ brew update
- You need to tap the mongodb package first and then install it:
$ brew tap mongodb/brew
$ brew install [email protected]
Here, we are installing version 4.2 – we could choose 3.4 or 3.6 as well, but we will use 4.2.
- MongoDB can be configured with this:
/usr/local/etc/mongod.conf
In the dbPath variable, you can specify the path where data should be stored. Logs are stored in /usr/local/var/log/mongodb. Data will be stored in BSON format in /usr/local/var/mongodb.
- You can start your MongoDB server with either of the following commands:
$ services start [email protected]
Or:
$ mongo --config /usr/local/etc/mongod.conf
- Access the mongo shell with this command:
$ mongo
Linux (Ubuntu)
- Install gnupg:
$ sudo apt-get install gnupg
- Install the public key for the package management system:
$ wget -qO - https://www.mongodb.org/static/pgp/server-4.2.asc | sudo apt-key add -
- Create a list file for MongoDB:
$ echo "deb [ arch=amd64 ] https://repo.mongodb.org/apt/ubuntu bionic/mongodb-org/4.2 multiverse" | sudo tee /etc/apt/sources.list.d/mongodb-org-4.2.list
$ sudo apt-get update
- Install the MongoDB package:
$ sudo apt-get install -y mongodb-org
- Start the MongoDB service:
- Access the mongo shell:
$ mongo
Windows
- Download and install MongoDB from https://www.mongodb.com/download-center/community?jmp=docs.
- While installing, select Install MongoDB as service and specify the service name as MongoDB. Also, specify the data and log directories.
- Once installed, set a path to the MongoDB directory in the Path environment variable.
- You can access the mongo shell as follows:
>mongo.exe
Installing Cassandra
To install the latest Cassandra setup, you can use the Homebrew package manager (https://brew.sh/). Use the following steps to set up a single-node instance.
macOS
- Make sure that you have Java installed and that the JAVA_HOME path is set.
- Install Cassandra's latest stable version (we are using 3.11.4) with the following command:
$ brew install cassandra
- You can run the Cassandra service using one of two ways:
$ cassandra
Or:
$ brew services start cassandra
This will start the Cassandra single-node test cluster.
- Access the command line for CQL with the following command:
$ cqlsh
You should get the following output:

Figure 0.3: Running Cassandra
- Find the configuration for Cassandra at the following location:
$ cd /usr/local/etc/cassandra
Here, there are three files that you need to worry about:
- README.txt: This file has information about the other files. We would suggest reading this first.
- cassandra.yaml: This is the main Cassandra configuration file.
- logback.xml: This is the logback configuration file for the Cassandra server.
- You can configure a multi-node cluster with Cassandra. To do so, these steps should be followed for all the nodes in a cluster. First, install Cassandra single-node servers on all the nodes.
- Go to the cassandra.yaml file and edit the following information:
- Add the current machine's IP address under listen_address and rpc_address. Here, listen_address specifies your current server's IP, and rpc_address is for remote procedure calls. Add each server's IP addresses as a comma-separated list under -seeds. This is where you list all the components of your cluster.
- Set auto_bootstrap to false. If this value is not in the configuration file, you can explicitly add it yourself. This setting is important if you want your new nodes to point to the location of your data correctly.
Once done, start the Cassandra service on each of your nodes.
- A tool called nodetool will be installed with your Cassandra setup. Using this, you can see the health of your cluster as well as many other things:
$ nodetool status
You should get the following output:

Figure 0.4: nodetool status
This is an important step. You need to open ports for all the nodes to communicate with each other. Open port 7000 to transfer data over the network and port 9042 to connect from the CLI to the required servers in the cluster.
Linux
To install Cassandra on Linux, you need to perform the following steps:
- Download and extract the Cassandra binary files with the following commands:
$ wget http://supergsego.com/apache/cassandra/3.11.5/apache-cassandra-3.11.5-bin.tar.gz
$ tar zxvf apache-cassandra-3.11.5-bin.tar.gz
- Export the CASSANDRA_HOME environment variable and point it to the extracted location.
- As per the cassandra.yml file, the configured directories (/var/lib/cassandra and /var/log/cassandra) need to be created and given full permissions using the following command:
$ chmod 777 /var/lib/cassandra
$ chmod 777 /var/log/cassandra
- You can add the Cassandra home path in the $PATH variable so that you can start Cassandra with the following command:
$ cassandra
$ cqlsh
- To run Cassandra in a multi-node cluster, just follow Step 6 onward in the macOS installation section.
Windows
- Download and extract the Cassandra setup from this link: http://cassandra.apache.org/download/.
- Add the path to the Cassandra folder in Environment variables.
- Run the Cassandra cluster with the following command:
- Start the Cassandra CLI using this (command is not compatible with Python 3):
> cqlsh
- You can follow Step 6 onward in the macOS installation section to run a multi-node cluster.
Installing Apache Spark and Scala
Before installing Spark, Java is needed for your system:
Linux Installation Steps
- Check the current version of Java on your machine. The following command will verify the version of Java that is installed on your system:
$java -version
If Java is already installed on your system, you will see the following output:
java version «1.7.0_71»
Java(TM) SE Runtime Environment (build 1.7.0_71-b13)
Java HotSpot(TM) Client VM (build 25.0-b02, mixed mode)
You have to install Java if it is not installed on your system.
- Now you need to ensure that Scala is installed on your system.
Installing the Scala programming language is mandatory before installing Spark as it is important for Spark's implementation. The following command will verify the version of Scala used on your system:
$scala -version
If Scala is already installed on your system, you will see the following response on the screen:
Scala code runner version 2.11.12 -- Copyright 2002-2013, LAMP/EPFL
If you don't have Scala, then you have to install it on your system. Let's see how to install Scala.
- First, download Scala for your operating system from the following link:
https://www.scala-lang.org/download/2.11.12.html
You need to download the latest version of Scala. Here, you will see the scala-2.11.12 version being used. After downloading, you will be able to find the Scala tar file in the Downloads folder.
- Extract the Scala tar file using the following command:
$ tar xvf scala-2.11.12.tgz
- Move the Scala software files to the /usr/local/scala directory using the following commands:
$ su –
Password:
# cd /home/Hadoop/Downloads/
# mv scala-2.11.12 /usr/local/scala
# exit
- Set PATH for Scala using the following command:
$ export PATH = $PATH:/usr/local/scala/bin
- Now verify the installation of Scala by checking the version:
$scala -version
If your Scala installation is successful, then you will get the following output:
Scala code runner version 2.11.12 — Copyright 2002-2013, LAMP/EPFL
Scala installation for macOS
Scala can be installed via Homebrew on macOS:
brew update
brew install scala
Once you are ready with Java and Scala on your system, we can download Apache Spark.
Linux Installation Steps
- Download Apache Spark (https://spark.apache.org/downloads.html) by using the following command:
spark-2.4.5-bin-hadoop2.6 version
After this, you can find a Spark tar file in the Downloads folder.
- Extract the Spark tar file using the following command:
$ tar xvf spark-2.4.5-bin-hadoop2.6.tgz
- Move the Spark software files to the directory using the following commands:
/usr/local/spark
$ su –
Password:
# cd /home/Hadoop/Downloads/
# mv spark-2.4.5-bin-hadoop2.6 /usr/local/spark
# exit
- Now configure the environment for Spark. You need to add the following path to the ~/.bashrc file, which will add the location where the Spark software files are located to the PATH variable:
export PATH = $PATH:/usr/local/spark/bin
- Use the following command for sourcing the ~/.bashrc file:
$ source ~/.bashrc
With this, you have successfully installed Apache Spark on your system. Now you need to verify it.
- Verify the installation of Spark on your system using the following command:
$spark-shell
The command will display the Spark Shell application version. If Spark has been installed successfully, then you will get the following output:
Spark assembly has been built with Hive, including Datanucleus jars on classpath
Using Spark's default log4j profile: org/apache/spark/log4j-defaults.properties
15/06/04 15:25:22 INFO SecurityManager: Changing view acls to: hadoop
15/06/04 15:25:22 INFO SecurityManager: Changing modify acls to: hadoop
15/06/04 15:25:22 INFO SecurityManager: SecurityManager: authentication disabled;
ui acls disabled; users with view permissions: Set(hadoop); users with modify permissions: Set(hadoop)
15/06/04 15:25:22 INFO HttpServer: Starting HTTP Server
15/06/04 15:25:23 INFO Utils: Successfully started service naming 'HTTP class server' on port 43292.
Welcome to the Spark World!
Installing Airflow
Airflow is a platform created by the community to programmatically author, schedule, and monitor workflows. Before installing Airflow, you will need to have Python and pip on your machine. If you have installed Anaconda already, then you will already have Python and pip on your machine. To install Airflow and get started with it, please go to this page: https://airflow.readthedocs.io/en/stable/start.html
We have used Airflow version 1.10.7 with Python version 3.7.1 in Chapter 9, Workflow Management for AI.
Installing AWS
We will use AWS as the primary cloud provider for our exercises. AWS offers reliable, scalable, and inexpensive cloud computing services. It's free to join, and you pay only for what you use. We will use their free tier service for our exercises. However, if you use its other tiers, you will be charged.
We will be using the AWS S3 and RDS services. S3 is free for up to 5 GB of storage. RDS is free for up to 750 hours within 12 months of a new registration.
For more information about the free tier, please refer to https://aws.amazon.com/free/.
Registering Your AWS Account
To use AWS services, we need to register a new account. Please follow the instructions here: https://aws.amazon.com/premiumsupport/knowledge-center/create-and-activate-aws-account/.
Creating an IAM Role for Programmatic AWS Access
Directly accessing or managing AWS services via the AWS console isn't the best practice. By default, you will be using your root account, which has access to all resources, to interact with AWS services if you don't set up an IAM user. When we create an IAM user, we limit privileges to certain resources. If an account is hacked and IAM user credentials are leaked, the damage caused by the data loss will be limited:
- Go to the AWS website: https://aws.amazon.com/. Log in to your console using your root account:

Figure 0.5: AWS website
- Use your account ID or account email to sign in:

Figure 0.6: AWS sign in
- After you sign in in to the console, search IAM in the Find Services search bar:

Figure 0.7: AWS Management Console
- After you click on IAM, you will be directed to the Identity and Access Management (IAM) console, and you will need to click on Add user to create an IAM user:

Figure 0.8: AWS IAM dashboard
- There are five steps that you need to go through when you create a new IAM user. The first step is to configure User name and Access type. We want this user to have programmatic access to our services:
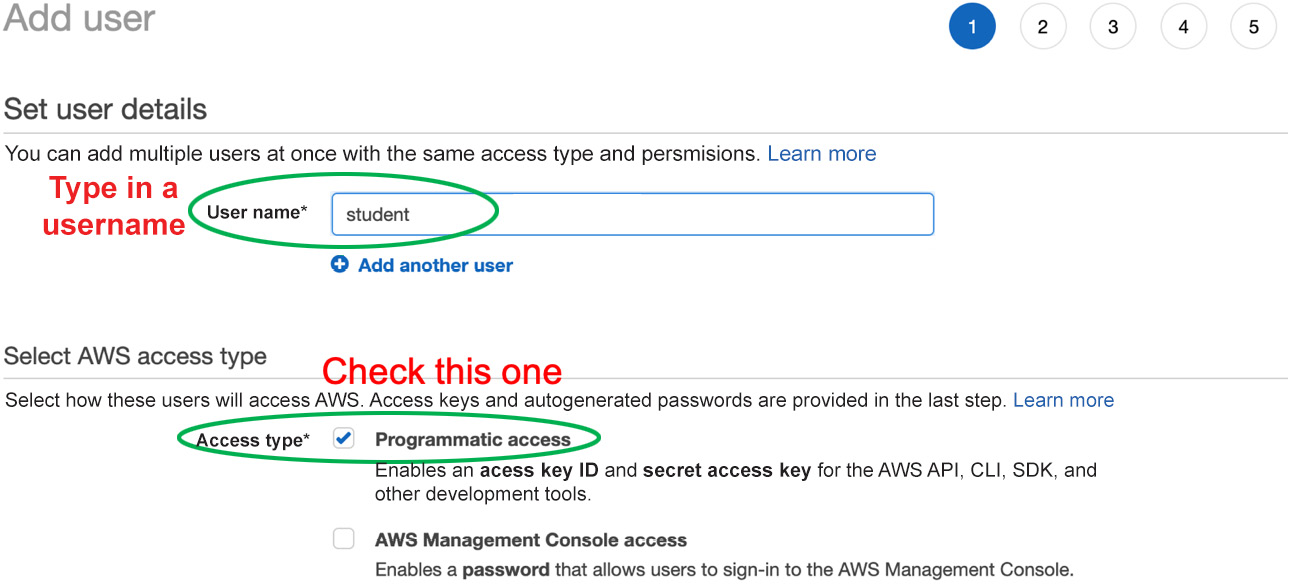
Figure 0.9: Adding a user
- Next, we will need to set permissions for this IAM user. We can either create our own permissions or just choose from the existing policies. For now, let's give this user Administrator Access, which has most of the privileges for most services:

Figure 0.10: Checking AdministratorAccess
- After we set permissions for this IAM user, the next step is to add tags for this user. This step is optional and is useful for organizing IAM users when you have too many of them:

Figure 0.11: Adding tags
- The next step is to verify that all the information and settings are correct:

Figure 0.12: Reviewing information and settings
- The final step in this process will show you the access key ID and the secret access key, which are credentials that allow your IAM user to access or control your AWS services. You will need these two keys to configure the AWS CLI, so it's best to copy them or write them down:

Figure 0.13: User access key ID and secret access key
- If you have successfully added a new IAM user, you will see the new user in your IAM console as follows:

Figure 0.14: New user details
Installing the AWS CLI
Before installing the AWS CLI, you will need Python and pip. If you have installed Anaconda, then you will already have Python and pip. If not, then please install Python and pip:
- Installation: Please go to https://anaconda.org/conda-forge/awscli and follow the instructions to install the AWS CLI.
- Configuration: We assume that you have created an IAM user and obtained its access key. If not, please go back to the previous step to create an IAM user and its access key. Then, go to https://docs.aws.amazon.com/cli/latest/userguide/cli-chap-configure.html and follow the instructions to configure the AWS CLI.
Installing an AWS Python SDK – Boto
The AWS Python SDK we will use is called Boto, which also requires Python and pip. Follow the instructions at this URL: https://aws.amazon.com/sdk-for-python/.
For installation information, please visit https://pypi.org/project/boto3/.
If you need to install it using conda, please visit https://anaconda.org/conda-forge/boto3.
Installing MySQL Client
We will use the MySQL Client to connect to our AWS RDS instance via a public IP. In order to do that, we need to install the MySQL Client on our local machine. Please refer to https://cloud.google.com/sql/docs/mysql/connect-admin-ip#install-mysql-client to install the MySQL Client.
Installing pytest
pytest is a testing framework that makes unit testing easy. To execute it, you just need to change your working directory and run $ pytest to run all of the unit tests in that directory.
To install pytest, please go to https://docs.pytest.org/en/latest/getting-started.html to install it.
Note
Before running pytest, please install the other packages required for the given exercise, such as Airflow.
Installing Moto
Moto is a library that enables your tests to easily mock out AWS services.
To install moto, please go to http://docs.getmoto.org/en/latest/docs/getting_started.html.
Installing PyTorch
PyTorch is a Python-based scientific computing package for deep learning research. It's an open source machine learning library based on the Torch library, and it's usually used for applications such as computer vision and natural language processing.
To install PyTorch, please go to https://pytorch.org/get-started/locally/.
Installing Gym
Gym is a toolkit for developing and comparing reinforcement learning algorithms. It makes no assumptions about the structure of your agent and is compatible with any numerical computation library, such as TensorFlow or Theano.
To install Gym, please go to https://gym.openai.com/docs/#installation.
Installing Docker
Docker is a tool for building images, which can be distributed and deployed to various environments.
Follow the installation instructions at https://docs.docker.com/install/ for your operating system.
Kubernetes – Minikube
Kubernetes is an engine that can host Docker containers. To run a local Kubernetes cluster, we use the Minikube tool.
Follow the installation instructions at https://kubernetes.io/docs/tasks/tools/install-minikube/ for your operating system.
Note
Minikube provisions its own VM using a hypervisor and sets up all the Kubernetes components inside it. If you wish to install Minikube inside a local or cloud VM, you will need to instruct Minikube to set up a Kubernetes cluster without using virtualization, because setting up a VM inside a VM is tricky.
To start up Minikube in a virtualized environment, add the --driver=none flag when starting up the cluster for the first time. When Minikube is running without a VM, all minikube and kubectl commands need to be run with root privileges. For this, you can add sudo before each of these commands. Alternatively, you can switch to root user by using sudo -s and entering the admin password when prompted.
Installing Maven
We will use Maven 3 as the build server for our Java applications. Install Maven by following the instructions at https://maven.apache.org/install.html.
Installing JDK
We will use the Java programming language to build a Flink streaming job in Chapter 12, Productionizing Your AI applications. There is a good chance that Java Development Kit (JDK) 8 or higher is already installed on your machine. If not, there are several ways to install it; follow the instructions for your operating system at https://openjdk.java.net/install/.
Installing Netcat
The Netcat tool is used to send data over a network with the TCP/IP protocol. Install it by following one of the following installation instructions:
- Linux (Ubuntu/Debian): Type the following command in Terminal:
sudo apt install netcat
- macOS: Type the following command in Terminal:
brew install netcat
- Windows: Download and install the tool from https://joncraton.org/blog/46/netcat-for-windows/.
Alternatively, type the following in Anaconda Prompt:
sudo apt install netcat
Installing Libraries
pip comes pre-installed with Anaconda. Once Anaconda is installed on your machine, all the required libraries can be installed using pip, for example, pip install numpy. Alternatively, you can install all the required libraries using pip install –r requirements.txt. You can find the requirements.txt file at https://packt.live/31E4pP0.
The exercises and activities will be executed in Jupyter Notebooks. Jupyter is a Python library and can be installed in the same way as the other Python libraries – that is, with pip install jupyter, but fortunately, it comes pre-installed with Anaconda. To open a notebook, simply run the command jupyter notebook in the Terminal or Command Prompt.
Accessing the Code Files
You can find the complete code files of this book at https://packt.live/3fpBOmh.
If you have any issues or questions about installation, please email us at [email protected].