
Chapter 3. Into the Real World

The previous chapter demonstrated the configuration for basic packet filtering on a single machine. In this chapter, we’ll build on that basic setup but move into more conventional territory: the packet-filtering gateway. Although most of the items in this chapter are potentially useful in a single-machine setup, our main focus is to set up a gateway that forwards a selection of network traffic and handles common network services for a basic local network.
A Simple Gateway
We’ll start with building what you probably associate with the term firewall: a machine that acts as a gateway for at least one other machine. In addition to forwarding packets between its various networks, this machine’s mission will be to improve the signal-to-noise ratio in the network traffic it handles. That’s where our PF configuration comes in.
But before diving into the practical configuration details, we need to dip into some theory and flesh out some concepts. Bear with me; this will end up saving you some headaches I’ve seen on mailing lists, newsgroups, and Web forums all too often.
Keep It Simple: Avoid the Pitfalls of in, out, and on
In the single-machine setup, life is relatively simple. Traffic you create should either pass out to the rest of the world or be blocked by your filtering rules, and you get to decide what you want to let in from elsewhere.
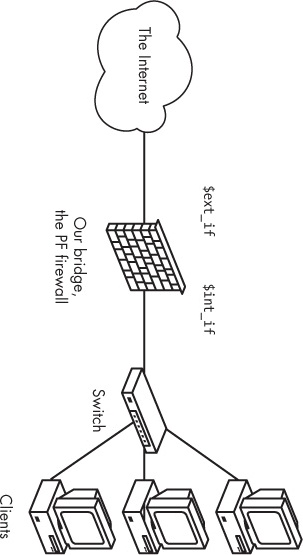
When you set up a gateway, your perspective changes. You go from the “It’s me versus the network out there” mindset to “I’m the one who decides what to pass to or from all the networks I’m connected to.” The machine has several, or at least two, network interfaces, each connected to a separate network, and its primary function (or at least the one we’re interested in here) is to forward network traffic between networks. Conceptually, the network would look something like Figure 3-1.
It’s very reasonable to think that if you want traffic to pass from the network connected to re1 to hosts on the network connected to re0, you’ll need a rule like the following:[13]
pass in proto tcp on re1 from re1:network to re0:network
                  port $ports keep state
However, one of the most common and most complained-about mistakes in firewall configuration is not realizing that the to keyword doesn’t in itself guarantee passage to the end point. The to keyword here means only that a packet or connection must have a destination address that matches those criteria in order to match the rule. The rule we just wrote lets the traffic pass in to just the gateway itself and on the specific interface named in the rule. To allow the packets in a bit further and to move on to the next network, we need a matching rule that says something like this:
pass out proto tcp on re0 from re1:network to re0:network
                     port $ports keep state
But please stop and take a moment to read those rules one more time. This last rule allows only packets with a destination in the network directly connected to re0 to pass, and nothing else. If that’s exactly what you want, fine. In other contexts, such rules are, while perfectly valid, more specific than the situation calls for. It’s very easy to let yourself dive deeply into specific details and lose the higher-level view of the configuration’s purpose—and maybe earn yourself a few extra rounds of debugging in the process.
If there are good reasons for writing very specific rules, like the preceding ones, you probably already know that you need them and why. By the time you have finished this book (if not a bit earlier), you should be able to articulate the circumstances when more specific rules are needed. However, for the basic gateway configurations in this chapter, it’s likely that you’ll want to write rules that are not interface-specific. In fact, in some cases, it isn’t useful to specify the direction either; you’d simply use a rule like the following to let your local network access the Internet:
pass proto tcp from re1:network to port $ports keep state
For simple setups, interface-bound in and out rules are likely to add more clutter to your rule sets than they’re worth. For a busy network admin, a readable rule set is a safer one. (And we’ll look at some additional safety measures, like antispoof, in Chapter 10.)
For the remainder of this book, with some exceptions, we’ll keep the rules as simple as possible for readability.
Network Address Translation vs. IPv6
Once we start handling traffic between separate networks, it’s useful to look at how network addresses work and why you’re likely to come across several different addressing schemes. The subject of network addresses has been a rich source of both confusion and buzzwords over the years. The underlying facts are sometimes hard to establish, unless you go to the source and wade through a series of RFCs. Over the next few paragraphs, I’ll make an effort to clear up some of the confusion.
For example, a widely held belief is that if you have an internal network that uses a totally different address range from the one assigned to the interface attached to the Internet, you’re safe, and no one from the outside can get at your network resources. This belief is closely related to the idea that the IP address of your firewall in the local network must be either 192.168.0.1 or 10.0.0.1.
There’s an element of truth in both notions, and those addresses are common defaults. But the real story is that it’s possible to sniff one’s way past network address translation, although PF offers some tricks that make that task harder.
The real reason we use a specific set of internal address ranges and a different set of addresses for unique external address ranges isn’t primarily to address security concerns. Rather, it’s the easiest way to work around a design problem in the Internet protocols: a limited range of possible addresses.
In the 1980s, when the Internet protocols were formulated, most computers on the Internet (or ARPANET, as it was known at the time) were large machines with anything from several dozen to several thousand users each. At the time, a 32-bit address space with more than four billion addresses seemed quite sufficient, but several factors have conspired to prove that assumption wrong. One factor is that the address-allocation process led to a situation where the largest chunks of the available address space were already allocated before some of the world’s more populous nations even connected to the Internet. The other, and perhaps more significant, factor was that by the early 1990s, the Internet was no longer a research project, but rather a commercially available resource with consumers and companies of all sizes consuming IP address space at an alarming rate.
The long-term solution was to redefine the Internet to use a larger address space. In 1998, the specification for IPv6, with 128 bits of address space for a total of 2128 addresses, was published as RFC 2460. But while we were waiting for IPv6 to become generally available, we needed a stopgap solution. That solution came as a series of RFCs that specified how a gateway could forward traffic with IP addresses translated so that a large local network would look like just one computer to the rest of the Internet. Certain previously unallocated IP address ranges were set aside for these private networks. These were free for anyone to use, on the condition that traffic in those ranges wouldn’t be allowed out on the Internet untranslated. Thus, network address translation (NAT) was born in the mid-1990s and quickly became the default way to handle addressing in local networks.[14]
PF supports IPv6 as well as the various IPv4 address translation tricks. (In fact, the BSDs were among the earliest IPv6 adopters, thanks to the efforts of the KAME project.[15]) All systems that have PF also support both the IPv4 and the IPv6 address families. If your IPv4 network needs a NAT configuration, you can integrate the translation as needed in your PF rule set. In other words, if you’re using a system that supports PF, you can be reasonably sure that your IPv6 needs have been taken care of, at least on the operating-system level. However, some operating systems with a PF port use older versions of the code, and it’s important to be aware that the general rule that newer PF code is better applies equally to the IPv6 context.
The examples in this book use mainly IPv4 addresses and NAT where appropriate, but most of the material is equally relevant to networks that have implemented IPv6.
Final Preparations: Defining Your Local Network
In Chapter 2, we set up a configuration for a single, standalone machine. We’re about to extend that configuration to a gateway version, and it’s useful to define a few more macros to help readability and to conceptually separate the local networks where you have a certain measure of control from everything else. So how do you define your “local” network in PF terms?
Earlier in this chapter, you saw the interface:network notation. This is a nice piece of shorthand, but you can make your rule set even more readable and easier to maintain by taking the macro a bit further. For example, you could define a $localnet macro as the network directly attached to your internal interface (re1:network in our examples). Or you could change the definition of $localnet to an IP address/netmask notation to denote a network, such as 192.168.100.0/24 for a subnet of private IPv4 addresses or 2001:db8:dead:beef::/64 for an IPv6 range.
If your network environment requires it, you could define your $localnet as a list of networks. For example, a sensible $localnet definition combined with pass rules that use the macro, such as the following, could end up saving you a few headaches:
pass proto { tcp, udp } from $localnet to port $portsWe’ll stick to the convention of using macros such as $localnet for readability from here on.
Setting Up a Gateway
We’ll take the single-machine configuration we built from the ground up in the previous chapter as our starting point for building our packet-filtering gateway. We assume that the machine has acquired another network card (or that you have set up a network connection from your local network to one or more other networks via Ethernet, PPP, or other means).
In our context, it isn’t too interesting to look at the details of how the interfaces are configured. We just need to know that the interfaces are up and running.
For the following discussion and examples, only the interface names will differ between a PPP setup and an Ethernet one, and we’ll do our best to get rid of the actual interface names as quickly as possible.
First, because packet forwarding is off by default in all BSDs, we need to turn it on in order to let the machine forward the network traffic it receives on one interface to other networks via one or more separate interfaces. Initially, we’ll do this on the command line with a sysctl command for traditional IPv4:
# sysctl net.inet.ip.forwarding=1
If we need to forward IPv6 traffic, we use this sysctl command:
# sysctl net.inet6.ip6.forwarding=1
This is fine for now. However, in order for this to work once you reboot the computer at some time in the future, you need to enter these settings into the relevant configuration files.
In OpenBSD and NetBSD, you do this by editing /etc/sysctl.conf and adding IP-forwarding lines to the end of the file so the last lines look like this:
net.inet.ip.forwarding=1
net.inet6.ip6.forwarding=1
In FreeBSD, make the change by putting these lines in your /etc/rc.conf:
gateway_enable="YES" #for ipv4
ipv6_gateway_enable="YES" #for ipv6
The net effect is identical; the FreeBSD rc script sets the two values via sysctl commands. However, a larger part of the FreeBSD configuration is centralized into the rc.conf file.
Now it’s time to check whether all of the interfaces you intend to use are up and running. Use ifconfig -a or ifconfig interface_name to find out.
The output of ifconfig -a on one of my systems looks like this:
$ ifconfig -a
lo0: flags=8049<UP,LOOPBACK,RUNNING,MULTICAST> mtu 33224
        groups: lo
        inet 127.0.0.1 netmask 0xff000000
        inet6 ::1 prefixlen 128
        inet6 fe80::1%lo0 prefixlen 64 scopeid 0x5
xl0: flags=8843<UP,BROADCAST,RUNNING,SIMPLEX,MULTICAST> mtu 1500
        lladdr 00:60:97:83:4a:01
        groups: egress
        media: Ethernet autoselect (100baseTX full-duplex)
        status: active
        inet 194.54.107.18 netmask 0xfffffff8 broadcast 194.54.107.23
        inet6 fe80::260:97ff:fe83:4a01%xl0 prefixlen 64 scopeid 0x1
fxp0: flags=8843<UP,BROADCAST,RUNNING,SIMPLEX,MULTICAST> mtu 1500
        lladdr 00:30:05:03:fc:41
        media: Ethernet autoselect (100baseTX full-duplex)
        status: active
        inet 194.54.103.65 netmask 0xffffffc0 broadcast 194.54.103.127
        inet6 fe80::230:5ff:fe03:fc41%fxp0 prefixlen 64 scopeid 0x2
pflog0: flags=141<UP,RUNNING,PROMISC> mtu 33224
enc0: flags=0<> mtu 1536
Your setup is most likely somewhat different. Here, the physical interfaces on the gateway are xl0 and fxp0. The logical interfaces lo0 (the loopback interface), enc0 (the encapsulation interface for IPSEC use), and pflog0 (the PF logging device) are probably on your system, too.
If you’re on a dial-up connection, you probably use some variant of PPP for the Internet connection, and your external interface is the tun0 pseudo-device. If your connection is via some sort of broadband connection, you may have an Ethernet interface to play with. However, if you’re in the significant subset of ADSL users who use PPP over Ethernet (PPPoE), the correct external interface will be one of the pseudo-devices tun0 or pppoe0 (depending on whether you use userland pppoe(8) or kernel mode pppoe(4)), not the physical Ethernet interface.
Depending on your specific setup, you may need to do some other device-specific configuration for your interfaces. After you have that set up, you can move on to the TCP/IP level and deal with the packet-filtering configuration.
If you still intend to allow any traffic initiated by machines on the inside, your /etc/pf.conf for your initial gateway setup could look roughly like this:
ext_if = "re0" # macro for external interface - use tun0 or pppoe0 for PPPoE
int_if = "re1" # macro for internal interface
localnet = $int_if:network
# ext_if IPv4 address could be dynamic, hence ($ext_if)
match out on $ext_if inet from $localnet nat-to ($ext_if) # NAT, match IPv4 only
block all
pass from { self, $localnet }
Note the use of macros to assign logical names to the network interfaces. Here, Realtek Ethernet cards are used, but this is the last time we’ll find this of any interest whatsoever in our context.
In truly simple setups like this one, we may not gain very much by using macros like these, but once the rule sets grow a little larger, you’ll learn to appreciate the readability they add.
One possible refinement to this rule set would be to remove the macro ext_if and replace the $ext_if references with the string egress, which is the name of the interface group that contains the interface that has the default route. Interface groups are not macros, so you would write the name egress without a leading $ character.
Also note the match rule with nat-to. This is where you handle NAT from the nonroutable address inside your local network to the sole official address assigned to you. If your network uses official, routable IPv4 addresses, you simply leave this line out of your configuration. The match rules, which were introduced in OpenBSD 4.6, can be used to apply actions when a connection matches the criteria without deciding whether a connection should be blocked or passed.
The parentheses surrounding the last part of the match rule ($ext_if) are there to compensate for the possibility that the IP address of the external interface may be dynamically assigned. This detail will ensure that your network traffic runs without serious interruptions, even if the interface’s IP address changes.
It’s time to sum up the rule set we’ve built so far: (1) We block all traffic originating outside our own network. (2) We make sure all IPv4 traffic initiated by hosts in our local network will pass into the outside world only with the source address rewritten to the routable address assigned to the gateway’s external interface. (3) Finally, we let all traffic from our local network (IPv4 and IPv6 both) and from the gateway itself pass. The keyword self in the final pass rule is a macro-ish reserved word in PF syntax that denotes all addresses assigned to all interfaces on the local host.
If your operating system runs a pre-OpenBSD 4.7 PF version, your first gateway rule set would look something like this:
ext_if = "re0" # macro for external interface - use tun0 or pppoe0 for PPPoE
int_if = "re1" # macro for internal interface
localnet = $int_if:network
# ext_if IP address could be dynamic, hence ($ext_if)
nat on $ext_if inet from $localnet to any -> ($ext_if) # NAT, match IPv4 only
block all
pass from { self, $localnet } to any keep state
The nat rule here handles the translation much as does the match rule with nat-to in the previous example.
On the other hand, this rule set probably allows more traffic than you actually want to pass out of your network. In one of the networks where I’ve done a bit of work, the main part of the rule set is based on a macro called client_out:
client_out = "{ ftp-data, ftp, ssh, domain, pop3, auth, nntp, http,
                https, 446, cvspserver, 2628, 5999, 8000, 8080 }"
It has this pass rule:
pass proto tcp from $localnet to port $client_out
This may be a somewhat peculiar selection of ports, but it’s exactly what my colleagues there needed at the time. Some of the numbered ports were needed for systems that were set up for specific purposes at other sites. Your needs probably differ at least in some details, but this should cover some of the more useful services.
Here’s another pass rule that is useful to those who want the ability to administer machines from elsewhere:
pass in proto tcp to port ssh
Or use this form, if you prefer:
pass in proto tcp to $ext_if port ssh
When you leave out the from part entirely, the default is from any, which is quite permissive. It lets you log in from anywhere, which is great if you travel a lot and need SSH access from unknown locations around the world. If you’re not all that mobile—say you haven’t quite developed the taste for conferences in far-flung locations, or you feel your colleagues can fend for themselves while you’re on vacation—you may want to tighten up with a from part that includes only the places where you and other administrators are likely to log in from for legitimate reasons.
Our very basic rule set is still not complete. Next, we need to make the name service work for our clients. We start with another macro at the start of our rule set:
udp_services = "{ domain, ntp }"This is supplemented with a rule that passes the traffic we want through our firewall:
pass quick proto { tcp, udp } to port $udp_servicesNote the quick keyword in this rule. We’ve started writing rule sets that consist of several rules, and it’s time to revisit the relationships and interactions between them.
As noted in the previous chapter, the rules are evaluated from top to bottom in the sequence they’re written in the configuration file. For each packet or connection evaluated by PF, the last matching rule in the rule set is the one that’s applied.
The quick keyword offers an escape from the ordinary sequence. When a packet matches a quick rule, the packet is treated according to the present rule. The rule processing stops without considering any further rules that might have matched the packet. As your rule sets grow longer and more complicated, you’ll find this quite handy. For example, it’s useful when you need a few isolated exceptions to your general rules.
This quick rule also takes care of NTP, which is used for time synchronization. Common to both the name service and time synchronization protocols is that they may, under certain circumstances, communicate alternately over TCP and UDP.
Testing Your Rule Set
You may not have gotten around to writing that formal test suite for your rule sets just yet, but there’s every reason to test that your configuration works as expected.
The same basic tests in the standalone example from the previous chapter still apply. But now you need to test from the other hosts in your network as well as from your packet-filtering gateway. For each of the services you specified in your pass rules, test that machines in your local network get meaningful results. From any machine in your local network, enter a command like this:
$ host nostarch.comIt should return exactly the same results as when you tested the stand-alone rule set in the previous chapter, and traffic for the services you have specified should pass[16].
You may not think it’s necessary, but it doesn’t hurt to check that the rule set works as expected from outside your gateway as well. If you’ve done exactly what this chapter says so far, it shouldn’t be possible to contact machines in your local network from the outside.
That Sad Old FTP Thing
The short list of real-life TCP ports we looked at a few moments back contained, among other things, FTP, the classic file transfer protocol. FTP is a relic of the early Internet, when experiments were the norm and security was not really on the horizon in any modern sense. FTP actually predates TCP/IP,[17] and it’s possible to track the protocol’s development through more than 50 RFCs. After more than 30 years, FTP is both a sad old thing and a problem child—emphatically so for anyone trying to combine FTP and firewalls. FTP is an old and weird protocol with a lot to dislike. Here are the most common points against it:
Passwords are transferred in the clear.[18]
The protocol demands the use of at least two TCP connections (control and data) on separate ports.
When a session is established, data is communicated via ports usually selected at random.
All of these points make for challenges security-wise, even before considering any potential weaknesses in client or server software that may lead to security issues. As any network graybeard will tell you, these things tend to crop up when you need them the least.
Under any circumstances, other more modern and more secure options for file transfer exist, such as SFTP and SCP, which feature both authentication and data transfer via encrypted connections. Competent IT professionals should have a preference for some form of file transfer other than FTP.
Regardless of our professionalism and preferences, we sometimes must deal with things we would prefer not to use at all. In the case of FTP through firewalls, we can combat problems by redirecting the traffic to a small program that’s written specifically for this purpose. The upside for us is that handling FTP offers us a chance to look at two fairly advanced PF features: redirection and anchors.
The easiest way to handle FTP in a default-to-block scenario such as ours is to have PF redirect the traffic for that service to an external application that acts as a proxy for the service. The proxy maintains its own named sub–rule set (an anchor in PF terminology), where it inserts or deletes rules as needed for the FTP traffic. The combination of redirection and the anchor provides a clean, well-defined interface between the packet-filtering subsystem and the proxy.
If We Must: ftp-proxy with Divert or Redirect
Enabling FTP transfers through your gateway is amazingly simple, thanks to the FTP-proxy program included in the OpenBSD base system. The program is called—you guessed it—ftp-proxy.
To enable ftp-proxy, you need to add this line to your /etc/rc.conf.local file on OpenBSD:
ftpproxy_flags=""
On FreeBSD, /etc/rc.conf needs to contain at least the first of these two lines:
ftpproxy_enable="YES"
ftpproxy_flags="" # and put any command line options here
If you need to specify any command-line options to ftp-proxy, you put them in the ftpproxy_flags variable.
You can start the proxy manually by running /usr/sbin/ftp-proxy if you like (or even better, use the /etc/rc.d/ftp-proxy script with the start option on OpenBSD), and you may want to do this in order to check that the changes to the PF configuration you’re about to make have the intended effect.
For a basic configuration, you need to add only three elements to your /etc/pf.conf: the anchor and two pass rules. The anchor declaration looks like this:
anchor "ftp-proxy/*"
In pre-OpenBSD 4.7 versions, two anchor declarations were needed:
nat-anchor "ftp-proxy/*"
rdr-anchor "ftp-proxy/*"
The proxy will insert the rules it generates for the FTP sessions here. Then, you also need a pass rule to let FTP traffic into the proxy:
pass in quick inet proto tcp to port ftp divert-to 127.0.0.1 port 8021
Note the divert-to part. This redirects the traffic to the local port, where the proxy listens via the highly efficient, local-connections-only divert(4) interface. In OpenBSD versions 4.9 and older, the traffic diversion happened via an rdr-to. If you’re upgrading an existing pre-OpenBSD 5.0 configuration, you’ll need to update your rdr-to rules for the FTP proxy to use divert-to instead.
If your operating system uses a pre-OpenBSD 4.7 PF version, you need this version of the redirection rule:
rdr pass on $int_if inet proto tcp from any to any port ftp -> 127.0.0.1 port 8021
Finally, make sure your rule set contains a pass rule to let the packets pass from the proxy to the rest of the world, where $proxy expands to the address to which the proxy daemon is bound:
pass out inet proto tcp from $proxy to any port ftp
Reload your PF configuration:
$ sudo pfctl -f /etc/pf.confBefore you know it, your users will thank you for making FTP work.
Variations on the ftp-proxy Setup
The preceding example covers a basic setup where the clients in your local network need to contact FTP servers elsewhere. This configuration should work well with most combinations of FTP clients and servers.
You can change the proxy’s behavior in various ways by adding options to the ftpproxy_flags= line. You may bump into clients or servers with specific quirks that you need to compensate for in your configuration, or you may want to integrate the proxy in your setup in specific ways, such as assigning FTP traffic to a specific queue. For these and other finer points of ftp-proxy configuration, your best bet is to start by studying the man page.
If you’re interested in ways to run an FTP server protected by PF and ftp-proxy, you could look into running a separate ftp-proxy in reverse mode (using the -R option) on a separate port with its own redirecting pass rule. It’s even possible to set up the proxy to run in IPv6 mode, but if you’re ahead of the pack in running the modern protocol, you’re less likely to bother with FTP as your main file transfer protocol.
Note
If your PF version predates the ones described here, you’re running on an outdated, unsupported operating system. I strongly urge you to schedule an operating system upgrade as soon as possible. If an upgrade is for some reason not an option, please look up the first edition of this book and study the documentation for your operating system for information on how to use some earlier FTP proxies.
Making Your Network Troubleshooting-Friendly
Making your network troubleshooting-friendly is a potentially large subject. Generally, the debugging- or troubleshooting-friendliness of your TCP/IP network depends on how you treat the Internet protocol that was designed specifically with debugging in mind: ICMP.
ICMP is the protocol for sending and receiving control messages between hosts and gateways, mainly to provide feedback to a sender about any unusual or difficult conditions en route to the target host.
There’s a lot of ICMP traffic, which usually happens in the background while you are surfing the Web, reading mail, or transferring files. Routers (remember, you’re building one) use ICMP to negotiate packet sizes and other transmission parameters in a process often referred to as path MTU discovery.
You may have heard admins refer to ICMP as either “evil” or, if their understanding runs a little deeper, “a necessary evil.” The reason for this attitude is purely historical. A few years back, it was discovered that the networking stacks of several operating systems contained code that could make the machine crash if it were sent a sufficiently large ICMP request.
One of the companies that was hit hard by this was Microsoft, and you can find a lot of material on the ping of death bug by using your favorite search engine. However, this all happened in the second half of the 1990s, and all modern operating systems have thoroughly sanitized their network code since then (at least, that’s what we’re led to believe).
One of the early work-arounds was to simply block either ICMP echo (ping) requests or even all ICMP traffic. That measure almost certainly led to poor performance and hard-to-debug network problems. In some places, however, these rule sets have been around for almost two decades, and the people who put them there are still scared. There’s most likely little to no reason to worry about destructive ICMP traffic anymore, but here we’ll look at how to manage just what ICMP traffic passes to or from your network.
In modern IPv6 networks, the updated icmp6 protocol plays a more crucial role than ever in parameter passing and even host configuration, and network admins are playing a high-stakes game while learning the finer points of blocking or passing icmp6 traffic. To a large extent, issues that are relevant for IPv4 ICMP generally apply to IPv6 ICMP6 as well, but in addition, ICMP6 is used for several mechanisms that were handled differently in IPv4. We’ll dip into some of these issues after walking through the issues that are relevant for both IP protocol versions.
Do We Let It All Through?
The obvious question becomes, “If ICMP is such a good and useful thing, shouldn’t we let it all through all the time?” The answer is that it depends.
Letting diagnostic traffic pass unconditionally makes debugging easier, of course, but it also makes it relatively easy for others to extract information about your network. So, a rule like the following might not be optimal if you want to cloak the internal workings of your IPv4 network:
pass inet proto icmp
If you want the same free flow of messages for your IPv6 traffic, the corresponding rule is this:
pass inet6 proto icmp6
In all fairness, it should also be said that you might find some ICMP and ICMP6 traffic quite harmlessly riding piggyback on your keep state rules.
The Easy Way Out: The Buck Stops Here
The easiest solution could very well be to allow all ICMP and ICMP6 traffic from your local network through and to let probes from elsewhere stop at your gateway:
pass inet proto icmp icmp-type $icmp_types from $localnet
pass inet6 proto icmp6 icmp6-type $icmp6_types from $localnet
pass inet proto icmp icmp-type $icmp_types to $ext_if
pass inet6 proto icmp6 icmp6-type $icmp6_types to $ext_if
This is assuming, of course that you’ve identified the list of desirable ICMP and ICMP6 types to fill out your macro definitions. We’ll get back to those shortly. Stopping probes at the gateway might be an attractive option anyway, but let’s look at a few other options that’ll demonstrate some of PF’s flexibility.
Letting ping Through
The rule set we have developed so far in this chapter has one clear disadvantage: Common troubleshooting commands, such as ping and traceroute (and their IPv6 equivalents, ping6 and traceroute6), will not work. That may not matter too much to your users, and because it was the ping command that scared people into filtering or blocking ICMP traffic in the first place, there are apparently some people who feel we’re better off without it. However, you’ll find these troubleshooting tools useful. And with a couple of small additions to the rule set, they will be available to you.
The diagnostic commands ping and ping6 rely on the ICMP and ICMP6 echo request (and the matching echo reply) types, and in order to keep our rule set tidy, we start by defining another set of macros:
icmp_types = "echoreq"
icmp6_types = "echoreq"
Then, we add rules that use the definitions:
pass inet proto icmp icmp-type $icmp_types
pass inet6 proto icmp6 icmp6-type $icmp6_types
The macros and the rules mean that ICMP and ICMP6 packets with type echo request will be allowed through and matching echo replies will be allowed to pass back due to PF’s stateful nature. This is all the ping and ping6 commands need in order to produce their expected results.
If you need more or other types of ICMP or ICMP6 packets to go through, you can expand icmp_types and icmp6_types to lists of those packet types you want to allow.
Helping traceroute
The traceroute command (and the IPv6 variant traceroute6) is useful when your users claim that the Internet isn’t working. By default, Unix traceroute uses UDP connections according to a set formula based on destination. The following rules work with the traceroute and traceroute6 commands on all forms of Unix I’ve had access to, including GNU/Linux:
# allow out the default range for traceroute(8):
# "base+nhops*nqueries-1" (33434+64*3-1)
pass out on egress inet proto udp to port 33433:33626 # For IPv4
pass out on egress inet6 proto udp to port 33433:33626 # For IPv6
This also gives you a first taste of what port ranges look like. They’re quite useful in some contexts.
Experience so far indicates that traceroute and traceroute6 implementations on other operating systems work roughly the same way. One notable exception is Microsoft Windows. On that platform, the tracert.exe program and its IPv6 sister tracert6.exe use ICMP echo requests for this purpose. So if you want to let Windows traceroutes through, you need only the first rule, much as when letting ping through. The Unix traceroute program can be instructed to use other protocols as well and will behave remarkably like its Microsoft counterpart if you use its -I command-line option. You can check the traceroute man page (or its source code, for that matter) for all the details.
This solution is based on a sample rule I found in an openbsd-misc post. I’ve found that list, and the searchable list archives (accessible among other places from http://marc.info/), to be a valuable resource whenever you need OpenBSD or PF-related information.
Path MTU Discovery
The last bit I’ll remind you about when it comes to troubleshooting is the path MTU discovery. Internet protocols are designed to be device-independent, and one consequence of device independence is that you cannot always predict reliably what the optimal packet size is for a given connection. The main constraint on your packet size is called the maximum transmission unit, or MTU, which sets the upper limit on the packet size for an interface. The ifconfig command will show you the MTU for your network interfaces.
Modern TCP/IP implementations expect to be able to determine the correct packet size for a connection through a process that simply involves sending packets of varying sizes within the MTU of the local link with the “do not fragment” flag set. If a packet then exceeds the MTU somewhere along the way to the destination, the host with the lower MTU will return an ICMP packet indicating “type 3, code 4” and quoting its local MTU when the local upper limit has been reached. Now, you don’t need to dive for the RFCs right away. Type 3 means destination unreachable, and code 4 is short for fragmentation needed, but the “do not fragment” flag is set. So if your connections to other networks, which may have MTUs that differ from your own, seem suboptimal, you could try changing your list of ICMP types slightly to let the IPv4 destination-unreachable packets through:
icmp_types = "{ echoreq, unreach }"As you can see, this means you do not need to change the pass rule itself:
pass inet proto icmp icmp-type $icmp_types
Now I’ll let you in on a little secret: In almost all cases, these rules aren’t necessary for purposes of path MTU discovery (but they don’t hurt either). However, even though the default PF keep state behavior takes care of most of the ICMP traffic you’ll need, PF does let you filter on all variations of ICMP types and codes. For IPv6, you’d probably want to let the more common ICMP6 diagnostics through, such as the following:
icmp6_types = "{ echoreq unreach timex paramprob }"This means that we let echo requests and destination unreachable, time exceeded, and parameter problem messages pass for IPv6 traffic. Thanks to the macro definitions, you don’t need to touch the pass rule for the ICMP6 case either:
pass inet6 proto icmp6 icmp6-type $icmp6_types
But it’s worth keeping in mind that IPv6 hosts rely on ICMP6 messages for automatic configuration-related tasks, and you may want to explicitly filter in order to allow or deny specific ICMP6 types at various points in your network.
For example, you’ll want to let a router and its clients exchange router solicitation and router advertisement messages (ICMP6 type routeradv and routersol, respectively), while you may want to make sure that neighbor advertisements and neighbor solicitations (ICMP6 type neighbradv and neighbrsol, respectively) stay confined within their directly connected networks.
If you want to delve into more detail, the list of possible types and codes are documented in the icmp(4) and icmp6(4) man pages. The background information is available in the RFCs.[19]
Tables Make Your Life Easier
By now, you may be thinking that this setup gets awfully static and rigid. There will, after all, be some kinds of data relevant to filtering and redirection at a given time, but they don’t deserve to be put into a configuration file! Quite right, and PF offers mechanisms for handling those situations.
Tables are one such feature. They’re useful as lists of IP addresses that can be manipulated without reloading the entire rule set and also when fast lookups are desirable.
Table names are always enclosed in < >, like this:
table <clients> persist { 192.168.2.0/24, !192.168.2.5 }Here, the network 192.168.2.0/24 is part of the table with one exception: The address 192.168.2.5 is excluded using the ! operator (logical NOT). The keyword persist makes sure the table itself will exist, even if no rules currently refer to it.
It’s also possible to load tables from files where each item is on a separate line, such as the file /etc/clients:
192.168.2.0/24
!192.168.2.5
This, in turn, is used to initialize the table in /etc/pf.conf:
table <clients> persist file "/etc/clients"
So, for example, you can change one of our earlier rules to read like this to manage outgoing traffic from your client computers:
pass inet proto tcp from <clients> to any port $client_out
With this in hand, you can manipulate the table’s contents live, like this:
$ sudo pfctl -t clients -T add 192.168.1/16Note that this changes the in-memory copy of the table only, meaning that the change will not survive a power failure or reboot, unless you arrange to store your changes.
You might opt to maintain the on-disk copy of the table with a cron job that dumps the table content to disk at regular intervals, using a command such as the following:
$ sudo pfctl -t clients -T show >/etc/clientsAlternatively, you could edit the /etc/clients file and replace the in-memory table contents with the file data:
$ sudo pfctl -t clients -T replace -f /etc/clientsFor operations you’ll be performing frequently, sooner or later, you’ll end up writing shell scripts. It’s likely that routine operations on tables, such as inserting or removing items or replacing table contents, will be part of your housekeeping scripts in the near future.
One common example is to enforce network access restrictions via cron jobs that replace the contents of the tables referenced as from addresses in the pass rules at specific times. In some networks, you may even need different access rules for different days of the week. The only real limitations lie in your own needs and your creativity.
We’ll be returning to some handy uses of tables frequently over the next chapters, and we’ll look at a few programs that interact with tables in useful ways.
[13] In fact, the keep state part denotes the default behavior and is redundant if you’re working with a PF version taken from OpenBSD 4.1 or later. However, there’s generally no need to remove the specification from existing rules you come across when upgrading from earlier versions. To ease the transition, the examples in this book will make this distinction when needed.
[14] RFC 1631, “The IP Network Address Translator (NAT),” dated May 1994, and RFC 1918, “Address Allocation for Private Internets,” dated February 1996, provide the details about NAT.
[15] To quote the project home page at http://www.kame.net/, “The KAME project was a joint effort of six companies in Japan to provide a free stack of IPv6, IPsec, and Mobile IPv6 for BSD variants.” The main research and development activities were considered complete in March 2006, with only maintenance activity continuing now that the important parts have been incorporated into the relevant systems.
[16] This is true unless, of course, the information changed in the meantime. Some sysadmins are fond of practical jokes, but most of the time changes in DNS zone information are due to real-world needs in that particular organization or network.
[17] The earliest RFC describing the FTP protocol is RFC 114, dated April 10, 1971. The switch to TCP/IP happened with FTP version 5, as defined in RFCs 765 and 775, dated June and December 1980, respectively.
[18] An encrypted version of the protocol, dubbed FTPS, is specified in RFC4217, but support remains somewhat spotty.
[19] The main RFCs describing ICMP and some related techniques are 792, 950, 1191, 1256, 2521, and 6145. ICMP updates for IPv6 are in RFC 3542 and RFC 4443. These documents are available in a number of places on the Web, such as http://www.ietf.org/ and http://www.faqs.org/, and probably also via your package system.