
Chapter 2
Exploring Photographic Optics
Now let’s look at the specifics of the lens you’re using. Before you go any further, it’s a good idea to fully understand the advantages and disadvantages of your lenses and how different lens use will affect your photos. So, let’s look at the different types of lenses and figure out what you can and can’t do with the ones you have.

A Nikon camera with a 50 mm lens.
The 50 mm Normal Lens
If you own a 35 mm film camera, then it probably came with a 50 mm “normal” lens. This lens has a lot going for it, such as being probably quite fast—f/2.0 (meaning it has an f-stop capability of 2.0, which we’ll discuss more in a minute)—or maybe even faster. It’s also lightweight and probably very sharp, even if it was comparatively inexpensive.
One of the big advantages of the 50 mm lens is that, depending on the vintage, it can be used with a digital camera of the same make. If you have a digital camera with a sensor that is smaller than 35 mm film (and most are), then your “normal” lens can become a very nice moderate telephoto for portraits when used on your digital camera. The only real drawback to the 50 mm lens is the obvious fact that the focal length is fixed (more on focal length in a minute).
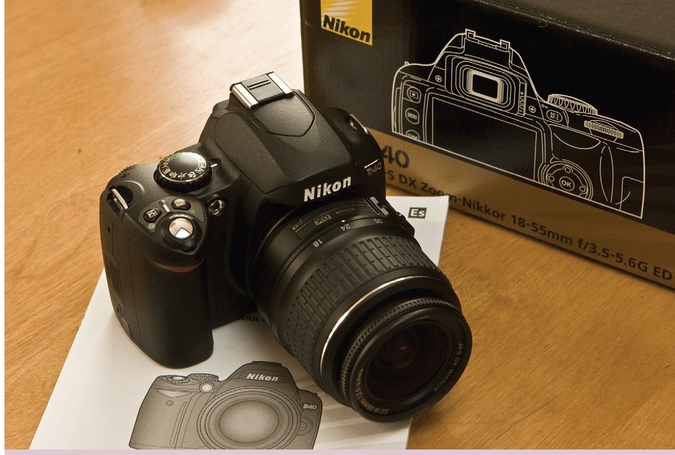
A Nikon D40 camera with kit zoom lens.
If you bought a DSLR, it probably came with a zoom lens with a range of about 18 mm to 60 mm (wide-angle to moderate telephoto, respectively). It probably also has a variable maximum aperture, which means that the aperture changes as the lens changes focal lengths (we’ll see how that happens soon). Modern cameras have electronic couplings in the lens that make the variability of the aperture quite seamless in use, so you probably won’t even notice it most of the time.
Zooms such as this are incredibly versatile; they are fantastic for most casual photography. For many people, this zoom is the only lens they’ll ever need to own.
This type of lens can be prone to flare, though, so use a lens hood. They are not equally sharp at all focal lengths or apertures (sometimes they differ dramatically), and they are prone to both vignetting and curvilinear distortion. The small maximum aperture and inherently shorter focal lengths of these lenses means that you will have less control when using selective focus techniques.
For photographers who shoot both film and digital, the big problem with kit zooms is that they are usually only compatible with digital cameras.
Vignetting is when the light from the lens is not distributed equally across the focal plane, making the corners and edges of the photograph appear darker than the middle. While vignetting is considered a technical flaw, some photographers like the effect.
Curvilinear distortion can take two forms: barrel and pincushion. Barrel distortion occurs when straight lines that are parallel to the edge of the frame bow out at the middle, and it is common when using lenses at extremely short focal lengths. Pincushion distortion occurs when straight lines at the edge of the frame pinch toward the middle. (See the “Case Studies” at the end of the chapter for more on distortion.)
Focal Length and Angle of View
The focal length of a lens is pretty simple to understand. For practical purposes, it’s the distance that the lens has to be away from the plane of focus (where the film or the digital sensor is located) in order to focus an object at infinity.
The angle of view is determined by the focal length of the lens. It’s the area that a lens covers, or “sees.”
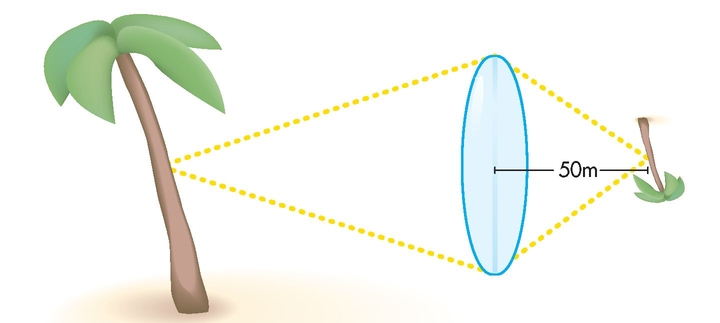
Illustration showing the focal length of a lens.
Understanding the difference between a lens’s focal length, its angle of view, and its coverage was a lot easier when everyone shot film that was the same size. It’s still easy, but digital cameras have thrown in a wrinkle or two.
As we now understand, a lens at a given focal length—say, a 50 mm lens from a 35 mm film camera—is 50 mm from the film plane when focused at infinity. At that focal length, the lens projects a circular image of a certain diameter. For a lens designed for a 35 mm camera, the diameter of the circle will typically be slightly larger than the diagonal of the 35 mm frame, or about 44 mm. The film simply cropped a rectangle out of the circular image (24 mm by 36 mm, in the case of 35 mm film).
However, if we mount that same lens onto a digital camera, the digital sensor is much smaller than a piece of 35 mm film. Therefore, the same lens now “sees” a much smaller angle of view.
Most DSLRs use a sensor that is 25.1 mm wide by 16.7 mm high. This yields a magnification factor of 1.5, so a typical digital camera would have needed a 33 mm lens to yield the equivalent angle of view of the 50 mm lens.
This is why so many sales brochures give the equivalent lens length instead of the actual length of the lens.

This photo was shot with a 24 mm lens on a full-frame 35 mm SLR. The clear area in the center shows the area that would have been captured by a typical DSLR. In order to duplicate the photo on a DSLR, I would have needed a 16 mm lens.
Aperture and F-stop
Okay, so you’ve heard the terms “aperture”, “diaphragm” and “f-stop,” but what exactly do they mean? “Aperture” or “diaphragm” (the two are often used interchangeably) relates to the device that controls the amount of light that reaches the film or digital sensor in a camera. The f-stop is a term that’s used to indicate the speed of the lens, or the size of a camera’s aperture. The higher the f-stop number, the smaller the actual opening of the aperture is. The f-stop is an expression of the ratio between the focal length of the lens divided by the diameter of the opening.
How Aperture Is Determined
A lens’s maximum aperture is easy to understand with our 50 mm lens as an example. If you’ve ever looked carefully at the front of your lens, you’ve noticed that the maximum aperture is actually expressed as a ratio—something like 1:2 or 1:2.8. This is because the maximum aperture is actually a ratio between the focal length of the lens (50 mm, in our example) and the maximum diameter of the lens. A lens that is marked as “f/2” (this is the maximum f-stop setting) means that the diameter of the lens at its narrowest point is 25 mm across.
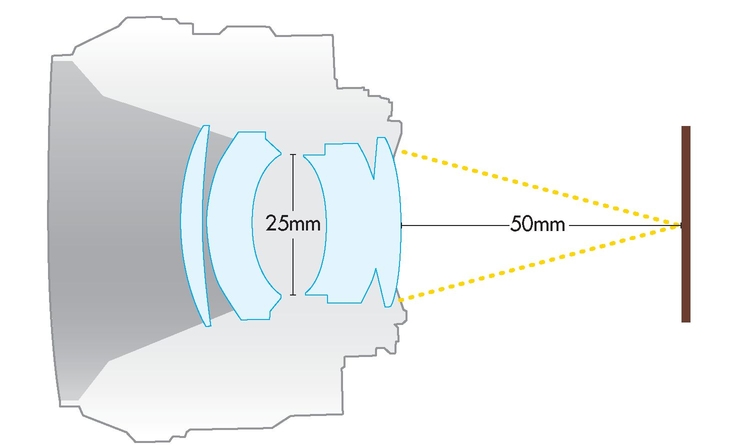
A cross-section of a 50 mm lens.
Many modern zoom lenses, especially the “kit” lenses that typically come with advanced amateur cameras, are variable aperture lenses (the 18 to 60 mm on my D40 has an aperture that changes from f/3.5 to f/5.6 as the lens is zoomed). This means that as the lens is zoomed out to long focal lengths, the ratio between the aperture and the focal length changes. In most situations, the camera will make the adjustment for you, so don’t worry about it for now.
How Aperture Controls Exposure
Changing the f-stop (or “stopping down,” as it’s called) causes a mechanical diaphragm inside the lens to close down and change this ratio. Now, here’s the thing you have to understand: as I said earlier, the aperture, or f-stop, is actually an expression of the ratio between the focal length of the lens divided by the diameter of the opening.
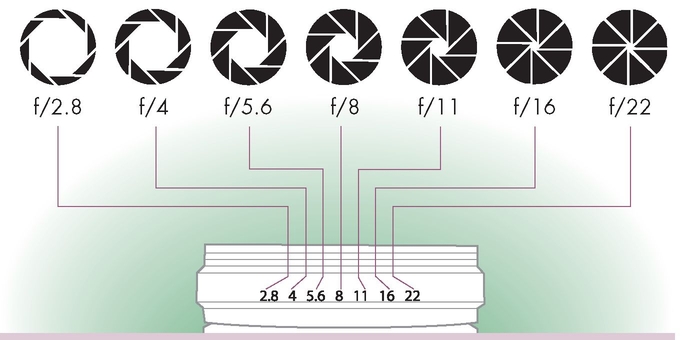
Examples of different lens apertures. A quick glance at the diagram should make things clear: As the aperture, or f-stop setting is changed, each whole stop lets in either half as much light, or twice as much light as the adjacent setting. So a setting of f/8 allows in twice as much light as f/11, or half as much light as f/5.6.
This means that as the f-stop numbers seem to get bigger—f/8, f/11, f/16, and so on—the actual opening is getting smaller. So the bigger the f-number, the less light is actually entering the camera.
Let me hear an, “Ah … now I get it!”
As many times as I have explained this to beginning photographers, this is usually the point that they have always slightly misunderstood. So, I am going to explain it one more time—but a little differently.
On a 50 mm lens, an opening of f/2.0 means that the aperture has a diameter of 25 mm. At f/4.0, the aperture is only 12.5 mm in diameter; at f/5.6 the aperture is 8.9 mm in diameter. The f-numbers are getting bigger, but the physical diameter of the diaphragm is getting smaller.
Got it?
Lens Aperture and Depth of Field
Depth of field is a very important creative tool. You don’t need to know the theory behind it, but if you want to progress past the point-and-shoot stage, you have know how to control it.
Pro Tip
Depth of field is typically the hardest thing for beginners to understand. So, here it is in the simplest terms possible: to get more depth of field, you should use a short focal length lens, a small lens opening, and/or move farther away from the subject. To get less depth of field, you should use a longer lens, a large lens opening, and/or move closer to the subject.
Here’s How It Works
Theoretically, a lens is only truly, precisely focused on one particular plane of focus.
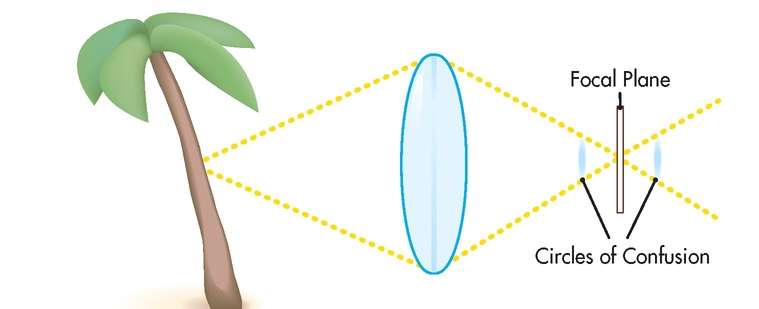
Illustration showing a wide-open lens.
Anything that is slightly in front of, or behind, the plane of focus is not sharp and shows up as unfocused pools of light. These unfocused areas are called “circles of confusion.”
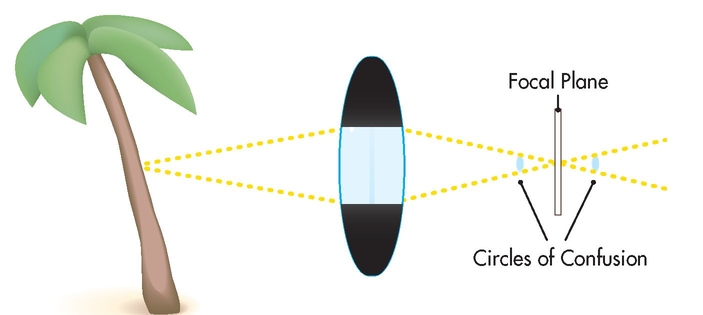
Illustration showing a closed lens.
When the aperture of the lens is large, the circles of confusion are correspondingly large. By closing the aperture of the lens, the circles of confusion become smaller and smaller. The result is a greater effect of sharpness in front of and behind the main plane of focus. This is what photographers call “depth of field.”
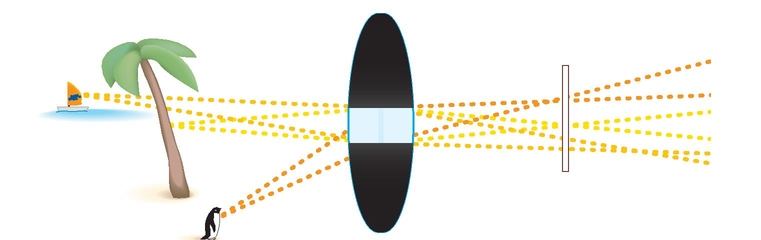
Illustration showing depth of field.
Strictly speaking, only the tree is truly focused. However, the other objects in front and behind become sharper and sharper as we close the lens aperture.
How to Use, See, and Predict Depth of Field
When you are setting the lens aperture on the camera, it doesn’t actually close down. It only closes when you take the picture. This means that most photographs will have more depth of field than what you see in the finder when you are viewing the scene. Most people like this, but there are times when you want to see or predict the depth of field that the lens will actually deliver.

These photographs were both shot with the lens set to 40 mm focal length. In the first one, the aperture is set to f/4; in the second, it is set to f/16. The focus was the same for both, but the aperture and shutter speed were changed. The effects of the change in depth of field were not apparent when I looked through the finder.
Most cameras have a depth of field preview button somewhere near the lens mount. This button will cause the lens’s adjustable diaphragm to “stop down” to the actual aperture at which the camera will shoot and allow you to see the effects of depth of field in advance. It will also make the image darker.
Unfortunately, on many modern cameras this is the only provision for predicting depth of field. The image gets so dark at small apertures that it’s difficult to see clearly.
Pro Tip
A company called Expoimaging makes a handy little disc that can calculate the depth of field for any lens/distance/aperture combination. In my humble opinion, this little device should come as standard equipment with every camera supplied with a zoom lens and belongs in every aspiring photographer’s bag.
Depth of Field: Inherent to Focal Length
Most photographers believe that depth of field is related to the size of the f-stop/aperture, and for practical purposes, this is true.
However, it is important to remember that the f-stop of a lens is a ratio between the opening and the focal length. So while a given f-stop (f/2.0, for example) represents an opening of 25 mm across a 50 mm “normal” lens, the same f-stop of f/2.0 would represent an opening of 50 mm across a 100 mm lens.
This is why longer lenses have less depth of field for any given aperture setting; the aperture is actually larger, hence less depth of field.
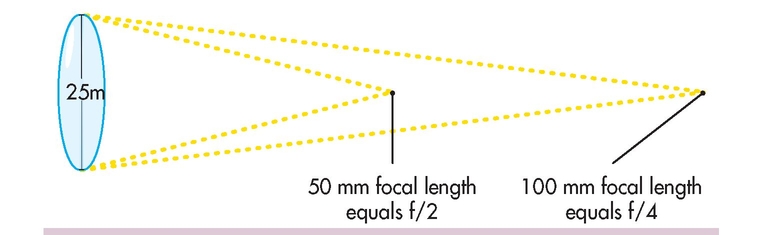
Illustration of aperture as it relates to focal length.
Why Should We Care?
This relationship has enormous impact when we apply our lens choices to digital photography. Because digital photographers are almost always using a lens of inherently shorter focal length to achieve the same angle of view (than they were accustomed to in 35 mm film photography), they are also working with much greater depth of field for a given angle of view. In fact, with the comparatively small maximum apertures of typical kit lenses, it can be difficult to achieve very shallow focus even with the lens fully open.
Pro Tip
How do you achieve that effect you see in magazines when everything is blurry in the background?
With the increased depth of field in digital photography, it is actually harder to get things out of focus than in focus. The problem is twofold: the short focal length of the lens and the (comparatively) small aperture of the zoom lenses that come with the camera.
In order to get the background to be really soft, you have to push everything to the extreme. Open the lens wide, zoom it to the longest focal length you can, and get as close to the subject as you can.
Depth of Field and Distance
There’s just one more thing I need to mention. Depth of field is also dependent on your distance to the object you’re focusing on. As you move closer and closer to something, the depth of field will steadily diminish. At very close distances it will virtually disappear, and it will be very difficult to achieve deep focus. This means that you can afford to open the lens more and more as you get farther and farther away from something, and you might need to close it more as you get closer. When you shoot objects that are distant, you can probably afford to shoot with a larger aperture.
Congratulations! If you have been able to understand everything so far, it will be clear sailing from now on.
If you didn’t get it all, then just go shoot some photos. Use your lens at the extremes: largest and smallest apertures, longest and shortest focal lengths. Then, reread this section. You’ll get it— don’t worry.
Focal Length, Angle of View, and Composition
People talk about how long lenses “compress” or “flatten” space and wide lenses distort space, but this isn’t really accurate.
If two objects are a certain distance away from us (let’s say, 10 and 15 feet), they have a certain relationship—a ratio between them and us. As we move toward the objects, that ratio changes. The object in the foreground becomes bigger faster, but the object in the background does not grow in size as quickly.
As I move father away from the two objects, the space between them seems to diminish and the object in the background appears larger relative to the object in the foreground.
The lens seems to have the effect of compressing the space between the two objects, but it is really a natural effect of how our proportional distance to the objects changes their relationship to each other. The lens simply records this phenomenon.
This makes the choice of focal length, together with depth of field, a powerful compositional tool.

These two globes are the same size; the space between them is about three feet. The first photo was shot with a 40 mm lens. For the second photo, the camera was moved closer to preserve the size of the globe in the foreground and shot with a 17 mm lens. This makes the farther globe look much smaller in proportion and emphasizes the distance between them. Another thing to notice is how much more of the wall beyond is visible in the photo shot with the wide-angle lens.
Autofocus: What It Is and How to Use It
Almost any modern camera these days has autofocus (AF). The two types of autofocus systems are either active or passive autofocus, and chances are your camera uses both systems and knows when to switch back and forth between the two.
Most of the time, your camera works in the passive autofocus mode. Inside the camera, there is an array of focusing sensors that are analyzing the contrast of the focusing screen at certain key locations within the picture area. By searching these different points, the lens focuses and refocuses in order to optimize the contrast at the AF sensor points. You can chose which point is the most important by using a control like a wheel or thumb pad on the back of the camera.
When your camera is actively autofocusing, it actually sends out a beam of infrared light (usually when you are shooting with flash in low light) which reflects from the subject in order to assist the focusing system.
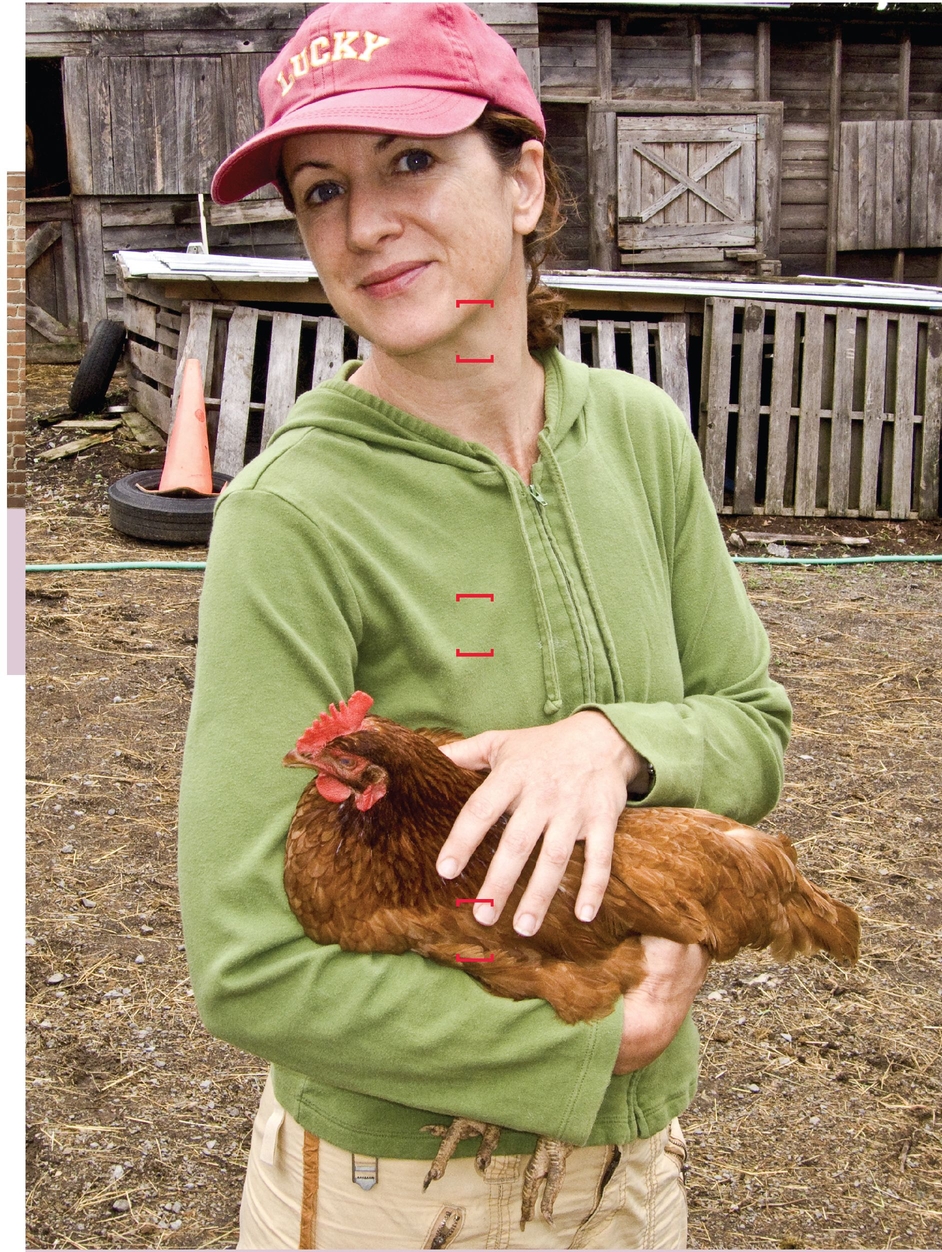
Autofocus zones are shown here with red brackets.
Here are some helpful and common autofocus frequently asked questions (FAQs):
I was shooting through a glass window, and all of my photos are blurry. What happened?
Chances are you were shooting in very low light or with a point-and-shoot camera. The camera was in active focus mode and the infrared assist beam was reflected by the glass, causing the camera to focus on the glass instead of the scene beyond the glass. Many point-and-shoots have an infinity setting that will lock the focus to infinity in order to avoid this problem. With SLRs, you should focus manually.
I was shooting close-ups of a car, and they all turned out blurry. What happened?
This is essentially the opposite of the other situation. The lens focused on the reflection in the shiny surface instead of the surface itself. This is the time for you to turn off your cameras autofocus and focus manually.
I was shooting a car race (or some other action scene), and all my photos are blurry. What happened?
Hmm, could be a few different things …
Remember that the AF system needs detail in order to focus. Putting the AF sensor on something that has no detail (like the hood of a white car) isn’t going to give it enough information to function properly.
Another possibility is that the action is too fast for your AF system. While modern cameras are incredible in terms of how quickly they can focus, they have their limitations. If you set the film motor drive or digital equivalent of frames per second (fps) too high, the AF sensors won’t have enough time to read the contrast of the scene. Some pro-level cameras can be very fast, but with prosumer-level, or advanced amateur cameras it’s often better to use a lower capture rate and be more decisive about when to shoot.
Finally, it is also very possible that your photographs aren’t out of focus but are blurry because your shutter speed is too slow. We’ll look at that issue in the next chapter.
Other Lenses
So … when is it time to graduate from the kit zoom?
Maybe never. The zoom lens that came with your camera is remarkably handy. I still use the one that came with my Canon 20D for trips to the beach and other family outings where I don’t want to endanger my pro gear.
Using the kit lens will help you to find “sweet spots” at certain focal lengths and within certain limitations. The kit zoom can be indistinguishable from a pro-quality lens. And if you never make prints bigger than 8‘×10,‘ then the kit zoom might be all you ever need.
On the other hand, if you are starting to make exhibition prints or feel like you are getting serious about photography, you might want to upgrade your lens in the same range as your kit zoom.
This photograph was shot with a very inexpensive kit zoom at 18 mm at f/3.5 (wide open). If you look carefully, you can see that the corners are darker (vignetting), and on a large print you would also be able to see the difference in the detail of the woman’s sweater from the center of the frame to the edge. The center of the frame, where the main subjects are, is as sharp as any of my pro lenses. Knowing the limitations of a lens helps you to use it well.
Prime Lenses
Do you find that you always seem to shoot at the same focal length? Many amateur photographers are under the impression that pros own and carry a virtual camera store of lenses in their bags. This might be true for some pros, but even then I think most pros and fine-art photographers have a certain focal length that they gravitate toward and shoot with most of the time. It might be a fashion photographer who consistently needs the shallow focus of an 85 mm f/1.2 or a sports photographer who shoots with a 300 mm f/2.8 all day long. If you’ve been shooting for a while, there is probably a prime/single focal length lens that you really need. These are the lenses that are worth top dollar. There are lots of famous photographers out there who never carry more than one lens.
Besides the obvious optical properties, shooting with fixed focal lengths can also be good for your growth as a photographer. They make you move around a subject and think, instead of just dialing in a composition. Moving from the kit zoom to a prime is probably the most important upgrade you can make to your camera.
Pro Tip
Using a tripod, shoot a series of photographs of a brick wall using different apertures and at a few different focal lengths.
Look at the photos on your computer. Look at both the center of the photographs and at the corners. Remember that even pro-quality lenses aren’t universally perfect at all apertures or focal lengths. Testing is a tool to optimize the way you use your lenses.
Long Zooms
Are you consistently frustrated by not being able to get close enough—and simply changing your vantage point isn’t an option? If this is the case, then perhaps you need another lens with more length. Moderate telephoto to long telephoto, variable aperture zooms like a 70-300 mm f/4.5-5.6 can be fantastic values and still be light enough that you won’t mind the extra weight in your camera bag. These are great for photographers who occasionally need a long lens but don’t make their living on long focal lengths.
Fast and long zoom lenses are sexy, but the reality is that unless you really need the speed and you shoot long focal lengths regularly, you won’t want to incur the weight penalty they exact.
Professional zoom lenses are really marked by the term “consistency. ” They usually have a constant maximum aperture, and the quality of the lens is more consistent throughout the zoom range. All zoom lenses have certain sweet spots, but the optical quality of professional zooms ranges from really good to awesome. Another important feature of pro-level zoom lenses is the fact that the front element doesn’t rotate as the lens is zoomed or focused, so the effect of a polarizing filter doesn’t change.
Pro Tip
Optical image stabilization (IS) and vibration reduction (VR) used to be options that were only available on very expensive professional-quality lenses, but this technology has recently become available to amateur photographers and really extends the range of using longer lenses without using a tripod.
The mechanics of how IS or VR works varies among different manufacturers, but the basics are that there is a special floating element in the lens that is moved during the exposure to compensate for the slight movement of the lens while the shutter is open.
What you need to know is that, within limits, IS and VR work very well and will allow photographers to handhold long lenses at shutter speeds we never could have considered in the past.
Ultra Wide-Angle Zoom Lenses
Do you find that you often can’t get back far enough to take the shot you want? Many of the ultra wide-angle zoom lenses like Canon’s 10-22 mm are made exclusively for digital cameras and will not adequately cover or even fit onto full-frame 35 mm film cameras. If you only work digitally, then the “digital only” DX lenses are often significantly cheaper and perform very well. But if you like to still shoot with film or are considering upgrading to a full-frame camera like Canon’s 5D, it makes sense to buy lenses that work for both (your kit zoom won’t). Think carefully about how you will use the lens before dropping your cash on the counter.
Lensbabies
The basic idea of the Lensbaby is that the proprietary Lensbaby lens (a simple 50 mm lens) is mounted to the end of a flexible tube that is focused by pushing or pulling the lens until you achieve the focus effect you want.

A camera with a Lensbaby lens.
The Lensbaby isn’t exactly a precision optical instrument, but it does give you back some of the selective focus that we have lost in digital photography. They are quite inexpensive ($100-400 depending on the model) and a fun little accessory to spice up your photography.
Because they really work best in close-up applications, you can also use the Lensbaby to gain back some of the depth of field you lose when working closely. I can definitely see how someone could use this inexpensive little device to spice up a wedding album for a friend or a bunch of vacation photos.

Photograph taken using a Lensbaby lens.
Teleconverters
Teleconverters are a small set of additional elements that attach to the back of another lens. The teleconverter combines with the original lens and increases the effective focal length by a certain amount (usually 1.4X, 2X, or 3X). This accessory can be a very effective way of extending the focal length of your long lenses without adding a lot of weight to your camera bag, but there are a few tradeoffs to consider.
Because a teleconverter is effectively changing the focal length of your lens, it is also effectively changing the lenses aperture. A 1.4X teleconverter used on a 200 mm lens with an f/2:8 maximum aperture makes the new lens/converter combination a 280 mm f/4. All other apertures are also affected, so you lose a stop of light across the board (two stops with a 2X converter). Most modern cameras have circuitry that senses the presence of the teleconverter and adjusts the light meter accordingly.
These tradeoffs might seem pretty severe unless you have carried a 300 mm f/2:8 in the hot sun for a couple of days. Then, the telecoverter seems like one of the best inventions in the history of the world.

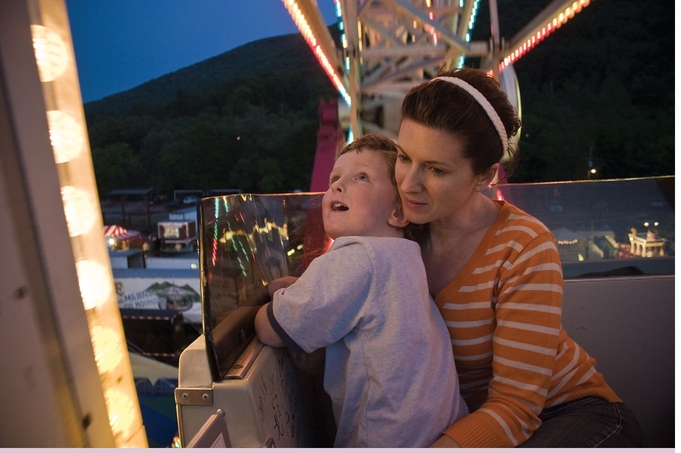
This is a perfectly nice picture of two kids on the street. It is shot with the lens set at 24 mm (equivalent to 38 mm on a 35 mm camera) at f/2.8. Still, the parked car and building don’t help much …

In this photo, the lens is zoomed to about 100 mm while the f-stop remains at 2.8. There’s a lot more impact due to the more selective focus of the longer lens and elimination of so many extraneous background elements. Notice how much less focus the boy has due to the decreased depth of field from the longer focal length lens.

This photo uses extreme depth of field. The focus is as deep and sharp as I could get it because I wanted both the boy and the bubbles in the foreground to be sharp. It’s shot with a 17 mm (equivalent to 27 mm on this camera) and represents a series of compromises due to the low light of the original scene. I shot this photo at f/4.0 at a fifteenth of a second while holding my breath and praying I could hold the camera steady.
This photograph was made with a very expensive, professional, ultra wide-angle lens, but it still has a little barrel distortion. (Look at the very edges of the frame.)
This photograph was made with a very inexpensive zoom lens at its longest setting. The pincushion distortion is noticeable along the top of the frame.
Both forms of distortion are pretty easy to fix on the computer, and neither is very noticeable in most casual photography.
The Least You Need to Know
• Depth of field is determined by the actual focal length of the lens, not it’s apparent field of view.
• Shorter lenses have more depth of field; longer lenses have less depth of field.
• Bigger apertures equal less depth of field; smaller apertures equal more depth of field.
• Closer distances equal less depth of field; farther distances equal more depth of field.
..................Content has been hidden....................
You can't read the all page of ebook, please click here login for view all page.