
Chapter 6
Light Is Color, and Color Is Light
We all know what color is, right? Stoplights tell us when to hit the brakes or the accelerator while driving. Orange cones mean we have to be careful, and blue skies mean good weather.
If color is so simple, why has it occupied—and confused—some of the greatest minds in the history of the world?
Plato, Goethe, Van Gogh, Richard Feynman … the list could continue on and on. The great thinkers of science, art, and philosophy have all been fascinated by color for one simple reason: color is a physical fact, but the perception of color is undeniably subjective. Color is where the physical and the metaphysical collide in our consciousness. One person’s fuchsia is another person’s magenta and still another’s pink. For a special few, it might even be gray and indistinguishable from chartreuse. Color is truly in the eye of the beholder.
But is it, really? We have machines that can measure, quantify, and calibrate color. But can we measure our perception? A red Ferrari is ablaze in the light of a desert sunset but turns to a dull gray parked under the mercury vapor street lamp of a parking lot. Why? Because the street lamp emits almost no red light, and if there is no red light present then there is no red light for the red paint of the car to reflect. While, in the red, rich light of the sunset, the car is supersaturated and seems unbelievable in its pure “redness.”
If the conventions of composition have power, then the power of color is exponential. Color is big to say the least, and it requires attention and practice to learn its secrets.
Color Perception
Color perception and the psychology of visual perception is a very rich topic that people have devoted their lives to understanding. Let me say that my explanation here, for the purposes of this book, is a vast oversimplification of a very deep and fascinating subject—and I encourage anyone interested in honing their photography skills to explore the subject of color even further.
How We See Color
In a nutshell, our eyes have two different types of photoreceptors: rods and cones. The rods have no color perception at all, and we use them in low-light conditions.
Cones are only sensitive to three colors: red, green, and blue. These are actually the only colors we can see, and we create all of the other colors by mixing them in our brains. When we look at a dandelion, our red receptors and our green receptors are excited. They send a message to our brain that says, “See red and green.” Our brain combines these two colors and says, “Wow, that’s a really yellow flower.”
Pro Tip
Here’s a simple way to test color: look at your computer screen or TV through a magnifying glass. Focus on something that is yellow, and you will see that there is no yellow on the screen—just red and green dots. Your brain “makes the yellow.
The thing that’s important and amazing about our eyes is that they can adapt very quickly to different spectrums of light. When we walk into an elevator lit with fluorescent light, it can look pretty nasty at first (often a sickly green). But after just a few moments, our eyes adjust and we see colors pretty closely to the way they appear under different lights.
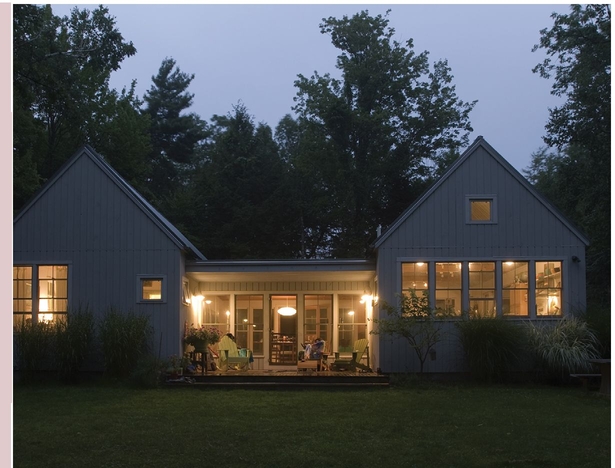
Arriving at a friend’s for dinner at dusk, you might find that the house looks something like this. The interior is warm and yellow while the last remains of the sun reflected in the sky make the exterior deep blue.
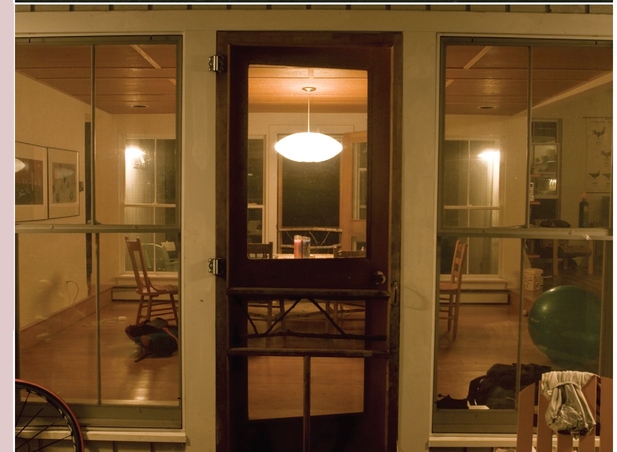
By the time we reach the front door, our eyes have begun to adjust to the color of the newly predominant light source—and the scene might look like this.

Once we’re inside, ou eyes completely adjust to the color of the incandescent lights. The food and our hostess still look a little warm, but the dusky daylight outside the window is completely blue/cyan.
Proportions of Color in Light Sources
If you remember your high school science classes, you may recall one of Isaac Newton’s many big discoveries that white light is actually composed of different colors (see what I meant about great minds thinking about color?).
Newton found that when you project white light into a prism, it is broken into a spectrum composed of the light’s constituent parts—which he identified as red, orange, yellow, green, blue, indigo, and violet. Depending on what the light source is, the spectrum might have all of these colors in different proportions. It might even have holes in the spectrum where certain colors are absent.
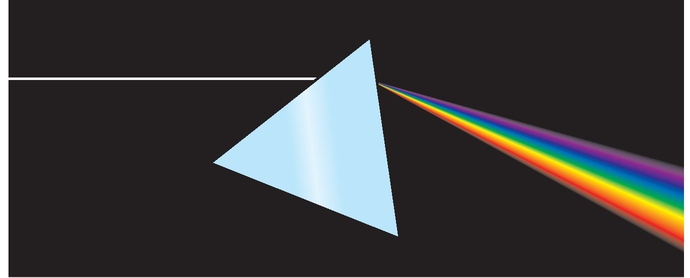
Light passing through a prism.
Black Body Light Sources
Most traditional light sources are called “black body” sources. A black body light source is a theoretical object that is black when it is absolutely cold and begins to radiate light as it is heated. The sun is a black body, and so is a light bulb or a candle. The light that these objects create is a byproduct of heat.
As the heat of these objects increases, the amount of light they generate also increases. The spectrum, or color of the light, also changes with increasing heat. For instance, a poker in a fireplace glows red-hot after sitting in the fire for a while and getting hotter. It emits a lot of red and yellow light but almost no blue light.
A candle flame burns hotter and brighter than the poker in the fireplace and creates enough blue light for us to see blue objects. The filament of a light bulb burns even hotter and brighter, and it produces a full spectrum of color but still has a preponderance of yellow light. The sun is truly “white hot” and produces much more light on the blue and violet ends of the spectrum than on the red, orange, and yellow side than the candle or a light bulb.
Pro Tip
The famous British scientist Lord Kelvin also noticed the correlation between a light source’s temperature and the spectrum of light it produces. He created a system to measure both the heat and the associated color of black body sources that is very similar to the Centigrade and Fahrenheit scales we are familiar with. This scale refers to the color of a light source in degrees “Kelvin.”
How Film Sees Color
Black body light sources can vary wildly in the proportions of yellow and blue light they produce, but within certain limitations our eyes can adapt to these changes.
Film, on the other hand, cannot adapt and must be manufactured or filtered in order to render different light sources with neutral and natural color. When photographers choose a type of film or filtration to compensate for a light source’s unique spectrum, we call this “balancing” the film to the light source.
Most color films are manufactured with a daylight balance, which is roughly the equivalent to the color of the sun at high noon (5,500 degrees Kelvin or “5,500 K.”
For reference, here are the degrees Kelvin for other light sources:
• Incandescent Photoflood lamps or quartz halogen bulbs made for photography: 3,200 K
• 100-watt household light bulb: approximately 2,700 K
• Candles on a birthday cake: approximately 1,800 K
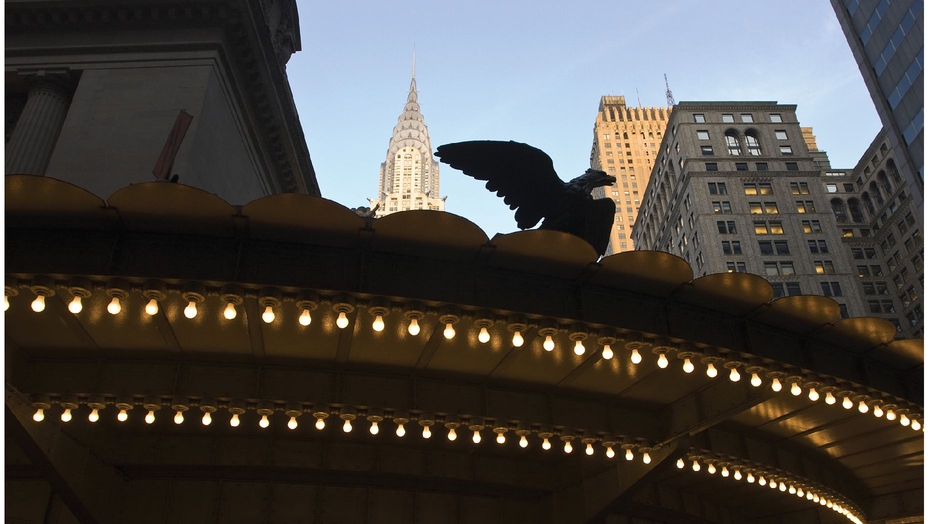
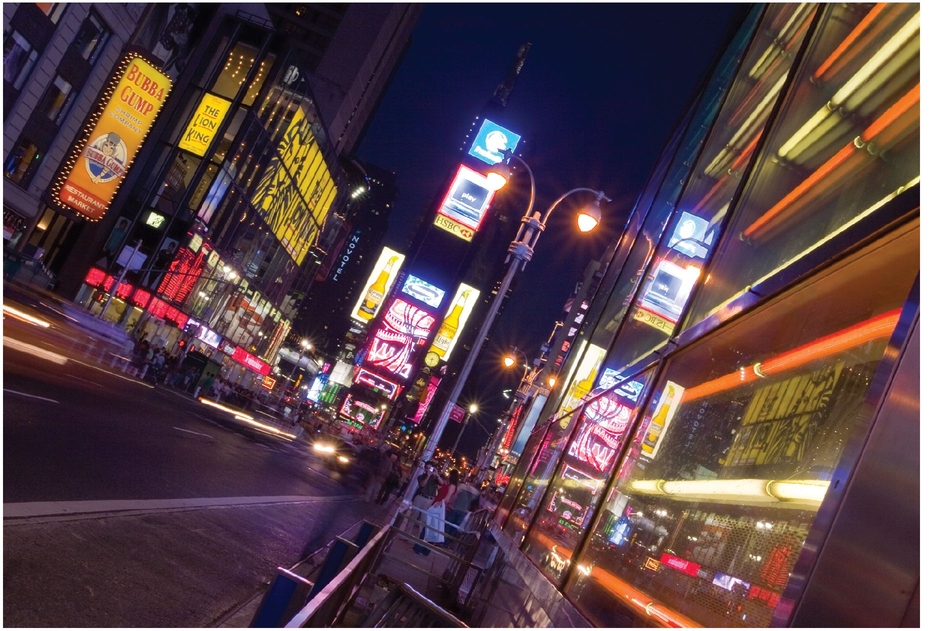
This photo shows a range of color temperatures in the same photo. The top of the Chrysler Building in New York City is being lit with the sun at sunset (about 4,000 K). The buildings in shade are bluer (about 8,000 K), and the common light bulbs of Grand Central Station are warm yellow (about 2,700 K).
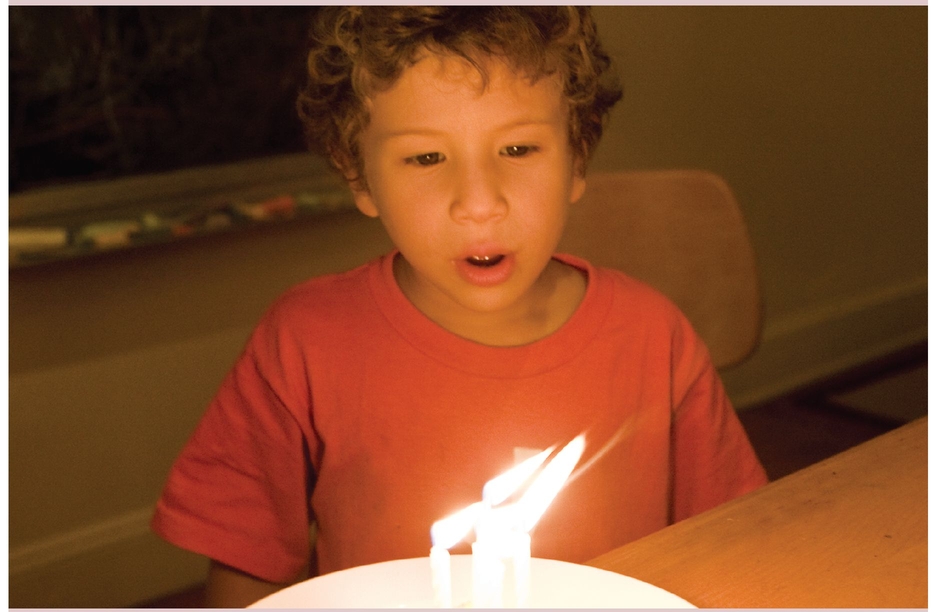
This photo draws all of its cues from the low direction and warm color of the light source.
We call these candles and light bulbs “warm sources” although their actual temperature is cooler (a candle is not as hot as the sun). They produce much more yellow light, and we associate the color with warmth.
Sometimes the sun might seem “cooler” or bluer (like at dawn or in the shade) because the blue sky is reflecting a lot of blue light into/onto the scene or object we are shooting. The color temperature in the shade of a building is typically about 8,000-10,000 degrees Kelvin. Pictures made under these conditions will typically have a blue/cyan cast unless we compensate for the excessive blue by either filtering the light coming in the lens (using color slide film) in the printing process (using color negative film), or by adjusting the white balance of when using a digital camera.
Similarly, the sun can also seem “warmer” when it is low in the sky at dawn or sunset because the light has to pass through more of the Earth’s atmosphere. Atmospheric haze filters out much of the bluer end of the spectrum, resulting in red sunsets. We see these types of colors in magazines and movies all the time. Like the guides of composition, we seem to have an innate sense of what they mean when we encounter them.
Non-Black Body Sources
Photographers run into big problems when they encounter light sources that don’t create light through radiant heat. Some examples of non-black body sources are fluorescent lights, mercury vapor lights, neon lights, and sodium vapor lights. Many of these light sources don’t produce complete spectrums or create excessive amounts of a particular color (like green). Non-black body sources can be extremely efficient, producing huge amounts of light in comparison to the power they consume—and some are excellent for photography, producing a spectrum of light that matches and mixes with daylight.
There was a time not so long ago that I carried a very expensive color temperature meter and about 50 filters in my camera bag in order to compensate for the problems these non-black body light sources created. Now, digital photography has simplified these problems enormously—but it doesn’t completely solve them.
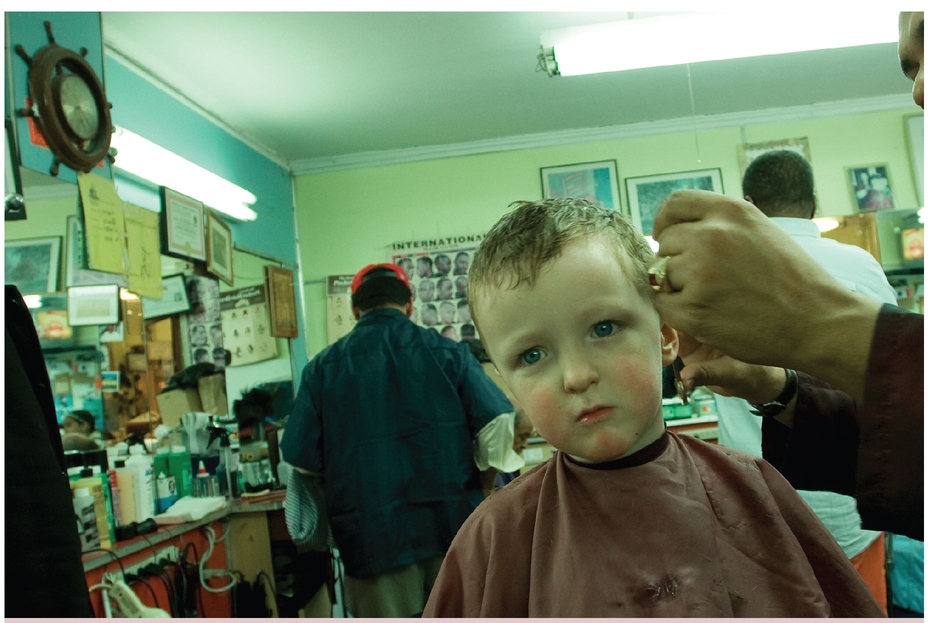
Fluorescent bulbs typically photograph with some form of green cast when shot with daylight film or balance.
Flash and LEDs
Flash units use xenon gas in a sealed glass tube to generate large amounts of light for short durations. They are made to correspond with typical “daylight” color temperatures (5,500-6,000 K).
Flash has its own set of benefits and shortcomings:
Pros:
• Short flash duration; photos shot with flash can freeze motion
• Huge output in a relatively small package
• Battery powered and portable; pro units can be plugged into AC outlets
Cons:
• Very difficult for beginners to learn how to previsualize
• Typical prices for professional units start at about $1,000 for a single light and can be much more.
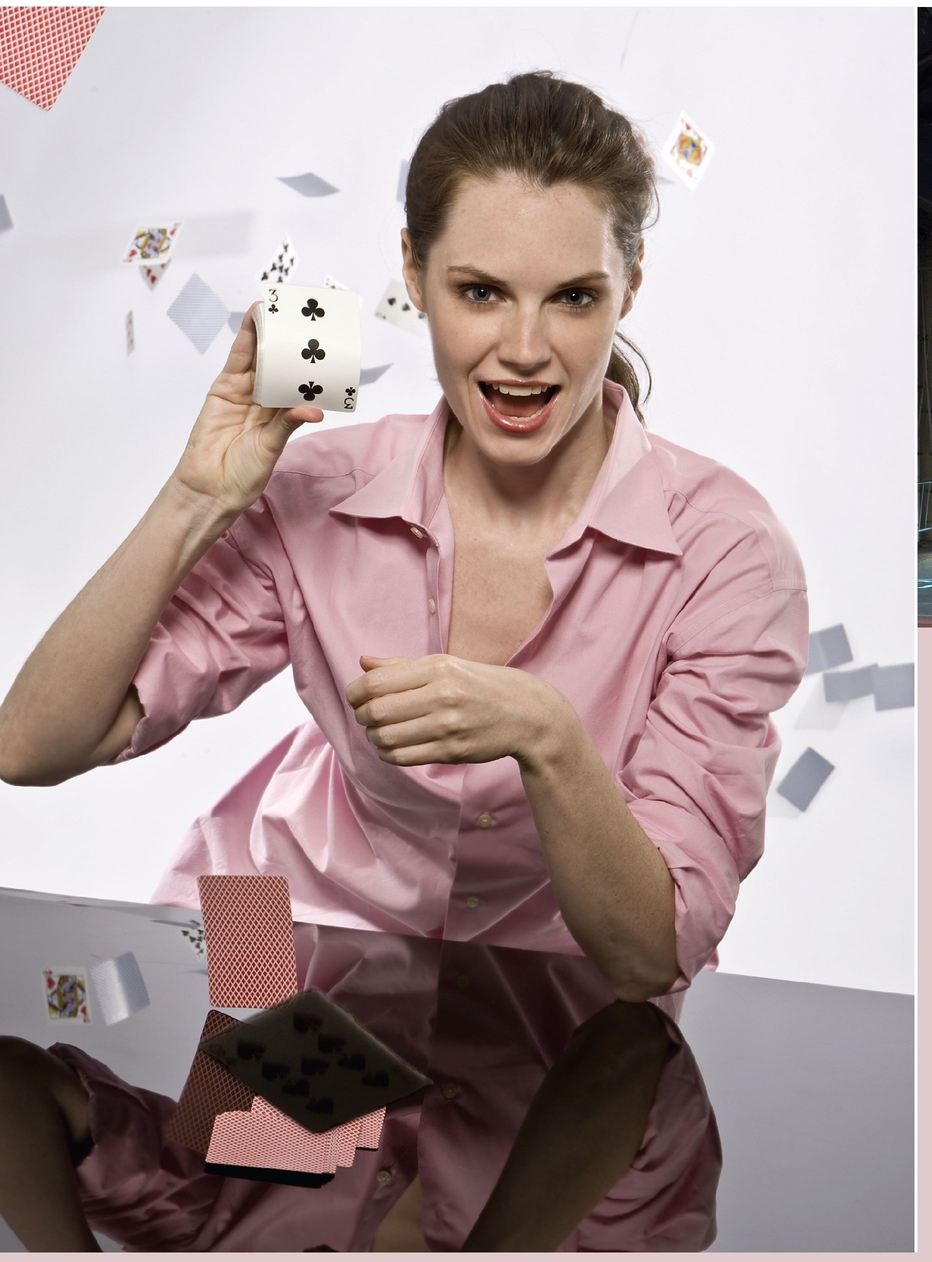
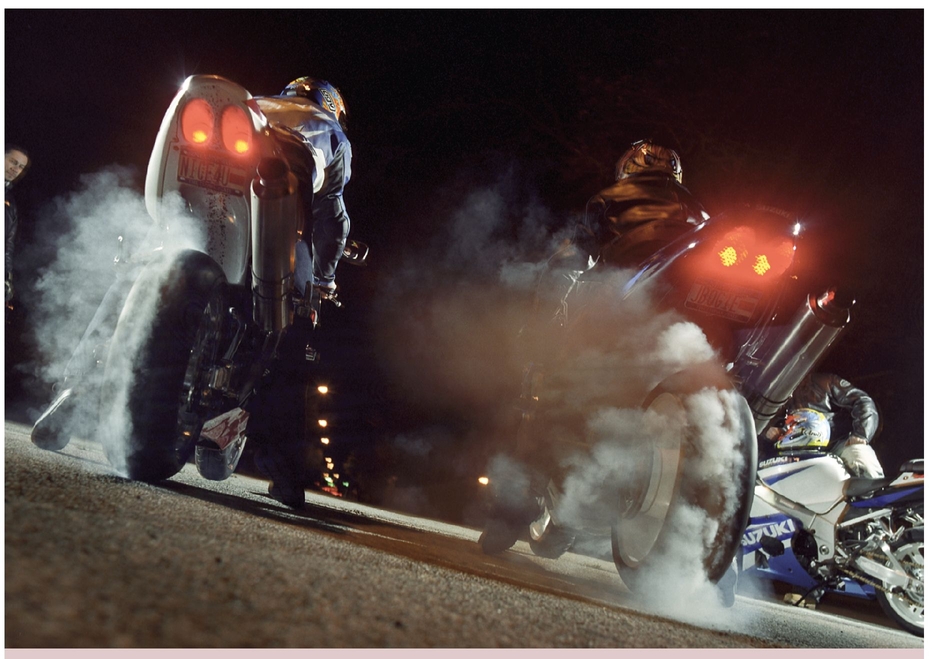
Flash units can have extremely short durations, enabling photographers to stop motion like these cards flying through the air.
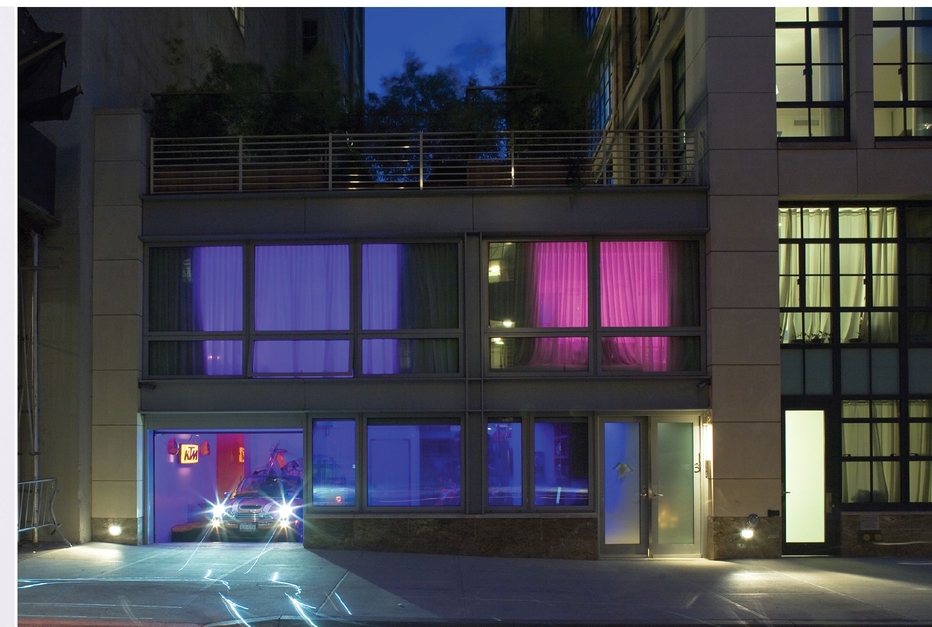
This amazing private residence was a job I shot for a lighting design company. It is lit almost entirely with LEDs. The owner can completely change all of the colors in the home with a keypad.
(Photo courtesy of design one corporation)
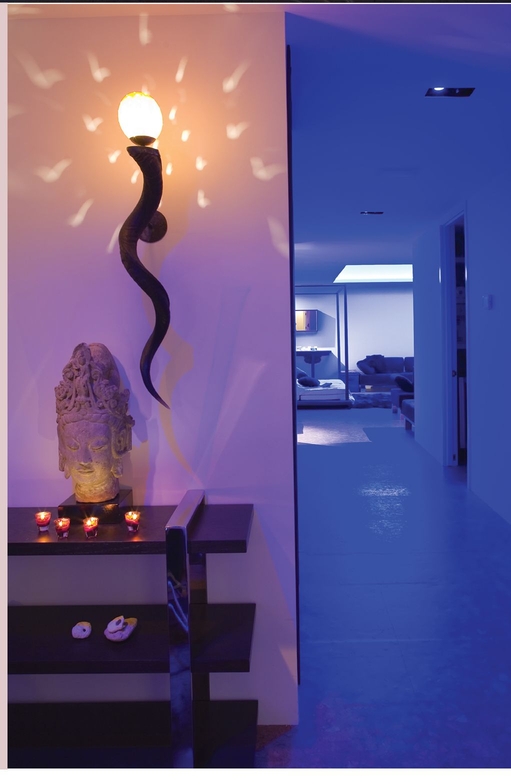
Light-emitting diodes (LEDs) have undergone some amazing advances since the little red lights that graced digital watches and calculators in 1980. They are emerging as one of the most interesting and efficient daylight-balanced (or variable balance) light sources suitable for photography. I predict that LEDs are going to be an important light source in both photography and our homes in the very near future.
LEDs are a continuous source (like a light bulb) so they can’t stop motion, but because they are continuous they are much easier to use. They are also cool to the touch (unlike a light bulb).
Here is a pro and con of using LEDs:
Pro:
• Easy to use and previsualize; what you see is what you get
Con:
• Not as powerful or versatile as flash
Digital Photography and Color Balance
Digital photographs shot in JPEG format must be “balanced” in the same way that film is in order to have the best possible color rendition. This is because JPEGs throw away information that is deemed to be unimportant. If a JPEG is shot out of balance, the other colors that were present in the original scene have been discarded and can’t fully be recovered or recreated. Photographs shot in RAW format allow you to choose the color balance later on, when you are viewing them on the computer.
When you shoot JPEGs and select a balance on your camera, you are telling the software in the camera what is important and what can be discarded. If you get it wrong, there is little you can do to fix it later.
Your camera does have an auto white balance (AWB) setting, and chances are it will do an amazing job of approximating, or averaging, the correct balance for almost any situation you encounter. I recommend that for 90 percent of your photography, you should leave your camera set to AWB. It’s tough for an amateur to beat the AWB setting because it requires so much vigilance. You have to constantly keep track of the light source every time you shoot. Many a pro has had a terrifying moment when they realized they forgot to change the white balance when they moved from inside to outside—and chances are, you will forget as well.
The problem with AWB is that it also corrects things you might not want corrected (like a deep red sunset). It will still look good but probably not as rich as if you had set the camera to “Daylight.” It also might not correct some things enough.
Pro Tip
When you shoot indoors, you will get better photos if you set your white balance to “tungsten” (the little light bulb symbol). Your photos won’t look so yellow. Just remember to set it back.
You camera has a menu of “stock” settings that approximate the common color balance situations:
• Daylight (5,500 K); the sun at high noon
• Flash; approximately 5,500-5,800 K
• Tungsten (3,200 K); Photofloods or professional quartz halogen (pretty good for household incandescent bulbs as well)
• Open shade; 7,000-10,000 K
• Cloudy; 6,000-8,000 K
• Fluorescent (there may be two different fluorescent settings); usually adds some magenta filtration to compensate for the green cast common in fluorescent lights There are a vast array of fluorescent fixtures out there, all with slightly different white balances, but the most common are “cool white” and “incandescent fluorescent.” You might have to experiment to find the best setting or simply create a custom setting.
• Custom white balance: Enables you to calibrate your camera to a specific light source
Creating a Custom White Balance
When it is really important to get the color as accurate as possible, you might need to create a custom white balance. Times that this is particularly problematic are when you are shooting under fluorescent or mercury vapor lights (very common in gymnasiums and sports arenas).
Fluorescent lights can vary wildly in their color spectrum according to brand and age. Mercury vapor lights are just plain awful; they look like giant light bulbs but are very green, and their exact spectrum can change according to how long they have been on. Sodium vapor lights (very common for modern street lamps) are even worse. Sometimes they are so yellow/red that they can’t be fully corrected.
The exact procedure for creating a custom white balance varies slightly from camera to camera, but all of them involve photographing a white object that is illuminated by the light conditions you will be shooting under.
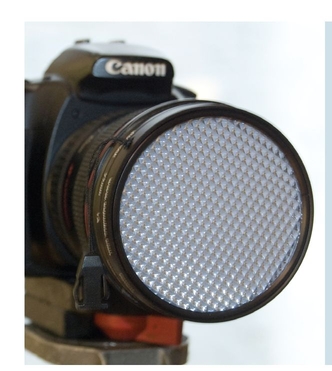
Pro Tip
The folks at Expoimaging make a great little gadget that fits onto your lens and makes this procedure even easier. You use it like an incident light meter. You take a photo of the light source that is lighting the scene with this translucent disc in place. This becomes the reference image your camera will use to create a custom white balance. It takes less than a minute and has worked perfectly for me.
You first take a photo of a blank piece of white paper (use an auto exposure setting to take the picture; you want the photo to be underexposed and rendered as “gray”). Then, select “Custom White Balance” in the main camera menu. The camera will ask you what photo you want to use as your ideal, so select the image you just shot and instruct the camera to use this image as your custom setting. The camera will color correct the image and use these settings to color correct all of the subsequent photographs you take while you are in “Custom White Balance” mode. Your stock white balance settings will not be affected.
This all sounds more complicated than it is once you have done it, and it makes shooting under difficult conditions so easy that I wonder how I ever got along without it.
Learning to See in Color
While it’s true that you can choose or create a custom white balance for any situation, this doesn’t really solve all of the problems of photographing in color. A good example is the earlier photo of my dinner hostess at the stove; she is correct, but the background in the window beyond is not. Similarly, the photo of the exterior of the house is not correct anywhere. The outside is blue/cyan, and the inside is yellow.
Whenever you have a few different light sources in a scene, you have to choose which source is the most important and correct for that particular source. This can sometimes get really complicated and require special lighting equipment.
But there’s another way to get around this problem: training your eyes to see the world the way the camera/film sees the world. Is it really so terrible that the interior lights of the house are so yellow? I don’t think so; I think it actually enhances the photo.
If you can learn to see the way the camera sees, then you can use the disparity of color in various light sources to your advantage. This makes the mismatch of different sources a tool instead of a problem. Even the green cast of fluorescent light can be used to your advantage once you know how to use it. (For a great use of the green fluorescent color cast, watch the Clint Eastwood film “Million Dollar Baby.” The unique color signature of fluorescent light is used as a background accent throughout the film and reinforces the atmosphere of a boxing gym.)
Turn Off Auto White Balance
Like I said, it’s tough to beat the AWB setting—but try shooting for at least a few days with the camera set to the “daylight” setting. (Don’t worry; you will turn AWB back on later.) This will approximate the effect of shooting color slides and help you learn to see color the way the camera sees it. Photos shot in the shade will go blue/cyan; photos shot indoors will go yellow/orange. Photos shot under fluorescent light will be green.
Even better, try to balance the settings of your camera to the light sources as you are shooting. The important thing is to become aware of the fact that different light sources will register color differently in your photographs.
Assignment: Seeing Color
In the previous chapter, I outlined an assignment to photograph a scene or an object every time you see it. This is also the best assignment I know to learn how to see in color.
When I was in college, I gave myself the challenge of photographing the Chrysler Building every time I saw it. There were times when I saw and photographed it 10 times over the course of the day. After a few years, I had several hundred slides showing me what the building looked like in early morning light, late afternoon light, the winter, the summer, sleet, and fog. I shot it at night so I learned how street lights and the fluorescent lights in office buildings looked. I shot with different films so I learned the “palettes” and color ranges for all of the different films on the market. It was one of the most valuable everyday assignments I’ve ever done.
Looking at Light
Light is also an emotional and visual cue to the viewer. When we look at a photograph shot in the desert, we don’t need to feel the heat to know that it’s hot. The quality and direction of the light can supply those cues. Light is a powerful tool, but it is so subtle that it’s easy to take for granted.
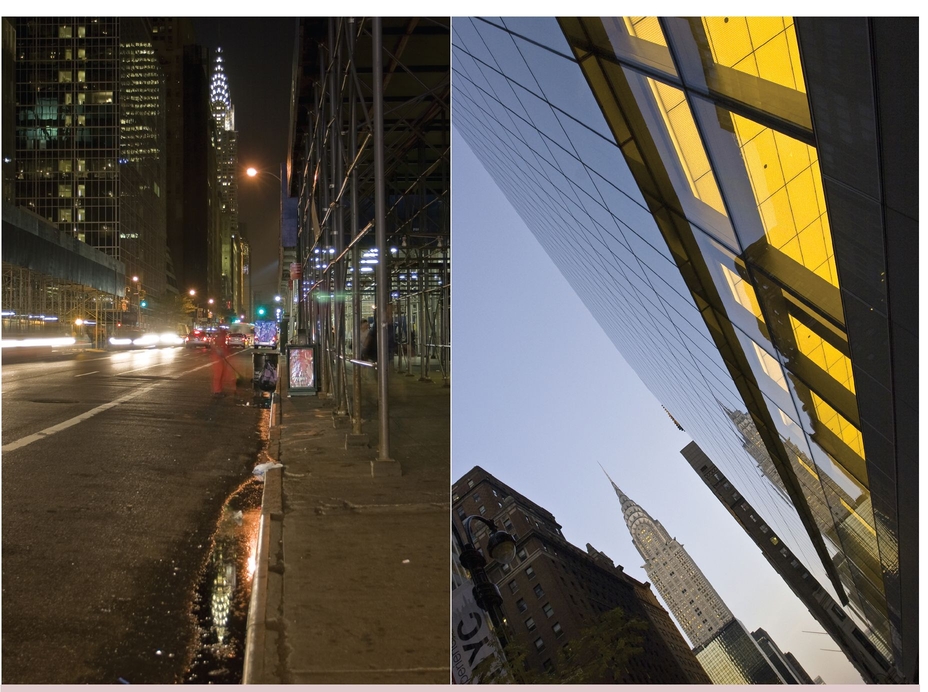
I made the three photos of the Chrysler Building in this chapter recently to illustrate the point about shooting a single subject under different lights in order to learn the colors of different light sources. These two show the color of sodium vapor street lamps and another (weird) yellow/green fluorescent light.
The Sun
The sun is the big daddy of all light sources, and the sun’s behavior influences all of our ideas about light. The sun is so powerful as an icon of lighting that any light source that doesn’t mimic the sun looks artificial.
They might seem obvious, but here are a few very important facts about the sun:
• The light from the sun comes from overhead most of the time.
• The sun is a very small light source (relatively), which means that it usually creates shadows with a sharp edge.
• Some of the sun’s light is refracted and diffused in the atmosphere. This means that the shadows that the sun creates aren’t completely black.
• Sometimes clouds cover the sun, effectively creating a very large, overhead light source that produces very soft or shadowless light.
• The apparent color temperature of the sun can vary from extremely warm yellow/red to extremely blue/cyan, depending on atmospheric conditions.
These points seem incredibly basic, simple, and obvious, but when you see a photo where the light comes from too low or has a shadow that is too feathered, it is a visual cue that the light is artificial. And that’s not necessarily a bad thing, but it’s still something to keep in mind—especially in the next chapter when we start to look at how to photograph people.

Letting the color be a little off sometimes helps to cue the viewer to the ambiance of the room. One reason we know the boy is in a home is because the color of the light is a little warm.
Other Common Sources
One common, everyday light source is the household incandescent light bulb. The incandescent light bulb is one of the great inventions of all time—just ask Thomas Edison.
In the past, it wasn’t an ideal light source for photography because no color films were made to balance for it (tungsten-balanced film is rated for 3,200 K and still renders most household bulbs with a slightly warm cast) and because slow film speeds limited photographers.
With digital cameras, both of these problems are largely eliminated. Moreover, light bulbs have one huge advantage over photographic flash: the light source is continuous, so you can see what you are doing and you can see the effect of the light on the subject as you move around (which can be very difficult to visualize with f lash).
Another everyday light source is the fluorescent light. These lights have the same traditional problems as incandescent bulbs (color, temperature, and speed), but they have one other big problem: they’re ugly.
Well, not really. No light source is ugly all by itself, but fluorescent sources are invariably placed in fixtures hidden in ceilings— and this results in soft light from directly overhead. If you could eliminate the green cast and move a fluorescent fixture around (there are professional units called Kino Flos that do this), it could be a great light source. Ordinary fluorescent lights can be good for certain kinds of object photography (like eBay auction photos).
And what about flashlights? I love using flashlights in photography. You just put the camera on a tripod in a dark room, open the camera (put it on “B” for the shutter speed), and then walk around the subject and “paint” the light where you want it to be. Better yet, the new LED flashlights often match daylight perfectly.
Painting with flashlights requires some experimentation, but it can make for very beautiful photographs. Photographers have been painting with various light sources since the beginning, but with new technologies every generation seems to reinvent the technique anew.
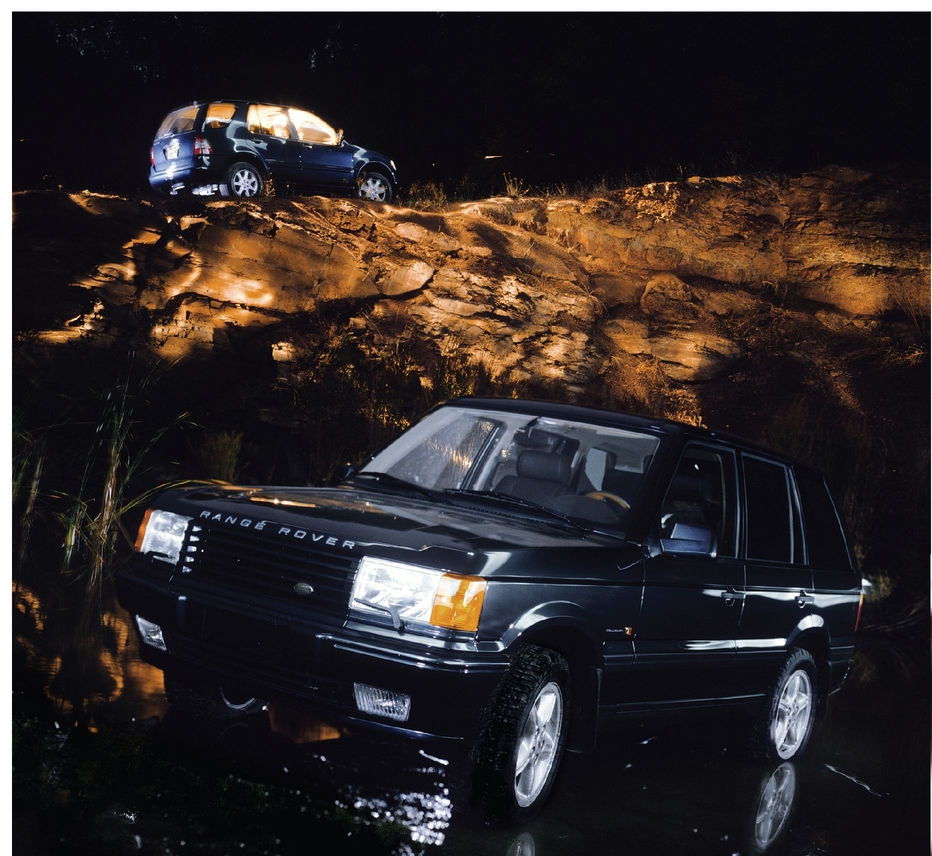
This photograph is entirely lit with two flashlights. The night was pitch black with no moon.
In this photograph, the tripod was set up in the pond with the car in the foreground. The car was on cinder blocks so it looks like it’s sitting on the surface of the water. The car is illuminated with a fluorescent “camp” flashlight, which I walked around with and pointed at the car (I was in the pond as well, wearing all-black clothes).
As I walked up the hill, I switched to a conventional flashlight (the yellow streaks) and then switched back to the fluorescent light to light the car on the cliff. The exposure time was about 20 minutes. We did the photo 10 times to get it right. There is no digital photo-editing.
I got very wet.
Light Direction
Years ago, camera instructions recommended that you position yourself with the sun at your back when taking a photo—but that was in an era when lenses weren’t coated with special anti-flare coating and cameras had rudimentary (if any) light meters.
With modern cameras, there’s no such thing as good or bad light for photography, but there is light that has purpose—and that can be used well or badly.
I could write an entire book about light, and maybe I will someday. But for now, here are a few quick thoughts about light direction and quality.

Front light: Light coming from the front shows us the world as we expect to see it.

Side light: Sidelight emphasizes the volume and texture of objects.
Backlight: Backlight is often surprising.

Reflected light: Reflected light is soft and diffuse.
Shadow Quality
Photographers have more ways to describe light than the Inuit have words to describe snow. We talk about hard light, soft light, specular light, kickers, fill, rims, and spots. Most of the time, what we are actually talking about can be boiled down to two simple ideas:
• The contrast between light and dark
• Whether the edge of the shadow cast by the light is hard or soft and feathered
The ability to change, or modify, the size of a light source is often within your power—even when you are using simple amateur equipment. It is the key element to think about when you start working with flash photography beyond the point-and-shoot mentality.
We’ll discuss the finer points of light source size in more depth in Chapter 10.

In this photograph, there are almost no shadows and little contrast between light and dark. This is because clouds are filtering and diffusing the sun. This transforms the small sun (relatively speaking) into a very large light source: the clouds.

This photo is shot with a point-and-shoot camera with a tiny flash, resulting in hard-edged, distinct shadows and a marked difference in light and dark values.
A light modifier is any device that a photographer uses between a light source and the subject to change the size or shape of the light hitting the subject. This can be something as large as the giant silk sails that are used on film sets to diffuse light or as simple as bouncing a flash onto a ceiling.
Flash: Lightning in a Bottle
In my teaching experience, I have learned that the hardest craft for my students to learn is how to use flash effectively. I can’t cram a three-semester course of study into this book, but we can look at some of the most basic problems and flaws with how people use flash and some simple ways to avoid the pitfalls.
The first big hurdle for everyone using flash is that we are attracted to something because we see a certain quality to the light. When we shoot with flash, the flash destroys and obliterates much of what we wanted in the first place. It replaces the existing, or ambient light, with the flash.
The photo of the boy in the bathtub is pretty good example of how people use flash. They put the camera on “Program” and the camera picks a high shutter speed that freezes motion and excludes, or overpowers, all of the existing light.
Ambient light is all of the light sources that exist in a scene before the introduction of a new photographic source.
Modern through-the-lens (TTL) flashes on DSLRs makes mixing ambient light and on-camera flash a breeze.
We’ll continue to look at how to use flash in specific situations in the coming chapters, but for right now let’s just look at some of the advantages to some auxiliary flash units and accessories that might be in your future.
Shoe-Mounted Flash
While the pop flash on your camera is very convenient, it’s not very powerful. It is also tiny in size, resulting in hard shadows. It is very close to the lens, which often results in red-eye and can’t be swiveled or pointed in any other direction besides straight ahead (so you can’t bounce light).
Shoe-mounted flashes offer a lot more power, faster recycle times (the flash is ready for the next shot more quickly), and they can be pointed at other surfaces. Most of the really top models can also serve as the “master” unit for multiple wireless flash setups.
Multiple and Wireless Flash Setups
Until just recently, multiple flash systems were only practical for professional photographers. There were three reasons: expense, slow film speeds (largely solved by the adjustable ISOs on DSLRs), and the need for a method to “preview” the lighting.
Because flash is so quick, it was very difficult to see what the film would record. This meant that professional photographers usually carried some kind of Polaroid back or camera. We used the Polaroid as a way to previsualize and control the light we would actually get on the film.
DSLRs allow you to see the results immediately. They open up a world of possibilities to amateur photographers.
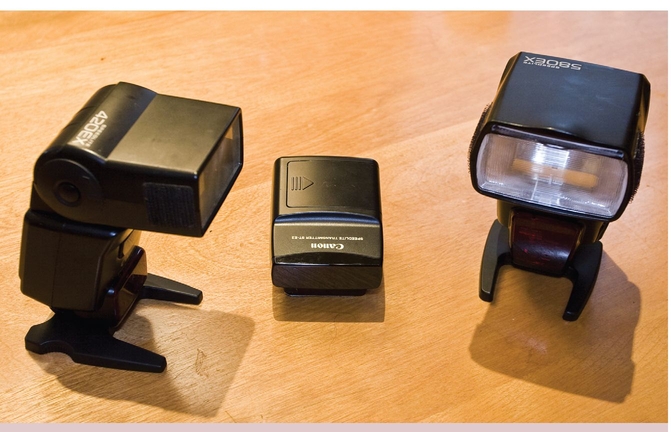
This is the basic gear to my wireless flash setup. The unit in the middle is the wireless controller that goes on the camera’s hot shoe; the two flash units can be placed remotely. I control them from the middle unit.
Most of the camera manufacturers also offer some form of wireless flash system. These systems allow multiple flashes placed in remote locations away from the camera to be controlled from the camera via radio or infrared link. They allow amateurs to create lighting setups that would have required carloads of equipment and assistants in the past.
All of the simple documentary photos you see in this book were shot with nothing more than the following equipment—with the addition of a small softbox and light stands.
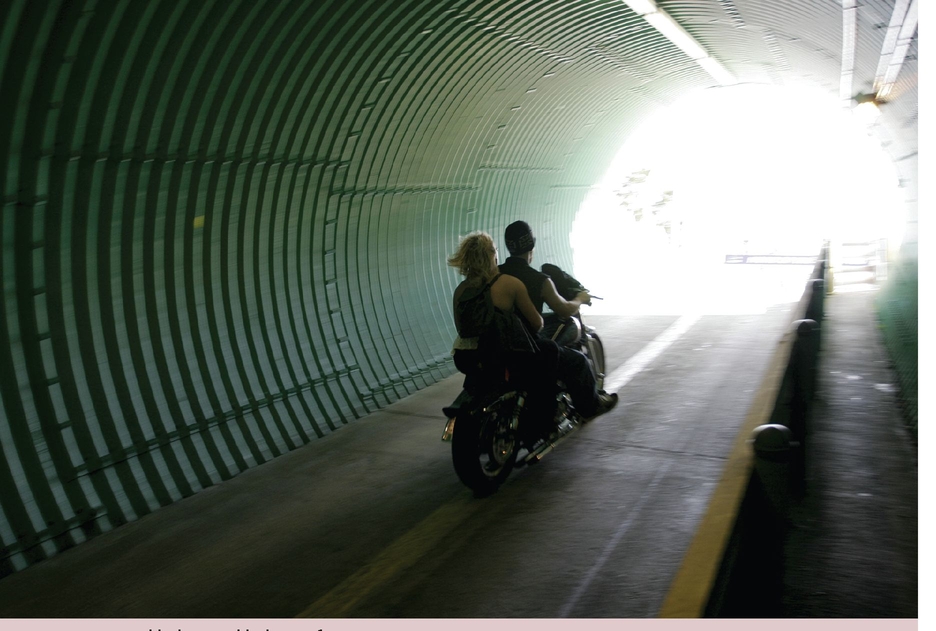
This is a great example of what wireless flash photography can do for you. This photo was shot with two small flash units while I was on a photojournalism assignment for MAXIM magazine. A portable wireless flash allowed me to work fast and travel light but still get the results that I would have needed heavy professional equipment for in the past.
Case Study: Mixing Ambient and Flash
The real key to getting flash to work for you is to actually try to make the photo work with the available light first. Then, add just the right amount of flash to “fill in” the areas that are lacking.
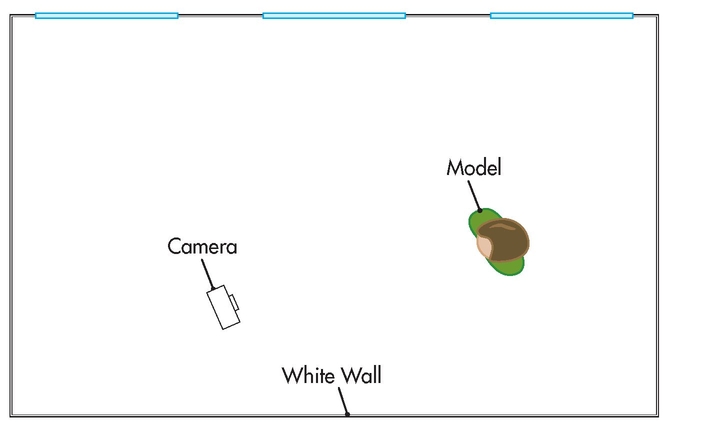
This diagram of the room will help you to understand the conditions under which the following photographs were made.
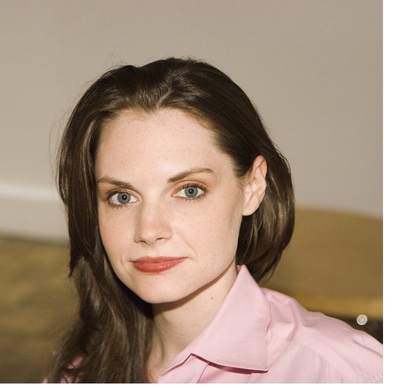
This photo is shot with the popup flash on a typical DSLR set to “Program” mode. The camera assumes that we want the young woman to be properly exposed and exposes her correctly. It sets a high shutter speed (1/125) and adds way too much light to the scene from the flash, destroying the ambient light from the windows.
The shadow is hard and the background is underexposed, making the woman look like she has been pasted into the background.
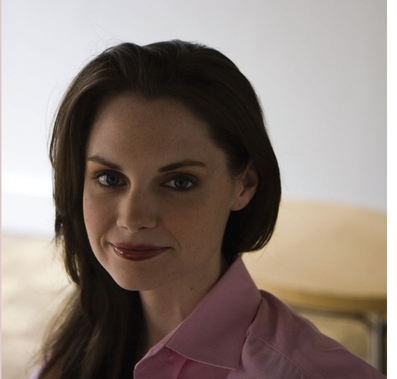
This photo is shot with only existing light and the same 2.8 f-stop, but the shutter speed is now 1/20th of a second. The background is exposed correctly and looks pretty nice.
I also like the edge of light on the left side of her face. Wouldn’t it be great to get the best of both photos?
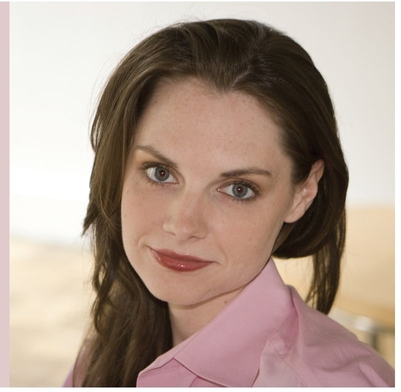
This photo is shot with the popup flash mixed with the ambient lighting of 2.8 at 1/20th of a second. The trick is that I used the exposure compensation of the popup flash to automatically underexpose the flash by one stop. It’s just “filling in” her face.
This is a huge improvement, but we can do even better …

This photo is still shot with the popup flash, but I added a light modifier (in this case, a tiny softbox diffuser to the popup flash). It’s only about four inches square, but at close distances it makes a big difference. It also threw some light on the wall at my right, which helps fill in the shadows and makes the light less contrast-y.
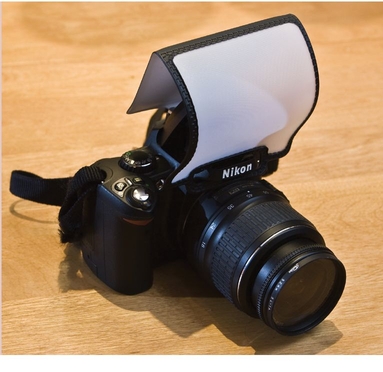
This little softbox will fit in the pocket of your jeans. At close distances, it’s a pretty effective little accessory.
Still, if I could use a more versatile flash unit, I could do even better …
In this photo, I eliminated the popup flash and went to a semi-professional flash on the camera’s hot shoe. I pointed the flash at the wall directly to my right and “bounced” the light onto the subject. In this case, the wall became my light modifier, and the flash created a light spot almost three feet in diameter (much larger and softer edged than the size of the actual flash on the camera). I still underexposed the flash by one stop in order to preserve the nice ambient light. (I know what you’re thinking: Why didn’t I just move her to the window? Simple— because it’s harder to control the sun than the camera and the flash.)
In order to get the most out of the scenario covered in this case study, you should use your camera manually. But there is an easy “cheat” that often works well. I’ll outline it in Chapter 8.
One thing to remember is that light modifiers are all around you. Bouncing a flash onto the ceiling turns a tiny source (the flash) into a large one (the ceiling). Moving a subject into the shade makes every building the sun is bouncing off of a light source. Pointing a light through a plant turns the plant into a light modifier that casts shadows in the background. The automatic flash units on modern cameras make this very simple. You just need to be resourceful with what’s around you.
Learning Lighting: The Strobist Blog and Flickr Group
I hesitate to promote this website because it could eventually put me out of a job. It’s a little advanced, but it’s really incredibly good.
The website “Strobist” (www.strobist.blogspot.com) was started by David Hobby, a photojournalist on staff at the Baltimore Sun. As a photojournalist, David has to work lean and fast and doesn’t have the luxury of two or three assistants to lug his lights around. He’s learned a lot over the years about how to do very sophisticated lighting with very minimal equipment, especially with battery powered, wireless strobe setups. His blog started as a way to share his knowledge and has grown into a true Internet phenomenon with more than 135,00 regular readers.
On the website, David and other members of the “Strobist” community give monthly lessons, share ideas, and provide assignments on how to use small flash effectively.
There is also a Flickr group (www.flickr.com) that participates in the assignments and critiques each other’s photographs on the Flickr website. How popular is it? There are more than 12,000 members in the “Strobist” Flickr group. Most of them are amateurs just like you who want to make better photos.
As I said at the beginning of this section, using flash well is one of the hardest things for any aspiring photographer to learn. David Hobby and “Strobist” are making it a lot easier.
The Least You Need to Know
• Color and light are really the same thing.
• Photographs shot in JPEG format must be correctly balanced to the light source when they are shot..
• Good flash photographs often start as good available-light photographs. Experimenting and practicing will help you to learn how to creatively mix flash with existing light.
• Learning to see light as color (as the camera sees it) makes color balance a creative tool instead of an obstacle.
• Color and its conventions are powerful and subtle cues for the viewer, learn to use the conventions to your advantage.
..................Content has been hidden....................
You can't read the all page of ebook, please click here login for view all page.