
Setting Up Your Vanishing Points
In this chapter, you will do a perspective drawing over the concept painting you created in Chapter 3. If you are new to perspective drawing, I recommend that you work along with the demonstration using the same file. More advanced readers should study this chapter, then do the assignment at the end.
If you are working along with me, open the demonstration concept painting from Chapter 3, CastleConcept_Horror.psd, on the Chapter 3 DVD materials. You don’t need multiple layers for your perspective drawing. Merge all of the background layers into one, keeping only the Castle layer separate. You will now have two layers, Castle and Background. Save it as a new file called Castle_Perspective_Drawing.psd.
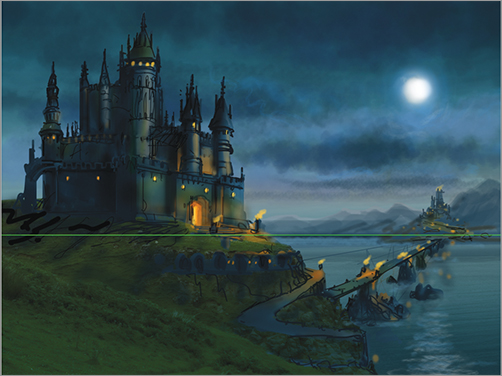
Your first task when starting a perspective drawing is to figure out the location of the horizon line. If you get this wrong, your drawing will never look right, and your structure won’t align properly with the landscape. Create a new layer for the horizon, and visualize where it would be if there were no mountains, trees, structures, or obstructions in the way. When you’ve located the horizon, draw it in using a bright green color (Figure 5-1).
Figure 5-1: The horizon line
Using the Pen Tool to Set Up Lines of Convergence
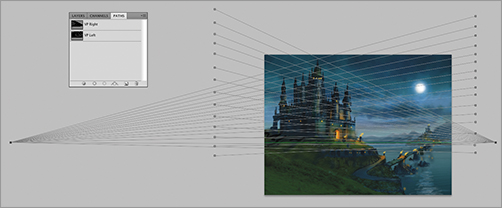
Use the technique you learned in the last chapter to set up your right and left vanishing points (VPs) with the Pen tool in separate path layers. With your concept painting as a reference, and remembering that your VPs must be located on the horizon line, explore some different locations for the VPs. You can grab the VP where all of your paths converge and move it around while holding down the Shift key to constrain the movement horizontally to follow the horizon line. Find locations for your two VPs that match the painting and are placed far enough apart to avoid distorting the structure. The closer the VP is to the center of the picture, the less you’ll see of the side of the structure that vanishes toward it. In this example, the right VP is placed closer to the center so the entryway of the castle is angled away from the viewer and illuminated by the moon. The castle walls that vanish to the left VP face more toward the viewer because that VP is twice as far from the center of the picture (Figure 5-2).
When you’re satisfied with the position of the VPs, click the Layers panel tab and create two new layers named VP left and VP right. Select the VP left layer. Pick a 2-pixel brush with opacity and size jitter turned off so there will be no variation in the mark, and choose a bright blue color. Return to the Paths panel, and drag the VP left path down to the Stroke Path With Brush icon at the bottom of the panel to stroke the lines of convergence with blue.
Figure 5-2: Locating vanishing points using paths
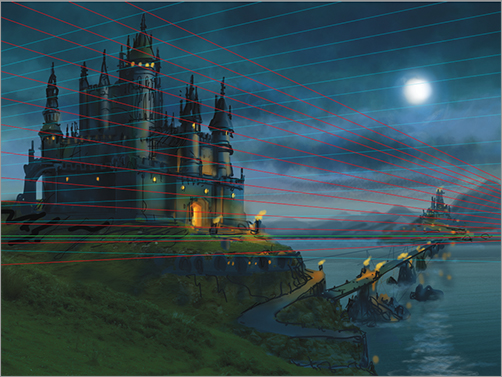
Select the VP right layer in the Layers panel, and pick a bright red color. Repeat the stroke process in the Paths panel with the VP right path to make the right lines of convergence visible (Figure 5-3).
Figure 5-3: Stoked paths visible in work area
Select these layers along with the layer with the horizon line and, while holding down the Shift key, click the Create A New Group folder icon ![]() at the bottom of the Layers panel. Doing so creates a group containing all of your perspective lines. Rename the group Perspective. You can turn the opacity of the entire group down to 20 or 30 percent so the lines don’t overwhelm your workspace.
at the bottom of the Layers panel. Doing so creates a group containing all of your perspective lines. Rename the group Perspective. You can turn the opacity of the entire group down to 20 or 30 percent so the lines don’t overwhelm your workspace.